Every year, we are proud to judge at the PA Raspberry Pi Competition for UK schools, run by PA Consulting. In this free competition, teams of students from schools all over the UK imagine, design, and create Raspberry Pi–powered inventions.
The PA Raspberry Pi Competition aims to inspire young people aged 8 to 18 to learn STEM skills, teamwork, and creativity, and to move toward a career in STEM.
We invite all UK teachers to register if you have students at your school who would love to take part!
For the first 100 teams to complete registration and submit their entry form, PA Consulting provides a free Raspberry Pi Starter Kit to create their invention.
The theme is deliberately broad so that teams can show off their creativity and ingenuity.
Among all the entries, judges from the tech sector and the Raspberry Pi Foundation choose the finalists with the most outstanding inventions in their age group.
The final teams get to take part in an exciting awards event to present their creations so that the final winners can be selected. This round’s PA Raspberry Pi Awards Ceremony takes place on Wednesday 28 April 2021, and PA Consulting are currently considering whether this will be a physical or virtual event.
All teams that participate in the competition will be rewarded with certificates, and there’s of course the chance to win trophies and prizes too!
If you would like to boost your skills so you can better support your team, then sign up to one of our free online courses designed for educators:
All entries are welcome, no matter what your students’ experience is! Here are the outstanding projects from last year’s competition:
To support teachers in guiding their teams through the competition, PA Consulting will hold a webinar on 12 November 2020 at 4.30–5.30pm. Sign up to hear first-hand what’s involved in taking part in the PA Raspberry Pi Competition, and use the opportunity to ask questions!
The post Take part in the PA Raspberry Pi Competition for UK schools appeared first on Raspberry Pi.
How do I install VirtualBox application on Ubuntu 20.04 Linux LTS system?
The post How to install VirtualBox on Ubuntu 20.04 Linux LTS appeared first on nixCraft.
Laura Sach and Martin O’Hanlon, who are both Learning Managers at the Raspberry Pi Foundation, have written a brand-new book to help you to get more out of your Python projects.
In Create Graphical User Interfaces with Python, Laura and Martin show you how to add buttons, boxes, pictures, colours, and more to your Python programs using the guizero library, which is easy to use and accessible for all, no matter your Python skills.
This new 156-page book is suitable for everyone — from beginners to experienced Python programmers — who wants to explore graphical user interfaces (GUIs).
You might have met Martin recently on one of our weekly Digital Making at Home live streams for young people, were he was a guest for an ‘ooey-GUI’ code-along session. He talked about his background and what it’s like creating projects and learning resources on a day-to-day basis.
Laura is also pretty cool! Here she is showing you how to solder your Raspberry Pi header pins:
Martin and Laura are also tonnes of fun on Twitter. You can find Martin as @martinohanlon, and Laura goes by @codeboom.
In Create Graphical User Interfaces with Python, you’ll find ten fun Python projects to create with guizero, including a painting program, an emoji match game, and a stop-motion animation creator.
You will also learn:
You can buy Create Graphical User Interfaces with Python now from the Raspberry Pi Press online store, or the Raspberry Pi store in Cambridge, UK.
And if you don’t need the lovely new book, with its new-book smell, in your hands in real life, you can download a PDF version for free, courtesy of The MagPi magazine.
The post New book: Create Graphical User Interfaces with Python appeared first on Raspberry Pi.
The libtraceevent package prior to version 5.9-1 was missing a soname link. This has been fixed in 5.9-1, so the upgrade will need to overwrite the untracked files created by ldconfig. If you get any of these errors
libtraceevent: /usr/lib/libtraceevent.so.1 exists in filesystem
when updating, use
pacman -Syu --overwrite /usr/lib/libtraceevent.so.1
to perform the upgrade.
Les arnaqueurs gèrent même leurs propres « agences de voyage » sur le dark web, en utilisant abusivement des points de fidélité et des numéros de cartes de crédit volés.
L'article Les fraudeurs en quête de vos points de fidélité durant la pandémie de COVID‑19 a d'abord été publié sur WeLiveSecurity
Pourquoi les dispositifs médicaux connectés sont-ils vulnérables aux attaques et quelle est la probabilité qu'ils soient piratés? Voici cinq failles numériques qui peuvent menacer votre santé.
L'article Sécurisation des dispositifs médicaux: Un hacker peut‑il vous briser le cœur? a d'abord été publié sur WeLiveSecurity
In computing education research, considerable focus has been put on the design of teaching materials and learning resources, and investigating how young people learn computing concepts. But there has been less focus on assessment, particularly assessment for learning, which is called formative assessment. As classroom teachers are engaged in assessment activities all the time, it’s pretty strange that researchers in the area of computing and computer science in school have not put a lot of focus on this.
That’s why in our most recent seminar, we were delighted to hear about formative assessment — assessment for learning — from Dr Shuchi Grover, of Looking Glass Ventures and Stanford University in the USA. Shuchi has a long track record of work in the learning sciences (called education research in the UK), and her contribution in the area of computational thinking has been hugely influential and widely drawn on in subsequent research.
Assessment is typically divided into two types:
Through formative assessment, teachers seek to find out where students are at, in order to use that information both to direct their preparation for the next teaching activities and to give students useful feedback to help them progress. Formative assessment can be used to surface misconceptions (or alternate conceptions) and for diagnosis of student difficulties.
As Shuchi outlined in her talk, a variety of activities can be used for formative assessment, for example:
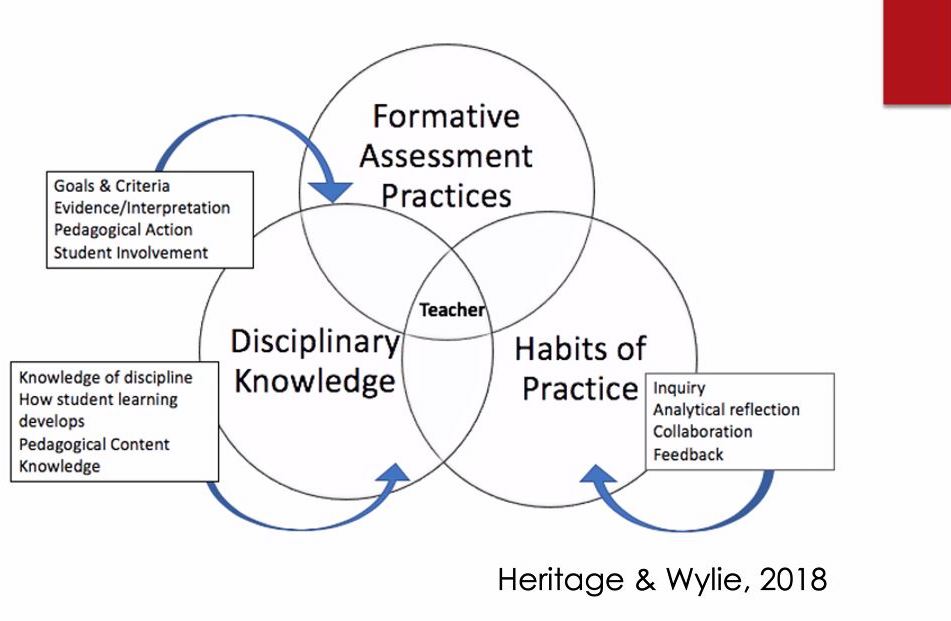
Shuchi described her own research in this topic, including a framework she has developed for formative assessment. This comprises three pillars:
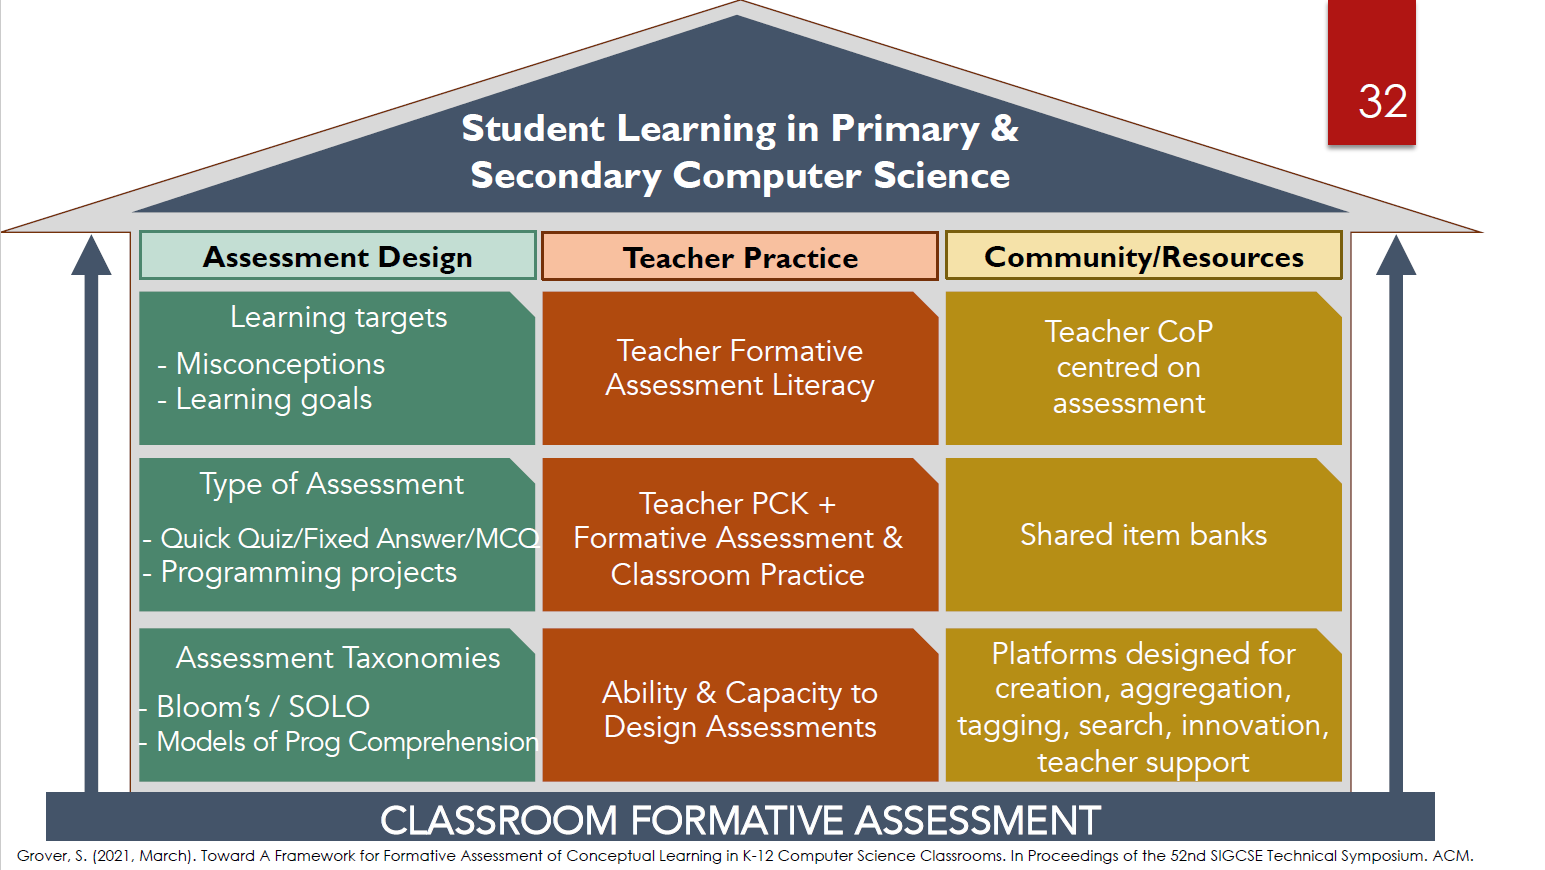
Shuchi’s presentation then focused on part of the first pillar in the framework: types of assessments, and particularly types of multiple-choice questions that can be automatically marked or graded using software tools. Tools obviously don’t replace teachers, but they can be really useful for providing timely and short-turnaround feedback for students.
As part of formative assessment, carefully chosen questions can also be used to reveal students’ misconceptions about the subject matter — these are called diagnostic questions. Shuchi discussed how in a classroom setting, teachers can employ this kind of question to help them decide what to focus on in future lessons, and to understand their students’ alternate or different conceptions of a topic.
The remainder of the seminar focused on the formative assessment of programming skills. There are many ways of assessing developing programming skills (see Shuchi’s slides), including Parsons problems, microworlds, hotspot items, rubrics (for artifacts), and multiple-choice questions. As an MCQ example, in the figure below you can see some snippets of block-based code, which students need to read and work out what the outcome of running the snippets will be.
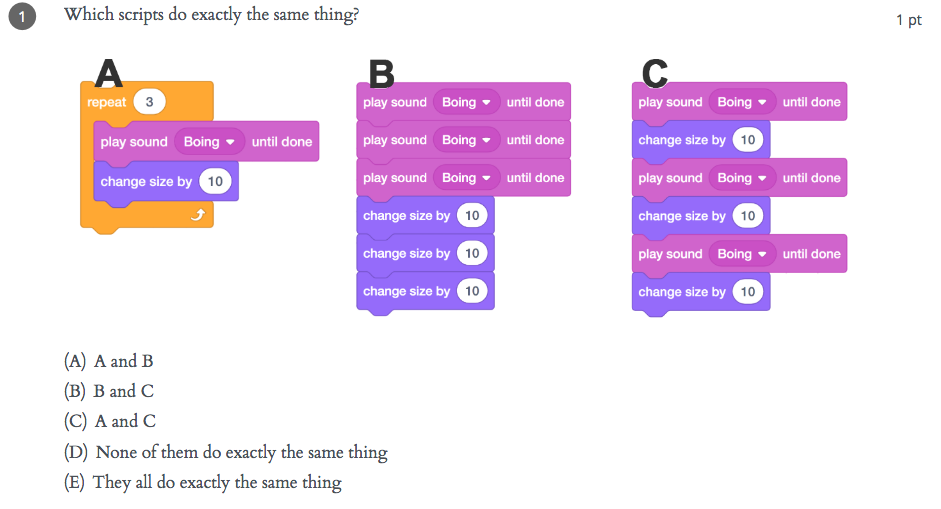
Questions such as this highlight that it’s important for learners to engage in code comprehension and code reading activities when learning to program. This really underlines the fact that such assessment exercises can be used to support learning just as much as to monitor progress.
Interestingly, Shuchi commented that in her experience, teachers in the UK are more used to using code reading activities than US teachers. This may be because code comprehension activities are embedded into the curriculum materials and support for pedagogy, both of which the Raspberry Pi Foundation developed as part of the National Centre for Computing Education in England. We explicitly share approaches to teaching programming that incorporate code reading, for example the PRIMM approach. Moreover, our work in the Raspberry Pi Foundation includes the Isaac Computer Science online learning platform for A level computer science students and teachers, which is centered around different types of questions designed as tools for learning.
All these materials are freely available to teachers wherever they are based.
Based on her work in US classrooms researching this topic, Shuchi’s call to action for teachers was to pay attention to formative assessment in computer science classrooms and to investigate what useful tools can support them to give feedback to students about their learning.
Shuchi is currently involved in an NSF-funded research project called CS Assess to further develop formative assessment in computer science via a community of educators. For further reading, there are two chapters related to formative assessment in computer science classrooms in the recently published book Computer Science in K-12 edited by Shuchi.
There was much to take away from this seminar, and we are really grateful to Shuchi for her input and look forward to hearing more about her developing project.
If you missed the seminar, you can find the presentation slides and a recording of the Shuchi’s talk on our seminars page.
In our next seminar on Tuesday 3 November at 17:00–18:30 BST / 12:00–13:30 EDT / 9:00–10:30 PT / 18:00–19:30 CEST, I will be presenting my work on PRIMM, particularly focusing on language and talk in programming lessons. To join, simply sign up with your name and email address.
Once you’ve signed up, we’ll email you the seminar meeting link and instructions for joining. If you attended this past seminar, the link remains the same.
The post Formative assessment in the computer science classroom appeared first on Raspberry Pi.
How do I install MySQL server 8.0 on Ubuntu 20.04 LTS Linux server? How can I add a new MySQL user and database on the newly set up Ubuntu server?
The post How to install MySQL server on Ubuntu 20.04 LTS Linux appeared first on nixCraft.
En plus de corriger le bogue activement exploité, la mise à jour apporte également des corrections pour quatre autres failles de sécurité.
L'article Google corrige une faille zero day Chrome utilisée par les attaquants a d'abord été publié sur WeLiveSecurity
Il peut être impossible de supprimer vos informations personnelles de Houseparty et d'autres services de médias sociaux - malgré les législations sur la vie privée!
L'article Vous pensez que vos données personnelles ont été supprimées? Pas si vite! a d'abord été publié sur WeLiveSecurity
I am delighted to share the news that we have appointed a new Chair and Trustees of the Raspberry Pi Foundation. Between them, they bring an enormous range of experience and expertise to what is already a fantastic Board of Trustees, and I am really looking forward to working with them.
John Lazar has been appointed as the new Chair of the Board of Trustees. John is a software engineer and business leader who is focused on combining technology and entrepreneurship to generate lasting positive impact.
Formerly the Chairman and CEO of Metaswitch Networks, John is now an angel investor, startup mentor, non-executive chairman and board director, including serving as the Chair of What3Words. He is a Fellow of the Royal Academy of Engineering and played an active role in developing the programme of study for England’s school Computer Science curriculum. John has also spent many years working on tech-related non-profit initiatives in Africa and co-founded Enza Capital, which invests in early-stage African technology companies that solve pressing problems.
John takes over the Chair from David Cleevely, who has reached the end of his two three-year terms as Trustee and Chair of the Foundation. David has made a huge contribution to the Foundation over that time, and we are delighted that he will continue to be involved in our work as one of the founding members of the Supporters Club.
Alongside John, we are welcoming three new Trustees to the Board of Trustees:
I am also delighted to announce that we have appointed Suranga Chandratillake as a Member of the Raspberry Pi Foundation. Suranga is a technologist, entrepreneur, and investor.
He founded the intelligent search company blinkx and is now a General Partner at Balderton Capital. Suranga is a Fellow of the Royal Academy of Engineering and a World Economic Forum Young Global Leader, and he serves on the UK Government’s Council for Science and Technology.
As a charity, the Raspberry Pi Foundation is governed by a Board of Trustees that is ultimately responsible for what we do and how we are run. It is the Trustees’ job to make sure that we are focused on our mission, which for us means helping more people learn about computing, computer science, and related subjects. The Trustees also have all the usual responsibilities of company directors, including making sure that we use our resources effectively. As Chief Executive, I am accountable to the Board of Trustees.
We’ve always been fortunate to attract the most amazing people to serve as Trustees and, as volunteers, they are incredibly generous with their time, sharing their expertise and experience on a wide range of issues. They are an important part of the team. Trustees serve for up to two terms of three years so that we always have fresh views and experience to draw on.
Appointments to the Board of Trustees follow open recruitment and selection processes that are overseen by the Foundation’s Nominations Committee, supported by independent external advisers. Our aim is to appoint Trustees who bring different backgrounds, perspectives, and lived experience, as well as a range of skills. As with all appointments, we consider diversity at every aspect of the recruitment and selection processes.
Formally, Trustees are elected by the Foundation’s Members at our Annual General Meeting. This year’s AGM took place last week on Zoom. Members are also volunteers, and they play an important role in holding the Board of Trustees to account, helping to shape our strategy, and acting as advocates for our mission.
You can see the full list of Trustees and Members on our website.
The post New Chair and Trustees of the Raspberry Pi Foundation appeared first on Raspberry Pi.
How do I check the TLS/SSL certificate expiration date from my Linux or Unix shell prompt? How can I find the TLS certificate expiry date from Linux and Unix shell scripts?
The post How to check TLS/SSL certificate expiration date from command-line appeared first on nixCraft.
Raspberry Pi Compute Module 4 designer Dominic Plunkett was kind enough to let us sit him down for a talk with Eben, before writing up his experience of bringing our latest board to life for today’s blog post. Enjoy.
When I joined Raspberry Pi, James, Eben and Gordon already had some ideas on the features they would like to see on the new Compute Module 4, and it was down to me to take these ideas and turn them into a product. Many people think design is a nice linear process: ideas, schematics, PCB, and then final product. In the real world the design process isn’t like this, and to get the best designs I often try something and iterate around the design loop to get the best possible solution within the constraints.
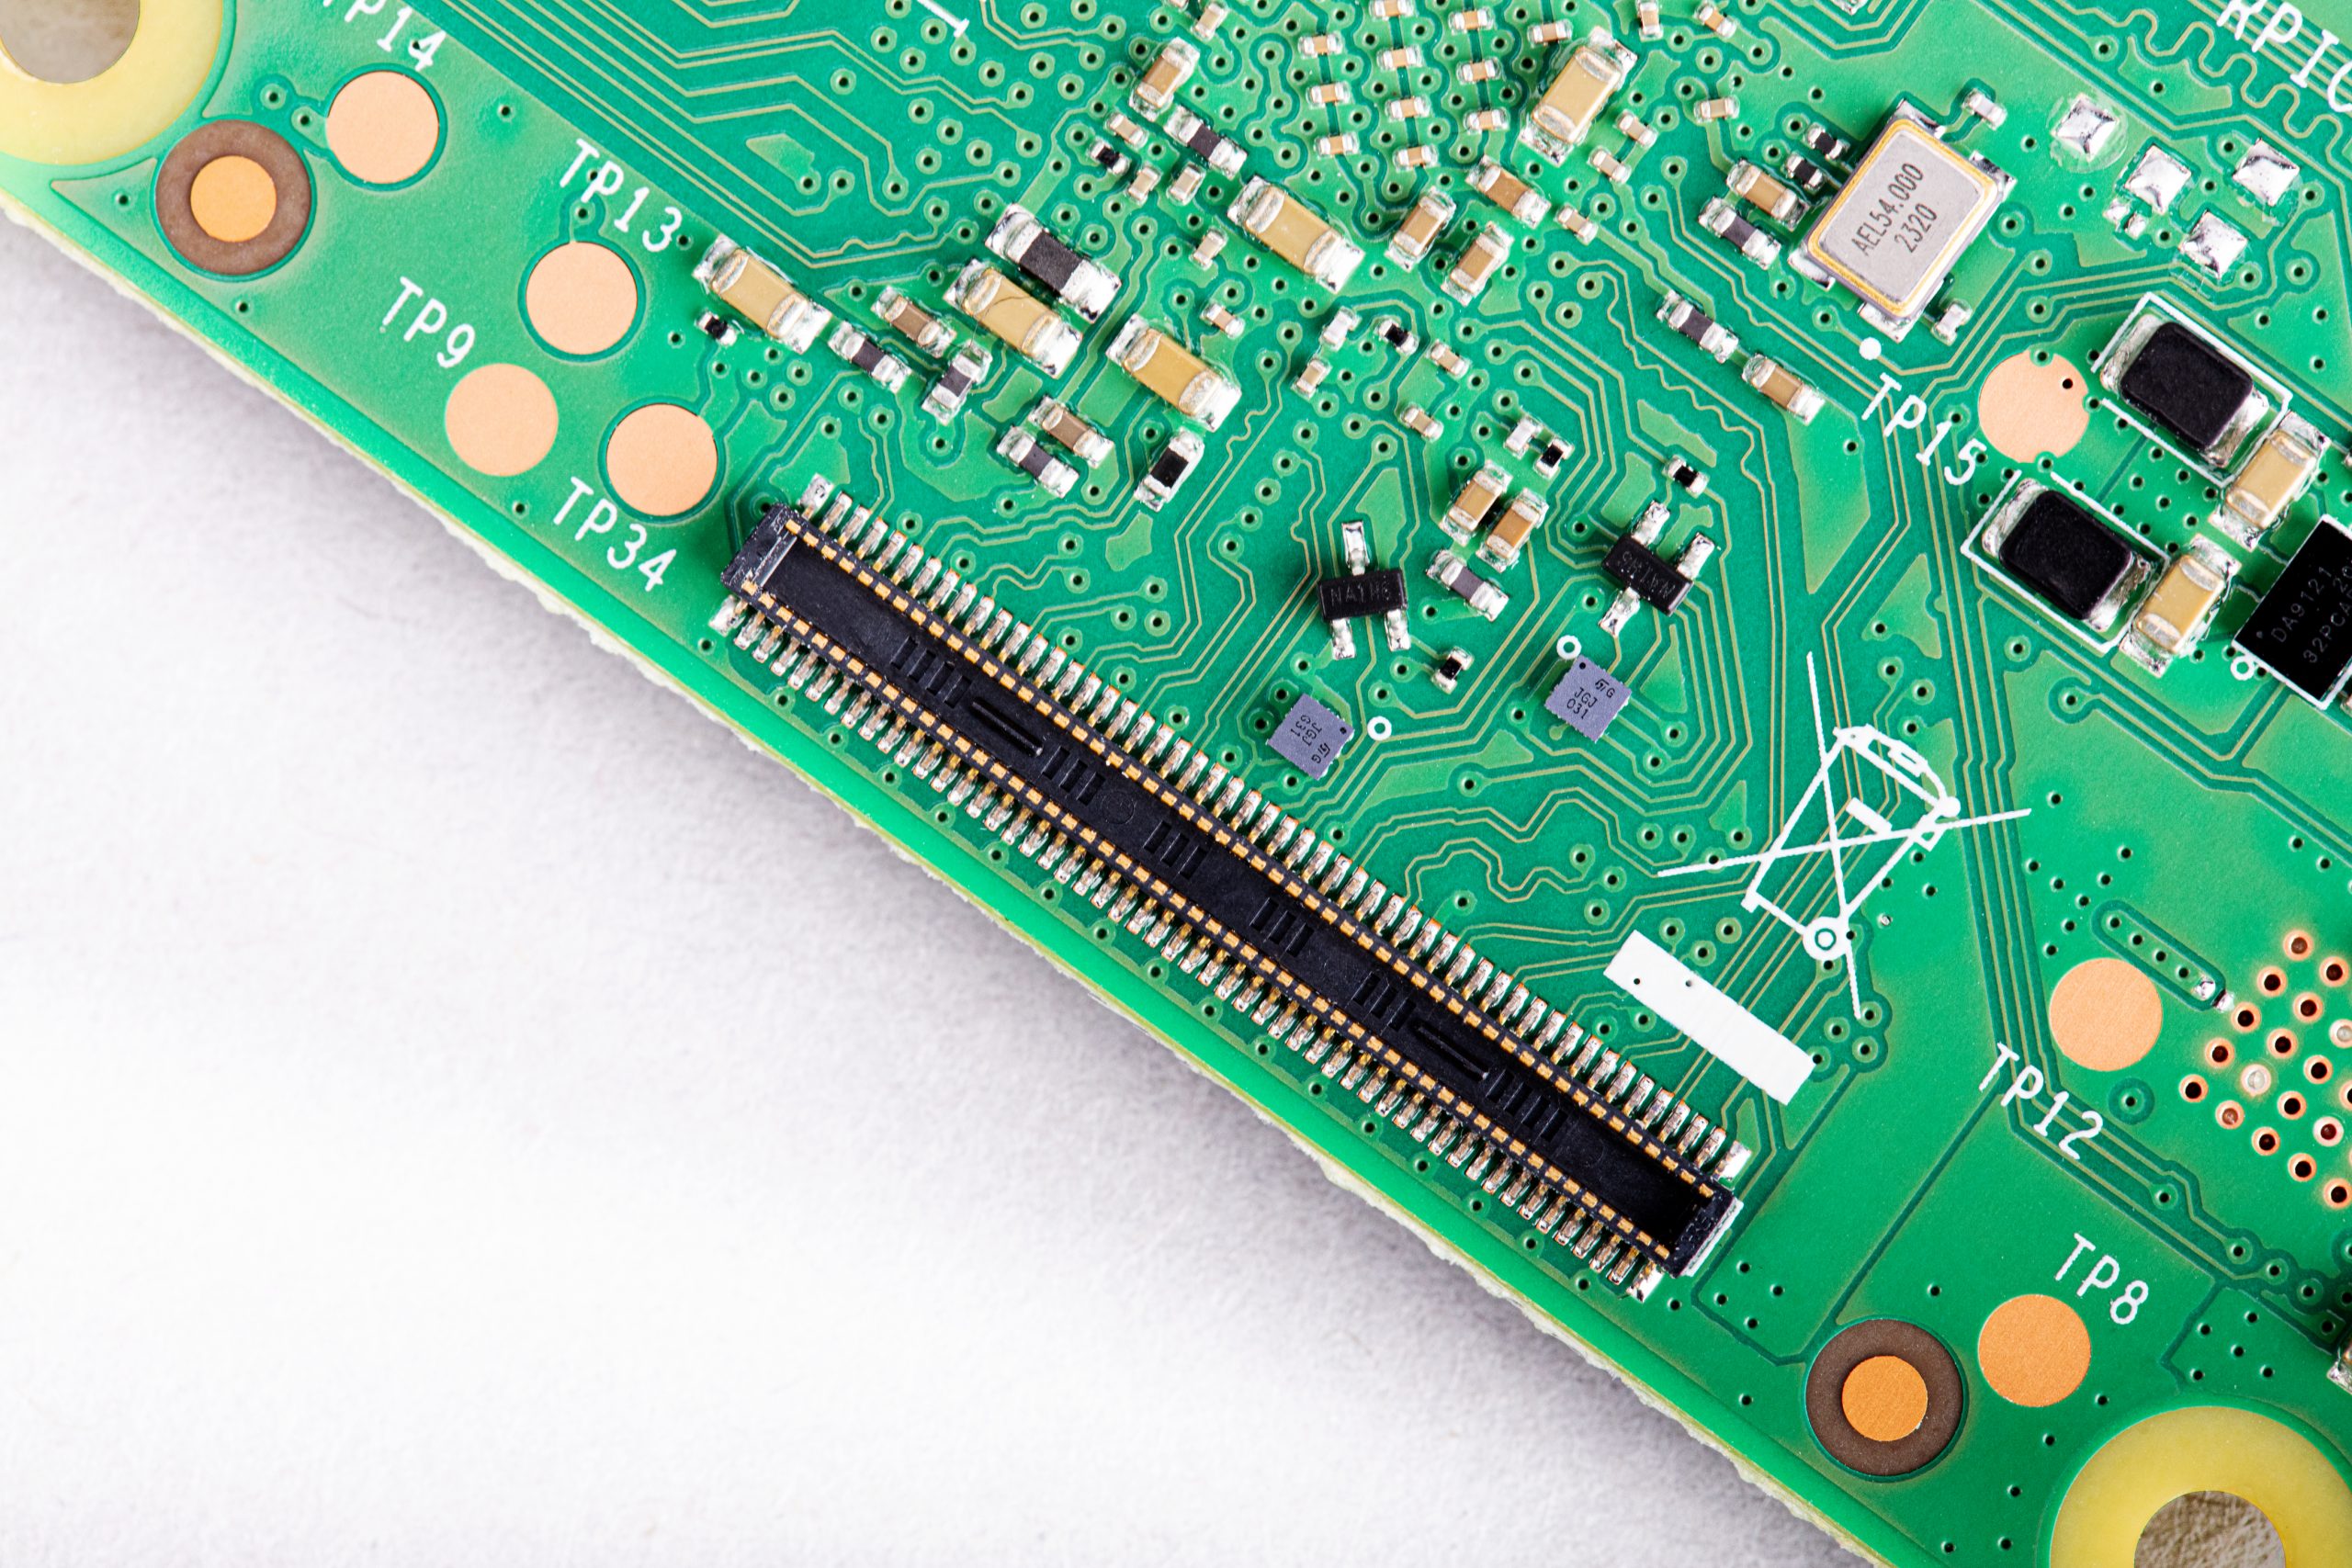
Previous Compute Modules were all in a 200-pin SODIMM form factor, but two important considerations pushed us to think about moving to a different form factor: the need to expose useful interfaces of the BCM2711 that are not present in earlier SoCs, and the desire to add extra components, which meant we needed to route tracks differently to make space on the PCB for the additional parts.
We knew we wanted to get the extra features of the BCM2711 out to the connector so that users could make use of them in their products. High-speed interfaces like PCIe and HDMI are so fast coming out of the BCM2711 that they need special IO pins that can’t also support GPIO: if we were to change the functionality of a GPIO pin to one of the new high-speed signals, this would break backwards compatibility.
We could consider adding some sort of multiplexer to swap between old and new functionality, but this would cost space on the PCB, as well as reducing the integrity of the fast signals. This consideration alone drives the design to a new pinout. We could have tried to use one of the SODIMM connectors with extra pins; while this would give a board with similar dimensions to the existing Compute Modules, it too would break compatibility.
We also wanted to add extra items to the PCB, so PCB space to put the additional parts was an important consideration. If you look carefully at a Compute Module 3 you can see a lot of tracks carrying signals from one side of the SoC to the pins on the edge connector. These tracks take up valuable PCB space, preventing components being fitted there. We could add extra PCB layers to move these tracks from an outer layer to an inner layer, but these extra layers add to the cost of the product.
This was one of the main drivers in changing to having two connectors on different edges of the board: doing so saves having to route tracks all the way across the PCB. So we arrived at a design that incorporated a rough split of which signals were going to end up on each of the connectors. The exact order of the signals wasn’t yet defined.
We experimented with trial PCB layouts for the Compute Module 4 and the CM4 IO Board to see how easy it would be to route the signals; even at this stage, the final size of the CM4 hadn’t been fixed. Over time, and after juggling parts around the PCB, I came to a sensible compromise. There were lots of things to consider, including the fact that the taller components had to go on the top side of the PCB.
The pinout was constantly being adjusted to an ordering that was a good compromise for both the CM4 and the IO Board. The IO Board layout was a really important consideration: after we made the first prototype boards, we decided to change the pinout slightly to make PCB layout on the IO Board even easier for the end user.
When the prototype Compute Module 4 IO Boards arrived back from manufacture, the connectors hadn’t arrived in time to be assembled by machine, so I fitted them by hand in the lab. Pro tip: if you have to fit connectors by hand, take your time to ensure they are lined up correctly, and use lots of flux to help the solder flow into the joints. Sometimes people use very small soldering iron tips thinking it will help; in fact, one of the goals of soldering is to get heat into the joint, and if the tip is too small it will be difficult to heat the solder joint sufficiently to make a good connection.
Whilst it was easy to add some headline features like a second HDMI port, other useful features don’t grab as much attention. One example is that we have simplified the powering requirements. Previous Compute Modules required multiple PSUs to power a board, and the power-up sequence had to be exactly correct. Compute Module 4 simply requires a single +5V PSU.
In fact, the simplest possible base board for Compute Module 4 just requires a +5V supply and one of the connectors and nothing else. You would need a CM4 variant with eMMC and wireless connectivity; you can boot the module with the eMMC, wireless connectivity gives you networking, and Bluetooth connectivity gives you access to IO devices. If you do add extra IO devices the CM4 also can provide a +3.3V supply to power those devices, avoiding the need for an external power supply.
We have seen some customers experience issues with adding wireless interfaces to previous Compute Modules, so a really important requirement was to provide the option of wireless support. We wanted to be as flexible as possible, so we have added support for an external antenna. Because radio certification can be a very hard and expensive process, we have a pre-certified external antenna kit that can be supplied with Compute Module 4. This should greatly simplify product certification for end products, although engineering designers should check to make certain of meeting all local requirements.
This is probably the most exciting new interface to come to Compute Module 4. On the existing Raspberry Pi 4, this interface is used internally to add the XHCI controller which provides the USB 3 ports. By providing the PCIe externally, we are giving end users the choice of how they would like to use this interface. Many applications don’t need USB 3 performance, so the end user can make use of it in other ways — for NVMe drives, to take one example.
In order to have wired Ethernet connectivity with previous Compute Modules, you needed to add an external USB-to-Ethernet interface. This adds complexity to the IO board, and one of the aims of the new Compute Module 4 is to make interfacing to it simple. With this in mind, we added a physical Ethernet interface to CM4, and we also took the opportunity to add support for IEEE1588 to this. As a result, adding Gigabit wired networking to CM4 requires only the addition of a magjack; no extra silicon is needed. Because this is a true Gigabit interface, it is also faster than the USB-to-Ethernet interfaces that previous Compute Modules use.
Early on in the process, we decided that we were going to open-source the design files for the Compute Module 4 IO Board. We used our big expensive CAD system for Compute Module 4 itself, and while we could have decided to do the design for the IO Board in the big CAD system too and then port it across to KiCAD, it’s easy to introduce issues in the porting process.
So, instead, we used KiCAD for the IO Board from the start, and the design files that come out of KiCAD are the same ones that we use in manufacture. During development I had both CAD systems running at the same time on the computer.
We have made some big changes to our new Compute Module 4 range, and these should make integration much simpler for our customers. Many interfaces now just need a connector and power, and the new form factor should enable people to design more compact and more powerful products. I look forward to seeing what our customers create over the next few years with Compute Module 4.
The new Raspberry Pi Compute Module 4 is available from our network of Approved Resellers. Head over to the Compute Module 4 product page and select your preferred variant to find your nearest reseller.
Can’t find a reseller near you? No worries. Many of our Approved Resellers ship internationally, so try a few other locations.
The post Designing the Raspberry Pi Compute Module 4 appeared first on Raspberry Pi.
Want to delete LXD based container with lxc command on Linux? Try these simple tips. To delete LXD instances/container and snapshots, we use the lxc delete command. However, the container/instance must be stopped, and all snapshots must be removed before removing the Linux container with the lxc command.
The post How to delete container with lxc (LXD) command on Linux appeared first on nixCraft.
nvidia is currently partially incompatible with linux >= 5.9 [1] [2]. While graphics should work fine, CUDA, OpenCL, and likely other features are broken. Users who've already upgraded and need those features are advised to switch to the linux-lts kernel for the time being until a fix for nvidia is available.
Quels sont les principaux risques de sécurité à prendre en compte lors de l'utilisation de clés USB et comment pouvez-vous atténuer les menaces?
L'article Votre clé USB est‑elle aussi sûre que vous le croyez? a d'abord été publié sur WeLiveSecurity
Today we have another guest post from Igalia’s Iago Toral, who has spent the past year working on the Mesa graphic driver stack for Raspberry Pi 4.
Four months ago we announced that work on the Vulkan effort for Raspberry Pi 4 (v3dv) was progressing well, and that we were moving the development to an open repository.
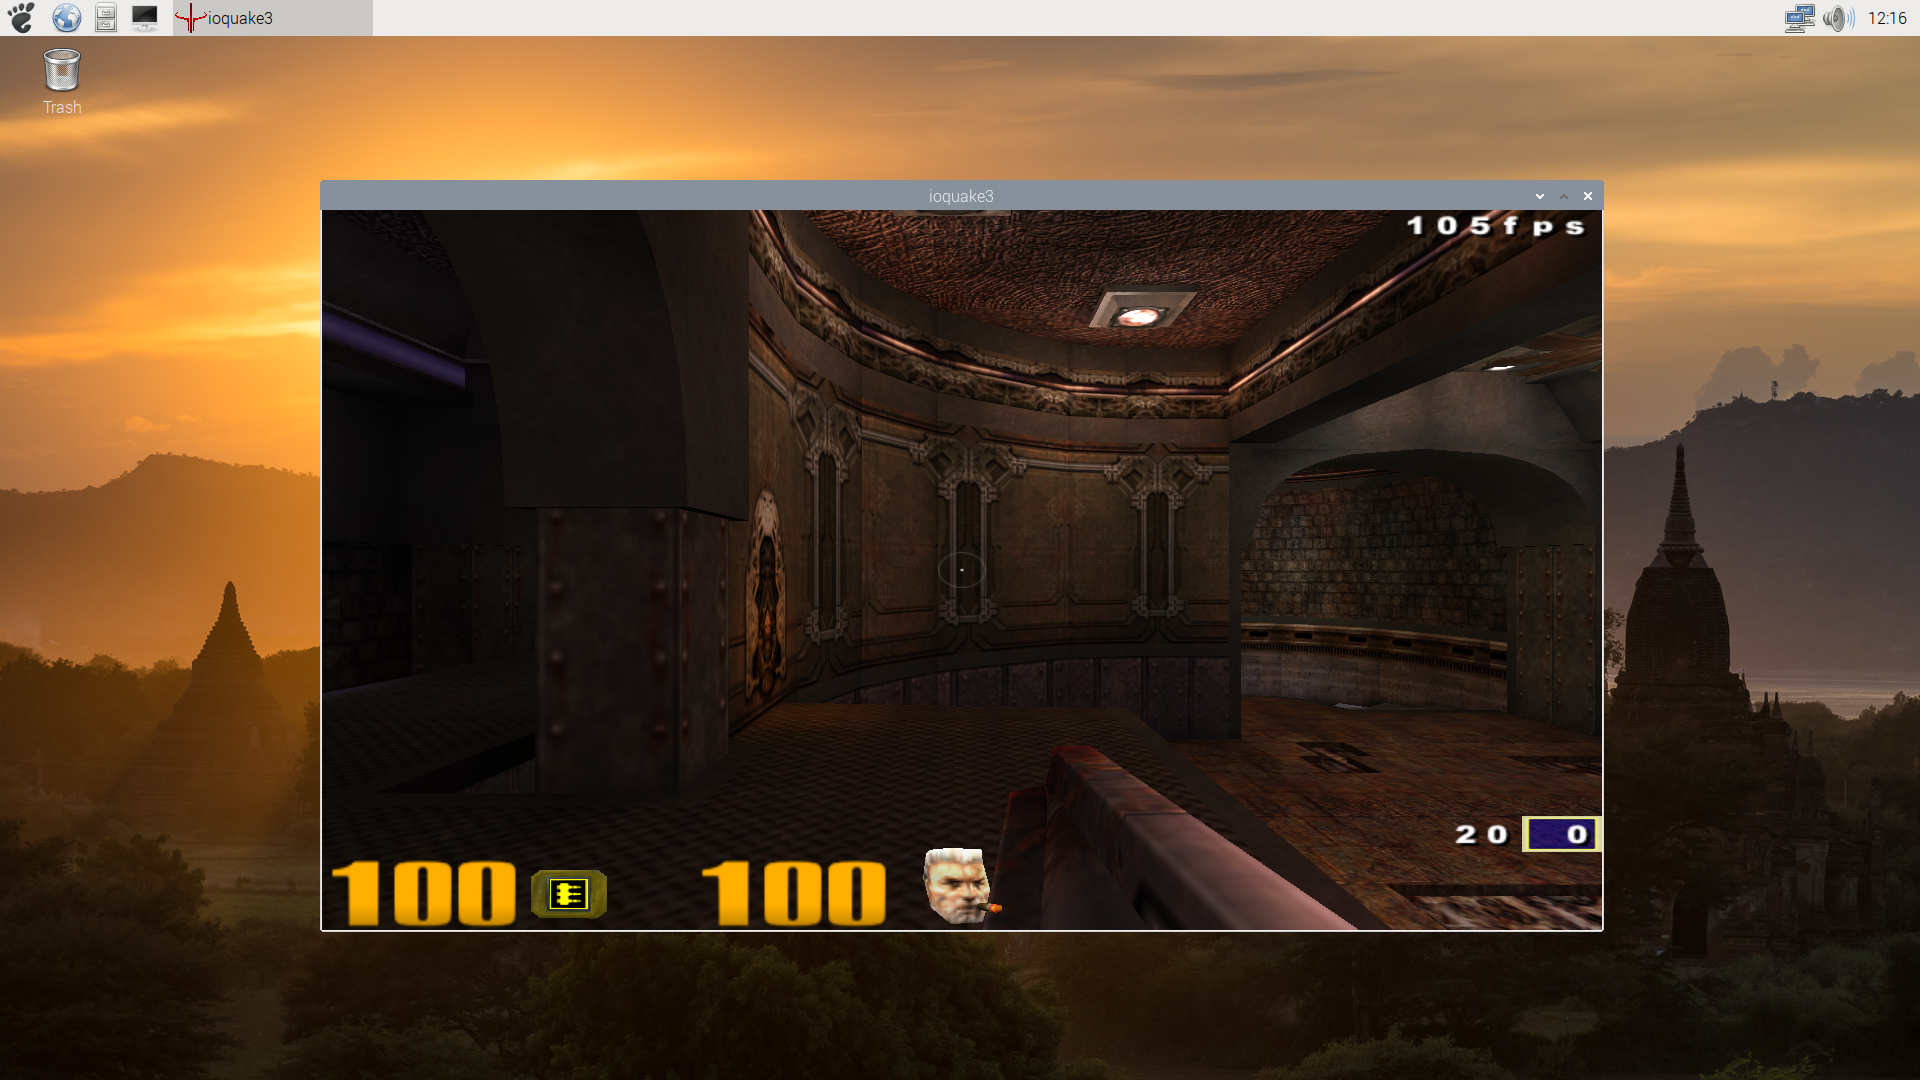
vkQuake3 on Raspberry Pi 4
This week, the Vulkan driver for Raspberry Pi 4 has been merged with Mesa upstream, becoming one of the official Vulkan Mesa drivers. This brings several advantages:
We said back in June that we were passing over 70,000 tests from the Khronos Conformance Test Suite for Vulkan 1.0, and that we had an implementation for a significant subset of the Vulkan 1.0 API. Now we are passing over 100,000 tests, and have implemented the full Vulkan 1.0 API. Only a handful of CTS tests remain to be fixed.

Sascha Willems’ deferred multisampling demo
This doesn’t mean that our work is done, of course. Although the CTS is a really complete test suite, it is not the same as a real use case. As mentioned some of our updates, we have been testing the driver with Vulkan ports of the original Quake trilogy, but deeper and more detailed testing is needed. So the next step will be to test the driver with more use cases, and fixing any bugs or performance issues that we find during the process.
The post Vulkan update: merged to Mesa appeared first on Raspberry Pi.
Les défauts, dont aucun n'est activement exploité, ont été corrigés quelques jours seulement après le lancement mensuel du Patch Tuesday.
L'article Microsoft publie deux correctifs urgent pour Windows a d'abord été publié sur WeLiveSecurity
It’s become a tradition that we follow each Raspberry Pi model with a system-on-module variant based on the same core silicon. Raspberry Pi 1 gave rise to the original Compute Module in 2014; Raspberry Pi 3 and 3+ were followed by Compute Module 3 and 3+ in 2017 and 2019 respectively. Only Raspberry Pi 2, our shortest-lived flagship product at just thirteen months, escaped the Compute Module treatment.
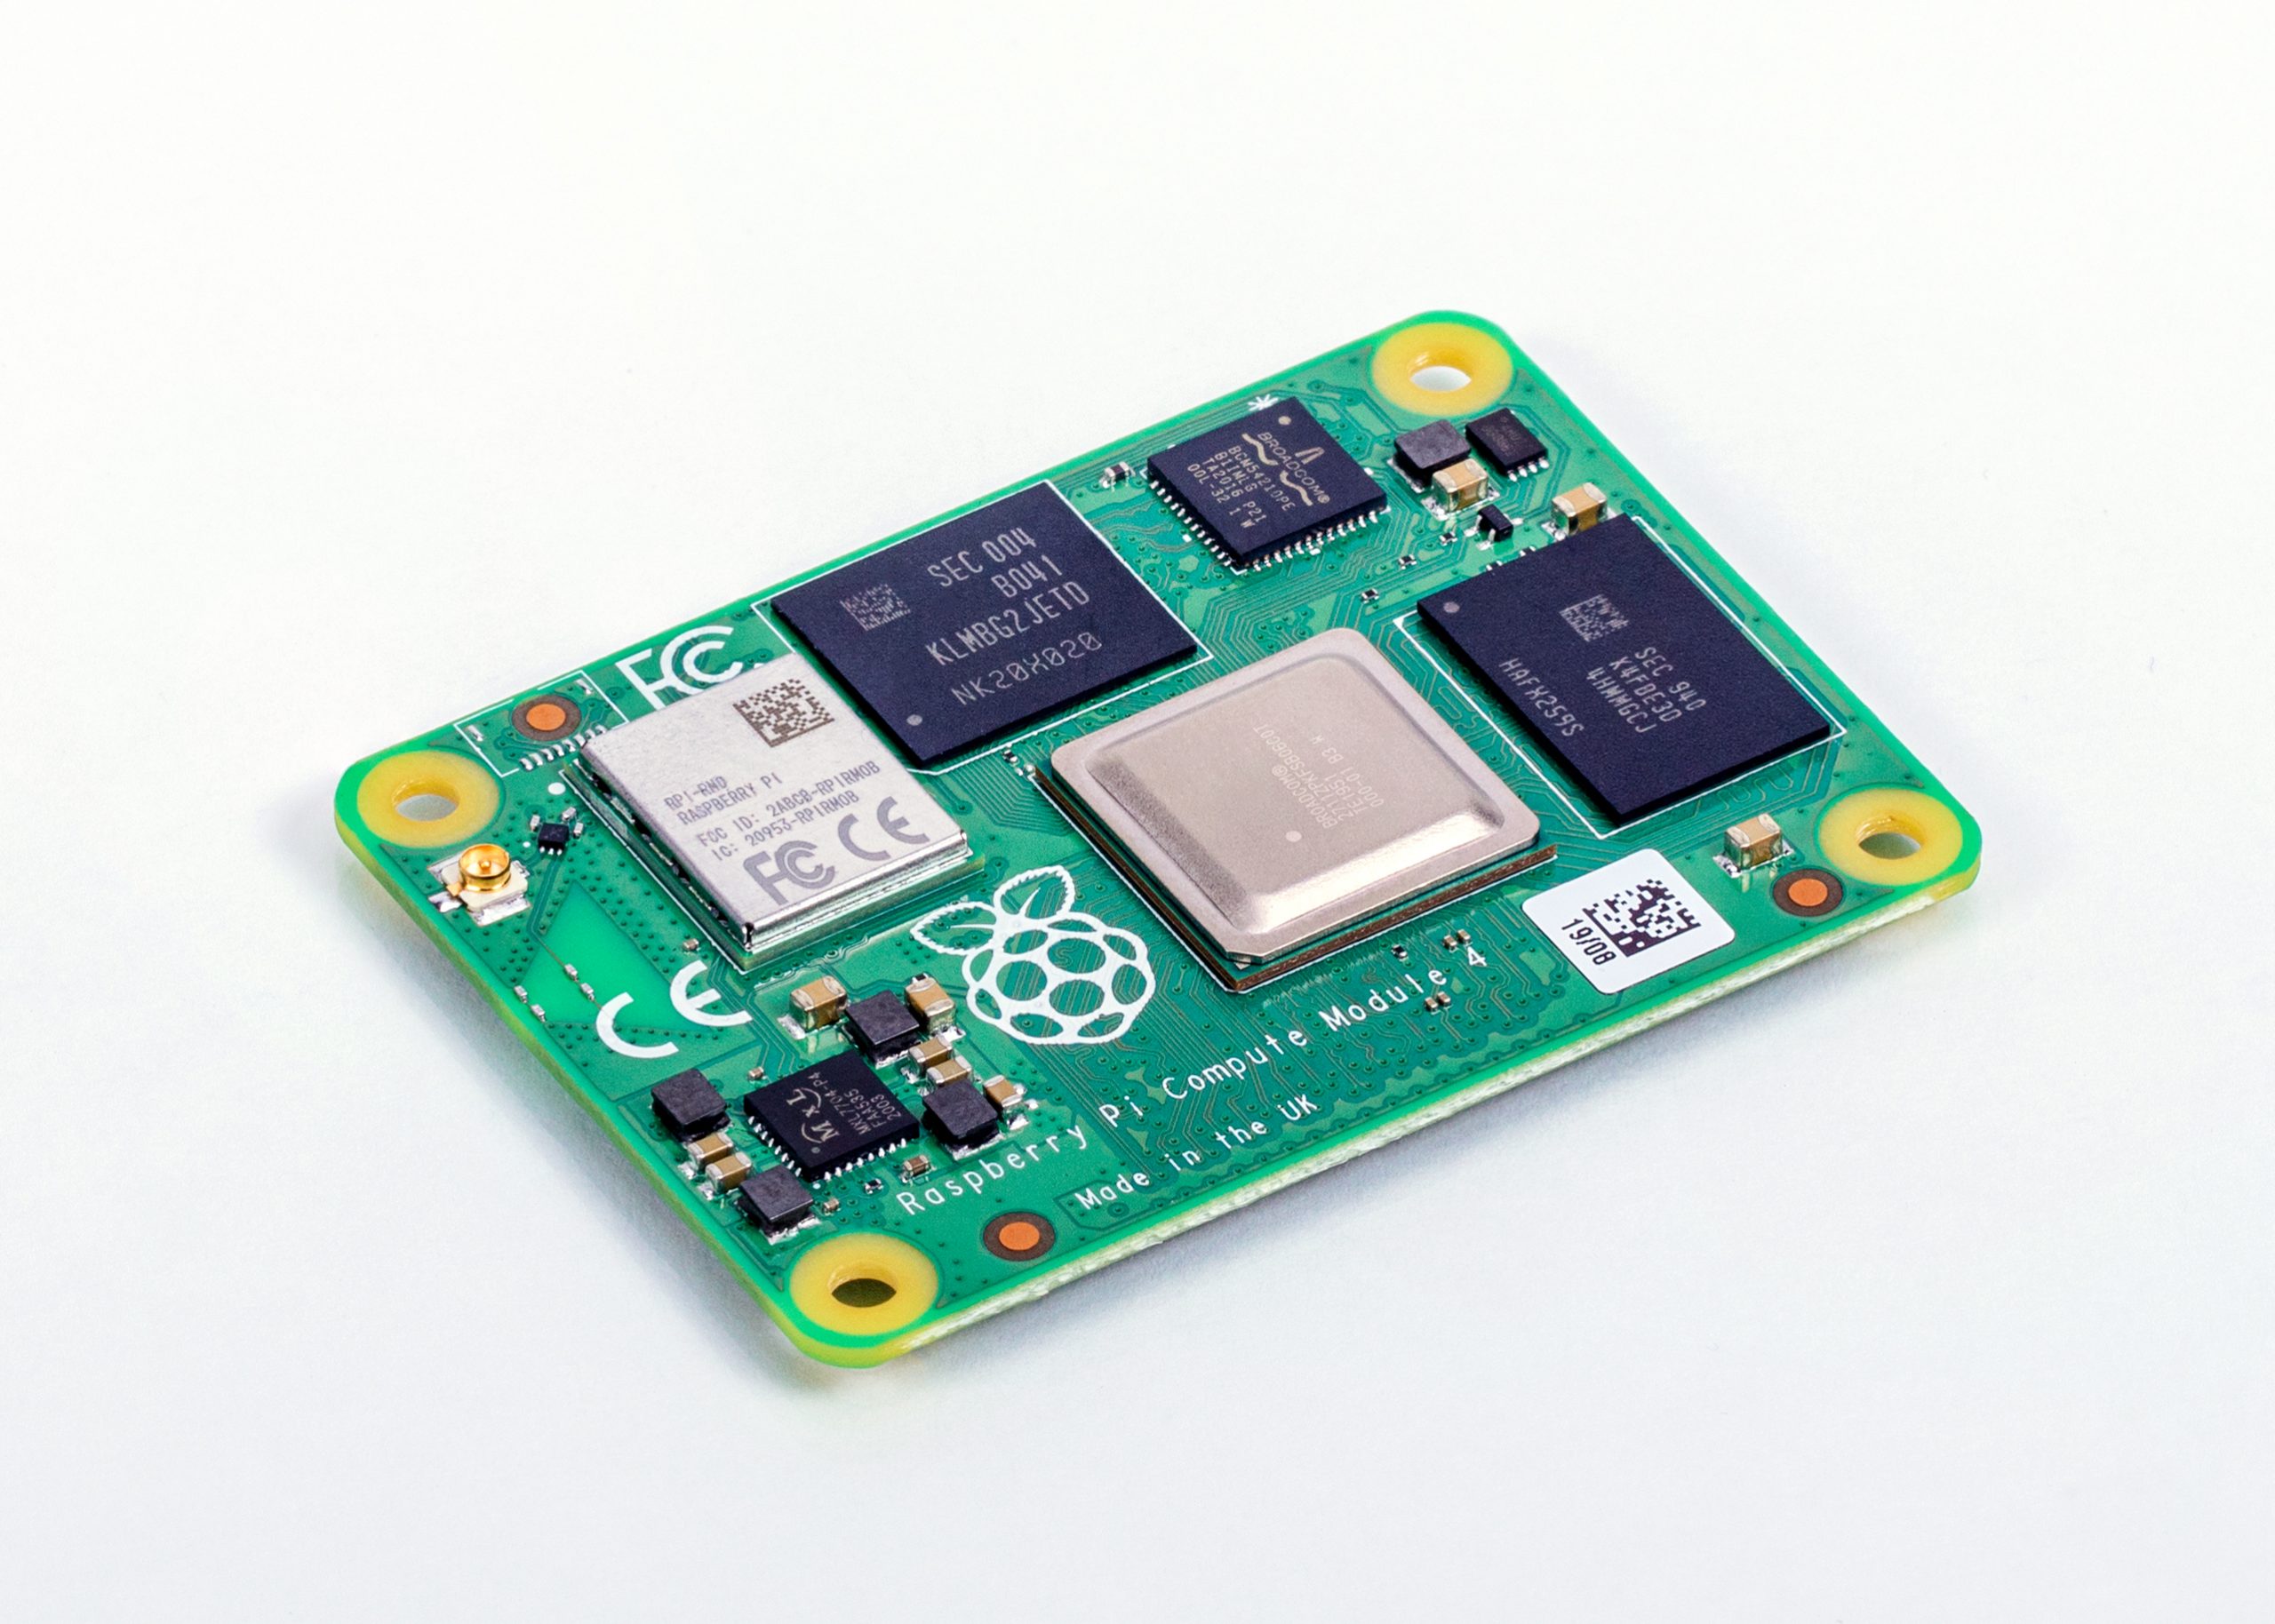
It’s been sixteen months since we unleashed Raspberry Pi 4 on the world, and today we’re announcing the launch of Compute Module 4, starting from $25.
Over half of the seven million Raspberry Pi units we sell each year go into industrial and commercial applications, from digital signage to thin clients to process automation. Many of these applications use the familiar single-board Raspberry Pi, but for users who want a more compact or custom form factor, or on-board eMMC storage, Compute Module products provide a simple way to move from a Raspberry Pi-based prototype to volume production.
Built on the same 64-bit quad-core BCM2711 application processor as Raspberry Pi 4, our Compute Module 4 delivers a step change in performance over its predecessors: faster CPU cores, better multimedia, more interfacing capabilities, and, for the first time, a choice of RAM densities and a wireless connectivity option.
You can find detailed specs here, but let’s run through the highlights:
Compute Module 4 introduces a brand new form factor, and a compatibility break with earlier Compute Modules. Where previous modules adopted the JEDEC DDR2 SODIMM mechanical standard, with I/O signals on an edge connector, we now bring I/O signals to two high-density perpendicular connectors (one for power and low-speed interfaces, and one for high-speed interfaces).
This significantly reduces the overall footprint of the module on its carrier board, letting you achieve smaller form factors for your products.
With four RAM options, four Flash options, and optional wireless connectivity, we have a total of 32 variants, with prices ranging from $25 (for the 1GB RAM, Lite, no wireless variant) to $90 (for the 8GB RAM, 32GB Flash, wireless variant).
We’re very pleased that the four variants with 1GB RAM and no wireless keep the same price points ($25, $30, $35, and $40) as their Compute Module 3+ equivalents: once again, we’ve managed to pack a lot more performance into the platform without increasing the price.
You can find the full price list in the Compute Module 4 product brief.
To help you get started with Compute Module 4, we are also launching an updated IO Board. Like the IO boards for earlier Compute Module products, this breaks out all the interfaces from the Compute Module to standard connectors, providing a ready-made development platform and a starting point for your own designs.
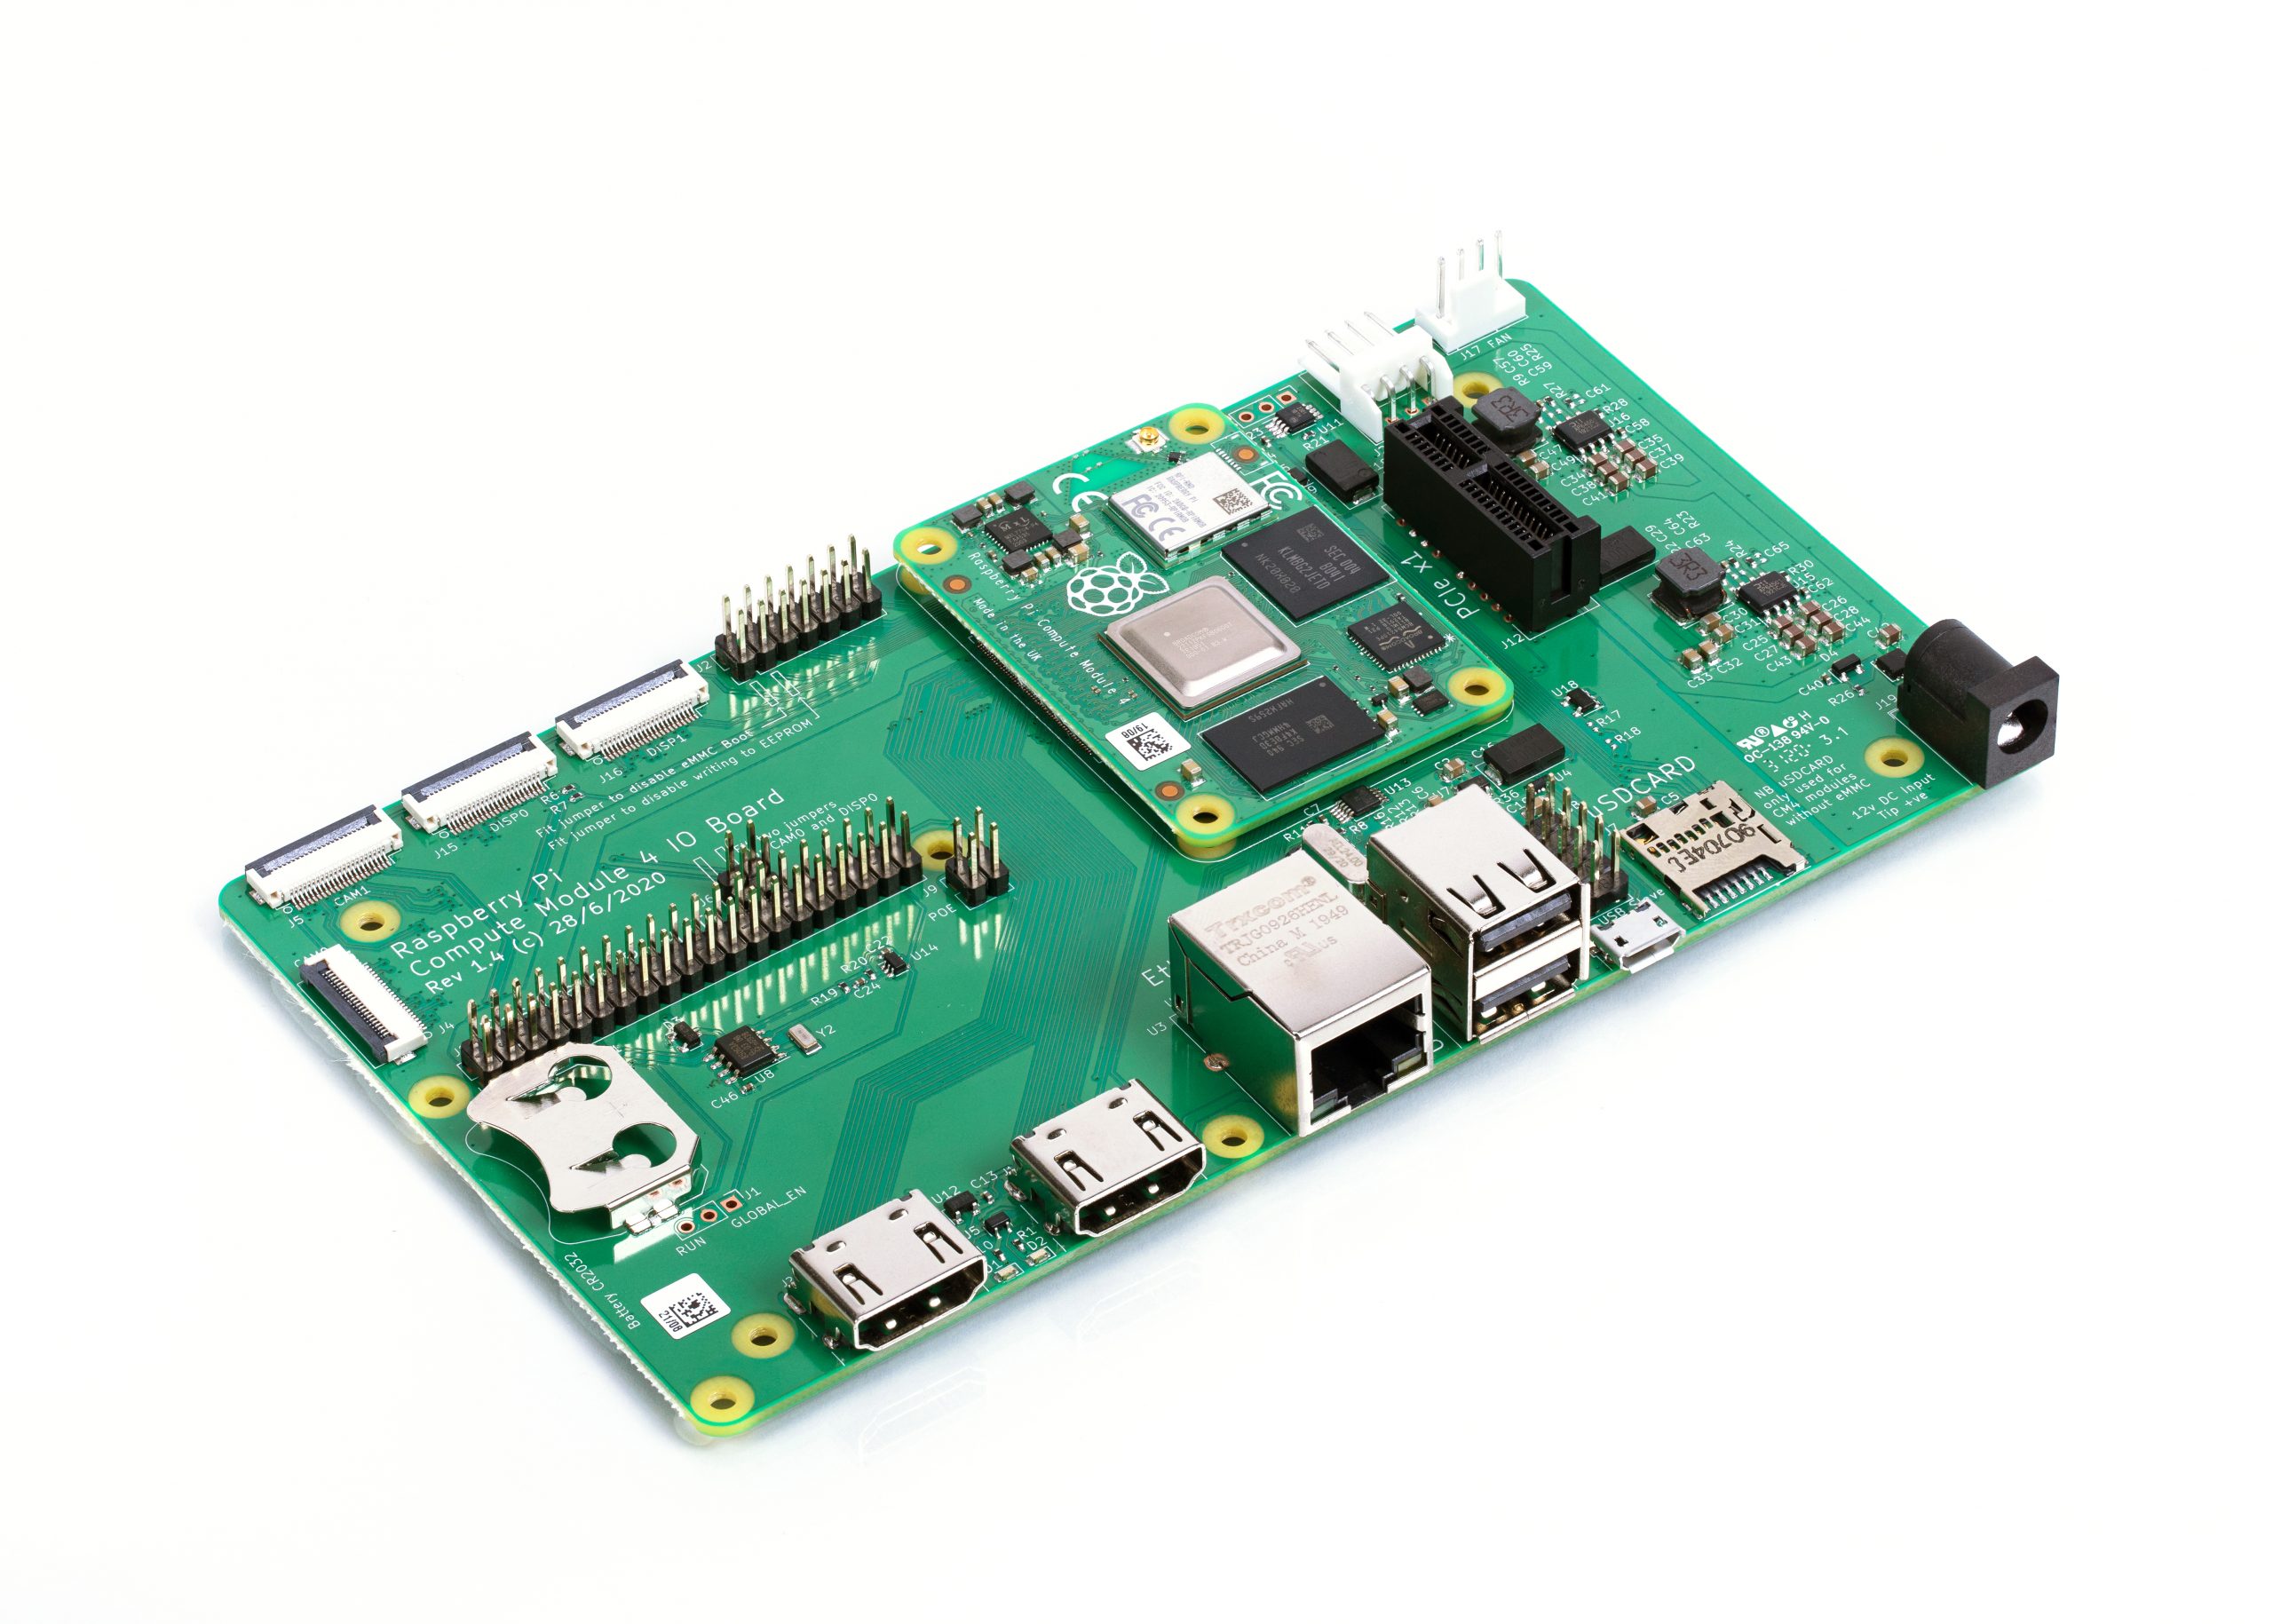
The IO board provides:
CAD for the IO board is available in KiCad format. You may recall that a few years ago we made a donation to support improvements to KiCad’s differential pair routing and track length control features; now you can use this feature-rich, open-source PCB layout package to design your own Compute Module carrier board.
In addition to serving as a development platform and reference design, we expect the IO board to be a finished product in its own right: if you require a Raspberry Pi that supports a wider range of input voltages, has all its major connectors in a single plane, or allows you to attach your own PCI Express devices, then Compute Module 4 with the IO Board does what you need.
We’ve set the price of the bare IO board at just $35, so a complete package including a Compute Module starts from $60.
We expect that most users of wireless Compute Module variants will be happy with the on-board PCB antenna. However, in some circumstances – for example, where the product is in a metal case, or where it is not possible to provide the necessary ground plane cut-out under the module – an external antenna will be required. The Compute Module 4 Antenna Kit comprises a whip antenna, with a bulkhead screw fixture and U.FL connector to attach to the socket on the module.
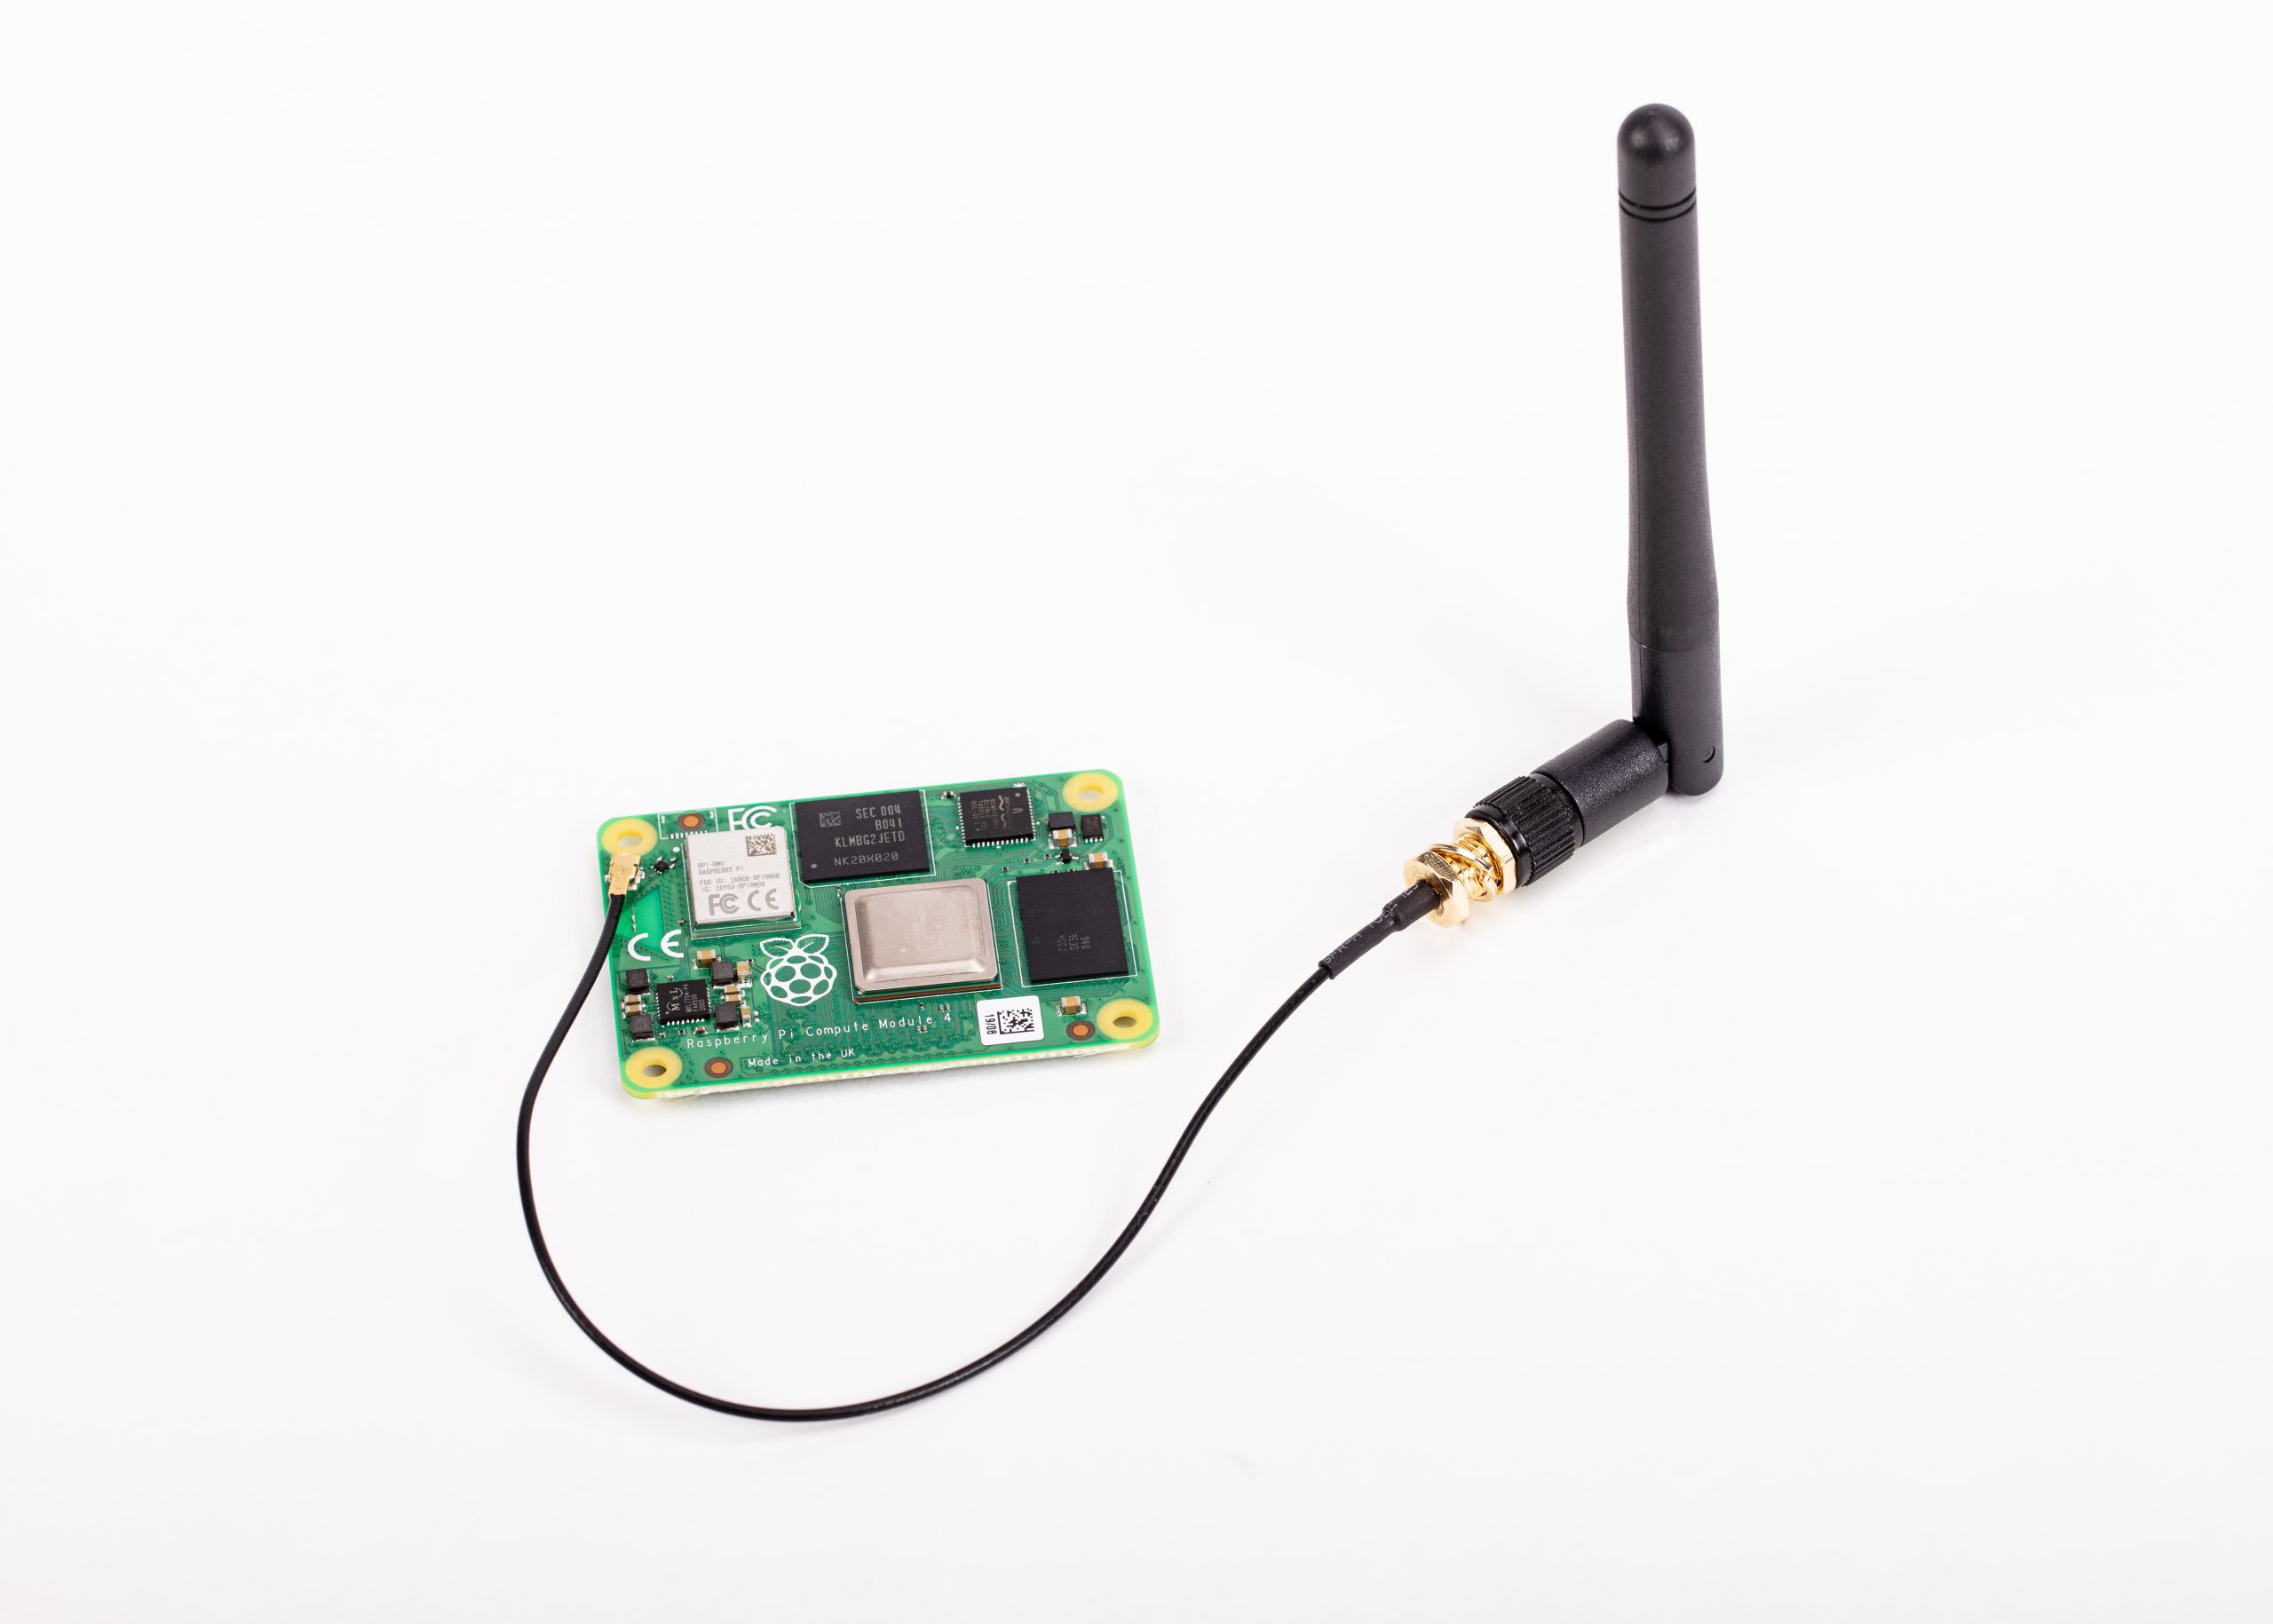
When using ether the Antenna Kit or the on-board antenna, you can take advantage of our modular certification to reduce the conformance testing costs for your finished product. And remember, the Raspberry Pi Integrator Programme is there to help you get your Compute Module-based product to market.
This is our best Compute Module yet. It’s also our first product designed by Dominic Plunkett, who joined us almost exactly a year ago.
I sat down with Dominic last week to discuss Compute Module 4 in greater detail, and you can find the video of our conversation here. Dominic will also be sharing more technical detail in the blog tomorrow.
In the meantime, check out the Compute Module 4 page for the datasheet and other details, and start thinking about what you’ll build with Compute Module 4.
The post Raspberry Pi Compute Module 4 on sale now from $25 appeared first on Raspberry Pi.
Il n'est pas nécessaire d'être diplômé en cybersécurité ou de disposer d'un budget illimité pour bien maîtriser les bases de la sécurité - voici cinq éléments qui vous mettront sur la bonne voie
L'article 5 choses que vous pouvez faire pour sécuriser votre bureau à domicile sans faire appel à un expert a d'abord été publié sur WeLiveSecurity
Du code PIN à l'authentification biométrique, de nombreuses options permettent de verrouiller votre smartphone. Quelle méthode est la plus sécuritaire?
L'article Capsule cybersécurité: Verrouillage sécuritaire de smartphone a d'abord été publié sur WeLiveSecurity
La plateforme de vidéoconférence met cette fonctionnalité à la disposition des utilisateurs des niveaux gratuits et payants.
L'article Zoom commence à déployer le chiffrement de bout en bout a d'abord été publié sur WeLiveSecurity
Certaines séquences sont déjà apparues sur des sites pour adultes, les cybercriminels offrant un accès à vie à l'intégralité des vidéos volées pour 150 $ US.
L'article 50 000 caméras domestiques auraient été piratées, des images mises en ligne a d'abord été publié sur WeLiveSecurity
Cinq pirates éthiques se sont partagés près de 300 000 dollars US en prime au bogue - jusqu'à présent.
L'article 55 failles de sécurité trouvées dans divers services Apple a d'abord été publié sur WeLiveSecurity