![]() In this post you will learn to create a Python script that allows users to enter its Google Analytics account and get information from there.
In this post you will learn to create a Python script that allows users to enter its Google Analytics account and get information from there.
In order to do that, we will create a Project in the Google Developers Console and authorize it to use the Analytics API.
Next, we will use the Oauth 2.0 protocol to allow users to connect to their Analytics account through our Project.
And finally, we will retrieve the number of sessions of our view, segmented by traffic source.
Let’s start!
Go to the Google Developers Console and login with your account.
Click on Create Project and write your Project name and choose (if you want) your project ID.
Next, on your new project menu, go to APIs & auth –> Credentials. Here, in the Oauth section, click on Create new Client ID.
In this case, as we are creating a script that will run on our computer, we will choose Installed application as the application type, and Other as the installed application type.

Finally, click on Create Client ID.
You will see, next to the OAuth section, the credentials for your project, which contain your Client ID, the Client Secret, and the redirect URIS. Click on Download JSON to download them, and save the file as client_secrets.json.
From here, go to APIs & auth –> Consent screen and personalize the message that your users will see when requesting access to their accounts.
Next, we need to activate the Goolge Analytics API in your Project. Go to APIs & auth –> APIs and look for the Analytics API. You just need to activate it by clicking at the OFF button on the right.
Ok! now that we have our Project created we can move on to our Python script!
In order to use the Analytics API with Python, we will use the Google API Python Client library. You can install it in your working environment using pip (how? learn to install Python, virtualenv and virtualenvwrapper to work with virtual environments).
$ pip install python-gflags
$ pip install -U google-api-python-client
We also install the python-gflags library, which we will use latter in the code.
Next create the file analytics_service_object.py in your working directory (where client_secrets.json is located). This file will create an authorized Analytics Service object, used to interact with the user’s analytics accounts.
import httplib2
from apiclient.discovery import build
from oauth2client.client import flow_from_clientsecrets
from oauth2client.file import Storage
from oauth2client import tools
import argparse

CLIENT_SECRETS = 'client_secrets.json'

# The Flow object to be used if we need to authenticate.
FLOW = flow_from_clientsecrets(
    CLIENT_SECRETS,
    scope='https://www.googleapis.com/auth/analytics.readonly',
    message='%s is missing' % CLIENT_SECRETS
    )

# A file to store the access token
TOKEN_FILE_NAME = 'credentials.dat'


def prepare_credentials():
    parser = argparse.ArgumentParser(parents=[tools.argparser])
    flags = parser.parse_args()
    # Retrieve existing credendials
    storage = Storage(TOKEN_FILE_NAME)
    credentials = storage.get()
    # If no credentials exist, we create new ones
    if credentials is None or credentials.invalid:
        credentials = tools.run_flow(FLOW, storage, flags)
    return credentials


def initialize_service():
    # Creates an http object and authorize it using
    # the function prepare_creadentials()
    http = httplib2.Http()
    credentials = prepare_credentials()
    http = credentials.authorize(http)
    # Build the Analytics Service Object with the authorized http object
    return build('analytics', 'v3', http=http)

if __name__ == '__main__':
    service = initialize_service()
In the previous script:
Now, when you type
$ python analytics_service_object.py
you will see, in a browser window, the consent screen you customized before. This means that your Project is asking your permission to access your Analytics account through the API. After clicking yes, your new credentials will be stored in TOKEN_FILE_NAME so that you won’t have to enter them again (except when the access_token expires).
Once we have an authorized Analytics service object, we can use it to retrieve all the data in the user’s analytics accounts.
For example, to get a list of all the existing accounts of the user, just type:
accounts = service.management().accounts().list().execute()
This will give you a dictionary containing the following keys:
As we will see, this is a common structure when getting data from analytics, even when we ask for properties or views instead of accounts (the returned object has the same keys).
Moreover, the items value is a list of accounts, each of which is in turn a dictionary with keys:
Therefore, you can get a list of your users accounts with:
def get_accounts_ids(service):
    accounts = service.management().accounts().list().execute()
    ids = []
    if accounts.get('items'):
        for account in accounts['items']:
            ids.append(account['id'])
    return ids
You can also see the account ids in the Google Analytics web. You have to go to the Admin tab, and open the top-left drop down menu. There, your different accounts will be displayed, with their id on the right.
But as you may know, each Account can have multiple Properties, each of which has a different tracking code. To obtain a list of the Properties inside the Account with an id of account_id, you can use:
webproperties = service.management().webproperties().list(
    accountId=account_id).execute()
where webproperties is a dictionary with the same keys as accounts, but in which
Again, each web property is a dictionary that contains the keys:
and many more (you can print the webproperties object to see its keys).
You’ll see that the web property id is the tracking code of this property, which you can also obtain in the Google Analytics Admin tab.
But there is another level! Inside each Property there can be multiple views! You can obtain a list of views (or profiles) of each web property with:
profiles = service.management().profiles().list(
    accountId=firstAccountId,
    webPropertyId=firstWebpropertyId).execute()
The profiles dictionary contains the same keys as accounts and webproperties, but with
and each profile has:
Now that we know how to get information about our accounts, properties and views, let’s obtain the number of sessions of a view during a period of time.
Create the file get_sessions.py and write:
from analytics_service_object import initialize_service


def get_sessions(service, profile_id, start_date, end_date):
    ids = "ga:" + profile_id
    metrics = "ga:sessions"
    data = service.data().ga().get(
        ids=ids, start_date=start_date, end_date=end_date, metrics=metrics
        ).execute()
    return data["totalsForAllResults"][metrics]


if __name__ == '__main__':
    service = initialize_service()
    profile_id = "your_profile_id"
    print get_sessions(service, profile_id, "2014-09-01", "2014-09-30")
Note: you have to add your view id in “your_profile_id”, and then, run this script with:
$ python get_sessions.py
Check all the functionalities of the service.data().ga().get() method, and retrieve all the data you want form your view!
Obtaining the number of sessions for each traffic source (i.e. organic, referral, social, direct, email and other) is a little bit trickier. You have to work with filters in order to segment your data.
Here’s a little script that does this, thanks to Michael for the update ![]()
from analytics_service_object import initialize_service

def get_source_group(service, profile_id, start_date, end_date):
    ids = "ga:" + profile_id
    metrics = "ga:sessions"
    dimensions = "ga:channelGrouping"
    data = service.data().ga().get(
        ids=ids, start_date=start_date, end_date=end_date, metrics=metrics,
        dimensions=dimensions).execute()
    return dict(
        data["rows"] + [["total", data["totalsForAllResults"][metrics]]])


if __name__ == '__main__':
    service = initialize_service()
    profile_id = "your_profile_id"
    start_date = "2014-09-01"
    end_date = "2014-09-30"
    data = get_source_group(service, profile_id, start_date, end_date)
    for key, value in data.iteritems():
        print key, value
Again, add your view’s id in “your_profile_id”, and change the start_date and end_date to match the time interval you want.
After running this script, you’ll see the desired information in your terminal.
Another solution to get the number of sessions by traffic source, less optimized but instructive, is to use filter instead of dimensions:
from analytics_service_object import initialize_service


not_source_filters = {
    "social": "ga:hasSocialSourceReferral==No",
    "organic": "ga:medium!=organic",
    "direct":  "ga:source!=(direct),ga:medium!=(none);ga:medium!=(not set)",
    "email": "ga:medium!=email",
    "referral": "ga:medium!=referral,ga:hasSocialSourceReferral!=No"
}

source_filters = {
    "social": "ga:hasSocialSourceReferral==Yes",
    "organic": "ga:medium==organic",
    "direct":  "ga:source==(direct);ga:medium==(none),ga:medium==(not set)",
    "email": "ga:medium==email",
    "referral": "ga:medium==referral;ga:hasSocialSourceReferral==No",
    "other": "%s;%s;%s;%s;%s" % (
        not_source_filters["social"], not_source_filters["organic"],
        not_source_filters["direct"], not_source_filters["email"],
        not_source_filters["referral"])
}


def get_source_sessions(service, profile_id, start_date, end_date, source):
    ids = "ga:" + profile_id
    metrics = "ga:sessions"
    filters = source_filters[source]
    data = service.data().ga().get(
        ids=ids, start_date=start_date, end_date=end_date, metrics=metrics,
        filters=filters).execute()
    return data["totalsForAllResults"][metrics]


if __name__ == '__main__':
    service = initialize_service()
    profile_id = "your_profile_id"
    start_date = "2014-09-01"
    end_date = "2014-09-30"
    for source in ["social", "organic", "direct", "email", "referral", "other"]:
        print source, get_source_sessions(
            service, profile_id, start_date, end_date, source)
Again, add your view’s id in “your_profile_id”, and change the start_date and end_date to match the time interval you want.
After running this script, you’ll see the desired information in your terminal.
Some information you may find useful when working with filters:
That’s all for today! ![]()
Please, +1 if was useful and share it with your friends! Thaaanks!
![]()
![]()
![]()
![]()
![]()
The post Use the Google Analytics API with Python appeared first on Marina Mele's site.
When you remove a Django Model or a full app in Django, you have to be careful in how you do it, and how the database will be affected.
Thus, in this short post I’ll explain what I do when deleting a model or an app.
Weather you’re removing a single model or a full app, you should first remove the desired models from the models.py file.
Moreover, you have to make sure that no other file imports these models or uses them (admin.py, views.py, etc).
Next, run South or migrate your database to properly delete these models from your database.
If you are using South, you should run something like
$ python manage.py schemamigration --auto your-app
$ python manage.py migrate your-app
changing your-app by the name of the app to migrate (where your deleted models were).
Next, if you are removing an entire app, you can now remove all the files in that app (models.py, views.py, etc). Again, make sure that the other apps don’t make an import from these files.
And finally, remove this app from your Installed Apps in the settings.py file.
But after doing all this, you will still have remnants of your models in the ContentType table, like permissions related to the deleted models.
One way to see this is when creating a Group in the Auth app using the admin. When you have to choose the permissions of the group, the box will show permissions that refer to the deleted models.
To clean these tables, we will create the file clean_model_app_remove.py and write the following:
from django.contrib.contenttypes.models import ContentType

# List of deleted apps
DEL_APPS = ["app-you-deleted", "second-app-deleted"]
# List of deleted models (that are not in the app deleted) In lowercase!
DEL_MODELS = ["model-you-deleted", "second-model-deleted"]

ct = ContentType.objects.all().order_by("app_label", "model")

for c in ct:
    if (c.app_label in DEL_APPS) or (c.model in DEL_MODELS):
        print "Deleting Content Type %s %s" % (c.app_label, c.model)
        c.delete()
where you should write in DEL_APPS the apps that you deleted, and in DEL_MODELS the models that you delete and that do not belong to any of the deleted apps. Moreover, note that the models have to be written in lowercase.
Finally, we just need to run our script with
$ python manage.py shell
>>>execfile("clean_model_app_remove.py")
Great! Now we cleanly removed our apps/models! ![]()
The post How to correctly remove a Model or an App in Django appeared first on Marina Mele's site.
To manage this website, I changed from Blogger to WordPress because I wanted to convert my Blog into a Website. I liked the idea to have structured pages where people could navigate through, and at the same time, maintain the Blog in a subfolder.
In this post, I want to share some WordPress plugins I installed for the website, and that helped me obtain the look and feel that I wanted. For example, a plugin for security aspects, like attempts to enter to your admin site, or a plugin for Search Engine Optimization (SEO), which gives you some tips that improve how search engines see your content.
One of the first things you should care about is security. Is anybody trying to access to your WP Admin interface? How can you block them? Is there someone making automated requests to your site?
To manage these issues, you can use a security plugin like iThemes Security, which among other things:![]()
When developing a site, it’s very useful to have a copy in a local environment, e.g. in your computer. This way, you can modify all the files and see the changes automatically, without having to upload them into the server.
Moreover, once you are satisfied with the changes you’ve made, you should upload them into a pre-production environment. This environment should be as similar as possible to the production environment (same server, same kind of database, etc). This way, you can catch some unexpected error before going to production.
One way to move all the WordPress site between your local, pre-production and production environments is to use a plugin like Duplicator. It allows you to duplicate, clone, backup, move and transfer an entire site from one location to another.
If you want to see a detailed description in how you can create a local environment and use Duplicator to move the local WordPress installation into your production environment, check this post.
At some point during the development process, and before the website goes live, you have to work in the production environment (or at least having it active). In these cases, you don’t want that users see the current content of your site, because it’s probably unfinished and with some style issues. However, at the same time you want to inform them that the page is still in working process, using a page with the message Coming Soon or Page under construction.
A similar argument applies when your site is running through some technical issues and you need to stop the user from visiting your site. In this case, you can show him a Maintenance Page to inform about the specific issue, and predict when the site will be active again.![]()
To manage these cases, you can use the plugin Coming Soon Page & Maintenance Mode, which is very easy to implement. Basically, it prevents unregistered users to see the contents of your site by showing them a Coming Soon or a Maintenance page (depending on which you have defined).
At the same time, it allows registered users (like admin, writers, etc) to see both the contents and the admin interface. This way you can still work, develop, and add new content in your site.
Have you heard about SEO? It stands for Search Engine Optimization, and basically it means that you should optimize your posts so that search engines like Google or Bing know what your post talks about. This way, when someone searches for the topic of your post, it will appear amongst the first entries.
This is very, very important. Studies have shown that people clicks on one of the first three results of Google around 60% of the time. And less than 10% of the users clic on a result in the second page of results! So placing your website among the first results can make a difference regarding the amount of traffic to your website!
The WordPress SEO plugin helps you improve the optimization of your posts. It have many functionalities, in particular:
This plugin is a must-have, don’t wait to install it!
The default WordPress Editor lacks from several functionalities that we are used to have in our day-to-day text editor.
The TinyMCE Advanced plugin allows you to add buttons in your editor to control some extra functionalities, like the font family, font size or background color, and at the same time it provides you with buttons to use as a shortcuts of the usual functionalities, like the Formats menu or the horizontal line.


Another useful plugin for your text editor is the Shortcodes Ultimate plugin, which adds a button in your editor to insert a variety of WordPress shortcodes, like spoiler lists, carousel images, audio, etc.
And finally, for those of you who write technical posts like me, I recommend the Crayon Syntax Highlighter plugin.
It adds a small button in your text editor that opens a nice code editor. There, you can select the language of your code (Python, Java, etc) so it will highlight it accordingly. Moreover, there are many options to customize the style of the code snippets, colors, numbered lines, interactivity, etc.
For every post and page of your site, you probably want to add buttons for sharing your content in social media. The Share Buttons plugin lets you do exactly that.
You can choose which social media buttons you want to include, like Google+, Facebook, Twitter or Reddit, and in some cases, even add a share counter.
Moreover, apart from the usual place of the sharing buttons, just after the post title, or at the end of the post, you can have a floating right menu with your buttons. The good thing about this method is that these buttons are visible anytime by the user. To you see them right now on the right of your screen? Sorry for the mobile users, they are hidden for you ![]()


Next on the list is the Social Comments plugin. Basically, it allows users to comment and share your posts on any of these social media: Google+, Facebook and Disqus.
For example, if you want to migrate a Blogger Blog into WordPress, I’m sure you would like to maintain your Google+ comments. Yeah, this website is an example for this case too ![]()
Finally, in this last section I will talk about the Widget functionality. Widgets are small pieces that customize the look and usability of your site.
Usually, you can place widgets in your sidebar or your footer, but depending on your specific Theme, you may have extra spaces.
WordPress comes with some default widgets to add, like a list of Categories of your posts, a Calendar, or a list of the recent comments. However, you may want to include much more things there! ![]()
One plugin I really like is Widget Logic, which as the name suggests, it allows to add some logic into your plugins. For example, you may want to show one widget or another depending on if you’re in a page or in post, or only show a specific widget for a particular post.


Another important widget is the Enhanced Text Widget, which allows you to write HTML, CSS, JavaScript, Flash, Shortcodes or PHP content inside your widget. This might be useful when you want to insert some piece of code in your website, like for example, a MailChimp form.
Next, you can use the Custom Meta Widget to customize the default WordPress Meta Widget. This is the one responsible for showing the login, admin, entry and comment feed. The problem is that in the default Meta Widget you can’t control which links to show, but with this widget you can ![]()


And finally, the last widget I will mention here is the BE Subpages Widget. Basically, it allows you to display another menu as a widget. For example, if your theme don’t implement a menu in your sidebar, you can create one and add it using this widget it your sidebar ![]()
That’s all!
Do you have other useful widgets that you want to share? Write your comments above! ![]()
The post 13 WordPress Plugins to improve your Website appeared first on Marina Mele's site.
Do you want to share a Python script to a friend that doesn’t have Python installed? In this post you’ll learn how ![]()
With the py2app package you can compile a Python script and create a portable Mac application. If you’re using windows, you can check py2exe.
First of all, we need to install the py2app python package. If you have a virtual environment, activate it now ![]()
$ pip install -U py2app
Next, we need to create a setup.py file for our project. In your working directory (the one that contains your Python script), type:
$ py2applet --make-setup MyApplication.py
This will create the file setup.py, which is responsible to tell setuptools how to build your application.
If you edit this file, you should see something like:
"""
This is a setup.py script generated by py2applet

Usage:
    python setup.py py2app
"""

from setuptools import setup

APP = ['MyApplication.py']
DATA_FILES = []
OPTIONS = {'argv_emulation': True}

setup(
    app=APP,
    data_files=DATA_FILES,
    options={'py2app': OPTIONS},
    setup_requires=['py2app'],
)
You should put the name of your starting python script (the one your run to start) in the APP variable.
APP = ['application_name.py']
Also, if your application uses some data files, like a json or a txt file, you should include it in DATA_FILES. For example:
DATA_FILES = ['myfile.json', 'myfile.txt']
Now, we will compile our project in Alias mode. This instructs py2app to build an application that uses the source data files in-place. Note that this means that the application will not be portable to other machines (we’ll do that next!).
$ python setup.py py2app -A
You will have two new folders inside your working directory: build and dist. The first one is used for building your app (you don’t have to touch it) and the second one contains your application bundle.
From the working directory, you can run your app using:
$ ./dist/application_name.app/Contents/MacOS/application_name
or you can find your application in Finder and open it from there (you’ll find it in dist/application_name).
Once your application is running, we are ready to create the stand alone version. First remove the build and dist folders with:
$ rm -rf build dist
and next, build your application:
$ python setup.py py2app
During the building process, I encounter some problems with the ModuleGraph package (remember that this package is installed at the same time as py2app).
If you get one of the following errors:
AttributeError: 'ModuleGraph' object has no attribute 'scan_code'
AttributeError: 'ModuleGraph' object has no attribute 'load_module'
Edit the file where this error ocured (for me, it was inside the virtual environment folder, named myenv), at:
myenv/lib/python2.7/site-packages/py2app/recipes/virtualenv.py
Look for the functions scan_code or load_module and add it an underscore before them, _scan_code and _load_module. Build again your application, it should work now ![]()
Next, try to run your app, and see if it works.
If you get errors with external packages, like certificates with httplib2 or requests, missing files in selenium webdriver, or import errors that normally work, you’ll have to fully include these packages in your application. Edit again the setup.py file and add the package that raised the error:
OPTIONS = {
    'argv_emulation': True,
    'packages': ['httplib2', 'requests', 'selenium']
    }
After saving the file, remove again the build and dist directories, build your application and try to run it. Maybe another package failed? Try to include it in the setup file and start over.
However, not all the errors you get will be solved like this, sorry…!
Once you’re application runs correctly, and you’re happy with the results, you can share it by copying the application bundle dist/application_name.
That’s all! Hope it was useful!
And please, don’t forget to share it with your friends, they might find it useful too ![]()
The post From a Python script to a portable Mac application with py2app appeared first on Marina Mele's site.
Google Analytics is a powerful tool that gives you useful insight about the traffic that arrives in your website. But together with Django, you will be able to retrieve data of your Analytics account and display it to the user, on demand.
In this post you’ll learn how to put together Django, the oauth2 protocol and the Google Analytics API.
Let’s Start! ![]()
First of all, you might want to check this post if you’re not familiar with the Google Analytics API with Python.
Moreover, it assumes that you are familiar with Python and pip, and that you know Django and have a working application. If you navigate into the Python and Django sections of this website you’ll learn more about those ![]()
I assume you have a working Django application, and that you want to extract data from your Google Analytics account using an existing Project. If you didn’t create a Project in the Google Developers Console, check this post and create one. Then, come back ![]()
But if you have a live Django project, then you need to create a Web application instead. You just need to select Web application as the Application type when you are creating a Client Id in the Credentials section:

In Authorized Javascript origins insert your website domain, and in authorized redirect uris, insert your domain plus /oauth2/oauth2callback. This endpoint will be used by django to catch the oatuh2 response.
After that, you should have the Oauth credentials in a json format.
You can obtain it from the Google Developers Console. Go to your project and then select APIs & Oauth credentials –> Oauth and click on Download JSON.
Next, we need to install the oaut2client python package. Activate your virtual environment (if you have one) and type:
$ pip install oauth2client
This will install oauth2client and the following packages: httplib2 (an http library), pyasn1 and pyasn1-modules (to use the ASN.1 protocol), and rsa to use the RSA cryptosystem).
Learn how to create one here, for Python 2.7 and for Python 3. It’s really useful, once you start using them you won’t stop! ![]()
Don’t forget to add these packages into the requirements file of your virtual environment.
And also, we will need the API Python Client library:
$ pip install python-gflags
$ pip install -U google-api-python-client
Next, we will create a Django app to manage the Authorization process. Depending on where you want to create the app’s folder, you will run a slightly different command (this one will create the folder in the current directory):
$ python manage.py startapp oauth2_authentication
Take the client_secrets.json file and save it inside this app, and include this app into your settings.py file, in the INSTALLED_APPS.
Now that we have the app created, we are going to create two different models that will store the Flow and Credential objects.
Edit the models.py inside the oaut2_authentication app and write:
from django.db import models
from django.contrib.auth.models import User
from oauth2client.django_orm import FlowField, CredentialsField


class FlowModel(models.Model):
    id = models.ForeignKey(User, primary_key=True)
    flow = FlowField()


class CredentialsModel(models.Model):
    id = models.ForeignKey(User, primary_key=True)
    credential = CredentialsField()
Next, we’ll edit the urls of your app. First, open the main urls.py and add the following urlpattern:
url(r'^oauth2/', include('oauth2_authentication.urls', namespace="oauth2"))
And in the oauth2_authentication/urls.py write:
from django.conf.urls import patterns, url
from . import views

urlpatterns = patterns(
    '',
    url(r'^$', views.index, name='index'),
    url(r'oauth2callback', views.auth_return, name='return'),
)
This way, /oauth2 will start the authorization process, and /oauth2/oaut2callback will wait for the authorization response.
But we need to write our views.py first:
import os
import httplib2
from oauth2client import xsrfutil
from oauth2client.client import flow_from_clientsecrets
from oauth2client.django_orm import Storage

from apiclient.discovery import build

from django.contrib.auth.decorators import login_required
from django.http import HttpResponseBadRequest
from django.http import HttpResponseRedirect
from django.shortcuts import render
from django.conf import settings
from django.contrib.auth import get_user_model
from django.core.urlresolvers import reverse
from django.contrib.sites.models import get_current_site

from .models import CredentialsModel, FlowModel

CLIENT_SECRETS = os.path.join(
    os.path.dirname(__file__), 'client_secrets.json')


def get_accounts_ids(service):
    accounts = service.management().accounts().list().execute()
    ids = []
    if accounts.get('items'):
        for account in accounts['items']:
            ids.append(account['id'])
    return ids


@login_required
def index(request):
    # use the first REDIRECT_URI if you are developing your app
    # locally, and the second in production
    # REDIRECT_URI = 'http://localhost:8000/oauth2/oauth2callback'
    REDIRECT_URI = "https://%s%s" % (
        get_current_site(request).domain, reverse("oauth2:return"))
    FLOW = flow_from_clientsecrets(
        CLIENT_SECRETS,
        scope='https://www.googleapis.com/auth/analytics.readonly',
        redirect_uri=REDIRECT_URI
    )
    user = request.user
    storage = Storage(CredentialsModel, 'id', user, 'credential')
    credential = storage.get()
    if credential is None or credential.invalid is True:
        FLOW.params['state'] = xsrfutil.generate_token(
            settings.SECRET_KEY, user)
        authorize_url = FLOW.step1_get_authorize_url()
        f = FlowModel(id=user, flow=FLOW)
        f.save()
        return HttpResponseRedirect(authorize_url)
    else:
        http = httplib2.Http()
        http = credential.authorize(http)
        service = build('analytics', 'v3', http=http)
        ids = get_account_ids(service)
        return render(
            request, 'oauth2_authentication/main.html', {'ids':ids})


@login_required
def auth_return(request):
    user = request.user
    if not xsrfutil.validate_token(
            settings.SECRET_KEY, request.REQUEST['state'], user):
        return HttpResponseBadRequest()
    FLOW = FlowModel.objects.get(id=user).flow
    credential = FLOW.step2_exchange(request.REQUEST)
    storage = Storage(CredentialsModel, 'id', user, 'credential')
    storage.put(credential)
    return HttpResponseRedirect("/oauth2")
Note that you have to choose which REDIRECT_URI to use, depending on if you are developing your Django app locally or your app is live on a server.
Inside the FLOW object, we have used the readonly scope, but you could also choose:
https://www.googleapis.com/auth/analytics for writing permissions, and https://www.googleapis.com/auth/analytics.manage.users to view and manage permission of users in the Analytics accounts (more info).
And finally, write something in the oauth2_authentication/main.html template, like:
Your credentials are up to date! :-)

{% if ids %}
The List of Ids of your Google Analytics accounts are: {{ids}}
{% endif %}
Now you just need to start the server and visit /oauth2 to start the authentication process. If everything worked correctly, you should see the list of ids of your Google Analytics account.
Note that once you have the Google Analytics service object you can retrieve all the data you want from your accounts. To see more examples, you can check this post: Google Analytics API with Python.
The post Use the Google Analytics API with Django appeared first on Marina Mele's site.
When running a complex Python program that takes quite a long time to execute, you might want to improve its execution time. But how?
First of all, you need the tools to detect the bottlenecks of your code, i.e. which parts take longer to execute. This way, you can concentrate in speeding these parts first.
And also, you should also control the memory and CPU usage, as it can point you towards new portions of code that could be improved.
Therefore, in this post I’ll comment on 7 different Python tools that give you some insight about the execution time of your functions and the Memory and CPU usage.
The simpler way to time a function is to define a decorator that measures the elapsed time in running the function, and prints the result:
import time
from functools import wraps


def fn_timer(function):
    @wraps(function)
    def function_timer(*args, **kwargs):
        t0 = time.time()
        result = function(*args, **kwargs)
        t1 = time.time()
        print ("Total time running %s: %s seconds" %
               (function.func_name, str(t1-t0))
               )
        return result
    return function_timer
Then, you have to add this decorator before the function you want to measure, like
@fn_timer
def myfunction(...):
    ...
For example, let’s measure how long it takes to sort an array of 2000000 random numbers:
@fn_timer
def random_sort(n):
    return sorted([random.random() for i in range(n)])


if __name__ == "__main__":
 random_sort(2000000)
If you run your script, you should see something like
Total time running random_sort: 1.41124916077 seconds
Anther option is to use the timeit module, which gives you an average time measure.
To run it, execute the following command in your terminal:
$ python -m timeit -n 4 -r 5 -s "import timing_functions" "timing_functions.random_sort(2000000)"
where timing_functions is the name of your script.
At the end of the output, you should see something like:
4 loops, best of 5: 2.08 sec per loop
indicating that of 4 times running the test (-n 4), and averaging 5 repetitions on each test (-r 5), the best test result was of 2.08 seconds.
If you don’t specify the number of tests or repetitions, it defaults to 10 loops and 5 repetitions.
However, both the decorator and the timeit module are based on Python. This is why the unix time utility may be useful, as it is an external Python measure.
To run the time utility type:
$ time -p python timing_functions.py
which gives the output:
Total time running random_sort: 1.3931210041 seconds
real         1.49
user         1.40
sys          0.08
The first line comes from the decorator we defined, and the other three:
Note: as defined in wikipedia, the kernel is a computer program that manages input/output requests from software, and translates them into data processing instructions for the central processing unit (CPU) and other electronic components of a computer.
Therefore, the difference between the real time and the sum of user+sys may indicate the time spent waiting for input/output or that the system is busy running other external tasks.
If you want to know how much time is spent on each function and method, and how many times each of them is called, you can use the cProfile module:
$ python -m cProfile -s cumulative timing_functions.py
Now you’ll see a detailed description of how many times each function in your code is called, and it will be sorted by the cumulative time spent on each one (thanks to the -s cumulative option).
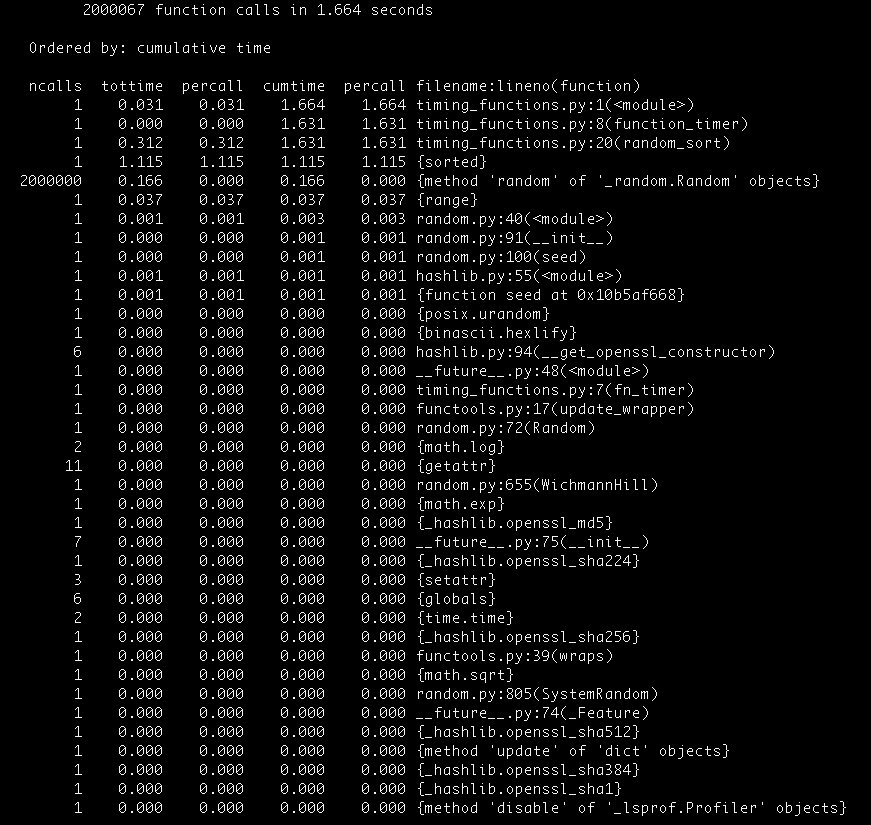
You’ll see that the total amount of time spent on running your script is higher than before. This is the penalty we pay for measuring the time each function takes to execute.
The line_profiler module gives you information about the CPU time spent on each line in your code.
This module has to be installed first, with
$ pip install line_profiler
Next, you need to specify which functions you want to evaluate using the @profile decorator (you don’t need to import it in your file):
@profile
def random_sort2(n):
    l = [random.random() for i in range(n)]
    l.sort()
    return l

if __name__ == "__main__":
    random_sort2(2000000)
Finally, you can obtain a line by line description of the random_sort2 function by typing:
$ kernprof -l -v timing_functions.py
where the -l flag indicates line-by-line and the -v flag indicates verbose output. With this method, we see that the array construction takes about 44% of the computation time, whereas the sort() method takes the remaining 56%.
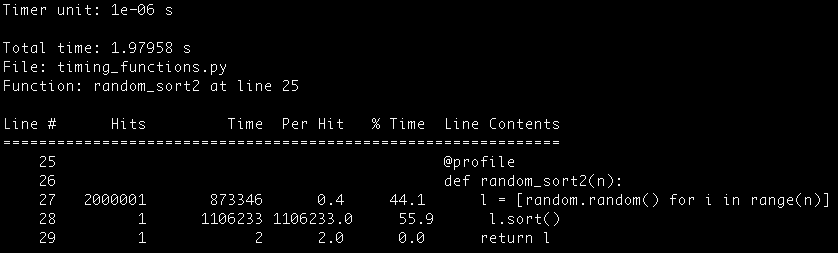
You will also see that due to the time measurements, the script might take longer to execute.
The memory_profiler module is used to measure memory usage in your code, on a line-by-line basis. However, it can make your code to run much more slower.
Install it with
$ pip install memory_profiler
Also, it is recommended to install the psutil package, so that the memory_profile runs faster:
$ pip install psutil
In a similar way as the line_profiler, use the @profile decorator to mark which functions to track. Next, type:
$ python -m memory_profiler timing_functions.py
yes, the previous script takes longer than the 1 or 2 seconds that took before. And if you didn’t install the psutil package, maybe you’re still waiting for the results!

Looking at the output, note that the memory usage is expressed in terms of MiB, which stand for mebibyte (1MiB = 1.05MB).
Finally, with this package you’ll be able to track how many objects of each type (str, tuple, dict, etc) are created at each stage in your code.
Install it with
$ pip install guppy
Next, add it in your code as:
from guppy import hpy


def random_sort3(n):
    hp = hpy()
    print "Heap at the beginning of the function\n", hp.heap()
    l = [random.random() for i in range(n)]
    l.sort()
    print "Heap at the end of the function\n", hp.heap()
    return l


if __name__ == "__main__":
    random_sort3(2000000)
And run your code with:
$ python timing_functions.py
You’ll see something like the following output:
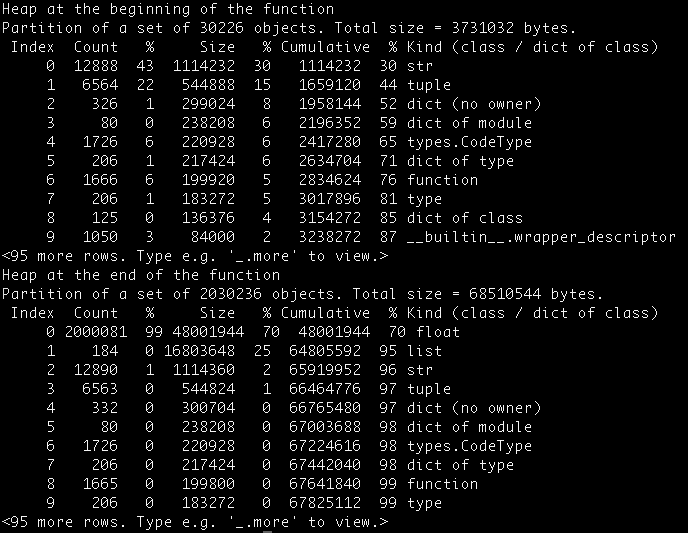
By placing the heap at different places in your code, you can study the object creation and deletion in the script flow.
If you want to learn more about speeding your Python code, I recommend you the book High Performance Python: Practical Performant Programming for Humans, september 2014.
Hope it was useful! ![]()
Don’t forget to share it with your friends!
The post 7 tips to Time Python scripts and control Memory & CPU usage appeared first on Marina Mele's site.
Imagine what would you do if you could automate all the repetitive and boring activities you perform using internet, like checking every day the first results of Google for a given keyword, or download a bunch of files from different websites.
In this post you’ll learn to use Selenium with Python, a Web Scraping tool that simulates a user surfing the Internet. For example, you can use it to automatically look for Google queries and read the results, log in to your social accounts, simulate a user to test your web application, and anything you find in your daily live that it’s repetitive. The possibilities are infinite! ![]()
*All the code in this post has been tested with Python 2.7 and Python 3.4.
Selenium is a python package that can be installed via pip. I recommend that you install it in a virtual environment (using virtualenv and virtualenvwrapper).
Learn how to create one here, for Python 2.7 and for Python 3. It’s really useful, once you start using them you won’t stop! ![]()
Remember that to create the environment in Python 2.7, just type:
$ mkvirtualenv selenium_env
and in Python 3:
$ mkvirtualenv --python=/usr/local/bin/python3 selenium_env
where you should use your own Python 3 path.
Note: if you don’t want to use a virtual environment, you can still install the packages directly on you computer.
To install selenium, you just need to type:
$ pip install selenium
In this post we are going to initialize a Firefox driver — you can install it by visiting their website. However, if you want to work with Chrome or IE, you can find more information here.
Once you have Selenium and Firefox installed, create a python file, selenium_script.py. We are going to initialize a browser using Selenium:
import time
from selenium import webdriver

driver = webdriver.Firefox()
time.sleep(5)
driver.quit()
This just initializes a Firefox instance, waits for 5 seconds, and closes it.
Well, that was not very useful…
How about if we go to Google and search for something?
Let’s make a script that loads the main Google search page and makes a query to look for “Selenium”:
import time
from selenium import webdriver
from selenium.webdriver.common.by import By
from selenium.webdriver.support.ui import WebDriverWait
from selenium.webdriver.support import expected_conditions as EC
from selenium.common.exceptions import TimeoutException


def init_driver():
    driver = webdriver.Firefox()
    driver.wait = WebDriverWait(driver, 5)
    return driver


def lookup(driver, query):
    driver.get("http://www.google.com")
    try:
        box = driver.wait.until(EC.presence_of_element_located(
            (By.NAME, "q")))
        button = driver.wait.until(EC.element_to_be_clickable(
            (By.NAME, "btnK")))
        box.send_keys(query)
        button.click()
    except TimeoutException:
        print("Box or Button not found in google.com")


if __name__ == "__main__":
    driver = init_driver()
    lookup(driver, "Selenium")
    time.sleep(5)
    driver.quit()
In the previous code:
Finally, run your code with:
$ python selenium_script.py
Did it work? If you got an ElementNotVisibleException , keep reading!
Google search has recently changed so that initially, Google shows this page:

and when you start writing your query, the search button moves into the upper part of the screen.

Well, actually it doesn’t move. The old button becomes invisible and the new one visible (and thus the exception when you click the old one: it’s not visible to click!).
We can update the lookup function in our code so that it catches this exception:
from selenium.common.exceptions import ElementNotVisibleException

def lookup(driver, query):
    driver.get("http://www.google.com")
    try:
        box = driver.wait.until(EC.presence_of_element_located(
            (By.NAME, "q")))
        button = driver.wait.until(EC.element_to_be_clickable(
            (By.NAME, "btnK")))
        box.send_keys(query)
        try:
            button.click()
        except ElementNotVisibleException:
            button = driver.wait.until(EC.visibility_of_element_located(
                (By.NAME, "btnG")))
            button.click()
    except TimeoutException:
        print("Box or Button not found in google.com")
To sum up, I’ve created a table with the main methods used here.
Note: it’s not a python file — don’t try to run/import it ![]()
# INITIALIZE DRIVER
from selenium import webdriver
from selenium.webdriver.support.ui import WebDriverWait

driver = webdriver.Firefox()
driver.wait = WebDriverWait(driver, 5)


# WAIT FOR ELEMENTS
from selenium.webdriver.common.by import By
from selenium.webdriver.support import expected_conditions as EC

element = driver.wait.until(
    EC.presence_of_element_located(
    EC.element_to_be_clickable(
    EC.visibility_of_element_located(
        (By.NAME, "name")
        (By.ID, "id")
        (By.LINK_TEXT, "link text")
        (By.PARTIAL_LINK_TEXT, "partial link text")
        (By.TAG_NAME, "tag name")
        (By.CLASS_NAME, "class name")
        (By.CSS_SELECTOR, "css selector")
        (By.XPATH, "xpath")
    )
)


# CATCH EXCEPTIONS
from selenium.common.exceptions import
    TimeoutException
    ElementNotVisibleException
That’s all! Hope it was useful! ![]()
Don’t forget to share it with your friends!
The post Selenium Tutorial: Web Scraping with Selenium and Python appeared first on Marina Mele's site.
In this post we’ll talk about the Atom editor which is, as they say, A hackable text editor for the 21st Century.
It’s a really nice, open source and modern editor, with a broad community that provides different and new packages and functionalities. Have you tried it yet?
Here, you’ll learn how to install it and how to configure it to write Python code. Let’s start! ![]()
First, download Atom from the official webpage.
Once installed, if you have a Mac or Windows, you’ll have two commands available: atom and apm. The first one is for opening the Atom editor, and the second one for installing Atom packages. We’ll see an example of both in the following.
Let’s start by creating a Python file with:
$ atom myfile.py
This will open the file in Atom, and you’ll see the containing folder with all its contents on the left sidebar.
In the new file, if you type de, you’ll see that it suggests if you want to create a new function. This is because Atom has detected that the file extension is a Python extension.
![]()
If you type the Tab key, you’ll see a template for a new function:
![]()
Note that you have the fname highlighted. This is because you can now type the name of your function and it will replace fname. Let’s name our function product.
Next, if you hit the Tab key again, the arguments of the function, arg, will be now selected. Just write x, y, as we need two different arguments for our function.
Finally, hit the Tab key again to select the body of our function, pass, and replace it for our code. The end function should be something like:
def product(x,y):
    return x * y
Also notice the blue circle next to the file name. This means that there are unsaved changes in your current file. You can save it just typing the usual cmd+c (or ctrl+c in windows).
Linter is an Atom package that provides a top level API so that there is a unification among all the linter atom plugins. This means that all the extra packages that you install, that highlight your code (for example to detect errors) will use a unified method.
To install it, just type:
$ apm install linter
Next, we’re going to install a Python Linter package, to help us detect errors in our Python code.
This package is called linter-flake8 and it’s an interface to flake8. To install it, you need to run:
$ pip install flake8
$ pip install flake8-docstrings
$ apm install linter-flake8
You must restart Atom to see the changes. For example, if we add the folling line of code in our file:
y = product(a, b)
without specifying what a or b are, we’ll see the following in our Atom screen:
![]()
If you open Atom and you find an error that says
The linter binary flake8 cannot be found
You will need to open the Atom init script (Atom –> Open your Init Script) and write the following:
process.env.PATH = ['/usr/local/bin/', process.env.PATH].join(':')
Restart Atom the apply these changes. It should work now ![]()
Moreover, there are Linters for other languages like HTML, CSS or Javascript. You can find a list here.
Here I’ll show you how you can configure Atom to follow PEP8, the official Python styling guide.
First, open the Atom –> Preferences window.
1. Use spaces instead of tabs.
Scroll down the Settings panel until you see the Soft Tabs option. Make sure it’s checked. This setting will convert tabs into spaces automatically.
![]()
2. Set the tab length to 4 spaces
A little below the Soft Tab setting, you”ll see the Tab Length. Set it to 4 spaces.
3. Automatic PEP8 validation.
If you installed the linter-flake8 package discussed in the previous section, you already have automatic PEP8 validation ![]()
In the same Preferences panel, you can see the Keybindings menu on the left. There, you’ll find a list of all the default keybindings active in your Atom editor.
However, by default, Atom confirms an autocomplete suggestion with both the Tab and Enter keys. But I only want to use the Tab key.
In order to disable Enter as an autocomplete confirm key, we need to go to the Keybindings menu where you’ll see a link that says your keymap file. Click on that link to open the keymap.cson file.
There, you need to write:
# Disable Enter key for confirming an autocomplete suggestion
'atom-text-editor:not(mini).autocomplete-active':
  'enter': 'editor:newline'
Save the file and you’ll see the changes immediately. No need to restart Atom ![]()
Project manager: a package for saving your projects.
Atom Django: Django support for Atom
Minimap: Displays a small map of the current file on the right side of your document (like Sublime Text by default).
Do you use other Packages? Write a comment below about them! ![]()
The post Install and Configure the Atom Editor for Python appeared first on Marina Mele's site.
The intuitive WordPress has become the most popular CMS (Content Management System), both by individuals and by companies. The fact that this platform is used in 25% of the Internet websites certify its undeniable popularity, and at the same time helps to understand why developers not using WordPress are wasting a huge opportunity.
Although there are a lot of causes that explain the success and its acceptation grade, some of the main reasons are the simplicity, flexibility and power that it offers to the developers when they have to create themes or plugins. Because of this, some developers say that despite they work with a CMS, they have the feeling that nothing is impossible to do.
Before starting to develop our theme, I recommend to make a new naked WordPress installation in a remote or local server. This is because in order to test our theme, we need to have it active.
In this post I’ll assume that you know how to install and configure a WordPress site, that you know how to access your server via FTP, and that you know HTML, CSS and have some notions of PHP.
As you may know, WordPress installs all themes in the themes directory, located inside the wp-content folder:
![]()
To begin to develop our theme, we can create a new folder with any name we want (don’t use special characters or spaces). However, keep in mind that to add a new directory inside themes doesn’t make WordPress understand that there exists a new theme to use. To offset this problem, we need at least two new files.
![]()
At the moment, we have the minimum required files for WordPress to detect a new theme. If we open the Theme Manager in our WordPress installation we’ll see something like this:
![]()
![]()
Notice that when we see something like this, it’s because WordPress has already detected our new theme.
Next we’ll improve the Theme Manager preview, to make it more attractive to potential users.
Now is the moment to open our style.css file and add, in comment format, some parameters at the top of the document. It’s very important to keep exactly the same structure that we show below, so that WordPress doesn’t have problems in understanding the parameters.
/*
Theme Name: My First WordPress Theme
Template Theme URI: http://my-website.com/my-first-wordpress-theme
Author: Your name here
Description: A description about your theme here.
Version: 1.0
*/
After this action, in the WordPress Theme Manager we’ll see something like this:

In this example only some of the possible parameters are defined (you can find the full set of options here).
Our advice is that you don’t only copy and paste the code: try to write it, change the parameters, put a cool name to your template, test and change the parameters… and check what happens in every situation. Additionally, we encourage you to continue these suggestions in any step we take. Dare to experiment without fear!
In order to complete our theme preview in the Theme Manager, we need to add a screenshot of the theme final look. As our theme consists on a white page, we’ll add a default image to illustrate this step.
This image should be renamed as screenshot, of 800x660px and preferably has to be in .png format (although .jpg, .jpeg or .gif are also valid formats). Moreover, it has to be placed inside the root directory of our theme, at the same level of the index.php and style.css files.
![]()
Now, our theme has a better look in the Theme Manager, right?
![]()
![]()
The next step is to add the rest of the files that we’ll use throughout this tutorial. All these files have their name defined by WordPress:
After creating these files, the directory of our theme must to be like this:
![]()
Note that we have just created these files, and are empty. Therefore, they do nothing by themselves. They simply are the files that WordPress will look for depending on each situation. Some of these files, for example the header.php, the footer.php or the sidebar.php, have to be added manually inside other templates.
Great! we already have the needed structure to create a functional theme in WordPress. The last step that we need to do is leave the theme active. It will be a white page, but this way we can start to see all our progresses that we are doing.
You can see the original post in spanish here.
See you at the next post!
When I was fourteen I read a book named “Learning to travel around the Internet”, which had a little HTML introduction in the last two chapters. These twenty-four pages changed my life forever. From that day, I never stopped working and learning about my two vocations, web developing and graphic design. As a front-end developer, I have specialized in Wordpress developing, web architecture and the design at the service of usability.
The post How to create a WordPress theme from scratch (I) appeared first on Marina Mele's site.
In this post we’re going to study the third-grade algorithm to compute the product of two numbers, and we’re going to compare it with a much more efficient algorithm: The Karatsuba multiplication algorithm.
Did you know that these two algorithms are the ones used in the built in Python multiplication?
We will talk about the Order of both algorithms and give you Python implementations of both of them.
Maybe you’re thinking, why is she writing now about algorithms? Some time ago, I took the course Algorithms: Design and Analysis, Part 1&2, by Tim Roughgarden, and it was a lot of fun.
Now I’m taking the course again, but I’m spending more time to review the algorithms and play with them. I really encourage you to take the course if you have some time. But first, read this post ![]()
This is the outline:
Let’s start! ![]()
First, we’re going to review the third grade algorithm, which all of you already know ![]()
Let’s start with these two numbers: 5678 x 1234. In order to compute their product you start with 4*5678, represented as:
  (2)(3)(3)
   5  6  7  8
x  1  2  3 |4|
-------------
2  2  7  1  2
Let’s count the number of operations performed in this step:
– If n is the number of digits of the first number, there are n products and at most n sums (carried numbers).
– So in total, you need 2n operations.
If we continue with the product, we have to repeat n times the same operation (where we assume that n is also the number of digits of the second number):
         5  6  7  8
      x  1  2  3  4
      -------------
      2  2  7  1  2
   1  7  0  3  4
1  1  3  5  6
5  6  7  8
which gives a total of 2n2 operations.
Finally, you need to sum all these numbers,
            5  6  7  8
         x  1  2  3  4
         -------------
         2  2  7  1  2
      1  7  0  3  4
   1  1  3  5  6
+  5  6  7  8
----------------------
   7  0  0  6  6  5  2
which takes around n2 operations more.
So in total, the number of operations is ~3n2, which means that it’s quadratic with the input (proportional to n2).
One point I would like to mention about this algorithm is that it’s complete: no matter what x and y you start with, if you perform correctly the algorithm, the algorithm terminates and finds the correct solution.
Here I give you an example of an implementation of the third grade algorithm, where I have included a Counter for the sum and product operations:
# third_grade_algorithm.py

def counted(fn):
    # Counter Decorator
    def wrapper(*args, **kwargs):
        if "" in args or " " in args:
            return "".join(map(lambda s: s.strip(), args))
        wrapper.called += 1
        return fn(*args, **kwargs)
    wrapper.called = 0
    wrapper.__name__ = fn.__name__
    return wrapper


@counted
def prod(x, y):
    # x, y are strings --> returns a string of x*y
    return str(eval("%s * %s" % (x, y)))


@counted
def suma(x, y):
    # x, y are strings --> returns a string of x+y
    return str(eval("%s + %s" % (x, y)))


def one_to_n_product(d, x):
    """d is a single digit, x is n-digit --> returns a string of d*x
    """
    result = ""
    carry = "0"
    for i, digit in enumerate(reversed(x)):
        r = suma(prod(d, digit), carry)
        carry, digit = r[:-1], r[-1]
        result = digit + result
    return carry + result


def sum_middle_products(middle_products):
    # middle_products is a list of strings --> returns a string
    max_length = max([len(md) for md in middle_products])
    for i, md in enumerate(middle_products):
        middle_products[i] = " " * (max_length - len(md)) + md
    carry = "0"
    result = ""
    for i in range(1, max_length + 1):
        row = [carry] + [md[-i] for md in middle_products]
        r = reduce(suma, row)
        carry, digit = r[:-1], r[-1]
        result = digit + result
    return carry + result


def algorithm(x, y):
    # x, y are integers --> returns an integer, x*y
    x, y = str(x), str(y)
    middle_products = []
    for i, digit in enumerate(reversed(y)):
        middle_products.append(one_to_n_product(digit, x) + " " * i)
    return int(sum_middle_products(middle_products))
Using that algorithm, if you run
$ python -i third_grade_algorithm.py
where (third_grade_algorithm.py is the name of the file), you will run the previous code and terminate with the Python console open. This way you can call your algorithm function and try:
>>> algorithm(6885, 1600)
1101600
>>> print("Suma was called %i times" % suma.called)
Suma was called 20 times
>>> print("Prod was called %i times" % prod.called)
Prod was called 16 times
So it took 20 + 16 = 36 operations to compute the product of these two numbers.
Once we have this code, we can average the number of operations used in the product of n-digit numbers:
def random_prod(n):
    suma.called = 0
    prod.called = 0
    x = randint(pow(10, n - 1), pow(10, n))
    y = randint(pow(10, n - 1), pow(10, n))
    algorithm(str(x), str(y))
    return suma.called + prod.called


def average():
    ntimes = 200
    nmax = 10
    result = []
    for n in range(nmax):
        avg = sum([random_prod(n + 1) for i in range(ntimes)]) / float(ntimes)
        result.append([n + 1, avg])
    return result
In the following figure, we plot the result of the previous experiment when ntimes = 200 samples and nmax = 10 digits:
![]()
We can see that these points fit the curve f(n) = 2.7 n2.
Note that 2.7 < 3, the proportionality factor we deduced before. This is because we were assuming the worst case scenario, whereas the average product takes into account random numbers.
But can we do better? Is there an algorithm that performs the product of two numbers quicker?
The answer is yes, and in the following section we will study one of them: The Karatsuba Algorithm.
Let’s first explain this algorithm through an example:
Imagine you want to compute again the product of these two numbers:
x = 5678
y = 1234
In order to do so, we will first decompose them in a singular way:
x = 5678
a = 56; b = 78
--> x = 100 * a + b
and the same for y:
y = 1234
c = 12; d = 34
--> y = 100 * c + d
If we want to know the product x * y:
xy = (100 * a + b)(100 * c + d) = 100^2 * ac + 100 * (ad + bc) + bd
Where we can calculate the following 3 parts separately:
A = ac
B = ad + bc
C = bd
However, we need two compute two products for the B term. Let’s see how we can compute only one product to reduce calculations ![]()
If we expand the product:
D = (a+b) * (c+d) = ac + ad + bc + bd
we see than the right hand side of the equation contains all A,B and C terms.
In particular, if we isolate B = ad + bc, we get:
B = D - ac - bd = D - A - C
Great! Now we only need three smaller products in order to compute x * y:
xy = 100^2 A + 100(D - A - C) + C
A = ac
B = (a+b)(c+d)
C = bd
Let’s put some numbers into the previous expressions:
xy = 100^2 * A + 100 * (D - A - C) + C
A = ac = 56 * 12 = 672
C = bd = 78 * 34 = 2652
D = (a+b)(c+d) = (56 + 78)(12 + 34) = 134 * 46 = 6164

xy = 100^2 * 672 + 100 * (6164 - 672 - 2652) + 2652
   = 6720000 + 284000 + 2652
   = 7006652
Yes! the result of 1234 * 5678 = 7006652! ![]()
In the next section, we’ll see the pseudo code for the Karatsuba Algorithm and we’re going to translate it into Python code.
In general though, we don’t have 4-digit numbers but n-digit numbers. In that case, the decomposition to be made is:
x = n-digit number
m = n/2 if n is even
m = (n+1)/2 if n is odd

a = 10^m * x1 + x2
--> x1 = First (n-m) digits of x
--> x2 = Last m digits of x
which is slightly different if n is even or odd.
In pseudocode, the Karatsuba Algorithm is:
procedure karatsuba(x, y)
  /* Base Case */
  if (x < 10) or (y < 10)
    return x*y
  /* calculates the number of digits of the numbers */
  m = max(size_base10(x), size_base10(y))
  m2 = m/2
  /* split the digit sequences about the middle */
  a, b = split_at(x, m2)
  c, d = split_at(y, m2)
  /* 3 products of numbers with half the size */
  A = karatsuba(a, c)
  C = karatsuba(b, d)
  D = karatsuba(a+b, c+d)
  return A*10^(2*m2) + (D-A-C)*10^(m2) + C
And the order of this algorithm Ο(nlog23) ≈ Ο(n1.585) is (more info).
Let’s write now the Python code ![]()
def karatsuba(x, y):
    # Base case
    if x < 10 or y < 10:
        return x * y
    # Calculate the number of digits of the numbers
    sx, sy = str(x), str(y)
    m2 = max(len(sx), len(sy)) / 2
    # Split the digit sequences about the middle
    ix, iy = len(sx) - m2, len(sy) - m2
    a, b = int(sx[:ix]), int(sx[ix:])
    c, d = int(sy[:iy]), int(sy[iy:])
    # 3 products of numbers with half the size
    A = karatsuba(a, c)
    C = karatsuba(b, d)
    D = karatsuba(a + b, c + d)
    return A * 10**(2 * m2) + (D - A - C) * 10**m2 + C

assert(karatsuba(1234, 5678) == 7006652)
Which is much simpler than the third-grade algorithm right?
Moreover, if we can compare the number of calculations of this algorithm with respect to the third-grade one:
![]()
where the red line is the Karatsuba algorithm, and the blue lines the 3rd grade one (see above).
Finally, I want to write here one of the quotes mentioned in the Algorithms course, which might encourage you to find a better solution ![]()
The post 3rd-grade & Karatsuba multiplication Algorithms appeared first on Marina Mele's site.
Sometimes, when we talk to our kids, we use phrases that can make them feel responsible for the emotions of adults. In this article, I explain which phrases and what problems there are in using them.
You’ve told your daughter three times to pick up the toy she was playing with and left on the dining room floor, and each time, she didn’t answer or even listen. On the fourth time, you say something like, I’ve told you several times to pick up the toy, you’re making me angry!
Guests have come over for dinner, and your child doesn’t want to sit next to one of them, and the guest says, You don’t want to sit next to me? Oh, you’re making me sad.
You’re trying to do something, and the kids are running around and shouting, and they’re not listening when you tell them to calm down, and eventually you say, Can you stop? You’re making me nervous!
Or some day when you’re playing really well with the kids, you might say, I’m happy when you’re happy.
What’s the problem with these phrases? Well, if you pay attention, these phrases create a direct relationship between the actions of the children and the emotions of the parents or adults. The child is responsible for making their parents angry because they didn’t pick up their toys,. The child is responsible for making a guest sad because they didn’t want to sit next to them. The child is responsible for making their father nervous or the child is responsible for making their mother happy.
Phrases like these end up making children responsible for the emotions of adults. What a heavy burden for a child, don’t you think?
When my children don’t answer me, I feel frustrated. Sometimes I even get angry because I repeat something to them several times, they look at me, and continue playing as if nothing happened.
But it’s important to realize that on the one hand, the child is having a great time, is distracted, absorbed in the game or situation, and their mind is not thinking, I’m going to ignore what my parents say and not answer. It’s happened to me several times when I raise my voice to get their attention and they react with, What happened? Did you say anything?
And on the other hand, it’s me who has a preconceived idea in my mind of what should happen, what we should do, how they should answer or react. And if that idea is not fulfilled, it generates discomfort and frustration for me. Let me explain it a litter bit better:
For example, in my head I think children should pick up their toys when I ask them to. If they don’t listen, I get frustrated and maybe even angry.
We’re running late for school and the children are calmly looking for a toy to take with them on the way. I get stressed because I want to arrive on time and I see that if we continue like this, we won’t make it.
In all these situations, I am responsible for what I feel and how I act, not others. And when I realize and accept it, I start thinking constructively:
When they don’t listen to me, I approach them, touch their arm to get their attention, ask them to look at me for a moment, and when I have their full attention and make sure they are listening, then I can say something like: I see that you’re having a lot of fun playing, but now it’s time for dinner and we need to pick up everything you left in the dining room. After dinner, or tomorrow you can continue playing.
When we’re running late for school, I have to accept that yes, we will be late, but I can look for some game to walk faster to school. And the next day, maybe get up 5 minutes earlier, or not get distracted when we’re all having breakfast, and start the routine of leaving a little earlier.
Why am I explaining all this? Well, because I think it’s important to be aware that we are the only ones responsible for our emotions and how we act on them. This way, we won’t blame our children, and we can also teach them that they are responsible for their emotions.
Phrases like you’re making me angry can make a child feel responsible for the happiness or emotions of adults, which can put a lot of pressure on the child.
If they see their parent sad or angry, they may think, I did something to make them feel that way. But who knows if their parent is feeling that way because of something unrelated to the child, or as often happens, it’s because many things combined. But children can end up feeling guilty and responsible for the emotions of adults.
This can also cause children to be more sensitive to manipulation or emotional blackmail: for example, doing something they’ve been asked to do to make the others happy, whether they be adults, schoolmates, cousins, etc.
But it’s not just that; if they’re sad or angry, they also delegate the responsibility for causing those emotions to someone else. They believe that someone else has caused their emotions, and therefore, they expect someone else to fix them.
Teaching our children that they are responsible for their own emotions and actions gives them control over and teaches how to manage them. We need to teach them that all emotions are natural, and that sometimes they don’t have control over what they feel, but they do have control over how they act.
One of the things that helps me when I read about any topic is examples of how to apply what I just read. They help me think about situations where I can do things differently, where I can improve. But also the opposite: they make it easier for me to remember what I’ve read when I’m in these situations and how to act.
Here are some examples:
We can express our feelings, but do so from the perspective of our responsibility, not blaming others.
I am sad because I had a bad day at work, but I know it will pass.
I am sad because I didn’t get what I wanted, but I need to accept the situation and look for other options.
I am experiencing a lot of frustration right now, but it has nothing to do with you. It’s just something that’s happening within me, and I’m managing it.
Teach our children that emotions are neither good nor bad, they are natural.
It’s normal to feel sad or angry sometimes. It’s a normal part of life, and we can learn to manage these emotions.
Feeling sadness or anger is not bad, it’s just means that something is affecting us.
Don’t worry about feeling nervous or scared, it’s normal, and we all feel it sometimes.
Teach our children that sometimes we can’t control our emotions, but we are responsible for our actions.
I understand that you are angry, but hitting your sister is not okay.
Sometimes emotions can be very intense and difficult to control, but we can always decide how to react to these emotions.
It’s normal to feel frustrated or sad, but it’s important not to let these emotions take over and think before we react.
If you have any useful phrases that can help children take responsibility for their emotions and learn to manage them, please add them to the comments so we can include them here too. Thank you!
In summary, it’s important for children to understand that they are not responsible for their parents’ happiness. Happiness is an individual responsibility, and we shouldn’t burden other people, especially our children, with it. It’s important for children to learn to take charge of their own happiness and to be allowed to make decisions and express their emotions. This not only makes them happier, but it also helps them develop social and emotional skills that will be very useful for them in the future.
The post Children are not responsible for other people’s emotions appeared first on Marina Mele's site.
A vegades, quan parlem amb els nens, utilitzem frases que poden pensar als nens que son responsables de les emocions dels adults. En aquest article t’explico quines frases son, i quins problemes hi ha en utilitzar-les.
Has dit 3 vegades a la teva filla que reculli la joguina amb la que estava jugant i que ha deixat tirada al menjador, i cap de les vegades t’ha contestat ni t’ha fet cas. A la quarta vegada, dius alguna cosa com: t’he dit varies vegades que recullis la joguina, m’estas enfadant!
Han vingut convidats a sopar i el teu fill no ha volgut seure al costat d’un d’ells, i aquest ha dit: No vols seure al meu costat? ai, que trist que em poses.
Estàs intentant fer una cosa i els nens estan corrent amunt i avall cridant, i no et fan cas quan els dius que estiguin tranquils, i al final dius: voleu parar, m’esteu posant nerviós!
O algun dia que esteu jugant molt bé amb els nens i dius: estic feliç quan tu estàs feliç.
Quin problema hi ha amb aquestes frases? Doncs que si t’hi fixes, aquestes frases creen una relació directa entre les accions dels nens i les emocions dels pares o els adults. El nen és el responsable, al no recollir, que el seus pares s’enfadin. El nen és responsable de posar trist a un convidat perquè no vol seure al seu costat. El nen és resonsable de posar nerviós al seu pare. El nen és responsable de que la seva mare sigui feliç.
Frases com aquestes, acaben responsabilitzant als nens de les emocions dels adults. Quin pes més gran per un nen, no creus?
Quan els meus fills no em contesten, em sento frustrada. Inclús a vegades m’enfado perquè els repeteixo varies vegades una cosa, em miren, i segueixen jugant com si res.
Però és important adonar-se’n que per una banda, el nen en aquell moment s’ho està passant molt bé, està distret, està absorvit en el joc o en la situació, i el seu cap no està pensant ara ignoraré el que em diuen els pares i no contestaré. M’ha passat varies vegades d’alçar la veu per cridar-los l’atenció i que reaccionessin com ai, que passa? ens havies dit alguna cosa?.
I per l’altra, soc jo la que tinc una idea preconcebuda al cap del que hauria de passar, del que hem de fer, de com han de contestar o reaccionar. I si aquesta idea no es compleix, em genera malestar i frustració. M’explico una mica millor:
tinc al cap que els nens han de recollir les joguines al moment quan els ho demano. Si no em fan cas, em frustro, potser m’arribo a enfadar.
fem tard a l’escola i els nens van tranquil·lament per la casa buscant una joguina per emportar-se pel camí. M’estresso perquè vull arribar puntual i veig que si seguim així, no ho farem.
En totes aquestes situacions, soc jo la responsable del que sento i com actuo, no els altres. I quan me n’adono i ho accepto, passo a pensar de forma constructiva:
Quan no m’escolten, m’acosto a ells, els toco el braç per cirdar-los l’atenció, els demano que em mirin un moment, i quan tinc tota la seva atenció i m’asseguro que m’estan escoltant, llavors els puc dir algo així com: veig que us ho esteu passant molt bé jugant, però ara és l’hora d’anar a sopar i hem de recollir tot el que heu deixat al menjador. Després de sopar, o demà podreu seguir jugant.
Quan fem tard a l’escola, he d’acceptar que sí, que arribarem tard, però puc buscar algun joc per anar caminant ràpid a l’escola. I el pròxim dia, aixecar-nos 5 minuts abans potser, o no despistar-me quan estem tots esmorzant, per començar la rutina de sortir per la porta una mica abans.
Tot això per què ho explico? Doncs perquè és important que siguem conscients que som nosaltres els únics responsables de les nostres emocions i de com actuem. D’aquesta manera no responsabilitzarem als nostres fills, i també els podrem transmetre que ells son els responsables de les seves emocions.
Frases com m’estàs enfadant fan que el nen es senti responsble de la felicitat o les emocions que senten els adults, i això pot posar molta pressió al nen.
Si veuen al seu pare trist o enfadat, poden pensar, he estat jo qui ho ha fet. Dec haver dit alguna cosa que l’ha posat trist. Però ves a saber si el seu pare està així per alguna cosa que no té res a veure amb el que acaba de passar, o com sovint passa, és un conjunt de coses. Però els nens poden acabar tenint un sentiment de culpa, i de responsabilitat davant d’aquestes emocions dels adults.
Això també pot provocar que els nens siguin més sensibles a ser manipulats o a cedir a xantatges emocionals: per exemple, fer alguna cosa que li han demanat perquè estiguin contentes les persones que li demanen, ja siguin adults, companys d’escola, cosins, etc.
Però no només això, també si ells estan tristos o enfadats, també deleguen la responsabilitat de provocar aquestes emocions a algú altre. Creuen que les seves emocions les ha provocat algú altre, i per tant, esperen que des de fora, les arreglin.
El fet de transmetre als nostres fills que ells son els responsables de les seves emocions i de com actuen, fa que tinguin el control sobre elles, i que les pugin apendre a gestionar. Hem d’ensenyar-los que totes les emocions son naturals, i que a vegades no tenen el control del que senten, però sí de com actuen.
Una de les coses que em va bé quan llegeixo sobre qualsevol tema son exemples de com aplicar el que acabo de llegir. M’ajuden a pensar en quines situacions ho puc fer diferent, puc millorar, i també al revés: faciliten que quan em trobi en aquestes situacions, me’n recordi del que he llegit, i de com puc actuar.
Aquí van alguns exemples:
Podem expressar els nostres sentiments, però fer-ho des del punt de vista de la nostra responsabilitat, no responsabilitzar als altres.
Estic trista perquè he tingut un mal dia a la feina, però sé que ja passarà
Estic trista perquè no he aconseguit el que volia, però he d’acceptar la situació i buscar altres opcions
Estic experimentant molta frustració en aquest moment, però això no té res a veure amb tu. És només una cosa que està passant en mi i ho estic gestionant.
Ensenyar als nostres fills que les emocions no son bones ni dolentes, son naturals.
És normal sentir-se trist/a o enfadat/a a vegades. És una part normal de la vida i podem aprendre a gestionar aquestes emocions.
Sentir tristesa o ràbia no és dolent, només ens està indicant que alguna cosa ens afecta.
No has de preocupar-te per sentir-te nerviós o poruc, és normal i tots ho sentim de vegades.
Ensenyar als nostres fills que a vegades no podem controlar les emocions, però sí que som responsables de les nostres accions.
Entenc que estiguis enfadat, però pegar a la teva germana no està bé.
A vegades les emocions poden ser molt intenses i difícils de controlar, però sempre podem decidir com reaccionar a aquestes emocions.
És normal sentir-se frustrat o trist, però és important que no ens deixem portar per aquestes emocions i pensem abans de reaccionar.
Si tens alguna frase útil, que et serveixi per ajudar als nens a responsabilitzar-se de les seves emocions, i que aprenguin a gestionar-les, si us plau, afegeix-ho als comentaris per poder-ho incloure també aquí. Gràcies!
En resum, és important que els nens entenguin que no són responsables de la felicitat dels pares. La felicitat és una responsabilitat individual, i no hem de descarregar-la en altres persones, especialment en els nostres fills. És important que els nens aprenguin a assumir la seva pròpia felicitat i que se’ls permeti prendre decisions i expressar les seves emocions. Això no només els farà més feliços, sinó que també els ajudarà a desenvolupar habilitats socials i emocionals que els seran molt útils en el futur.
The post Els nens no son responsables de les emocions dels altres appeared first on Marina Mele's site.
Raising children is no easy task. It requires patience, consistency, and a lot of guidance. As parents, we have the responsibility to teach our children the important skills they will need to live successful and rewarding lives. One such skill is assertiveness.
Assertiveness is a form of communication which involves expressing oneself openly and honestly, with consideration for the rights of others. It is an important skill for children to develop as it helps them become more confident and secure in their self-expression. It encourages children to have healthy relationships with others, respect boundaries and stand up for themselves.
In this blog post, we will explore why assertiveness is important for children, the main benefits of being assertive, and tips on how to teach assertiveness.
Assertiveness entails expressing one’s opinions or perspectives confidently and respectfully. And I consider it a crucial skill for children as it allows them to communicate their thoughts, emotions, and ideas clearly while also considering the feelings of others.
But let me emphasize that assertiveness is not the same as aggression. It is important to differentiate between making your point in a confident and respectful way, versus using forceful and intimidating language that can be off-putting to others. Additionally, assertiveness should be expressed in a way that is honest and direct, but not rude or condescending.
Assertiveness can be useful to resolve problems, as it helps children to be aware of their own needs, as well as the needs of others. This awareness can then be used to come up with creative solutions to conflicts or disagreements. For example, if your child is facing a problem with a friend, they can use assertiveness to communicate what they need and come up with a plan that works for everyone.
This skill also helps children to effectively communicate with others. Through assertive communication, children are able to express their thoughts and feelings in a way that is direct but not aggressive, and allows them to be understood and taken seriously by their peers. Additionally, it can help to build trust between the involved parties, as each person is able to trust that the other is being honest and trustworthy in their interactions.
Lastly, assertiveness encourages children to take an active role in advocating for their needs and wants. It helps them to recognize their own value and to recognize that their voice is important. This can be especially beneficial for shy or introverted children, as it gives them confidence to speak up and make their opinions known.
The first tip I want to share is to model assertive behaviour. This means that I express my own feelings in a respectful and direct manner, without being aggressive or passive. I also ensure that I listen to my children and allow their opinions, feelings and wishes to be heard. By doing this, I hope to teach my children that they can express themselves in a confident, non-aggressive manner too.
Another tip is to practice role-play. This can be done by creating scenarios in which children can practice expressing their own needs, while also respecting the needs of others. Here are some examples:
Ordering food at a restaurant: Have your child pretend to be the customer and you play the role of the server. Encourage your child to practice ordering politely and assertively, making sure to speak clearly and make eye contact.
Standing up to a bully: Create a scenario in which your child is being bullied by another child. Encourage your child to assertively communicate their feelings, telling the other child how their actions are making them feel and standing up for themselves.
Negotiating with a friend: Set up a scenario in which your child and a friend have a disagreement over something, such as sharing toys or playing a game. Encourage your child to assertively communicate their needs and wants, while also being willing to compromise and find a solution that works for both parties.
Asking for help: Create a scenario in which your child needs help with something, such as completing a task or understanding a lesson. Encourage your child to assertively ask for help, making sure to clearly communicate what they need assistance with and why.
And the last tip is that we should try to use positive assertive language when disciplining children. This means that we must explain why a certain behaviour is not acceptable and provide alternatives. Here are some examples:
I understand that you want to keep playing, but it’s time to clean up now.
I can see that you’re upset, but hitting your brother is not okay. Let’s find a better way to express your feelings.
I understand that you’re frustrated, but we don’t yell in our house. Let’s take a deep breath and try to communicate calmly.
I know you didn’t mean to spill the juice, but it’s important to clean up after ourselves. Let’s work together to clean it up.
I understand that you’re feeling angry right now, but it’s not okay to throw things. Let’s take a break and come back to this when we’re both feeling calmer.
The key is to use “I” statements, acknowledge the child’s feelings, and offer alternatives or solutions that promote positive behaviour.
As a mother and a professional, I understand the importance of setting boundaries for children. Establishing clear limits helps children learn self-control, emotional regulation, and respect for others. By using assertiveness, we can communicate our expectations and model the behavior we’d like our children to adopt. Additionally, setting boundaries helps create a sense of security for children, as they know what to expect and can navigate their environment with confidence.
Again, role-playing can be an excellent tool for teaching boundary-setting skills to children. By engaging in various scenarios, children can practice expressing their needs and standing up for themselves in a safe and controlled environment. Here are some examples:
Role-play a situation where a friend wants to borrow a favourite toy, but your child isn’t comfortable sharing it. Encourage your child to practice saying “no” assertively and calmly, explaining their reasoning without becoming defensive or aggressive.
In a role-play scenario involving peer pressure, you could have your child pretend they are at a party where friends are pressuring them to engage in activities they are uncomfortable with, such as trying a new risky game or consuming unhealthy snacks. Encourage your child to practice assertively expressing their feelings and standing their ground, while also suggesting alternative activities that align with their values.
Another role-play situation could involve addressing bullying at school. Have your child imagine they are witnessing someone being teased or mistreated. Help them practice assertively intervening by telling the bully to stop, standing up for the victim, and reporting the incident to a trusted adult. This will help them develop the confidence and skills needed to handle such situations in real life.
A scenario involving personal space boundaries could involve your child pretending to play with a friend who is consistently invading their personal space or touching them without permission. Encourage your child to practice assertively communicating their discomfort and setting clear limits on physical contact, while remaining respectful and empathetic towards their friend.
To practice assertiveness in the context of family dynamics, create a role-play scenario in which a sibling or relative is continually borrowing your child’s belongings without asking. Help your child practice expressing their feelings about the situation and setting clear boundaries around the use of their possessions, emphasizing the importance of mutual respect and communication.
Lastly, consider a role-play situation where your child needs to advocate for themselves in an academic setting. For example, they could pretend they’ve been given an unfair grade on a project. Encourage your child to practice assertively discussing their concerns with the “teacher” (played by you or another family member), presenting evidence to support their case and respectfully asking for a grade reconsideration. This will help them develop the skills needed to navigate challenging situations in their educational journey.
In conclusion, assertiveness is an important skill for children to develop. It helps to foster healthy relationships, encourages honest communication, and allows children to stand up for themselves in challenging situations. By modeling assertive behavior and engaging in role-play scenarios, we can teach children how to express themselves confidently and respectfully. This, in turn, will help them lead more meaningful and fulfilling lives.
The post Assertiveness: A Crucial Skill for Children’s Personal Growth appeared first on Marina Mele's site.
In this blog post, we will explore the concept of critical thinking and its role in fostering creativity and problem-solving. We will look at how critical thinking can help to identify biases and challenge conventions, explore alternative ideas and solutions, and broaden perspectives. We will also discuss the importance of developing critical thinking skills, such as reading, researching, questioning, and practicing mindfulness. Finally, we will focus on how critical thinking can empower individuals to make informed decisions and become more confident and independent in their thinking. So let’s get started!
“It is the mark of an educated mind to be able to entertain a thought without accepting it.”—Aristotle
Critical thinking is the process of actively and skilfully conceiving, applying, analysing, synthesizing and evaluating information gathered from observation, experience, reflection, reasoning, or communication. It involves a careful examination of the facts, and often involves the questioning of underlying assumptions. It is a cognitive process that requires the development of skills, such as analysis and evaluation, in order to make sound judgments about the validity of evidence and the overall worth of an argument.
There are many different types of critical thinking skills, and each of them requires the ability to identify and evaluate the credibility of evidence, and to draw conclusions from that evidence.
The benefits of developing critical thinking skills include the ability to think objectively and make sound judgments, the ability to identify and evaluate evidence, the ability to draw conclusions from evidence, and the ability to make decisions quickly and confidently. Critical thinking can also help to improve problem-solving and communication skills, as well as increase one’s capacity for creativity and innovation.
Examples of critical thinking can be seen in everyday life. For instance, when a parent is presented with a difficult decision regarding their child, they may use critical thinking skills to evaluate the different options and come to an informed conclusion. Additionally, when a student is presented with a complex problem in mathematics, they may use critical thinking skills to break down the problem into its components and develop an effective strategy to solve it. In business, critical thinking can be used to evaluate new ideas and strategies, and to make decisions about how best to allocate resources.
Creativity and critical thinking are closely intertwined. When people are encouraged to be creative, they are also encouraged to think outside the box and explore alternative ideas and solutions. Through critical thinking, people can consider different perspectives and explore different possibilities and thus, help them with creativity and innovation.
Critical thinking can also help to identify biases and challenge conventions. For example, here are some common biases:
By questioning the assumptions underlying an argument or situation, people can develop a more complete understanding of the issue at hand. This can help to bring new insight and uncover potential solutions that may not have been considered before.
Moreover, critical thinking can also help to open people up to new perspectives and broaden their views. By questioning the assumptions underlying their own beliefs and ideas, people can develop empathy and understanding. They can also learn to consider different viewpoints and develop an appreciation of diversity. This can help to foster creative problem-solving and spark new ideas.
Here are some tips to develop critical thinking skills:
In conclusion, critical thinking is an important skill for developing creativity and problem-solving. It involves the ability to identify and evaluate evidence, draw conclusions from evidence, and make decisions quickly and confidently. Developing critical thinking skills requires the ability to read, research, question, and practice mindfulness. When people are encouraged to think critically, they can learn to challenge assumptions, explore alternative ideas and solutions, and broaden their perspectives. This can help to foster creativity and empower individuals to make informed decisions.
The post Thinking Outside the Box: Creative Problem-Solving with Critical Thinking appeared first on Marina Mele's site.
It’s natural to feel regret, but it is also important to reflect on our regrets and learn from them. In this blog post, we’ll be exploring the effects of regret, the impact it can have on our lives, and how we can use it as an opportunity to learn and grow. We’ll look at why it is important to acknowledge and accept our regrets, how to find a silver lining in them, and why practicing self-compassion and forgiveness is so important. Through understanding and accepting our regrets, we can make better decisions and create a life that is true to our values. So, let’s dive into this topic and start reflecting on our regrets.
Regret is an emotion that can be expressed in many different ways – from a gentle pang of disappointment to a deep and overwhelming sorrow. It is a universal feeling, one that we have all experienced in some form or another. But what exactly is it?
At its core, regret is a feeling of sadness, repentance, or disappointment at something that you have done, or failed to do [1]. We feel regret when we realize that our actions or inactions have led to consequences that could have been avoided. It can be a powerful feeling, as it can be a reminder of our own limitations and the consequences of our choices.
Usually, regret is a negative emotion that can lead to feelings of guilt or disappointment. We may even experience regret for things that we did not do or for decisions that were beyond our control. In these cases, we must learn to accept and forgive ourselves for our mistakes and take responsibility for our actions.
But sometimes, regret can also be a positive emotion, as it can motivate us to reflect on our past decisions and make better choices in the future. It can be a reminder of valuable lessons that we have learned, and the importance of reflecting on our experiences. Regret can be a source of growth and learning, if we use it as a tool to help us better understand ourselves and our actions.
Regret is an emotion that should be taken seriously and not ignored, as it can have a strong impact on our lives. To learn from our experiences and move forward, we must be willing to reflect on our choices and learn from our mistakes. By doing so, we can develop a greater understanding of ourselves and how we can make better decisions in the future.
A recent study by researchers at the University of California, Berkeley, found that 76% of participants regretted things that they could have done, but did not [1], not things that they did wish they didn’t. This isn’t surprising, as it’s often our inactions that can cause us the most regret in the long run.
Regret can be a difficult emotion to grapple with, and it can often lead to feelings of guilt and helplessness. Unfortunately, regret about inactions tends to be more enduring and can even intensify as time goes by. For example, regret about the career path can appear a few years after the decision was made, and can increase over time.
But it’s important to remember that first, it’s never too late to take action and make changes. And second, that decision was made probably the best you could, given the situation or the previous knowledge you had. So try to forgive yourself, accept the outcome, and if you wish, take action.
Remember that it’s natural to feel regret, it’s human. What you can do is use it as a powerful tool for growth and learning [2]. Taking the time to reflect on our regrets and consider how we can move forward can be a helpful way to process our emotions and make sure that we are living a life that is true to our values.
Acknowledging and accepting our regrets is more productive than ignoring or fixating on them [3]. As parents, we can often find ourselves regretting decisions we made in the past that we now feel were wrong. For example, I can think of many things I said to my kids that after looking at the outcome, I realised were not the best things to say, or do.
But I think it is important to recognize and accept these mistakes as part of the learning process, rather than fixating on them or suppressing the regret that they generate. By doing so, we can start to use our experiences as a way to grow and learn, allowing us to make better decisions in the future.
Finding a silver lining in our regrets, something positive in the outcome, can help us think more clearly and make better decisions [3]. It can be difficult to accept our mistakes, but it is important to look for the lessons that we can learn from them. We can focus on the positive changes that have occurred as a result of our regrets, such as understanding what we value more in raising our children or learning to be more patient and understanding.
Practicing self-compassion and forgiveness is crucial for positive adjustment in the face of regrets [3]. It is natural to have moments of self-doubt and criticism, but it is important to remember that we are all human and capable of making mistakes. By practicing self-compassion and forgiveness, we can start to move away from regret and focus on the present. We can learn from our mistakes, which can help us become the best we can be.
In conclusion, it is important to reflect upon our regrets and learn from them in order to make the best decisions in the future. Acknowledging and accepting our regrets is more productive than ignoring or fixating on them, and taking action to remedy them can help to move forward and grow from our experiences. Practicing self-compassion and forgiveness is also key for positive adjustment when dealing with regrets. We can use our regrets as stepping stones to become better parents, and to become the best version of ourselves.
The post Overcoming Regrets: Finding the Strength to Move Forward appeared first on Marina Mele's site.
Artificial Intelligence (AI) is increasingly becoming a part of our lives. From facial recognition systems to self-driving cars, AI technologies are changing the way we live and work. But with this increasing presence of AI in our lives comes a need to ensure that it is used in a safe, ethical, and responsible way.
In response to this need, the European Union has proposed the Artificial Intelligence Act (AI Act). This proposed regulation seeks to ensure that AI is developed and used in a way that protects the fundamental rights and freedoms of individuals and society. It sets out a number of requirements for AI systems, such as requiring human oversight, fairness, non-discrimination, privacy, data protection, safety, and robustness.
This blog post will look at the AI Act in more detail, exploring its purpose, its categories, and its main concerns. We will also look at how the Act is designed to protect individuals fundamental rights and how it can be implemented in a way that ensures AI is used for good.
![]()
The Artificial Intelligence Act (AI Act) is a proposed regulation of the European Union that aims to introduce a common regulatory and legal framework for artificial intelligence. It was proposed by the European Commission on 21 April 2021 and is currently being negotiated by the European Parliament and the Council of the European Union.
The purpose of the AI Act is to ensure that AI is developed and used in a way that is safe, ethical, and responsible. The Act sets out a number of requirements for AI systems, including requirements for human oversight, fairness, non-discrimination, privacy, data protection, safety, and robustness.
The AI Act is a complex piece of legislation, but it has the potential to ensure that AI is used in a way that benefits society. The Act is still under negotiation, but it is expected to come into force in 2026.
The AI Act defines three categories of AI systems:
Let’s see each of these categories in more detail.
The AI Act defines unacceptable risk systems as those that pose a serious threat to the fundamental rights and freedoms of natural persons, such as their right to privacy, non-discrimination, or physical integrity.
Some examples of unacceptable risk systems include:
The AI Act prohibits the development and use of unacceptable risk systems. This means that companies and organizations cannot develop or use these systems in the European Union.
There are a few exceptions to the prohibition on unacceptable risk systems. For example, the prohibition does not apply to systems that are used by law enforcement agencies for the prevention or detection of crime. However, even in these cases, the systems must be used in a way that complies with the law and that does not violate individuals’ fundamental rights.
The prohibition on unacceptable risk systems is an important part of the AI Act. It is designed to protect individuals’ fundamental rights and to ensure that AI is used in a way that is safe and ethical.
The AI Act defines high-risk systems as those that pose a significant threat to the safety or fundamental rights of natural persons, such as their right to life, health, or property.
Some examples of high-risk systems include:
The AI Act sets out specific requirements for high-risk AI systems. These requirements include:
The AI Act also requires providers of high-risk AI systems to register their systems with a central EU database. This will allow the authorities to monitor the use of these systems and to take action if they are used in a way that violates the law.
The requirements for high-risk AI systems are designed to ensure that these systems are used in a safe and ethical way. They will help to protect individuals’ fundamental rights and to ensure that AI is used for good.
The AI Act defines minimal risk systems as those that do not pose any significant threat to the safety or fundamental rights of natural persons. This means that they are considered to be relatively safe and ethical.
Some examples of minimal risk systems include:
The AI Act does not impose any specific requirements on minimal risk systems. However, they must still comply with general EU law, such as the General Data Protection Regulation (GDPR).
The AI Act also requires providers of minimal risk systems to make certain information publicly available, such as the purpose of the system and the data that it uses. This will allow users to make informed decisions about whether or not to use these systems.
The minimal risk category is designed to ensure that AI systems that are considered to be relatively safe and ethical are not overregulated. This will help to promote the development and use of these systems, which can benefit society in a number of ways.
The AI Act is a complex piece of legislation that has been met with mixed reactions from the AI community. Some people have praised the Act for its ambitious approach to regulating AI, while others have criticized it for being too complex and burdensome.
Here are some of the main concerns that have been raised about the AI Act:
These are just some of the main concerns that have been raised about the AI Act. It is important to note that the Act is still under negotiation, so it is possible that some of these concerns will be addressed before it comes into force. However, the Act is a complex piece of legislation, and it is likely that there will be further debate about it in the coming months and years.
The AI Act is a proposed regulation from the European Union that aims to ensure that AI is developed and used in a safe, ethical, and responsible way. It sets out a number of requirements for AI systems, such as requiring human oversight, fairness, non-discrimination, privacy, data protection, safety, and robustness. The Act is still under negotiation, but it is expected to come into force in 2026.
The AI Act is an ambitious attempt to regulate AI in the European Union. It sets out a number of requirements that are designed to ensure that AI is used in a way that benefits society. However, the Act has also been met with mixed reactions, and there are still a number of concerns that need to be addressed before it comes into force.
For example, some people have expressed concern that the definition of AI is too broad, and that the requirements for high-risk AI systems are too burdensome. Others have argued that the penalties for non-compliance are too weak.
Ultimately, the AI Act is a complex piece of legislation that will have a significant impact on the development and use of AI in the European Union. It is important that these concerns are addressed, and that the Act is implemented in a way that ensures that AI is used in a safe, ethical, and responsible way.
The post AI and Fundamental Rights: How the AI Act Aims to Protect Individuals appeared first on Marina Mele's site.
Do you ever wish you could just describe an image in your mind and have it magically appear on your screen? Well, thanks to recent advances in artificial intelligence, we’re getting closer than ever to making that sci-fi dream a reality. In this post, we’ll explore the history of how AI has evolved to generate increasingly stunning and creative images from text descriptions alone.
![]()
It all started with an exciting breakthrough in 2014 from researcher Ian Goodfellow and his colleagues. They introduced an AI technique called generative adversarial networks, or GANs for short. GANs pit two neural networks against each other in a competitive game of counterfeiting. One AI generates fake images while the other tries to detect the fakes. Through this adversarial training process, the “generator” keeps getting better at producing realistic images that can fool its partner AI. GANs were like a creative spark that ignited the field of neural art generation.
Suddenly, GANs were creating photorealistic pictures of everything from human faces to stunning landscapes. Researchers also adapted GANs for applications like transferring artistic styles from one image to another. However, GANs had their limitations. They were tricky to train properly and often got stuck churning out a limited variety of similar-looking images.
The AI community turned to a different technique to overcome these challenges – Transformers. Originally created for processing language in applications like chatbots, Transformers proved to be a key ingredient in the next generation of text-to-image models. In 2018, OpenAI introduced GPT-2 which used the Transformer architecture to generate remarkably human-like text.
Researchers soon realized they could train Transformers like GPT-2 on massive datasets of image and caption pairs. The result was DALL-E in 2021, which could generate diverse and realistic images from text prompts. DALL-E’s outputs were still a bit rough around the edges though.
This brings us to CLIP, another pivotal model in text-to-image generation by OpenAI. CLIP provided the missing link between understanding text and images. By training on captioned images, CLIP learned to embed text and images into a common mathematical space. This enabled better alignment between text descriptions and the generated image results.
CLIP acted as a guiding hand for image generation AIs like DALL-E, dramatically improving the quality and accuracy of the images produced from text prompts. But CLIP was still hungry for more data and processing power to reach its full potential.
That’s where diffusion models came to the rescue! Diffusion models simulate the natural process of particles diffusing and coalescing to gradually transform random noise into coherent images. Researchers discovered that running the diffusion process in a compressed latent space made image generation much more efficient.
Latent Diffusion combined with guidance from CLIP resulted in huge leaps in quality and creativity. Now high-resolution images poured out of the models with incredible detail and precision tailored to the text prompts. Services like DALL-E 2 from OpenAI brought these advanced text-to-image models directly into the hands of everyday users through intuitive apps and websites.
Of course, the story doesn’t end here. Generative AI is advancing rapidly with new techniques like Stable Diffusion making high-quality image generation widely accessible and customizable. There are still challenges around consistency, coherence and photorealism, but the future looks bright as research continues.
The journey so far has been remarkable. In less than a decade, AI has evolved from simply classifying images to creatively synthesizing them. Who knows what new innovations and applications the next decade may bring as generative models continue to mature. But one thing’s for sure – the worlds of art, media and communication will never be the same!
Which part of this incredible AI image journey excites you the most? Let me know in the comments! I’d love to hear your thoughts.
The post The Incredible Journey of AI Image Generation appeared first on Marina Mele's site.
Have you ever wondered if there could be a better, more open social media platform? Well, a new application called BlueSky Social aims to make that vision a reality. In this article, we’ll explore what BlueSky is, where it came from, and what makes it special.
![]()
In short, BlueSky is a decentralized social networking protocol and service started in 2019 by Twitter co-founder Jack Dorsey. It launched an invite-only beta app in early 2023 that currently has around 1 million users.
The app allows you to post text and photos, follow other users, like and reply to posts, and more. It uses a Twitter-like interface that will feel familiar. One key difference is it lacks personalized algorithmic feeds. BlueSky simply shows posts in chronological order.
![]()
But BlueSky’s real magic lies in its goal to be a fully decentralized network. Imagine a social media platform that isn’t owned by any single company. One where you can carry your identity and content between different communities that set their own rules. Exciting, right? Let’s learn more!
BlueSky began in 2019 as an internal initiative at Twitter led by Jack Dorsey [1]. The idea was to develop an open standard that Twitter itself would eventually adopt. But in 2021, as Dorsey stepped down as Twitter CEO, BlueSky was spun out as an independent company called Bluesky Social LLC [2].
The project is led by CEO Jay Graber, an experienced engineer and startup founder. In 2022, the team open sourced early protocol code called the Authenticated Transfer (AT) Protocol [2]. This allows data portability between networks.
The BlueSky app launched first on iOS in February 2023, then Android in April. It grew rapidly to around 850.000 users by September [2]. But this app is just the beginning…
![]()
The long-term plan is for BlueSky’s social app to be one of many decentralized networks interconnected via the AT Protocol. This means you could join different social apps but keep your profile, followers, and posts across all of them.
Each network could set their own rules around things like moderation and making money. All while users enjoy seamless data portability. Pretty cool, huh?
This decentralized future is still in early stages. But if BlueSky succeeds, it could provide an open model beyond today’s centralized social media giants.
One unique feature of BlueSky is it allows users to create their own custom algorithms and feeds. There is no single algorithm imposed by the platform, and the pre-installed feeds can be removed or swapped out for different ones.
![]()
For example, you could make a feed focused on posts from friends in a certain city or on a particular topic. The chronological main feed shows everything, but custom feeds let you filter the content. This level of adaptability aligns with BlueSky’s mission to give users more control over their social media experience.
So if you’re intrigued by a more decentralized vision for social media, watch BlueSky as it develops. With an engaged team and community, this little blue bird has big dreams for a better online future.
Follow me on Bluesky at @marinamele.bsky.social
The post BlueSky Social – A Sneak Peek at the Future of Social Media appeared first on Marina Mele's site.
ChatGPT is a new artificial intelligence chatbot that has taken the world by storm. Developed by OpenAI and launched in November 2022, ChatGPT can engage in conversational dialogues and perform a variety of tasks like answering questions, explaining concepts, summarizing text passages, and even generating new content like articles, poems and computer code.
But what exactly is ChatGPT and how does this impressive new AI work? Let’s break it down.
![]()
All the images of this post have been generated using Midjourney.
ChatGPT is based on a large language AI model called GPT-3, which was created by OpenAI in 2020. GPT-3 uses a specialized deep learning technique called transformers to analyze massive amounts of text data and understand the patterns and structure of human language. Check this article if you want to know more about large language models.
Building on the capabilities of GPT-3, OpenAI trained ChatGPT specifically to have natural conversations and respond to a wide range of prompts and instructions. After over a year of development and training on vast datasets, ChatGPT was unveiled to the public in a beta version in November 2022, immediately capturing people’s attention and imagination.
Other tech companies like Anthropic and Google have also launched their own AI chatbots, such as Claude and Bard, to rival ChatGPT. Each model possesses its unique strengths, and a detailed comparison will be provided later in the article.
When you give ChatGPT a written prompt or question, it analyzes the text to understand the intent and context. It then generates a response by predicting the most likely next words in a sequence, based on the patterns it learned during its training.
ChatGPT progressively generates its response word-by-word, while continuously referring back to the original prompt for context. This allows it to have coherent, multi-turn conversations that stay on topic.
The key to ChatGPT’s conversational abilities lies in its training methodology. During training, ChatGPT was shown many real examples of human conversations, questions and answers from diverse sources on the internet. It uses these examples to learn the nuances of natural dialogue.
ChatGPT was also trained using a technique called reinforcement learning from human feedback. Essentially, it was rewarded when it generated responses that humans rated as satisfactory, and penalized for inadequate responses. This allowed it to keep improving the quality and relevance of its replies.
ChatGPT offers a wide range of useful applications and capabilities that showcase the technology’s current strengths and potential. However, as with any AI system, it also comes with significant limitations that warrant consideration.
First, we will explore some of the key ways ChatGPT can provide value and assistance. While not an exhaustive list, these applications demonstrate ChatGPT’s diverse conversational skills.
These examples offer just a sample of ChatGPT’s expanding capabilities. Its conversational nature enables a wide variety of functions through natural prompts and instructions. However, ChatGPT is far from flawless. Next we will discuss key current limitations to understand its deficiencies alongside its utilities.
The breadth of tasks ChatGPT can perform is impressive. It can hold conversations, explain concepts, summarize texts and generate new content in various styles. However, as an AI system still in development, ChatGPT has significant limitations to keep in mind.
![]()
Therefore, while remarkably capable, ChatGPT cannot fully replace human intellect just yet. Relying solely on it for critical advice would be unwise. That said, various plugins and integrations are expanding ChatGPT’s capabilities beyond just text generation. And for less high-stakes applications like drafting emails or summarizing concepts, ChatGPT proves very useful.
While often accurate, ChatGPT cannot be relied upon for 100% factual correctness. Any high-stakes use should involve human verification of its outputs.
While these limitations highlight areas for improvement, they do not negate ChatGPT’s impressive capabilities. Understanding its boundaries allows for responsible, informed use – avoiding overreliance or unrealistic expectations. ChatGPT was built to generate likely text continuations, not possess encyclopedic knowledge. By recognizing its strengths as a conversational model and anticipating its weaknesses, we can have productive interactions without frustration.
Moving forward, it will be insightful to explore how alternative AI systems attempt to address ChatGPT’s limitations. In the next section, we will compare ChatGPT to its two major competitors – Claude and Bard – to see how they stack up in terms of capabilities, limitations, and overall utility. Examining the contrasts and similarities with these other natural language models will provide useful perspective on the current state and trajectory of this rapidly evolving technology.
ChatGPT made a big splash as the first widely available conversational AI, but it now faces competition from Claude created by Anthropic, and Bard from Google. How do these alternative natural language models compare?
![]()
Claude is an AI assistant developed by startup Anthropic to prioritize safety and integrity. Like ChatGPT, it uses a transformer neural network architecture for natural language processing. However, Anthropic employed a technique called Constitutional AI to align Claude’s goals and values with human preferences.
As a result, Claude is said to exhibit less harmful bias and is more cautious about generating dangerous or unethical content compared to ChatGPT. It also incorporates self-supervised learning to better handle novel situations outside its training data.
It has a bigger context than ChatGPT or Bard, of about 100k tokens. This gives it the ability to read longer articles, even short books, and retain the information within a chat for much longer.
On the other hand, Claude’s capabilities lag behind ChatGPT and Bard when it comes to conversational breadth and creativity. Its responses tend to be simpler and more constrained. Though possibly safer, Claude lacks some of the expressiveness that makes ChatGPT engaging.
Google’s Bard aims to rival ChatGPT as an AI assistant that can explain concepts, generate content, and converse naturally. It is based on Google’s LaMDA model rather than GPT, featuring deep neural networks and trillions of parameters.
In initial tests, Bard appears significantly more grounded in facts compared to ChatGPT, with Google’s extensive Knowledge Graph likely providing useful context. However, Bard’s responses are often shorter and it struggles with more complex conversational prompts.
However, Bard also has access to the internet. This means that it can keep its knowledge up-to-date by reading the latest news articles, blog posts, and social media posts. This gives Bard a significant advantage over ChatGPT, which in general, it’s not able to access the internet (only paid users and with the browsing on).
For example, if you ask Bard about the latest news, it will be able to tell you about the most recent events. It will also be able to provide you with links to articles and other sources of information so that you can learn more.
In general, I use
But my recommendation is that you should try the different tools and discover which one works better for your specific needs. I sometimes ask the same question to two different chats, to compare, and even discover new functionalities. You can have a browser window specifically for your AI tools like Bard, ChatGPT or Claude.
And you, which of them do you use in your daily live? Leave a comment with your specific use cases. I’d like to know!
Follow me to stay tuned to the latest news regarding AI. You can subscribe to my blog here, or to my weekly AI newsletter at marinamele.substack.com.
The post What is ChatGPT and how it compares to Bard and Claude appeared first on Marina Mele's site.
As a parent or caregiver, you’ve likely encountered the challenge of a frustrated child. This is an experience as universal as it is daunting. Children, much like the rest of us, are not born with an innate ability to manage frustration effectively. However, recognizing and addressing these feelings in children is not just about soothing the present moment; it’s about building resilience. With the further complications brought about by the pandemic, the task of guiding children through their frustrations has become even more critical. In this article, we will delve deep into the roots and management of frustration in children, empowering you to help the young ones navigate their emotions and foster lasting resilience.
![]()
Low Frustration Tolerance (LFT) is a term that describes the difficulty some children face in handling challenging situations without becoming overwhelmed by negative emotions. If your child becomes irritable, has emotional outbursts, or throws temper tantrums more frequently than seems typical, they may be experiencing LFT. Recognizing the hallmarks of LFT is the first step in helping your child overcome these hurdles.
It’s important to differentiate between high and low frustration tolerance. Children with high frustration tolerance can weather difficulties with calm and perseverance, whereas those with low tolerance may quickly resort to anger or despair. Understanding where your child falls on this spectrum can significantly affect how you approach their frustration.
The difference between high and low frustration tolerance goes beyond the immediate reactions to stressors. It can have far-reaching implications for your child’s development, influencing everything from their social interactions to their approach to problem-solving. In the following sections, we explore these aspects more closely.
At the heart of LFT are complex brain networks and temperamental factors. Genetics and innate temperament can predispose a child to lower frustration tolerance, but so can the environment they’re growing up in. It’s crucial to comprehend the role these factors play as you navigate your child’s frustrating moments.
The influence of parenting cannot be overstated. An overly strict or permissive approach can hinder a child’s ability to self-regulate, increasing the chances of LFT. Conversely, a balanced approach can promote a healthier response to frustrations.
Knowing the signs of high frustration, such as distress at criticism, aggressive physical behaviors, or the development of irrational beliefs, is essential for early intervention. Recognizing these signs can provide you with the opportunity to step in and offer support before emotions escalate.
If LFT is not addressed, it can lead to more severe behavioral issues like oppositional defiant disorder. Such conditions can have a negative impact on all aspects of a child’s life, from academic performance to social interactions.
Besides behavioral issues, untreated LFT can lead to problems at school and with peers. Difficulty dealing with frustration can make it hard for children to concentrate on tasks or work collaboratively with others, hindering their learning and social development.
Long-term high frustration levels can also translate into mental health risks. It is important for parents and caregivers to understand these potential consequences in order to take proactive steps in addressing LFT.
Your empathetic response sets the tone for how a child manages frustration. Showing understanding and mirroring emotional regulation can teach them how to handle their feelings.
It’s not just about responding to the frustration, but doing so in sync with your child’s emotional state. This process, known as co-regulation, involves you participating in your child’s emotional experiences and helping them navigate through them. By doing so, you provide a safe space for them to learn and understand their emotions.
To foster a sense of control and capability in your child, encourage them to engage in problem-solving and to think proactively. This not only offers them strategies to deal with frustration at that moment but also helps them develop skills that will benefit them throughout their lives.
A warm, consistent, and responsive parenting style is key. This kind of environment supports a child’s learning to cope with frustration positively and constructively, bolstering their resilience and ability to tackle challenges head-on.
Often, frustration can be exacerbated by unmet physical needs. Ensuring that your child is well-rested, fed, and physically healthy can significantly decrease their levels of frustration.
Teaching your child how to identify and articulate their emotions is a fundamental aspect of emotional coaching. Additionally, providing them with a suite of coping skills will enable them to deal with frustration in a healthy manner. This also highlights the importance of parenting training to better equip caregivers to handle such emotional challenges.
For children with developmental disorders such as ADHD or Autism, the strategies may need to be tailored to fit their specific challenges and needs. In such cases, professional support might be necessary to provide additional guidance.
Activities recommended by experts include breathing exercises, creating calming spaces within the home, engaging in physical activities, and using music or art as outlets for expression. These not only serve as ways to cope, but also as avenues for children to explore and express their emotions.
For some children, sensory-focused techniques such as playing with stress balls or kinetic sand might provide the necessary comfort and distraction to deal with moments of intense frustration.
Remember that each child is different, and what works for one may not work for another. It’s important to tailor these activities to your child’s preferences and needs. Check out more activities here.
Every child reacts differently to frustration, and understanding your child’s specific temperament is crucial. Your responses should be customized to their unique needs and personality.
Together with your child, work on identifying specific triggers of frustration and establish constructive responses to those situations.
Before addressing the behavior that results from frustration, it’s important to connect with your child. This means understanding their feelings and offering comfort, serving as a foundation for teaching them how to manage their emotions effectively.
Acknowledging when you need help is important. If your child’s frustration is significant and persistent, seeking additional support from child development specialists can be beneficial.
Learning to manage frustration is not a luxury; it’s an essential life skill. Through your guidance and support, your child can learn to navigate their emotions and develop the resilience necessary for a healthy and successful life.
We have touched upon various strategies and insights that are crucial for helping children cope with frustration. By adopting an empathetic and proactive approach, you can guide your child towards emotional maturity and resilience. Do you have strategies that work for your child, or are you seeking advice? Feel free to share your experiences and questions in the comments below.
The post Understanding Frustration in Children appeared first on Marina Mele's site.