Thanks to BBC Box, you might be able to enjoy personalised services without giving up all your data. Sean McManus reports:
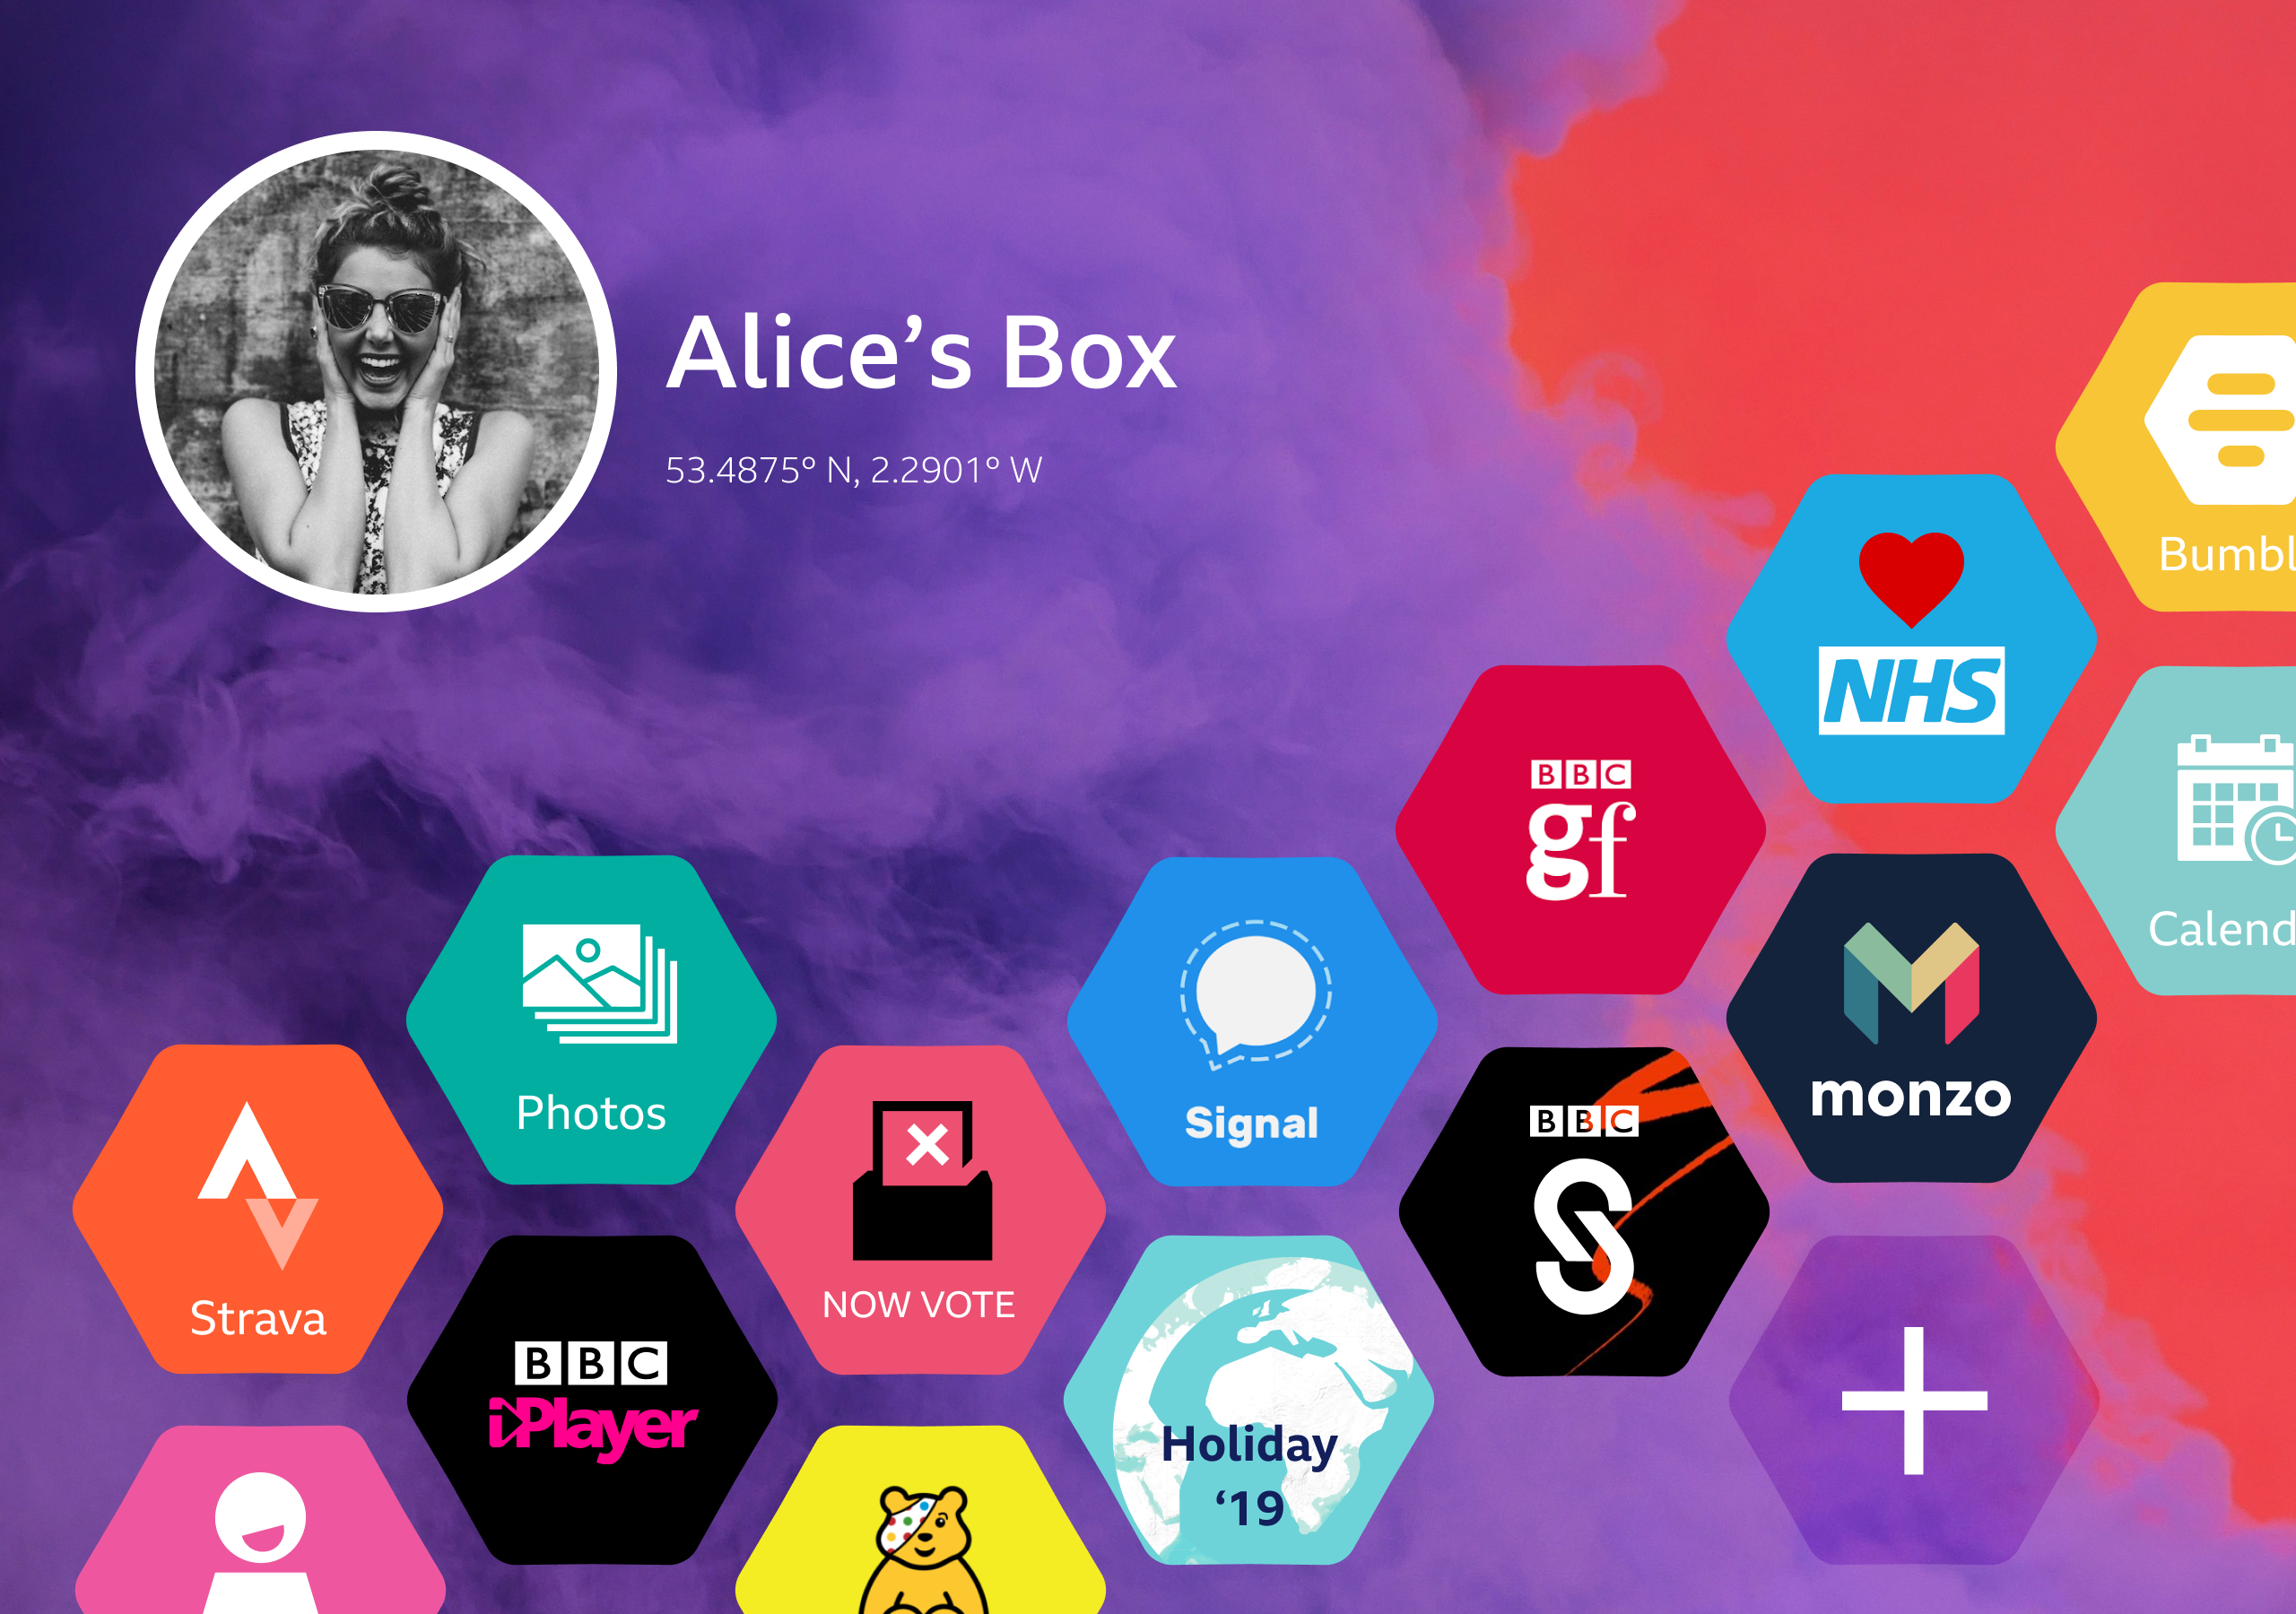
One day, you could watch TV shows that are tailored to your interests, thanks to BBC Box. It pulls together personal data from different sources in a household device, and gives you control over which apps may access it.
“If we were to create a device like BBC Box and put it out there, it would allow us to create personalised services without holding personal data,” says Max Leonard.
TV shows could be edited on the device to match the user’s interests, without those interests being disclosed to the BBC. One user might see more tech news and less sport news, for example.
BBC Box was partly inspired by a change in the law that gives us all the right to reuse data that companies hold on us. “You can pull out data dumps, but it’s difficult to do anything with them unless you’re a data scientist,” explains Max. “We’re trying to create technologies to enable people to do interesting things with their data, and allow organisations to create services based on that data on your behalf.”
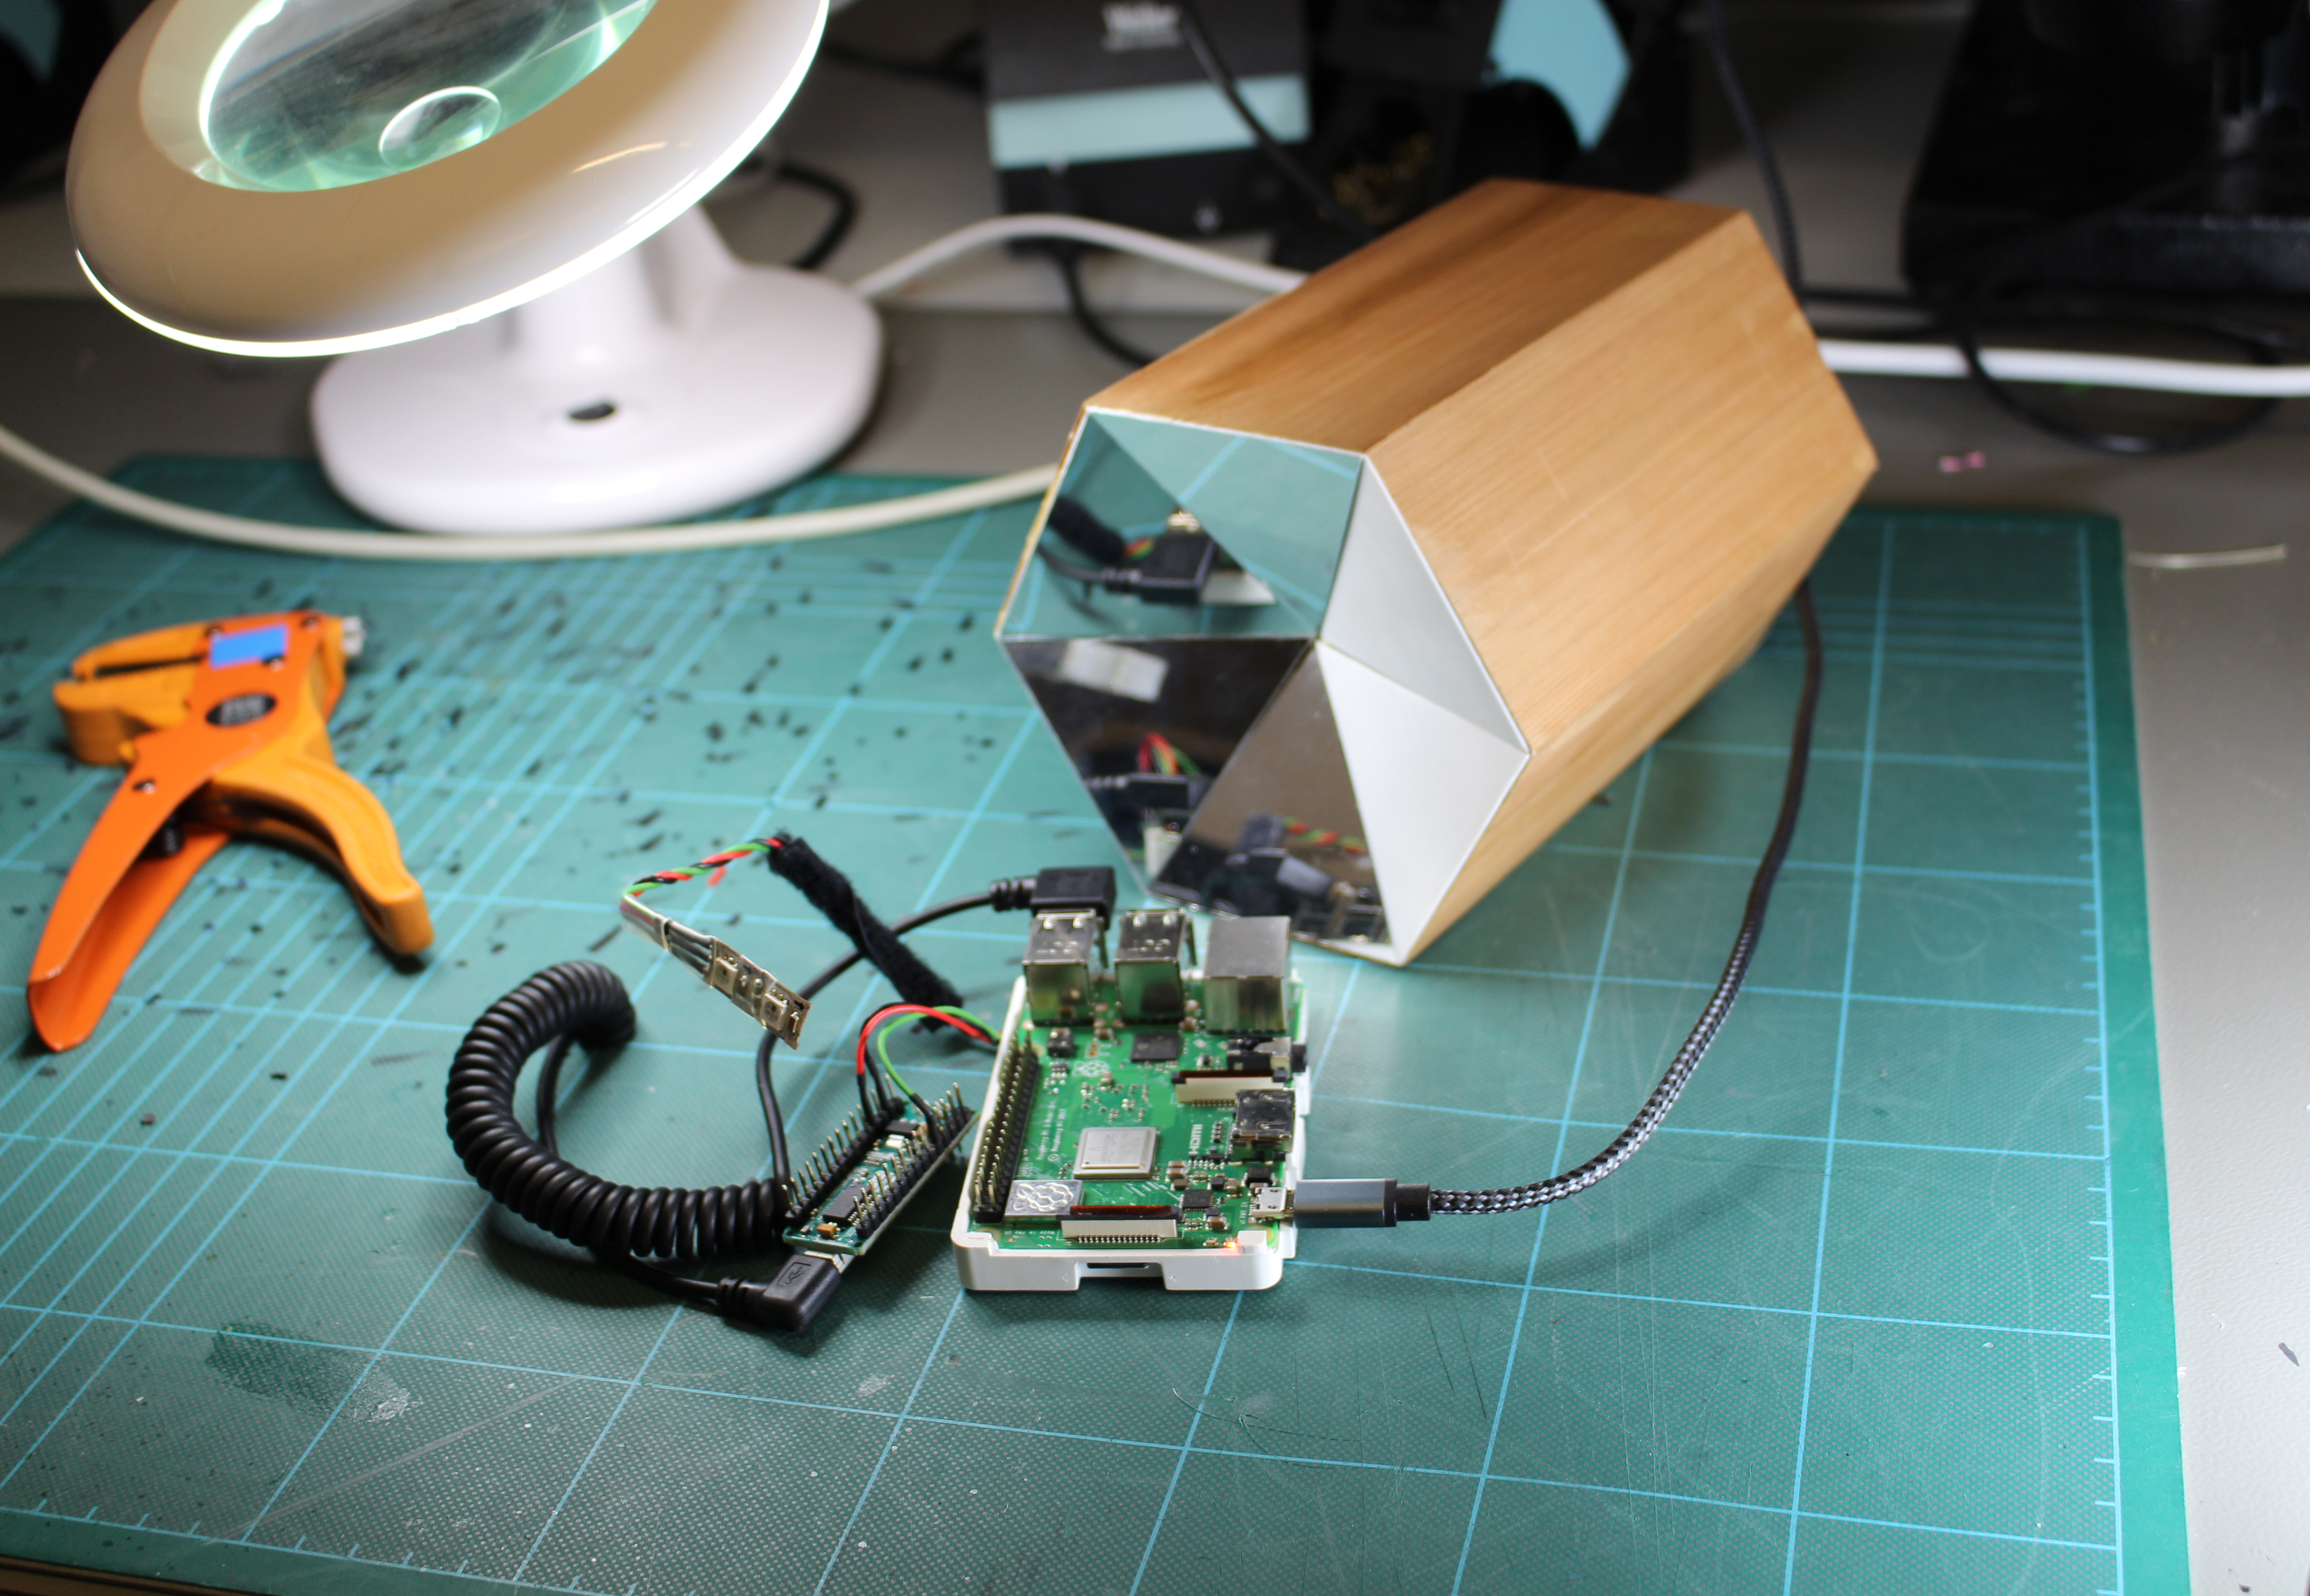
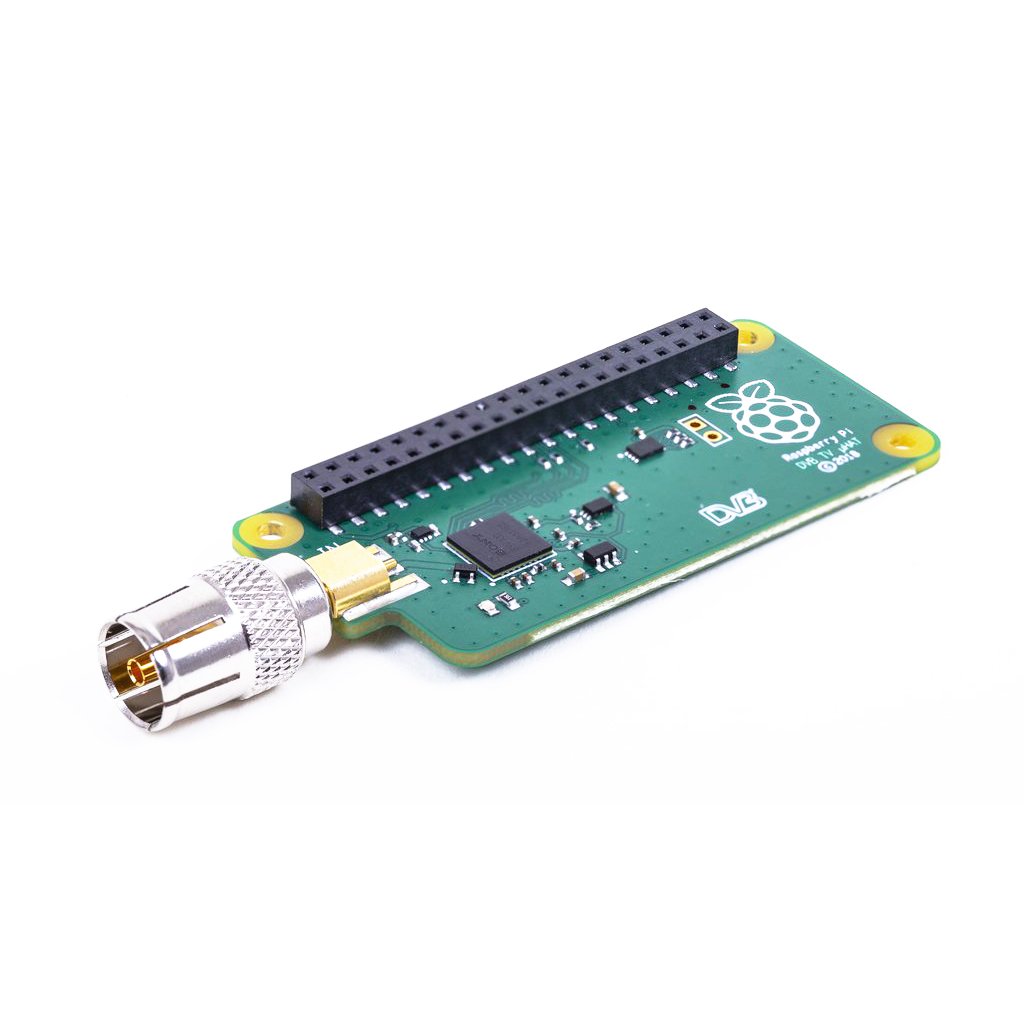
BBC Box is based on Raspberry Pi 3B+, the most powerful model available when this project began. “Raspberry Pi is an amazing prototyping platform,” says Max. “Relatively powerful, inexpensive, with GPIO, and able to run a proper OS. Most importantly, it can fit inside a small box!”
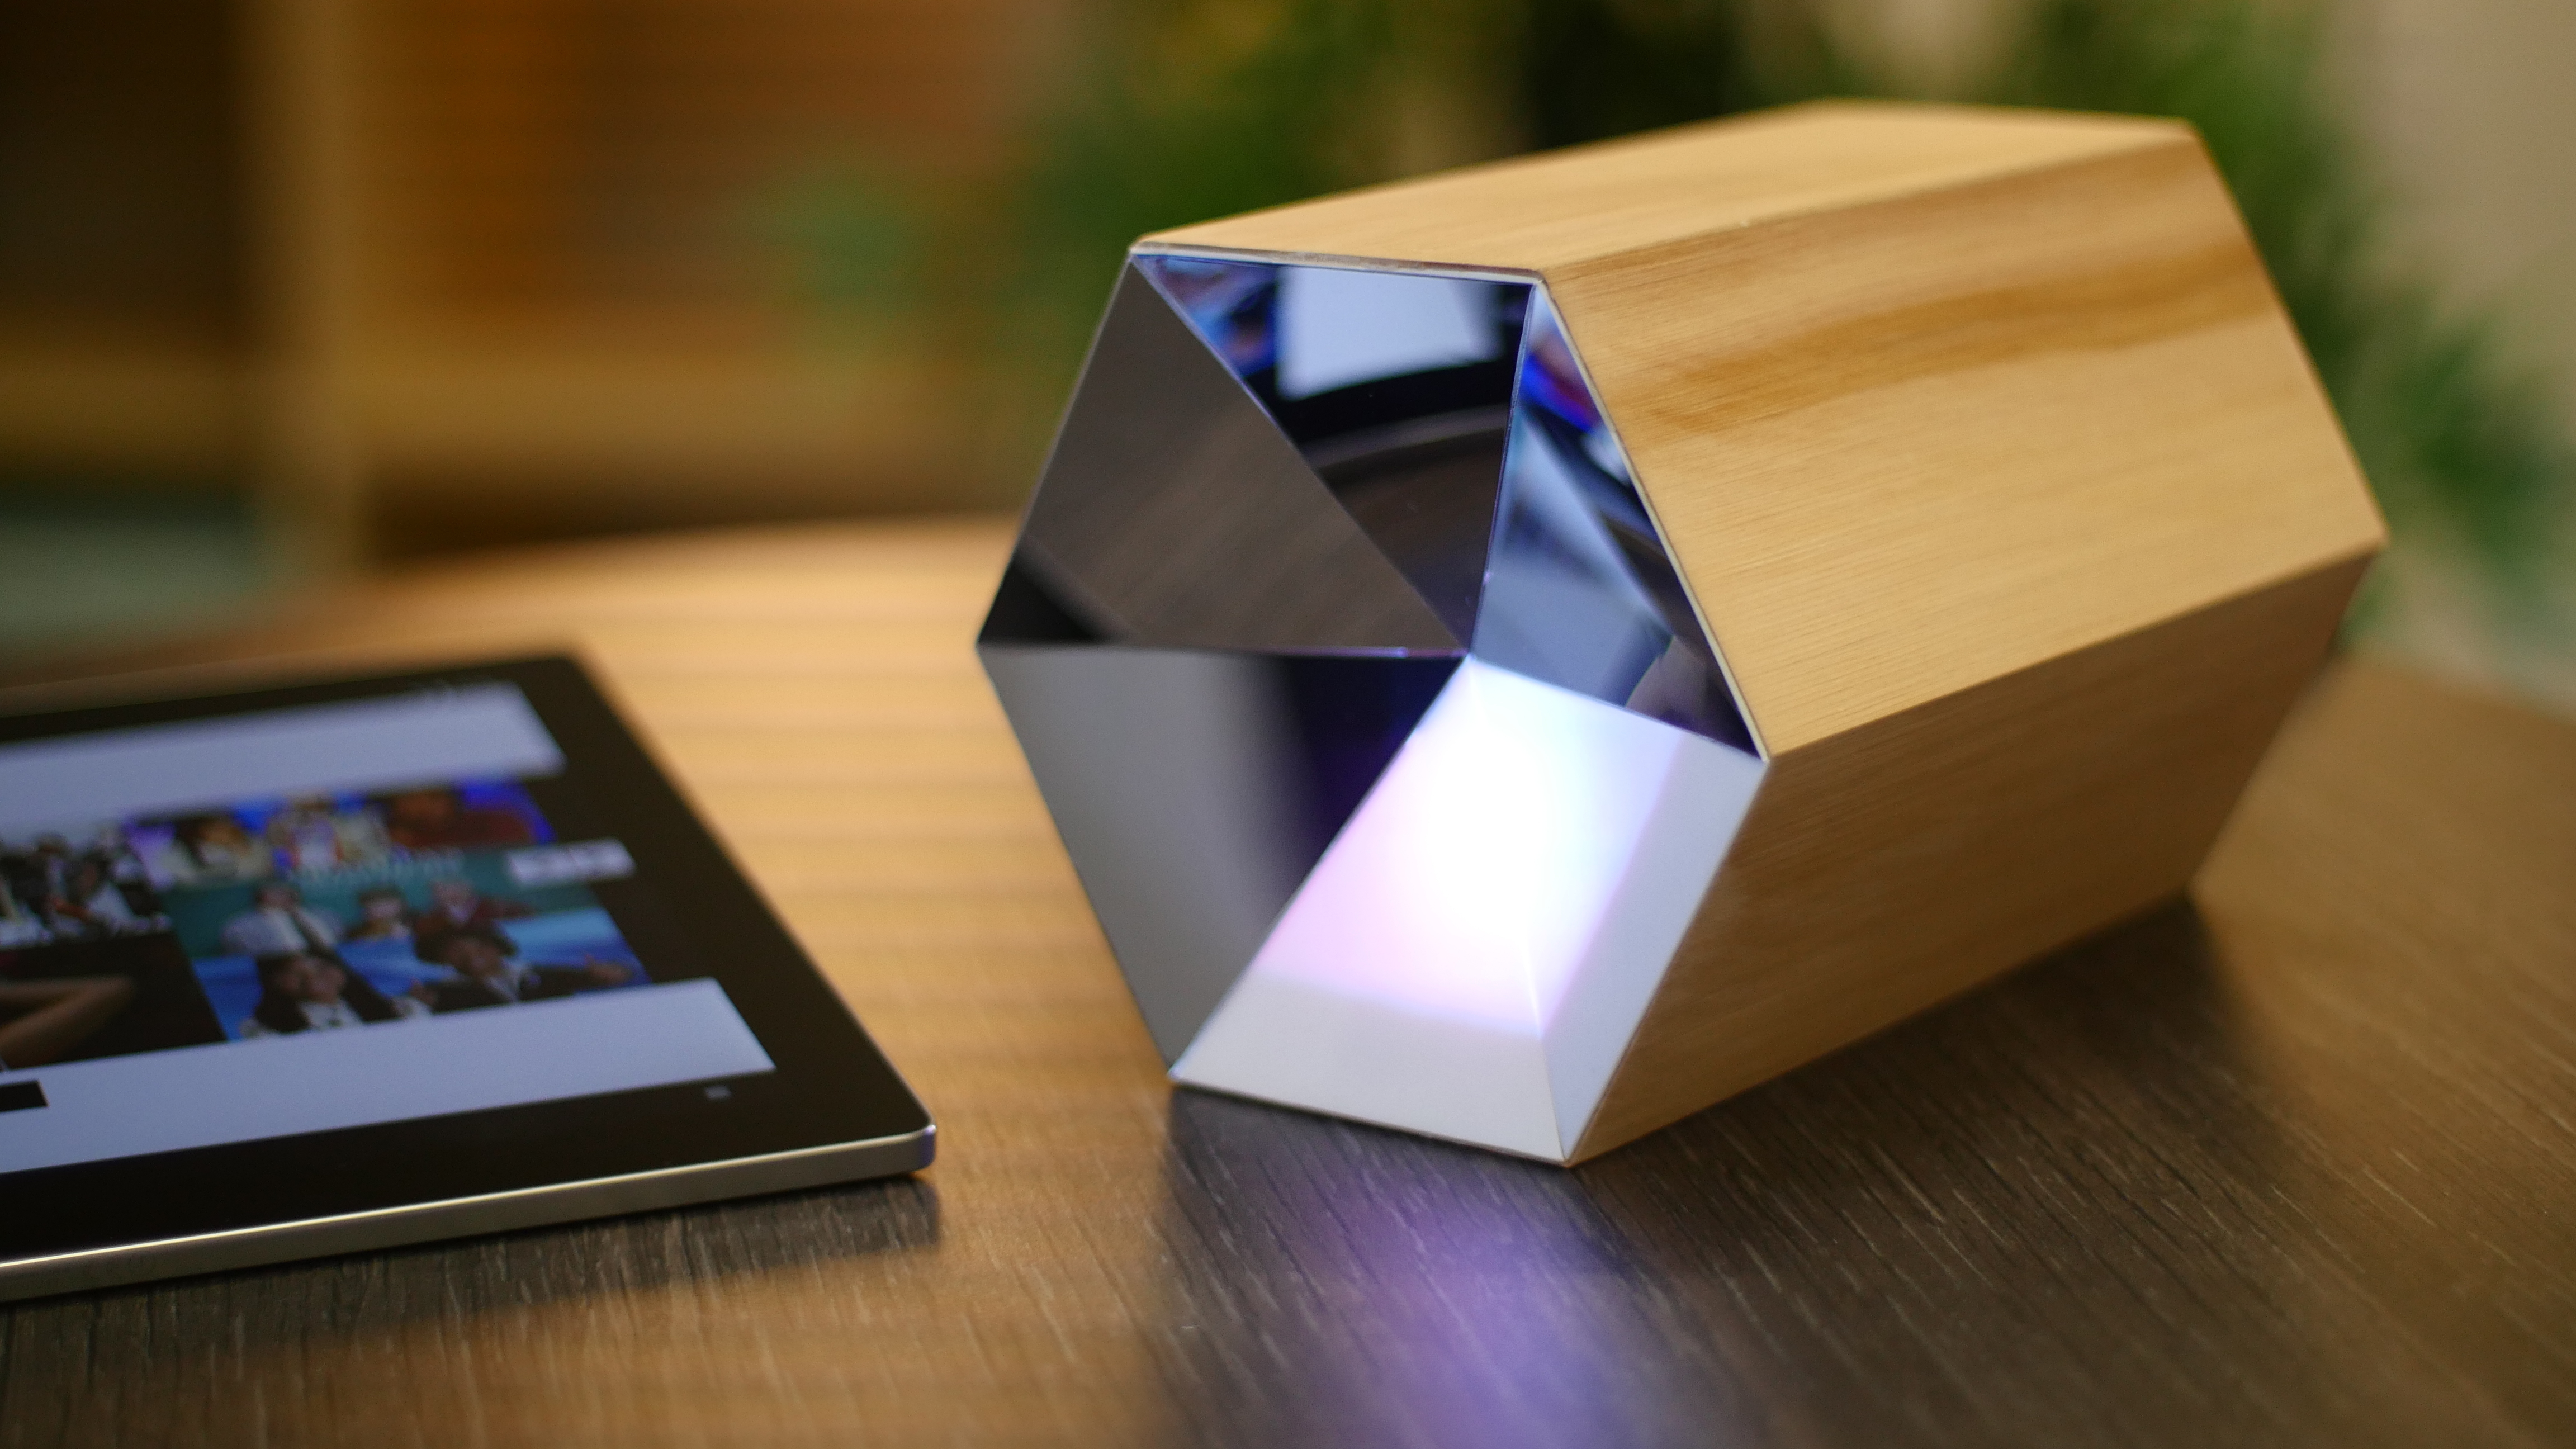
That prototype box is a thing of beauty, a hexagonal tube made of cedar wood. “We created a set of principles for experience and interaction with BBC Box and themes of strength, protection, and ownership came out very strongly,” says Jasmine Cox. “We looked at shapes in nature and architecture that were evocative of these themes (beehives, castles, triangles) and played with how they could be a housing for Raspberry Pi.”
The core software for collating and managing access to data is called Databox. Alpine Linux was chosen because it’s “lightweight, speedy but most importantly secure”, in Max’s words. To get around problems making GPIO access work on Alpine Linux, an Arduino Nano is used to control the LEDs. Storage is a 64GB microSD card, and apps run inside Docker containers, which helps to isolate them from each other.
The BBC has piloted two apps based on BBC Box. One collects your preferred type of TV programme from BBC iPlayer and your preferred music genre from Spotify. That unique combination of data can be used to recommend events you might like from Skiddle’s database.
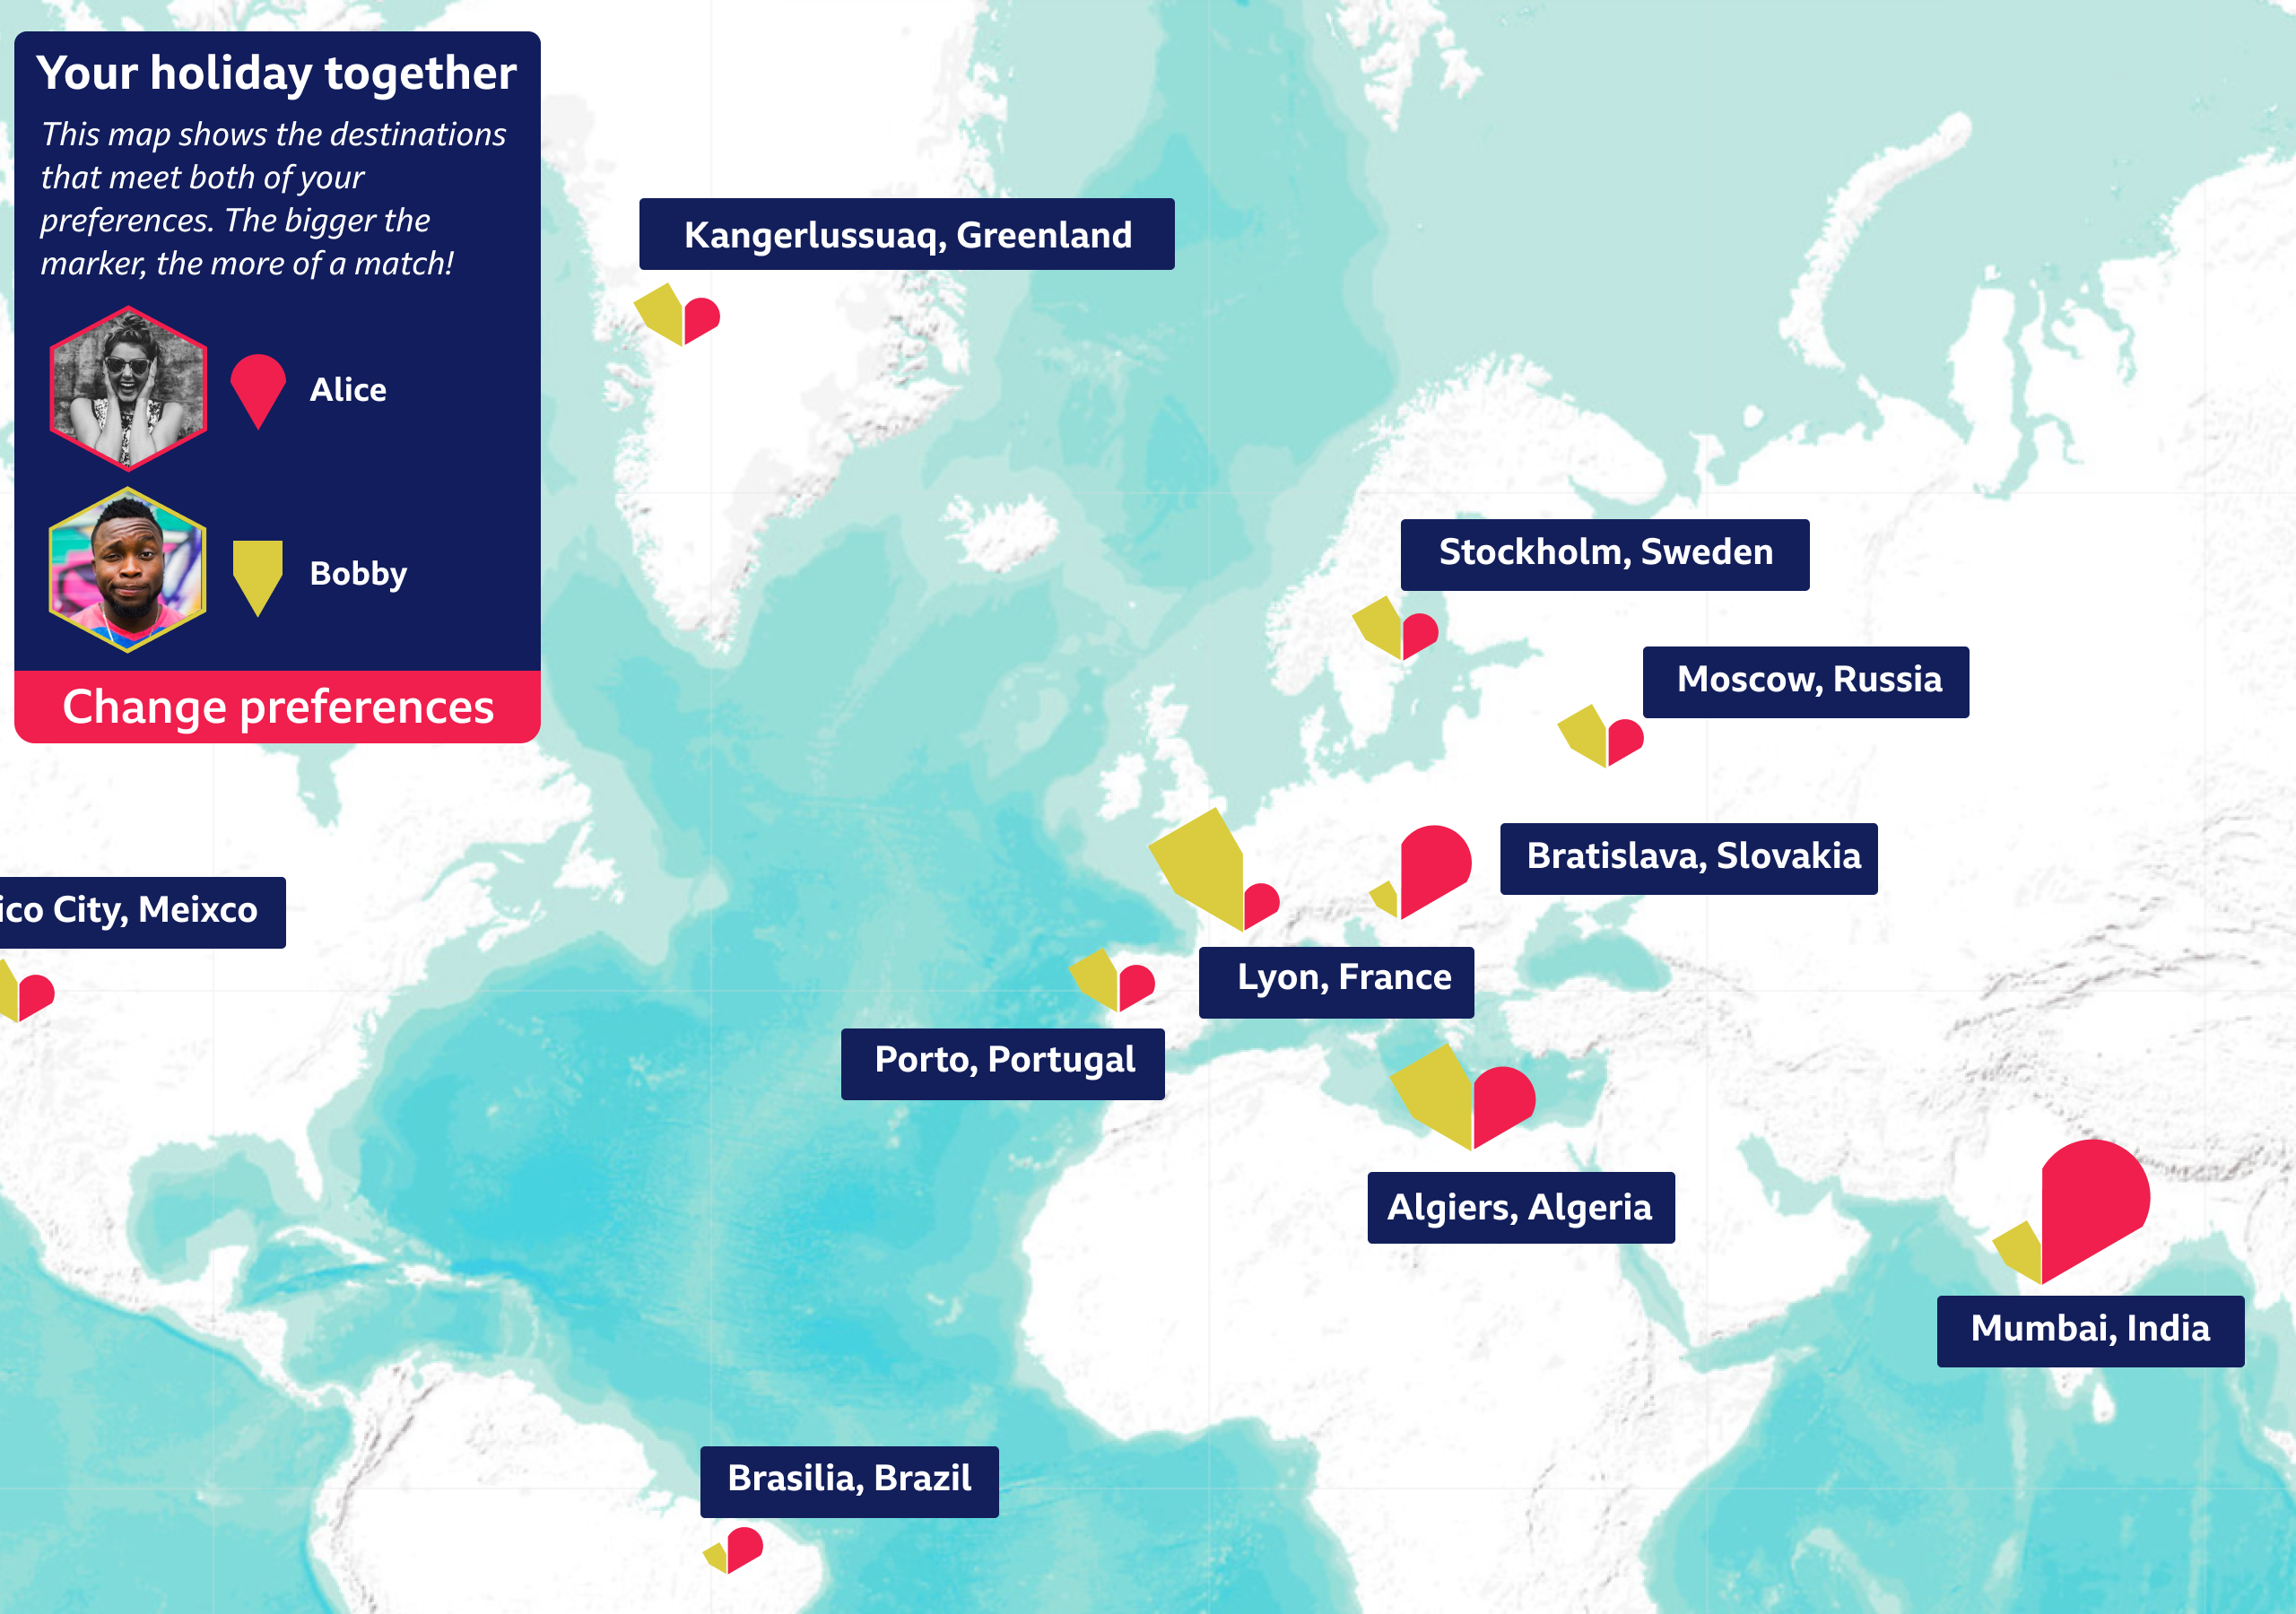
Another application helps two users to plan a holiday together. It takes their individual preferences and shows them the destinations they both want to visit, with information about them brought in from government and commercial sources. The app protects user privacy, because neither user has to reveal places they’d rather not visit to the other user, or the reason why.
The team is now testing these concepts with users and exploring future technology options for BBC Box.
This article was lovingly yoinked from the latest issue of The MagPi magazine. You can read issue 87 today, for free, right now, by visiting The MagPi website.
You can also purchase issue 87 from the Raspberry Pi Press website with free worldwide delivery, from the Raspberry Pi Store, Cambridge, and from newsagents and supermarkets across the UK.
The post Securely tailor your TV viewing with BBC Box and Raspberry Pi appeared first on Raspberry Pi.
Today’s blog post started as a deflated “What do I buy my Secret Santa person?” appeal from a friend last night. My answer is this, a nice and early Secret Santa idea guide for anyone stuck with someone for whom they have no idea what to buy.
All the gifts listed below cost £10 or less, and they’re all available from the Raspberry Pi store in Cambridge, UK. Many of them are also available to buy online, but if you’re able to visit our store, you definitely should – we have a couple of in-store exclusives on offer too.
If your Secret Santa limit is set at £5, as many seem to be, we’ve a few ideas that will fit nicely within your budget.
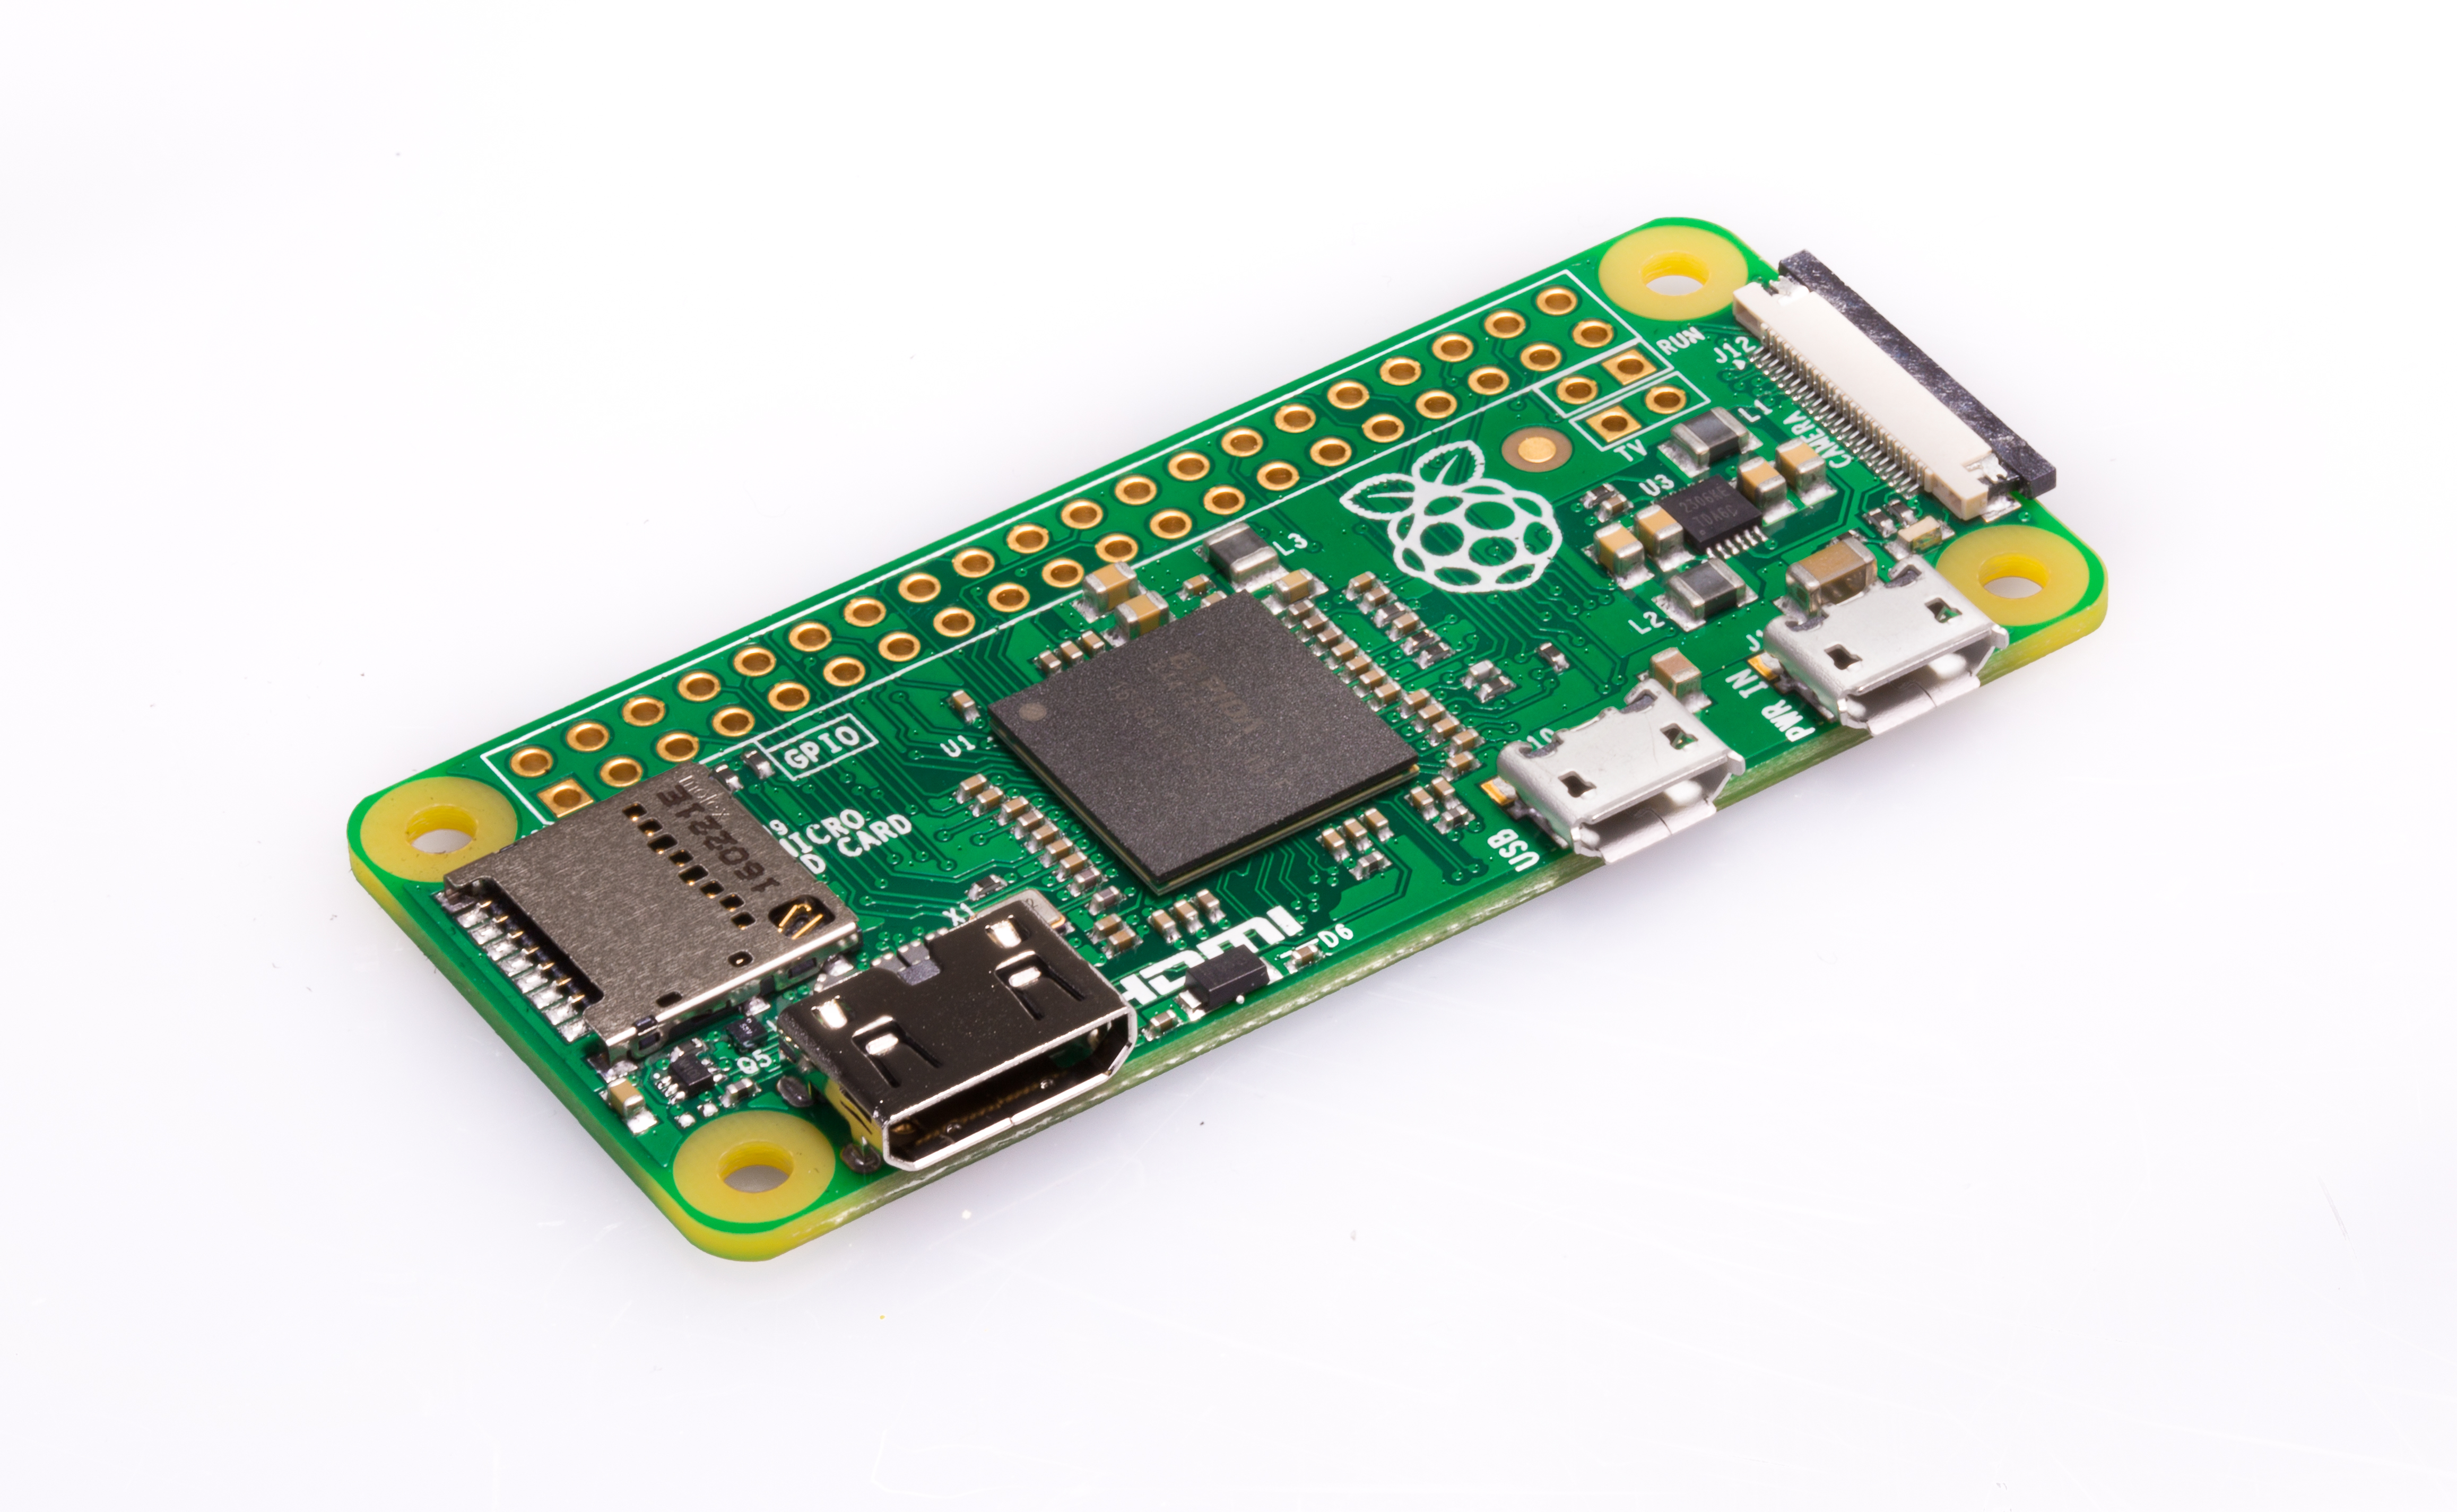
We’ll start with the obvious: Raspberry Pi Zero, our tiny computer that packs a punch without leaving a dent in your finances. At bang on £5, anyone of the electronics/techie persuasion will be delighted to receive this at the office Christmas party.
Help your Secret Santa pick show their love for Raspberry Pi with a Raspberry Pi pin (£3) or sticker pack (£4). They’ll be as on-brand as Pete Lomas (and that’s saying something).
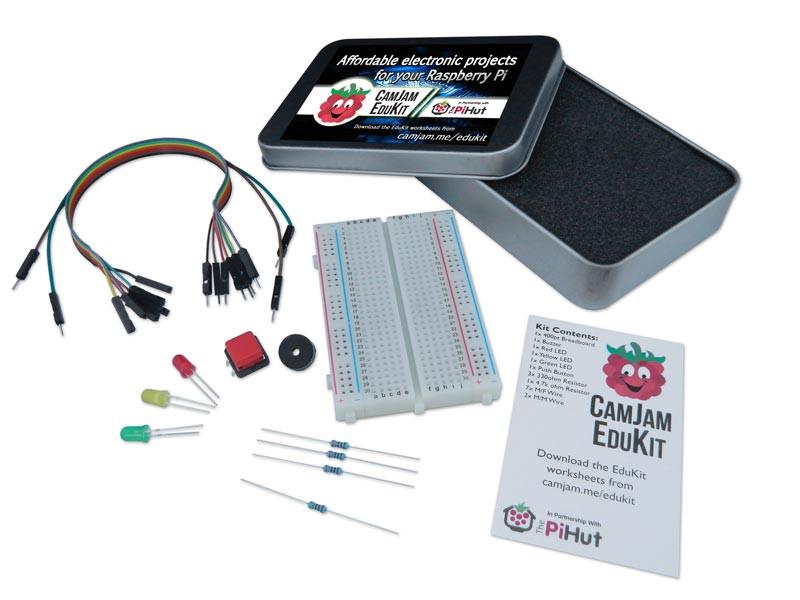
The CamJam Edukit #1 is jam-packed with all the bits you need to get started with digital making, and it’s supported by free downloadable worksheets. It’s a fantastic gift for anyone who’d enjoy learning electronics or expanding their coding know-how. At £5, you can’t go wrong.
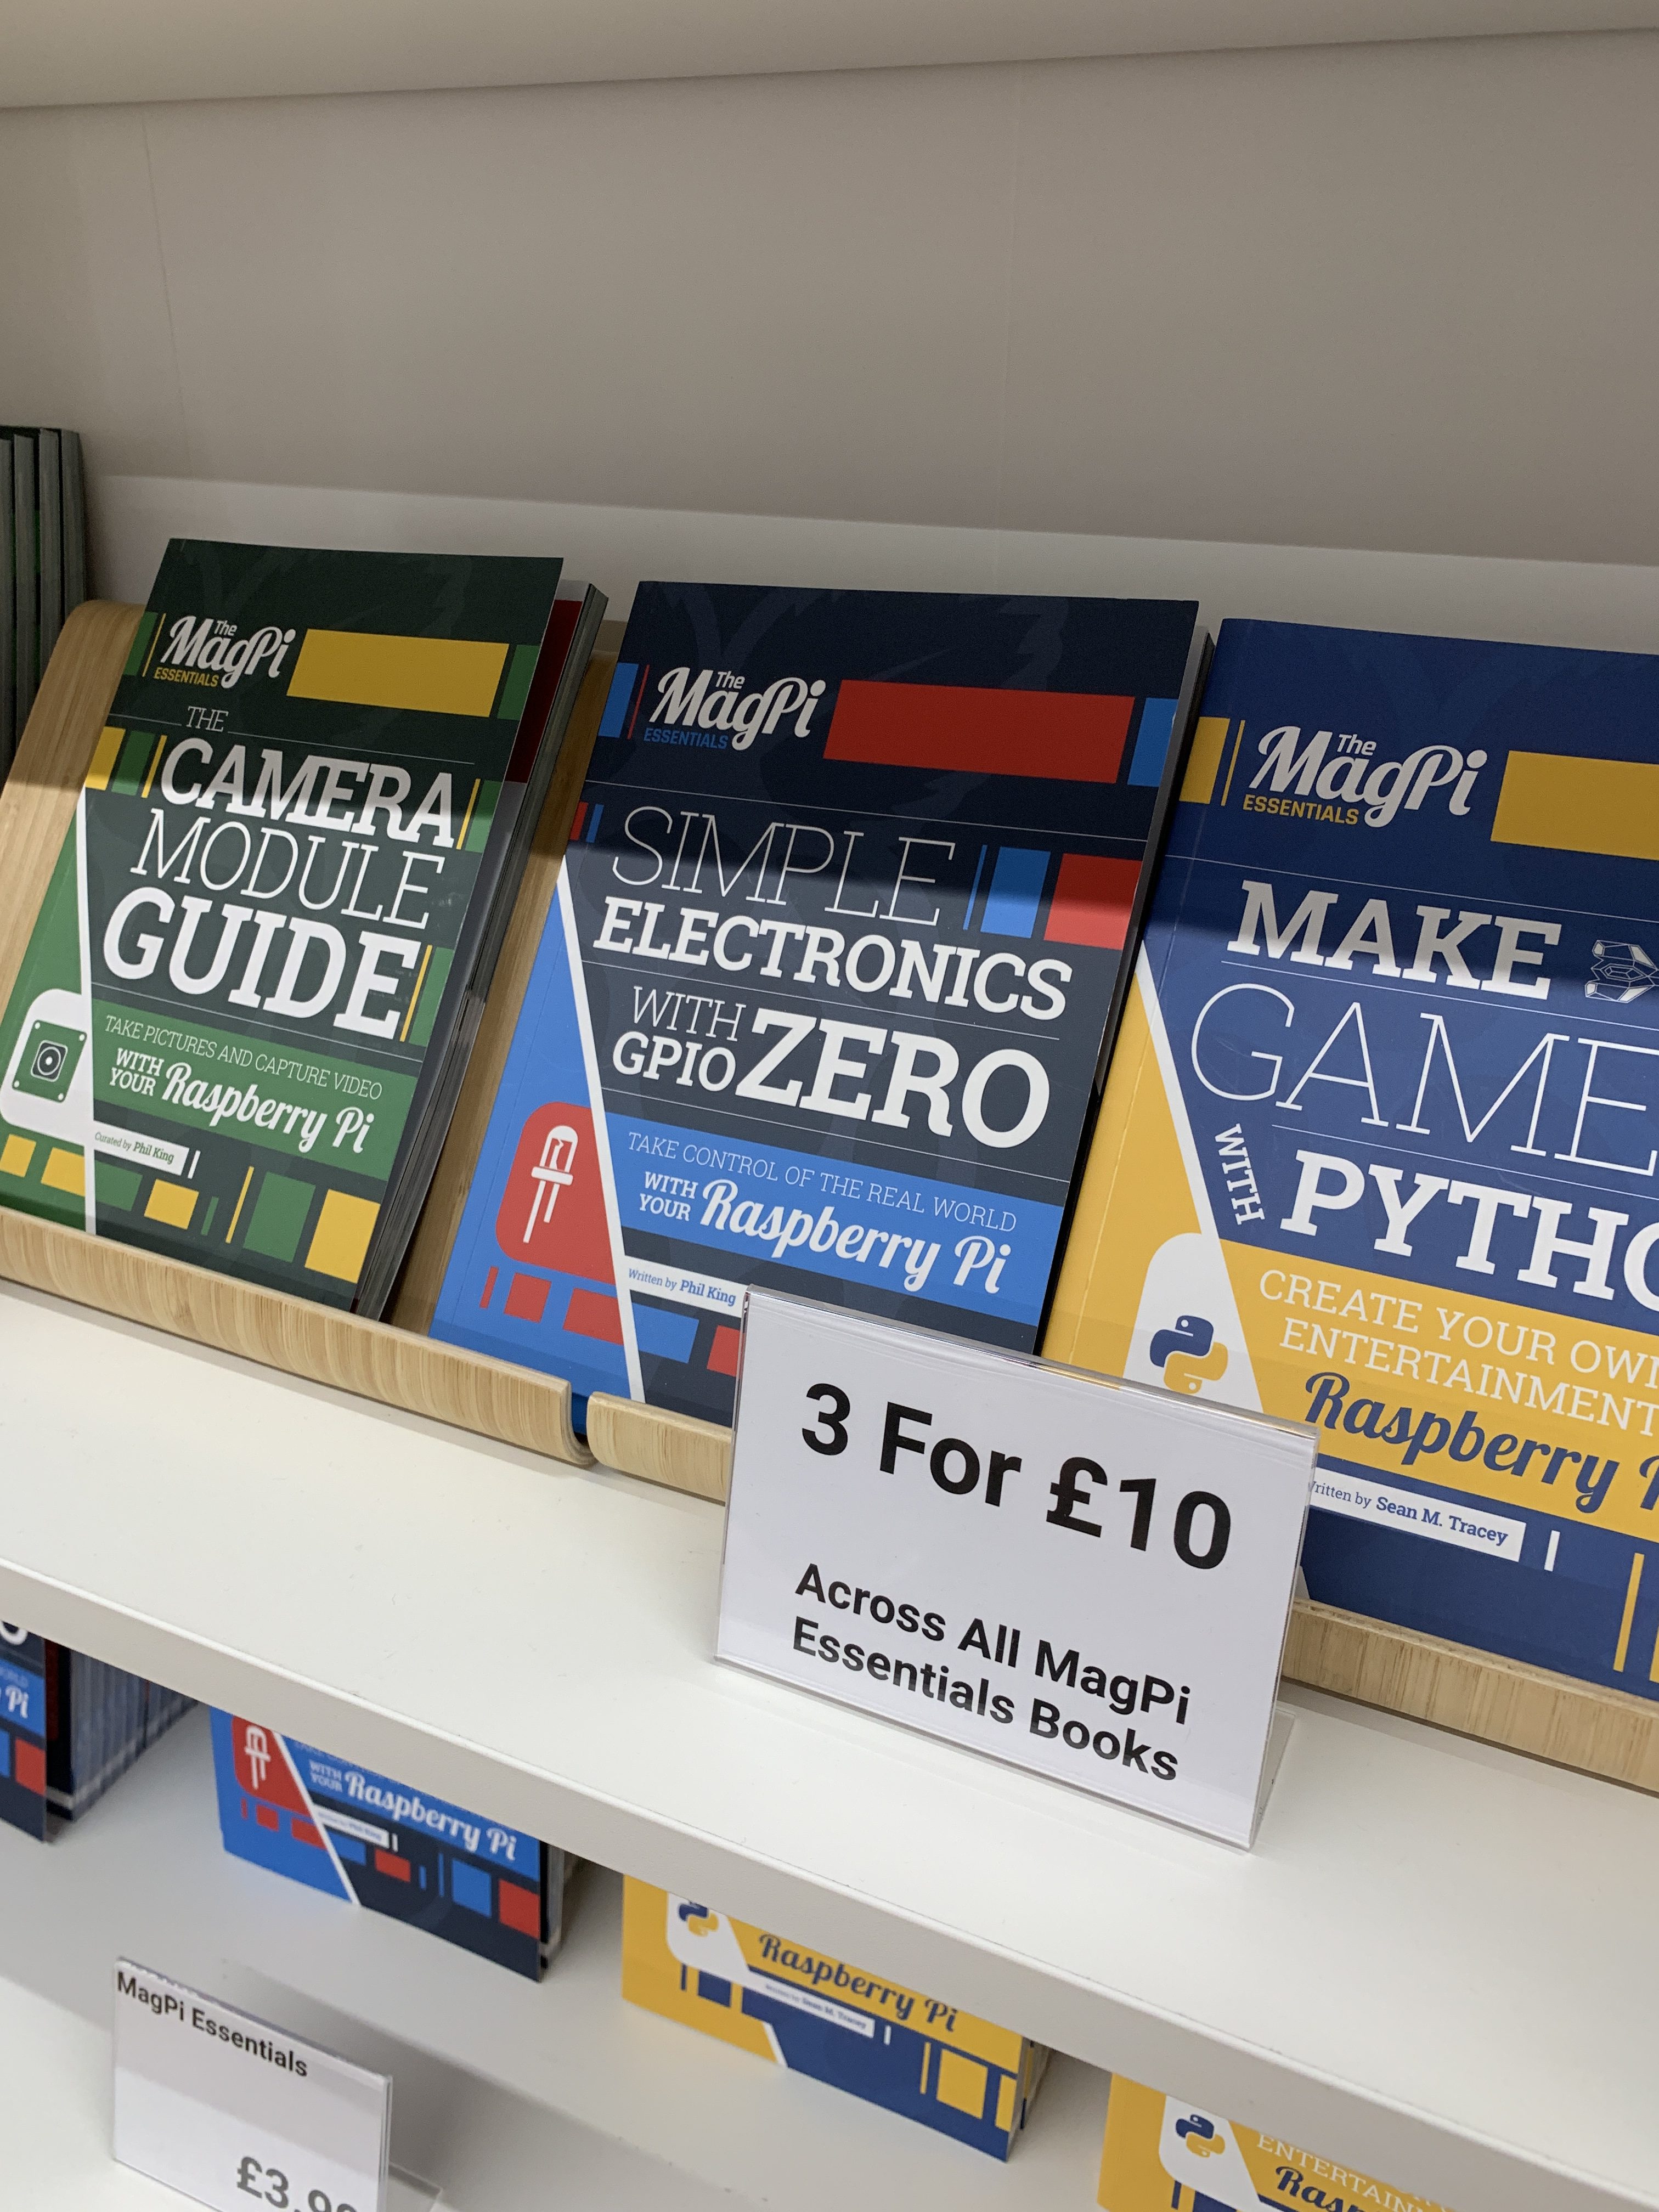
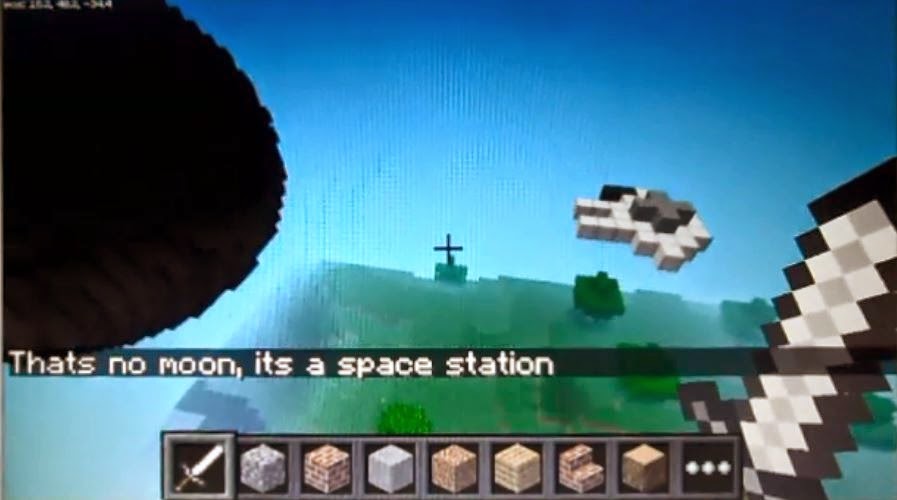
At £3.99 each, the Essentials Guides cover a range of topics, including Learning to code with C, Hacking and making in Minecraft, and Making games in Python. Our in-store offer will score you three guides for £10, which brings us nicely to…
A £10 budget? Check you out!

With added wireless LAN and Bluetooth connectivity, Raspberry Pi Zero W will cost you £9.50, leaving you 50p to buy yourself some sweets for a job well done.
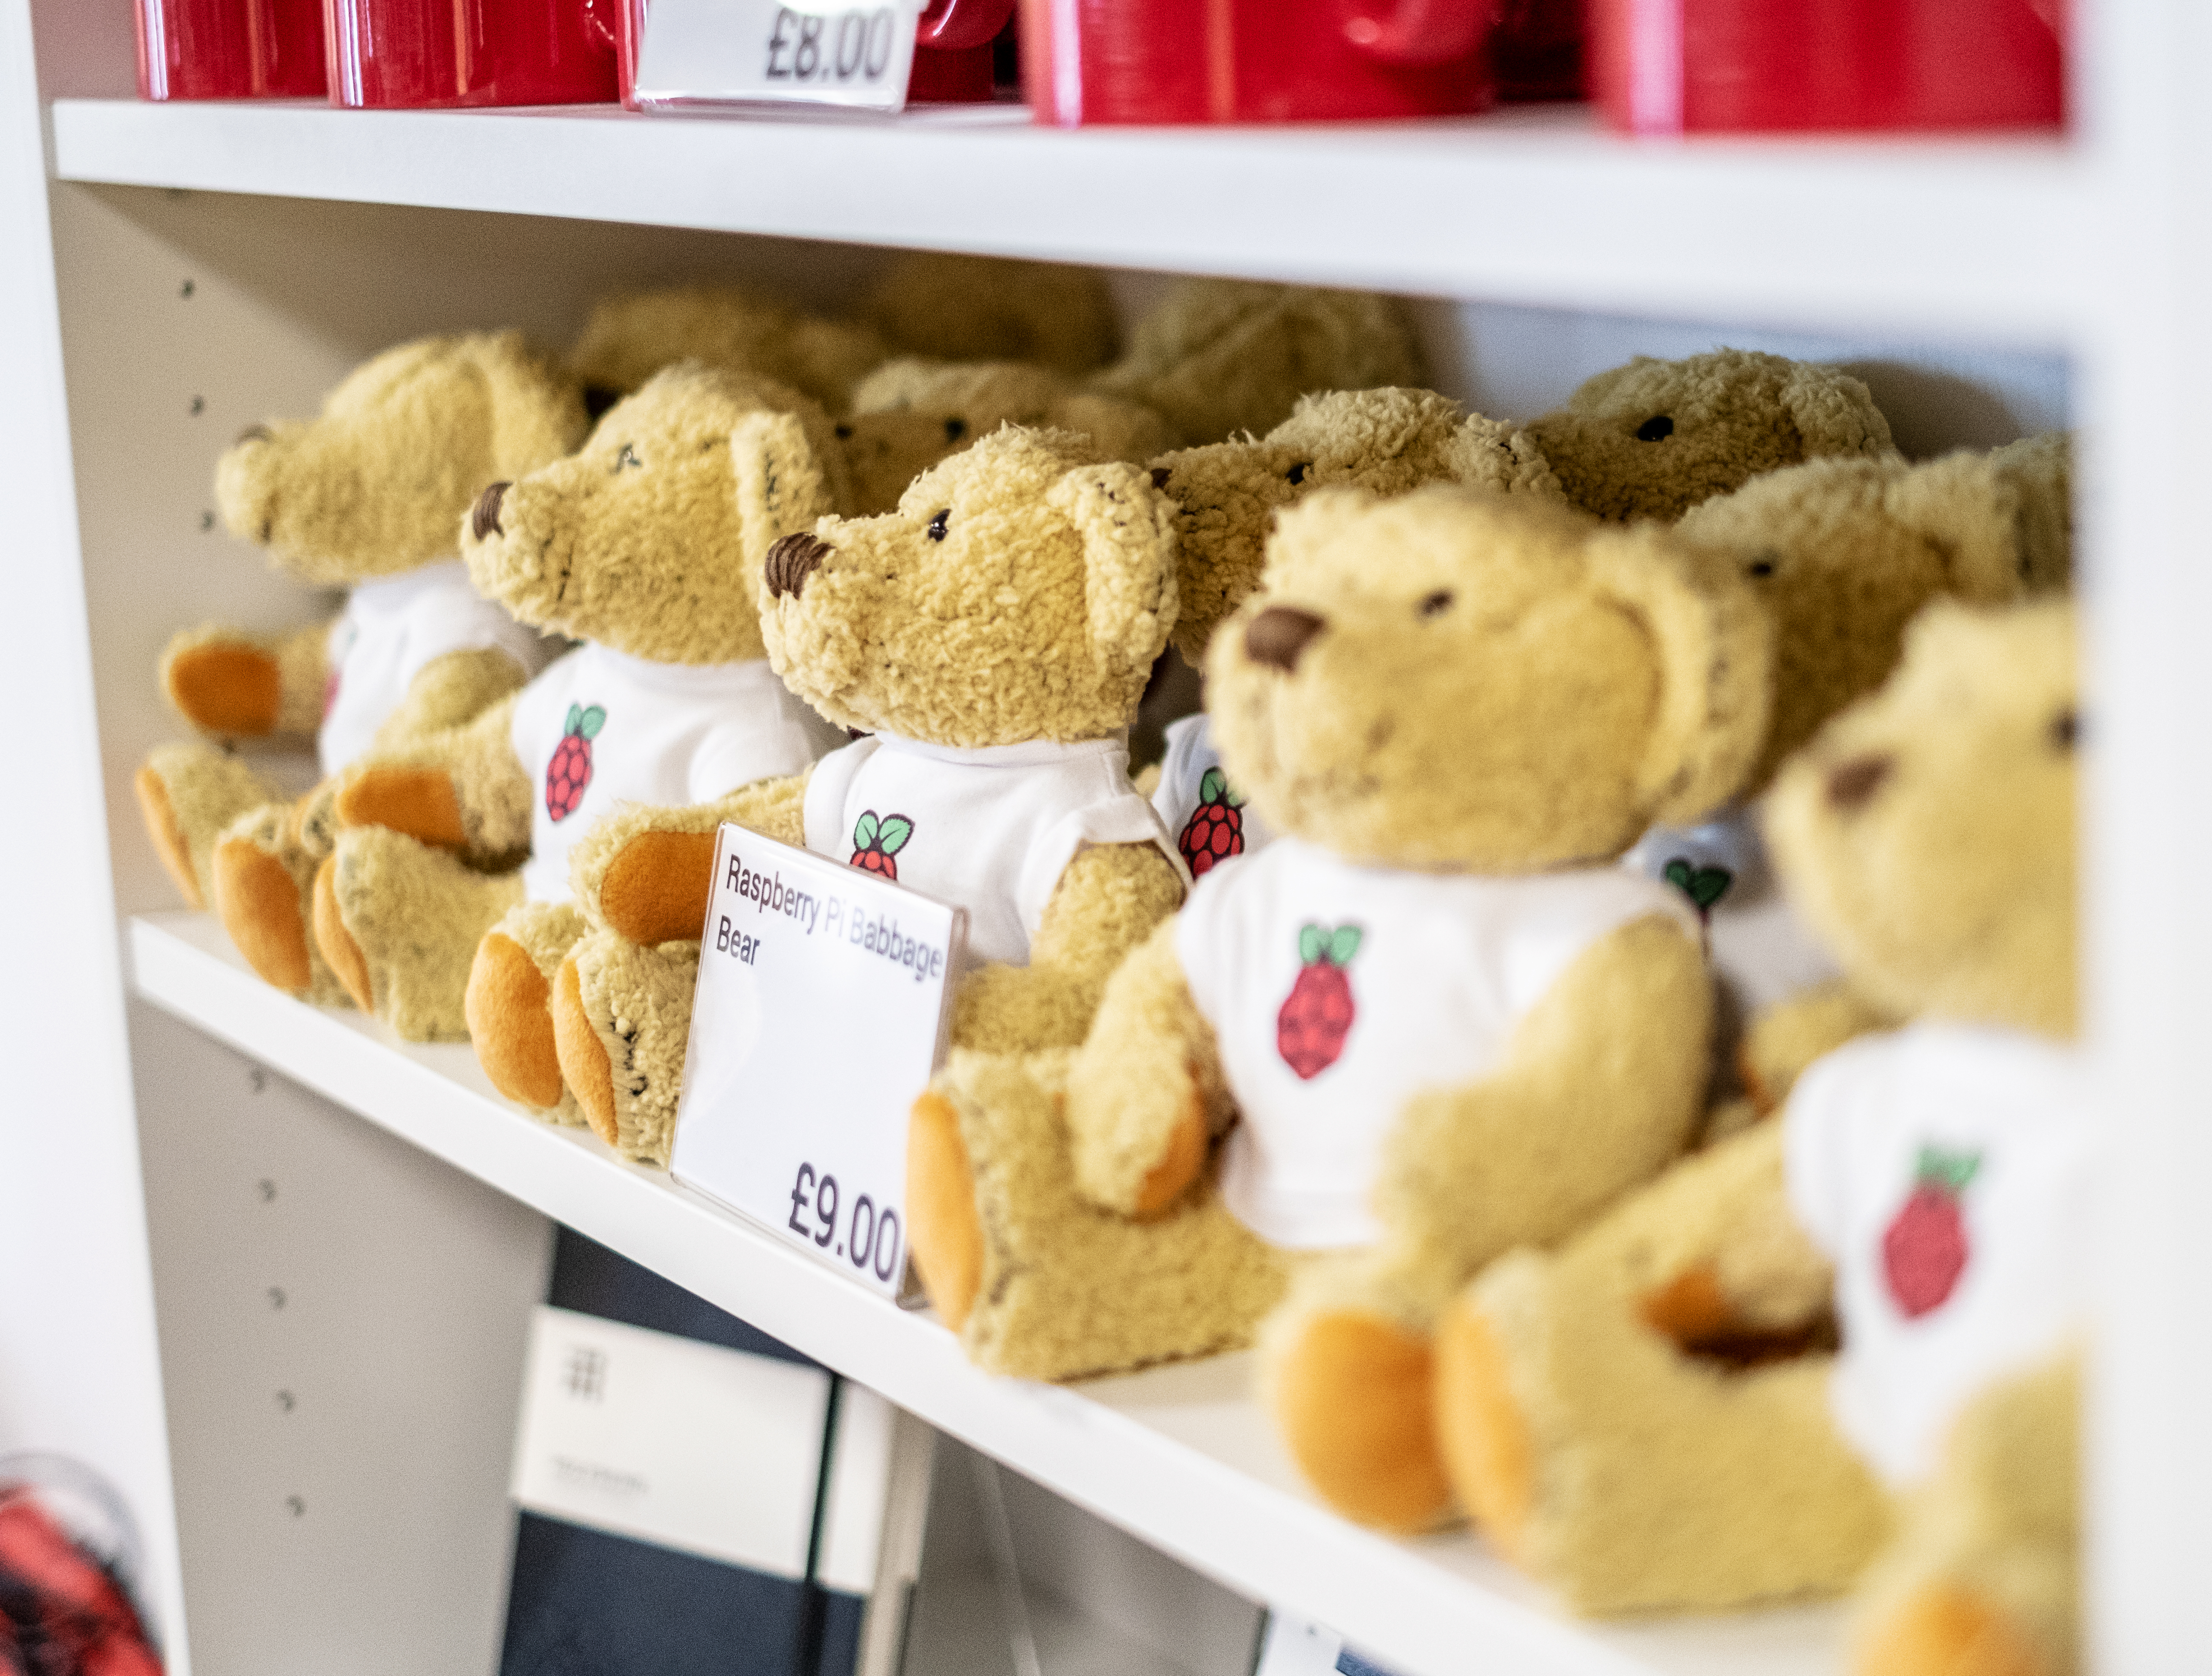
Babbage Bear, for many the face of Raspberry Pi, is the perfect gift for all ages. He’ll cost you £9, as will any of his Adafruit friends.
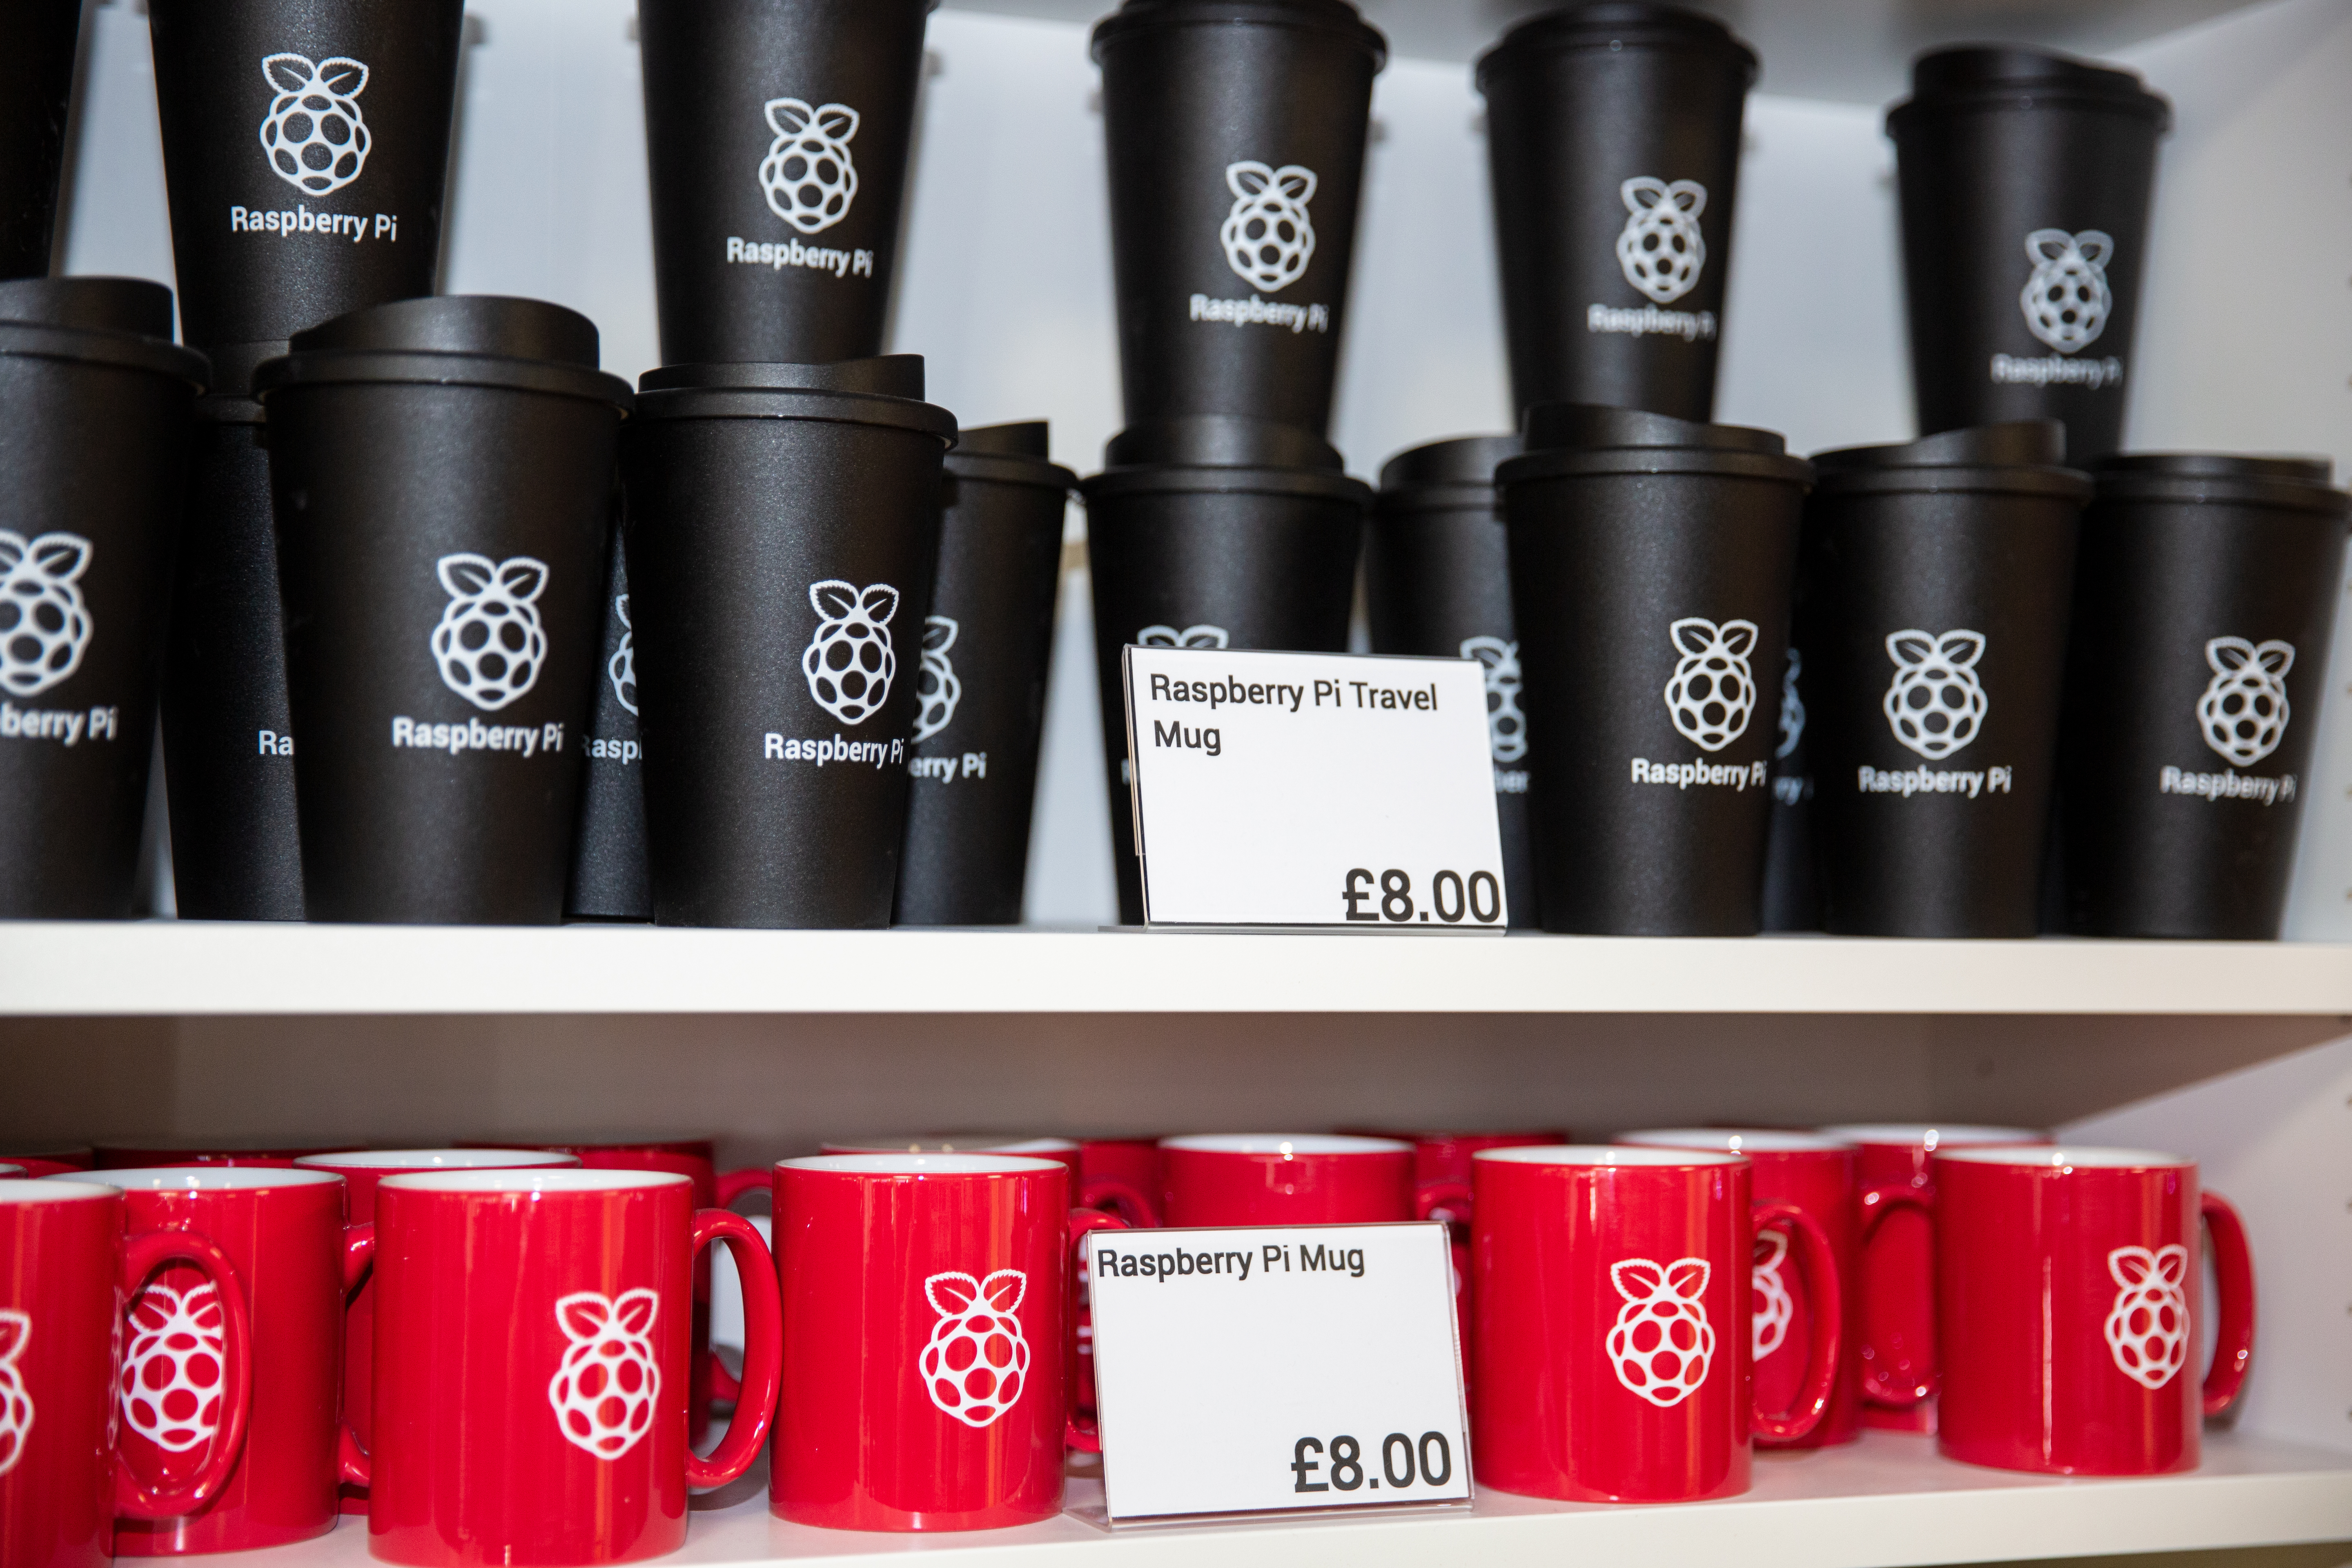
What do you buy for the Raspberry Pi fan who has everything? A store-exclusive travel cup. At £8 each, our branded drinkware is rather swell, even if we do say so ourselves.

Ranging in price from £3.99 to around £15, our Raspberry Pi Press books and magazines are a great gift for anyone looking to learn more about making, electronics, or video gaming.
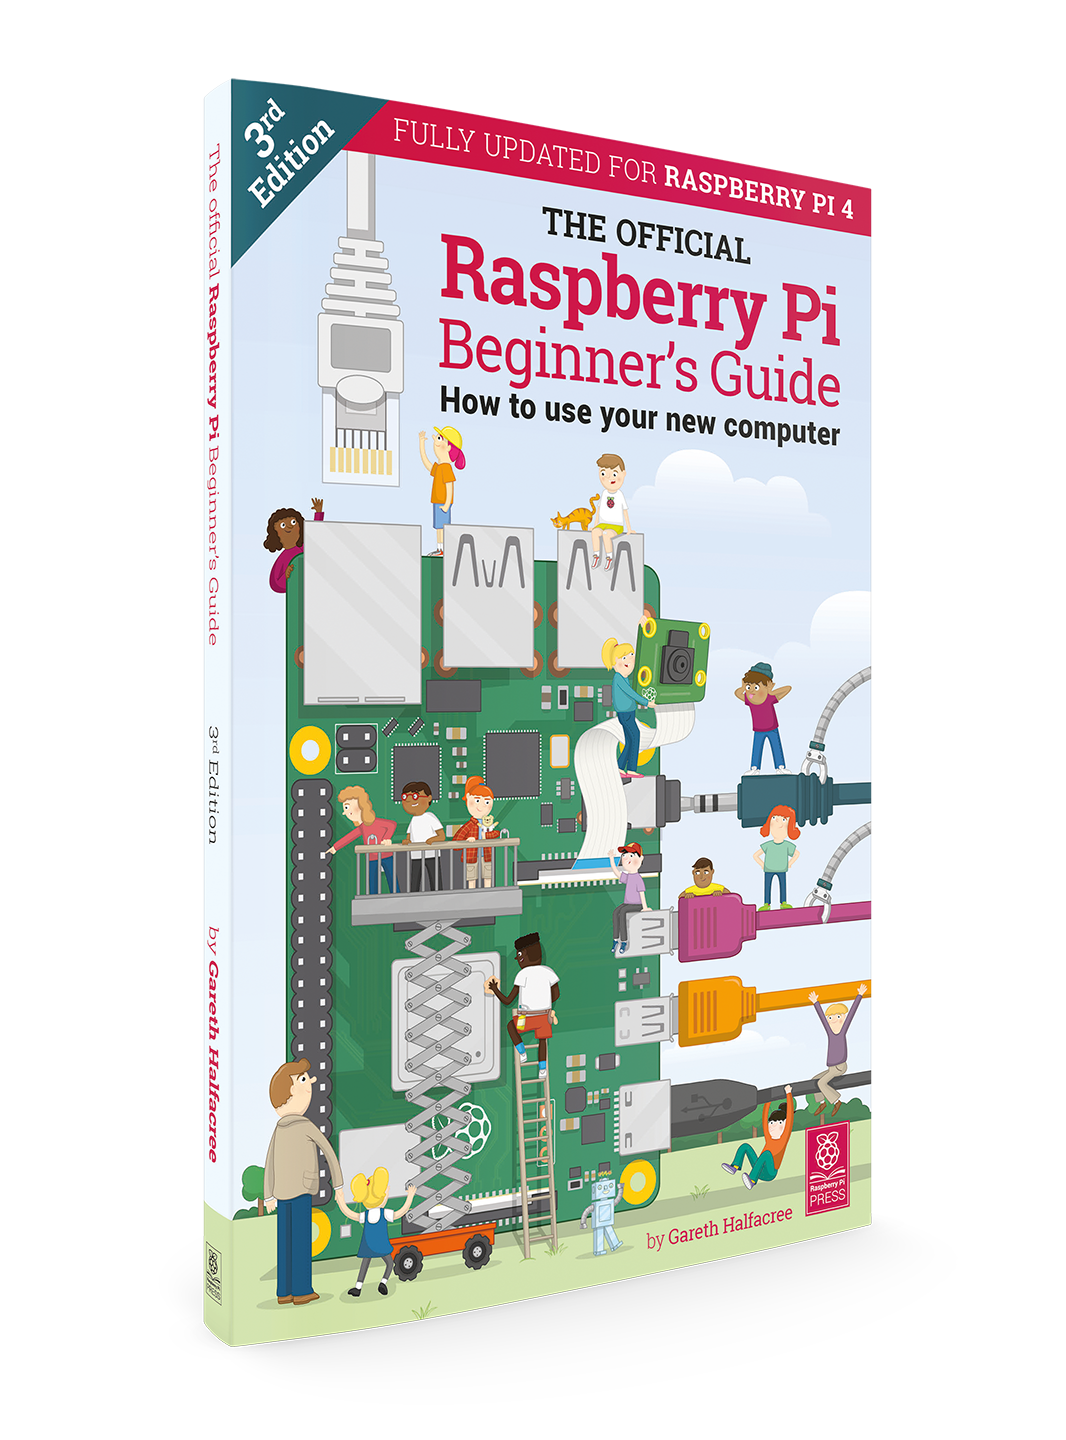
If you’ve heard your Secret Santa match mention that they like tinkering and making in their spare time, but you don’t think they’ve tried Raspberry Pi yet, this is the book for them. Updated to include the new Raspberry Pi 4 and upgrades to Scratch 3, our Beginner’s Guide will help them get started with this fabulous addition to their toolkit.
These gifts are a little more than £10, and worth every penny. They’d make the perfect gift for anyone who loves making and Raspberry Pi.
The Bearable badges are cute, light-activated LED badges that require no soldering or external computers. Instead, the kit uses conductive thread and sensors, making it a wonderful maker project for anyone, whether or not they’ve done any electronics before. Choose between an adorable sleepy fox and a lovable little bear, both at £15.
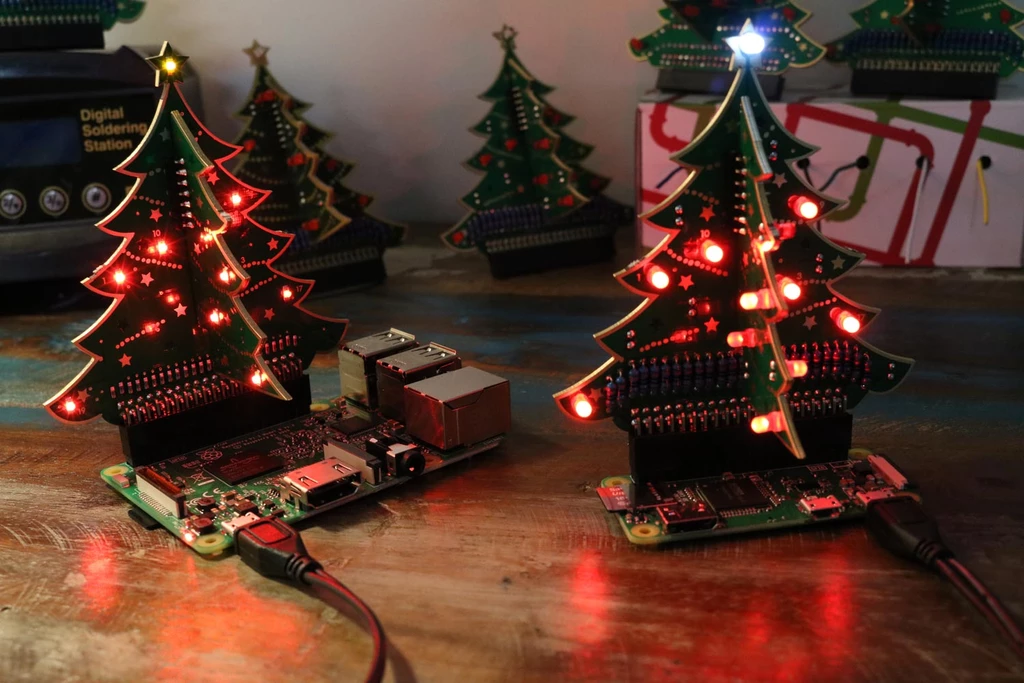
Available both as a pre-soldered kit (£15) and as a solder-yourself kit (£12), the 3D Xmas Tree is the ultimate festive HAT for Raspberry Pi. Once it’s assembled, you can use pre-written code to light it up, or code your own light show.

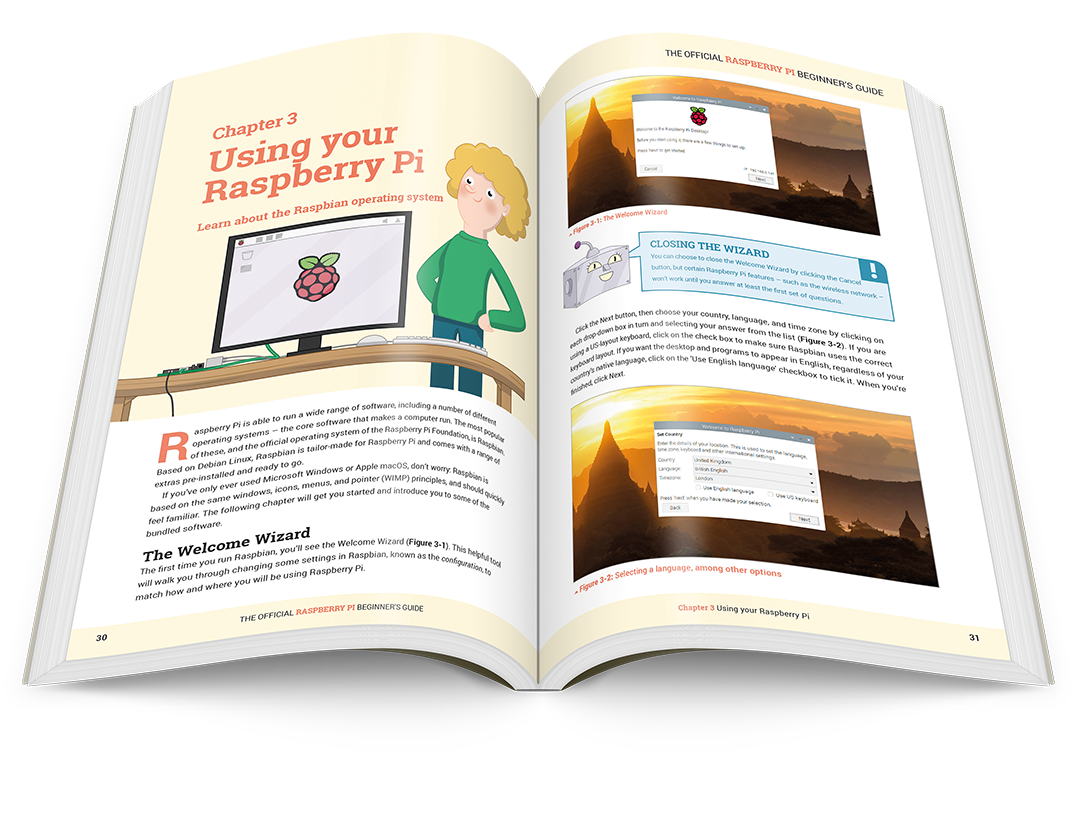
The Raspberry Pi Store now offers gift cards, giving your giftee the chance to pick their own present. Add whatever value you’d like from a minimum of £5, and watch them grin with glee as they begin to plan their next project.
Plus, our wonderful Jack has designed these rather lovely Christmas tote bags, available exclusively in store and as a limited run!
We’ll be publishing our traditional Raspberry Pi gift guide soon. It’ll include all the tech and cool maker stuff your nearest and dearest will love to receive this holiday season, with links to buy online. If you think there’s something we shouldn’t miss, let us know in the comments below.
The post Secret Santa ideas for the Raspberry Pi fan in your office appeared first on Raspberry Pi.
These Raspberry Pis take hourly photographs of snails in plastic container habitats, sharing them to the Snail Habitat website.
While some might find them kind of icky, I am in love with snails (less so with their homeless cousin, the slug), so this snail habitat project from Mrs Nation’s class is right up my alley.
This project was done in a classroom with 22 students. We broke the kids out into groups and created 5 snail habitats. It would be a great project to do school-wide too, where you create 1 snail habitat per class. This would allow the entire school to get involved and monitor each other’s habitats.
Each snail habitat in Mrs Nation’s class is monitored by a Raspberry Pi and camera module, and Misty Lackie has written specific code to take a photo every hour, uploading the image to the dedicated Snail Habitat website. This allows the class to check in on their mollusc friends without disturbing their environment.
“I would love to see others habitats,” Misty states on the project’s GitHub repo, “so if you create one, please share it and I would be happy to publish it on snailhabitat.com.”

The post Raspberry Pi snail habitats for Mrs Nation’s class appeared first on Raspberry Pi.
The Raspberry Pi Press is really excited to announce the release of Get Started with Raspberry Pi. This isn’t just a book about a computer: it’s a book with a computer.
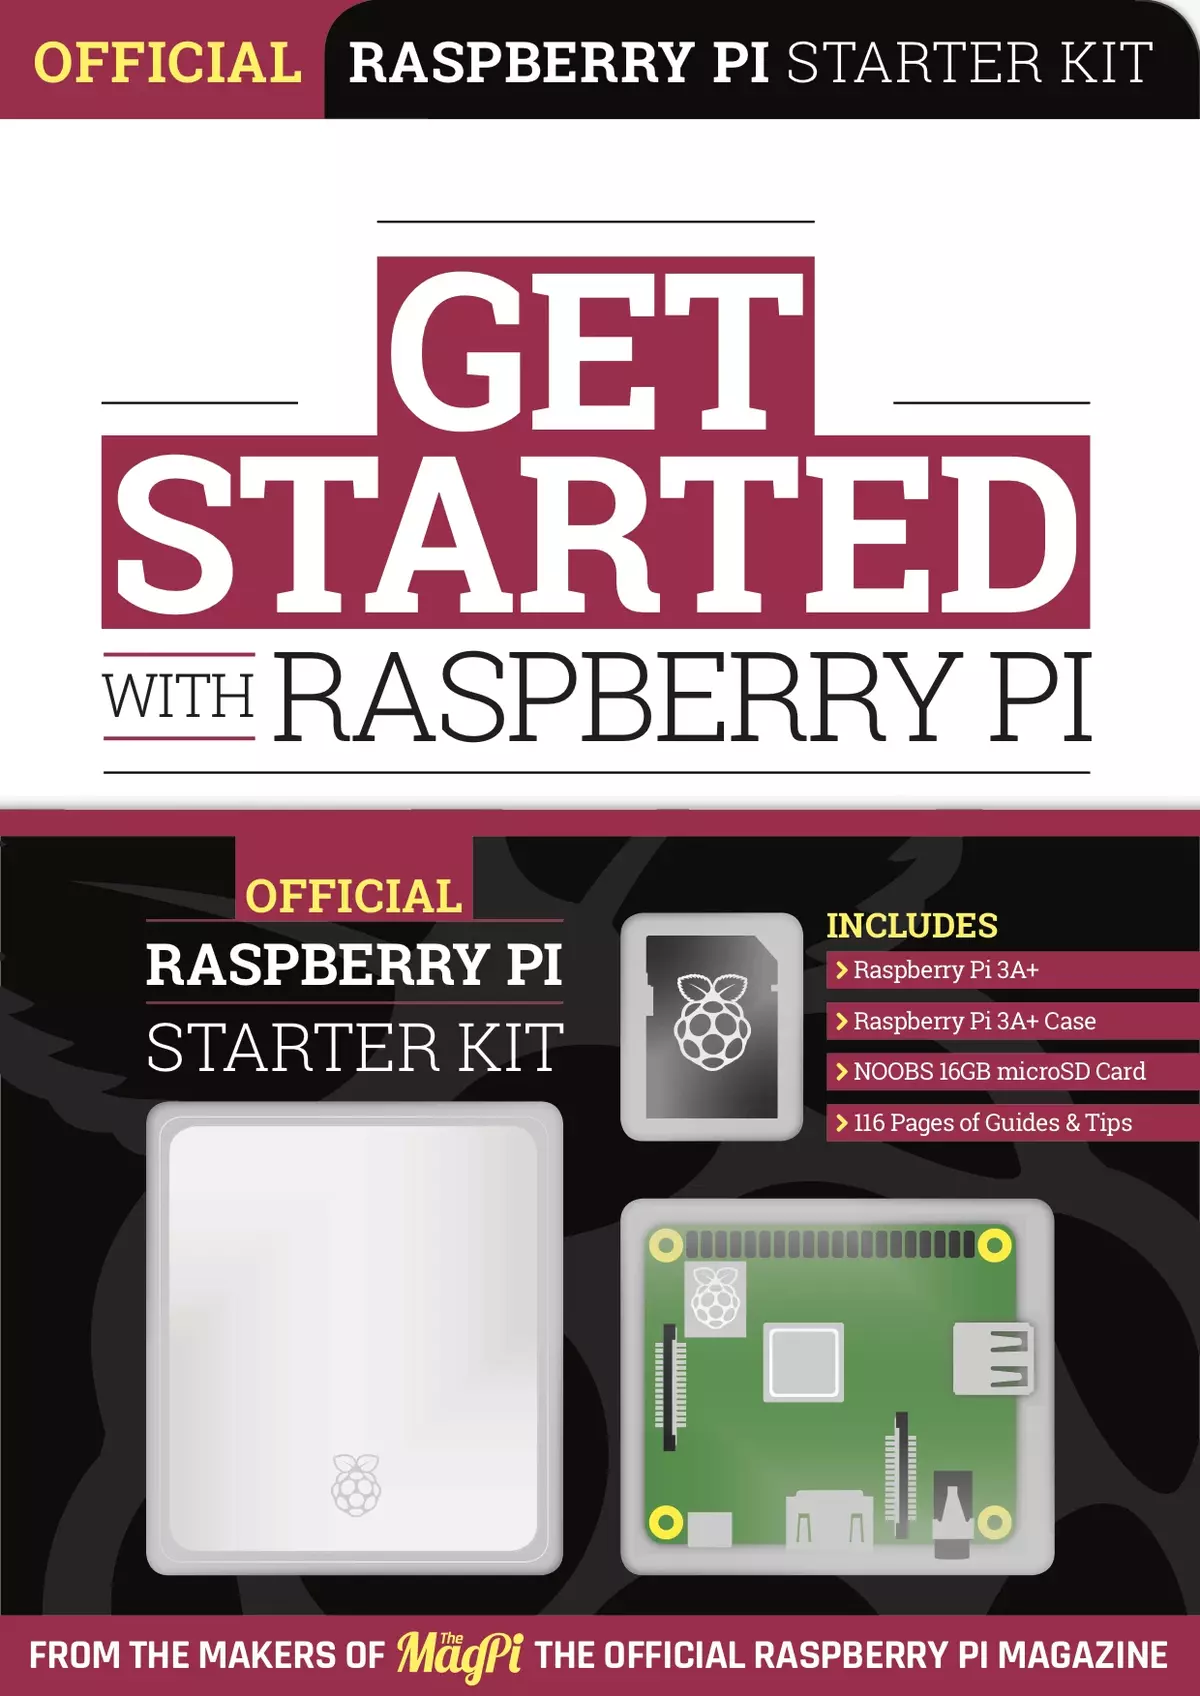
Ideal for beginners, this official guide and starter kit contains everything you need to get started with Raspberry Pi.
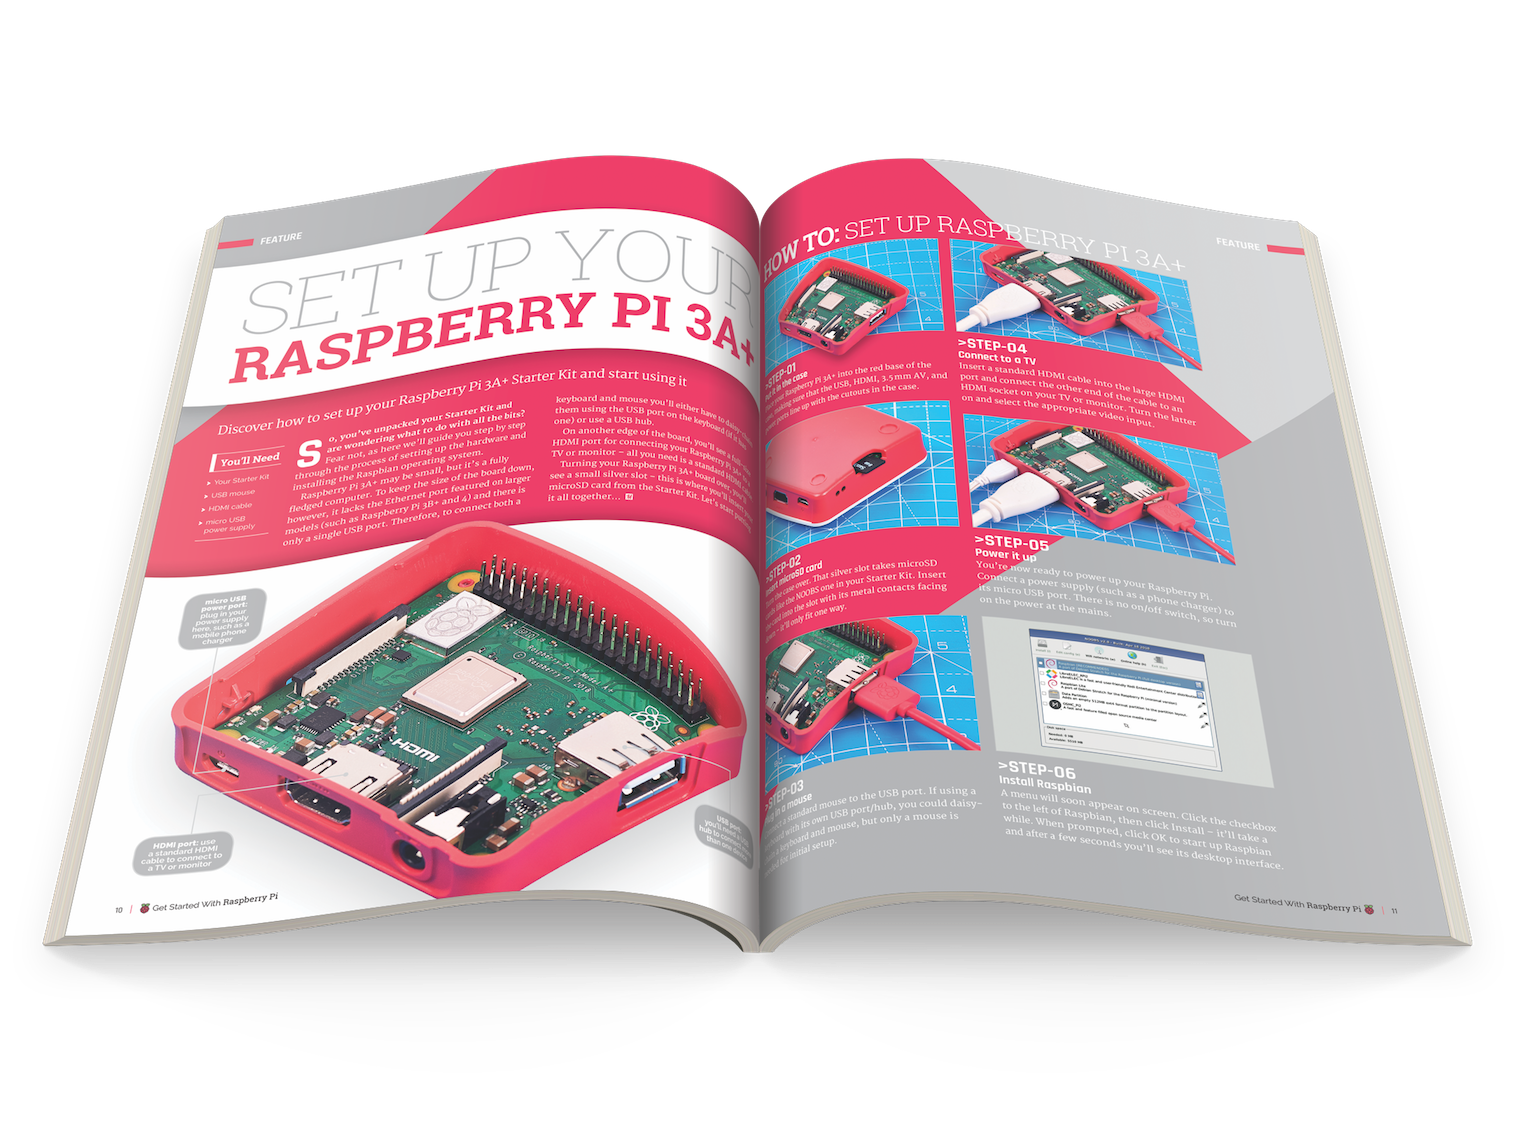
Inside you’ll find a Raspberry Pi 3A+, the official case, and a 16GB microSD memory card – preloaded with NOOBS, containing the Raspbian operating system. The accompanying 116-page book is packed with beginner’s guides to help you master your new Raspberry Pi!

A brilliant Christmas gift idea, it’s available now in the Raspberry Pi Press store. As always, we have also released the guide as a free PDF – minus the 3A+, case and SD card, of course!
And that’s not all! We have also created a new edition of our popular Raspberry Pi Beginner’s Guide book.
As well as covering Raspberry Pi 4, this 252-page book features programming and physical computing projects updated for Scratch 3, which is available in the latest version of Raspbian.
It’s available now in the Raspberry Pi Press Store, with free worldwide delivery. And, as always, you can also download a free PDF version.
Curious minds should make note that Raspberry Pi Press releases free downloadable PDFs of all publications on launch day. Why? Because, in line with our mission statement, we want to put the power of computing and digital making into the hands of people all over the world, and that includes the wealth of information we publish as part of Raspberry Pi Press.
We publish new issues of Wireframe magazine every two weeks, new issues of HackSpace magazine and The MagPi magazine every month, and project books such as The Book of Making, Wearable Tech Projects, and An Introduction to C & GUI Programming throughout the year.
If you’d like to own a physical copy of any of our publications, we offer free international shipping across most of our product range. You’ll also find many of our magazines in top UK supermarkets and newsagents, and in Barnes and Noble in the US.
The post New book (with added computer): Get Started with Raspberry Pi appeared first on Raspberry Pi.
We love Raspberry Pi for how it’s helping a new generation of children learn to code, how it’s resulted in an explosion of new makers of all ages, and how it’s really easy to turn any TV into a smart TV.
While we always have a few Raspberry Pi computers at hand for making robots and cooking gadgets, or just simply coding a Scratch game, there’s always at least one in the house powering a TV. With the release of the super-powered Raspberry Pi 4, it’s time to fully upgrade our media centre to become a 4K-playing powerhouse.
We asked Wes Archer to take us through setting one up. Grab a Raspberry Pi 4 and a micro-HDMI cable, and let’s get started.
Only Raspberry Pi 4 can output at 4K, so it’s important to remember this when deciding on which Raspberry Pi to choose.
Raspberry Pi has been a perfect choice for a home media centre ever since it was released in 2012, due to it being inexpensive and supported by an active community. Now that 4K content is fast becoming the new standard for digital media, the demand for devices that support 4K streaming is growing, and fortunately, Raspberry Pi 4 can handle this with ease! There are three versions of Raspberry Pi 4, differentiated by the amount of RAM they have: 1GB, 2GB, or 4GB. So, which one should you go for? In our tests, all versions worked just fine, so go with the one you can afford.
Made of aluminium and designed to be its own heatsink, the Flirc case for Raspberry Pi 4 is a perfect choice and looks great as part of any home media entertainment setup. This will look at home in any home entertainment system.
The official Raspberry Pi 4 case is always a good choice, especially the black and grey edition as it blends in well within any home entertainment setup. If you’re feeling adventurous, you can also hack the case to hold a small fan for extra cooling.
Another case made of aluminium, this is effectively a giant heatsink that helps keep your Raspberry Pi 4 cool when in use. It has a choice of three colours – black, gold, and gunmetal grey – so is a great option if you want something a little different.

4K content can be quite large and your storage will run out quickly if you have a large collection. Having an external hard drive connected directly to your Raspberry Pi using the faster USB 3.0 connection will be extremely handy and avoids any streaming lag.
![]()
The extra power Raspberry Pi 4 brings means things can get quite hot, especially when decoding 4K media files, so having a fan can really help keep things cool. Pimoroni’s Fan SHIM is ideal due to its size and noise (no loud buzzing here). There is a Python script available, but it also “just works” with the power supplied by Raspberry Pi’s GPIO pins.
If you are feeling adventurous, you can add a Raspberry Pi TV HAT to your 4K media centre to enable the DVR feature in Kodi to watch live TV. You may want to connect your main aerial for the best reception. This will add a perfect finishing touch to your 4K media centre.
If your TV does not support HDMI-CEC, allowing you to use your TV remote to control Kodi, then this nifty wireless keyboard is extremely helpful. Plug the USB dongle into your Raspberry Pi, turn on the keyboard, and that’s it. You now have a mini keyboard and mouse to navigate with.
Looking to read the rest of this article? We don’t blame you. Build the ultimate 4K home theatre PC using a Raspberry Pi 4 and Kodi is this month’s feature article for the brand-new MagPi magazine issue 87, out today.
You can read issue 87 today, for free, right now, by visiting The MagPi website.
You can also purchase issue 87 from the Raspberry Pi Press website with free worldwide delivery, from the Raspberry Pi Store, Cambridge, and from newsagents and supermarkets across the UK.
The post Build the ultimate 4K home theatre PC using a Raspberry Pi 4 and Kodi appeared first on Raspberry Pi.
Sean Hodgins is back with a new Halloween-themed project, this time using a pico projector and a Raspberry Pi Zero to display images and animations onto a mask.
It’s kinda creepy but very, very cool.
Face Changing Projection Mask – Be Anyone
Have a hard time deciding what to be on Halloween? Just be everything. Some links for the project below. Support my Free Open Source Projects by becoming joining the Patreon!
Sean designed his own PCB – classic Sean – to connect the header pins of a Raspberry Pi Zero to a pico projector. He used Photoshop to modify video and image files in order to correct the angle of projection onto the mask.
He then 3D-printed this low poly mask from Thingiverse, adapting the design to allow him to attach it to a welding mask headband he purchased online.
As Sean explains in the video, there are a lot of great ways you can use the mask. Our favourite suggestion is using a camera to take a photo of someone and project their own face back at them. This idea is reminiscent of the As We Are project in Columbus, Ohio, where visitors sit inside a 14-foot tall head as their face is displayed on screens covering the outside.
For more of Sean’s excellent Raspberry Pi projects, check out his YouTube channel, and be sure to show him some love by clicking the ol’ subscribe button.
The post Project anyone’s face onto your own with Raspberry Pi Zero appeared first on Raspberry Pi.
Earlier this year, James Conger built a chartplotter for his boat using a Raspberry Pi. Here he is with a detailed explanation of how everything works:
Building your own Chartplotter with a Raspberry Pi and OpenCPN
Provides an overview of the hardware and software needed to put together a home-made Chartplotter with its own GPS and AIS receiver. Cost for this project was about $350 US in 2019.
The entire build cost approximately $350. It incorporates a Raspberry Pi 3 Model B+, dAISy AIS receiver HAT, USB GPS module, and touchscreen display, all hooked up to his boat.
Perfect for navigating the often foggy San Francisco Bay, the chartplotter allows James to track the position, speed, and direction of major vessels in the area, superimposed over high-quality NOAA nautical charts.
For more nautically themed Raspberry Pi projects, check out Rekka Bellum and Devine Lu Linvega’s stunning Barometer and Ufuk Arslan’s battery-saving IoT boat hack.
The post Build a Raspberry Pi chartplotter for your boat appeared first on Raspberry Pi.
We are delighted to announce a new partnership that will ensure the long-term growth and success of the free, annual UK Bebras Computational Thinking Challenge.
‘Bebras’ means ‘beaver’ in Lithuanian; Prof. Valentina Dagiene named the competition after this hard-working, intelligent, and lively animal.
The Raspberry Pi Foundation has teamed up with Oxford University to support the Bebras Challenge, which every November invites students to use computational thinking to solve classical computer science problems re-worked into accessible and interesting questions.
Bebras is:
![]()
Bebras is an international challenge that started in Lithuania in 2004. Participating in Bebras is a great way to engage students of all ages in the fun of problem solving, and to give them an insight into computing and what it’s all about. Computing principles are highlighted in the answers, so Bebras can be quite educational for teachers too.
The UK became involved in Bebras for the first time in 2013, and the numbers of participating students have increased from 21,000 in the first year to 202,000 last year. Internationally, more than 2.78 million learners took part in 2018.
To give you a taste of what Bebras involves, try this example question!
You’ve still got three more days to sign up for this year’s Bebras Challenge.
The annual challenge is only one part of the equation: questions from previous years are available as a resource with which teachers can create self-marking quizzes to use with their classes! This means you can support the computational thinking part of the school curriculum throughout the whole year.
![]()
You can also use the Bebras App to try 100 computational thinking problems, and download sets of Bebras Cards for primary schools.
Follow @bebrasuk to stay up to date with what’s on offer for you.
The post The Raspberry Pi Foundation and Bebras appeared first on Raspberry Pi.
Why hunch over a laptop when you can use Raspberry Pi 4 to build a portable computer just for you? Here’s how HackSpace magazine editor Ben Everard did just that…
Yes, I have mislaid the CAPS LOCK and function keys from the keyboard. If you come across them in the Bristol area, please let me know.
When Raspberry Pi 4 came out, I was pleasantly surprised by how the more powerful processor and enhanced memory allowed it to be a serious contender for a desktop computer. However, what if you don’t have a permanent desk? What if you want a more portable option? There are plenty of designs around for laptops built using Raspberry Pi computers, but I’ve never been that keen on the laptop form factor. Joining the screen and keyboard together always makes me feel like I’m either slumped over the screen or the keyboard is too high. I set out to build a portable computer that fitted my way of working rather than simply copying the laptop design that’s been making our backs and fingers hurt for the past decade.
Deciding where to put the parts on the plywood backing
I headed into the HackSpace magazine workshop to see what I could come up with.
A few things I wanted to consider from a design point of view:
• Material. Computer designers have decided that either brushed aluminium or black plastic are the options for computers, but ever since I saw the Novena Heirloom laptop, I’ve wanted one made in wood. This natural material isn’t necessarily perfectly suited to computer construction, but it’s aesthetically pleasing and in occasionally stressful work environments, wood is a calming material. What’s more, it’s easy to work with common tools.
• Screen setup. Unsurprisingly, I spend a lot of my time reading or writing. Landscape screens aren’t brilliant choices for this, so I wanted a portrait screen. Since Raspberry Pi 4 has two HDMI ports, I decided to have two portrait HDMI screens. This lets me have one to display the thing we’re doing, and one to have the document to write about the thing we’re doing.
• No in-built keyboard or mouse. Unlike a laptop, I decided I wanted to work with external input devices to create a more comfortable working setup.
• Exposed wiring. There’s not a good reason for this — we just like the aesthetic (but it does make it easier to hack an upgrade in the future).
A few things I wanted to consider from a technical point of view:
• Cooling. Raspberry Pi can run a little hot, so I wanted a way of keeping it cool while still enabling the complete board to be accessible for working with the GPIO.
• Power. Raspberry Pi needs 5 V, but most screens need 12 V. I wanted my computer to have just a single power in. Having this on a 12 V DC means I can use an external battery pack in the future.
There’s no great secret to this build. I used two different HDMI screens (one 12 inches and one 7 inches) and mounted them on 3 mm plywood. This gives enough space to mount my Raspberry Pi below the 7-inch screen. This plywood backing is surrounded by a 2×1 inch pine wall that’s just high enough to expand beyond the screens. There’s a slight recess in this pine surround that a plywood front cover slots into to protect the screens during transport. The joints on the wood are particularly unimpressive being butt joints with gaps in. The corners are secured by protectors which I fabricated from 3 mm aluminium sheet (OK, fabricated is a bit of a grand word — we cut, bent, and drilled them from 3 mm aluminium sheet).
You can get smaller voltage converters than this, but we like the look of the large coil and seven-segment display
I made this machine quickly as we intended it to be a prototype. I fully expected that the setup would prove too unusual to be useful and planned to disassemble it and make a different form factor after I’d learned what worked and what didn’t. However, so far, I’m happy with this setup and don’t have any plans to redesign it soon.
Power comes in via a 5.1 mm jack. This goes to both the monitors and a buck converter which steps it down to 5 V for Raspberry Pi and fan (the converter has a display showing the current voltage because I like the look of seven-segment displays). Power is controlled by three rocker switches (because I like rocker switches rather than soft switches), allowing you to turn Raspberry Pi, fan, and screens on and off separately.
We used a spade drill bit and a Dremel with a sanding attachment to carve out the space for our Raspberry Pi
We’ve had to cut USB and power cables and shorten them to make them fit nicely in the case.
We had to cut quite a lot of cables up to make them fit. Fortunately, most have sensibly coloured inners to help you understand what does what
The only unusual part of the build was the cooling for Raspberry Pi. Since I wanted to leave the body of my Raspberry Pi free, that meant that I had to have a fan directing air over the CPU from the side. After jiggling the fan into various positions, I decided to mount it at 45 degrees just to the side of the board. I needed a mount for this — 3D printing would have worked well, but I’d been working through the Power Carving Manual reviewed in issue 23, so put these skills to the test and whittled a bit of wood to the right shape. Although power carving is usually used to produce artistic objects, it’s also a good choice for fabrication when you need a bit of a ‘try-and-see’ approach, as it lets you make very quick adjustments.
Overall, my only disappointment with the making of this computer is the HDMI cables. I decided not to cut and splice them to the correct length as the high-speed nature of the HDMI signal makes this unreliable. Instead, I got the shortest cables I could and jammed them in.
We control the fan via a switch rather than automatically for two reasons: so we can run silently when we want, and so all the GPIO pins are available for HATs and other expansions
In use, I’m really happy with my new computer. So far, it has proved sturdy and reliable, and our design decisions have been vindicated by the way it works for me. Having two portrait screens may seem odd, but at least for technology journalists it’s a great option. The 7-inch screen may seem little, but these days most websites have a mobile-friendly version that renders well in this size, and it’s also big enough for a terminal window or Arduino IDE. A few programs struggle to work in this form factor (we’re looking at you, Mu).
Our corners are not the best joints, but the metal surrounds ensure they are strong and protected from bumps (oh, and we like the look of them)
We live in a world where — for many of us — computers are an indispensable tool that we spend most of our working lives using, yet the options for creating ones that are personal and genuinely fit our way of working are slim. We don’t have to accept that. We can build the machines that we want to use: build our own tools. This is a machine designed for my needs — yours may be different, but you understand them better than anyone. If you find off-the-shelf machines don’t work well for you, head to the workshop and make something that does.
HackSpace magazine is out now, available in print from your local newsagent or from the Raspberry Pi Store in Cambridge, online from Raspberry Pi Press, or as a free PDF download. Click here to find out more and, while you’re at it, why not have a look at the subscription offers available, including the 12-month deal that comes with a free Adafruit Circuit Playground!
The post Portable Raspberry Pi 4 computer | Hackspace magazine #24 appeared first on Raspberry Pi.
Raspberry Pi’s own Rik Cross shows you how to code your own Columns-style tile-matching puzzle game in Python and Pygame Zero.
Created by Hewlett-Packard engineer Jay Geertsen, Columns was Sega’s sparkly rival to Nintendo’s all-conquering Tetris.
Tile-matching games began with Tetris in 1984 and the less famous Chain Shot! the following year. The genre gradually evolved through games like Dr. Mario, Columns, Puyo Puyo, and Candy Crush Saga. Although their mechanics differ, the goals are the same: to organise a board of different-coloured tiles by moving them around until they match.
Here, I’ll show how you can create a simple tile-matching game using Python and Pygame. In it, any tile can be swapped with the tile to its right, with the aim being to make matches of three or more tiles of the same colour. Making a match causes the tiles to disappear from the board, with tiles dropping down to fill in the gaps.
At the start of a new game, a board of randomly generated tiles is created. This is made as an (initially empty) two-dimensional array, whose size is determined by the values of rows and columns. A specific tile on the board is referenced by its row and column number.
We want to start with a truly random board, but we also want to avoid having any matching tiles. Random tiles are added to each board position, therefore, but replaced if a tile is the same as the one above or to it’s left (if such a tile exists).
Our board consists of 12 rows and 8 columns of tiles. Pressing SPACE will swap the 2 selected tiles (outlined in white), and in this case, create a match of red tiles vertically.
In our game, two tiles are ‘selected’ at any one time, with the player pressing the arrow keys to change those tiles. A selected variable keeps track of the row and column of the left-most selected tile, with the other tile being one column to the right of the left-most tile. Pressing SPACE swaps the two selected tiles, checks for matches, clears any matched tiles, and fills any gaps with new tiles.
A basic ‘match-three’ algorithm would simply check whether any tiles on the board have a matching colour tile on either side, horizontally or vertically. I’ve opted for something a little more convoluted, though, as it allows us to check for matches on any length, as well as track multiple, separate matches. A currentmatch list keeps track of the (x,y) positions of a set of matching tiles. Whenever this list is empty, the next tile to check is added to the list, and this process is repeated until the next tile is a different colour.
If the currentmatch list contains three or more tiles at this point, then the list is added to the overall matches list (a list of lists of matches!) and the currentmatch list is reset. To clear matched tiles, the matched tile positions are set to None, which indicates the absence of a tile at that position. To fill the board, tiles in each column are moved down by one row whenever an empty board position is found, with a new tile being added to the top row of the board.
The code provided here is just a starting point, and there are lots of ways to develop the game, including adding a scoring system and animation to liven up your tiles.
Here’s Rik’s code, which gets a simple tile-match game running in Python. To get it working on your system, you’ll first need to install Pygame Zero. And to download the full code, go here.
You can read more features like this one in Wireframe issue 25, available now at Tesco, WHSmith, all good independent UK newsagents, and the Raspberry Pi Store, Cambridge.
Or you can buy Wireframe directly from Raspberry Pi Press — delivery is available worldwide. And if you’d like a handy digital version of the magazine, you can also download issue 25 for free in PDF format.
![]()
Make sure to follow Wireframe on Twitter and Facebook for updates and exclusive offers and giveaways. Subscribe on the Wireframe website to save up to 49% compared to newsstand pricing!
The post Make a Columns-style tile-matching game | Wireframe #25 appeared first on Raspberry Pi.
Rob made an interactive Dungeons and Dragons table using a Raspberry Pi and an old TV. He thought it best to remind me, just in case I had forgotten. I hadn’t forgotten. Honest. Here’s a photo of it.
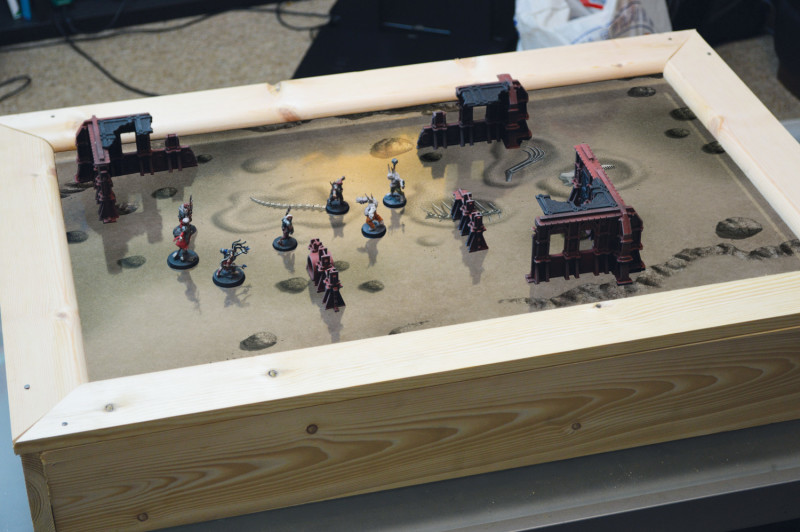
The table connects to Roll20 via Chromium, displaying the quest maps while the GM edits and reveals the layout using their laptop. Yes, they could just plug their laptop directly into the monitor, but using the Raspberry Pi as a bridge means there aren’t any awkward wires in the way, and the GM can sit anywhere they want around the table.
Rob wrote up an entire project how-to for The MagPi magazine. Go forth and read it!
The post Rob’s Raspberry Pi Dungeons and Dragons table appeared first on Raspberry Pi.
Ummm…YES PLEASE!
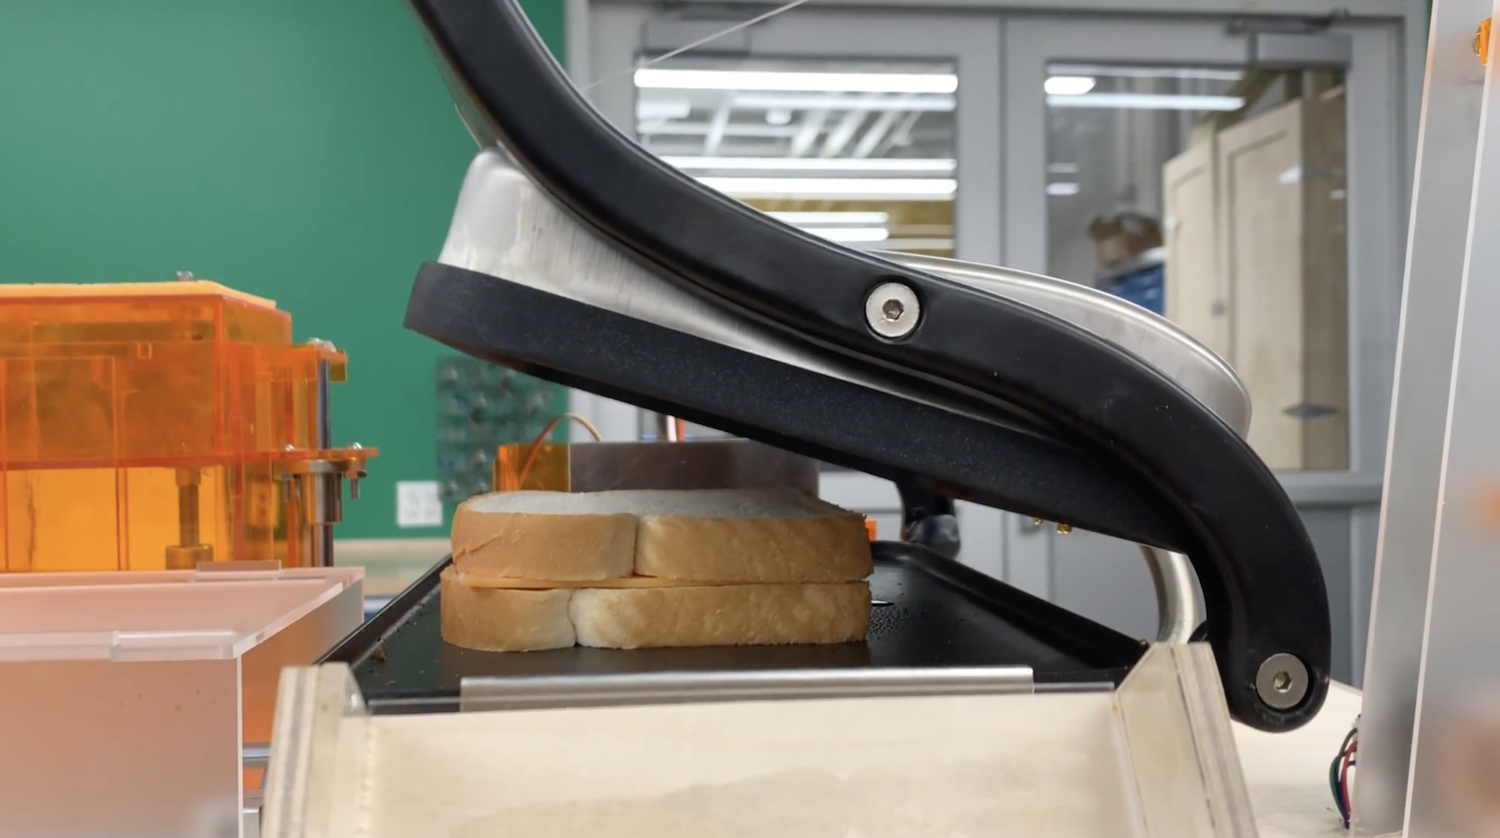
Cheeseborg: The Grilled Cheese Robot!
More cool stuff at http://www.tabb.me and http://www.evankhill.com Cheeseborg has one purpose: to create the best grilled cheese it possibly can! Cheeseborg is fully automated, voice activated, and easy to move. With Google Assistant SDK integration, Cheeseborg can even be used as a part of your smart home.
Sometimes we’ll see a project online and find ourselves hoping and praying that it uses a Raspberry Pi, just so we have a reason to share it with you all.
That’s how it was when I saw Cheeseborg, the grilled cheese robot, earlier this week. “Please, please, please…” I prayed to the robot gods, as I chowed down on a grilled cheese at my desk (true story), and, by the grace of all that is good in this world, my plea was answered.
Cheeseborg uses both an Arduino Mega and a Raspberry Pi 3 in its quest to be the best ever automated chef in the world. The Arduino handles the mechanics, while our deliciously green wonder board runs the Google Assistant SDK, allowing you to make grilled cheese via voice command.
Saying “Google, make me a grilled cheese” will set in motion a series of events leading to the production of a perfectly pressed sammie, ideal for soup dunking or solo snacking.
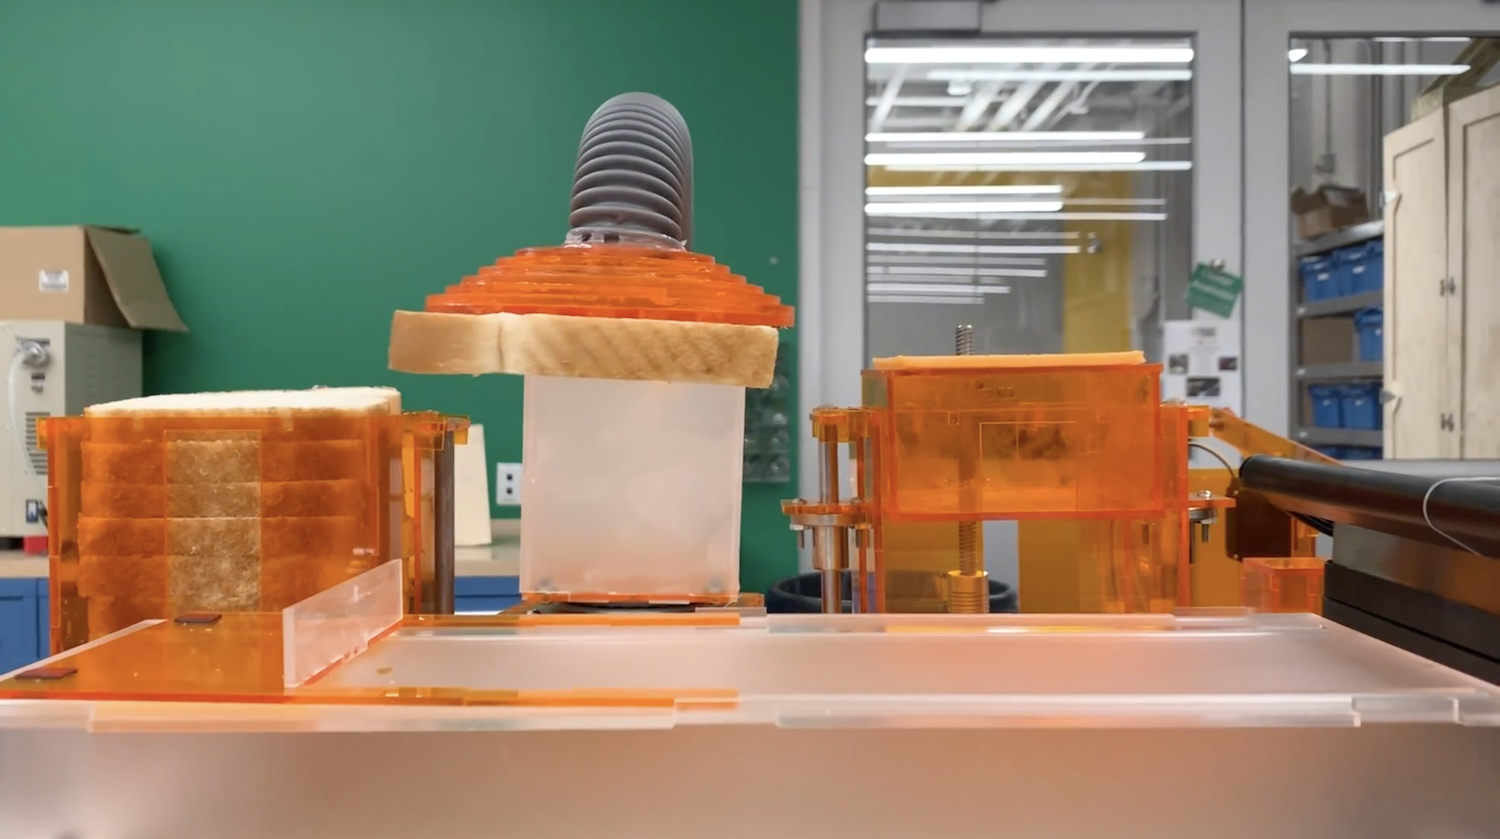
The robot uses a vacuum lifter to pick up a slice of bread, dropping it onto an acrylic tray before repeating the process with a slice of cheese and then a second slice of bread. Then the whole thing is pushed into a panini press that has been liberally coated in butter spray (not shown for video aesthetics), and the sandwich is toasted, producing delicious ooey-gooey numminess out the other side.
Pareidolia much?
Here at Raspberry Pi, we give the Cheeseborg five slices out of five, and look forward to one day meeting Cheeseborg for real, so we can try out its scrummy wares.
ooooey-gooey numminess
You can find out more about Cheeseborg here.
Yes, there’s a difference: but which do you prefer? What makes them different? And what’s your favourite filling for this crispy, cheesy delight?
The post The grilled cheese-making robot of your dreams appeared first on Raspberry Pi.
Reddit was alive with the sound of retro gaming this weekend.
First out to bat is this lovely minimalist, wall-mounted design built by u/sturnus-vulgaris, who states:
I had planned on making a bar top arcade, but after I built the control panel, I kind of liked the simplicity. I mounted a frame of standard 2×4s cut with a miter saw. Might trim out in black eventually (I have several panels I already purchased), but I do like the look of wood.
Next up, a build with Lego bricks, because who doesn’t love Lego bricks?
Just completed my mini arcade cabinet that consists of approximately 1,000 [Lego bricks], a Raspberry Pi, a SNES style controller, Amazon Basics computer speakers, and a 3.5″ HDMI display.
u/RealMagicman03 shared the build here, so be sure to give them an upvote and leave a comment if, like us, you love Raspberry Pi projects that involve Lego bricks.
And lastly, this wonderful use of the Raspberry Pi Compute Module 3+, proving yet again how versatile the form factor can be.
CM3+Lite cartridge for GPi case. I made this cartridge for fun at first, and it works as all I expected. Now I can play more games l like on this lovely portable stuff. And CM3+ is as powerful as RPi3B+, I really like it.
Creator u/martinx72 goes into far more detail in their post, so be sure to check it out.
What other projects did you see this weekend? Share your links with us in the comments below.
The post Raspberry Pi retro gaming on Reddit appeared first on Raspberry Pi.
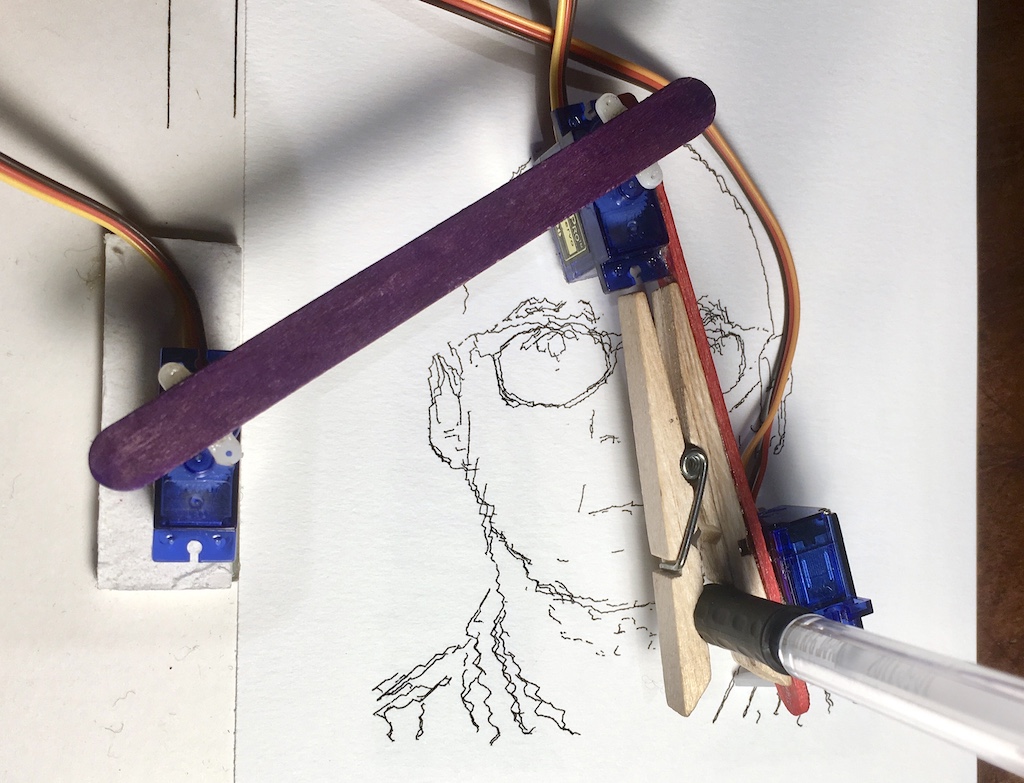
BrachioGraph touts itself as the cheapest, simplest possible pen plotter, so, obviously, we were keen to find out more. Because, if there’s one thing we like about our community, it’s your ability to recreate large, expensive pieces of tech with a few cheap components and, of course, a Raspberry Pi.
So, does BrachioGraph have what it takes? Let’s find out.
The project ingredients list calls for two sticks or pieces of stiff card and, right off the bat, we’re already impressed with the household item ingenuity that had gone into building BrachioGraph. It’s always fun to see Popsicle sticks used in tech projects, and we reckon that a couple of emery boards would also do the job — although a robot with add-on nail files sounds a little too Simone Giertz, if you ask us. Simone, if you’re reading this…

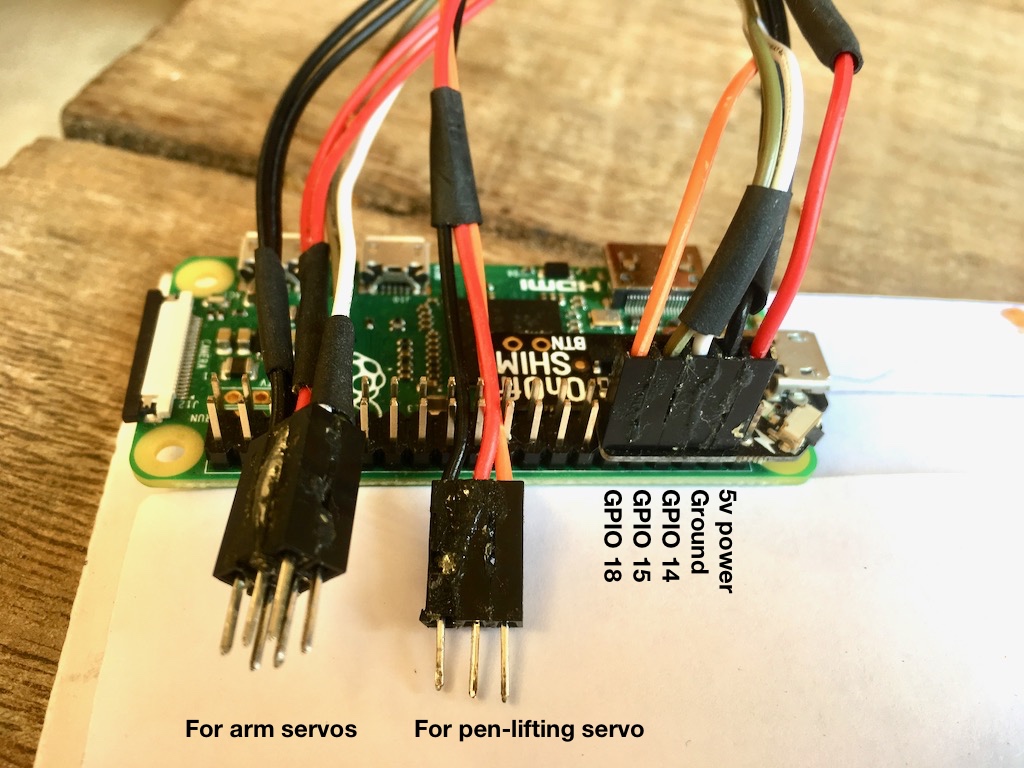
You’ll also need a pencil or ballpoint pen, a peg, three servomotors, and a $5 Raspberry Pi Zero. That’s it. They weren’t joking when they said this plotter was simple.
The plotter runs on a Python script, and all the code for the project has been supplied for free. You can find it all on the BrachioGraph website, here.
We’ll be trying out the plotter for ourselves here at Pi Towers, and we’d love to see if any of you give it a go, so let us know in the comments.
The post We love a good pen plotter appeared first on Raspberry Pi.
If you have one of our official cases, keyboards or mice, or if you’ve visited the Raspberry Pi Store in Cambridge, UK, then you know the work of Kinneir Dufort. Their design has become a part of our brand that’s recognised the world over. Here’s an account from the Kinneir Dufort Chief Design Officer, Craig Wightman, of their team’s work with us.
Over the last six years, our team at Kinneir Dufort have been privileged to support Raspberry Pi in the design and development of many of their products and accessories. 2019 has been another landmark year in the incredible Raspberry Pi story, with the opening of the Raspberry Pi store in February, the launch of the official keyboard and mouse in April, followed by the launch of Raspberry Pi 4 in June.
We first met Eben, Gordon and James in 2013 when we were invited to propose design concepts for an official case for Raspberry Pi Model B. For the KD team, this represented a tremendously exciting opportunity: here was an organisation with a clear purpose, who had already started making waves in the computing and education market, and who saw how design could be a potent ingredient in the presentation and communication of the Raspberry Pi proposition.
Alongside specific design requirements for the Model B case, the early design work also considered the more holistic view of what the 3D design language of Raspberry Pi should be. Working closely with the team, we started to define some key design principles which have remained as foundations for all the products since:
Whilst maintaining a core of consistency in the product look and feel, these principles have been applied with different emphases to suit each product’s needs and functions. The Zero case, which started as a provocative “shall we do this?” sketch visual sent to the team by our Senior Designer John Cowan-Hughes after the original case had started to deliver a return on investment, was all about maximum simplicity combined with adaptability via its interchangeable lids.
The ‘levitating lid’ version of the Zero case is not yet publically available
Later, with the 3A+ case, we started with the two-part case simplicity of the Zero case and applied careful detailing to ensure that we could accommodate access to all the connectors without overcomplicating the injection mould tooling. On Raspberry Pi 4, we retained the two-part simplicity in the case, but introduced new details, such as the gloss chamfer around the edge of the case, and additional material thickness and weight to enhance the quality and value for use with Raspberry Pi’s flagship product.
After the success of the KD design work on Raspberry Pi cases, the KD team were asked to develop the official keyboard and mouse. Working closely with the Raspberry Pi team, we explored the potential for adding unique features but, rightly, chose to do the simple things well and to use design to help deliver the quality, value and distinctiveness now integrally associated with Raspberry Pi products. This consistency of visual language, when combined with the Raspberry Pi 4 and its case, has seen the creation of a Raspberry Pi as a new type of deconstructed desktop computer which, in line with Raspberry Pi’s mission, changes the way we think about, and engage with, computers.
The launch of the Cambridge store in February – another bold Raspberry Pi move which we were also delighted to support in the early planning and design stages – provides a comprehensive view of how all the design elements work together to support the communication of the Raspberry Pi message. Great credit should go to the in-house Raspberry Pi design team for their work in the development and implementation of the visual language of the brand, so beautifully evident in the store.
An early sketch model of the Raspberry Pi Store
In terms of process, at KD we start with a brief – typically discussed verbally with the Raspberry Pi team – which we translate into key objectives and required features. From there, we generally start to explore ideas with sketches and basic mock-ups, progressively reviewing, testing and iterating the concepts.
Sketching and modelling and reviewing
For evaluating designs for products such as the cases, keyboard and mouse, we make considerable use of our in-house 3D printing resources and prototyping team. These often provide a great opportunity for the Raspberry Pi team to get hands on with the design – most notably when Eben took a hacksaw to one of our lovingly prepared 3D-printed prototypes!
EBEN YOUR FINGERS
Sometimes, despite hours of reviewing sketches and drawings, and decades of experience, it’s not until you get hands-on with the design that you can see further improvements, or you suddenly spot a new approach – what if we do this? And that’s the great thing about how our two teams work together: always seeking to share and exchange ideas, ultimately to produce better products.
There’s no substitute for getting hands-on
Back to the prototype! Once the prototype design is agreed, we work with 3D CAD tools and progress the design towards a manufacturable solution, collaborating closely with injection moulding manufacturing partners T-Zero to optimise the design for production efficiency and quality of detailing.
One important aspect that underpins all our design work is that we always start with consideration for the people we are designing for – whether that’s a home user setting up a media centre, an IT professional using Raspberry Pi as a web server, a group of schoolchildren building a weather station, or a parent looking to encourage their kid to code.
Engagement with the informed, proactive and enthusiastic online Raspberry Pi community is a tremendous asset. The instant feedback, comments, ideas and scrutiny posted on Raspberry Pi forums is powerful and healthy; we listen and learn from this, taking the insight we gain into each new product that we develop. Of course, with such a wide and diverse community, it’s not easy to please everyone all of the time, but that won’t stop us trying – keep your thoughts and feedback coming to RPifeedback@kinneirdufort.com!
If you’d like to know more about KD, or the projects we work on, check out our blog posts and podcasts at www.kinneirdufort.com.
The post Designing distinctive Raspberry Pi products appeared first on Raspberry Pi.
Engineering has always been important, but never more so than now, as we face global challenges and need more brilliant young minds to solve them. Tim Peake, ESA astronaut and one of our Members, knows this well, and is a big advocate of engineering, and of STEM more broadly.
![]()
That’s why during his time aboard the International Space Station for the Principia mission, Tim was involved in the deployment of two Astro Pis, special Raspberry Pi computers that have been living on the ISS ever since, making it possible for us to run our annual European Astro Pi Challenge.
Tim spoke about the European Astro Pi Challenge at today’s award ceremony
Tim played a huge part in the first Astro Pi Challenge, and he has helped us spread the word about Astro Pi and the work of the Raspberry Pi Foundation ever since.
![]()
Earlier this year, Tim was awarded the 2019 Royal Academy of Engineering Rooke Award for his work promoting engineering to the public, following a nomination by Raspberry Pi co-founder and Fellow of the Academy Pete Lomas. Pete says:
“As part of Tim Peake’s Principia mission, he personally spearheaded the largest education and outreach initiative ever undertaken by an ESA astronaut. Tim actively connects space exploration with the requirement for space engineering.
As a founder of Raspberry Pi, I was thrilled that Tim acted as a personal ambassador for the Astro Pi programme. This gives young people across Europe the opportunity to develop their computing skills by writing computer programs that run on the specially adapted Raspberry Pi computers onboard the ISS.” – Pete Lomas
Today, Tim received the Rooke Award in person, at a celebratory event held at the Science Museum in London.
Royal Academy of Engineering CEO Dr Hayaatun Sillem presents Tim with the 2019 Rooke Award for public engagement with engineering, in recognition of his nationwide promotion of engineering and space
Four hundred young people got to attend the event with him, including two winning Astro Pi teams. Congratulations to Tim, and congratulations to those Astro Pi winners who got to meet a real-life astronaut!
![]()
Since Tim’s mission on the ISS, the Astro Pi Challenge has evolved, and in collaboration with ESA Education, we now offer it in the form of two missions for young people every year:
…then help the young people in your life participate! Mission Zero is really simple and requires no prior coding knowledge, neither from you, nor from the young people in your team. Or your team could take part in Mission Space Lab — you’ve still got 10 days to send us your team’s experiment idea! And then, who knows, maybe your team will get to meet Tim Peake one day… or even become astronauts themselves!
![]()
The post Tim Peake and Astro Pi winners meet at Rooke Award ceremony appeared first on Raspberry Pi.
Hey there! I’ve just come back from a two-week vacation, Liz and Helen are both off sick, and I’m not 100% sure I remember how to do my job.
So, while I figure out how to social media and word write, here’s this absolutely wonderful video from Ian Charnas, showing how he hacked his car windscreen wipers to sync with his stereo.
FINALLY! Wipers Sync to Music
In this video, I modify my car so the windshield wipers sync to the beat of whatever music I’m listening to. You can own this idea!
Ian will be auctioning off the intellectual property rights to his dancing wipers on eBay, will all proceeds going to a charity supporting young makers.

The post Musically synced car windscreen wipers using Raspberry Pi appeared first on Raspberry Pi.
Alex, Helen and I are all in our respective beds today with the plague. So your usual blog fodder won’t get served up today because none of us can look at a monitor for more than thirty seconds at a trot: instead I’m going to ask you to come up with some content for us. Let us know in the comments what you think we should be blogging about next, and also if you have any top sinus remedies.
The post Plague at Pi Towers appeared first on Raspberry Pi.
Here’s an update from Iago Toral of Igalia on development of the open source VC4 and V3D OpenGL drivers used by Raspberry Pi.
Some of you may already know that Eric Anholt, the original developer of the open source VC4 and V3D OpenGL drivers used by Raspberry Pi, is no longer actively developing these drivers and a team from Igalia has stepped in to continue his work. My name is Iago Toral (itoral), and together with my colleagues Alejandro Piñeiro (apinheiro) and José Casanova (chema), we have been hard at work learning about the V3D GPU hardware and Eric’s driver design over the past few months.
![]()
Learning a new GPU is a lot of work, but I think we have been making good progress and in this post we would like to share with the community some of our recent contributions to the driver and some of the plans we have for the future.
But before we go into the technical details of what we have been up to, I would like to give some context about the GPU hardware and current driver status for Raspberry Pi 4, which is where we have been focusing our efforts.
The GPU bundled with Raspberry Pi 4 is a VideoCore VI capable of OpenGL ES 3.2, a significant step above the VideoCore IV present in Raspberry Pi 3 which could only do OpenGL ES 2.0. Despite the fact that both GPU models belong in Broadcom’s VideoCore family, they have quite significant architectural differences, so we also have two separate OpenGL driver implementations. Unfortunately, as you may have guessed, this also means that driver work on one GPU won’t be directly useful for the other, and that any new feature development that we do for the Raspberry Pi 4 driver stack won’t naturally transport to Raspberry Pi 3.
The driver code for both GPU models is available in the Mesa upstream repository. The codename for the VideoCore IV driver is VC4, and the codename for the VideoCore VI driver is V3D. There are no downstream repositories – all development happens directly upstream, which has a number of benefits for end users:
V3D and VC4 labels.At present, the V3D driver exposes OpenGL ES 3.0 and OpenGL 2.1. As I mentioned above, the VideoCore VI GPU can do OpenGL ES 3.2, but it can’t do OpenGL 3.0, so future feature work will focus on OpenGL ES.
Okay, so with that introduction out of the way, let’s now go into the nitty-gritty of what we have been working on as we ramped up over the last few months:
Disclaimer: I won’t detail here everything we have been doing because then this would become a long and boring changelog list; instead I will try to summarize the areas where we put more effort and the benefits that the work should bring. For those interested in the full list of changes, you can always go to the upstream Mesa repository and scan it for commits with Igalia authorship and the v3d tag.
First we have the shader compiler, where we implemented a bunch of optimizations that should be producing better (faster) code for many shader workloads. This involved work at the NIR level, the lower-level IR specific to V3D, and the assembly instruction scheduler. The shader-db graph below shows how the shader compiler has evolved over the last few months. It should be noted here that one of the benefits of working within the Mesa ecosystem is that we get a lot of shader optimization work done by other Mesa contributors, since some parts of the compiler stack are shared across multiple drivers.
Evolution of the shader compiler (June vs present)
Another area where we have done significant work is transform feedback. Here, we fixed some relevant flushing bugs that could cause transform feedback results to not be visible to applications after rendering. We also optimized the transform feedback process to better use the hardware for in-pipeline synchronization of transform feedback workloads without having to always resort to external job flushing, which should be better for performance. Finally, we also provided a better implementation for transform feedback primitive count queries that makes better use of the GPU (the previous implementation handled all this on the CPU side), which is also correct at handling overflow of the transform feedback buffers (there was no overflow handling previously).
We also implemented support for OpenGL Logic Operations, an OpenGL 2.0 feature that was somehow missing in the V3D driver. This was responsible for this bug, since, as it turns out, the default LibreOffice theme in Raspbian was triggering a path in Glamor that relied on this feature to render the cursor. Although Raspbian has since been updated to use a different theme, we made sure to implement this feature and verify that the bug is now fixed for the original theme as well.
Fixing Piglit and CTS test failures has been another focus of our work in these initial months, trying to get us closer to driver conformance. You can check the graph below showcasing Piglit test results to have a quick view at how things have evolved over the last few months. This work includes a relevant bug fix for a rather annoying bug in the way the kernel driver was handling L2 cache invalidation that could lead to GPU hangs. If you have observed any messages from the kernel warning about write violations (maybe accompanied by GPU hangs), those should now be fixed in the kernel driver. This fix goes along with a user-space fix to go that should be merged soon in the upstream V3D driver.
Evolution of Piglit test results (June vs present)
A a curiosity, here is a picture of our own little continuous integration system that we use to run regression tests both regularly and before submitting code for review.
Our continuous integration system
The other big piece of work we have been tackling, and that we are very excited about, is OpenGL ES 3.1, which will bring Compute Shaders to Raspberry Pi 4! Credit for this goes to Eric Anholt, who did all the implementation work before leaving – he just never got to the point where it was ready to be merged, so we have picked up Eric’s original work, rebased it, and worked on bug fixes to have a fully conformant implementation. We are currently hard at work squashing the last few bugs exposed by the Khronos Conformance Test Suite and we hope to be ready to merge this functionality in the next major Mesa release, so look forward to it!
Compute Shaders is a really cool feature but it won’t be the last. I’d like to end this post with a small note on another important large feature that is currently in early stages of development: Geometry Shaders, which will bring the V3D driver one step closer to exposing a full programmable 3D pipeline – so look forward to that as well!
The post VC4 and V3D OpenGL drivers for Raspberry Pi: an update appeared first on Raspberry Pi.
Replicate the physics of barrel rolling – straight out of the classic Donkey Kong. Mark Vanstone shows you how.
Released in 1981, Donkey Kong was one of the most important games in Nintendo’s history.
Donkey Kong first appeared in arcades in 1981, and starred not only the titular angry ape, but also a bouncing, climbing character called Jumpman – who later went on to star in Nintendo’s little-known series of Super Mario games. Donkey Kong featured four screens per level, and the goal in each was to avoid obstacles and guide Mario (sorry, Jumpman) to the top of the screen to rescue the hapless Pauline. Partly because the game was so ferociously difficult from the beginning, Donkey Kong’s first screen is arguably the most recognisable today: Kong lobs an endless stream of barrels, which roll down a network of crooked girders and threaten to knock Jumpman flat.
Donkey Kong may have been a relentlessly tough game, but we can recreate one of its most recognisable elements with relative ease. We can get a bit of code running with Pygame Zero – and a couple of functions borrowed from Pygame – to make barrels react to the platforms they’re on, roll down in the direction of a slope, and fall off the end onto the next platform. It’s a very simple physics simulation using an invisible bitmap to test where the platforms are and which way they’re sloping. We also have some ladders which the barrels randomly either roll past or sometimes use to descend to the next platform below.
Our Donkey Kong tribute up and running in Pygame Zero. The barrels roll down the platforms and sometimes the ladders.
Once we’ve created a barrel as an Actor, the code does three tests for its platform position on each update: one to the bottom-left of the barrel, one bottom-centre, and one bottom-right. It samples three pixels and calculates how much red is in those pixels. That tells us how much platform is under the barrel in each position. If the platform is tilted right, the number will be higher on the left, and the barrel must move to the right. If tilted left, the number will be higher on the right, and the barrel must move left. If there is no red under the centre point, the barrel is in the air and must fall downward.
There are just three frames of animation for the barrel rolling (you could add more for a smoother look): for rolling right, we increase the frame number stored with the barrel Actor; for rolling to the left, we decrease the frame number; and if the barrel’s going down a ladder, we use the front-facing images for the animation. The movement down a ladder is triggered by another test for the blue component of a pixel below the barrel. The code then chooses randomly whether to send the barrel down the ladder.
The whole routine will keep producing more barrels and moving them down the platforms until they reach the bottom. Again, this is a very simple physics system, but it demonstrates how those rolling barrels can be recreated in just a few lines of code. All we need now is a jumping player character (which could use the same invisible map to navigate up the screen) and a big ape to sit at the top throwing barrels, then you’ll have the makings of your own fully featured Donkey Kong tribute.
Here’s Mark’s code, which sets some Donkey Kong Barrels rolling about in Python. To get it working on your system, you’ll first need to install Pygame Zero. And to download the full code, go here.
You can read more features like this one in Wireframe issue 24, available now at Tesco, WHSmith, all good independent UK newsagents, and the Raspberry Pi Store, Cambridge.
Or you can buy Wireframe directly from Raspberry Pi Press — delivery is available worldwide. And if you’d like a handy digital version of the magazine, you can also download issue 24 for free in PDF format.
![]()
Make sure to follow Wireframe on Twitter and Facebook for updates and exclusive offers and giveaways. Subscribe on the Wireframe website to save up to 49% compared to newsstand pricing!
The post Code your own Donkey Kong barrels | Wireframe issue 24 appeared first on Raspberry Pi.
Over the autumn term, we’ll be launching three brand-new, online courses on the FutureLearn platform. Wherever you are in the world, you can learn with us for free, thanks to support from Google.
The course presenters are Pi Towers residents Mark, Janina, and Eirini
The first new course is Design and Prototype Embedded Computer Systems, which will start on 28 October. In this course, you will discover the product design life cycle as you design your own embedded system!
![]()
You’ll investigate how the purpose of the system affects the design of the system, from choosing its components to the final product, and you’ll find out more about the design of an algorithm. You will also explore how embedded systems are used in the world around us. Book your place today!
What else would you expect us to call the sequel to Programming 101 and Programming 102? That’s right — we’ve made Programming 103: Saving and Structuring Data! The course will begin on 4 November, and you can reserve your place now.
![]()
Programming 103 explores how to use data across multiple runs of your program. You’ll learn how to save text and binary files, and how structuring data is necessary for programs to “understand” the data that they load. You’ll look at common types of structured files such as CSV and JSON files, as well as how you can connect to a SQL database to use it in your Python programs.
The third course, Introduction to Encryption and Cryptography, is currently in development, and therefore coming soon. In this course, you’ll learn what encryption is and how it was used in the past, and you’ll use the Caesar and Vigenère ciphers.
The Caesar cipher is a type of substitution cipher
You’ll also look at modern encryption and investigate both symmetric and asymmetric encryption schemes. The course also shows you the future of encryption, and it includes several practical encryption activities, which can be used in the classroom too.
If you’re a secondary school teacher in England, note that all of the above courses count towards your Computer Science Accelerator Programme certificate.
The very first group of teachers who earned Computer Science Accelerator Programme certificates: they got to celebrate their graduation at Google HQ in London.
What’s been your favourite online course this year? Tell us about it in the comments.
The post Your new free online training courses for the autumn term appeared first on Raspberry Pi.
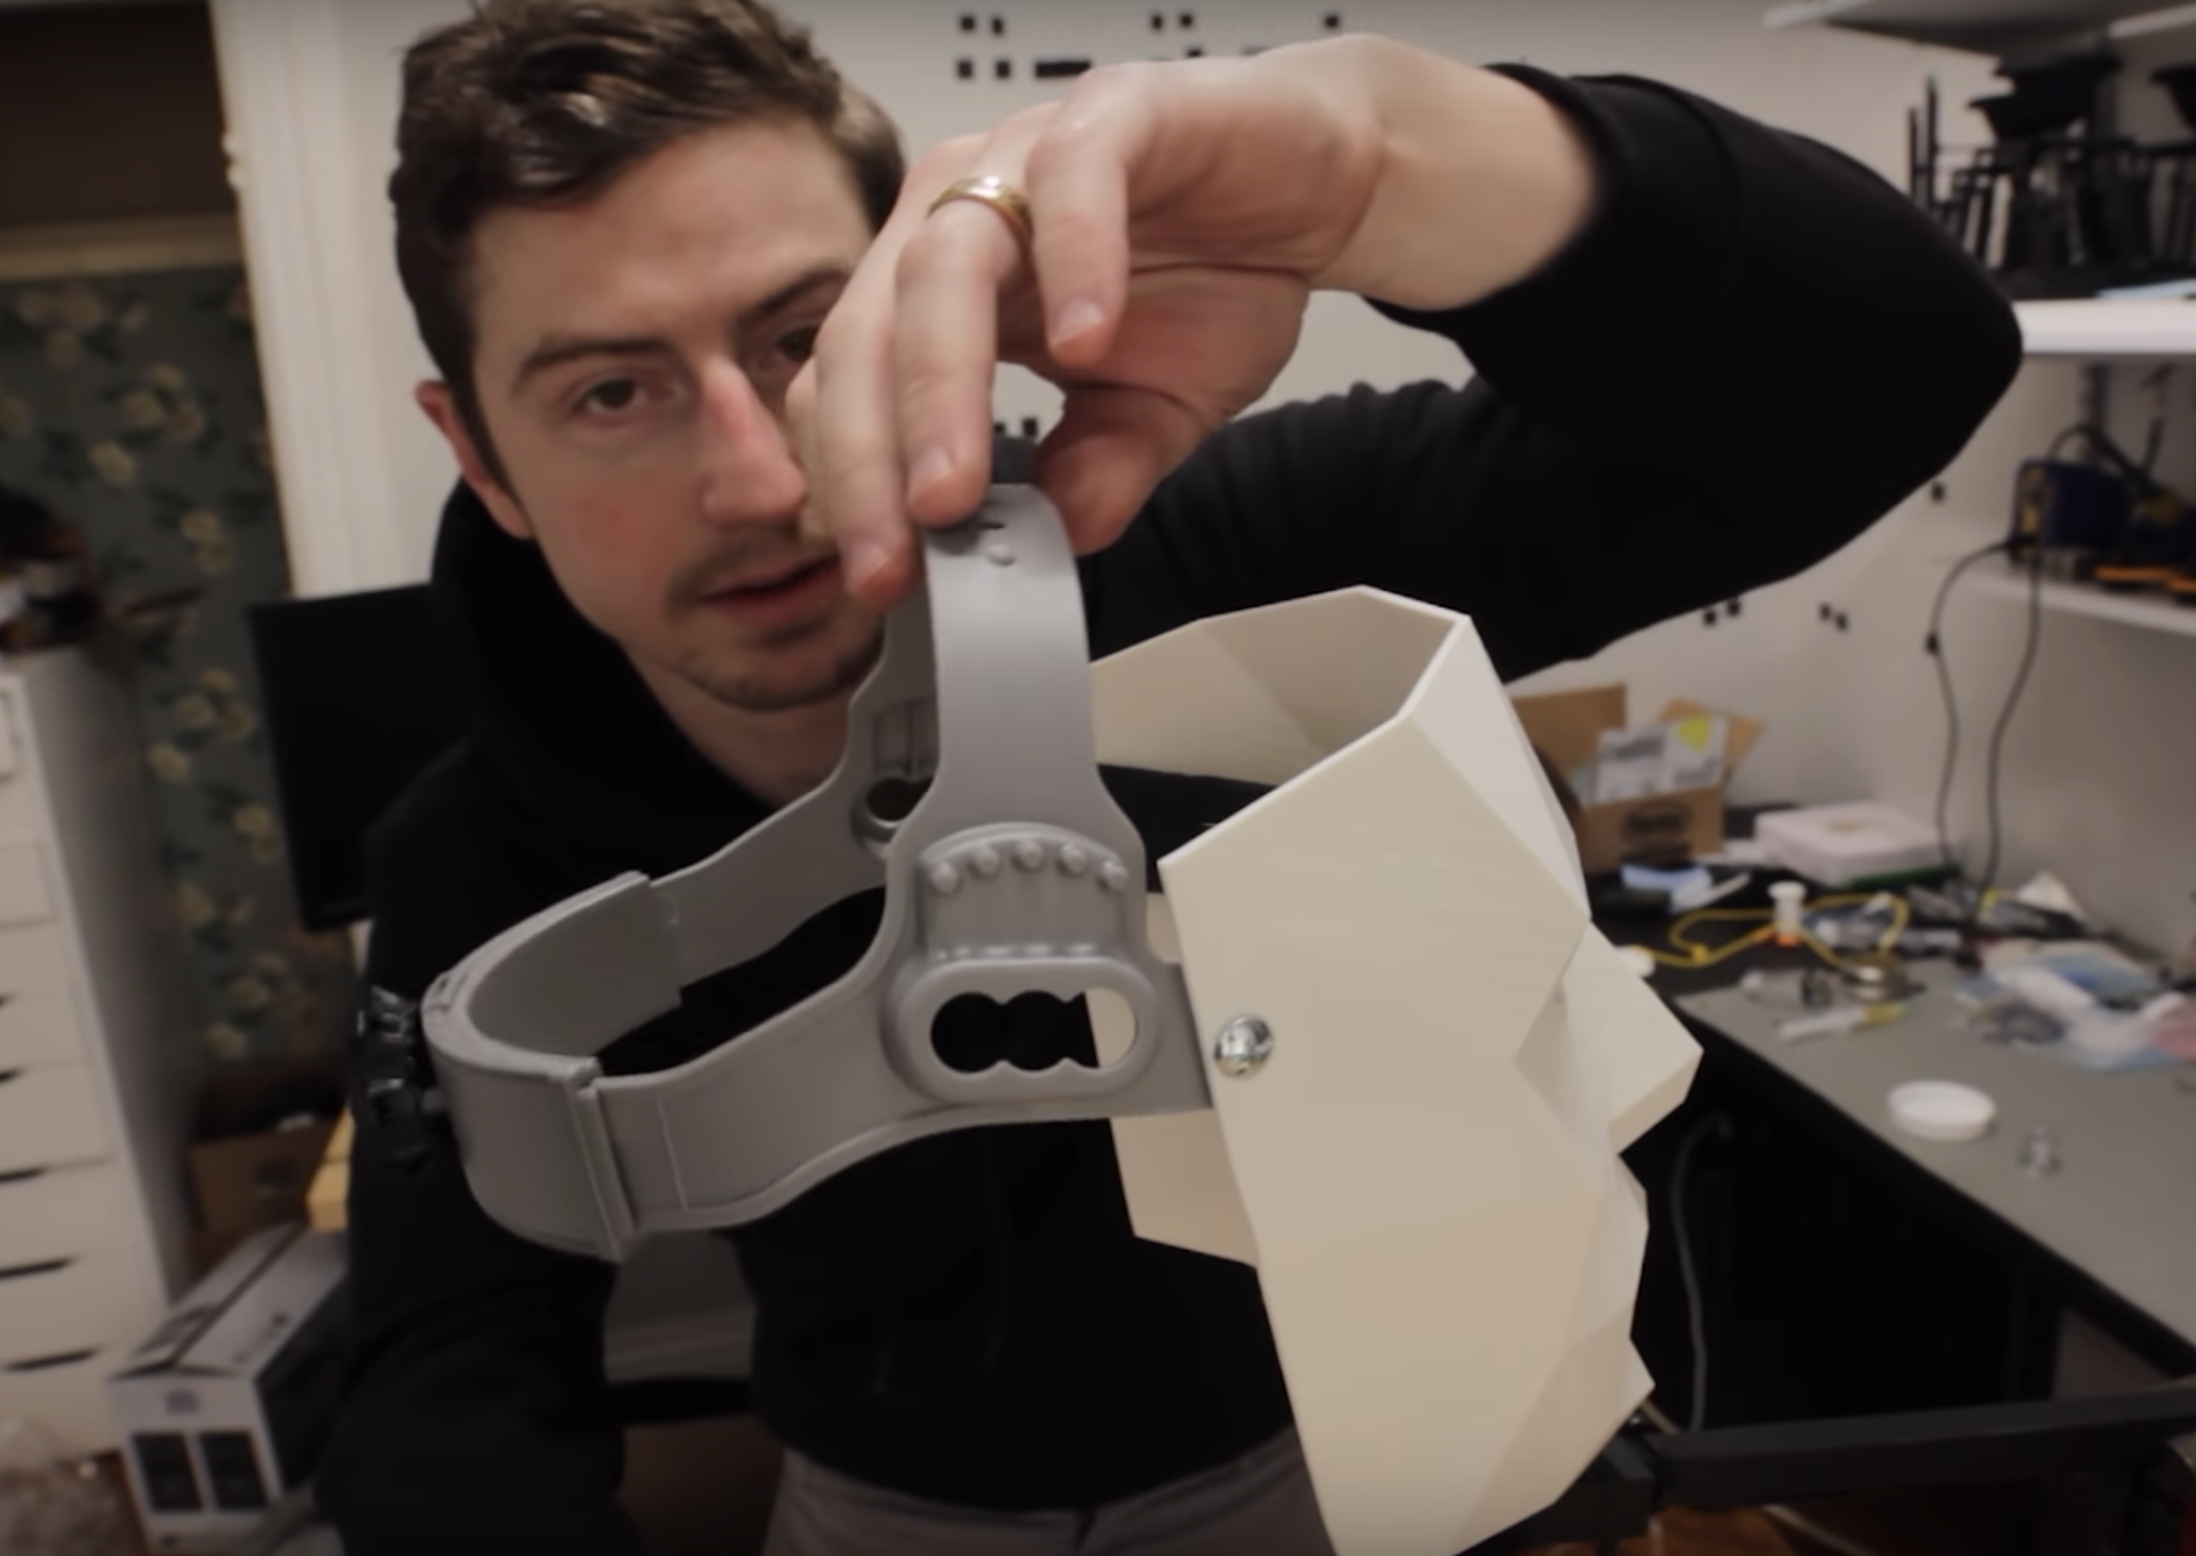
When we invited Estefannie Explains It All to present at Coolest Projects International, she decided to make something cool with a Raspberry Pi to bring along. But being Estefannie, she didn’t just make something a little bit cool. She went ahead and made Raspberry Pi Zero-powered Jurassic Park goggles, or, as she calls them, the world’s first globally triggered, mass broadcasting, photon-emitting and -collecting head unit.
Make your own Jurassic Park goggles using a Raspberry Pi // MAKE SOMETHING
Is it heavy? Yes. But these goggles are not expensive. Follow along as I make the classic Jurassic Park Goggles from scratch!! The 3D Models: https://www.thingiverse.com/thing:3732889 My code: https://github.com/estefanniegg/estefannieExplainsItAll/blob/master/makes/JurassicGoggles/jurassic_park.py Thank you Coolest Projects for bringing me over to speak in Ireland!! https://coolestprojects.org/ Thank you Polymaker for sending me the Polysher and the PolySmooth filament!!!!
Estefannie’s starting point was the set of excellent 3D models of the iconic goggles that Jurassicpaul has kindly made available on Thingiverse. There followed several 3D printing attempts and lots of sanding, sanding, sanding, spray painting, and sanding, then some more printing with special Polymaker filament that can be ethanol polished.
Estefannie soldered rings of addressable LEDs and created custom models for 3D-printable pieces to fit both them and the goggles. She added a Raspberry Pi Zero, some more LEDs and buttons, an adjustable headgear part from a welding mask, and – importantly – four circles of green acetate. After quite a lot of gluing, soldering, and wiring, she ended up with an entirely magnificent set of goggles.
Here, they’re modelled magnificently by Raspberry Pi videographer Brian. I think you’ll agree he cuts quite a dash.
![]()
Estefannie wrote a Python script to interact with Twitter, take photos, and provide information about the goggles’ current status via the LED rings. When Estefannie powers up the Raspberry Pi, it runs a script on startup and connects to her phone’s wireless hotspot. A red LED on the front of the goggles indicates that the script is up and running.
Once it’s running, pressing a button at the back of the head unit makes the Raspberry Pi search Twitter for mentions of @JurassicPi. The LEDs light up green while it searches, just like you remember from the film. If Estefannie’s script finds a mention, the LEDs flash white and the Raspberry Pi camera module takes a photo. Then they light up blue while the script tweets the photo.
All the code is available on Estefannie’s GitHub. I love this project – I love the super clear, simple user experience provided by the LED rings, and there’s something I really appealing about the asynchronous Twitter interaction, where you mention @JurassicPi and then get an image later, the next time googles are next turned on.
If you read the beginning of this post and thought, “wait, what’s Coolest Projects?” then be sure to watch to the end of Estefannie’s video to catch her excellentCoolest Projects mini vlog. And then sign up for updates about Coolest Projects events near you, so you can join in next year, or help a team of young people to join in.
The post Estefannie’s Jurassic Park goggles appeared first on Raspberry Pi.
Machine learning is everywhere. It’s used for image and voice recognition, predictions, and even those pesky adverts that always seem to know what you’re thinking about!
If you’ve ever wanted to know more about machine learning, or if you want to help you learners get started with machine learning, then our new free projects are for you!
Spoiler alert: we won’t show you how to build your own Terminator. Trust us, it’s for the best.
When we hosted Scratch Conference Europe this summer, machine learning was the talk of the town: all of the machine learning talks and workshops were full with educators eager to learn more and find out how to teach machine learning. So this is the perfect time to bring some free machine learning resources to our projects site!
Smart classroom assistant is about creating your own virtual smart devices. You will create a machine learning model that recognises text commands, such as “fan on”, “Turn on my fan”, or my personal favourite, “It’s roasting in here!”.
![]()
In the project, you will be guided through setting up commands for a desk fan and lamp, but you could pick all sorts of virtual devices — and you can even try setting up a real one! What will you choose?
Journey to school lets you become a psychic! Well, not exactly — but you will be able to predict how your friends travel from A to B.
![]()
By doing a survey and collecting lots of information from your friends about how they travel around, you can train the computer to look for patterns in the numbers and predict how your friends travel between places. When you have perfected your machine learning model, you can try using it in Scratch too!
Did you ever make up your own secret language that only you understood? Just me? Well, in the Alien language project you can teach your computer to understand your made-up words. You can record lots of examples to teach it to understand ‘left’ and ‘right’ and then use your model in Scratch to move a character with your voice!![]()
Train your model to recognise as many sounds as you like, and then create games where the characters are voice-controlled!
In the Did you like it? project, you create a character in Scratch that will recognise whether you enjoyed something or not, based on what you type. You will train your character by giving it some examples of positive and negative comments, then watch it determine how you are feeling. Once you have mastered that, you can train it to reply, or to recognise other types of messages too. Soon enough, you will have made your very own sentiment analysis tool!
![]()
We’d like to extend a massive thank you to Dale from Machine Learning for Kids for his help with bringing these projects to our projects site. Machine Learning for Kids is a fantastic website for finding out more about machine learning, and it has loads more great projects for you to try, so make sure you check it out!
The post Try our new free machine learning projects for Scratch appeared first on Raspberry Pi.
The weekend’s nearly here and the weather’s not looking too fantastic around these parts – we’re going to need some project ideas. Here’s a fun roundup of some of my favourite Star Wars-themed makes from the archive that I reckon you’ll really like.
Because, well, who doesn’t like Star Wars, right? Tell us which is your favourite in the comments.
Grab a glue gun and your favourite Star Wars-themed ice cube trays to create your own custom LEDs, perfect for upping the wow factor of your next Raspberry Pi project. Learn how.

She may just have won a billion awards for Fleabag, but Phoebe Waller-Bridge is also known to some as the voice of L3-37, the salty droid companion of Lando Calrissian in Solo: A Star Wars Story.
Thanks to Patrick PatchBOTS Stefanski, you can build your own. Find out more.
LEGO + Star Wars + Raspberry Pi? Yes please! Upgrade your favourite Star Wars merch to play music via the Pimoroni Speaker pHAT, thanks to Dan Aldred.
There’s a reason Martin O’Hanlon is part of the Raspberry Pi Foundation team. This recreation of Star Wars Episode IV may or may not have been it – you decide.
LED rings spinning at 300rpm around a Raspberry Pi? Yes please. Not only is this project an impressive feat of engineering, but it’s also super pretty! Find out more, young Padawan.
Are there any Star Wars-related Raspberry Pi projects we’ve missed? Let us know in the comments below!
The post Fantastic Star Wars-themed Raspberry Pi projects appeared first on Raspberry Pi.
Plant scientists and agronomists use growth chambers to provide consistent growing conditions for the plants they study. This reduces confounding variables – inconsistent temperature or light levels, for example – that could render the results of their experiments less meaningful. To make sure that conditions really are consistent both within and between growth chambers, which minimises experimental bias and ensures that experiments are reproducible, it’s helpful to monitor and record environmental variables in the chambers.
Arabidopsis thaliana in a growth chamber on the International Space Station. Many experimental plants are less well monitored than these ones.
(“Arabidopsis thaliana plants […]” by Rawpixel Ltd (original by NASA) / CC BY 2.0)
In a recent paper in Applications in Plant Sciences, Brandin Grindstaff and colleagues at the universities of Missouri and Arizona describe how they developed Growth Monitor pi, or GMpi: an affordable growth chamber monitor that provides wider functionality than other devices. As well as sensing growth conditions, it sends the gathered data to cloud storage, captures images, and generates alerts to inform scientists when conditions drift outside of an acceptable range.
Appl Plant Sci. 2019 Aug; 7(8): e11280. Figure 1, © 2019 Grindstaff et al. / CC BY 4.0
The authors emphasise – and we heartily agree – that you don’t need expertise with software and computing to build, use, and adapt a system like this. They’ve written a detailed protocol and made available all the necessary software for any researcher to build GMpi, and they note that commercial solutions with similar functionality range in price from $10,000 to $1,000,000 – something of an incentive to give the DIY approach a go.
GMpi uses a Raspberry Pi Model 3B+, to which are connected temperature-humidity and light sensors from our friends at Adafruit, as well as a Raspberry Pi Camera Module.
Appl Plant Sci. 2019 Aug; 7(8): e11280. Figure 2, © 2019 Grindstaff et al. / CC BY 4.0
The team used open-source app Rclone to upload sensor data to a cloud service, choosing Google Drive since it’s available for free. To alert users when growing conditions fall outside of a set range, they use the incoming webhooks app to generate notifications in a Slack channel. Sensor operation, data gathering, and remote monitoring are supported by a combination of software that’s available for free from the open-source community and software the authors developed themselves. Their package GMPi_Pack is available on GitHub.
Appl Plant Sci. 2019 Aug; 7(8): e11280. Figure 3, © 2019 Grindstaff et al. / CC BY 4.0
With a bill of materials amounting to something in the region of $200, GMpi is another excellent example of affordable, accessible, customisable open labware that’s available to researchers and students. If you want to find out how to build GMpi for your lab, or just for your greenhouse, Affordable remote monitoring of plant growth in facilities using Raspberry Pi computers by Brandin et al. is available on PubMed Central, and it includes appendices with clear and detailed set-up instructions for the whole system.
The post Growth Monitor pi: an open monitoring system for plant science appeared first on Raspberry Pi.
On my holidays this year I enjoyed a walk in the Brecon Beacons. We set out nice and early, walked 22km through some of the best scenery in Britain, got a cup of tea from the snack van on the A470, and caught our bus home. “I enjoyed that walk,” I thought, “and I’d like to do one like it again.” What I DIDN’T think was, “I’d like to do that walk again, only I’d like it to be nearly three times as long, and it definitely ought to have about three times more ascent, or else why bother?”
Alan Peaty is a bit more hardcore than me, so, a couple of weekends ago, he set out on the Brecon Beacons 10 Peaks Ultramarathon: “10 peaks; 58 kilometres; 3000m of ascent; 24 hours”. He went with his friend Neil and a Raspberry Pi Zero in an eyecatching 3D-printed case.
“The brick”, nestling on a backpack, with sunlit Corn Du and Pen y Fan in the background
The Raspberry Pi Zero ensemble – lovingly known as the brick or, to give it its longer name, the Rosie IoT Brick or RIoT Brick – is equipped with a u-blox Neo-6 GPS module, and it also receives GPS tracking info from some smaller trackers built using ESP32 microcontrollers. The whole lot is powered by a “rather weighty” 20,000mAh battery pack. Both the Raspberry Pi and the ESP32s were equipped with “all manner of additional sensors” to track location, temperature, humidity, pressure, altitude, and light level readings along the route.
Where the route crosses over itself is the most fervently appreciated snack van in Wales
Via LoRa and occasional 3G/4G from the many, many peaks along the route, all this data ends up on Amazon Web Services. AWS, among other things, hosts an informative website where family members were able to keep track of Alan’s progress along windswept ridges and up 1:2 gradients, presumably the better to appreciate their cups of tea and central heating. Here’s a big diagram of how the kit that completed the ultramarathon fits together; it’s full of arrows, dotted lines, and acronyms.
Alan, Neil, the brick, and the rest of their gear completed the event in an impressive 18 hours and one minute, for which they got a medal.
Well earned
You can follow the adventures of this project, its antecedents, and the further evolutions that are doubtless to come, on the Rosie the Red Robot Twitter feed. And you can find everything to do with the project in this GitHub repository, so you can complete ultramarathons while weighed down with hefty power bricks and bristling with homemade tracking devices, too, if you like. Alan is raising money for Alzheimer’s Research UK with this event, and you can find his Brecon Beacons 10 Peaks JustGiving page here.
The post Tracking the Brecon Beacons ultramarathon with a Raspberry Pi Zero appeared first on Raspberry Pi.
Low-cost open labware is a good thing in the world, and I was particularly pleased when micropalaeontologist Martin Tetard got in touch about the Raspberry Pi-based microscope he is developing. The project is called microscoPI (what else?), and it can capture, process, and store images and image analysis results. Martin is engaged in climate research: he uses microscopy to study tiny fossil remains, from which he gleans information about the environmental conditions that prevailed in the far-distant past.
microscoPI: a microcomputer-assisted microscope
microscoPI a project that aims to design a multipurpose, open-source and inexpensive micro-computer-assisted microscope (Raspberry PI 3). This microscope can automatically take images, process them, and save them altogether with the results of image analyses on a flash drive. It it multipurpose as it can be used on various kinds of images (e.g.
Martin repurposed an old microscope with a Z-axis adjustable stage for accurate focusing, and sourced an inexpensive X/Y movable stage to allow more accurate horizontal positioning of samples under the camera. He emptied the head of the scope to install a Raspberry Pi Camera Module, and he uses an M12 lens adapter to attach lenses suitable for single-specimen close-ups or for imaging several specimens at once. A Raspberry Pi 3B sits above the head of the microscope, and a 3.5-inch TFT touchscreen mounted on top of the Raspberry Pi allows the user to check images as they are captured and processed.
![]()
The Raspberry Pi runs our free operating system, Raspbian, and free image-processing software ImageJ. Martin and his colleagues use a number of plugins, some developed themselves and some by others, to support the specific requirements of their research. With this software, microscoPI can capture and analyse microfossil images automatically: it can count particles, including tiny specimens that are touching, analyse their shape and size, and save images and results before prompting the user for the name of the next sample.
![]()
microscoPI is compact – less than 30cm in height – and it’s powered by a battery bank secured under the base of the microscope, so it’s easily portable. The entire build comes in at under 160 Euros. You can find out more, and get in touch with Martin, on the microscoPI website.
The post A low-cost, open-source, computer-assisted microscope appeared first on Raspberry Pi.
What happens when you give two linguists jobs at Raspberry Pi? They start thinking they can do digital making, even though they have zero coding skills! Because if you don’t feel inspired to step out of your comfort zone here — surrounded by all the creativity, making, and technology — then there is no hope you’ll be motivated to do it anywhere else.
Maja and Nina, our translation team, and coding beginners
Maja and I support the community of Raspberry Pi translation volunteers, and we wanted to build something to celebrate them and the amazing work they do! Our educational content is already available in 26 languages, with more than 400 translations on our projects website. But our volunteer community is always translating more content, and so off we went, on an ambitious (by our standards!) mission to create a Raspberry Pi–powered translation notification system. This is a Raspberry Pi that pulls GitHub data to display a message on a Sense HAT and play a tune whenever we add fresh translated content to the Raspberry Pi projects website!
There were three parts to the project: two of them were pretty easy (displaying a message on a Sense HAT and playing a tune), and one more challenging (pulling information about new translated content added to our repositories on GitHub). We worked on each part separately and then put all of the code together.
Mandatory for coding: baked goods and tea
We used the Raspberry Pi projects Getting started with the Sense HAT and GPIO music box to help us with this part of our build.
At first we wanted the Sense HAT to display fireworks, but we soon realised how bad we both are at designing animations, so we moved on to displaying a less creative but still satisfying smiley face, followed by a message saying “Hooray! Another translation!” and another smiley face. ![]()
We used the sense_hat and time modules, and wrote a function that can be easily used in the main body of the program. You can look at the comments in the code above to see what each line does:
![]()
So we could add the fun tune, we learned how to use the Pygame library to play sounds. Using Pygame it’s really simple to create a function that plays a sound: once you have the .wav file in your chosen location, you simply import and initialise the pygame module, create a Sound object, and provide it with the path to your .wav file. You can then play your sound:
![]()
We’ve programmed our translation notification system to play the meow sound three times, using the sleep function to create a one-second break between each sound. Because why would you want one meow if you can have three?
This was the more challenging part for Maja and me, so we asked for help from experienced programmers, including our colleague Ben Nuttall. We explained what we wanted to do: pull information from our GitHub repositories where all the projects available on the Raspberry Pi projects website are kept, and every time a new language directory is found, to execute the sparkles and meow functions to let us and EVERYONE in the office know that we have new translations! Ben did a bit of research and quickly found the PyGithub library, which enables you to manage your GitHub resources using Python scripts.
Check out the comments to see what the code does
The script runs in an infinite loop, checking all repositories in the ‘raspberrypilearning’ organisation for new translations (directories with names in form of xx-XX, eg. fr-CA) every 60 minutes. Any new translation is then printed and preserved in memory. We had some initial issues with the usage of the PyGithub library: calling .get_commits() on an empty repository throws an exception, but the library doesn’t provide any functions to check whether a repo is empty or not. Fortunately, wrapping this logic in a try...except statement solved the problem.
And there we have it: success!
Demo of our Translation Notification System build
Subscribe to our YouTube channel: http://rpf.io/ytsub Help us reach a wider audience by translating our video content: http://rpf.io/yttranslate Buy a Raspberry Pi from one of our Approved Resellers: http://rpf.io/ytproducts Find out more about the #RaspberryPi Foundation: Raspberry Pi http://rpf.io/ytrpi Code Club UK http://rpf.io/ytccuk Code Club International http://rpf.io/ytcci CoderDojo http://rpf.io/ytcd Check out our free online training courses: http://rpf.io/ytfl Find your local Raspberry Jam event: http://rpf.io/ytjam Work through our free online projects: http://rpf.io/ytprojects Do you have a question about your Raspberry Pi?
You can find the complete Python script on my GitHub.
We’re pretty proud that the whole Raspberry Pi office now hears a meowing cat whenever new translated content is added to our projects website, but we’ve got plans for further development of our translation notification system. Our existing translated educational resources have already been viewed by over 1 million users around the world, and we want anyone interested in the translations our volunteers make possible to be able to track new translated projects as the go live!
One way to do that is to modify the code to tweet or send an email with the name of the newly added translation together with a link to the project and information on the language in which it was added. Alternatively, we could adapt the system to only execute the sparkles and meow functions when a translation in a particular language is added. Then our more than 1000 volunteers, or any learner using our translations, could set up their own Raspberry Pi and Sense HAT to receive notifications of content in the language that interests them, rather than in all languages.
Both ideas pose a pretty big challenge for the inexperienced new coders of the Raspberry Pi translation team, so we’d really appreciate any tips you have for helping us get started or for improving our existing system! Please share your thoughts in the comments below.
The post Pulling Raspberry Pi translation data from GitHub appeared first on Raspberry Pi.
You can see how the skies above Stonehenge affect the iconic stones via a web browser thanks to a Raspberry Pi computer.
Stonehenge is Britain’s greatest monument and it currently attracts more than 1.5 million visitors each year. It’s possible to walk around the iconic stone circle and visit the Neolithic houses outside the visitor centre. Yet, worries about potential damage have forced preservationists to limit access.
With that in mind, Eric Winbolt, Interim Head of Digital/Innovation at English Heritage, had a brainwave. “We decided to give people an idea of what it’s like to see the sunrise and sunset within the circle, and allow them to enjoy the skies over Stonehenge in real time without actually stepping inside,” he explains.
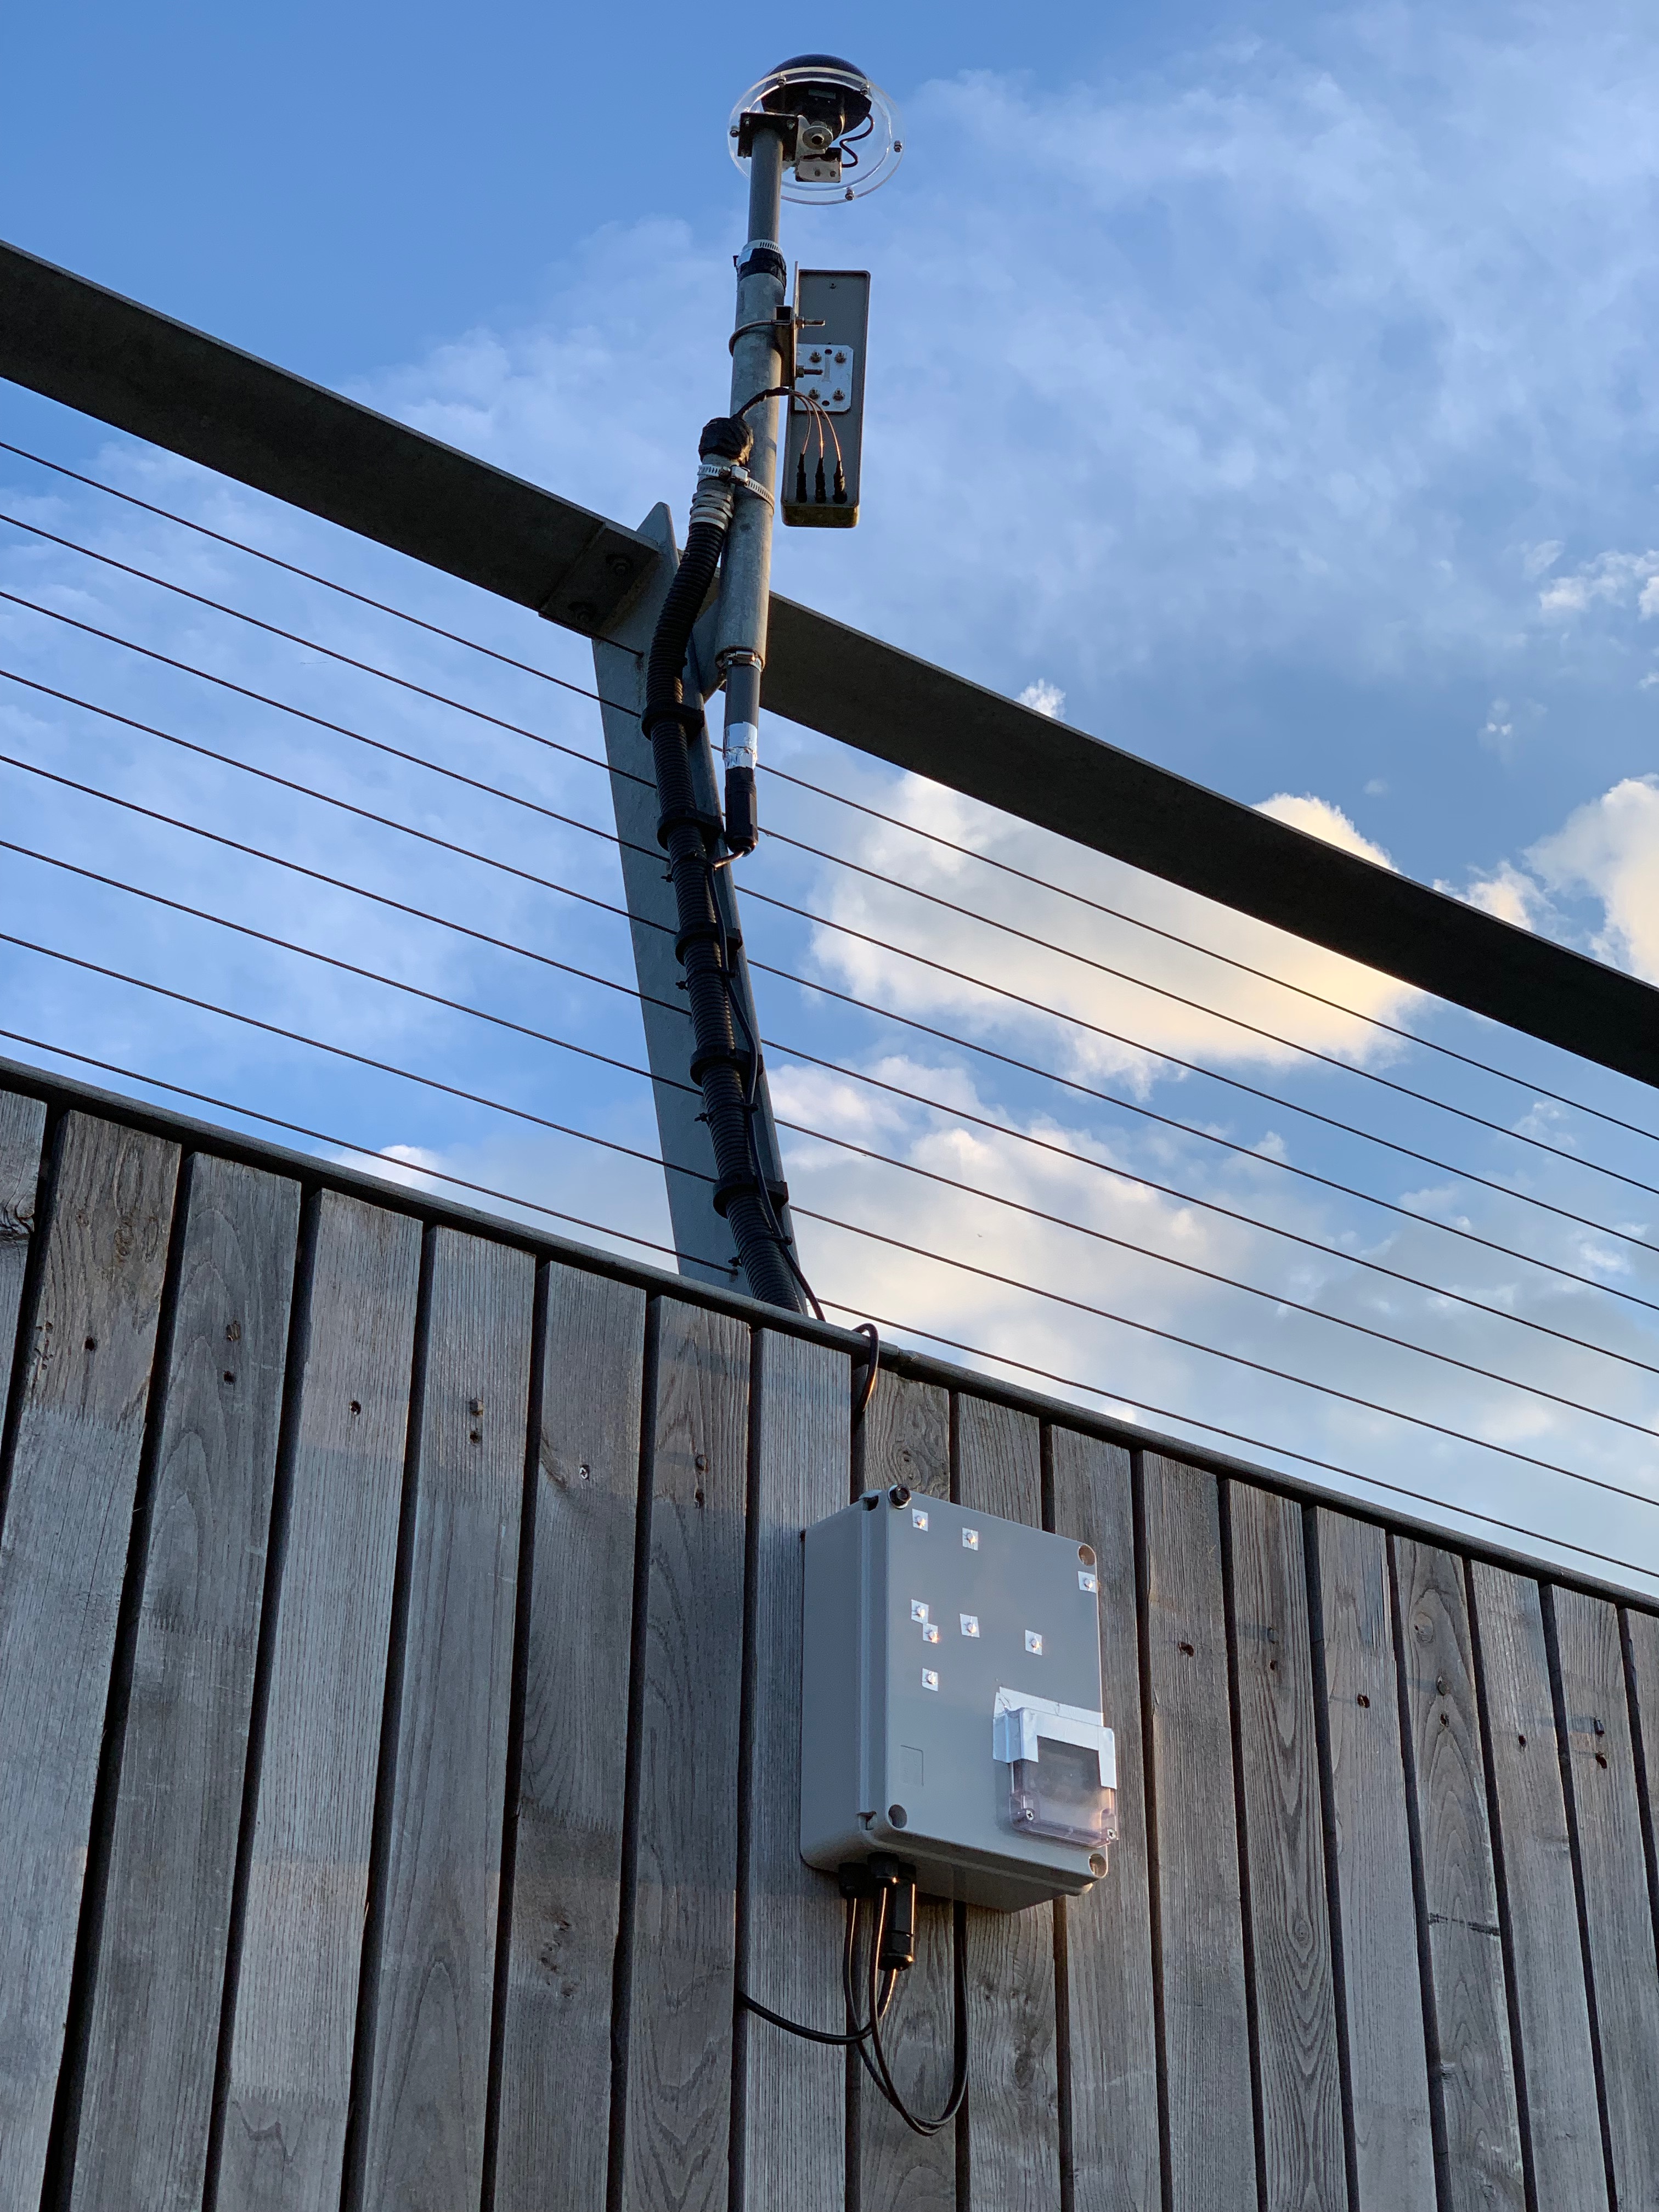
This could have been achieved by permanently positioning a camera within the stone circle, but this was ruled out for fear of being too intrusive. Instead, Eric and developers from The Bespoke Pixel agency snapped a single panoramic shot of the circle’s interior using a large 8K high-res, 360-degree camera when the shadows and light were quite neutral.
“We then took the sky out of the image with the aim of capturing an approximation of the view without impacting on the actual stones themselves,” Eric says.
By taking a separate hemispherical snapshot of the sky from a nearby position and merging it with the master photograph of the stones, the team discovered they could create a near real-time effect for online visitors. They used an off-the-shelf, upwards-pointing, 220-degree fish-eye lens camera connected to a Raspberry Pi 3 Model A+ computer, taking images once every four minutes.
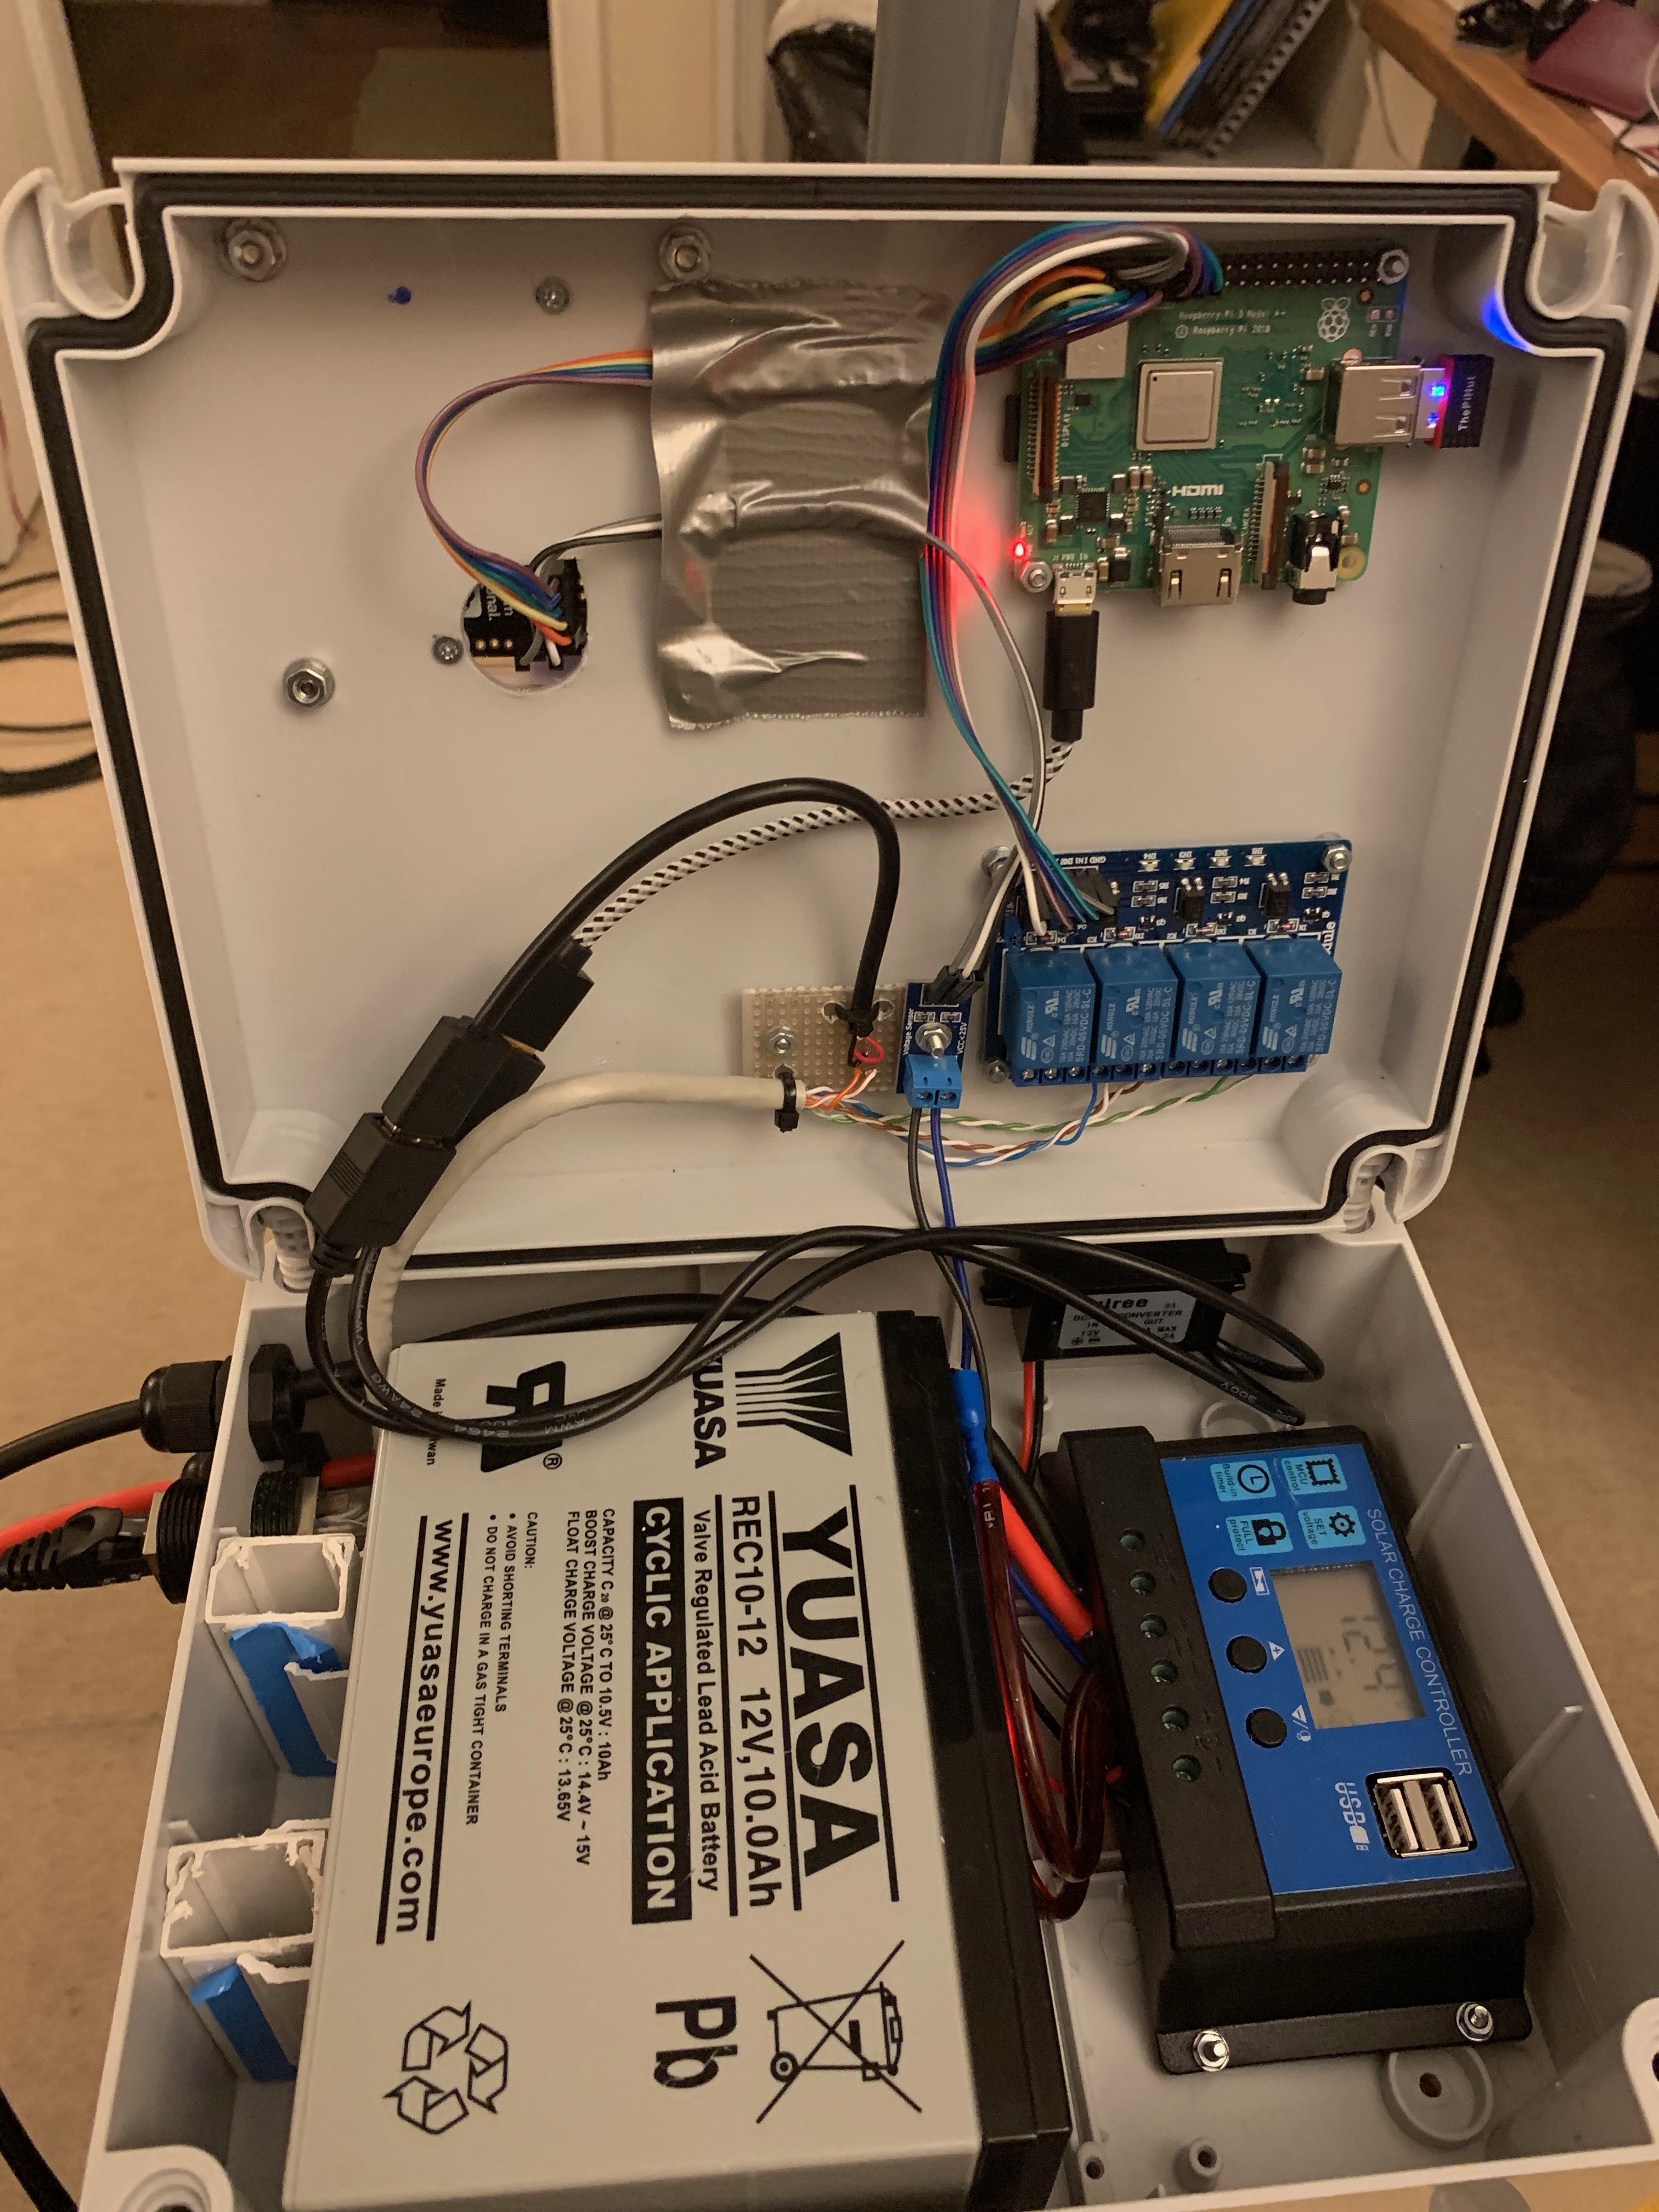
This Raspberry Pi was also fitted with a Pimoroni Enviro pHAT containing atmospheric, air pressure, and light sensors. Captured light values from the sky image were then used to alter the colour values of the master image of the stones so that the light on Stonehenge, as seen via the web, reflected the ambient light of the sky.
“What it does is give a view of the stones as it looks right now, or at least within a few minutes,” says Eric. “It also means the effect doesn’t look like two images simply Photoshopped together.”
Indeed, coder Mark Griffiths says the magic all runs from Node.js. “It uses a Python shell to get the sensor data and integrates with Amazon’s AWS and an IoT messaging service called DweetPro to tie all the events together,” he adds.
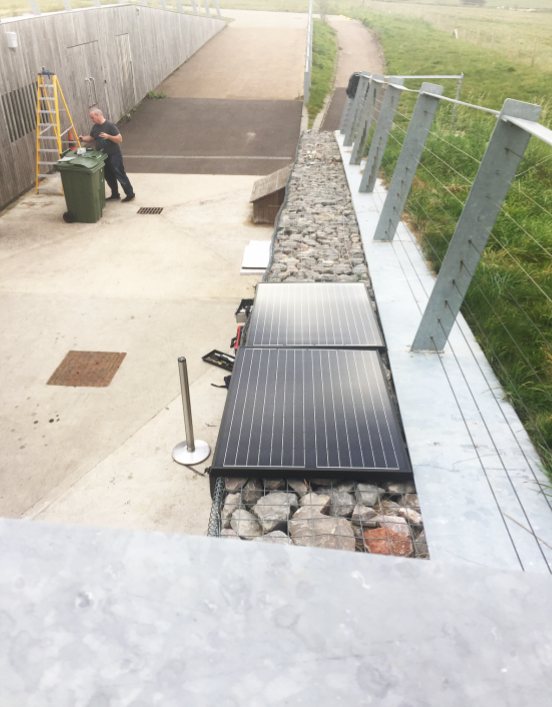
There was also a lot of experimentation. “We used the HAT via the I2C connectors so that we could mount it away from the main board to get better temperature readings,” says Mark, “We also tried a number of experiments with different cameras, lenses, and connections and it became clear that just connecting the camera via USB didnít allow access to the full functionality and resolutions.”
Mark reverse-engineered the camera’s WiFi connection and binary protocol to work out how to communicate with it via Raspberry Pi so that full-quality images could be taken and downloaded. “We also found the camera’s WiFi connection would time out after several days,” reveals Mark, “so we had to use a relay board connected via the GPIO pins.”
With such issues resolved, the team then created an easy-to-use online interface that lets users click boxes and see the view over the past 24 hours. They also added a computer model to depict the night sky.
“Visitors can go to the website day and night and allow the tool to pan around Stonehenge or pause it and pan manually, viewing the stones as they would be at the time of visiting,” Eric says. “It can look especially good on a smart television. It’s very relaxing.”
View the stones in realtime right now by visiting the English Heritage website.
The post View Stonehenge in real time via Raspberry Pi appeared first on Raspberry Pi.
Learn how to code a sprinting minigame straight out of Daley Thompson’s Decathlon with Raspberry Pi’s own Rik Cross.
Spurred on by the success of Konami’s Hyper Sports, Daley Thompson’s Decathlon featured a wealth of controller-wrecking minigames.
Released in 1984, Daley Thompson’s Decathlon was a memorable entry in what’s sometimes called the ‘joystick killer’ genre: players competed in sporting events that largely consisted of frantically waggling the controller or battering the keyboard. I’ll show you how to create a sprinting game mechanic in Python and Pygame.
There are variables in the Sprinter() class to keep track of the runner’s speed and distance, as well as global constant ACCELERATION and DECELERATION values to determine the player’s changing rate of speed. These numbers are small, as they represent the number of metres per frame that the player accelerates and decelerates.
The player increases the sprinter’s speed by alternately pressing the left and right arrow keys. This input is handled by the sprinter’s isNextKeyPressed() method, which returns True if the correct key (and only the correct key) is being pressed. A lastKeyPressed variable is used to ensure that keys are pressed alternately. The player also decelerates if no key is being pressed, and this rate of deceleration should be sufficiently smaller than the acceleration to allow the player to pick up enough speed.
Press the left and right arrow keys alternately to increase the sprinter’s speed. Objects move across the screen from right to left to give the illusion of sprinter movement.
For the animation, I used a free sprite called ‘The Boy’ from gameart2d.com, and made use of a single idle image and 15 run cycle images. The sprinter starts in the idle state, but switches to the run cycle whenever its speed is greater than 0. This is achieved by using index() to find the name of the current sprinter image in the runFrames list, and setting the current image to the next image in the list (and wrapping back to the first image once the end of the list is reached). We also need the sprinter to move through images in the run cycle at a speed proportional to the sprinter’s speed. This is achieved by keeping track of the number of frames the current image has been displayed for (in a variable called timeOnCurrentFrame).
To give the illusion of movement, I’ve added objects that move past the player: there’s a finish line and three markers to regularly show the distance travelled. These objects are calculated using the sprinter’s x position on the screen along with the distance travelled. However, this means that each object is at most only 100 pixels away from the player and therefore seems to move slowly. This can be fixed by using a SCALE factor, which is the relationship between metres travelled by the sprinter and pixels on the screen. This means that objects are initially drawn way off to the right of the screen but then travel to the left and move past the sprinter more quickly.
Finally, startTime and finishTime variables are used to calculate the race time. Both values are initially set to the current time at the start of the race, with finishTime being updated as long as the distance travelled is less than 100. Using the time module, the race time can simply be calculated by finishTime - startTime.
Here’s Rik’s code, which gets a sprinting game running in Python (no pun intended). To get it working on your system, you’ll first need to install Pygame Zero. Download the code here.
You can read more features like this one in Wireframe issue 23, available now at Tesco, WHSmith, all good independent UK newsagents, and the Raspberry Pi Store, Cambridge.
Or you can buy Wireframe directly from Raspberry Pi Press — delivery is available worldwide. And if you’d like a handy digital version of the magazine, you can download issue 23 for free in PDF format.
Autonauts is coming to colonise your computers with cuteness. We find out more in Wireframe issue 23.
Make sure to follow Wireframe on Twitter and Facebook for updates and exclusive offers and giveaways. Subscribe on the Wireframe website to save up to 49% compared to newsstand pricing!
The post Make a keyboard-bashing sprint game | Wireframe issue 23 appeared first on Raspberry Pi.
“If you’ve ever been curious about electronics or programming, then the Raspberry Pi is an excellent tool to have in your arsenal,” enthuses Tinkernut in his latest video, Raspberry Pi – All You Need To Know.
And we aren’t going to argue with that.
Raspberry Pi – All You Need To Know
If you keep your ear to the Tinkering community, I’m sure you’ve heard whispers (and shouts) of the Raspberry Pi. And if you wanted to get into making, tinkering, computing, or electronics, the Raspberry Pi is a great tool to have in your tool belt. But what is it?
“This Pi can knit a Hogwarts sweater while saving a cat from a tree,” he declares. “It can recite the Canterbury Tales while rebuilding an engine.” Tinkernut’s new explainer comes after a short hiatus from content creation, and it’s a cracking little intro to what Raspberry Pi is, what it can do, and which model is right for you.
“This little pincushion, right here”
Tinkernut, we’re glad you’re back. And thank you for making us your first subject in your new format.
If you like what you see, be sure to check out more Tinkernut videos, and subscribe.

The post Tinkernut’s Raspberry Pi video guide appeared first on Raspberry Pi.
After the success of our last snazzy wallpaper for your computer and smartphone, Fiacre is back with another visual delight.
Click one of the images below to visit the appropriate download page!
Standard rules apply: these images are for personal use only and are not to be manipulated, printed, turned into t-shirts, glazed onto mugs or sold.
Let us know in the comments if you decide to use the wallpaper, or tag a photo with #SnazzyRPi on Twitter and Instagram.
The post Another snazzy Raspberry Pi wallpaper for your phone and computer appeared first on Raspberry Pi.
In June we launched Raspberry Pi 4, and it has been selling extremely well, with over 1 million devices already made. We launched the product in a select set of countries in June, and ever since, we’ve been steadily making it available in more and more places; currently, Raspberry Pi 4 is on the market in 55 countries.
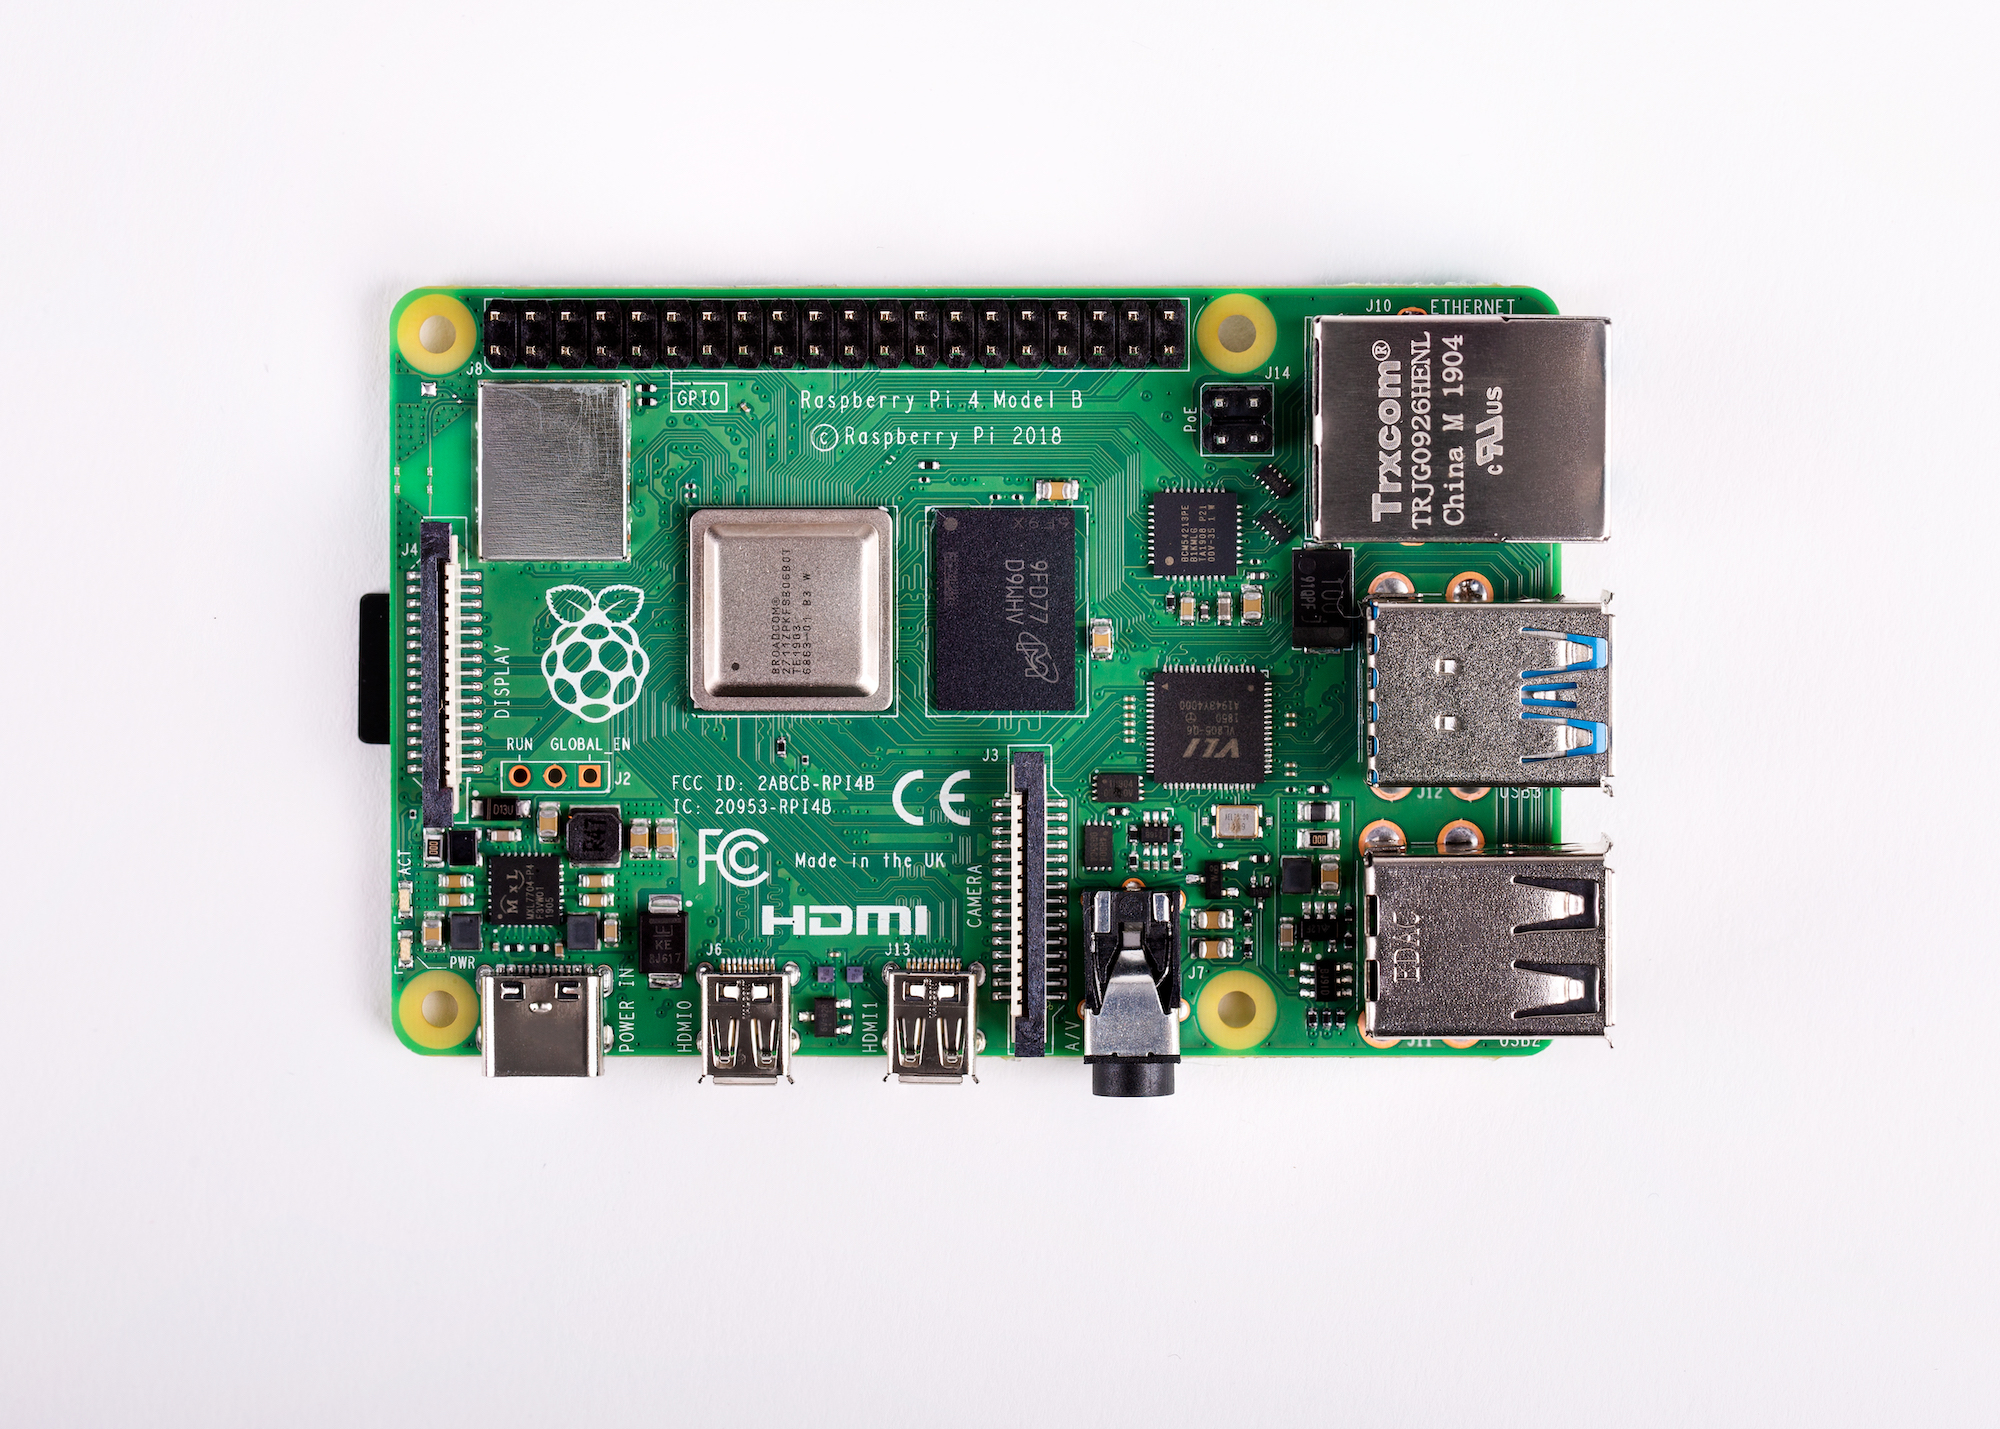
There have been many questions around why Raspberry Pi 4 isn’t available in certain countries, and this post will give you some insight into this.
Whenever a company wants to sell a product on a market, it first has to prove that selling it is safe and legal. Compliance requirements vary between different products; rules that would apply to a complicated machine like a car will, naturally, not be the same as those that apply to a pair of trainers (although there is some overlap in the Venn diagram of rules).
Regions of the world within each of which products have to be separately tested
Different countries usually have slightly different sets of regulations, and testing has to be conducted at an accredited facility for the region the company intends to sell the product in.
Compliance for a country is broken into the following: testing, certification, and marking.
Compliance testing requirements vary from country to country; there is no single set of tests or approvals that allow you to sell a product globally. Often, it’s necessary to test the product within the country that compliance is needed for; only some countries accept test reports from other countries.
For the launch of Raspberry Pi 4, we tested to EU, FCC (USA), and IC (Canada) regulations, and we’ve used these test reports to apply for compliance in as many countries as possible.
Once testing is complete, a certificate is issued for the product. The time this takes is variable, and some countries post such certificates online publicly so people can search for products.
Testing in the remaining countries that require testing to happen in-country is now complete, and the respective certificates are being granted for Raspberry Pi 4 right now. However, whilst the certificate is being issued, the product isn’t yet compliant; we need to add the regulatory markings for this to happen.
Like testing requirements, product marking requirements may differ from country to country. The main difficulty of marking is that many countries require a unique certificate number to be printed on packaging, leaflets, and the product itself.
Some countries, such as the USA, allow companies to create the certificate number themselves (hence jazzy numbers like 2ABCB-RPI4B), and so we can place these on the product before launch. In other countries, however, the certificate number is issued at the end of the certification process.
For Raspberry Pi 4, we are now at the final stage for compliance: marking. All our certificates have been issued, and we are updating the packaging, leaflet, and product with the various certificate numbers needed to unlock the last few countries.
The countries that we have certificates for that require markings to be added: South Korea, Brazil, Mexico, Taiwan, Chile, and Japan.
The process is beginning, and Raspberry Pi 4 should be available in these markets soon.
We post all our product compliance information online.
This is a broad overview of the compliance process for Raspberry Pi, and there are some details omitted for the sake of clarity. Compliance is a complex and varied task, but it is very important to demonstrate that Raspberry Pi 4 is a compliant, safe, and trustworthy product.
We aim to make Raspberry Pi 4 available in more countries than ever before, ensuring that everyone can take advantage of the amazing features, power, and cost-effectiveness it offers.
The post Compliance, and why Raspberry Pi 4 may not be available in your country yet appeared first on Raspberry Pi.
Weave through a randomly generated landscape in Mark Vanstone’s homage to the classic arcade game Scramble.
Scramble was developed by Konami and released in arcades in 1981. Players avoid terrain and blast enemy craft.
In the early eighties, arcades and sports halls rang with the sound of a multitude of video games. Because home computers hadn’t yet made it into most households, the only option for the avid video gamer was to go down to their local entertainment establishment and feed the machines with ten pence pieces (which were bigger then). One of these pocket money–hungry machines was Konami’s Scramble — released in 1981, it was one of the earliest side-scrolling shooters with multiple levels.
The Scramble player’s jet aircraft flies across a randomly generated landscape (which sometimes narrows to a cave system), avoiding obstacles and enemy planes, bombing targets on the ground, and trying not to crash. As the game continues, the difficulty increases. The player aircraft can only fly forward, so once a target has been passed, there’s no turning back for a second go.
In this example code, I’ll show you a way to generate a Scramble-style scrolling landscape using Pygame Zero and a couple of additional Pygame functions. On early computers, moving a lot of data around the screen was very slow — until dedicated video hardware like the blitter chip arrived. Scrolling, however, could be achieved either by a quick shuffle of bytes to the left or right in the video memory, or in some cases, by changing the start address of the video memory, which was even quicker.
Avoid the roof and the floor with the arrow keys. Jet graphic courtesy of TheSource4Life at opengameart.org.
For our scrolling, we can use a Pygame surface the same size as the screen. To get the scrolling effect, we just call the scroll() function on the surface to shift everything left by one pixel and then draw a new pixel-wide slice of the terrain. The terrain could just be a single colour, but I’ve included a bit of maths-based RGB tinkering to make it more colourful. We can draw our terrain surface over a background image, as the SRCALPHA flag is set when we create the surface. This is also useful for detecting if the jet has hit the terrain. We can test the pixel from the surface in front of the jet: if it’s not transparent, kaboom!
The jet itself is a Pygame Zero Actor and can be moved up and down with the arrow keys. The left and right arrows increase and decrease the speed. We generate the landscape in the updateLand() and drawLand() functions, where updateLand() first decides whether the landscape is inclining or declining (and the same with the roof), making sure that the roof and floor don’t get too close, and then it scrolls everything left.
Each scroll action moves everything on the terrain surface to the left by one pixel.
The drawLand() function then draws pixels at the right-hand edge of the surface from y coordinates 0 to 600, drawing a thin sliver of roof, open space, and floor. The speed of the jet determines how many times the landscape is updated in each draw cycle, so at faster speeds, many lines of pixels are added to the right-hand side before the display updates.
The use of randint() can be changed to create a more or less jagged landscape, and the gap between roof and floor could also be adjusted for more difficulty. The original game also had enemy aircraft, which you could make with Actors, and fuel tanks on the ground, which could be created on the right-hand side as the terrain comes into view and then moved as the surface scrolls. Scramble sparked a wave of horizontal shooters, from both Konami and rival companies; this short piece of code could give you the basis for making a decent Scramble clone of your own:
Here’s Mark’s code, which gets a Scramble-style scrolling landscape running in Python. To get it working on your system, you’ll first need to install Pygame Zero. And to download the full code, go here.
You can read more features like this one in Wireframe issue 22, available now at Tesco, WHSmith, and all good independent UK newsagents, and the Raspberry Pi Store, Cambridge.
Or you can buy Wireframe directly from Raspberry Pi Press — delivery is available worldwide. And if you’d like a handy digital version of the magazine, you can also download issue 22 for free in PDF format.
![]()
Make sure to follow Wireframe on Twitter and Facebook for updates and exclusive offers and giveaways. Subscribe on the Wireframe website to save up to 49% compared to newsstand pricing!
The post Create a Scramble-style scrolling landscape | Wireframe issue 22 appeared first on Raspberry Pi.
Chris Aviles, aka the teacher we all wish we’d had when we were at school, discusses how his school is in New Jersey is directly linking data with life itself…
Over to you, Chris.
Every year, our students take federal or state-mandated testing, but what significant changes have we made to their education with the results of these tests? We have never collected more data about our students and society in general. The problem is most people and institutions do a poor job interpreting data and using it to make meaningful change. This problem was something I wanted to tackle in FH Grows.
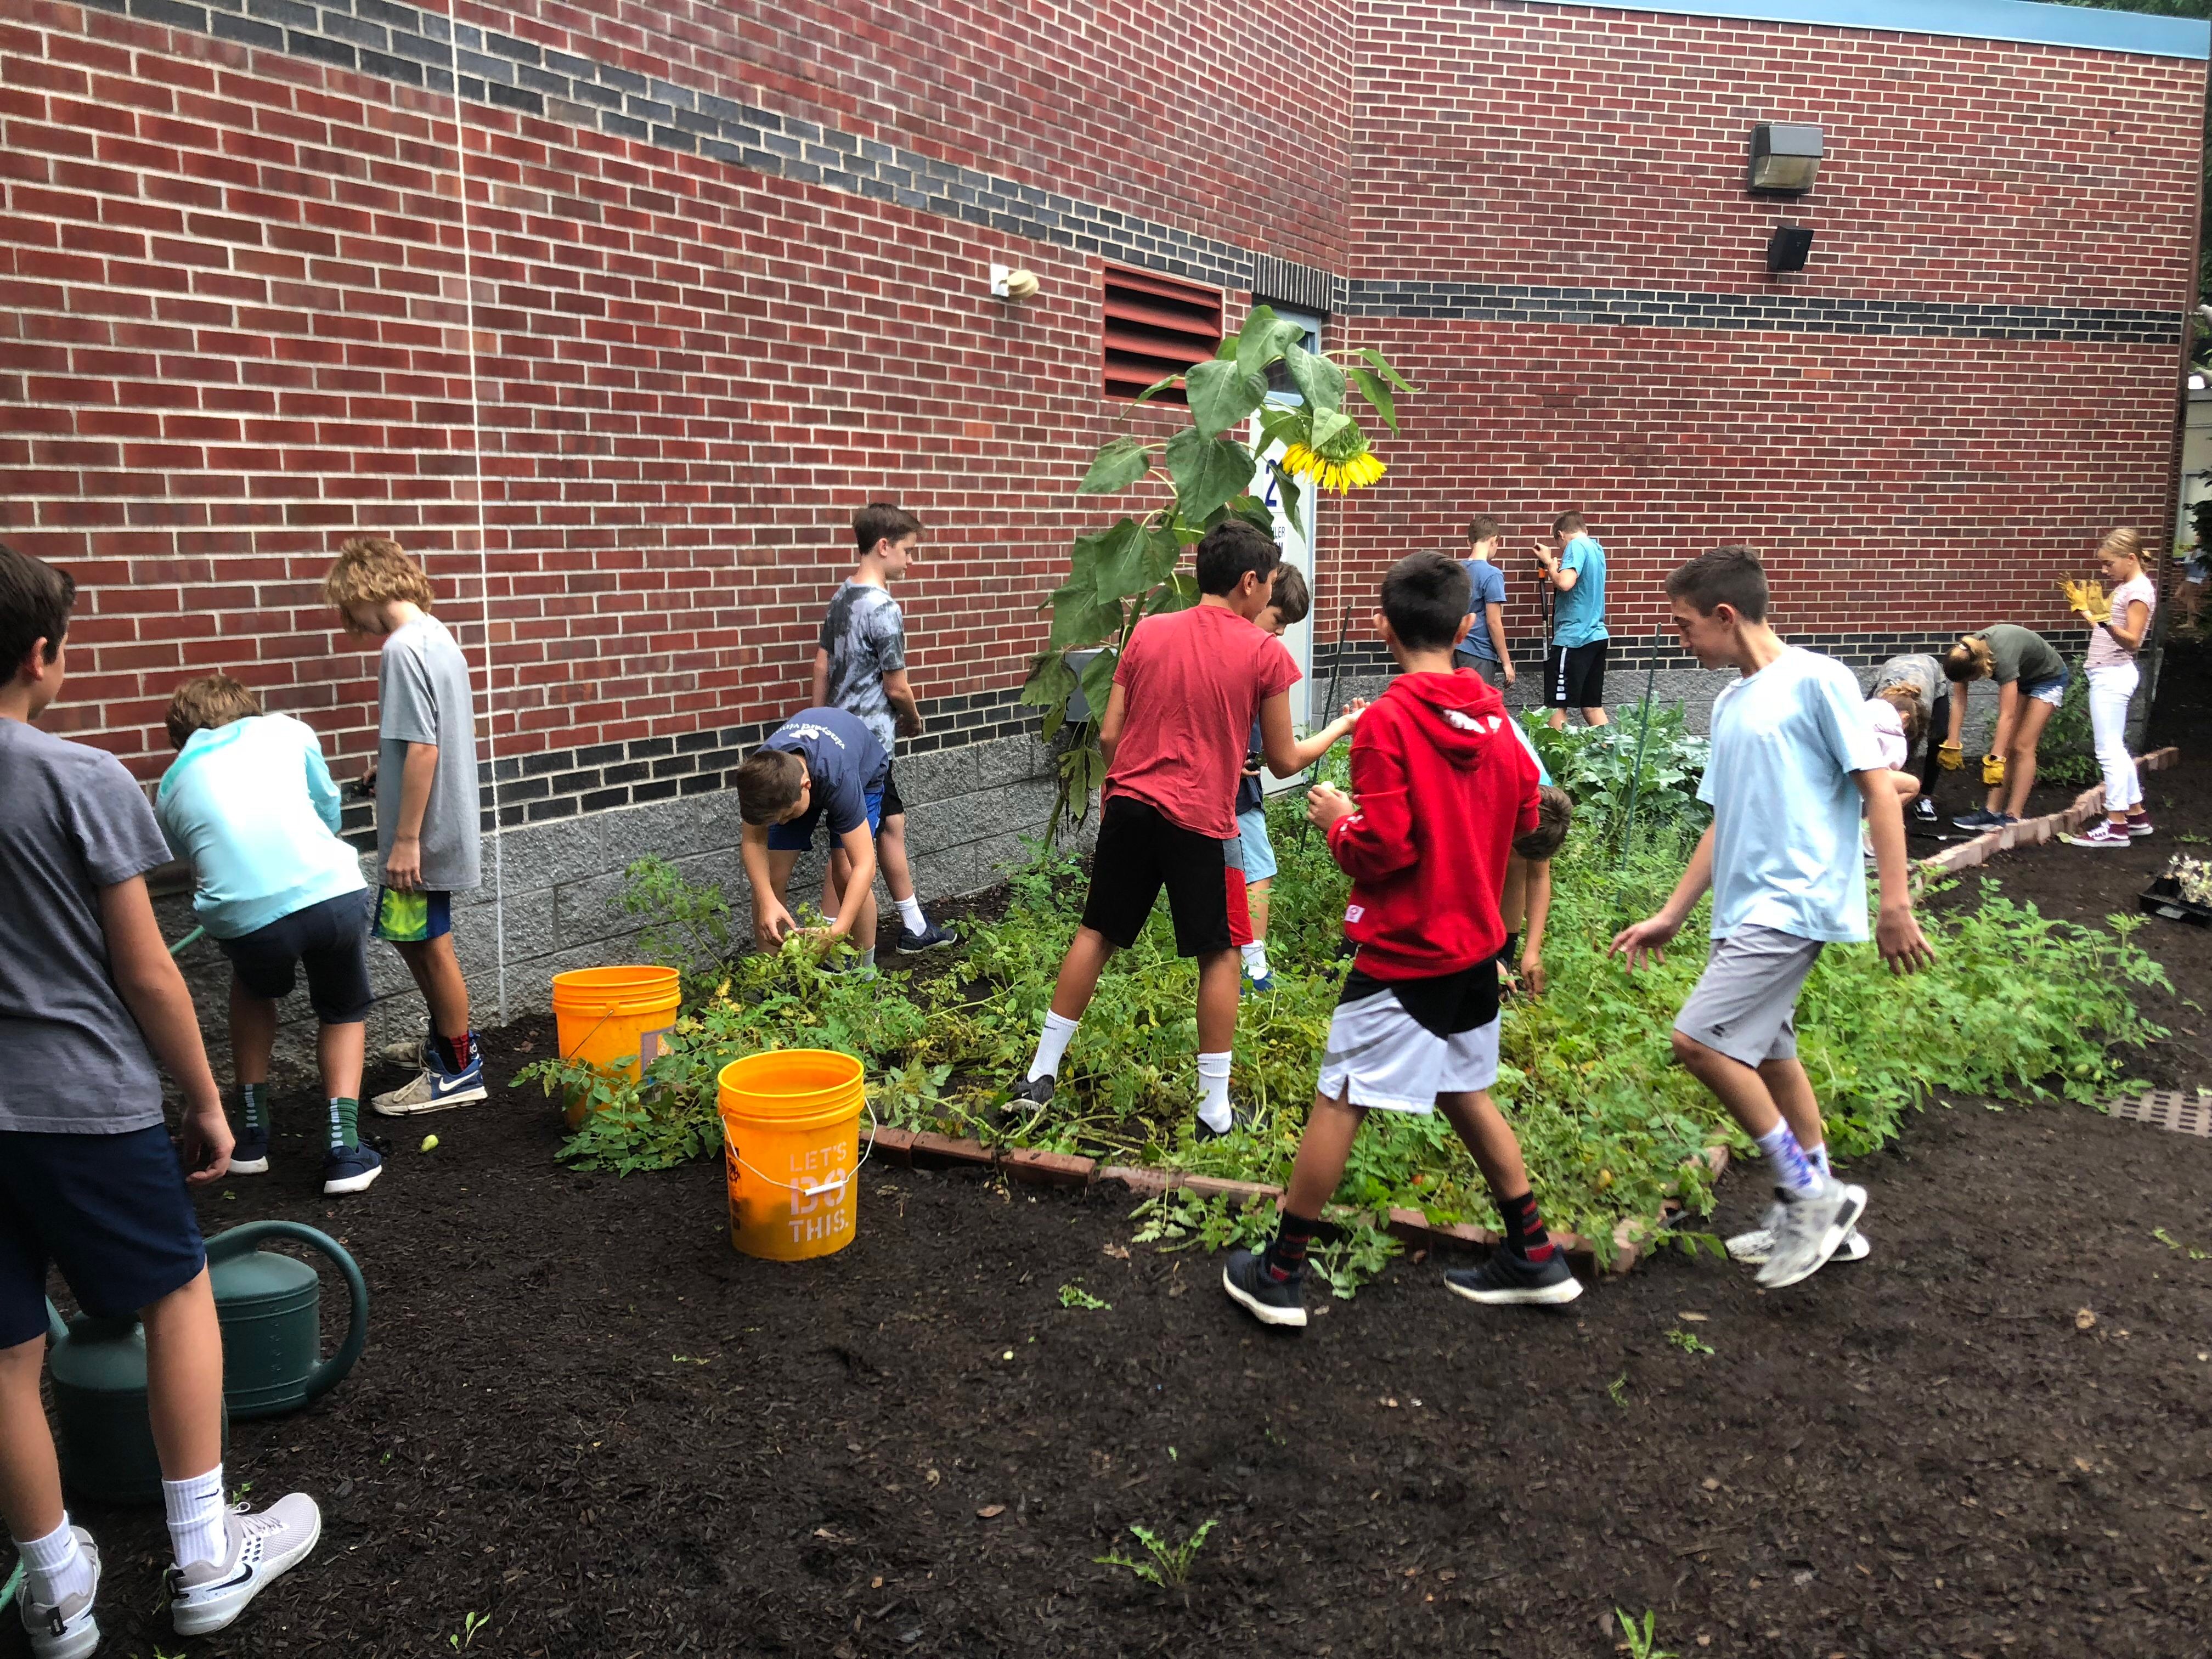
FH Grows is the name of my seventh-grade class, and is a student-run agriculture business at Knollwood Middle School in Fair Haven, New Jersey. In FH Grows, we sell our produce both online and through our student-run farmers markets. Any produce we don’t sell is donated to our local soup kitchen. To get the most out of our school gardens, students have built sensors and monitors using Raspberry Pis. These sensors collect data which then allows me to help students learn to better interpret data themselves and turn it into action.
In the greenhouse, our gardens, and alternative growing stations (hydroponics, aquaponics, aeroponics) we have sensors that log the temperature, humidity, and other important data points that we want to know about our garden. This data is then streamed in real time, online at FHGrows.com. When students come into the classroom, one of the first things we look at is the current, live data on the site and find out what is going on in our gardens. Over the course of the semester, students are taught about the ideal growing conditions of our garden. When looking at the data, if we see that the conditions in our gardens aren’t ideal, we get to work.
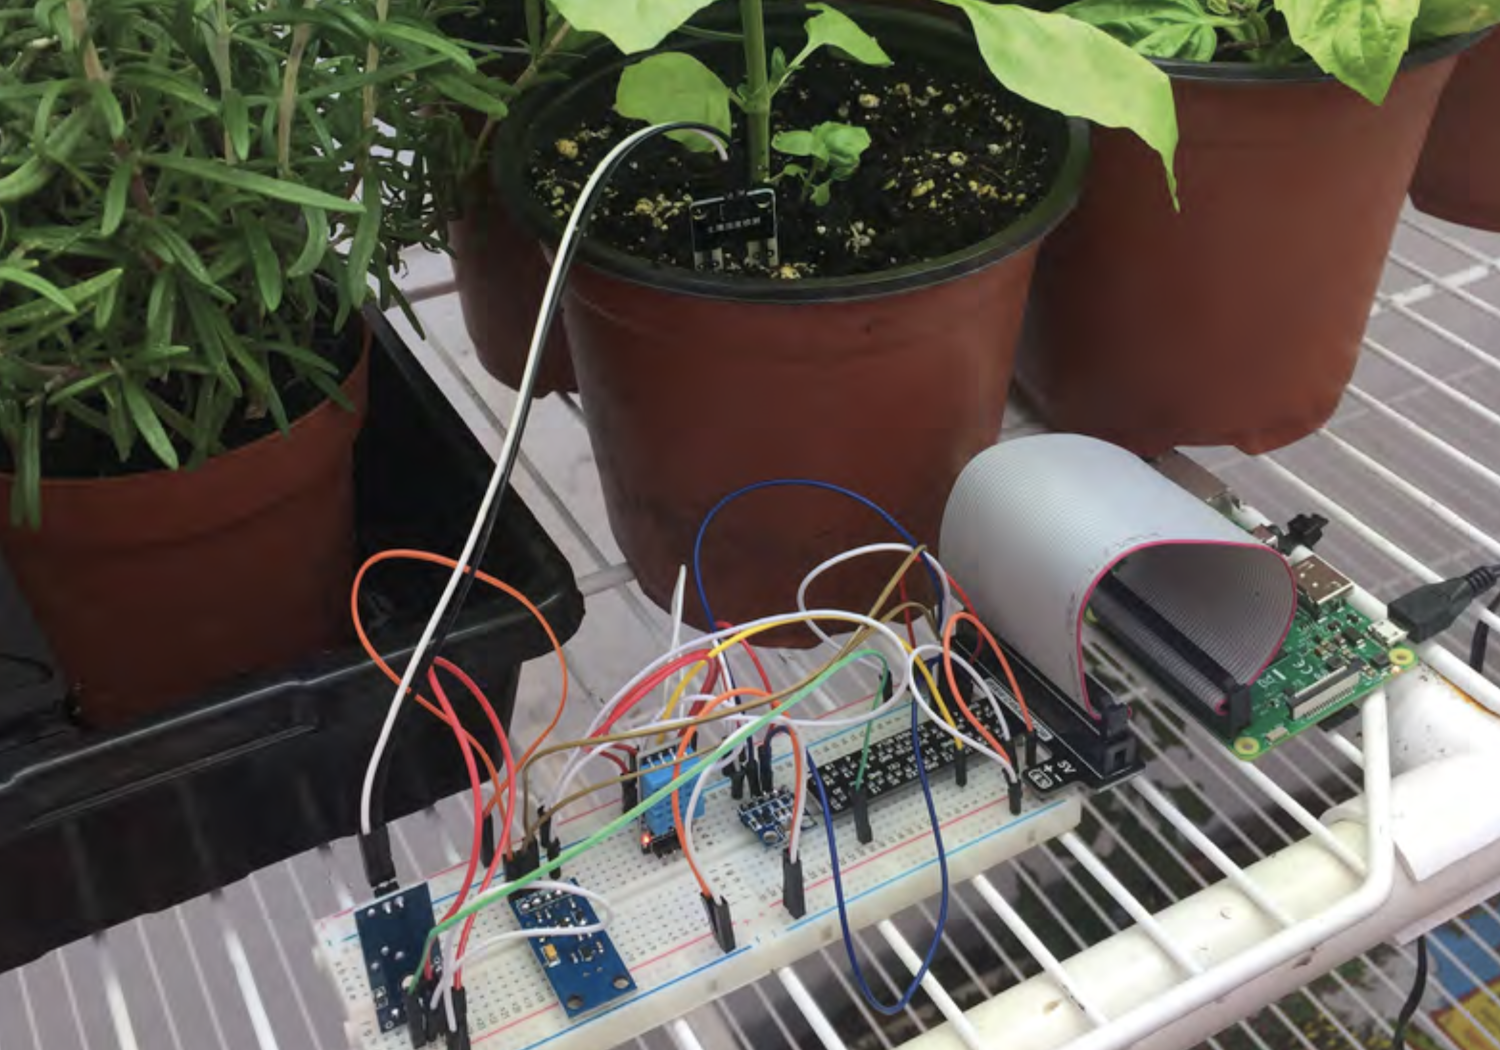
If we see that the greenhouse is too hot, over 85 degrees, students will go and open the greenhouse door. We check the temperature a little bit later, and if it’s still too hot, students will go turn on the fan. But how many fans do you turn on? After experimenting, we know that each fan lowers the greenhouse temperature between 7-10 degrees Fahrenheit. Opening the door and turning on both fans can bring a greenhouse than can push close to 100 degrees in late May or early June down to a manageable 80 degrees.
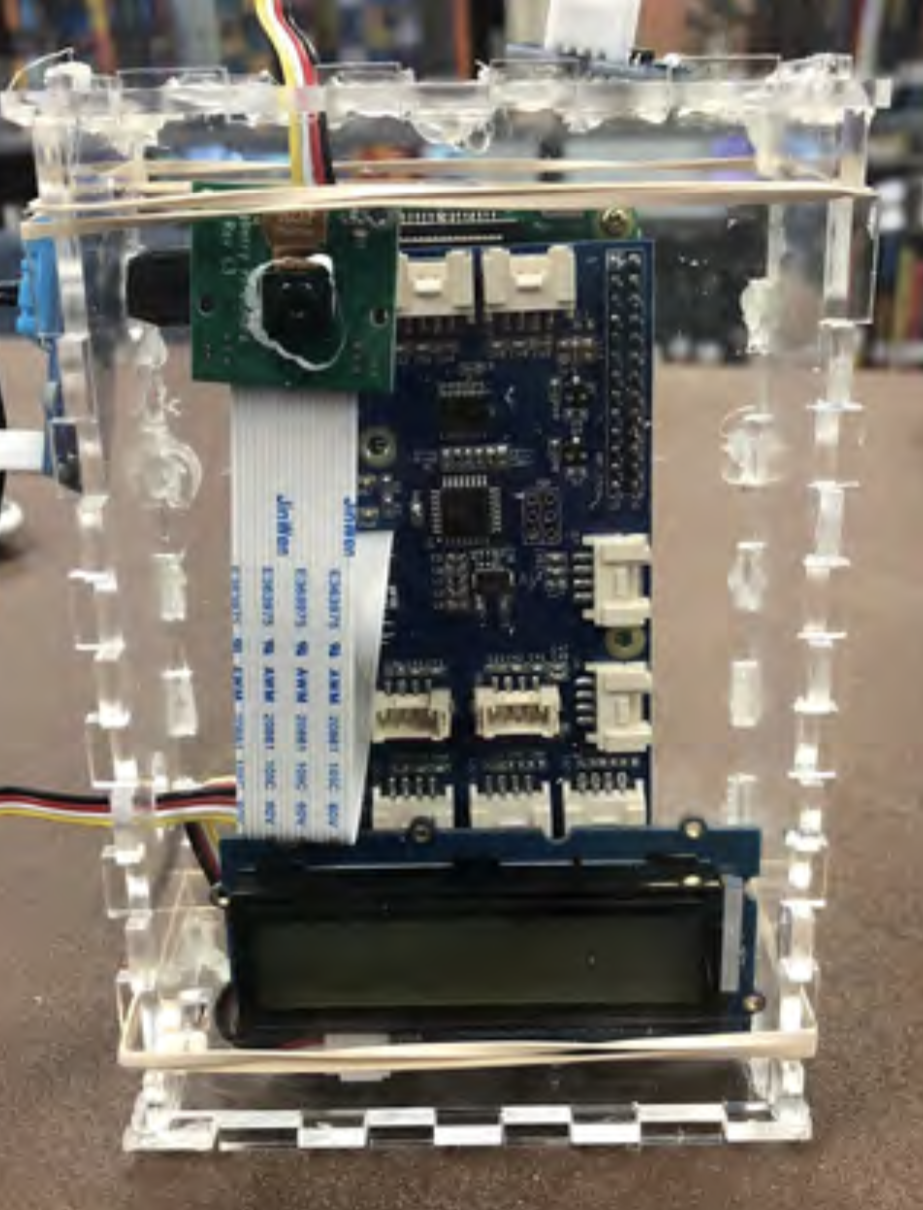
Turning data into action can allow for some creativity as well. Over-watering plants can be a real problem. We found that our plants were turning yellow because we were watering them every day when we didn’t need to. How could we solve this problem and become more efficient at watering? Students built a Raspberry Pi that used a moisture sensor to find out when a plant needed to be watered. We used a plant with the moisture sensor in the soil as our control plant. We figured that if we watered the control plant at the same time we watered all our other plants, when the control plant was dry (gave a negative moisture signal) the rest of the plants in the greenhouse would need to be watered as well.
This method of determining when to water our plants worked well. We rarely ever saw our plants turn yellow from overwatering. Here is where the creativity came in. Since we received a signal from the Raspberry Pi when the soil was not wet enough, we played around with what we could do with that signal. We displayed it on the dashboard along with our other data, but we also decided to make the signal send as an email from the plant. When I showed students how this worked, they decided to write the message from the plant in the first person. Every week or so, we received an email from Carl the Control Plant asking us to come out and water him!
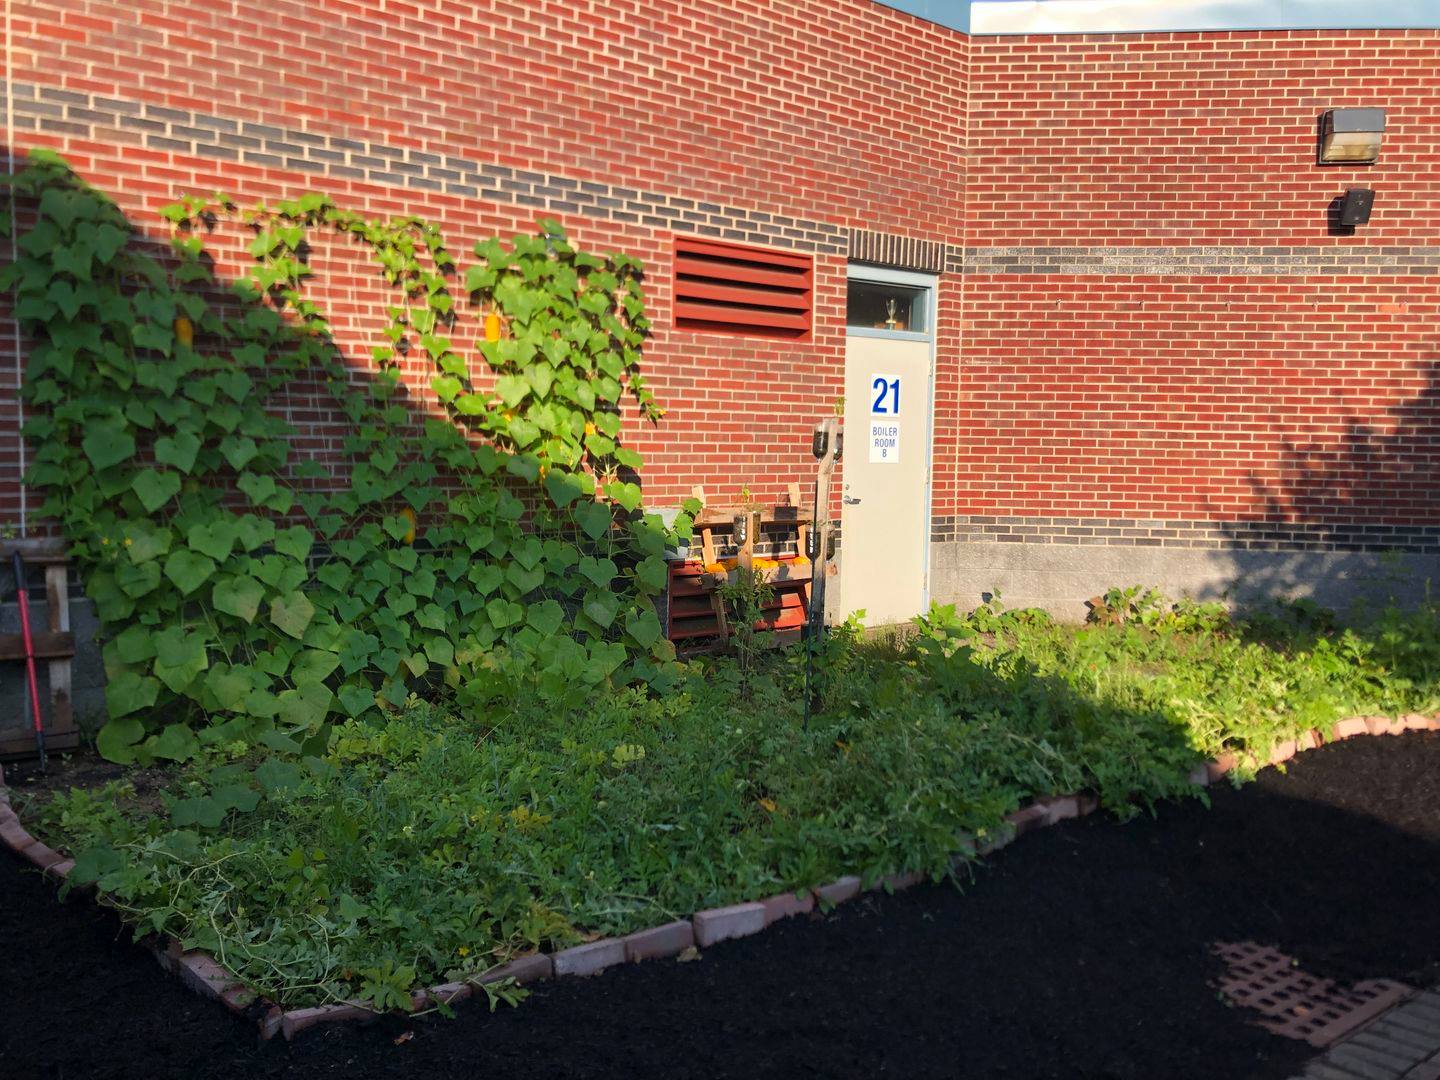
If students don’t honour Carl’s request for water, use data to know when to cool our greenhouse, or had not done the fan experiments to see how much cooler they make the greenhouse, all our plants, like the basil we sell to the pizza places in town, would die. This is the beauty of combining data literacy with a school garden: failure to interpret data then act based on their interpretation has real consequences: our produce could die. When it takes 60-120 days to grow the average vegetable, the loss of plants is a significant event. We lose all the time and energy that went into growing those plants as well as lose all the revenue they would have brought in for us. Further, I love the urgency that combining data and the school garden creates because many students have learned the valuable life lesson that not making a decision is making a decision. If students freeze or do nothing when confronted with the data about the garden, that too has consequences.
The other major way we use data in FH Grows is to spot trends and make predictions. Different to using data to create the ideal growing conditions in our garden every day, the sensors that we use also provide a way for us to use information about the past to predict the future. FH Grows has about two years’ worth of weather data from our Raspberry Pi weather station (there are guides online if you wish to build a weather station of your own). Using weather data year over year, we can start to determine important events like when it is best to plant our veggies in our garden.
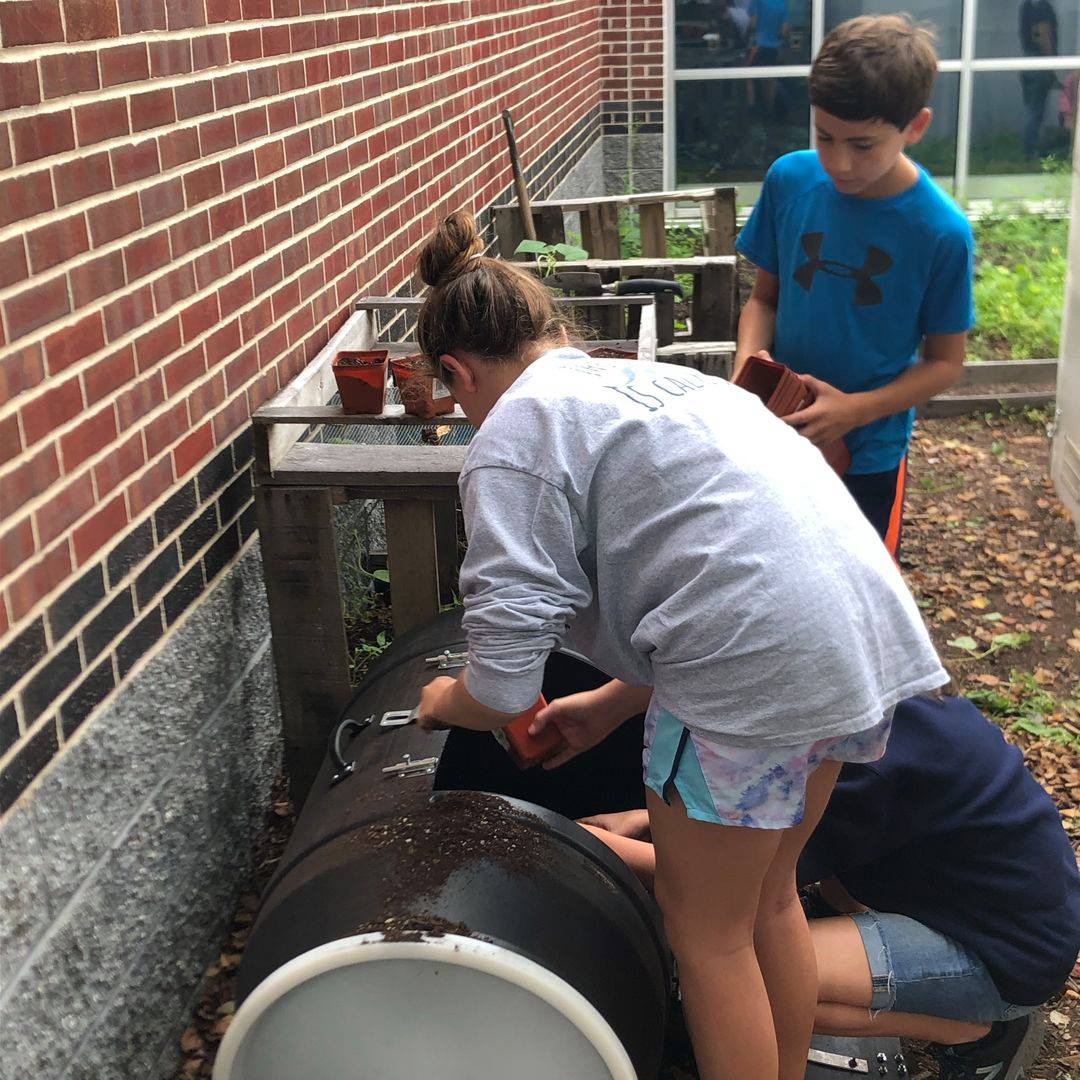
For example, one of the most useful data points on the Raspberry Pi weather station is the ground temperature sensor. Last semester, we wanted to squeeze in a cool weather grow in our garden. This post-winter grow can be done between March and June if you time it right. Getting an extra growing cycle from our garden is incredibly valuable, not only to FH Grows as business (since we would be growing more produce to turn around and sell) but as a way to get an additional learning cycle out of the garden.
So, using two seasons’ worth of ground temperature data, we set out to predict when the ground in our garden would be cool enough to do this cool veggie grow. Students looked at the data we had from our weather station and compared it to different websites that predicted the last frost of the season in our area. We found that the ground right outside our door warmed up two weeks earlier than the more general prediction given by websites. With this information we were able to get a full cool crop grow at a time where our garden used to lay dormant.
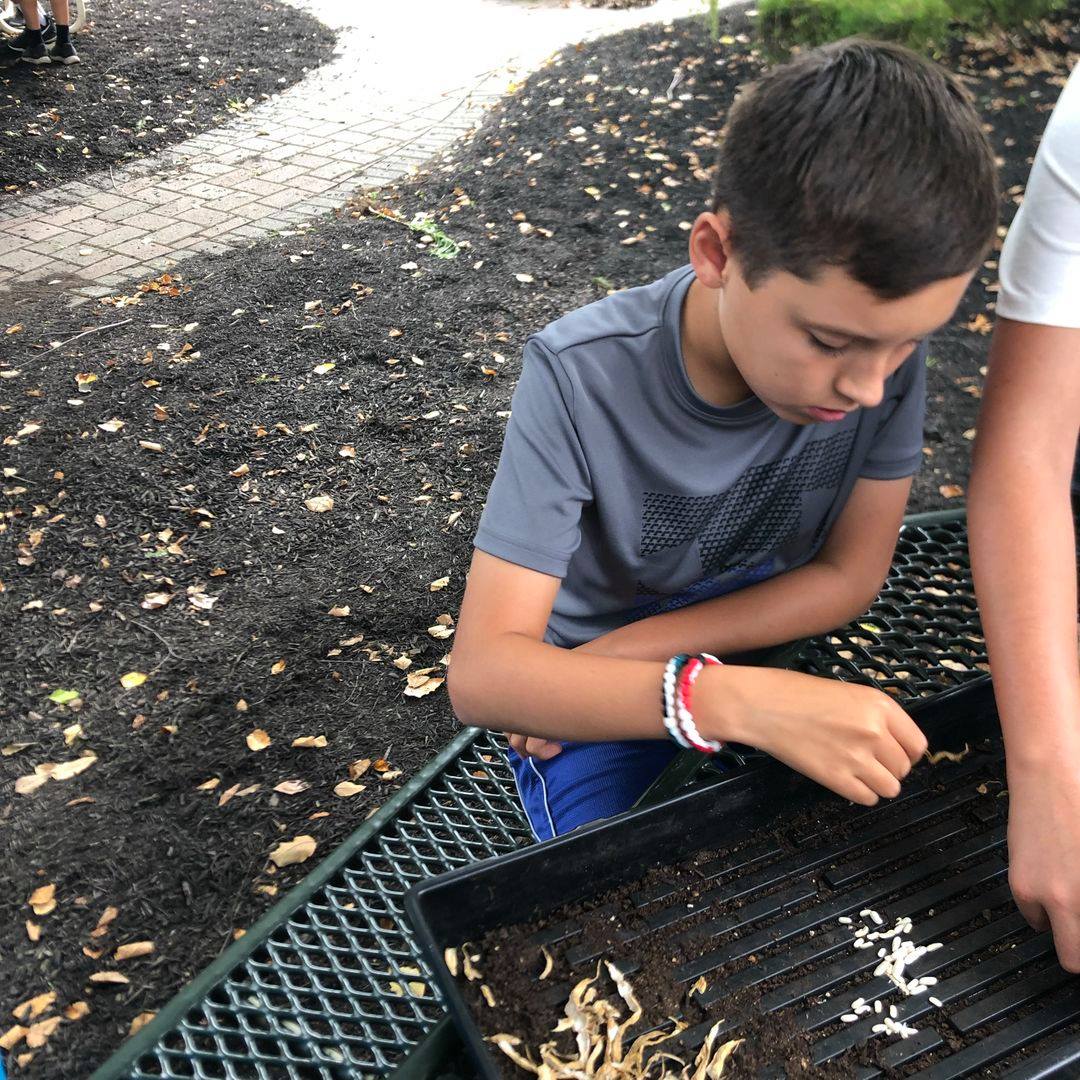
We also used our Raspberry Pi to help us predict whether or not it was going to rain over the weekend. Using a Raspberry Pi connected to Weather Underground and previous years’ data, if we believed it would not rain over the weekend we would water our gardens on Friday. If it looked like rain over the weekend, we let Mother Nature water our garden for us. Our prediction using the Pi and previous data was more accurate for our immediate area than compared to the more general weather reports you would get on the radio or an app, since those considered a much larger area when making their prediction.
It seems like we are going to be collecting even more data in the future, not less. It is important that we get our students comfortable working with data. The school garden supported by Raspberry Pi’s amazing ability to collect data is a boon for any teacher who wants to help students learn how to interpret data and turn it into action.
Issue 10 of Hello World magazine is out today, and it’s free. 100% free.
Click here to download the PDF right now. Right this second. If you want to be a love, click here to subscribe, again for free. Subscribers will receive an email when the latest issue is out, and we won’t use your details for anything nasty.
If you’re an educator in the UK, click here and you’ll receive the printed version of Hello World direct to your door. And, guess what? Yup, that’s free too!
What I’m trying to say here is that there is a group of hard-working, passionate educators who take the time to write incredible content for Hello World, for free, and you would be doing them (and us, and your students, kids and/or friends) a solid by reading it :)
The post Using data to help a school garden appeared first on Raspberry Pi.
Grab yourself a Raspberry Pi, a Makey Makey, and some copper pipes: it’s interactive wind chime time!
Perpetual Chimes
Perpetual Chimes is a set of augmented wind chimes that offer an escapist experience where your collaboration composes the soundscape. Since there is no wind indoors, the chimes require audience interaction to gently tap or waft them and encourage/nurture the hidden sounds within – triggering sounds as the chimes strike one another.
I don’t like wind chimes. There, I said it. I also don’t like the ticking of the second hand of analogue clocks, and I think these two dislikes might be related. There’s probably a name for this type of dislike, but I’ll leave the Googling to you.

Sound designer Frazer Merrick’s interactive wind chimes may actually be the only wind chimes I can stand. And this is due, I believe, to the wonderful sounds they create when they touch, much more wonderful than regular wind chime sounds. And, obviously, because these wind chimes incorporate a Raspberry Pi 3.
Perpetual Chimes is a set of augmented wind chimes that offer an escapist experience where your collaboration composes the soundscape. Since there is no wind indoors, the chimes require audience interaction to gently tap or waft them and encourage/nurture the hidden sounds within — triggering sounds as the chimes strike one another. Since the chimes make little acoustic noise, essentially they’re broken until you collaborate with them.
Follow the Instructables tutorial to create your own!
The post Raspberry Pi interactive wind chimes appeared first on Raspberry Pi.
We’re super excited to announce our new partnership with Studiocanal and Aardman Animations celebrating their new film A Shaun the Sheep Movie: Farmageddon, in cinemas this autumn.
Raspberry Pi has partnered with Shaun the Sheep!
Subscribe to our YouTube channel: http://rpf.io/ytsub Help us reach a wider audience by translating our video content: http://rpf.io/yttranslate Buy a Raspberry Pi from one of our Approved Resellers: http://rpf.io/ytproducts Find out more about the #RaspberryPi Foundation: Raspberry Pi http://rpf.io/ytrpi Code Club UK http://rpf.io/ytccuk Code Club International http://rpf.io/ytcci CoderDojo http://rpf.io/ytcd Check out our free online training courses: http://rpf.io/ytfl Find your local Raspberry Jam event: http://rpf.io/ytjam Work through our free online projects: http://rpf.io/ytprojects Do you have a question about your Raspberry Pi?
Aardman has created so many characters that the members of Raspberry Pi hold dear in our hearts. From the early days of Morph’s interactions with Tony Hart, or Christmas evenings sat watching the adventures of Wallace and Gromit, through to their grand cinema-screen epics, we all have a soft spot for the wonderful creatures this talented bunch have invented.
So when Aardman approached us to ask if we’d like to be the Educational Partner for their new film A Shaun the Sheep Movie: Farmageddon, we obviously jumped at the chance. Aardman are passionate about education, and we are too, so this really was a no-brainer.
Today we are launching the brand-new, global Code Club competition ‘Shaun the Sheep: Mission to Space’.

We’re asking young people in registered Code Clubs across the world to create awe-inspiring animations featuring Shaun the Sheep and his new friend Lu-La’s adventures, by following our specially themed ‘Shaun the Sheep: Mission to Space’ Scratch project guide!
The ‘Shaun the Sheep: Mission to Space’ competition closes October 25 2019, and you can find more information on the Code Club website.
For those of you who aren’t in a Code Club, we’re also running a second giveaway here on the Raspberry Pi blog. For your chance to enter, you need to find three characters from the film that we’ve hidden throughout the Raspberry Pi and Code Club websites. Once you’ve found three, fill in this form, and we’ll pick ten winners to receive some A Shaun the Sheep Movie: Farmageddon goodies, including stickers and a pair of Shaun the Sheep ears.

Please note: at least one of the characters you submit must be from the Code Club website, so get hunting!
The closing date for the character hunt is 4 October 2019.
Both competitions are open to everyone, no matter where in the world you are.
We’ll also be uploading the ‘Shaun the Sheep: Mission to Space’ Scratch project to the Raspberry Pi desktops at the Raspberry Pi Store, Cambridge, so make sure you stop by this coming half-term to try your hand at coding your own Shaun the Sheep adventure.
The post Raspberry Pi has partnered with Shaun the Sheep! appeared first on Raspberry Pi.
So, yesterday we announced the launch of the 2019/2020 European Astro Pi Challenge, and adults across the globe groaned with jealousy as a result. It’s OK, we did too.
The European Astro Pi Challenge is ridiculously cool. It’s definitely one of the most interesting, awesome, spectacular uses of a Raspberry Pi in the known universe. Two Raspberry Pis in stellar, space-grade aluminium cases are currently sat aboard the International Space Station, waiting for students in ESA Member States to write code to run on them to take part in the Astro Pi Challenge.
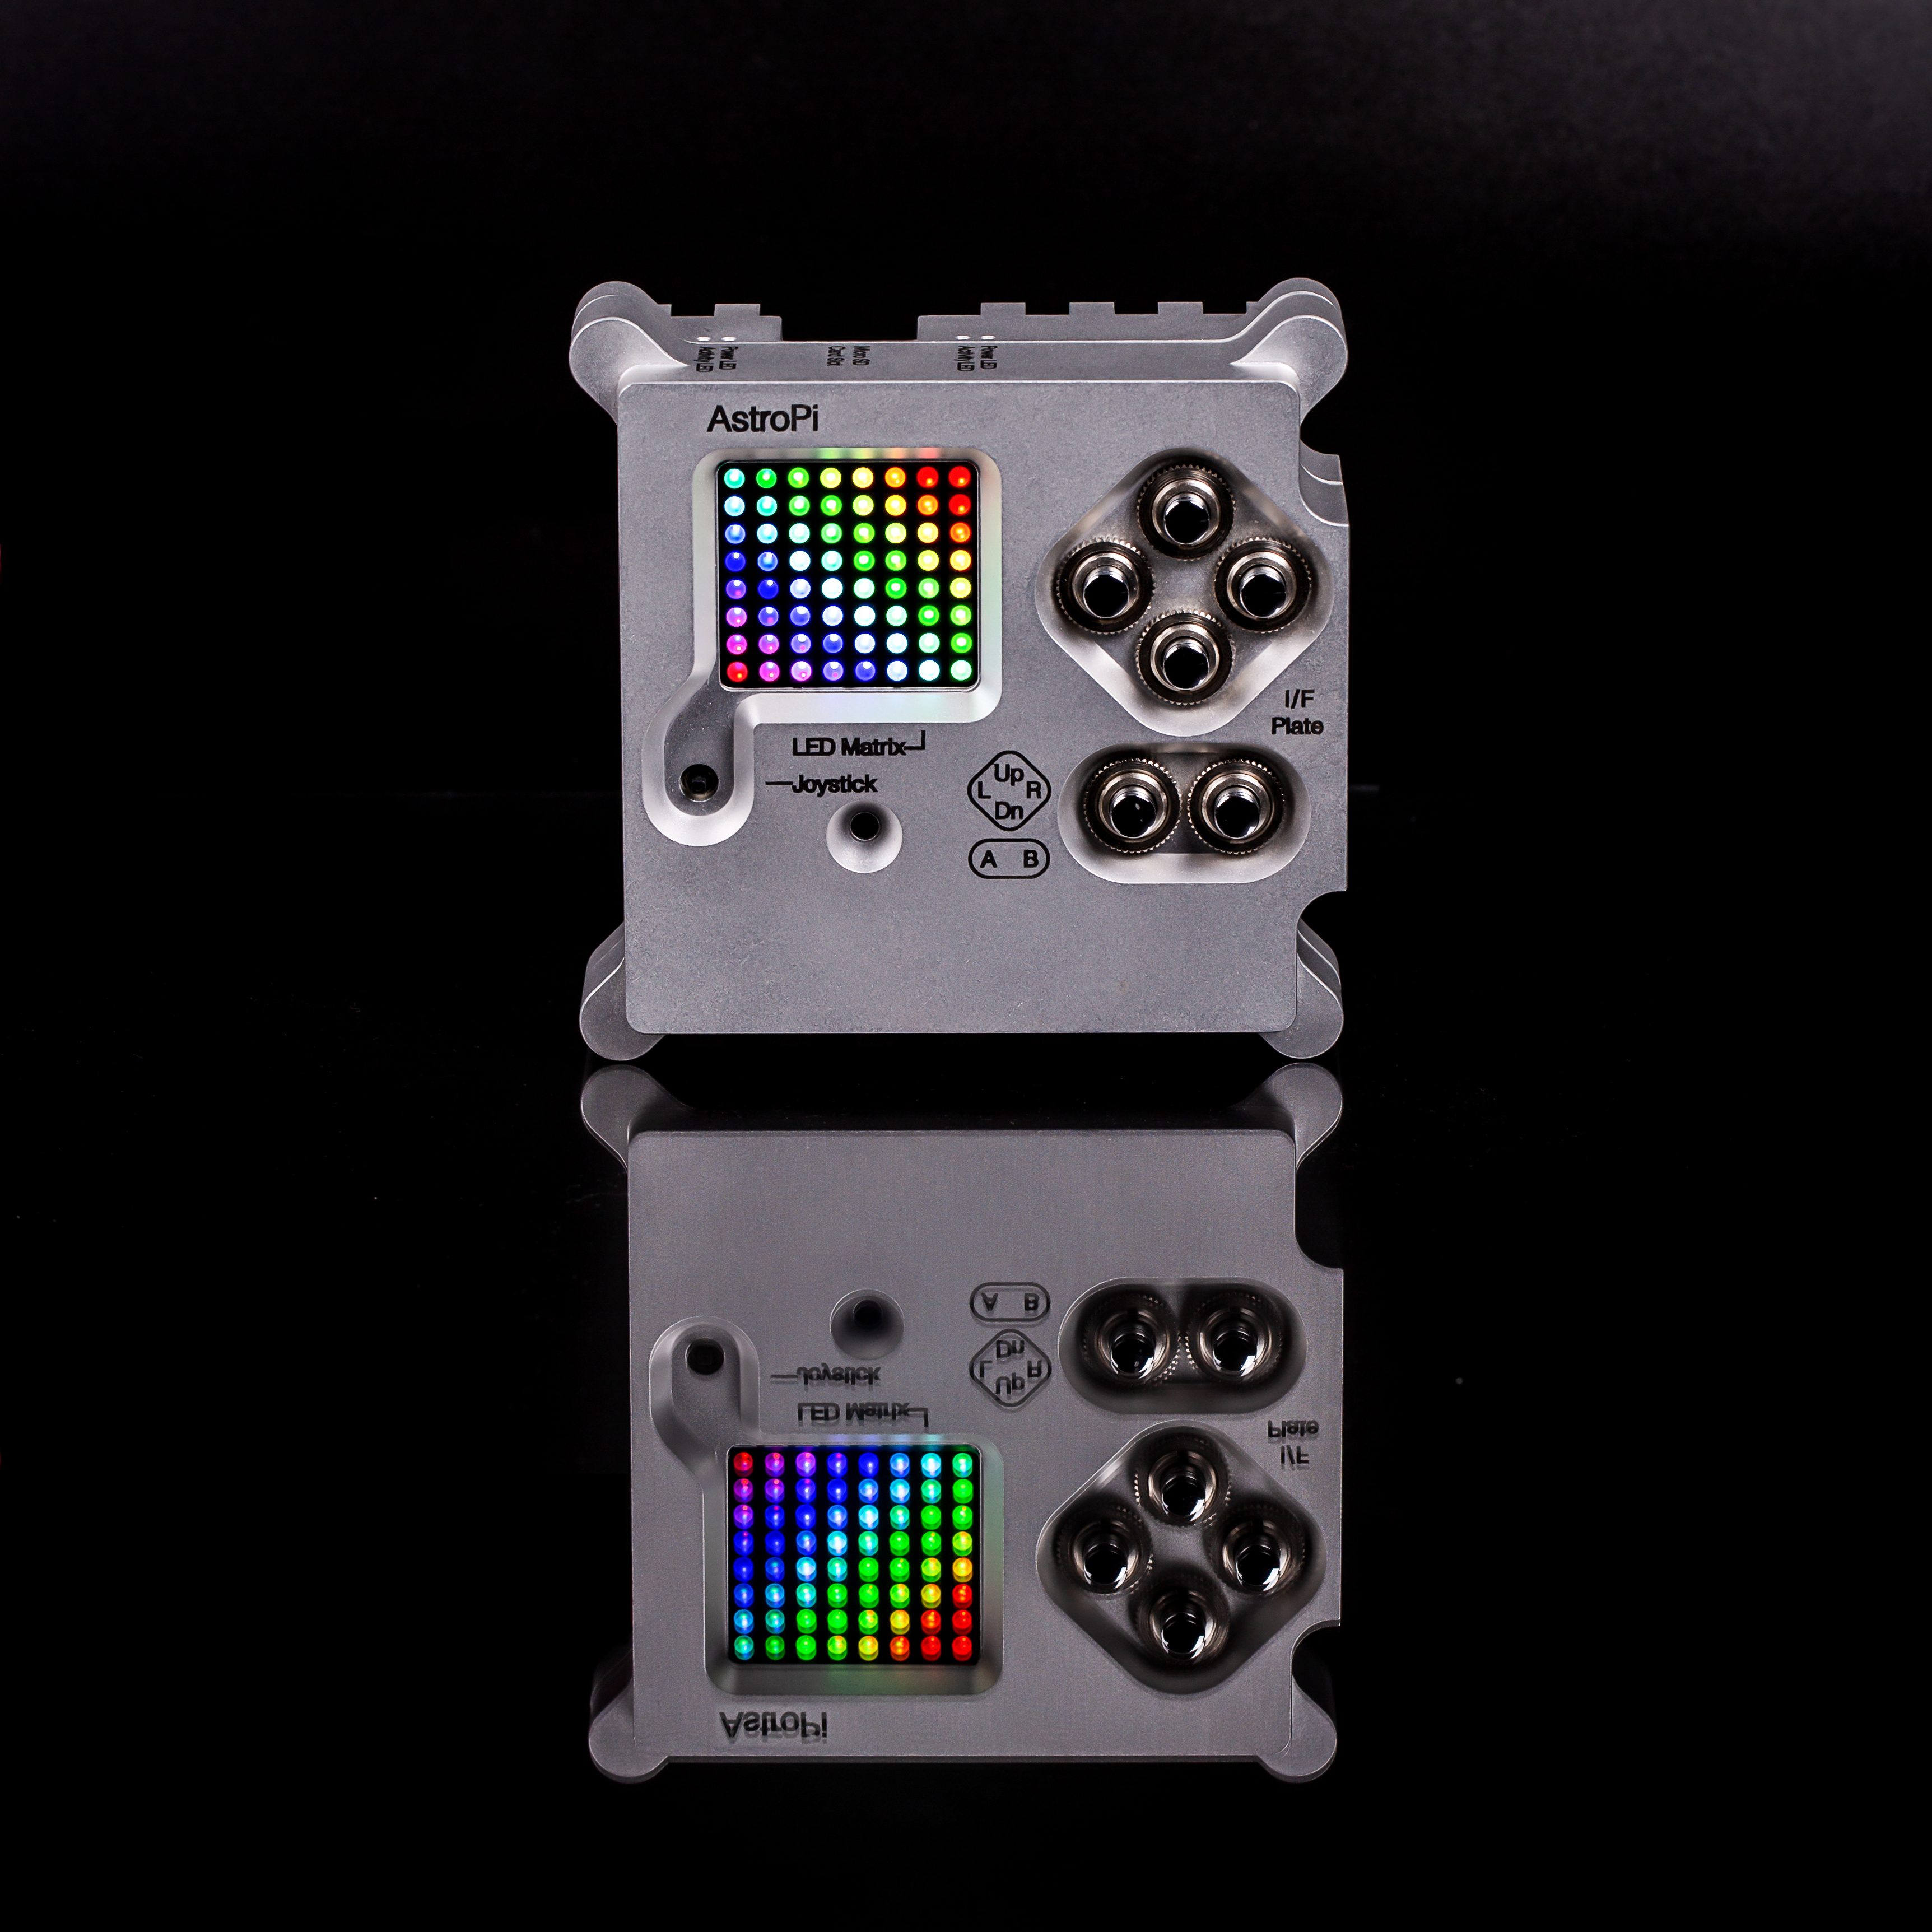
But what if, like us, you’re too old to take part in the challenge? How can you get that great sense of space wonderment when you’re no longer at school?
If you’re too old to take part in the challenge, it means you’re old enough to be a team mentor. Team mentors are responsible for helping students navigate the Astro Pi Challenge, ensuring that everyone is where they’re meant to be, doing what they’re meant to be doing. You’ll also also the contact between the team and us, Raspberry Pi and ESA. You’re basically a team member.
You’re basically taking part.
Mission Zero requires very little of its participants:
And while they need an adult to supervise them, said adult doesn’t need any coding experience either.
(Spoiler alert: you’re said adult.)
Instead, you just need an hour to sit down with your team at a computer and work through some directions. And the result? Your team’s completed code will run aboard the International Space Station, and they’ll get a certificate to prove it.
If you live in an ESA Member State and know anyone aged 14 years or younger, there is absolutely no reason for them not to take part in Astro Pi Mission Zero. And, since they’re probably not reading this blog post right now, it’s your responsibility to tell them about Astro Pi. This is how you take part in the European Astro Pi Challenge: you become the bearer of amazing news when you sit your favourite kids down and tell them they’re going to be writing code that will run on the International Space Station…IN SPACE!
To find out more about Mission Zero, click here. We want to see you pledging your support to your favourite non-adults, so make sure to tell us you’re going to be taking part by leaving a comment below.
There really is no excuse.

*ESA Member States: Austria, Belgium, Czech Republic, Denmark, Estonia, Finland, France, Germany, Greece, Hungary, Ireland, Italy, Luxembourg, the Netherlands, Norway, Poland, Portugal, Romania, Spain, Sweden, Switzerland and the United Kingdom. Residents of Slovenia, Canada, or Malta can also take part.
The post How you, an adult, can take part in the European Astro Pi Challenge appeared first on Raspberry Pi.
Each year, the European Astro Pi Challenge allows students and young people in ESA Member States (or Slovenia, Canada, or Malta) to write code for their own experiments, which could run on two Raspberry Pi units aboard the International Space Station.
The Astro Pi Challenge is a lot of fun, it’s about space, and so that we in the Raspberry Pi team don’t have to miss out despite being adults, many of us mentor their own Astro Pi teams — and you should too!
So, gather your team, stock up on freeze-dried ice cream, and let’s do it again: the European Astro Pi Challenge 2019/2020 launches today!
Luca Parmitano launches the 2019-20 European Astro Pi Challenge
ESA astronaut Luca Parmitano is this year’s ambassador of the European Astro Pi Challenge. In this video, he welcomes students to the challenge and gives an overview of the project. Learn more about Astro Pi: http://bit.ly/AstroPiESA ★ Subscribe: http://bit.ly/ESAsubscribe and click twice on the bell button to receive our notifications.
The European Astro Pi Challenge 2019/2020 is made up of two missions: Mission Zero and Mission Space Lab.
Mission Zero has been designed for beginners/younger participants up to 14 years old and can be completed in a single session. It’s great for coding clubs or any groups of students don’t have coding experience but still want to do something cool — because having confirmation that code you wrote has run aboard the International Space Station is really, really cool! Teams write a simple Python program to display a message and temperature reading on an Astro Pi computer, for the astronauts to see as they go about their daily tasks on the ISS. No special hardware or prior coding skills are needed, and all teams that follow the challenge rules are guaranteed to have their programs run in space!

Mission Space Lab is aimed at more experienced/older participants up to 19 years old, and it takes place in 4 phases over the course of 8 months. The challenge is to design and write a program for a scientific experiment to be run on an Astro Pi computer. The best experiments will be deployed to the ISS, and teams will have the opportunity to analyse and report on their results.

How to plan your Astro Pi Mission Space Lab experiment
Subscribe to our YouTube channel: http://rpf.io/ytsub Help us reach a wider audience by translating our video content: http://rpf.io/yttranslate Buy a Raspberry Pi from one of our Approved Resellers: http://rpf.io/ytproducts Find out more about the #RaspberryPi Foundation: Raspberry Pi http://rpf.io/ytrpi Code Club UK http://rpf.io/ytccuk Code Club International http://rpf.io/ytcci CoderDojo http://rpf.io/ytcd Check out our free online training courses: http://rpf.io/ytfl Find your local Raspberry Jam event: http://rpf.io/ytjam Work through our free online projects: http://rpf.io/ytprojects Do you have a question about your Raspberry Pi?
For both missions, each member of the team has to be at least one of the following:
To take part in the European Astro Pi Challenge, head over to the Astro Pi website, where you’ll find more information on how to get started getting your team’s code into SPACE!
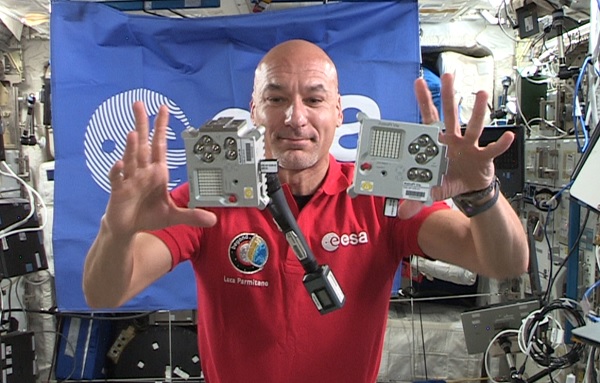
Obligatory photo of Raspberry Pis floating in space!
*ESA Member States: Austria, Belgium, Czech Republic, Denmark, Estonia, Finland, France, Germany, Greece, Hungary, Ireland, Italy, Luxembourg, the Netherlands, Norway, Poland, Portugal, Romania, Spain, Sweden, Switzerland and the United Kingdom
The post Run your code aboard the International Space Station with Astro Pi appeared first on Raspberry Pi.
Gamifying boxing with a special punchbag that allows you to fight Luke Skywalker? Rob Zwetsloot starts a training montage to check it out.
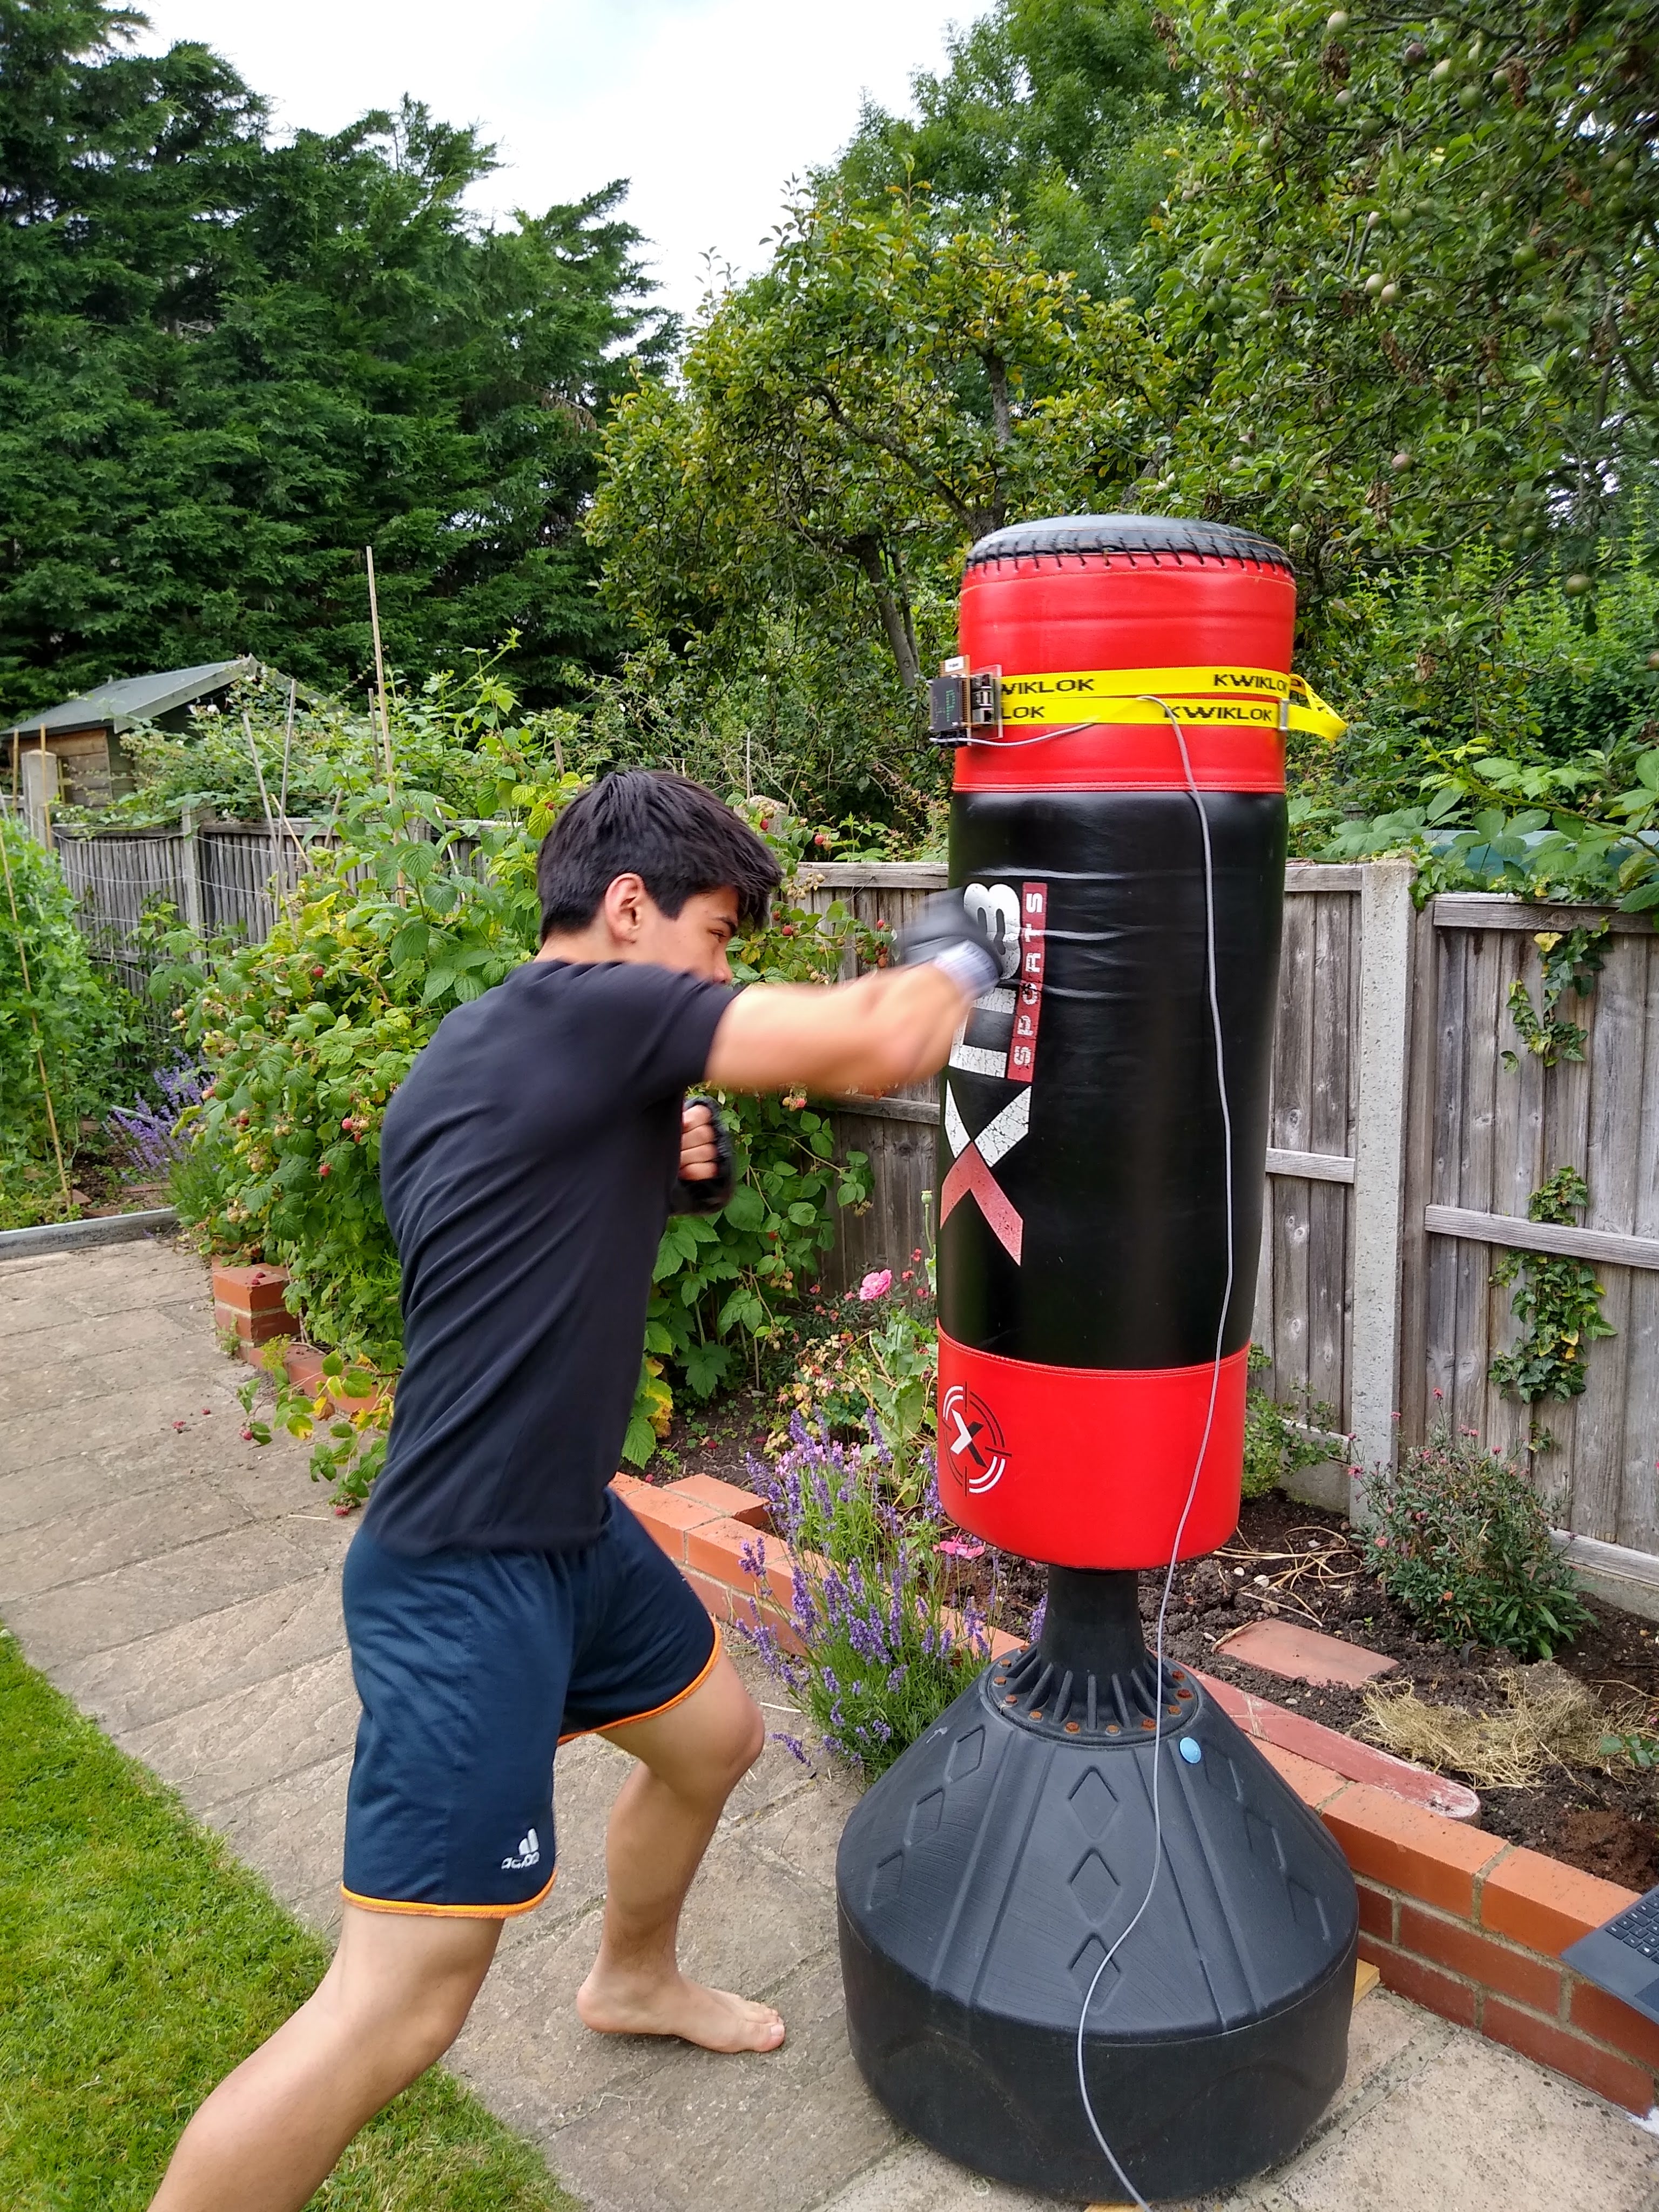
Not Rob
Did you know that the original version of Street Fighter had a variant where you could punch the buttons to get Ryu to attack? The harder you smacked the kick button, the more damage it would do. These apparently wore out very quickly, which is why watching Street Fighter tournaments these days is akin to watching someone playing the piano. Albeit with six buttons and a joystick.
What if you could bring this back? And combine it with other arcade classics and staples? Meet Richard Kirby’s Pi Fighter.
“Pi Fighter is essentially a real-world old-school fighting video game,” Richard tells us. “The player chooses an opponent and challenges them to a sparring match. Each player has a certain number of health points that decrement each time the other player lands an attack. Instead of clicking a joystick or mouse button, the player hits a heavy bag. The strength of the hit is measured by an accelerometer. [A Raspberry] Pi translates the acceleration of the heavy bag (measured in G) into the number of health points to decrement from the opponent. [Raspberry] Pi runs your opponent, which attacks you — you don’t actually get hit, but your health points decrement each time they attack.”
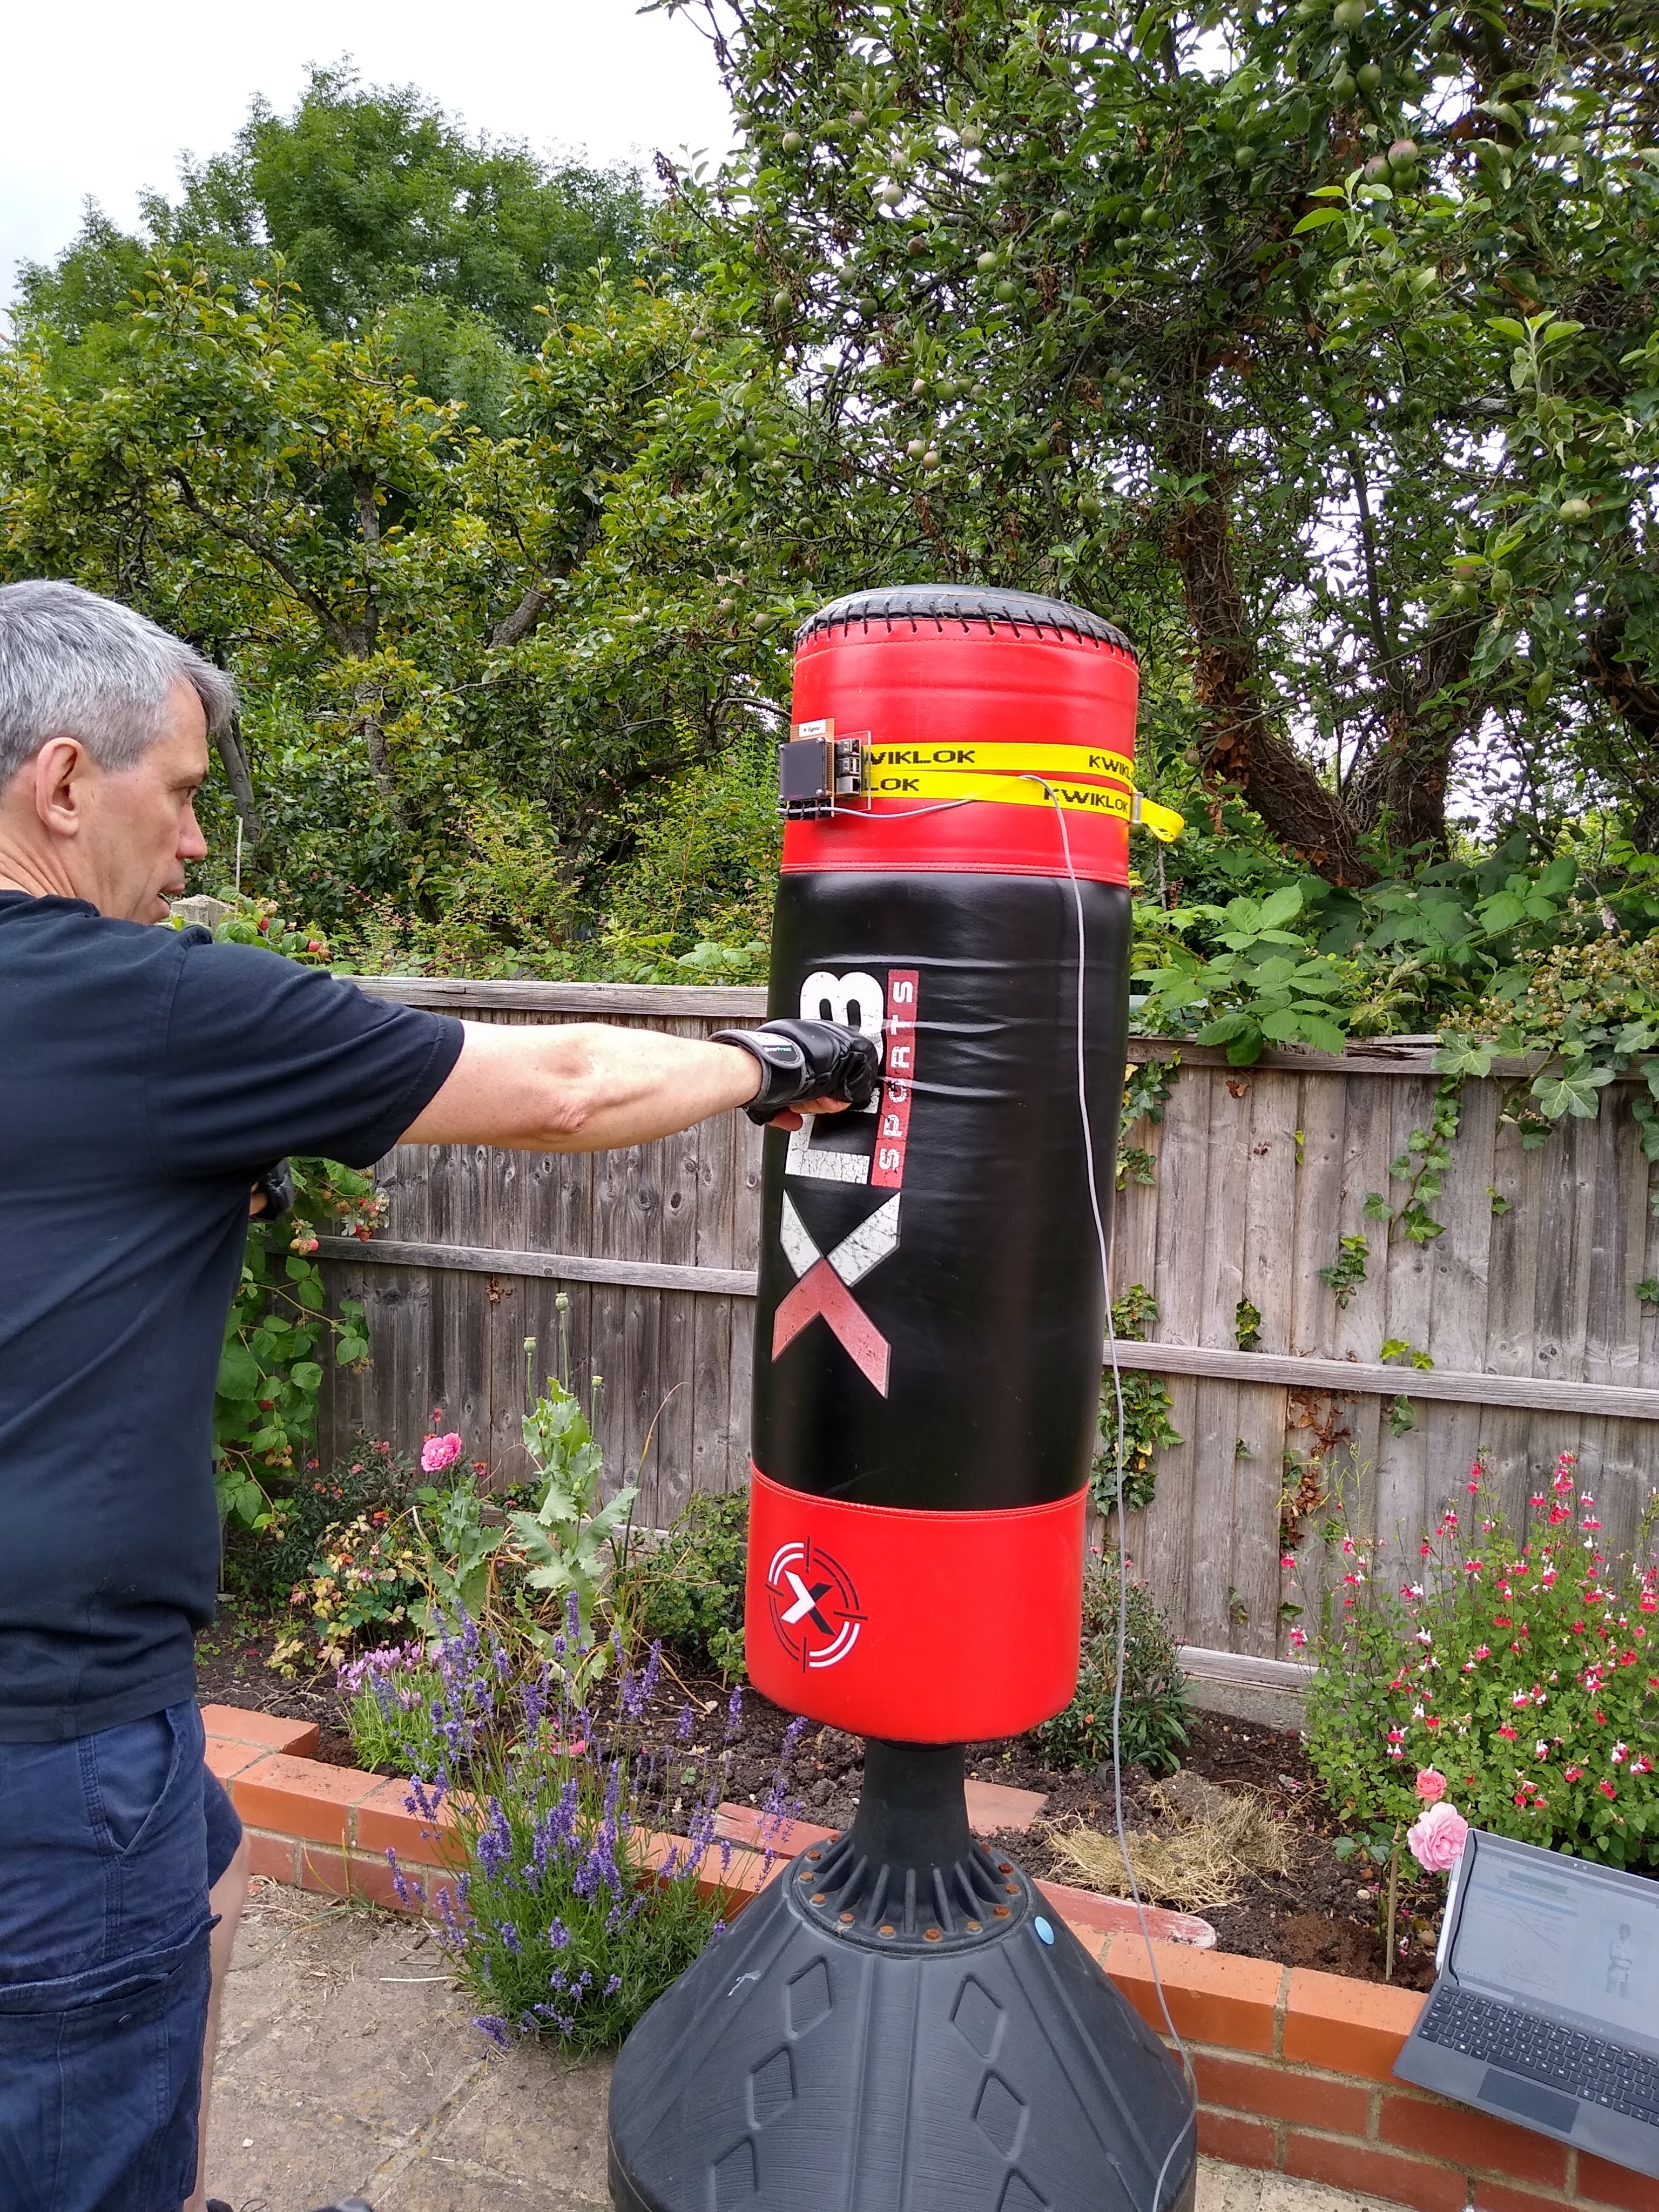
Use a heavy bag to get a good workout and a good idea of your punch strength, Rocky IV style
It’s a remarkably simple idea, and it started off as just an app that used a smartphone’s accelerometer. Translating that to a Raspberry Pi is just a case of adding an accelerometer of its own.
3… 2… 1… Fight!
“I realised it could be used to measure the overall strength of a punch, but it was hard to know how that would translate into an actual punch, hence the idea to use a heavy bag,” Richard explains. “This appealed to me as I studied karate and always enjoyed hitting a heavy bag. It is always difficult to gauge your own strength, so I thought it would be useful to actually measure the force. The project ended up consuming a good amount of time, as you would expect when you are learning.”
While Pi Fighter is already used at events, Richard says “[i]t needs a bit of tuning and coding to get everything right […]. It could be a never-ending project for me. You can always fix things and make the software more robust, the user interface more usable, etc. It isn’t mass-rollout ready, but I have never had it fail at a key moment such as presenting at a Raspberry Jam or Raspberry Pint. It (mostly) gets better every time I put some effort into it.”
If you find yourself at Raspberry Pint in London, make sure to do a bit of a warm-up first — you might find yourself head-to-head in a boxing match with a Jedi. Here’s hoping they don’t know Teräs Käsi.
The post Gamified boxing with Pi Fighter appeared first on Raspberry Pi.
We love ‘Raspberry Pi + space’ stuff. There, I’ve said it. No taksies backsies.
From high-altitude balloon projects transporting Raspberry Pis to near space, to our two Astro Pi units living aboard the International Space Station, we simply can’t get enough.
Seriously, if you’ve created anything space-related using a Raspberry Pi, please tell us!
Surrey Satellite Technology Ltd (SSTL) sent a Raspberry Pi Zero to space as part of their Demonstration of Technology (DoT-1) satellite, launched aboard a Soyuz rocket in July.
Earth captured from Low Earth Orbit by a Raspberry Pi
Subscribe to our YouTube channel: http://rpf.io/ytsub Help us reach a wider audience by translating our video content: http://rpf.io/yttranslate Buy a Raspberry Pi from one of our Approved Resellers: http://rpf.io/ytproducts Find out more about the #RaspberryPi Foundation: Raspberry Pi http://rpf.io/ytrpi Code Club UK http://rpf.io/ytccuk Code Club International http://rpf.io/ytcci CoderDojo http://rpf.io/ytcd Check out our free online training courses: http://rpf.io/ytfl Find your local Raspberry Jam event: http://rpf.io/ytjam Work through our free online projects: http://rpf.io/ytprojects Do you have a question about your Raspberry Pi?
So, not that we’re complaining, but why did they send the Raspberry Pi Zero to space to begin with? Well, why not? As SSTL state:
Whilst the primary objective of the 17.5kg self-funded DoT-1 satellite is to demonstrate SSTL’s new Core Data Handling System (Core-DHS), accommodation was made available for some additional experimental payloads including the Raspberry Pi camera experiment which was designed and implemented in conjunction with the Surrey Space Centre.
Essentially, if you can fit a Raspberry Pi into your satellite, you should.
Managing Director of SSTL Sarah Parker went on to say that “the success of the Raspberry Pi camera experiment is an added bonus which we can now evaluate for future missions where it could be utilised for spacecraft ‘selfies’ to check the operation of key equipments, and also for outreach activities.”
SSTL’s very snazzy-looking Demonstration of Technology (DoT-1) satellite
The onboard Raspberry Pi Zero was equipped with a Raspberry Pi Camera Module and a DesignSpark M12 Mount Lens. Image data captured on the space-bound Raspberry Pi was sent back to the SSTL ground station via the Core-DHS.
So, have you sent a Raspberry Pi to space? Or anywhere else we wouldn’t expect a Raspberry Pi to go? Let us know in the comments!
The post Raspberry Pi in space! appeared first on Raspberry Pi.
We are delighted to co-launch Isaac Computer Science, a new online platform for teachers and students of A level Computer Science.
Introducing Isaac Computer Science
Introducing the new Isaac Computer Science online learning platform and calendar of free events for students and teachers. Be the first to know about new features and content on the platform: Twitter – ncce.io/ytqstw Instagram – ncce.io/ytqsig Facebook – ncce.io/ytqsfb If you are a teacher, you may also be interested in our free online training courses for GCSE Computer Science teachers.
The project is a collaboration between the Raspberry Pi Foundation and the University of Cambridge, and is funded by the Department for Education’s National Centre for Computing Education programme.
Isaac Computer Science gives you access to a huge range of online learning materials for the classroom, homework, and revision — all for free.
The platform’s resources are mapped to the A level specifications in England (including the AQA and OCR exam boards). You’ll be able to set assignments for your students, have the platform mark it for you, and be confident that the content is relevant and high quality. We are confident that this will save you time in planning lessons and setting homework.
“Computer Science is a relatively small subject area and teachers across the country often work alone without the support of colleagues. Isaac Computer Science will build a teaching and learning community to support teachers at all levels and will offer invaluable support to A level students in their learning journey. As an experienced teacher, I am very excited to have the opportunity to work on this project.”
– Diane Dowling, Isaac Computer Science Learning Manager and former teacher
And that’s not all! To further support you, we are also running free student workshops and teacher CPD events at universities and schools around England. Tickets for the events are available to book through the Isaac Computer Science website.
“Isaac Computer Science helped equip me with the skills to teach A level, and ran a great workshop at one of their recent Discovery events using the micro:bit and the Kitronik :MOVE mini. This is a session that I’ll definitely be using again and again.”
– James Spencer, Computer Science teacher at St Martin’s School
A teacher works with her students at our recent Discovery event in Cambridge.
Isaac Computer Science provides:
Isaac Computer Science allows you to:
Start using Isaac Computer Science today:
The post Say hello to Isaac Computer Science appeared first on Raspberry Pi.
Fiacre took a rather snazzy photo of a Raspberry Pi 4, and he liked it so much that he set it as his iPhone’s wallpaper.
And we liked it so much that we asked him to produce size variants so we could share them with all of you.
You’ll find three variants of the image below: smartphone, 1920×1200, 4K. Just click on the appropriate image to be redirected to the full-resolution version.
Standard rules apply: these images are for personal use only and are not to be manipulated or sold.
Should we create more snazzy wallpapers of Raspberry Pi? Lets us know in the comments, and we’ll get Fiacre to work.
The post A rather snazzy Raspberry Pi 4 wallpaper for your phone and computer appeared first on Raspberry Pi.
Coolest Projects is the world’s leading technology fair for young people. It’s our event series where young creators, makers, and innovators share their projects with fellow creators and the public, and they explore each others’ work. And it’s awesome!
Launching Coolest Projects 2020!
Coolest Projects is a world-leading showcase that enables and inspires the next generation of digital creators and innovators to present the projects that they have created with code. Find out more: http://coolestprojects.org/ Sign up for the latest Coolest Projects news: http://eepurl.com/dG4UJb
In 2020, we’ll run three Coolest Projects events:
 Mark the dates of the UK, USA, and International events in your diary today! Our community also runs regional Coolest Projects events in Belgium, Malaysia, and beyond.
You’ll get to see first-hand what the next generation is creating with technology. Young people in our community are brimming with new, cutting-edge ideas and enjoy expressing their creativity through making digital projects.
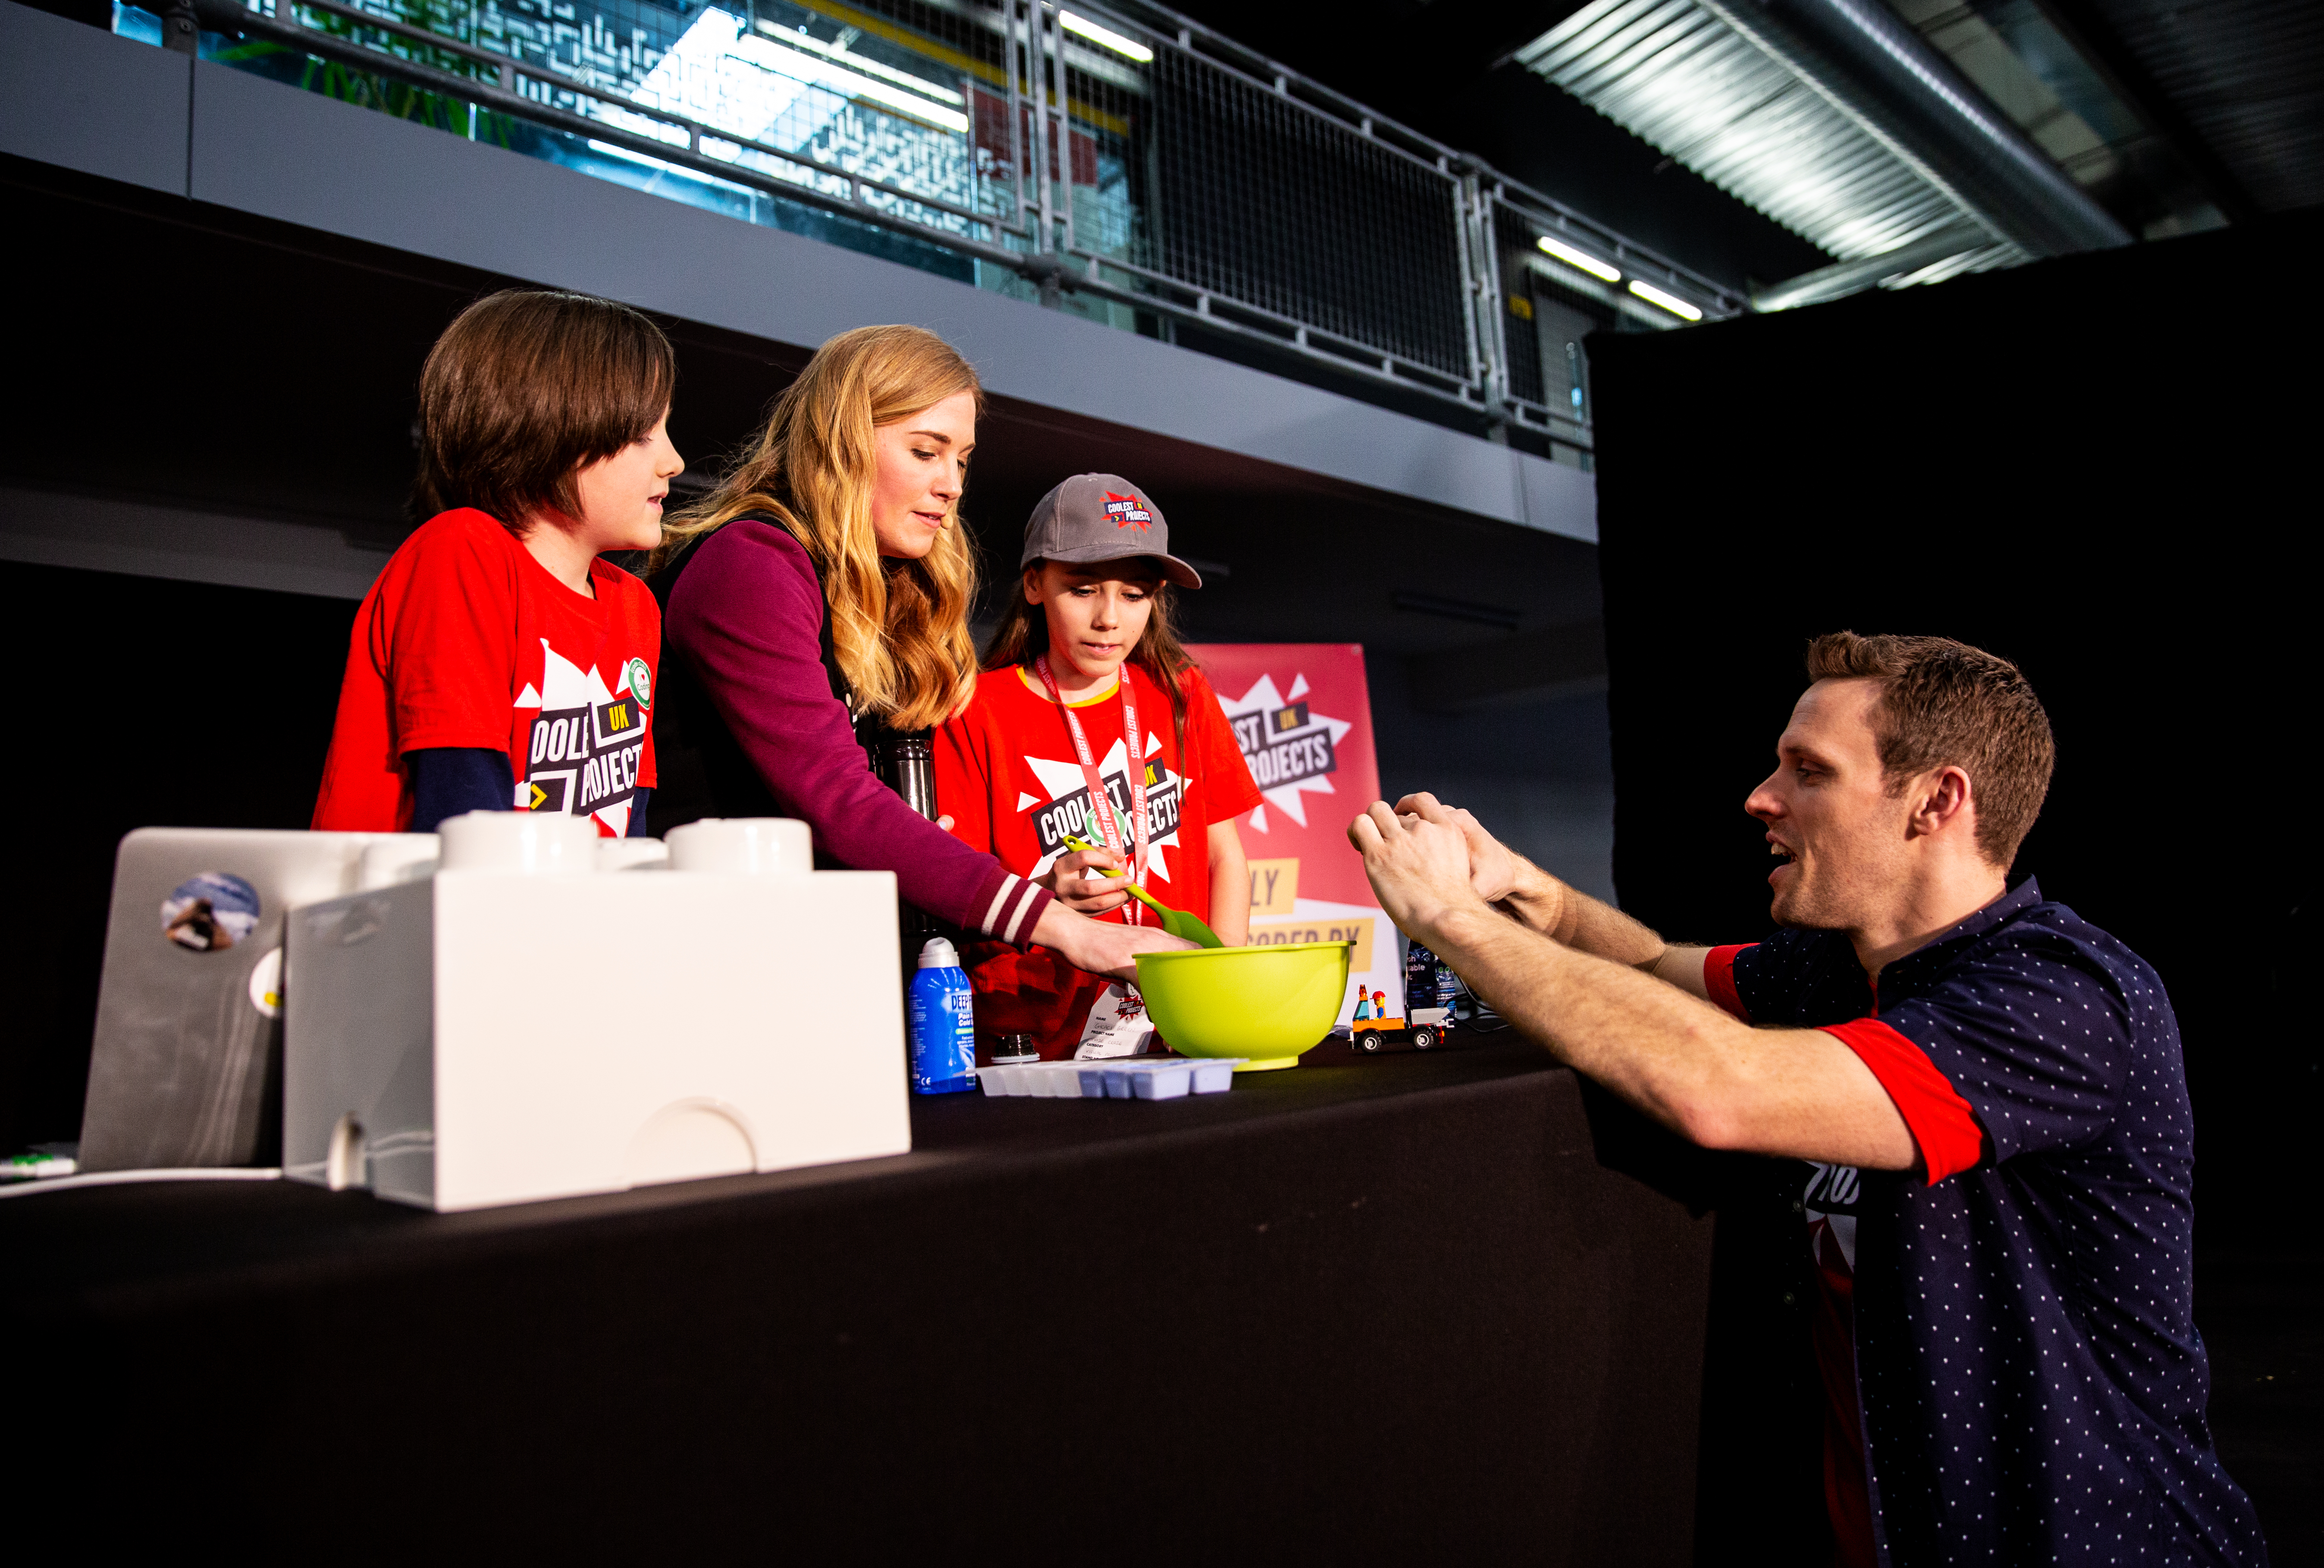
You’ll also get to flex your own technical and maker skills: our Coolest Projects events have a Discovery Zone, where the maker community and local organisations run unique, hands-on activities!
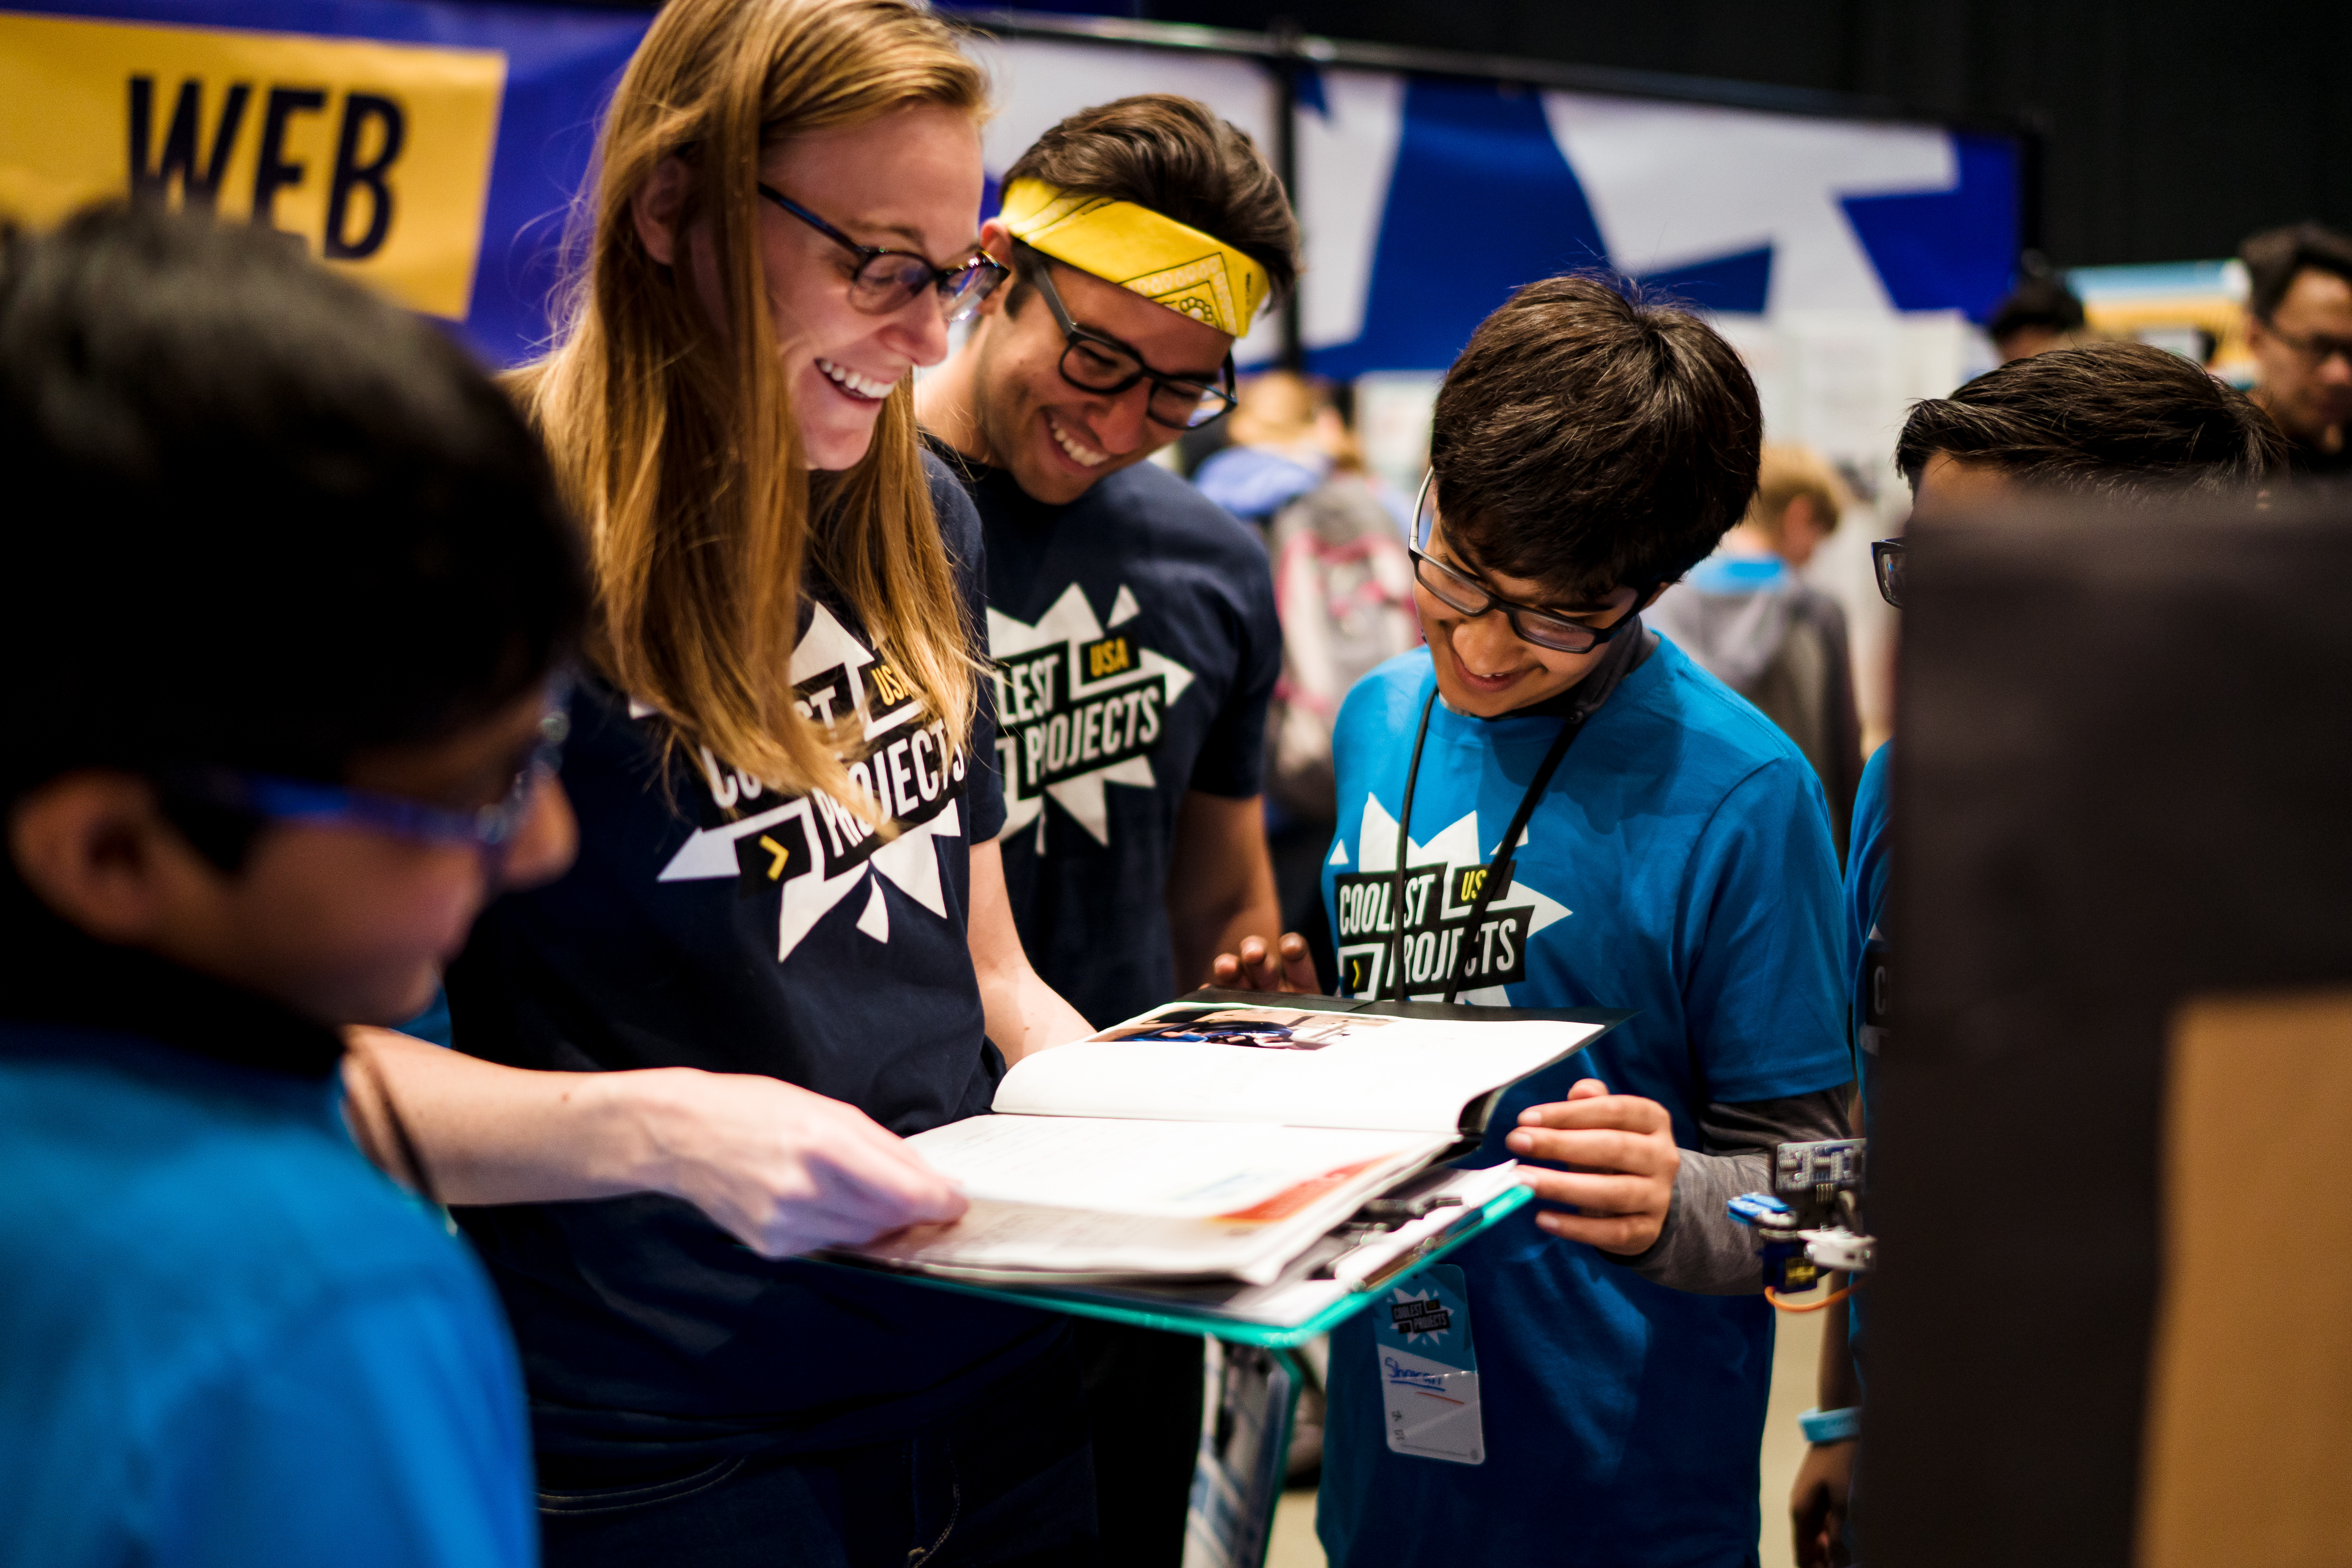
If you’re an educator, maker, or tech professional, you can support young people you know to participate, as individuals or in teams with their friends. Whether you know young tech enthusiasts through Code Club, CoderDojo, another club, or your school — anyone aged 7–18 can enter Coolest Projects, and you can help them get showcase-ready!
Check out our ‘How to make a project’ workbook, which is perfect for supporting young people through the project building process step by step.
Help us continue to make Coolest Projects events free to enter and attend for young people so they can dream big and be inspired by their peers’ creations!
Email partners@raspberrypi.org to learn more about supporting Coolest Projects.
Project registration and visitor tickets aren’t available just yet — sign up to the Coolest Projects newsletter to be the first to hear when we launch them!
The post Save the date for Coolest Projects 2020 appeared first on Raspberry Pi.
By refitting a vintage Roland DG DXY-990 pen plotter using Raspberry Pi, the members of Liege Hackerspace in Belgium have produced a rather nifty build that writes out every tweet mentioning a specific hashtag.
Liege Hackerspace member u/iooner first shared an image of the plotter yesterday, and fellow Redditors called for video of the project in action immediately.
Watch the full video here. And to see the code code for the project, visit the Liege Hackerspace GitHub.
The post Control a vintage Roland pen plotter with Raspberry Pi appeared first on Raspberry Pi.
Five years ago, the Raspberry Pi Foundation recognised a need for free, high-quality CPD for educators. In response, we started running Picademy, a two-day training event that provides educators all over the UK and North America with the knowledge and skills they need to teach computing with confidence, creativity, and excitement.
We are delighted to now bring you a new free training programme called Picademy Bytes for teachers in the UK who are unable to attend the two-day Picademy events. Picademy Bytes training sessions are 60- to 90-minute community-led events taking place at various UK locations, led by Community Trainers who we ourselves have inducted.
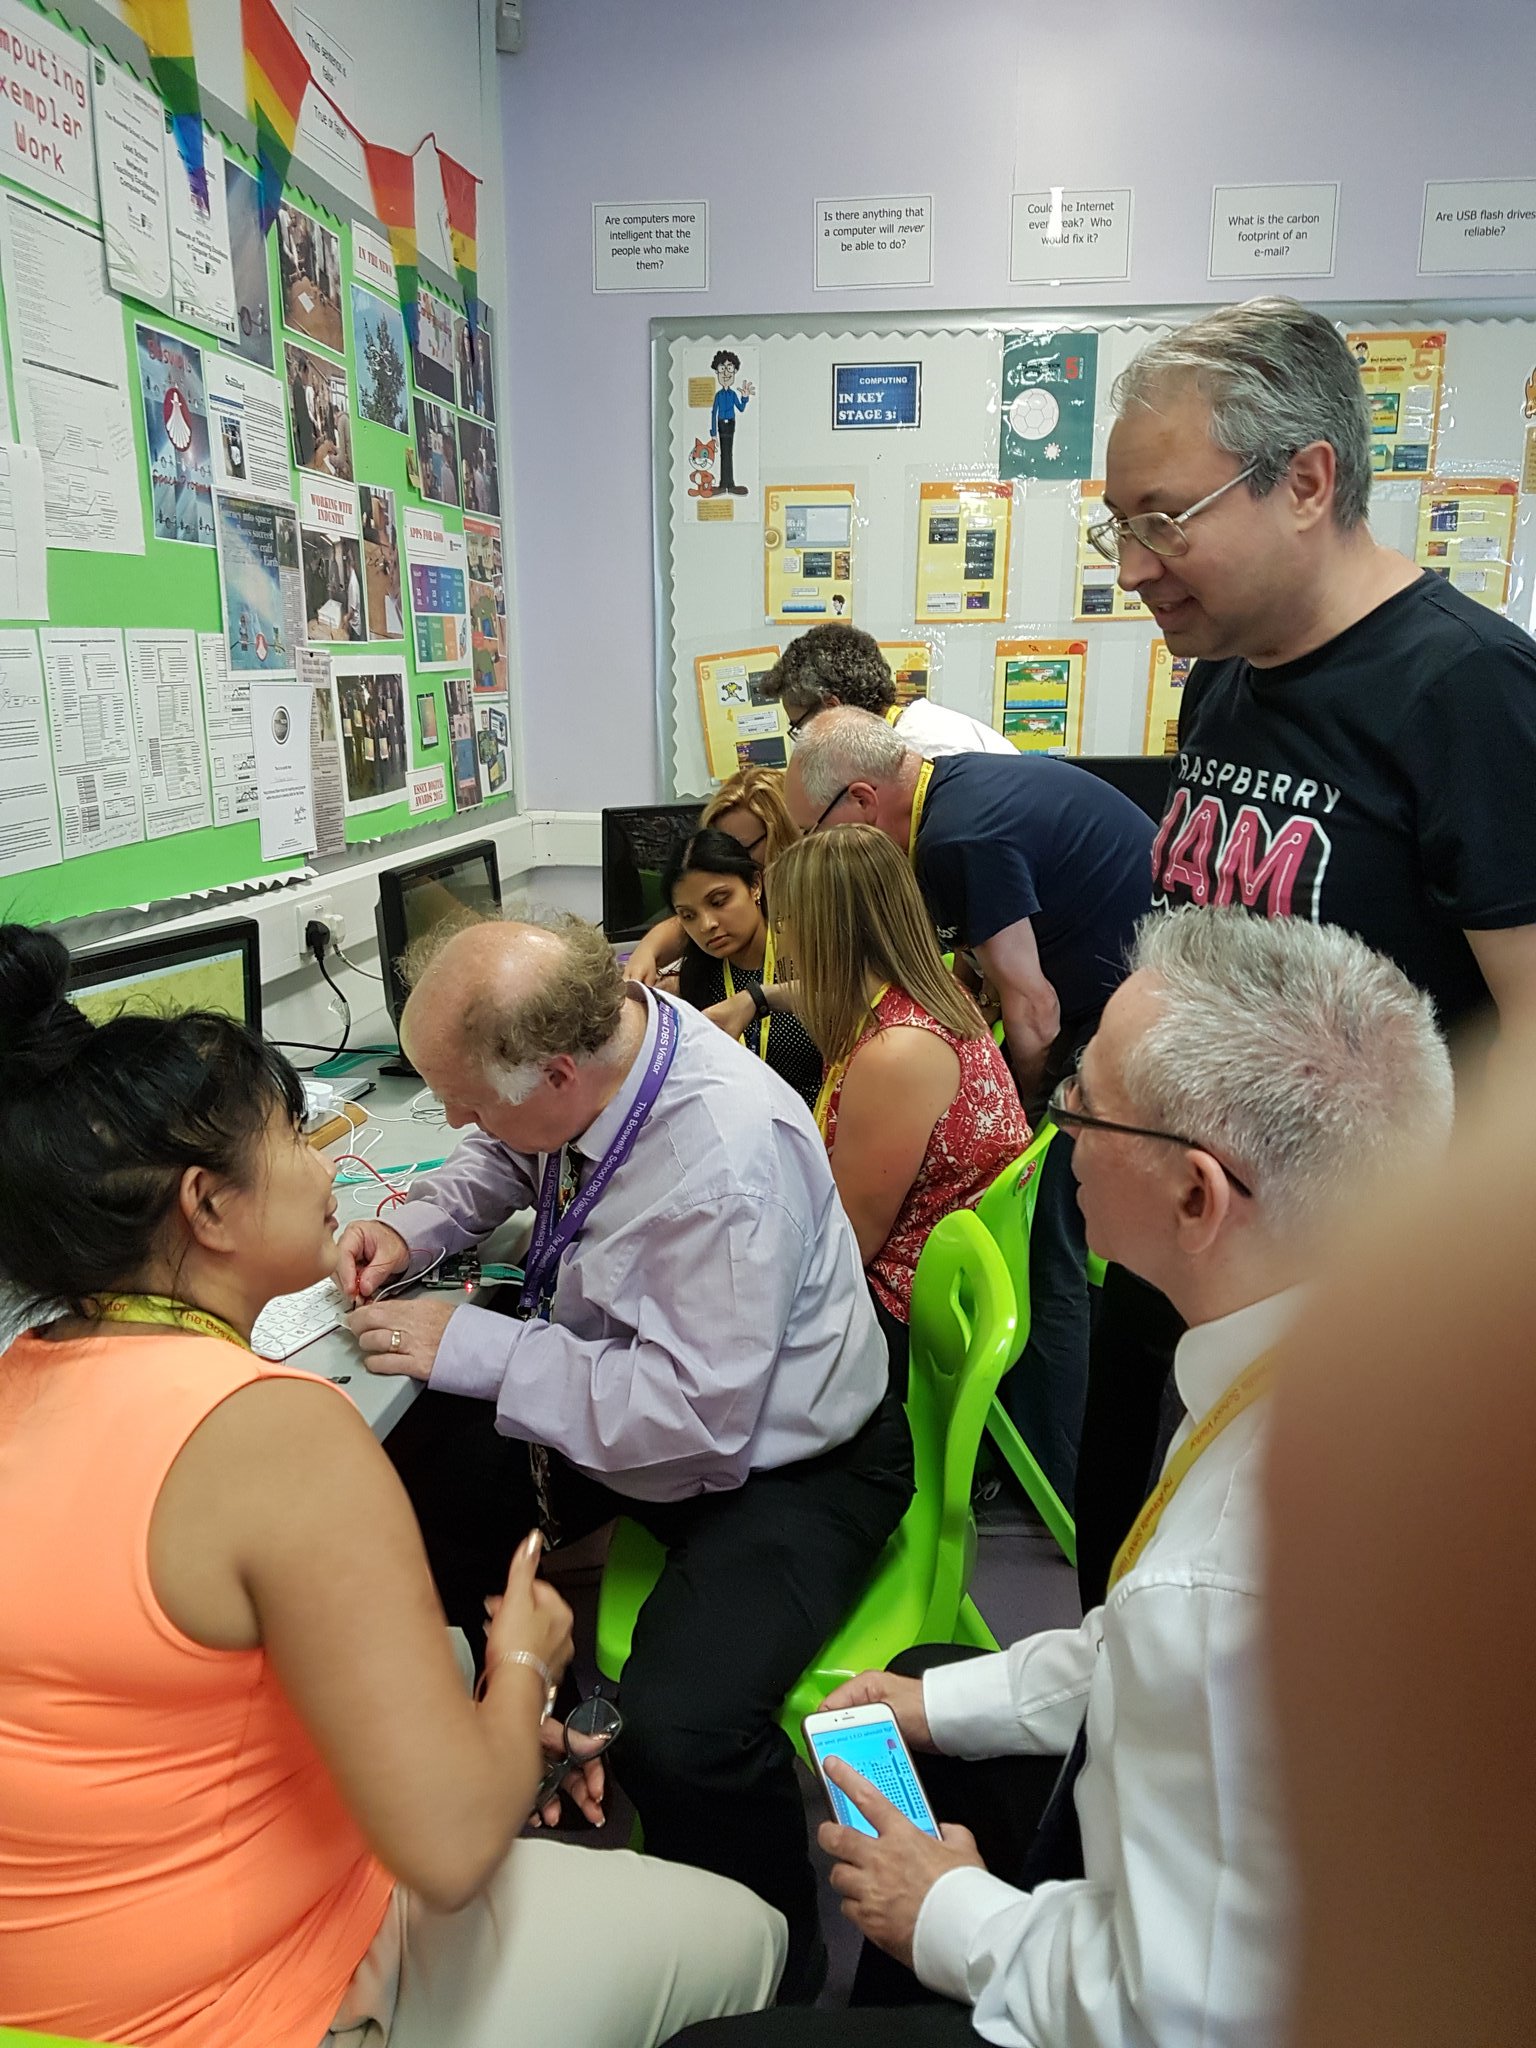
The aim of Picademy Bytes is to highlight the value of delivering curriculum objectives through physical computing activities: the programme provides teachers with the opportunity to experiment with physical computing in a short, face-to-face training session. Teachers can then take what they’ve learned back to their schools, to use or adapt for their own Computing lessons.
In June this year, we invited our first four Community Trainers to attend an induction session, where we introduced them to the resources for their Picademy Bytes sessions, and they gave us feedback on our plans and the session content.
All four Community Trainers are teachers and Raspberry Pi Certified Educators, having attended Picademy in the past. They volunteered to become Community Trainers because they are enthusiastic to help other teachers in their local areas to deliver exciting learning experiences for their students.
The first Picademy Bytes session took place in July at the Computer Science in Schools Conference 2019 at Staffordshire University in Stoke-on-Trent, and most attendees were secondary school teachers. Attendees described the session as “well-balanced [between] theory and practical” and said that it was “very informative and provided ideas for the classroom”.
Upcoming Picademy Bytes sessions will soon be listed on the Computing at School website and on the Raspberry Pi Foundation website. If you are based in or near Belfast, Bradford, South Wales, Hull, London, North Devon, or Plymouth, look out for events near you from this month! And there will be plenty more events in locations across the UK after that. We look forward to seeing you there!
The post Picademy Bytes: free physical computing training for teachers appeared first on Raspberry Pi.
Do you have a spare Raspberry Pi lying around? And a Bluetooth games controller? Do you have access to boom lifts or other heavy machinery?
Well, then we most certainly (do not) have the project for you.
Allow us to introduce what is (possibly, probably, hopefully) the world’s first Raspberry Pi–controlled boom lift. Weighing in at 13,000lb, this is the epitome of DON’T try this at home.
Please don’t!

Shared on Reddit over the weekend, u/Ccundiff12’s project received many an upvote and concerned comment, but, as the poster explains, hacking the boom is a personal project for personal use to fix a specific problem — thankfully not something built for the sake of having some fun.
Meet STRETCH. Circa 1989 Genie Boom that I bought (cheap) from a neighbor. I use it to trim trees around my property. Its biggest problem was that it always got stuck. It’s not really an off-road vehicle. It used to take two people to move it around… one to drive the lift, and the other to push it with the tractor when it lost traction. The last time it got stuck, I asked my wife to assist by driving one of the two…….. the next day I started splicing into the control system. Now I can push with the tractor & run the boom via remote!
Visit the original Reddit post for more information on the build. And remember: please do not try this at home.
The post Controlling a boom lift with a Raspberry Pi appeared first on Raspberry Pi.
Making player and computer-controlled cars race round a track isn’t as hard as it sounds. Mark Vanstone explains all.
The original Super Sprint arcade machine had three steering wheels and three accelerator pedals.
Decades before the advent of more realistic racing games such as Sega Rally or Gran Turismo, Atari produced a string of popular arcade racers, beginning with Gran Trak 10 in 1974 and gradually updated via the Sprint series, which appeared regularly through the seventies and eighties. By 1986, Atari’s Super Sprint allowed three players to compete at once, avoiding obstacles and collecting bonuses as they careened around the tracks.
The original arcade machine was controlled with steering wheels and accelerator pedals, and computer-controlled cars added to the racing challenge. Tracks were of varying complexity, with some featuring flyover sections and shortcuts, while oil slicks and tornadoes posed obstacles to avoid. If a competitor crashed really badly, a new car would be airlifted in by helicopter.
So how can we make our own Super Sprint-style racing game with Pygame Zero? To keep this example code short and simple, I’ve created a simple track with a few bends. In the original game, the movement of the computer-controlled cars would have followed a set of coordinates round the track, but as computers have much more memory now, I have used a bitmap guide for the cars to follow. This method produces a much less predictable movement for the cars as they turn right and left based on the shade of the track on the guide.
Four Formula One cars race around the track. Collisions between other cars and the sides of the track are detected.
With Pygame Zero, we can write quite a short piece of code to deal with both the player car and the automated ones, but to read pixels from a position on a bitmap, we need to borrow a couple of objects directly from Pygame: we import the Pygame image and Color objects and then load our guide bitmaps. One is for the player to restrict movement to the track, and the other is for guiding the computer-controlled cars around the track.
Three bitmaps are used for the track. One’s visible, and the other two are guides for the cars.
The cars are Pygame Zero Actors, and are drawn after the main track image in the draw() function. Then all the good stuff happens in the update() function. The player’s car is controlled with the up and down arrows for speed, and the left and right arrows to change the direction of movement. We then check to see if any cars have collided with each other. If a crash has happened, we change the direction of the car and make it reverse a bit. We then test the colour of the pixel where the car is trying to move to. If the colour is black or red (the boundaries), the car turns away from the boundary.
The car steering is based on the shade of a pixel’s colour read from the guide bitmap. If it’s light, the car will turn right, if it’s dark, the car will turn left, and if it’s mid-grey, the car continues straight ahead. We could make the cars stick more closely to the centre by making them react quickly, or make them more random by adjusting the steering angle more slowly. A happy medium would be to get the cars mostly sticking to the track but being random enough to make them tricky to overtake.
Our code will need a lot of extra elements to mimic Atari’s original game, but this short snippet shows how easily you can get a top-down racing game working in Pygame Zero:
Here’s Mark’s code, which gets a Super Sprint-style racer running in Python. To get it working on your system, you’ll first need to install Pygame Zero. And to download the full code, go here.
You can read more features like this one in Wireframe issue 21, available now at Tesco, WHSmith, and all good independent UK newsagents.
Or you can buy Wireframe directly from Raspberry Pi Press — delivery is available worldwide. And if you’d like a handy digital version of the magazine, you can also download issue 21 for free in PDF format.
![]()
Make sure to follow Wireframe on Twitter and Facebook for updates and exclusive offers and giveaways. Subscribe on the Wireframe website to save up to 49% compared to news stand pricing!
The post Recreate Super Sprint’s top-down racing | Wireframe issue 21 appeared first on Raspberry Pi.
The MagPi magazine puts Raspberry Pi 4 to the ultimate test as writer and all-round tech tinkerer PJ Evans uses it for a week as his desktop computer.
When Raspberry Pi 4 was launched earlier in 2019, the significant improvements in processor speed, data throughput, and graphics handling lead to an interesting change of direction for this once humble small computer. Although it’s impressive that you can run a full Linux operating system on a $35 device, a lot of people were just using their Raspberry Pi to get Scratch or Python IDLE up and running. Many people were skipping the graphical side altogether and using smaller models, such as Raspberry Pi Zero, for projects previously covered by Arduino and other microcontrollers.
Raspberry Pi 4 was different. Tellingly, the Raspberry Pi Foundation released a new all-in-one kit and named it the Desktop Kit. For the first time truly in Raspberry Pi history, the new model was considered powerful enough to be used as a daily computer without any significant compromise. Challenge accepted. We asked PJ Evans to spend a week using a Raspberry Pi 4 as his only machine. Here’s what happened.
Our new favourite single-board computer comes in a selection of RAM sizes: 1GB, 2GB, or 4GB. Given a price difference of £20 between the 1GB and 4GB versions, it made sense to go right for the top specification. That’s the version included in the official Desktop Kit that I went out and bought for £105 (inc. VAT) at the official Raspberry Pi store; it normally retails for $120 plus local taxes. My last laptop was £1900. I’m not suggesting that the two can be reasonably compared in terms of performance, but £1795 minus the cost of a monitor is a difference worth remarking upon.
Back at the office, I inspected the contents. For your money you get: a 4GB version of Raspberry Pi 4, thoughtfully already installed in the new official case; the official keyboard and mouse; the new USB-C power supply; a 16GB microSD card preloaded with the Raspbian Buster operating system; and a copy of The Official Raspberry Pi Beginner’s Guide 252-page book. It’s very well packaged and presented, with little plastic waste. The book is the icing on the cake if you are looking at this set for a young person’s first computer, short-circuiting the ‘now what do I do?’ stage. What pleased me, in particular, was the inclusion of two micro-HDMI cables in the kit, allowing me to set up a dual-screen system without delay.
I set up my new workstation next to my existing laptop, with two 1080p monitors that only had DVI connectors, so I had to get a couple of £2 adapters and an additional cable to get sound out of the audio jack of my Raspberry Pi. Time for an initial test-drive. Booting up into Raspbian Buster was quick, about ten seconds, and connection to WiFi easy. There’s no doubting the feel of the speed improvements. Yes, I’ve read all the benchmark tests, but I wanted to know how that translates to user experience. This new kit does not disappoint.

Raspbian has matured impressively as an OS. For my daily desktop scenario, the jewel in the crown is Chromium: having such a capable web browser is what makes this whole experiment feasible. Others have upped their game, too: Firefox has come a long way, and many other browsers are now available, such as Vivaldi. A check of some of my most visited sites showed Chromium to be just as capable as Chrome on my regular machine. Unsurprisingly, it wasn’t as snappy and I hit a few bumps, but we’ll get to that.
I’m no expert when it comes to GPUs, but I was impressed with the dual-monitor support. The setup worked first time and didn’t seem to have any detrimental effect on the machine’s performance. I was expecting slow window drawing or things getting ‘stuck’, but this wasn’t the case.
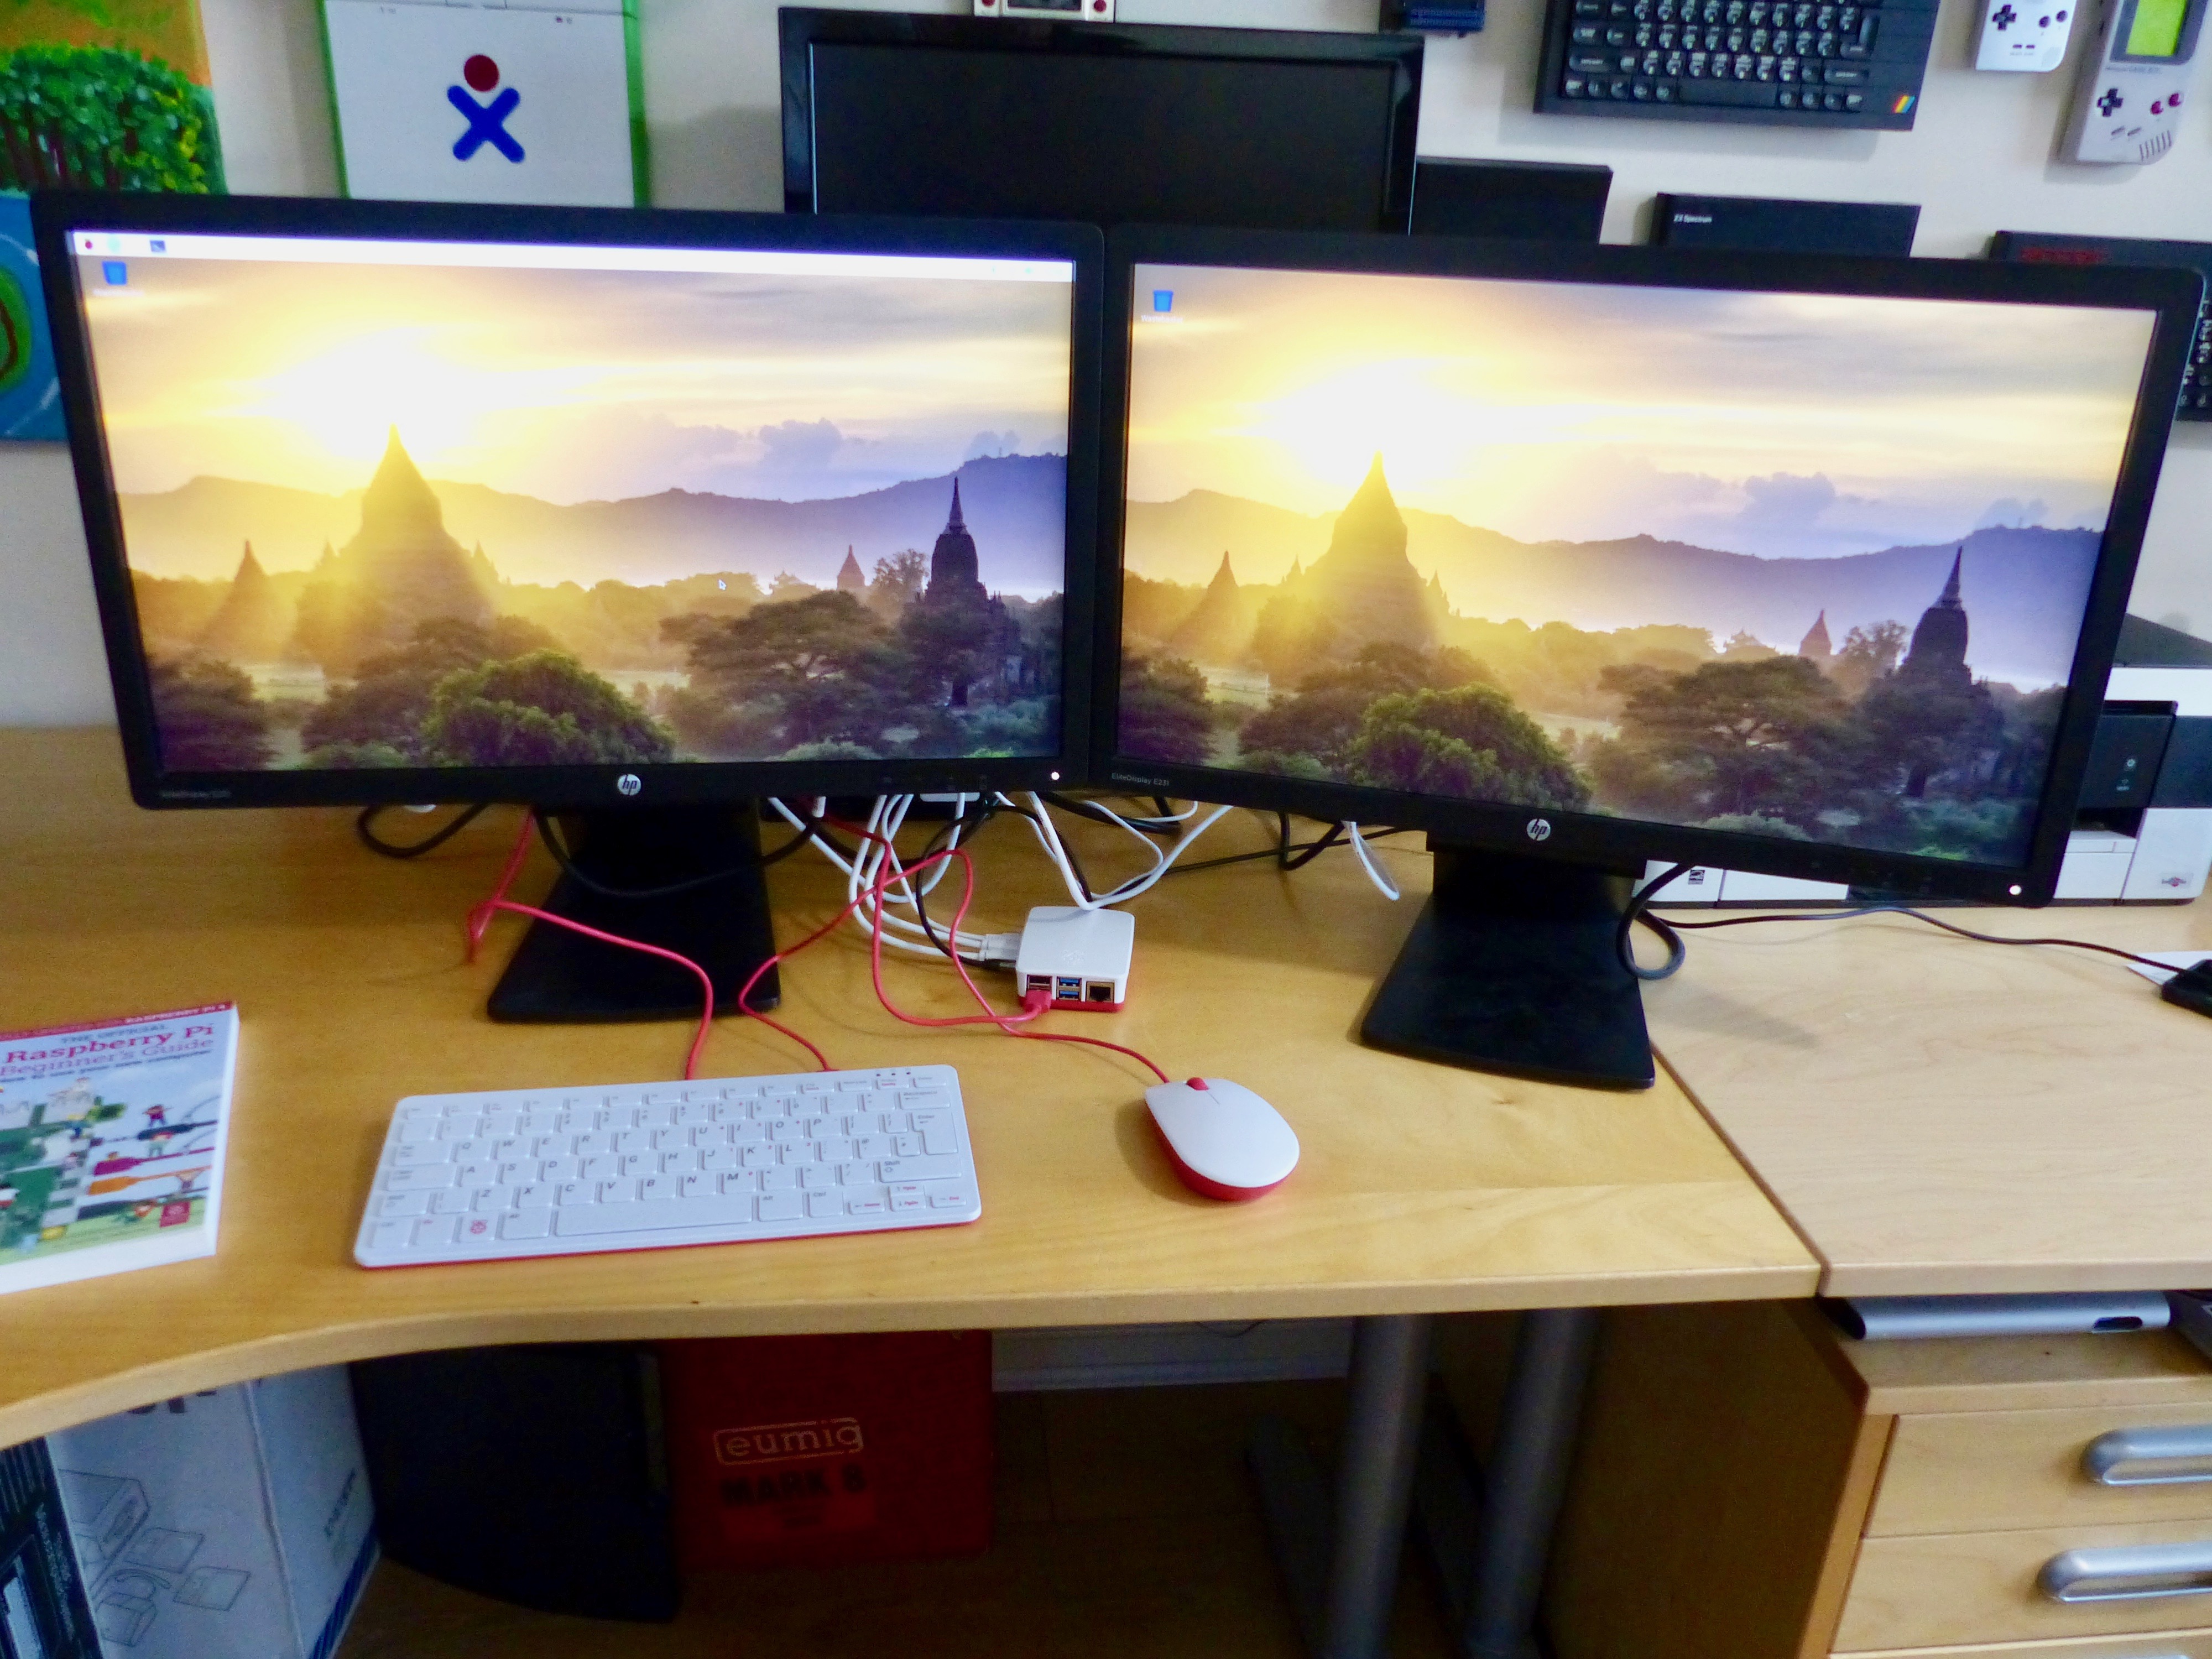
By the end of the first day, I was getting used to the keyboard and mouse too. They are a nice mixture of being both functional and aesthetically pleasing. The keyboard comes with a three-port hub, so you can connect the mouse if you wish. It does not have the build quality and precision of my daily wireless keyboard and trackpad, but for a fraction of the price, I was surprised how much I got for my money. By the end of the week, I’d grown quite fond of it.
If you’d like to see what PJ got up to for the rest of his week spent using Raspberry Pi as a desktop replacement, head over to The MagPi magazine’s website, where you can either buy the magazine with international home delivery or download the PDF for FREE!
The MagPi magazine is also available from most high street newsagents in the UK, or from the Raspberry Pi store in Cambridge.
What we’re trying to say, dear reader, is that there is absolutely no reason for you not to read the rest of this article. And when you have, let us know what you thought of it in the comments below.
And while we have your attention, here’s the latest video from The MagPi — a teaser of their review for the rather nifty RockyBorg, available now from PiBorg.
RockyBorg: the £99 Raspberry Pi robot!
Power. Performance. Pint-sized. The new RockyBorg has it all. Read our review in The MagPi 85: https://magpi.cc/get85 Would you like a FREE #RaspberryPi? Subscribe today to twelve months print subscription! You can see all our subscription offers on The MagPi magazine website: https://magpi.cc/subscribe
The post Raspberry Pi 4: a full desktop replacement? appeared first on Raspberry Pi.
We want to improve the way we support companies that design with Raspberry Pi computers, and we need your help to do it.
Raspberry Pi’s success is thanks to the community that exists around it. When we launched Raspberry Pi 4, our most powerful computer yet, we gave our community the chance to ask our engineers all about the new product.
![]()
Now we’d like to turn the tables and ask you some questions as we work to improve the support we offer to people and organisations that design using Raspberry Pi.
If you have experience of designing products or industrial solutions that use Raspberry Pi, we would love to hear from you.
Raspberry Pi has been used to power products from Compute Module-based industrial controllers made by Kunbus…
![]()
…to Raspberry Pi-based washing machines with Raspberry Pi touchscreen displays from Marathon.
![]()
Organisations are increasingly using various kinds of Raspberry Pi computer to power products and solutions, and we want to do more to support designers.
If you have experience as a design consultancy that uses Raspberry Pi computers in products, or if you have used a designer to build a product that includes a Raspberry Pi, we would love to talk to you about it. You will help shape what we offer in the future, and make designing products with Raspberry Pi simple, quick, and powerful.
If you use Raspberry Pi in products or in industrial solutions, I want to talk to you. Please fill in this form with a few details of your experience so we can talk more.
The post Help us make it easier for you to design products with Raspberry Pi appeared first on Raspberry Pi.