Homes in Madrid, Dublin, Cardiff, Ljubljana, and Leuven are participating in the Citizens Observing UrbaN Transport (WeCount) project, a European Commission–funded research project investigating sustainable economic growth.
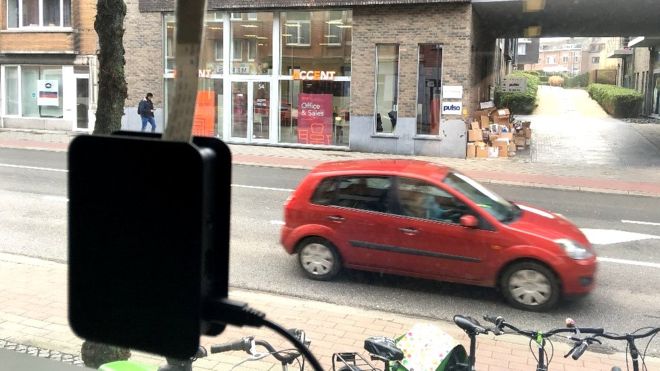
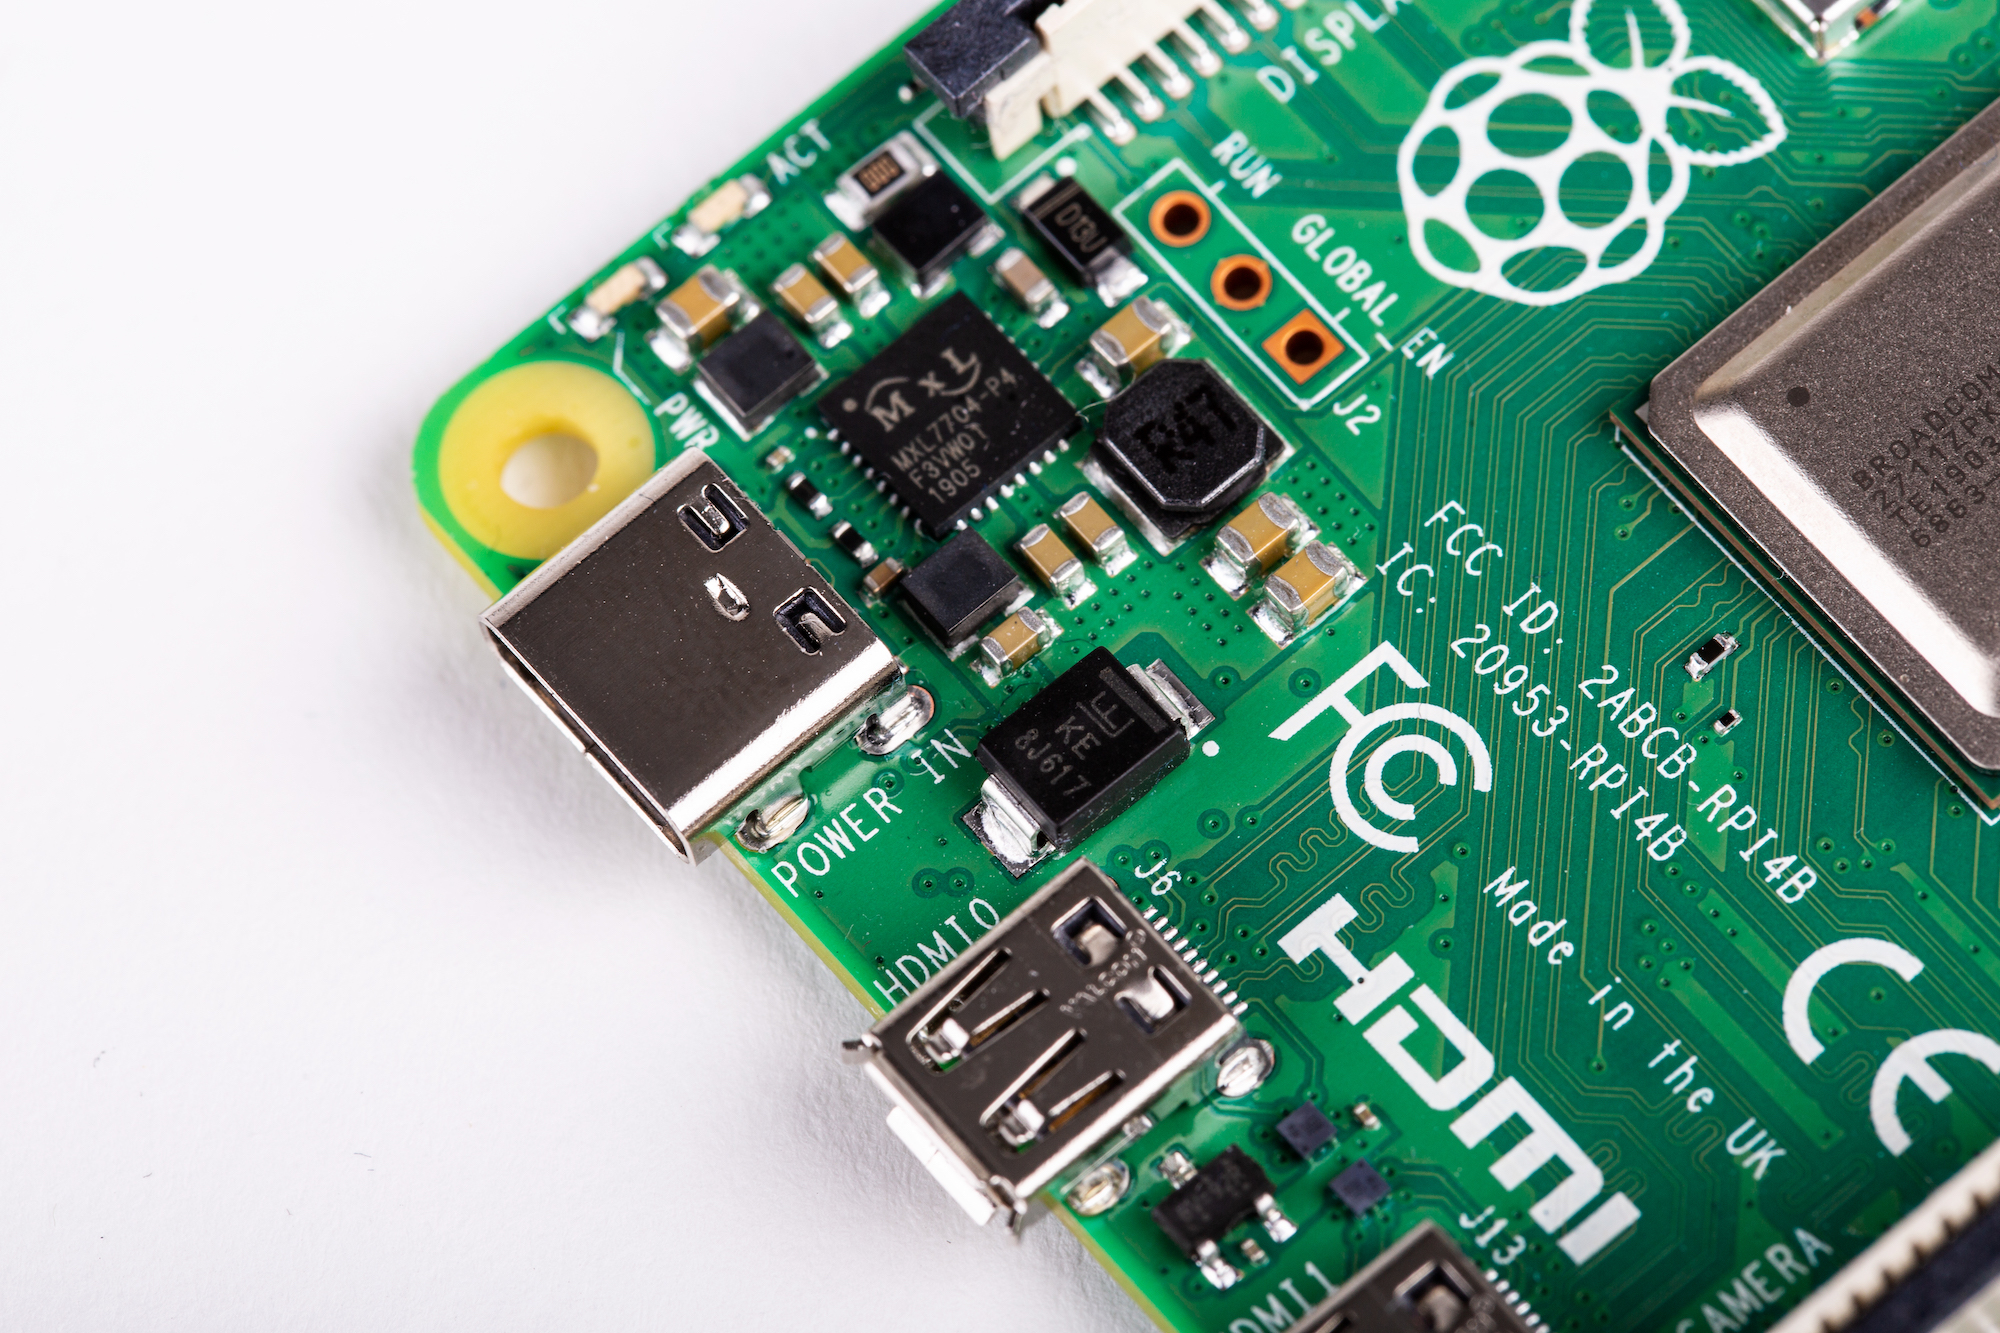
1,500 Raspberry Pi traffic sensors will be distributed to homes in the five cities to gather data on traffic conditions. Every hour, the devices will upload information to publically accessible cloud storage. The team behind WeCount says:
Following this approach, we will be able to quantify local road transport (cars, heavy goods vehicles, active travel modes, and speed), produce scientific knowledge in the field of mobility and environmental pollution, and co-design informed solutions to tackle a variety of road transport challenges.
“With air pollution being blamed for 500,000 premature deaths across the continent in 2018,” states a BBC News article about the project, “the experts running the survey hope their results can be used to make cities healthier places to live.” Says the WeCount team:
[T]he project will provide cost-effective data for local authorities, at a far greater temporal and spatial scale than what would be possible in classic traffic counting campaigns, thereby opening up new opportunities for transportation policy making and research.
Find more information about the WeCount project on the BBC News website and on the the CORDIS website.
The small form factor and low cost of Raspberry Pi mean it’s the ideal brain for citizen science projects across the globe, including our own Raspberry Pi Oracle Weather Station.
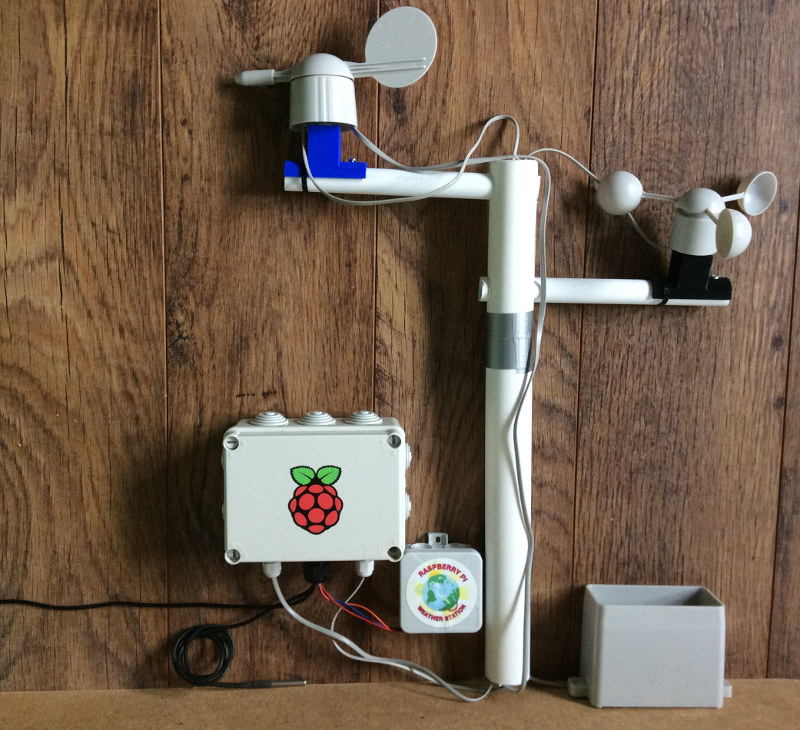
While the original Oracle Weather Station programme involved only school groups from across the world, we’ve published freely accessible online guides to building your own Raspberry Pi weather station, and to uploading weather data to the Initial State platform.
Another wonderful Raspberry Pi–powered citizen science project is Penguin Watch, which asks the public to, you guessed it, watch penguins. Time-lapse footage — obtained in the Antarctic by Raspberry Pi Camera Modules connected to Raspberry Pi Zeros — is uploaded to the Penguin Watch website, and anyone in the world can go online to highlight penguins in the footage, helping the research team to monitor the penguin population in these locations.

Setting up. Credit: Alasdair Davies, ZSL
Penguin Watch is highly addictive and it’s for a great cause, so be sure to check it out.
The post Citizen science traffic monitoring with Raspberry Pi appeared first on Raspberry Pi.
YouTube is a haven for awesome Raspberry Pi projects, and we often spend time scanning through the platform’s wares for hidden gems. One such hidden gem is this video from TechWiser, in which they showcase some of their favourite Raspberry Pi projects:
Cool Raspberry Pi 4 Projects We Use At TechWiser
Here are some of the best projects we use at TechWiser office.
From installing PiHole in the office, to upgrading a cupboard with RFID recognition for keyless entry, TechWiser has the whole ‘incorporating Raspberry Pi into everything’ thing down to a fine art.

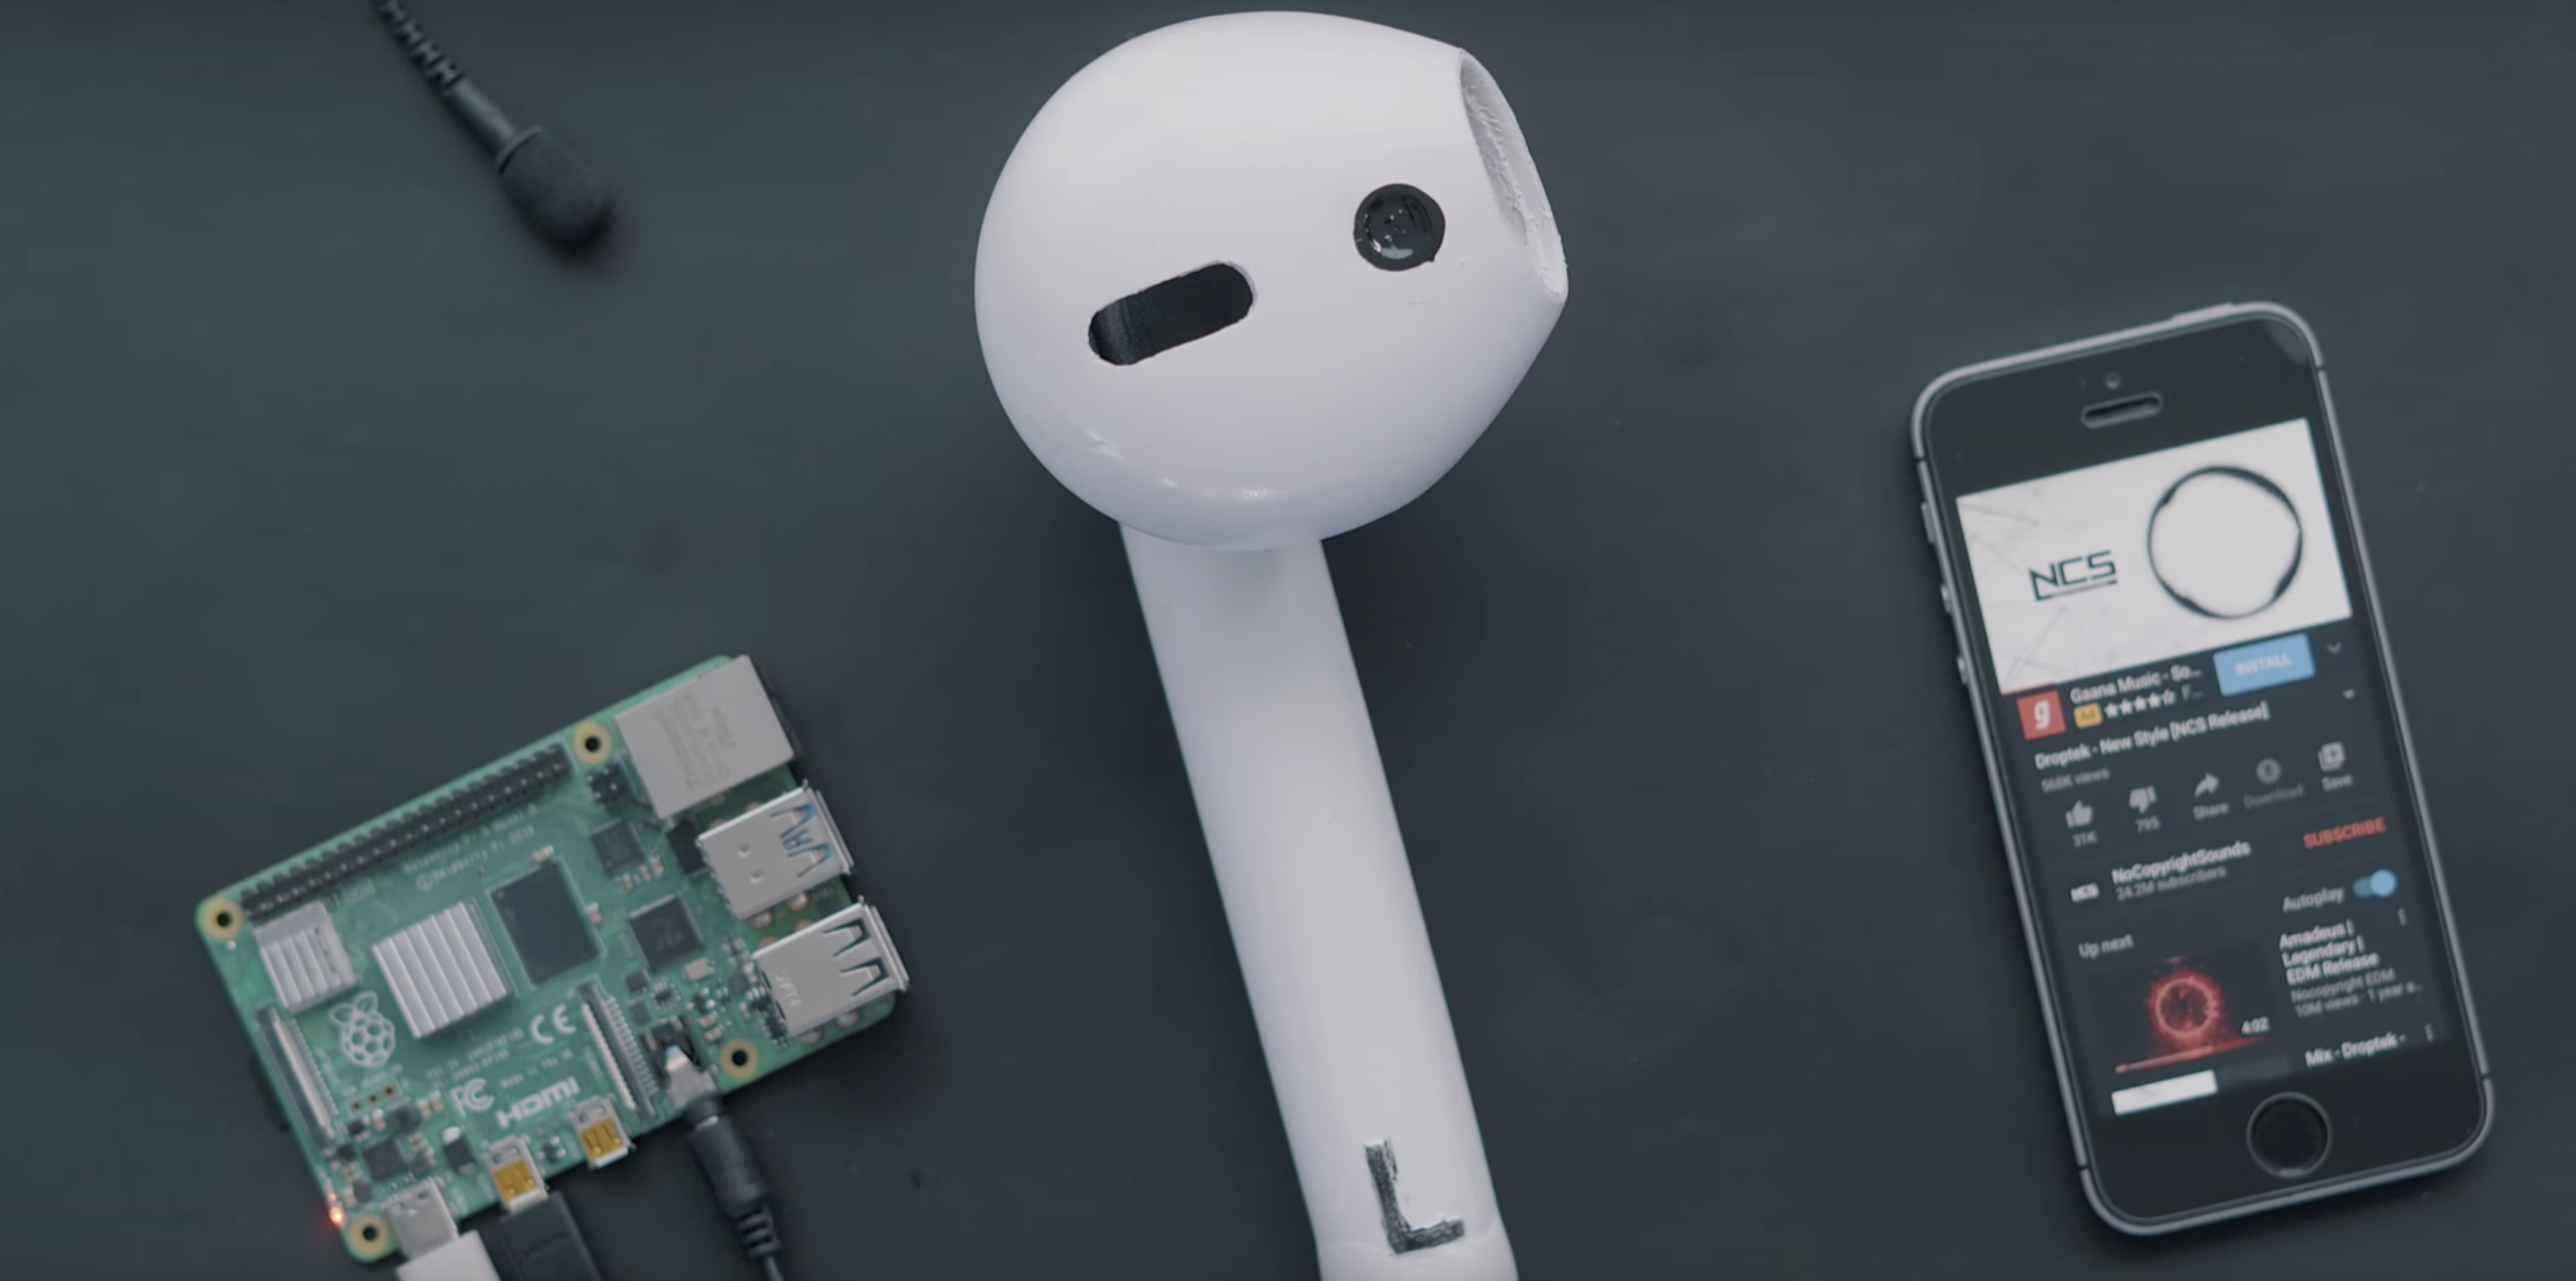
But it’s not all just about practicality. Does anyone really need a giant Apple AirPod? No. But, does the idea of a giant Apple AirPod sound cool? You betcha!
And their YouTube button that flashes whenever they earn a new subscriber is rather lovely too. I wonder if they noticed it flash when Raspberry Pi subscribed to their channel?

TechWiser’s YouTube channel contains a plethora of Raspberry Pi and tech tutorials and reviews, and you should definitely check them out.
The post TechWiser’s giant Raspberry Pi AirPod speaker (and more) appeared first on Raspberry Pi.
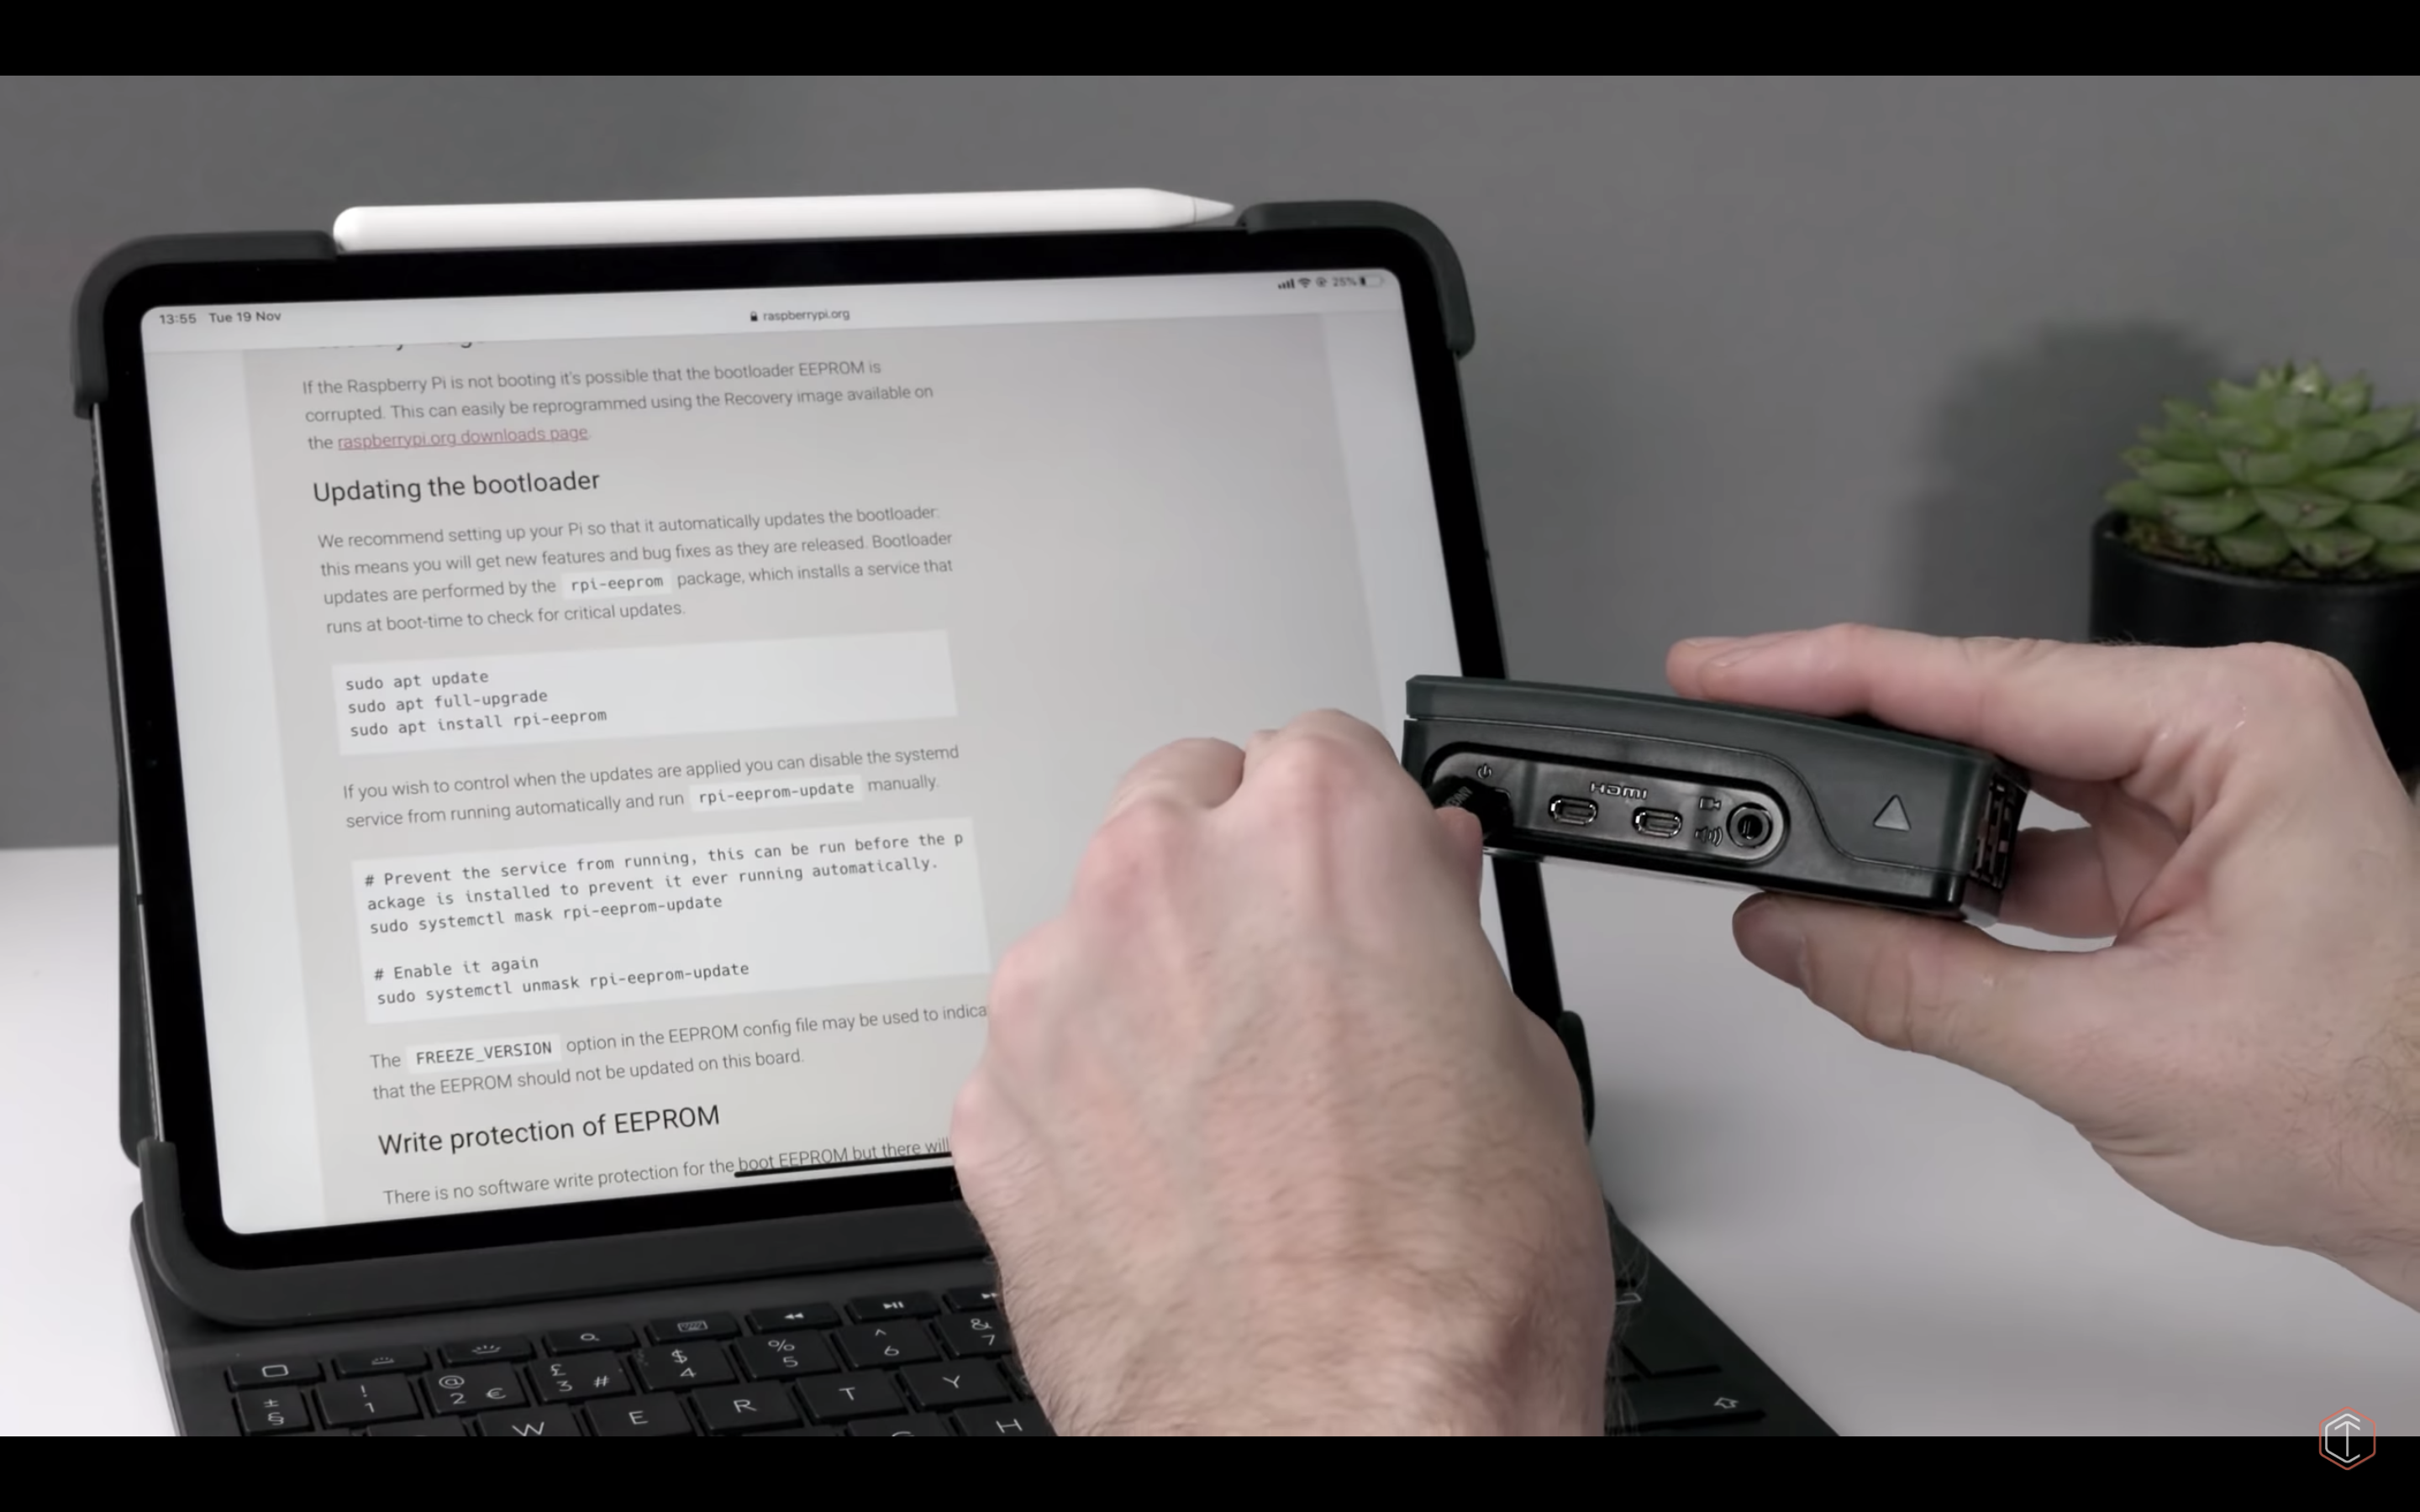
Have you ever considered attaching your Raspberry Pi 4 to an Apple iPad Pro? How would you do it, and why would you want to? Here’s YouTuber Tech Craft to explain why Raspberry Pi 4 is their favourite iPad Pro accessory, and why you may want to consider using yours in the same way.
We’ve set the video to start at Tech Craft’s explanation.
My Favourite iPad Pro Accessory: The Raspberry Pi 4
The Raspberry Pi 4 is my favourite accessory to use with the iPad Pro. In this video, learn more about what the Pi can do, what gear you need to get running with one, how to connect it to your iPad and what you’ll find it useful for.
Having installed Raspbian on Raspberry Pi and configured the computer to use USB-C as an Ethernet connection (read Ben Hardill’s guide to find out how to do this), Tech Craft could select it as an Ethernet device in the iPad’s Settings menu.
So why would you want to connect your Raspberry Pi 4 to your iPad? For starters, using your iPad instead of a conventional HDMI monitor will free up desk space, and also allow you to edit your code on the move. And when you’ve connected the two devices like this, you don’t need a separate power lead for Raspberry Pi, because the iPad powers the computer. So this setup is perfect for train or plane journeys, or for that moment when your robot stops working at a Raspberry Jam, or for maker conventions.

You can also use Raspberry Pi as a bridge between your iPad and portable hard drive, for disk management.
Tech Craft uses the SSH client Blink to easily connect to their Raspberry Pi via its fixed IP address, and with Juno Connect, they connect to a running Jupyter instance on their Raspberry Pi to do data science work.
For more information on using Raspberry Pi with an iPad, make sure you watch the whole video. And, because you’re a lovely person, be sure to subscribe to Tech Craft for more videos, such as this one on how to connect wirelessly to your Raspberry Pi from any computer or tablet:
Mobile Raspberry Pi with ANY iPad. No USB-C needed.
Following on my from earlier video about pairing the Raspberry Pi 4 with the iPad Pro over USB-C, this video show how to pair any iPad (or iPhone, or Android tablet) with a Pi4 or a Pi3 over WiFi.
The post Connect your Raspberry Pi 4 to an iPad Pro appeared first on Raspberry Pi.
We’ve had some reports of people finding cases that pretend to be official Raspberry Pi products online — these are fakes, they’re violating our trademark, they’re not made very well, and they’re costing you and us money that would otherwise go to fund the Raspberry Pi Foundation’s charitable work. (Reminder, for those who are new to this stuff: we’re a not-for-profit, which means that every penny we makes goes to support our work in education, and that none of us gets to own a yacht.)

If you want to be certain that the Raspberry Pi accessories you buy are the real thing, make sure you’re purchasing from one of our Authorised Resellers: if you buy via our website, you’ll automatically be directed to the Authorised Resellers in your region. Lots of other vendors also sell the official case, so if you’re wondering whether yours is the real thing, we’ve found there are some easy ways to tell the difference.
![]()
![]()
![]()
![]()
![]()
A wellwisher sent us one of the fake cases (elegantly photographed by Fiacre above), which we passed around the office with a great deal of wincing, imagining what you guys might say if you got your hands on one and thought we’d made it. They’re really not very nice; the moulding’s awful, the fit’s bad, the colour’s off, and we’d be embarrassed if we had made something like this ourselves.
We thought we’d ask the good people at T-Zero, who did all the work on the tooling and injection moulding for the real case (which is a considerably harder job than we’d imagined at first — you can read about the very bumpy road we had before finding T-Zero, who are amazing partners, in this post from days of yore), why the fake cases look so hideous. Simon Oliver, Grand Poobah of Plastics, wrote back:
Basically, what you are witnessing is very cheaply and quickly made tooling. The flash is just poor toolmaking. The rounded edges are due to the toolmaking method of milling everything, which is quick and cheap, but you can’t get definition of sharp corners because you have to have a radius in places. I have tried to explain it below, and you have to think in reverse for the tool.
![]()
Can you imagine how many electrodes are needed for the logo? The leaves around the top have to be laser-cut into an electrode to get the definition. See screen grabs of the tool and moulding — look how many sharp corners there are!
![]()
![]()
To properly make a tool for something this complicated, you need more electrodes than someone quickly copying a case like this would find economical. The official Raspberry Pi case needed 140 electrodes to produce the tool.
A few of the electrodes that went to make the injection moulding tool for the official case
Reverse-engineering by digitising existing components in a CAD will also loose definition, particularly in sharp corners, as the moulding process will form a small radius even if the tool is a sharp corner.
Plastic shrinks away from a 90 degree corner, leaving a smallish radius in any case. So your data from digitising will have a radius, and then [the producers] compound it by milling the lot.
Finally, the colour is off! It took ages to get your Raspberry Pi red correct. A lot of suppliers can’t repeat it; the current supplier had five attempts!
Thanks, Simon; and to everybody reading this, we hope it arms you with the confidence to make sure you’re buying a genuine product!
Before panic ensues, please note: we love third-party cases designed for Raspberry Pi. So much so that we sell a few of them in our store here in Cambridge.
The internet is full of innovative cases you can purchase, as well as wonderful 3D-printable alternatives you can make yourself, and as long as they aren’t breaking any trademark rules — using our logo, copying the work of others, pretending to be official when they’re not — that’s great!
If you’ve designed a case for any of the Raspberry Pi models, share it with us in the comments below, as we’d love to see your work. And if you see a case, or any other Raspberry Pi accessory, for sale that you think is breaking trademark rules or attempting to imitate our official products, please let us know.
The post Fake cases — make sure yours is the real deal appeared first on Raspberry Pi.
Learn how to code a simple Boulder Dash homage in Python and Pygame. Mark Vanstone shows you how.
The original Boulder Dash was marked out by some devious level design, which threatened to squash the player at every turn.
Boulder Dash first appeared in 1984 for the Commodore 64, Apple II, and the Atari 400/800. It featured an energetic gem collector called Rockford who, thanks to some rather low-resolution graphics, looked a bit like an alien. His mission was to tunnel his way through a series of caves to find gems while avoiding falling rocks dislodged by his digging. Deadly creatures also inhabited the caves which, if destroyed by dropping rocks on them, turned into gems for Rockford to collect.
The ingenious level designs were what made Boulder Dash so addictive. Gems had to be collected within a time limit to unlock the exit, but some were positioned in places that would need planning to get to, often using the physics of falling boulders to block or clear areas. Of course, the puzzles got increasingly tough as the levels progressed.
Written by Peter Liepa and Chris Gray, Boulder Dash was published by First Star Software, which still puts out new versions of the game to this day. Due to its original success, Boulder Dash was ported to all kinds of platforms, and the years since have seen no fewer than 20 new iterations of Boulder Dash, and a fair few clones, too.
Our homage to Boulder Dash running in Pygame Zero. Dig through the caves to find gems – while avoiding death from above.
We’re going to have a look at the boulder physics aspect of the game, and make a simple level where Rockford can dig out some gems and hopefully not get flattened under an avalanche of rocks. Writing our code in Pygame Zero, we’ll automatically create an 800 by 600-size window to work with. We can make our game screen by defining a two-dimensional list, which, in this case, we will fill with soil squares and randomly position the rocks and gems.
Each location in the list matrix will have a name: either wall for the outside boundary, soil for the diggable stuff, rock for a round, moveable boulder, gem for a collectable item, and finally, rockford to symbolise our hero. We can also define an Actor for Rockford, as this will make things like switching images and tracking other properties easier.
Here’s Mark’s code, which gets an homage to Boulder Dash running in Python. To get it working on your system, you’ll first need to install Pygame Zero. And to download the full code, go here.
Our draw() function is just a nested loop to iterate through the list matrix and blit to the screen whatever is indicated in each square. The Rockford Actor is then drawn over the top. We can also keep a count of how many gems have been collected and provide a congratulatory message if all of them are found. In the update() function, there are only two things we really need to worry about: the first being to check for keypresses from the player and move Rockford accordingly, and the second to check rocks to see if they need to move.
Rockford is quite easy to test for movement, as he can only move onto an empty square – a soil square or a gem square. It’s also possible for him to push a boulder if there’s an empty space on the other side. For the boulders, we need to first test if there’s an empty space below it, and if so, the boulder must move downwards. We also test to see if a boulder is on top of another boulder – if it is, the top boulder can roll off and down onto a space either to the left or the right of the one beneath.
There’s not much to add to this snippet of code to turn it into a playable game of Boulder Dash. See if you can add a timer, some monsters, and, of course, some puzzles for players to solve on each level.
An important thing to notice about the process of scanning through the list matrix to test for boulder movement is that we need to read the list from the bottom upwards; otherwise, because the boulders move downwards, we may end up testing a boulder multiple times if we test from the beginning to the end of the list. Similarly, if we read the list matrix from the top down, we may end up moving a boulder down and then when reading the next row, coming across the same one again, and moving it a second time.
You can read more features like this one in Wireframe issue 30, available now at Tesco, WHSmith, all good independent UK newsagents, and the Raspberry Pi Store, Cambridge.
Or you can buy Wireframe directly from Raspberry Pi Press — delivery is available worldwide. And if you’d like a handy digital version of the magazine, you can also download issue 30 for free in PDF format.
![]()
Make sure to follow Wireframe on Twitter and Facebook for updates and exclusive offers and giveaways. Subscribe on the Wireframe website to save up to 49% compared to newsstand pricing!
The post Code a Boulder Dash mining game | Wireframe #30 appeared first on Raspberry Pi.
Tired of losing vegetable crops to frequent summertime hail storms, Nick Rogness decided to build something to protect them. And the result is brilliant!
Digital Garden with hail protection
Tired of getting your garden destroyed by hail storms? I was, so I did something about it…maker style!
“I live in a part of the country where hail and severe weather are commonplace during the summer months,” Nick explains in his Hackster tutorial. “I was getting frustrated every year when my wife’s garden was get demolished by the nightly hail storms losing our entire haul of vegetable goodies!”
Nick drew up plans for a solution to his hail problem, incorporating liner actuators bolted to a 12ft × 12ft frame that surrounds the vegetable patch. When a storm is on the horizon, the actuators pull a heavy-duty tarp over the garden.

Nick connected two motor controllers to a Raspberry Pi Zero W. The Raspberry Pi then controls the actuators to pull the tarp, either when a manual rocker switch is flipped or when it’s told to do so via weather-controlled software.
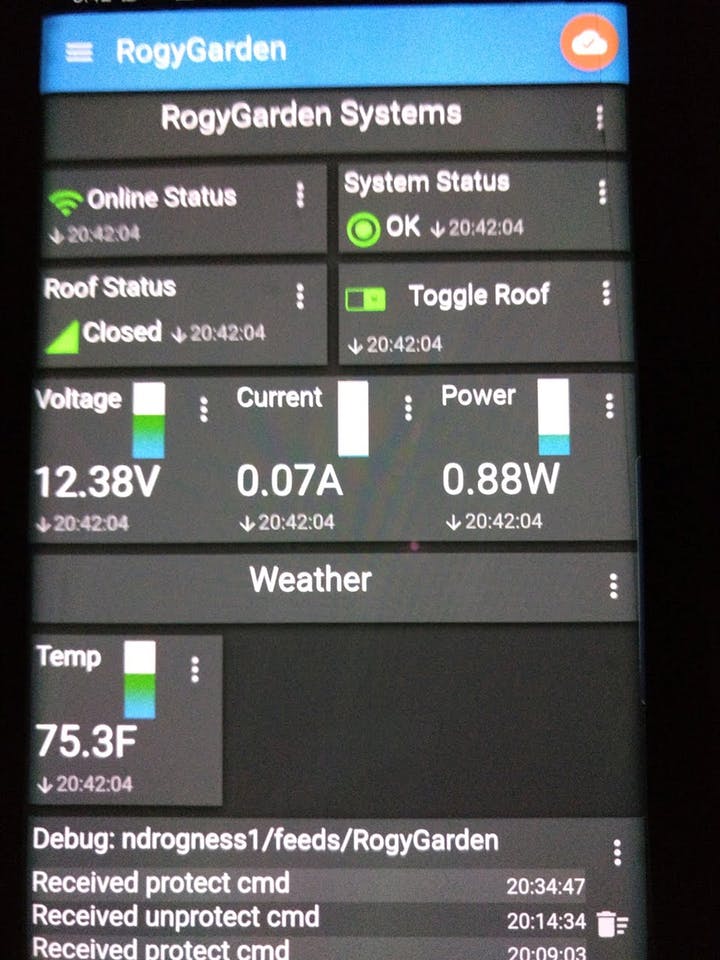
“Software control of the garden was accomplished by using a Raspberry Pi and MQTT to communicate via Adafruit IO to reach the mobile app on my phone,” Nick explains. The whole build is powered by a 12V Marine deep-cycle battery that’s charged using a solar panel.
You can view the full tutorial on Hackster, including the code for the project.
The post Protect your veggies from hail with a Raspberry Pi Zero W appeared first on Raspberry Pi.
At Raspberry Pi, we’re interested in all things to do with technology, from building new tools and helping people teach computing, to researching how young people learn to create with technology and thinking about the role tech plays in our lives and society. One of the aspects of technology I myself have been thinking about recently is algorithms.
Technology impacts our lives at the level of privacy, culture, law, environment, and ethics.
All kinds of algorithms — set series of repeatable steps that computers follow to perform a task — are running in the background of our lives. Some we recognise and interact with every day, such as online search engines or navigation systems; others operate unseen and are rarely directly experienced. We let algorithms make decisions that impact our lives in both large and small ways. As such, I think we need to consider the ethics behind them.
Ethics are rules of conduct that are recognised as acceptable or good by society. It’s easier to discuss the ethics of a specific algorithm than to talk about ethics of algorithms as a whole. Nevertheless, it is important that we have these conversations, especially because people often see computers as ‘magic boxes’: you push a button and something magically comes out of the box, without any possibility of human influence over what that output is. This view puts power solely in the hands of the creators of the computing technology you’re using, and it isn’t guaranteed that these people have your best interests at heart or are motivated to behave ethically when designing the technology.
Who creates the algorithms you use, and what are their motivations?
You should be critical of the output algorithms deliver to you, and if you have questions about possible flaws in an algorithm, you should not discount these as mere worries. Such questions could include:
Below, I give two concrete examples to show where ethics come into the creation and use of algorithms. If you know other examples (or counter-examples, feel free to disagree with me), please share them in the comments.
Part of the ‘magic box’ mental model is the idea that computers are cold instructions followers that cannot think for themselves — so how can they be biased?
Humans aren’t born biased: we learn biases alongside everything else, as we watch the way our family and other people close to us interact with the world. Algorithms acquire biases in the same way: the developers who create them might inadvertently add their own biases.
Humans can be biased, and therefore the algorithms they create can be biased too.
An example of this is a gang violence data analysis tool that the Met Police in London launched in 2012. Called the gang matrix, the tool held the personal information of over 300 individuals. 72% of the individuals on the matrix were non-white, and some had never committed a violent crime. In response to this, Amnesty International filed a complaint stating that the makeup of the gang matrix was influenced by police officers disproportionately labelling crimes committed by non-white individuals as gang-related.
We live in a content-rich society: there is much, much more online content than one person could possibly take in. Almost every piece of content we consume is selected by algorithms; the music you listen to, the videos you watch, the articles you read, and even the products you buy.
![]()
Some of you may have experienced a week in January of 2012 in which you saw a lot of either cute kittens or sad images on Facebook; if so, you may have been involved in a global social experiment that Facebook engineers performed on 600,000 of its users without their consent. Some of these users were shown overwhelmingly positive content, and others overwhelmingly negative content. The Facebook engineers monitored the users’ actions to gage how they responded. Was this experiment ethical?
In order to select content that is attractive to you, content algorithms observe the choices you make and the content you consume. The most effective algorithms give you more of the same content, with slight variation. How does this impact our beliefs and views? How do we broaden our horizons?
People generally don’t like making decisions; almost everyone knows the discomfort of indecision. In addition, emotions have a huge effect on the decisions humans make moment to moment. Algorithms on the other hand aren’t impacted by emotions, and they can’t be indecisive.
While algorithms are not immune to bias, in general they are way less susceptible to it than humans. And if a bias is identified in an algorithm, an engineer can remove the bias by editing the algorithm or changing the dataset the algorithm uses. The same cannot be said for human biases, which are often deeply ingrained and widespread in society.
As is true for all technology, algorithms can create new problems as well as solve existing problems.
That’s why there are more and less appropriate areas for algorithms to operate in. For example, using algorithms in policing is almost always a bad idea, as the data involved is recorded by humans and is very subjective. In objective, data-driven fields, on the other hand, algorithms have been employed very successfully, such as diagnostic algorithms in medicine.
I would love to hear what you think: this conversation requires as many views as possible to be productive. Share your thoughts on the topic in the comments! Here are some more questions to get you thinking:
Feel free to respond to other people’s comments and discuss the points they raise.
The ethics of algorithms is one of the topics for which we offer you a discussion forum on our free online course Impact of Technology. The course also covers how to facilitate classroom discussions about technology — if you’re an educator teaching computing or computer science, it is a great resource for you!
The Impact of Technology online course is one of many courses developed by us with support from Google.
The post Can algorithms be unethical? appeared first on Raspberry Pi.
In the latest Explaining Computers video, Christopher Barnatt explains how to use servo motors with Raspberry Pi. Using servos is a great introduction to the digital making side of computing; servos allow you to control the movement of all manner of project components with your Raspberry Pi and a motor controller attached to its GPIO pins.
Raspberry Pi Servo Motor Control
Control of SG90 servos in Python on a Raspberry Pi, including an explanation of PWM and how a servo differs from a motor. You can download the code from the video at: https://www.explainingcomputers.com/pi_servos_video.html The five-pack of SG90 servos used in this video was purchased on Amazon.co.uk here: https://www.amazon.co.uk/dp/B07H9VC698/ref=nosim?tag=explainin-21 with a similar product on Amazon.com here: https://amzn.to/2QHshx3 (affiliate links).
Christopher picked up his SG90 servo motors online, where you’ll find a variety of servo options. What type of servo you need depends on the project you want to create, so be sure to consider the weight and size of what you plan to move, and the speed at which you need to move it.
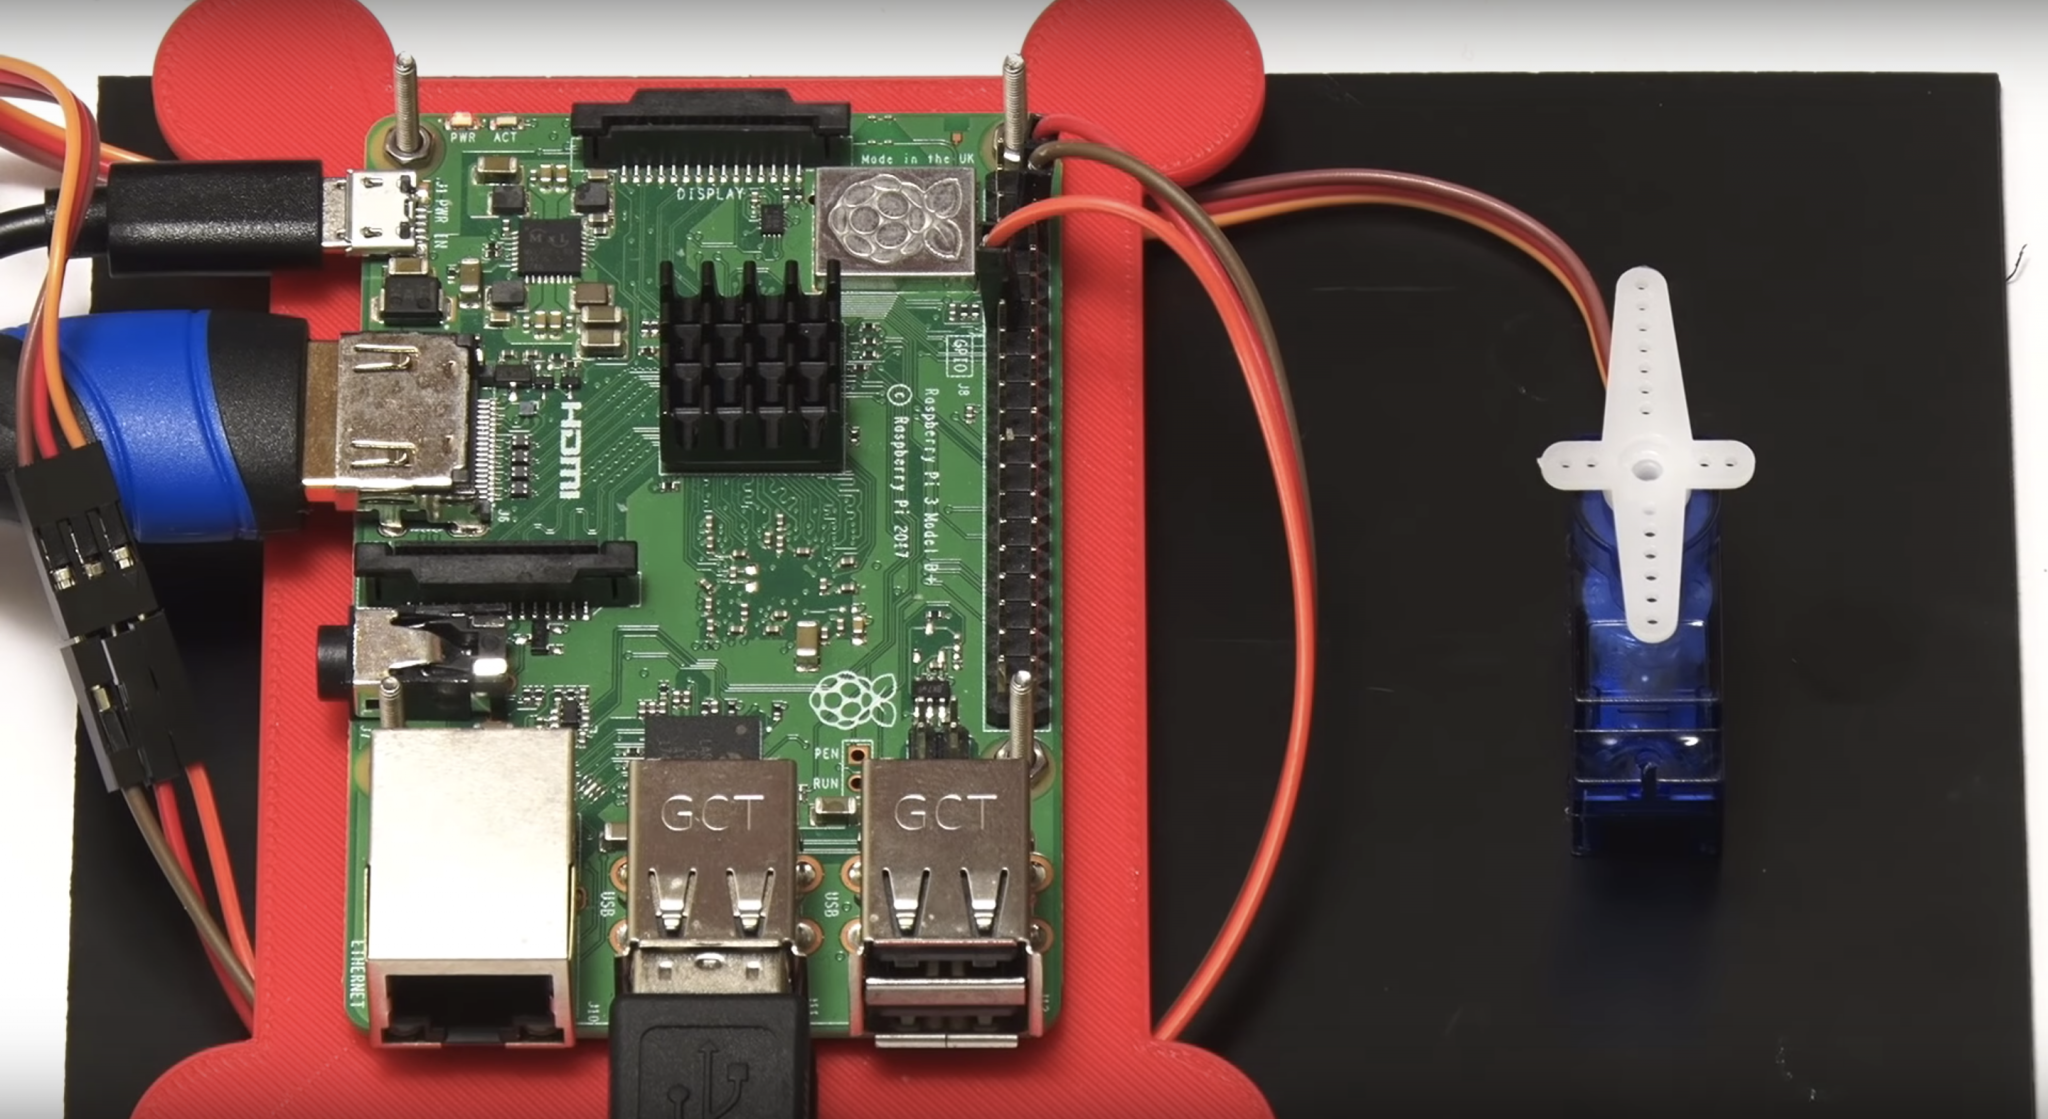
As the motor controller connects via GPIO, you can even use the tiny £5 Raspberry Pi Zero to control your servo, which makes adding movement to your projects an option even when you’re under tight space constraints.
For other detailed computing videos, be sure to subscribe to the Explaining Computers YouTube channel.
And for more Raspberry Pi projects, check out the Raspberry Pi projects page.
We’re always looking for people to join our incredible community of translators to help us translate our free resources, including the free projects found on our projects page.
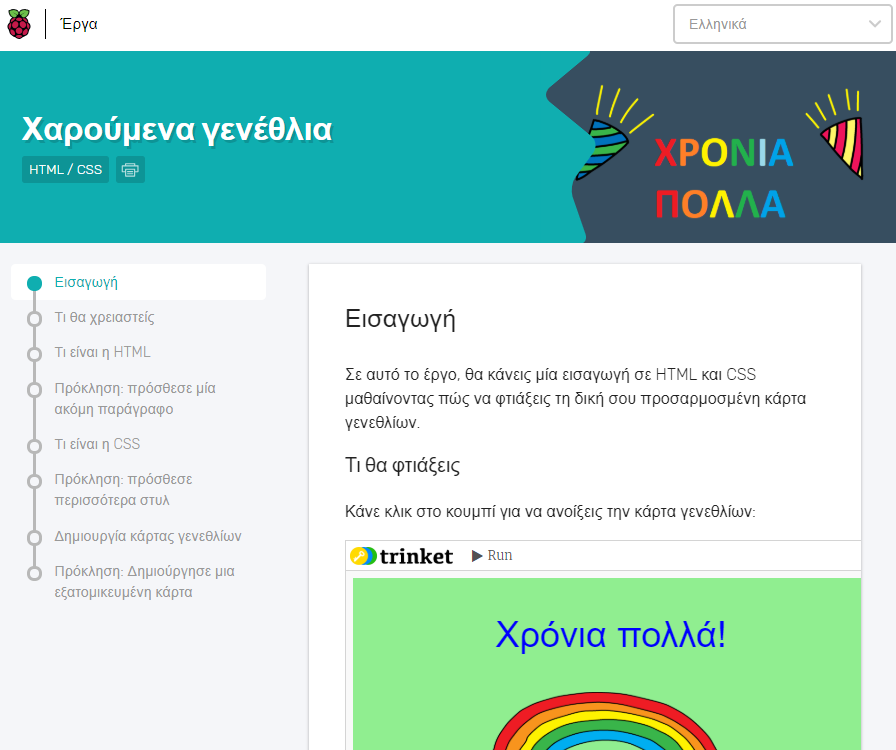
If you speak English and another language and would like to give a portion of your time to making our resources available to more people across the globe, sign up as a translator today.
The post How to control multiple servo motors with Raspberry Pi appeared first on Raspberry Pi.
Floyd Steinberg is back with more synthy Raspberry Pi musical magic, this time turning a door into a MIDI controller.
I played The Doors on a door – using a Raspberry PI DIY midi controller and a Yamaha EX5
You see that door? You secretly want that to be a MIDI controller? Here’s how to do it, and how to play a cover version of “Break On Through” by The Doors on a door ;-) Link to source code and the DIY kit below.
If you don’t live in a home with squeaky doors — living room door, I’m looking at you — you probably never think about the musical potential of mundane household objects.
Unless you’re these two, I guess:
When Mama Isn’t Home / When Mom Isn’t Home ORIGINAL (the Oven Kid) Timmy Trumpet – Freaks
We thought this was hilarious. Hope you enjoy! This video has over 60 million views worldwide! Social Media: @jessconte To use this video in a commercial player, advertising or in broadcasts, please email kyle@scalemanagement.co
If the sound of a slammed oven door isn’t involved in your ditty of choice, you may instead want to add some electronics to that sweet, sweet harmony maker, just like Floyd.

Trusting in the melodic possibilities of incorporating a Raspberry Pi 3B+ and various sensory components into a humble door, Floyd created The Doors Door, a musical door that plays… well, I’m sure you can guess.
If you want to build your own, you can practice some sophisticated ‘copy and paste’ programming after downloading the code. And for links to all the kit you need, check out the description of the video over on YouTube. While you’re there, be sure to give the video a like, and subscribe to Floyd’s channel.
And now, to get you pumped for the weekend, here’s Jim:
The Doors – Break On Through HQ (1967)
recorded fall 1966 – lyrics: You know the day destroys the night Night divides the day Tried to run Tried to hide Break on through to the other side Break on through to the other side Break on through to the other side, yeah We chased our pleasures here Dug our treasures there But can you still recall The time we cried Break on through to the other side Break on through to the other side Yeah!
The post Playing The Doors with a door (and a Raspberry Pi) appeared first on Raspberry Pi.
Are you attending Bett Show this year? Then come to our free educator sessions on Friday 24 January right next to Bett to take a break from the hustle and bustle of the show floor and learn something new!
Our team will be in a private room below the Fox@ExCel pub, next door to Bett, all day on Friday 24 January. We’ll be offering free physical computing sessions for primary and secondary educators during the day. Then from 17:30, you can drop in to chat to us about computing in your classroom, and to connect with like-minded educators.
![]()
11:00–12:30: Physical computing session for primary teachers (limited spaces, please register to attend)
12:45–13:30: Panel and Q&A for primary teachers: Code Club and the National Centre of Computing Education (drop in without registering)
14:30–16:00: Physical computing session for secondary teachers (limited spaces, please register to attend)
16:15–17:00: Panel and Q&A for secondary teachers: Code Club and the National Centre of Computing Education (drop in without registering)
17:30–21:00: Informal meet and greet with the Raspberry Pi team for everyone (drop in without registering)
![]()
In these free, registration-only, practical sessions (tailored to primary and secondary educators, respectively), we’ll highlight the value of delivering curriculum objectives through physical computing activities.
You’ll learn about:
![]()
The sessions are perfect for you if you’d like an introduction to how to bring physical computing to your classroom, because no experience of physical computing is needed.
Both sessions are free and open to all teachers and educators working with learners in the relevant Key Stages.
Spaces are limited for both sessions, so make sure you register to reserve your space:
Following each of the physical computing sessions, you’ll have the chance to find out how else we can help you bring computing to your school! During a 45-minute panel and Q&A, our team will introduce you all things Code Club and how to set up an engaging coding club in your school, and to the comprehensive, free support we offer you through the National Centre of Computing Education. You’ll also be able to ask us any questions you have about the programmes and resources we offer to you.
![]()
There is no need to register for this ‘panel and Q&A’ part of the day — just drop in when it suits you.
Your evening at Fox@ExCel, from 17:30 onwards, will be an informal meet and greet with the Raspberry Pi team. Snacks and refreshments will be provided, and you can drop in whenever you like.
This is your time to chat to us, discover more about the other educational activities we run, and network with other primary and secondary educators who want to encourage children and young adults to get hands-on with computing.
![]()
We hope to see many of you there, and we’re looking forward to chatting with you!
If you have any questions about this event, or want to find out more, please contact events@raspberrypi.org and we will get back to you!
The Fox@ExCel is a pub located in Warehouse K next to the ExCel Center, easily accessed from the footpath between the ExCel West Entrance and Custom House DLR Station.
![]()
You will find us in a private area below the main floor of the Fox@ExCel. There should be a sign directing you to the location, and you can also ask the pub staff to point the way.
From Custom House DLR Station:
Follow the signs along the footbridge towards the ExCel main entrance, enter the door labelled ‘Fox@ExCel’ on the first building to your right, and head down the stairs.
From the ExCel West Entrance:
Turn right out of the main entrance and follow the footbridge towards the ExCel. You will find the entrance to the Fox@ExCel in the second pair of doorways on your left. Enter the building and go down the stairs.
The post Come to our free educator sessions next to Bett 2020 appeared first on Raspberry Pi.
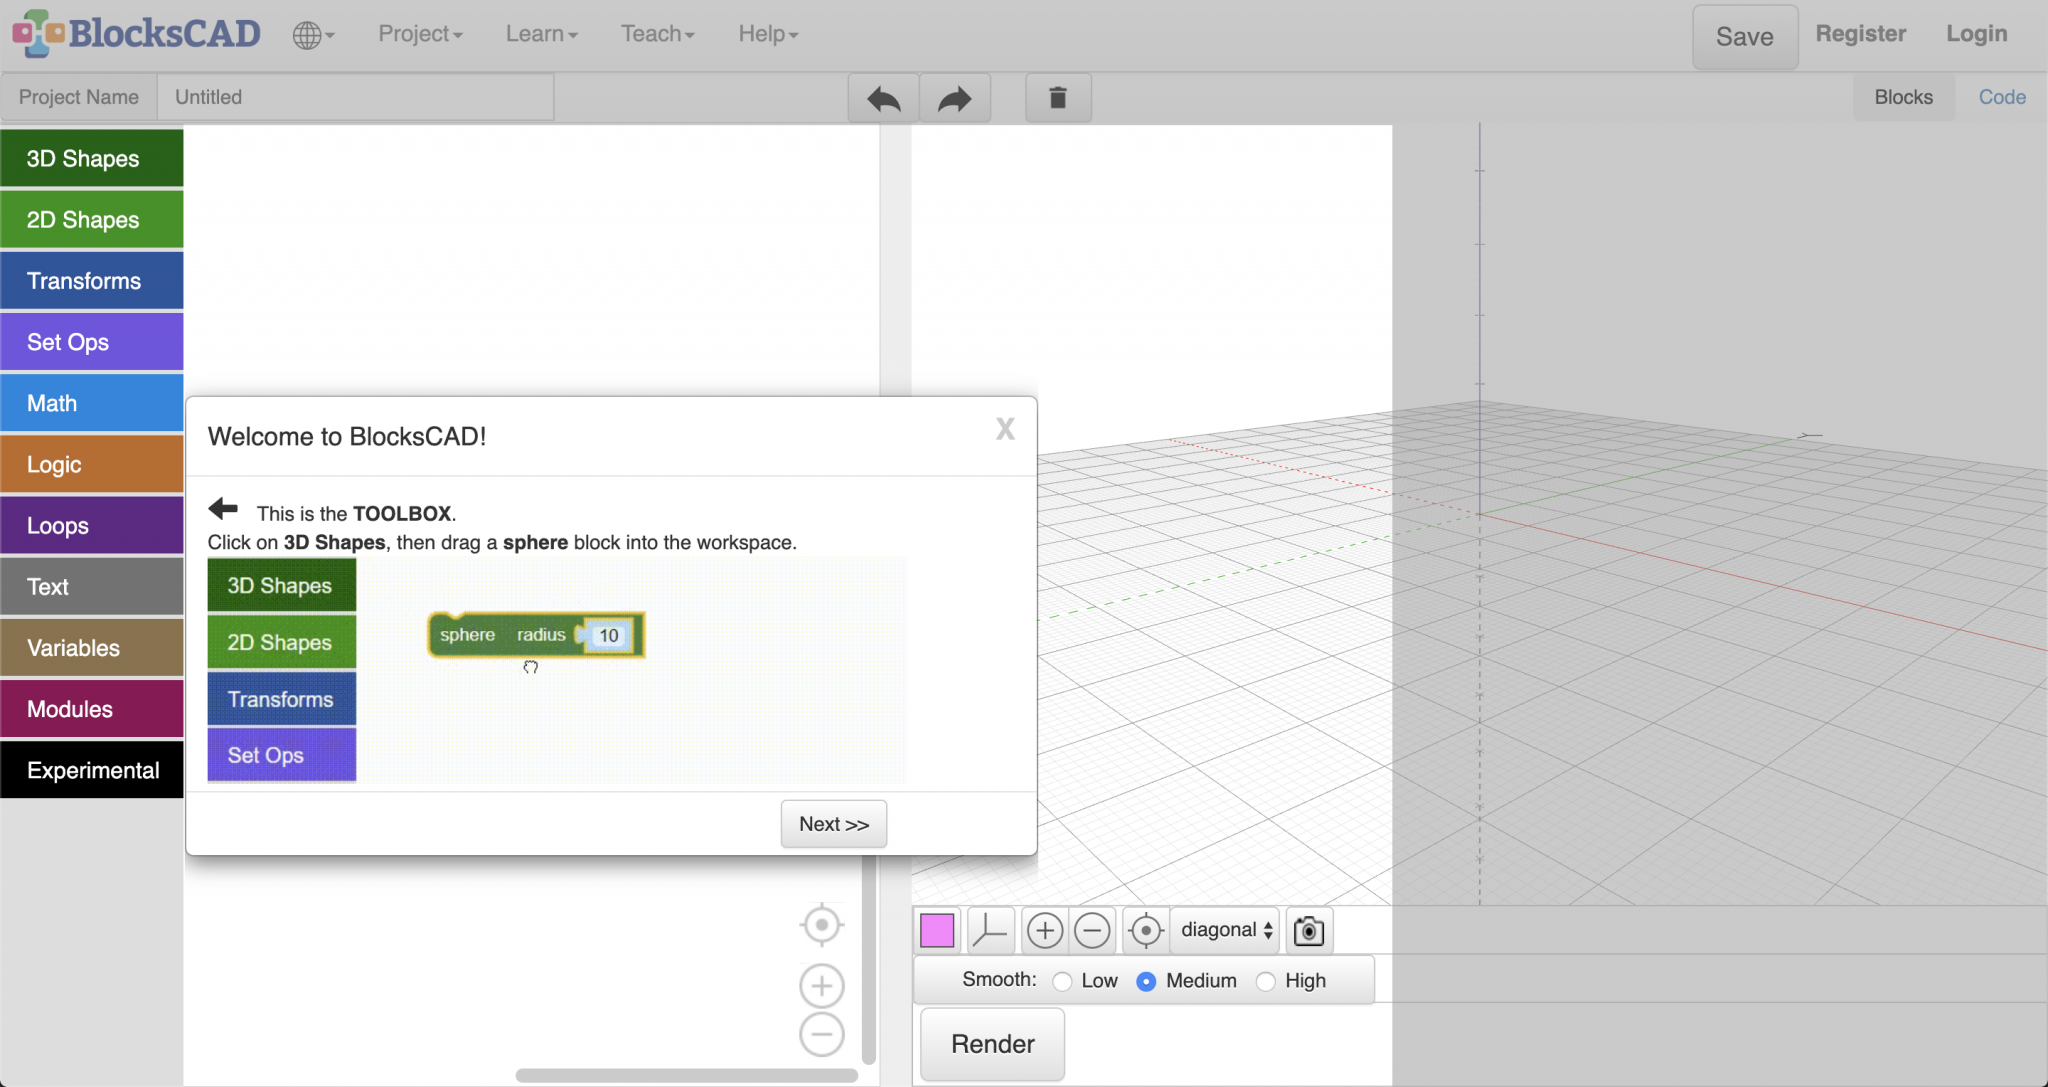
BlocksCAD is a 3D model editor that you use in a web browser, and it runs on Raspberry Pi. You drag and drop code blocks to design 3D models that can be exported for 3D printing.
In this project, you will use BlocksCAD to design a 3D pendant. The pendant uses a geometric pattern based on ‘the flower of life’, a design which is often found in historical art.

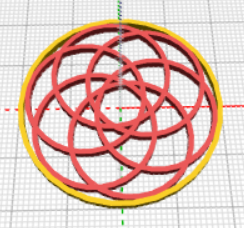
The finished pendant with a cord threaded through the small hanging hoop
If you have access to a 3D printer, then you can print your pendant. The pendant is small and only uses a little bit of filament. There’s a hoop on top of the pendant so that you can put it on a necklace or cord. The pendant has a diameter of 40 mm, plus the hoop for hanging. It is 2 mm thick, so it will 3D-print quite quickly.
After this project, you’ll also be able to code your own design and create a custom pendant.
This project can be completed in a web browser using BlocksCAD. Open Chromium and enter the BlocksCAD editor URL: blockscad3d.com/editor.
The design uses six interlocking hoops in the centre, and a larger hoop around the outside. As mentioned, the pendant is 40 mm wide, plus the hoop for hanging, which is 2 mm thick.

Click 3D Shapes and drag a cylinder block to the project. Create a cylinder with a radius of 12, and a height of 2 (the unit here is millimetres). Cylinders are automatically centred along the X and Y axes. Select not centered so that the pendant sits on the surface. (This means that the Z-axis value is greater than 0.)
![]()
Click on the Render button after each change to your code to see the results.
Now, drag a difference block from Set Ops to encase the cylinder. Add another cylinder block in the bottom space, and this time give it a radius of 11 mm. This will remove a smaller cylinder from the centre. This creates a hoop. Click Render again to see it.
If you like, you can click on the coloured square to change the colour used in the viewer. This does not affect the colour of your pendant, as that depends on the colour of the filament that you use.
The design uses six intersecting hoops, and each hoop is moved out from the centre and rotated a different number of degrees.
In the final design, there is no central hoop: the hoops are all moved out from the centre.
Drag a translate block (from Transforms) around your code, and set X and Y to 5. This moves the first hoop into position.
Now the hoop is a little off-centre. You need multiple copies of this hoop, rotated around the centre. First, create three equally spaced hoops.
Add a count Loops block to create three hoops. To space the hoops, add a rotate Transforms block between the count loop and the translate block.
In the count block, set the i variable from 1 to 3. You’ll need to insert an arithmetic block from Math and a variable (i) block from Variables into the Z field of the rotate block.
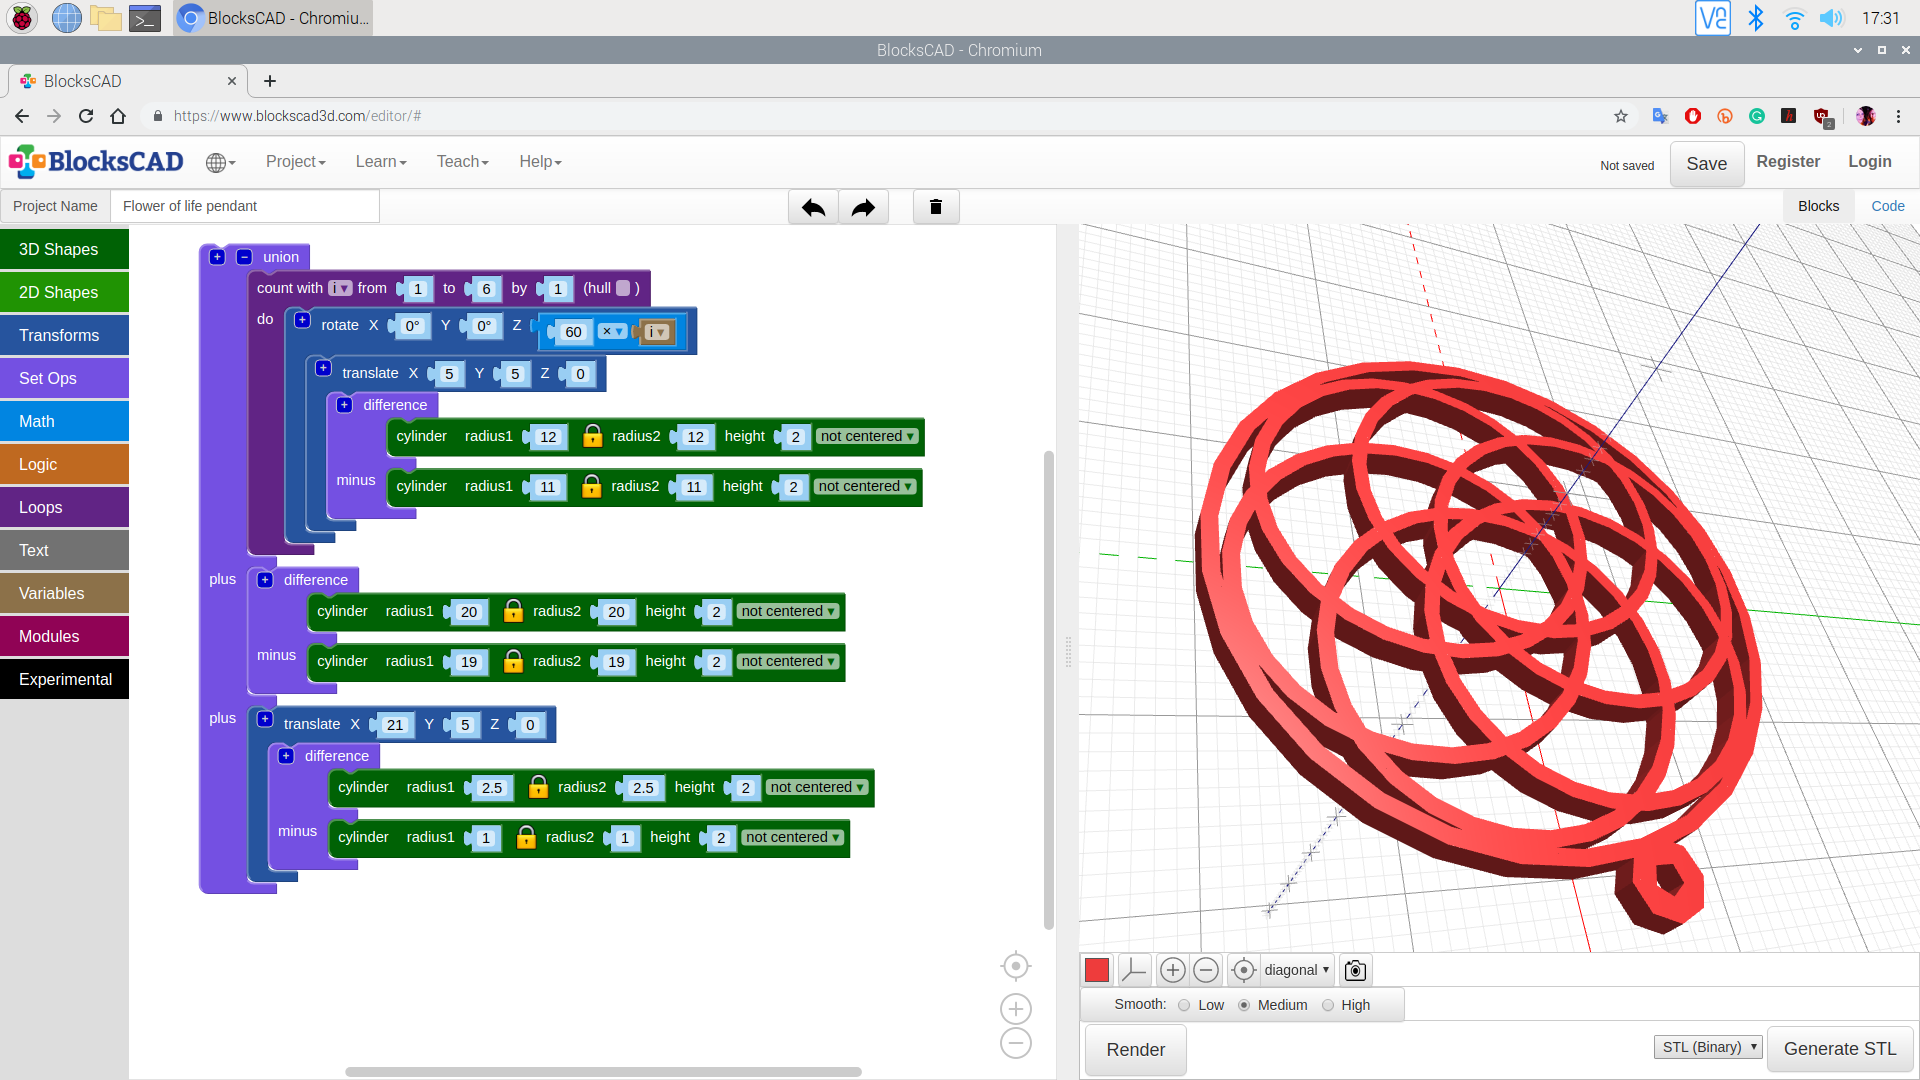
The rotation moves each hoop by 120 × i degrees, so that the three hoops are distributed equally around the 360 degrees of a circle (360 / 3 = 120). Look at the code and make sure you understand how it works. The finished design has six hoops rather than three. In the count block, set i from 1 to 6, and set the Z rotation to 60, so it creates six equally spaced hoops.
Next, add a border around the edge of the design. Create a centred hoop that touches the edges of the design. You can either do the maths to work out what the radius of the circle needs to be, or you can just create a circle and change the radius until it works. Either approach is fine!
Encase your code with a union block from Set Ops, to join the border to the other hoops. Add a difference block to the plus section of union, and two cylinder blocks to make the hoop.
The six hoops each have a radius of 12 mm, so the border cylinder that you are making needs to be bigger than that. You could try setting the radius to 24 mm.
To make a hoop, the radius of the second cylinder in the difference block needs to be 1 mm smaller than the radius of the first cylinder.
Adjust the size of the cylinders until the border hoop just touches the outer edges of the six inner hoops.
The radius should be around 20 mm. (As mentioned in the introduction, the finished pendant will be 40 mm in diameter.)
You could also use maths to work out the diameter. The diameter of each inner hoop is 24 mm. If the hoops met at the centre of the pendant, the border hoop would need to have a radius of 24 mm. But the inner hoops overlap, as they are translated 5 mm along the X and Y axes.
This removes a section from the radius. This section is on the arc, 5 mm from the origin, so we need to remove 5 mm from 24 mm. Thus the inner radius of the border hoop should be 19 mm.
Maths is really useful when you need to be accurate. But it’s fine to just change things until you get the result you need.
Now, add a small hanging hoop through which you can thread a cord to make a necklace.
Click the [+] on the union block to add another section to add the new hoop.
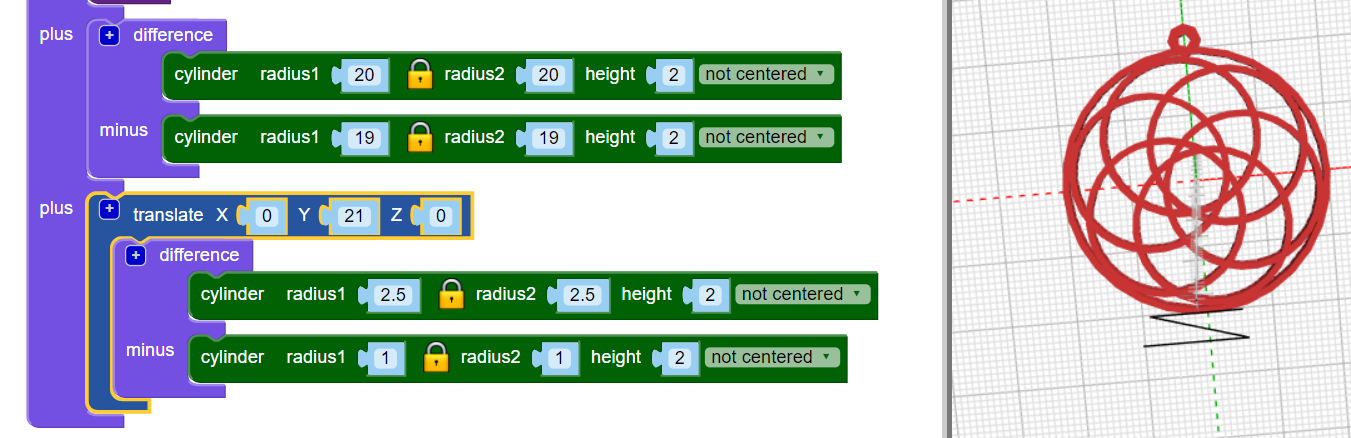
At the moment, the position of the hanging hoop isn’t very visually pleasing.
Add a rotate block to move the inner hoops so that the hanging hoop is centred over one of the gaps between them.
Experiment and change some values in your pendant. For example, change the number of hoops, or the rotation.

You could also try to use cuboids (cubes) instead of cylinders to create a pattern.
BlocksCAD 3D can export an STL file for 3D printing. Render your model and then click on Generate STL. Remember where you save the STL file. Now 3D-print your pendant using a filament of the colour of your choice. Very carefully remove the 3D print from the print bed. The pendant is thin, so it’s quite delicate.
You might need to remove small strands of filament (especially from the hanging hoop) to tidy up the print.
Thread the pendant on to a chain or cord. If you want to use a thicker cord or necklace, then you can adjust the design to have a larger hanging hoop.
You can download the full code and check it against your own. You can also check out our projects page, where you’ll find more images and step-by-step instructions for using BlocksCAD.
This project was created by Dr Tracy Gardner and the above article was featured in this month’s issue of The MagPi magazine. Get your copy of The MagPi magazine issue 89 today from your local newsagent, the Raspberry Pi Store, Cambridge, or online from Raspberry Pi Press.
The post Design 3D prints with a Raspberry Pi and BlocksCAD appeared first on Raspberry Pi.
If you own a 3D printer, you’ll likely have at least heard of OctoPrint, created by Gina Häußge and maintained by her and Guy Sheffer! OctoPrint has the potential to transform your 3D printing workflow for the better, and it’s very easy to set up. This guide will take you through the setup process step by step, and give you some handy tips along the way.

Before we start finding out how to install OctoPrint, let’s look at why you might want to. OctoPrint is a piece of open-source software that allows us to add WiFi functionality to any 3D printer with a USB port (which is pretty much all of them). More specifically, you’ll be able to drop files from your computer onto your printer, start/stop prints, monitor your printer via a live video feed, control the motors, control the temperature, and more, all from your web browser. Of course, with great power comes great responsibility — 3D printers have parts that are hot enough to cause fires, so make sure you have a safe setup, which may include not letting it run unsupervised.
• Raspberry Pi 3 (or newer)
• MicroSD card
• Raspberry Pi power adapter
• USB cable (the connector type will depend on your printer)
• Webcam/Raspberry Pi Camera Module (optional)
• 3D-printed camera mount (optional)
Before we get started, it is not recommended that anything less than a Raspberry Pi 3 is used for this project. There have been reports of limited success using OctoPrint on a Raspberry Pi Zero W, but only if you have no intention of using a camera to monitor your prints. If you want to try this with a Pi Zero or an older Raspberry Pi, you may experience unexpected print failures.
Firstly, you will need to download the latest version of OctoPi from the OctoPrint website. OctoPi (created by Guy Sheffer) is a Raspbian distribution that comes with OctoPrint, video streaming software, and CuraEngine for slicing models on your Raspberry Pi. When this has finished downloading, unzip the file and put the resulting IMG file somewhere handy.
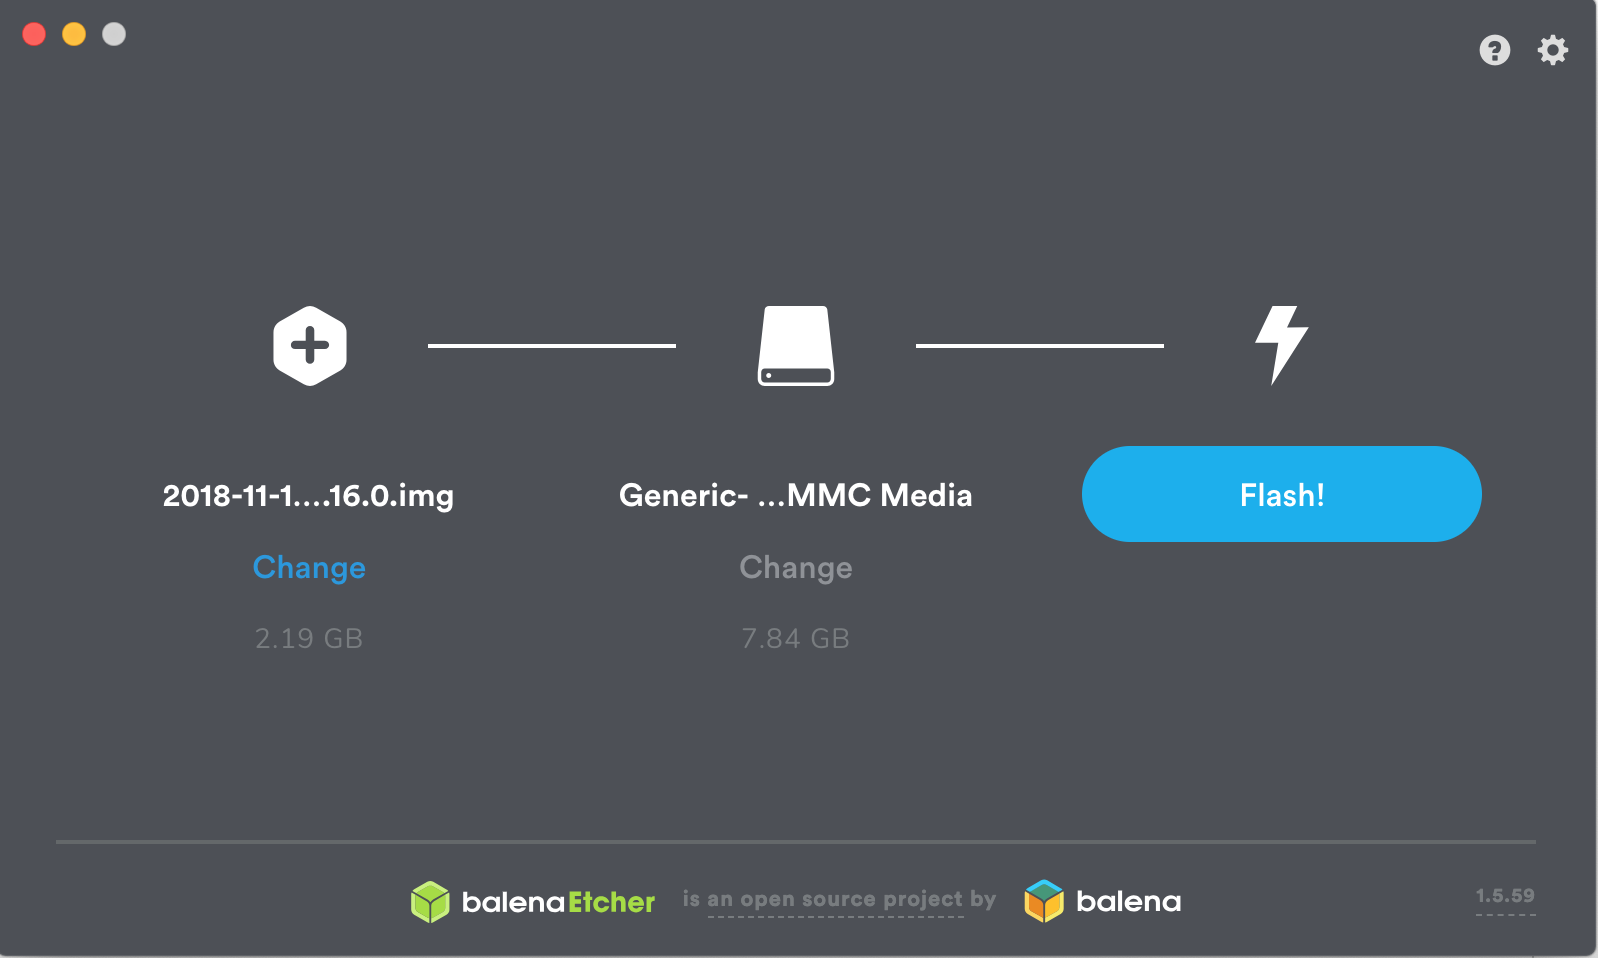
Next, we need to flash this image onto our microSD card. We recommend using Etcher to do this, due to its minimal UI and ease of use; plus it’s also available to use on both Windows and Mac. Get it here: balena.io/etcher. When Etcher is installed and running, you’ll see the UI displayed. Simply click the Select Image button and find the IMG file you unzipped earlier. Next, put your microSD card into your computer and select it in the middle column of the Etcher interface.
Finally, click on Flash!, and while the image is being burned onto the card, get your WiFi router details, as you’ll need them for the next step.
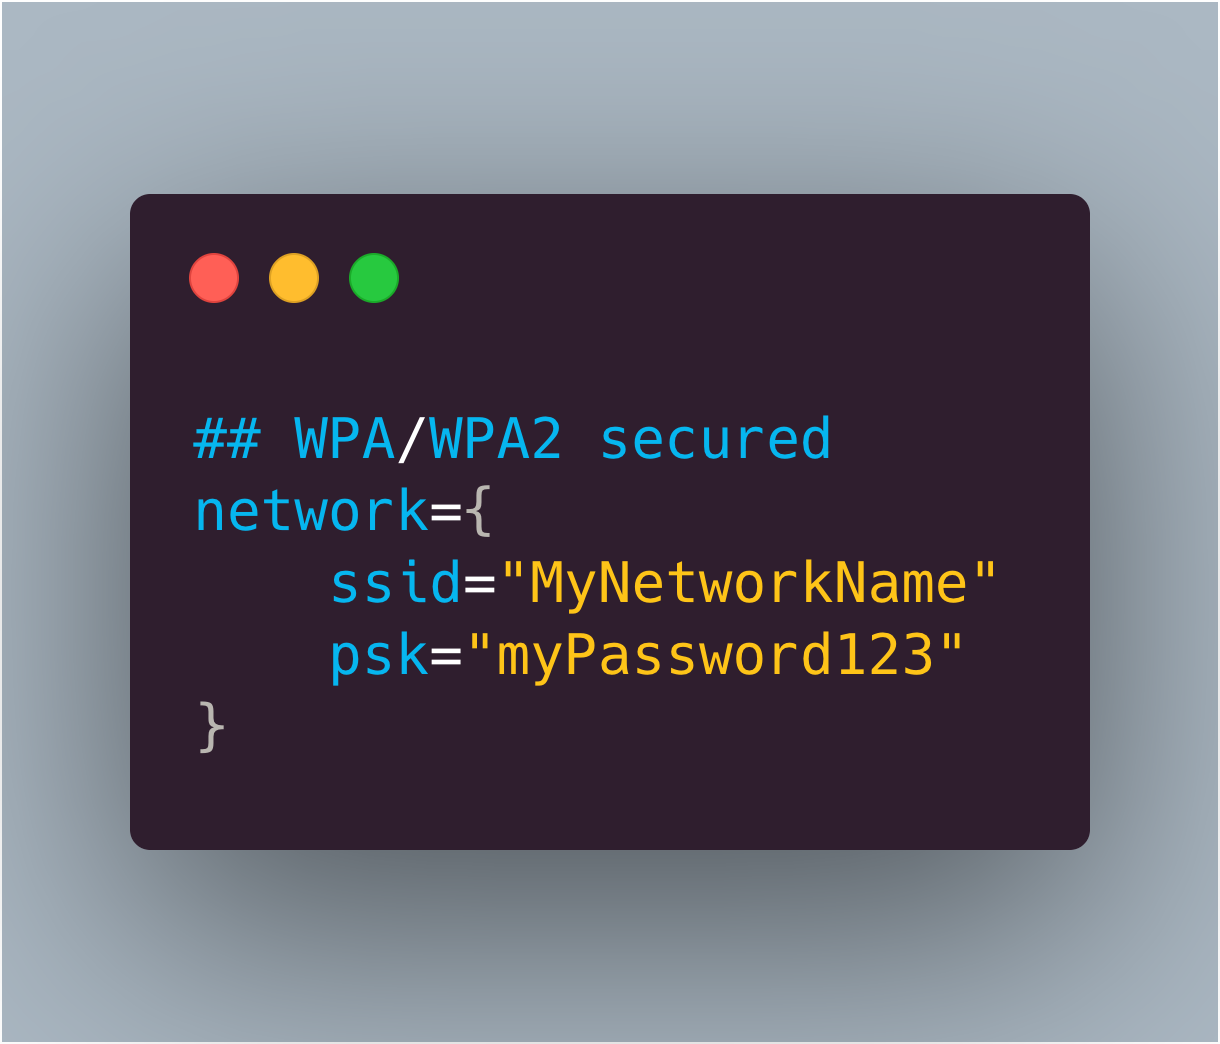
Now that you have your operating system, you’ll want to add your WiFi details so that the Raspberry Pi can automatically connect to your network after it’s booted. To do this, remove the microSD card from your computer (Etcher will have ‘ejected’ the card after it has finished burning the image onto it) and then plug it back in again. Navigate to the microSD card on your computer — it should now be called boot — and open the file called octopi-wpa-supplicant.txt. Editing this file using WordPad or TextEdit can cause formatting issues; we recommend using Notepad++ to update this file, but there are instructions within the file itself to mitigate formatting issues if you do choose to use another text editor. Find the section that begins ## WPA/WPA2 secured and remove the hash signs from the four lines below this one to uncomment them. Finally, replace the SSID value and the PSK value with the name and password for your WiFi network, respectively (keeping the quotation marks). See the example below for how this should look.
Further down in the file, there is a section for what country you are in. If you are using OctoPrint in the UK, leave this as is (by default, the UK is selected). However, if you wish to change this, simply comment the UK line again by adding a # before it, and uncomment whichever country you are setting up OctoPrint in. The example below shows how the file will look if you are setting this up for use in the US:
# Uncomment the country your Pi is in to activate Wifi in RaspberryPi 3 B+ and above
# For full list see: https://en.wikipedia.org/ wiki/ISO_3166-1_alpha-2
#country=GB # United Kingdom
#country=CA # Canada
#country=DE # Germany
#country=FR # France
country=US # United States
When the changes have been made, save the file and then eject/unmount and remove the microSD card from your computer and put it into your Raspberry Pi. Plug the power supply in, and go and make a cup of tea while it boots up for the first time (this may take around ten minutes). Make sure the Raspberry Pi is running as expected (i.e. check that the green status LED is flashing intermittently). If you’re using macOS, visit octopi.local in your browser of choice. If you’re using Windows, you can find OctoPrint by clicking on the Network tab in the sidebar. It should be called OctoPrint instance on octopi – double-clicking on this will open the OctoPrint dashboard in your browser.
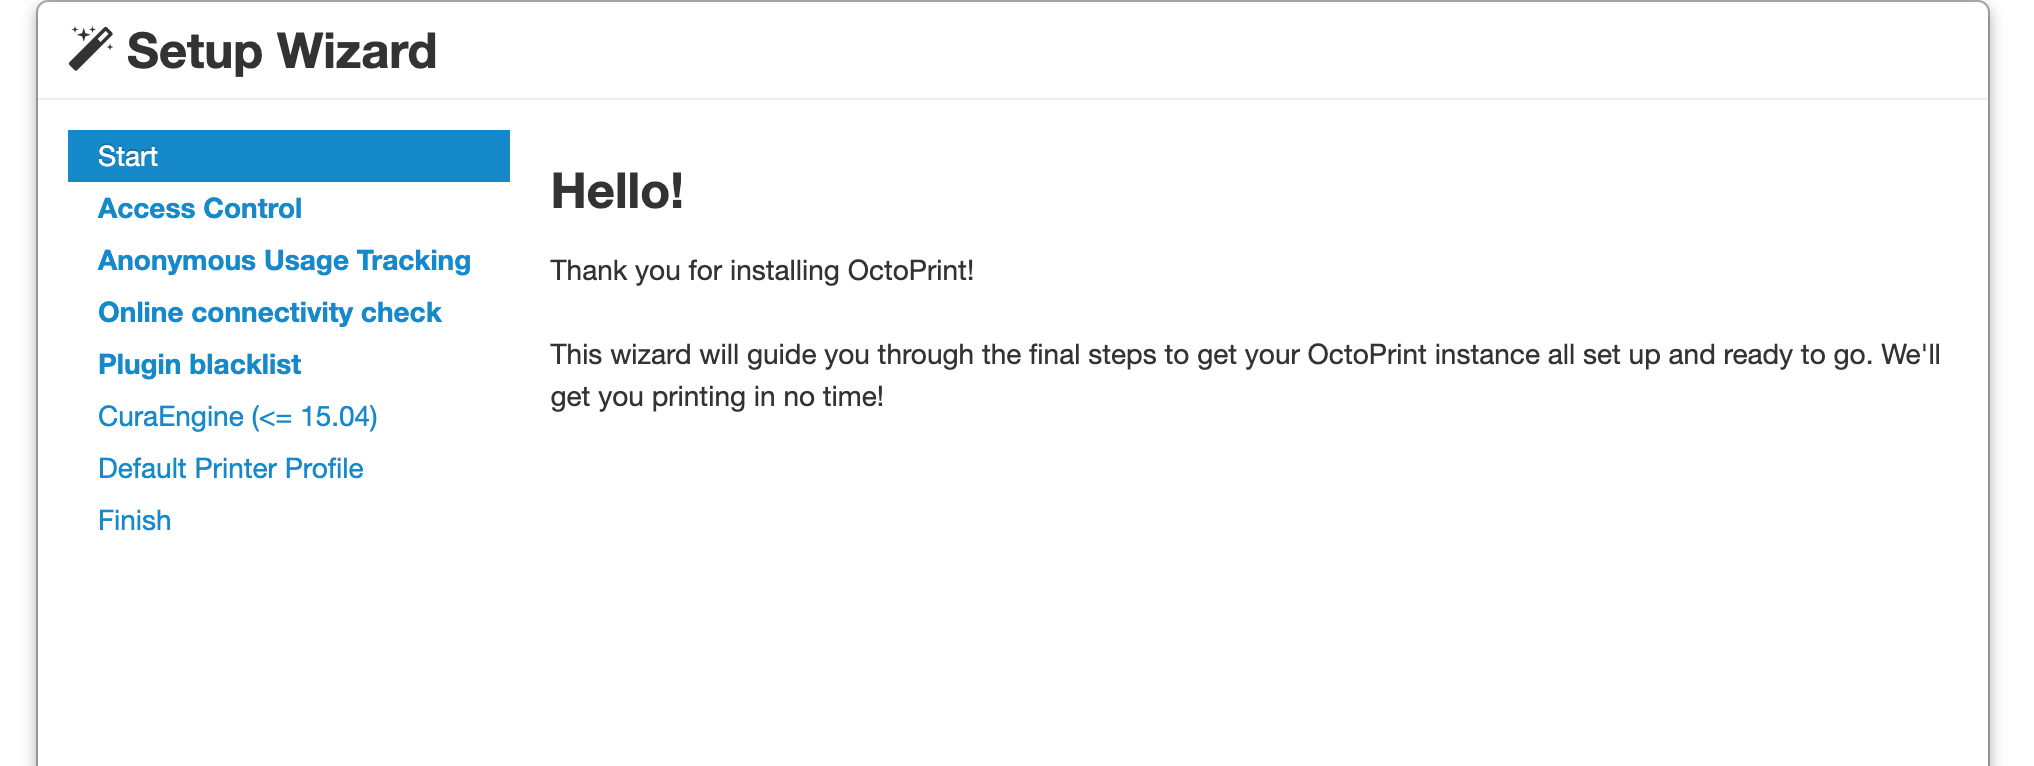
If you see the screen shown above, then congratulations! You have set up OctoPrint.
Not seeing that OctoPrint splash screen? Fear not, you are not the first. While a full list of issues is beyond the scope of this article, common issues include: double-checking your WiFi details are entered correctly in the octopi-wpa-supplicant.txt file, ensuring your Raspberry Pi is working correctly (plug the Raspberry Pi into a monitor and watch what happens during boot), or your Raspberry Pi may be out of range of your WiFi router. There’s a detailed list of troubleshooting suggestions on the OctoPrint website.
We now have the opportunity to set up OctoPrint for our printer using the handy wizard. Most of this is very straightforward — setting up a password, signing up to send anonymous usage stats, etc. — but there are a few sections which require a little more thought.
We recommend enabling the connectivity check and the plug-ins blacklist to help keep things nice and stable. If you plan on using OctoPrint as your slicer as well as a monitoring tool, then you can use this step to import a Cura profile. However, we recommend skipping this step as it’s much quicker (and you can use a slicer of your choice) to slice the model on your computer, and then send the finished G-code over.
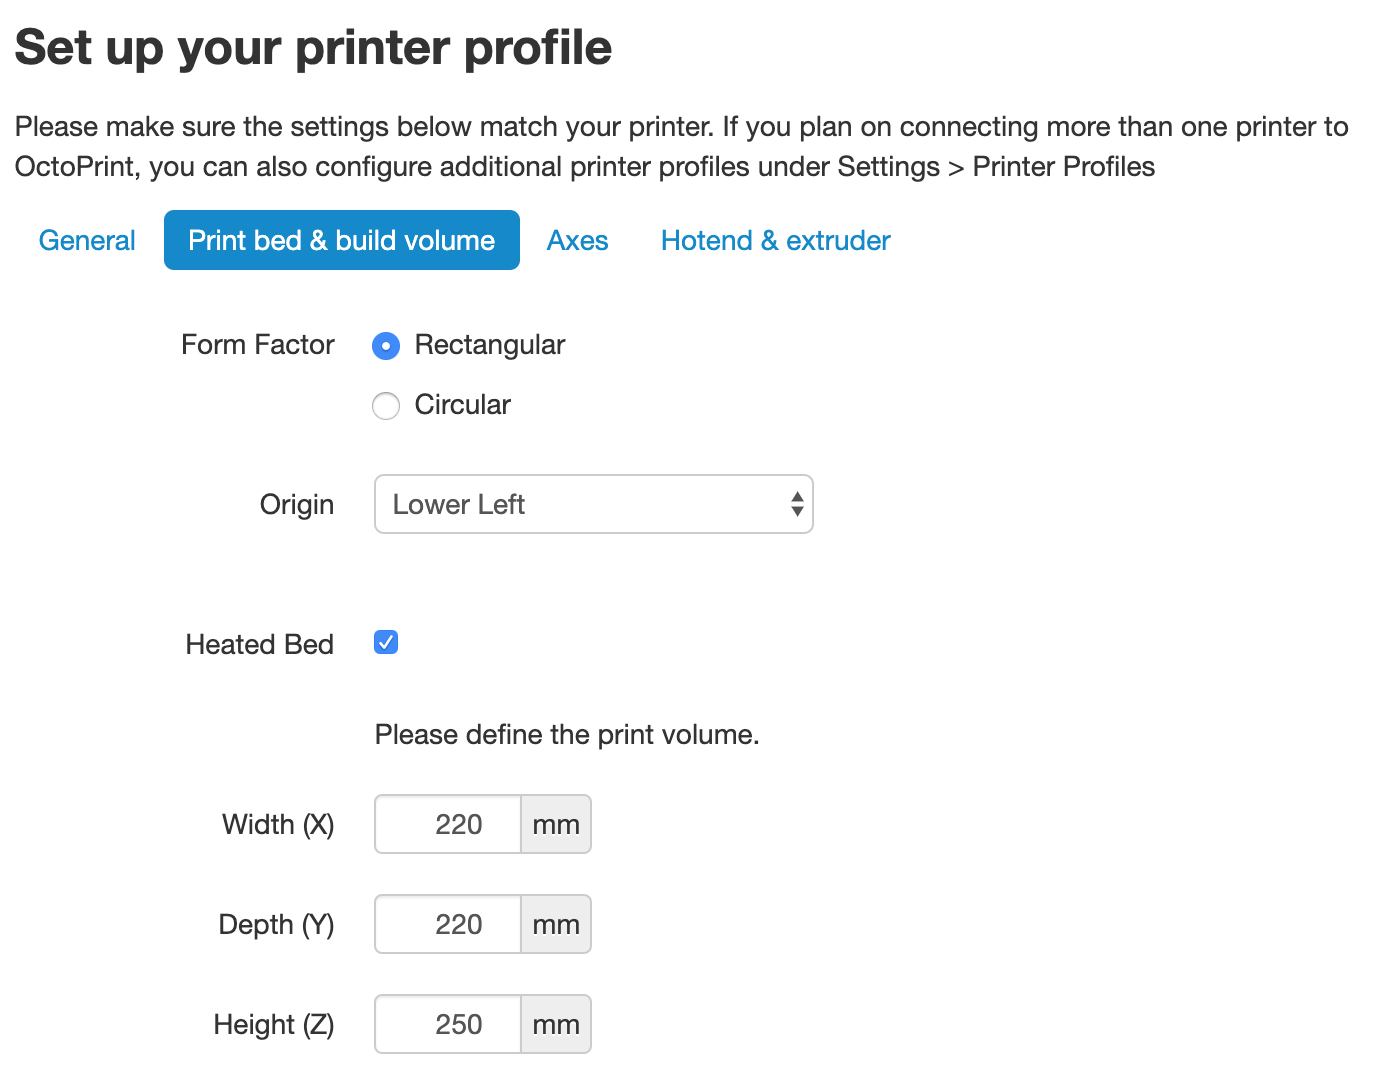
Finally, we need to put in our printer details. Above, we’ve included some of the specs of the Creality Ender-3 as an example. If you can’t find the exact details of your printer, a quick web search should show what you need for this section.
The General tab can have anything in it, it’s just an identifier for your own use. Print bed & build volume should be easy to find out — if not, you can measure your print bed and find out the position of the origin by looking at your Cura printer profile. Leave Axes as default; for the Hotend and extruder section, defaults are almost certainly fine here (unless you’ve changed your nozzle; 0.4 is the default diameter for most consumer printers).
Now that you’re set up with OctoPrint, you’re ready to start printing. Turn off your Raspberry Pi, then plug it into your 3D printer. After it has booted up, open OctoPrint again in your browser and take your newly WiFi-enabled printer for a spin by clicking the Connect button. After it has connected, you’ll be able to set the hot end and bed temperature, then watch as the real-time readings are updated.
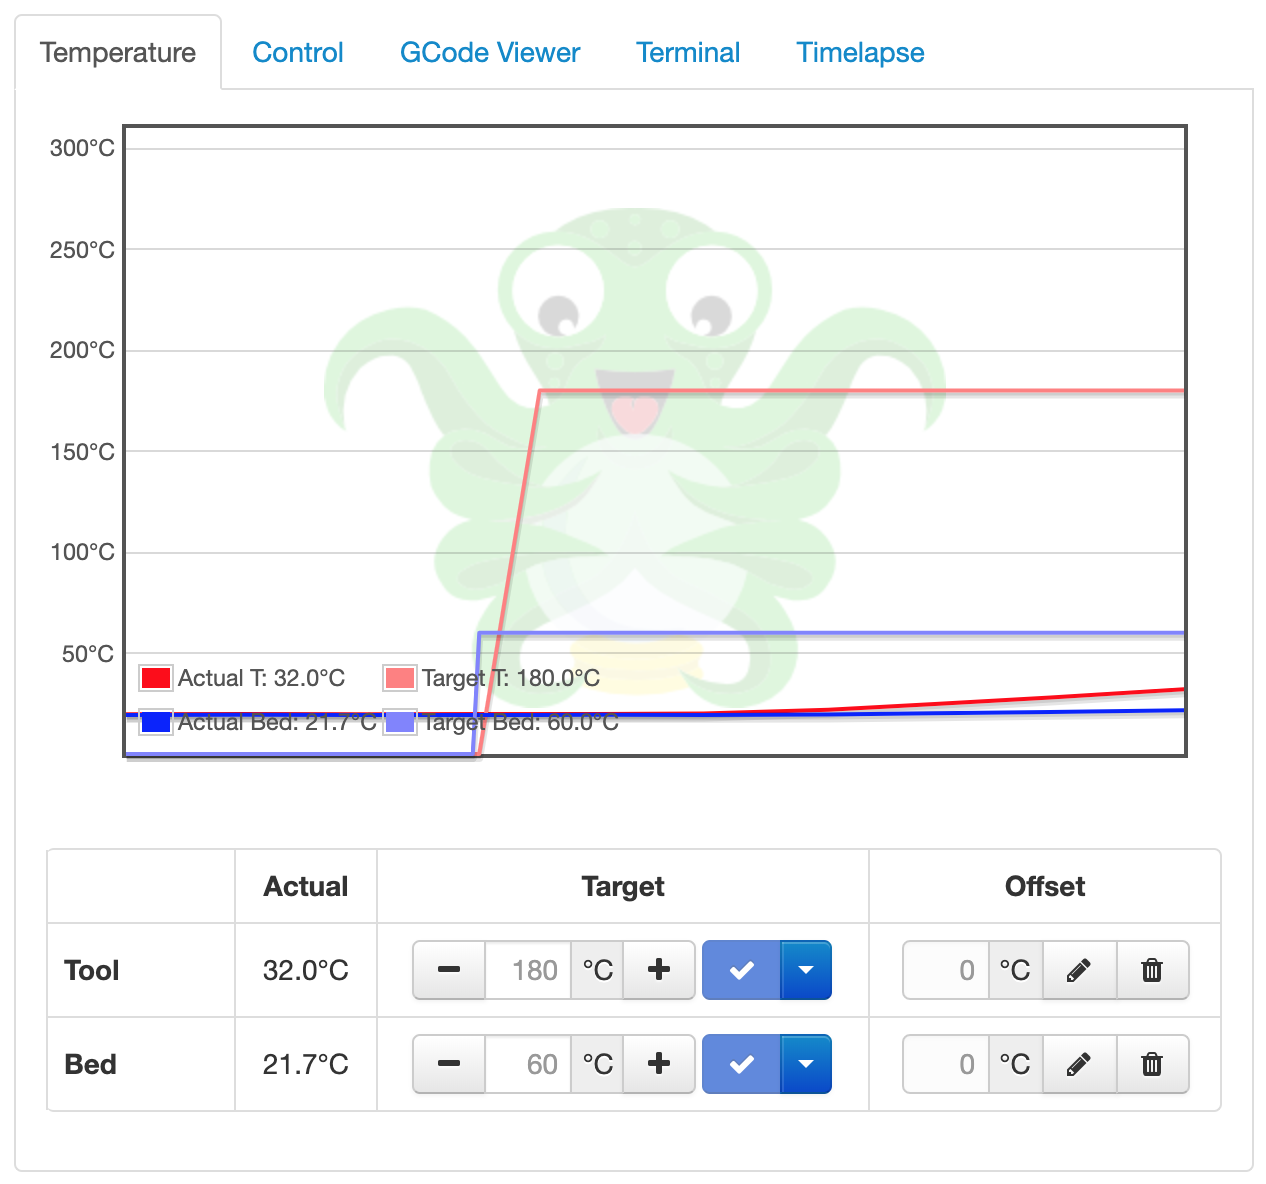
In the Control tab, we can see the camera stream (if you’re using one) and the motor controls, as well as commands to home the axes. There’s a G-code file viewer to look through a cross-section of the currently loaded model, and a terminal to send custom G-code commands to your printer. The last tab is for making time-lapses; however, there is a plug-in available to help with this process.
Undoubtedly the easiest way to set up video monitoring of your prints is to use the official Raspberry Pi Camera Module. There are dozens of awesome mounts on Thingiverse for a Raspberry Pi Camera Module, to allow you to get the best angle of your models as they print. There are also some awesome OctoPrint-themed Raspberry Pi cases to house your new printer brains. While it isn’t officially supported by OctoPrint, you can use a USB webcam instead if you have one handy, or just want some very high-quality video streams. The OctoPrint wiki has a crowdsourced list of webcams known to work, as well as a link for the extra steps needed to get the webcam working correctly.
As mentioned earlier, our recommended way of printing a model using OctoPrint is to first use your slicer as you would if you were creating a file to save to a microSD card. Once you have the file, save it somewhere handy on your computer, and open the OctoPrint interface. In the bottom left of the screen, you will see the Upload File button — click this and upload the G-code you wish to print.
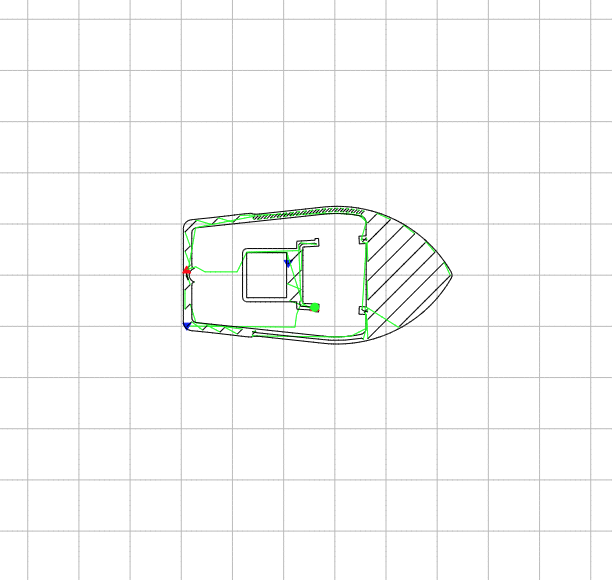
You’ll see the file/print details appear, including information on how long it’ll take for the object to print. Before you kick things off, check out the G-code Viewer tab on the right. You can not only scroll through the layers of the object, but, using the slider at the bottom, you can see the exact pattern the 3D printer will use to ‘draw’ each layer. Now click Print and watch your printer jump into action!
OctoPrint has scores of community-created plug-ins, but our favourite, Octolapse, makes beautiful hypnotic time-lapses. What makes them so special is that the plug-in alters the G-code of whatever object you are printing so that once each layer has finished, the extruder moves away from the print to let the camera take an unobstructed shot of the model. The result is an object that seems to grow out of the build plate as if by magic. You’ll not find a finer example of it than here.
Satisfying 3D Prints TimeLapse episode 7 (Prusa I3 Mk3 octopi)
3D Printing timelapses of models printed on the Prusa i3 MK3! Here’s another compilation of my recent timelapses. I got some shots that i think came out really great and i hope you enjoy them! as always if you want to see some of these timelapses before they come out or want to catch some behind the scenes action check out my instagram!
OctoPrint was created and is maintained by Gina Häußge (@foosel) and Guy Sheffer (@GuySoft)! A big thank you to both of them for putting in many, many volunteer hours to provide the world with an amazing piece of free, open-source software.
Head over to the OctoPrint website to find out how you can support OctoPrint’s continued existence.
This tutorial comes fresh from the pages of HackSpace magazine issue 26 and was written by Glenn Horan. Thanks, Glenn.
To get your copy of HackSpace magazine issue 26, visit your local newsagent, the Raspberry Pi Store, Cambridge, or the Raspberry Pi Press online store.
Fans of HackSpace magazine will also score themselves a rather delightful Adafruit Circuit Playground Express with a 12-month subscription. Sweet!
The post How to set up OctoPrint on your Raspberry Pi appeared first on Raspberry Pi.
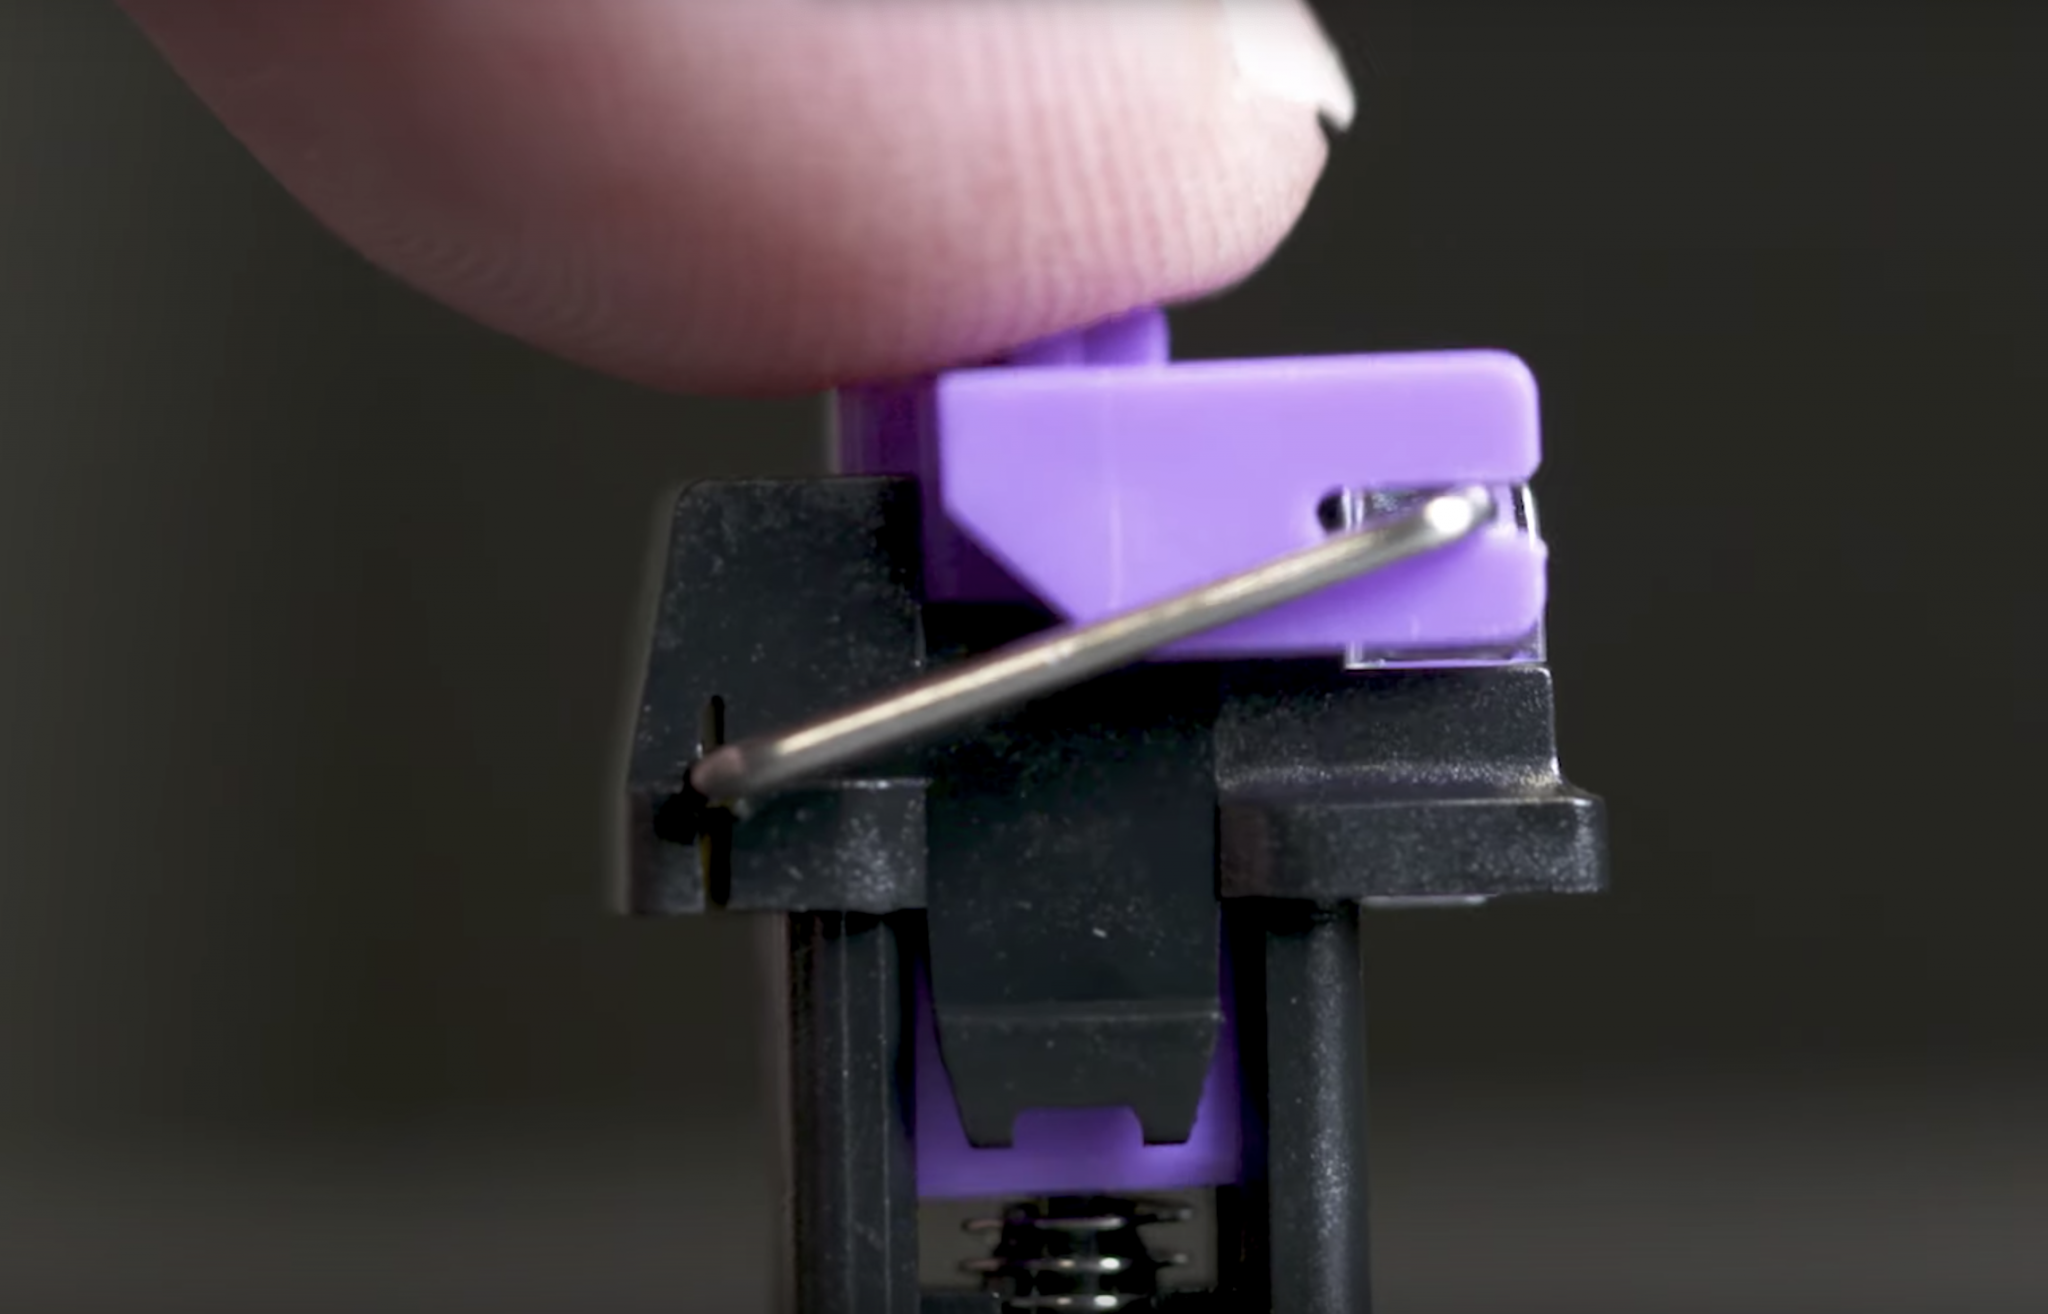
In our latest video for the newly rebranded Raspberry Pi Press YouTube channel, Custom PC’s Edward Chester explains what mechanical keyboards are, and why they’re so clicky.
How do mechanical keyboards work?
So, what makes a mechanical keyboard ‘mechanical’? And why are some mechanical keyboards more ‘clicky’ than others? Custom PC’s Edward Chester explains all. Check out our Elite List of mechanical keyboards: https://rpf.io/elite-list-mechanical-keyboard Subscribe to our channel: https://rpf.iopressytsub Visit the Custom PC magazine website: https://rpf.io/ytcustompc Our magazines and books: https://rpf.io/ytpress Raspberry Pi Press is the publishing imprint of Raspberry Pi Trading Ltd., a subsidiary of The Raspberry Pi Foundation.
Custom PC is one of the many magazines produced by Raspberry Pi Press, the publishing imprint of Raspberry Pi Trading Ltd; it does exactly what it says on the tin cover: provide everything you need to know about the ins and outs of custom PC building and all the processes that make the topic so fascinating.
Be sure to subscribe to the Raspberry Pi Press YouTube channel, because we’ll be offering more videos from Custom PC, alongside content from The MagPi magazine, HackSpace magazine, Wireframe, and our future standalone book publications, such as The Official Raspberry Pi Beginner’s Guide and An Introduction to C & GUI Programming (the latter of which is currently on sale with free worldwide shipping!), on that channel very soon.
The post What makes a mechanical keyboard ‘clicky’? appeared first on Raspberry Pi.
If you’re reading this, it’s probably because you bagged yourself a brand-new Raspberry Pi for Christmas, and you’re wondering what you should do next.
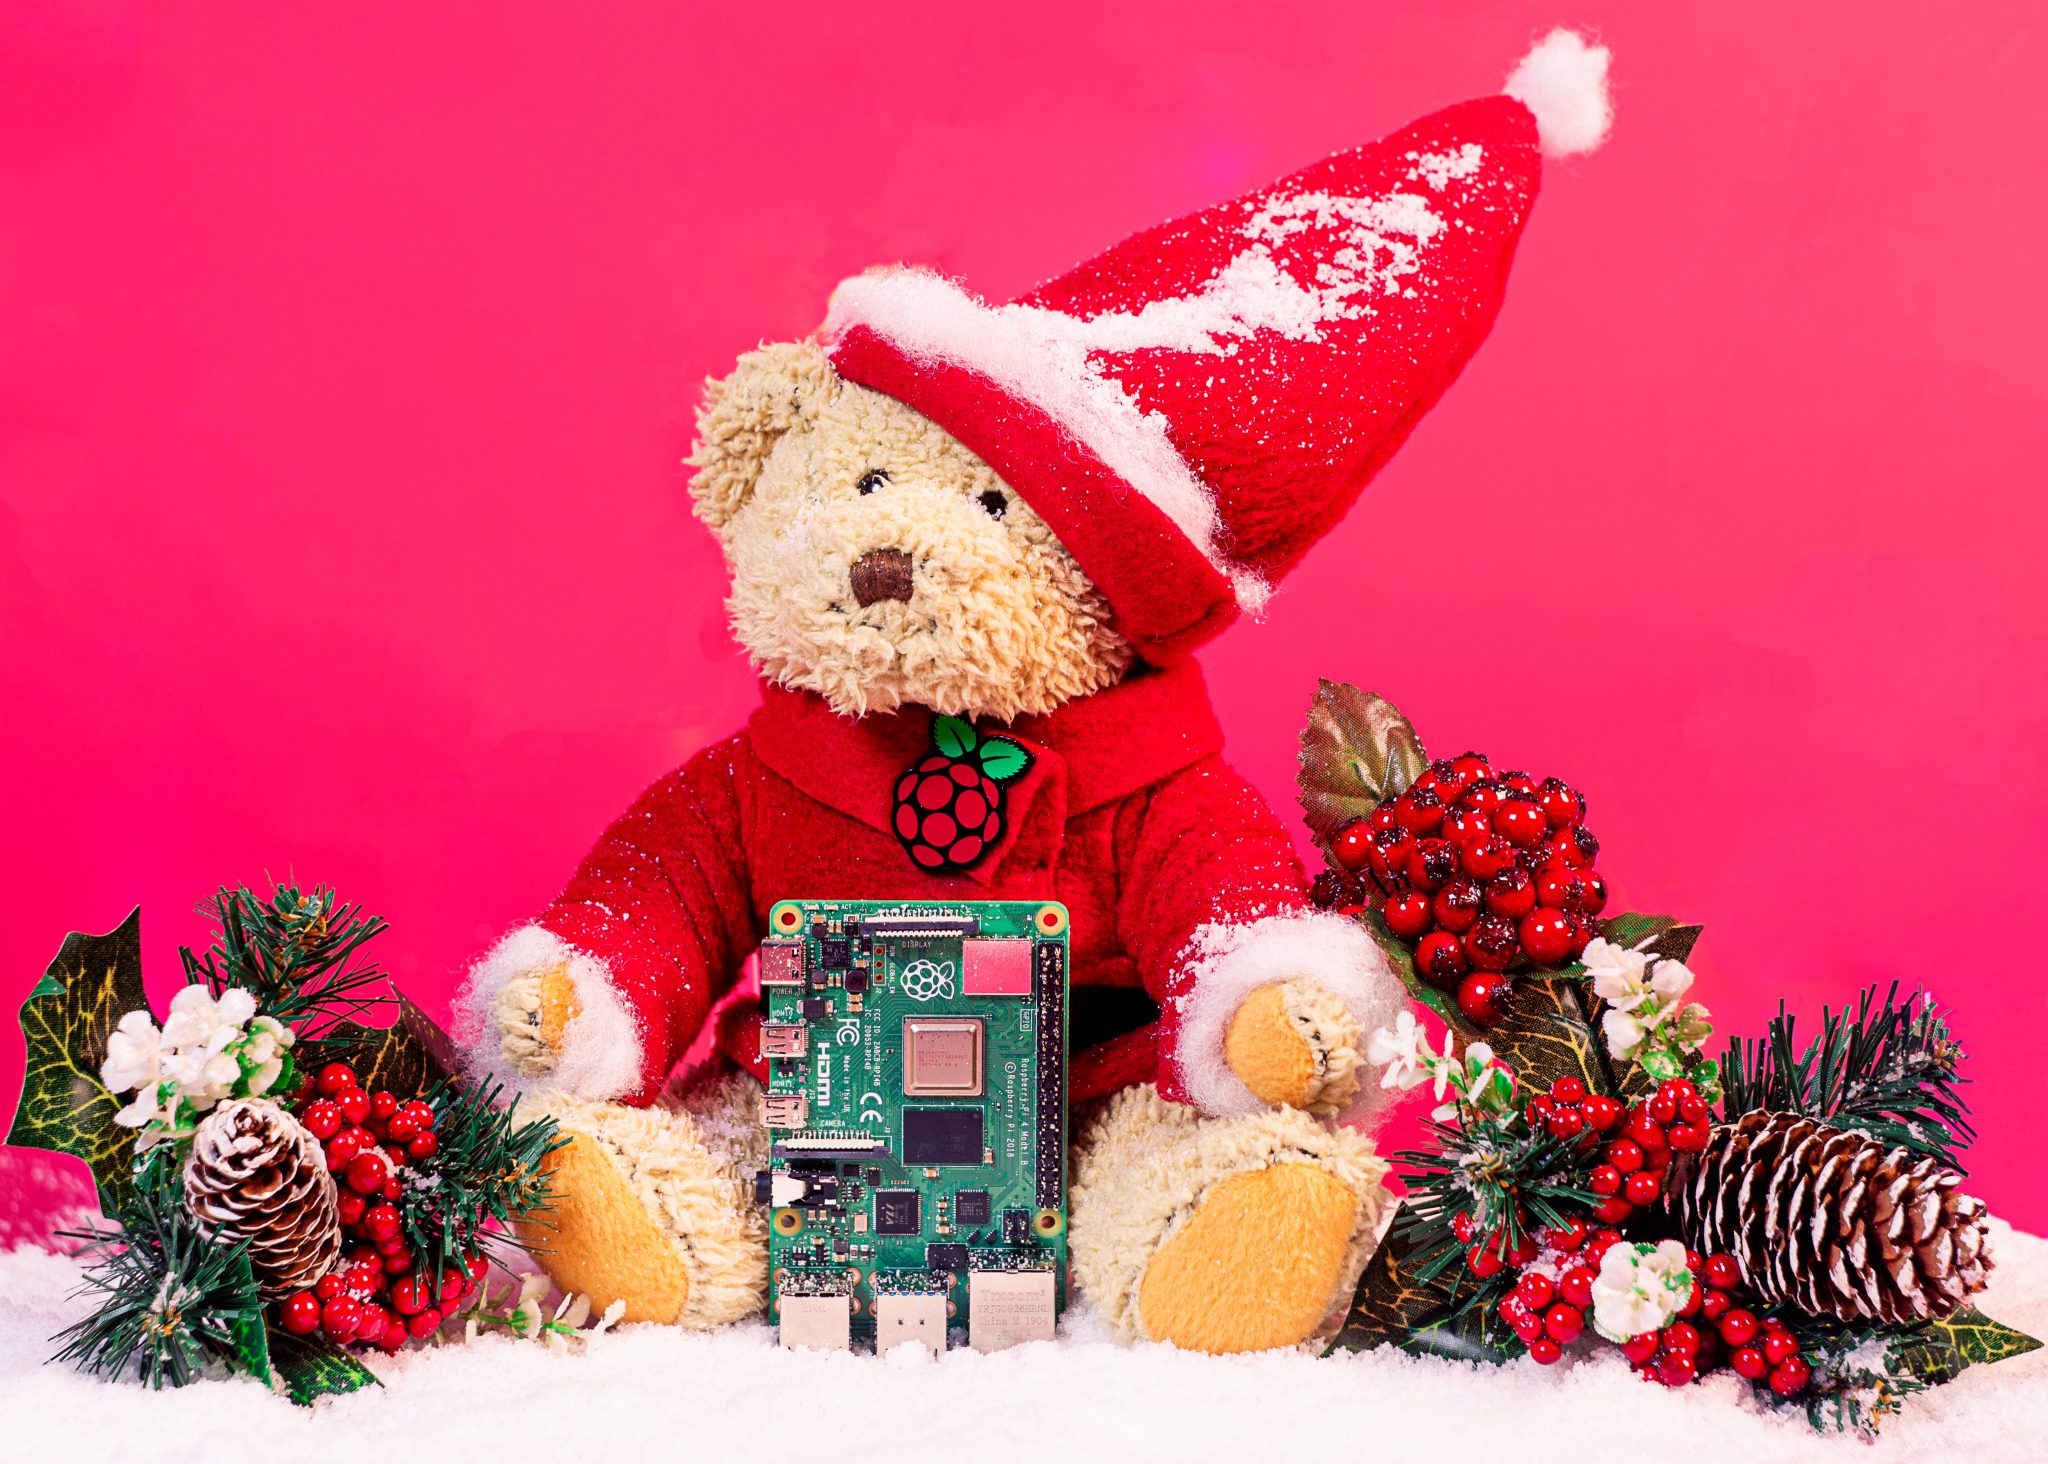
Well, look no further, for we’re here to show you the ropes. So, sit back, pull on a pair of those nice, warm socks that you found in your stocking, top up your eggnog, and let’s get started.
Unless your Raspberry Pi came in a kit with a preloaded SD card, you’ll need to download an operating system. Find a microSD card (you may have one lurking in an old phone) and click here to download the latest version of Raspbian, our dedicated Raspberry Pi operating system.
To get Raspbian onto the microSD card, use free online software such as Etcher. Here’s a video from The MagPi magazine to show you how to do it.
Use Etcher to install operating systems onto an SD card
Lucy Hattersley shows you how to install Raspberry Pi operating systems such as Raspbian onto an SD card, using the excellent Etcher. For more tutorials, check out The MagPi at http://magpi.cc ! Don’t want to miss an issue? Subscribe, and get every issue delivered straight to your door.
Here, this video should help:
How to set up your Raspberry Pi || Getting started with #RaspberryPi
Learn #howto set up your Raspberry Pi for the first time, from plugging in peripherals to setting up #Raspbian.
Insert your microSD card into your Raspberry Pi. The microSD card slot should be fairly easy to find, and you need to make sure that you insert it with the contact side facing the board. If you feel like you’re having to force it in, you have it the wrong way round.
Next, plug your HDMI cable into the Raspberry Pi and your chosen HDMI display. This could be a computer monitor or your home television.
If you’re using a Raspberry Pi Zero or Raspberry Pi Zero W, you’ll need a mini HDMI to HDMI cable or adapter.
If you’re using a Raspberry Pi 4, you’ll need a micro HDMI to HDMI cable or adapter.

Next, plug in any peripherals that you want to use, such as a mouse or keyboard.
Lastly, plug your power cable into your Raspberry Pi. This is any standard micro USB cable (if you have an Android phone, check your phone charger!), or a USB-C power cable if you’re using the Raspberry Pi 4.
Most kits will come with all of the cables and adapters that you need, so look in the box first before you start rummaging around your home for spare cables.
Once the power cable is connected, your Raspberry Pi will turn on. If it doesn’t, check that your SD card is inserted correctly and your cables are pushed in fully.
Still in doubt? Here’s Sally Le Page with more:
How to use a Raspberry Pi ft. Dr Sally Le Page
What is a Raspberry Pi and what do you need to get started? Our ‘How to use a Raspberry Pi’ explainer will take you through the basics of your #RaspberryPi, and how you can get hands-on with Raspbian and #coding language tools such as Scratch and Mu, with our host, Dr Sally Le Page.
Once on, the Raspberry Pi will direct you through a setup process that allows you to change your password and connect to your local wireless network.
And then, you’re good to go!
Now what? Well, that depends on what you want to do with your Raspberry Pi.
Many people use their Raspberry Pi to learn how to code. If you’re new to coding, we suggest trying out a few of our easy online projects to help you understand the basics of Scratch — the drag-and-drop coding platform from MIT — and Python — a popular general-purpose programming language and the reason for the “Pi” in Raspberry Pi’s name.
Maybe you want to use your Raspberry Pi to set up control of smart devices in your home, or build a media centre for all your favourite photos and home movies. Perhaps you want to play games on your Raspberry Pi, or try out various HATs and add-ons to create fun digital making projects.

Whatever you want to do with your Raspberry Pi, the internet is full of brilliant tutorials from the Raspberry Pi Foundation and online creators.
Get involved with the Raspberry Pi Foundation
From community events and magazines to online learning and space exploration – there are so many ways to get involved with the Raspberry Pi Foundation.
The Raspberry Pi community is huge, and spreads across the entire globe, bringing people together to share their love of coding, digital making, and computer education. However you use your Raspberry Pi, know that, by owning it, you’ve helped the non-profit Raspberry Pi Foundation to grow, bringing more opportunities to kids and teachers all over the world. So, from the bottom of our hearts this festive season, thank you.
We can’t wait to see what 2020 brings!
The post How to set up and use your brand-new Raspberry Pi appeared first on Raspberry Pi.
A few of our favourite online makers decided to take part in a makers’ Secret Santa, producing home-made gifts based on their skills. So, OBVIOUSLY, Estefannie used a Raspberry Pi. Thanks, Estefannie.
HOW I HACKED INSTAGRAM FOR MY SECRET SANTA // MAKE SOMETHING
I got in a Maker Secret Santa this year so I decided to make a thing and hack Instagram for it. #YTMakersSecretSanta MAKERS SECRET SANTA! FOLLOW EVERYONE: Kids Invent Stuff https://www.youtube.com/channel/UC-glo52BMvZH9PPUamjGIcw Colin Furze https://www.youtube.com/user/colinfurze The Hacksmithhttps://www.youtube.com/user/MstrJames Look Mum No Computer https://www.youtube.com/channel/UCafxR2HWJRmMfSdyZXvZMTw Sufficiently Advanced https://www.youtube.com/channel/UCVS89U86PwqzNkK2qYNbk5A Subscribe to my channel if you’d like to be the first to know when I publish the next video :) Let me know what other videos you would like to see.
In the video above, Estefannie uses a Raspberry Pi to hack Instagram to illuminate a handmade freeform circuit whenever Kids Invent Stuff gains a like on a post.
“But why not use the Instagram API?”, I hear you cry. Well, as Estefannie explains, she wanted the gift to be a surprise, and if she had used the Instagram API, she would have had to have asked them for their details in order to access it.
Watch to the end of the video to see the gift that Estefannie received from her Secret Santa, a certain Colin Furze. You can see his complete build video for the Cat-o-Matic below.
CAT-O-MATIC auto cat feeder/terrifier YTMakers Secret Santa
Fear not your cat feeding issues are sorted………..Furzestyle No cat was harmed in making of this but it did run off……….but came back and is fine. Thanks to the Kids Invent Stuff channel for organising this Secret Santa check them out here https://www.youtube.com/channel/UC-glo52BMvZH9PPUamjGIcw And the other channels involved Estefannie Explains https://www.youtube.com/user/estefanniegg Sufficiently Advanced https://www.youtube.com/channel/UCVS89U86PwqzNkK2qYNbk5A Look Mum No Computer https://www.youtube.com/channel/UCafxR2HWJRmMfSdyZXvZMTw The Hacksmiths https://www.youtube.com/user/MstrJames Check out the new FURZE Merch store.
The post Brass freeform circuit (Raspberry Pi) Instagram tracker appeared first on Raspberry Pi.
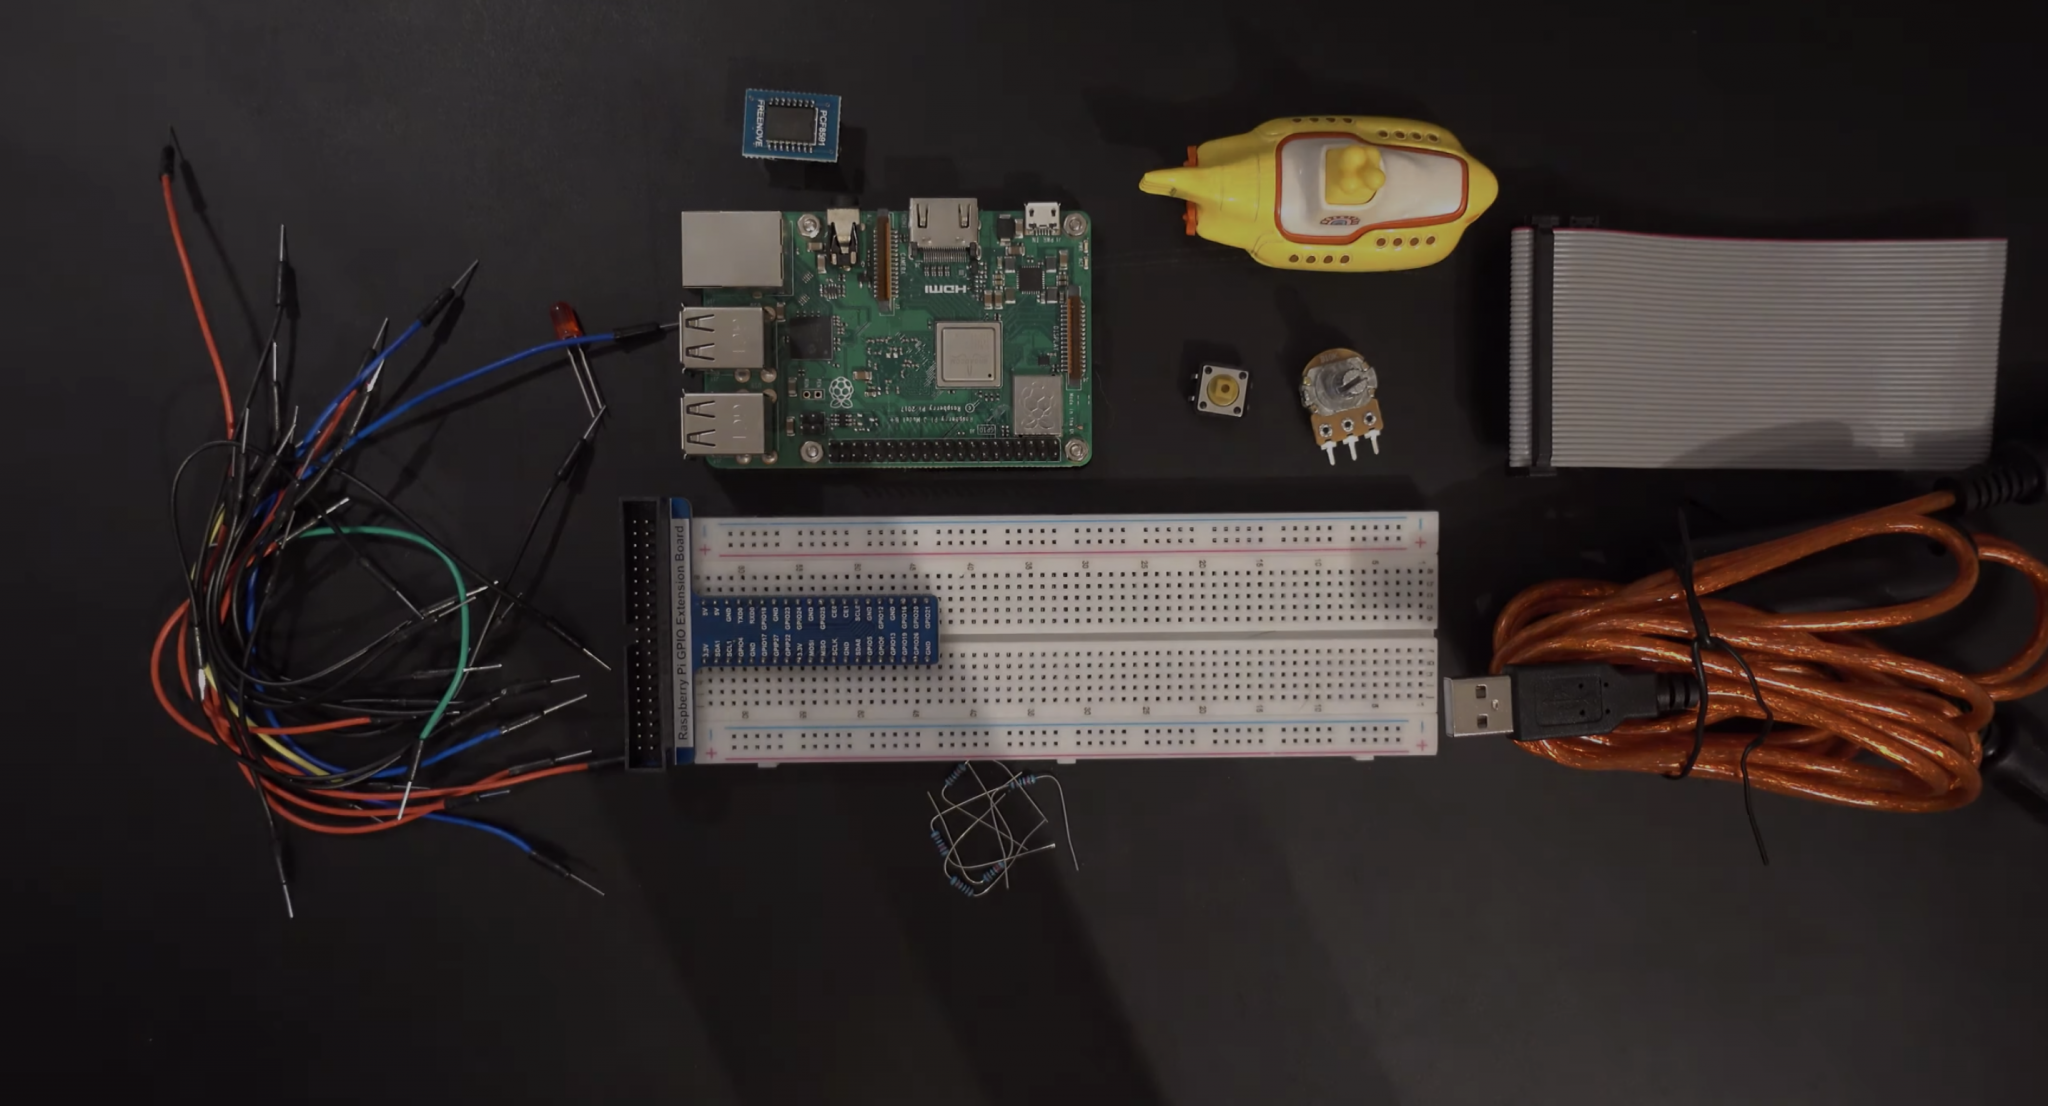
You might have a baby/dog/hamster that you want to keep an eye on when you’re not there. We understand: they’re lovely, especially hamsters. Here’s how HackSpace magazine contributor Dr Andrew Lewis built a Raspberry Pi baby cam to watch over his small creatures…
When a project is going to be used in the home, it pays to take a little bit of extra time on appearance
You can get wireless baby monitors that have a whole range of great features for making sure your little ones are safe, sound, and sleeping happily, but they come with a hefty price tag.
In this article, you’ll find out how to make a Raspberry Pi-powered streaming camera, and combine it with a built-in I2C sensor pack that monitors temperature, pressure, and humidity. You’ll also see how you can use the GPIO pins on Raspberry Pi to turn an LED night light on and off using a web interface.
The hardware for this project is quite simple, and involves minimal soldering, but the first thing you need to do is to install Raspbian onto a microSD card for your Raspberry Pi. If you’re planning on doing a headless install, you’ll also need to enable SSH by creating an empty file called SSH on the root of the Raspbian install, and a file with your wireless LAN details called wpa_supplicant.conf.
You can download the code for this as well as the 3D-printable files from our GitHub. You’ll need to transfer the code to the Raspberry Pi. Next, connect the camera, the BME280 board, and the LEDs to the Raspberry Pi, as shown in the circuit diagram.
The BME280 module uses the I2C connection on pins 3 and 5 of the GPIO, taking power from pins 1 and 9. The LEDs connect directly to pins 19 and 20, and the camera cable fits into the camera connector.
Insert the microSD card into the Raspberry Pi and boot up. If everything is working OK, you should be able to see the IP address for your device listed on your hub or router, and you should be able to connect to it via SSH. If you don’t see the Raspberry Pi listed, check your wireless connection details and make sure your adapter is supplying enough power. It’s worth taking the time to assign your Raspberry Pi with a static IP address on your network, so it can’t change its IP address unexpectedly.
Use the raspi-config application to enable the camera interface and the I2C interface. If you’re planning on modifying the code yourself, we recommend enabling VNC access as well, because it will make editing and debugging the code once the device is put together much easier. All that remains on the software side is to update APT, download the babycam.py script, install any dependencies with PIP, and set the script to run automatically. The main dependencies for the babycam.py script are the RPi.bme280 module, Flask, PyAudio, picamera, and NumPy. Chances are that these are already installed on your system by default, with the exception of RPi.bme280, which can be installed by typing sudo pip3 install RPi.bme280 from the terminal. Once all of the dependencies are present, load up the script and give it a test run, and point your web browser at port 8000 on the Raspberry Pi. You should see a webpage with a camera image, controls for the LED lights, and a read-out of the temperature, pressure, and humidity of the room.
Finishing a 3D print by applying a thin layer of car body filler and sanding back will give a much smoother surface. This isn’t always necessary, but if your filament is damp or your nozzle is worn, it can make a model look much better when it’s painted
The easiest way to get the babycam.py script to run on boot is to add a line to the rc.local file. Assuming that the babycam.py file is located in your home directory, you should add the line python3 /home/pi/babycam.py to the rc.local file, just before the line that reads exit 0. It’s very important that you include the ampersand at the end of the line, otherwise the Python script will not be run in a separate process, the rc.local file will never complete, and your Raspberry Pi will never boot.
With the software and hardware working, you can start putting the case together. You might need to scale the 3D models to suit the tin can you have before you print them out, so measure your tin before you click Print. You’ll also want to remove any inner lip from the top of the can using a can opener, and make a small hole in the side of the can near the bottom for the USB power cable. Next, make a hole in the bottom of the can for the LED cables to pass through.
If you want to add more than a couple of LEDs (or want to use brighter LEDs), you should connect your LEDs to the power input, and use a transistor on the GPIO to trigger them
If you haven’t already done so, solder appropriate leads to your LEDs, and don’t forget to put a 330 Ω resistor in-line on the positive side. The neck of the camera is supported by two lengths of aluminium armature wire. Push the wire up through each of the printed neck pieces, and use a clean soldering iron to weld the pieces together in the middle. Push the neck into the printed top section, and weld into place with a soldering iron from underneath. Be careful not to block the narrow slot with plastic, as this is where the camera cable passes up through the neck and into the camera.
You need to mount the BME280 so that the sensor is exposed to the air in the room. Do this by drilling a small hole in the 3D-printed top piece and hot gluing the sensor into position. If you’re going to use the optional microphone, you can add an extra hole and glue the mic into place in the same way. A short USB port extender will give you enough cable to plug the USB microphone into the socket on your Raspberry Pi
Paint the tin can and the 3D-printed parts. We found that spray blackboard paint gives a good effect on 3D-printed parts, and PlastiKote stone effect paint made the tin can look a little more tactile than a flat colour. Once the paint is dry, pass the camera cable up through the slot in the neck, and then apply the heat-shrink tubing to cover the neck with a small gap at the top and bottom. Connect the camera to the top of the cable, and push the front piece on to hold it into place. Glue shouldn’t be necessary, but a little hot glue might help if the front parts don’t hold together well.
Push the power cable through the hole in the case, and secure it with a knot and some hot glue. Leave enough cable free to easily remove the top section from the can in future without stressing the wires.
If you’re having trouble getting the armature wire through the 3D-printed parts, try using a drill to help twist the wire through
Glue the bottom section onto the can with hot glue, and hot-glue the LEDs into place on the bottom, feeding the cable up through the hole and into the GPIO header. This is a good time to hot-glue a weight into the bottom of the can to improve its stability. I used an old weight from some kitchen scales, but any small weight should be fine. Finally, fix the Raspberry Pi into place on the top piece by either drilling or gluing, then reconnect the rest of the cables, and push the 3D-printed top section into the tin can. If the top section is too loose, you can add a little bit of hot glue to hold things together once you know everything is working.
With the right type of paint, even old tin cans make a good-looking enclosure
for a project
That should be all of the steps complete. Plug in the USB and check the camera from a web browser. The babycam.py script includes video, sensors, and light control. If you are using the optional USB microphone, you can expand the functionality of the app to include audio streaming, use cry detection to activate the LEDs (don’t make the LEDs too stimulating or you’ll never get a night’s sleep again), or maybe even add a Bluetooth speaker and integrate a home assistant.
HackSpace magazine is out now, available in print from your local newsagent, the Raspberry Pi Store in Cambridge, and online from Raspberry Pi Press.
If you love HackSpace magazine as much as we do, why not have a look at the subscription offers available, including the 12-month deal that comes with a free Adafruit Circuit Playground!
And, as always, you can download the free PDF here.
The post Raspberry Pi 3 baby monitor | Hackspace magazine #26 appeared first on Raspberry Pi.
We’re always going to beat the drum for projects that seek to improve the lives of people with disabilities. That’s why we fell in love with the Airdrum, which was created to allow anyone, in particular people with disabilities, to play a musical instrument.
The Airdrum – speaker and MIDI song demo
This video demonstrates the speaker functionality with playing a song from a midi file on the Raspberry pi using Fluidsynth. (The hand movement is just for fun) The Airdrum is powered by a power supply for demonstration purposes.
Designed by two Dutch electrical engineering students, Alessandro Verdiesen and Luuk van Kuijk, the project came to life during their first year at university. “We aimed to develop a musical instrument that could be used to generate music by moving,” explains Alessandro, who has recently been working on a fully modular version 2.0.
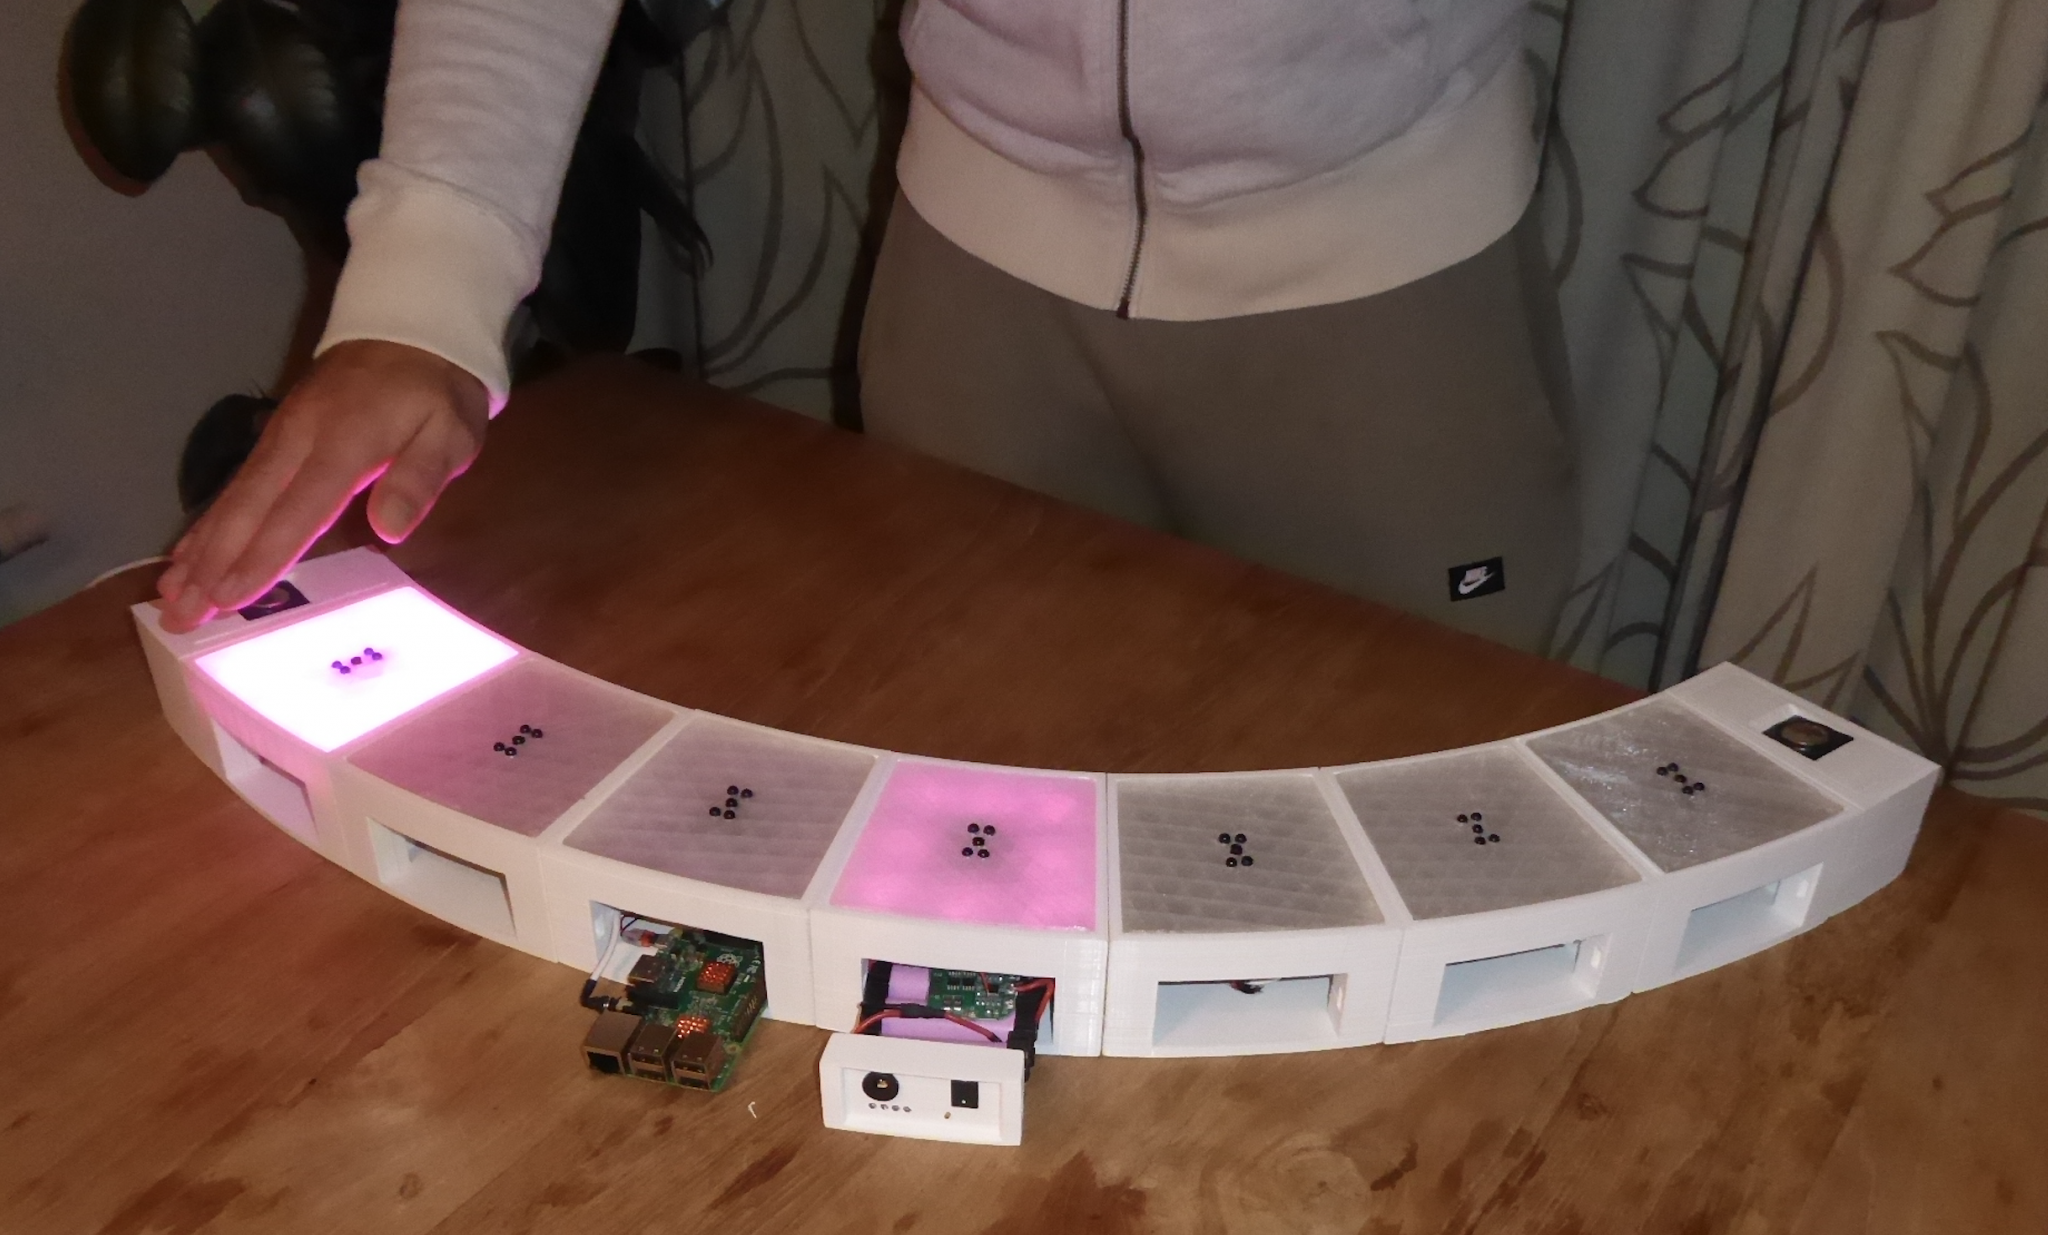
After speaking with therapists and health care institutions, the pair decided to make a drum that could be played by moving objects above a set of panels and they put Raspberry Pi at its heart. “The basic functionality of the Airdrum is to detect the distance of an object above each connected panel and play a sound,” says Alessandro. “These panels contain IR distance sensors and coloured LEDs for visual feedback.”
From the outset, Alessandro and Luuk needed their project to be accessible, affordable, adjustable and, in the latest iteration, modular, with each drummable section containing an Arduino Mini, an IR sensor, and LEDs. They also wanted the instrument to have a broader appeal and be suitable for everybody, including professional musicians, so it had to sound as good as it played.
“We needed it to be as versatile as it can be and allow people to choose custom sounds, colours, and lights while being a standalone instrument and a multi-purpose input/output device,” Alessandro reveals. To make it easy to place the modules together, they used magnetic connections between the panels. This allowed them to be placed together in various configurations, with a minimum of two per Airdrum.
These speaker modules can bookend the sensor panels, although the sound can be outputted via the Raspberry Pi to a different sound system too
With a structured plan that divided milestones into electrical, mechanical, and software components, the pair used 3D printing for the enclosure, which allowed rapid prototyping for quick interactions. They used speaker panels to bookend the modules for auditive feedback.
Each of the panels includes a buck converter so that the current through the connectors can be drawn to a minimum. The master module panel contains Raspberry Pi 3 running custom programs written in C and Python, as well as the free, open-source software synthesiser FluidSynth. It connects to the other panels through I2C, constantly polling the panels for their measurements and for the configuration of their colour.
“If an object has been detected, the Raspberry Pi generates a sound and outputs it on the AUX audio jack,” says Alessandro. “This output is then used by the mono D-class amplifiers in the speaker panels to make the tones audible.”
Custom-made Airdrum detecting modules fit snugly into their 3D-printed cases and can be arranged in a full circle if you have enough of them
The pair chose Raspberry Pi because of its versatility and technical prowess. “The Airdrum needed something powerful enough to run software to generate audio through MIDI using the input from the panels and the Raspberry Pi is a great universal and low-cost development board with integrated DAC for audio,” explains Alessandro. “It also has a I2C bus to act as a data transfer master unit and they’re compact enough to fit inside of the casing. The Raspberry Pi enables easy implementation of future upgrades, too.”
Indeed, the pair want to explore the MIDI possibilities and connect the Airdrum with a smartphone or tablet. An app is being planned, as is a built-in synthesiser. “The people we have shown the Airdrum to have been very enthusiastic,” Alessandro says. “That has been very motivating.”
There’s loads more amazing projects and tutorials in The MagPi #89, out today, including our 50 tools and tips for makers, and a huge accessory guide! You can get The MagPi #89 online at our store, or in print from the Raspberry Pi Store in Cambridge and all good newsagents and supermarkets. You can also access The MagPi magazine via our Android and iOS apps.
Don’t forget our amazing subscription offers either, which include a free gift of a Raspberry Pi Zero W when you subscribe for twelve months.
And, as with all our Raspberry Pi publications, you can download the free PDF from our website.
The post Hands-free Raspberry Pi Airdrum | The MagPi 89 appeared first on Raspberry Pi.
Do you need to run a script whenever your Raspberry Pi turns on? Here’s Estefannie to explain how to edit crontab to do exactly that.
How to start a script at start-up on a Raspberry Pi // LEARN SOMETHING
Do you want your Raspberry Pi to automatically run your code when it is connected to power? Then you are in the right place. In this new #LEARNSOMETHING video I show you how to make you Raspberry Pi run your script automatically when it is connected to a power source.
While there are many ways of asking your Raspberry Pi to run a script on start-up, crontab -e is definitely one of the easiest.
AND, as Estefannie explains (in part thanks to me bugging asking her to do so), if you create a run folder on your desktop, you can switch out the Python scripts you want to run at start-up whenever you like and will never have to edit crontab again!
Weeeeee!
Now go write some wonderful and inspiring festive scripts while I take a well-earned nap. I just got off a plane yet here I am, writing blog posts for y’all because I love you THAT DARN MUCH!

This is Teddy. Teddy is also in the video.
And don’t forget to like and subscribe for more Estefannie Explains it All goodness!
The post How to run a script at start-up on a Raspberry Pi using crontab appeared first on Raspberry Pi.
What, your Christmas tree ISN’T touch-enabled?
Capacitive Touch Christmas Tree How To | Raspberry Pi | Bare Conductive Pi Cap
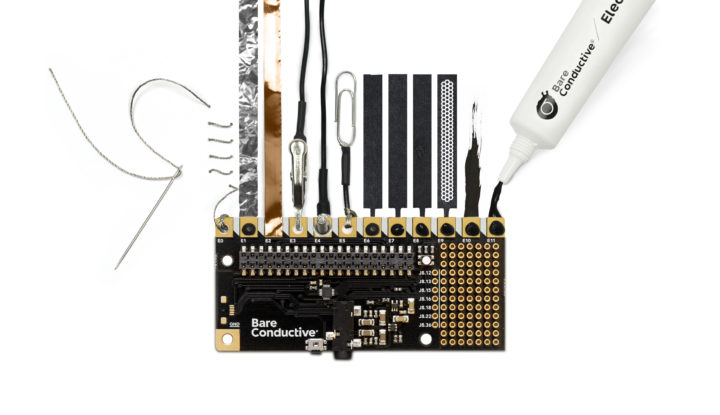
Turn your Christmas tree into a capacitive touch-interactive musical instrument using a Raspberry Pi and a Bare Conductive Pi Cap. You’ll be rocking around the Christmas tree in no time! /* Bare Conductive */ Pi Cap: https://www.bareconductive.com/shop/pi-cap/ Touch Board: https://www.bareconductive.com/shop/touch-board/ Code: https://github.com/BareConductive/picap-touch-mp3-py #RasberryPi #BareConductive #Christmas
Using the Bare Conductive Pi Cap, Davy Wybiral hooked up his fairy lights and baubles to a Raspberry Pi. The result? Musical baubles that allow the user to play their favourite festive classics at the touch of a finger. These baubles are fantastic, and it’s easy to make your own. Just watch the video for Davy’s how-to.
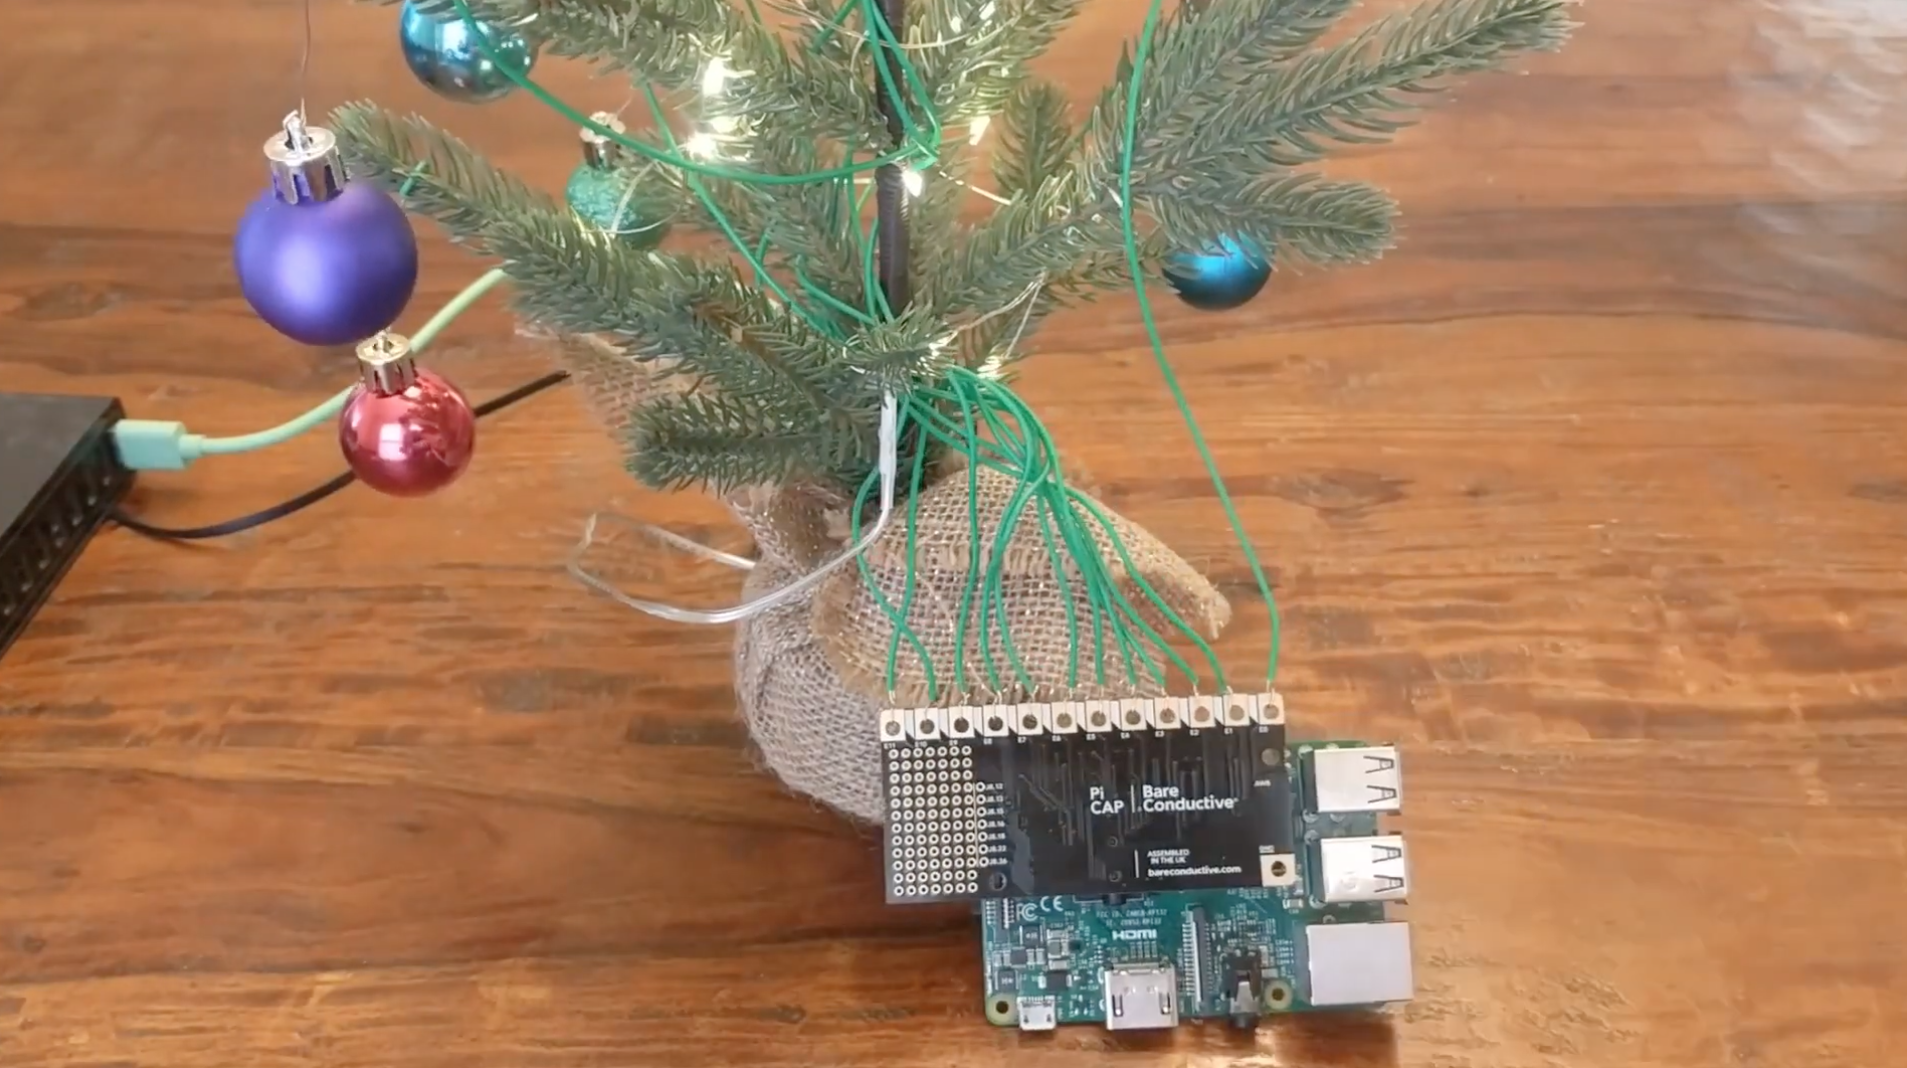
The code for Bare Conductive’s Pi Cap polyphonic touch MP3 utility can be found in this GitHub repo, and you can pick up a Pi Cap on the Bare Conductive website. Then all you need to do is hook up your favourite tree decorations to the Pi Cap via insulated wires, and you’re good to go. It’s OK if your decorations aren’t conductive: you’ll actually be touching the wires and not the ornaments themselves.
And don’t worry about touching the wires, it’s perfectly safe. But just in this instance. Please don’t make a habit of touching wires.
 Make sure to subscribe to Davy on YouTube (we did) and give him a like for the baubles video. Also, leave a comment to tell him how great it is, because nice comments are lovely, and we should all be leaving as many of them as we can on the videos for our favourite creators.
The post Raspberry Pi capacitive-touch musical Christmas tree appeared first on Raspberry Pi.
Synthesiser? Synthesizer? Whichever it is*, check out this video of Floyd Steinberg showing how he set up his Raspberry Pi as one of them.
How to use a Raspberry PI as a synthesizer
How to use a Raspberry PI as a synthesizer. Table of contents below! The Raspberry PI is a popular card-sized computer. In this video, I show how to set up a Raspberry PI V3 as a virtual analog synthesizer with keyboard and knobs for realtime sound tweaking, using standard MIDI controllers and some very minor shell script editing.
“In this video,” Floyd explains on YouTube, “I show how to set up a Raspberry Pi 3 as a virtual analogue synthesiser with keyboard and knobs for real-time sound tweaking, using standard MIDI controllers and some very minor shell script editing. The result is a battery-powered mini synth creating quite impressive sounds!”

We know a fair few of you (Raspberry Pi staff included) love dabbling in the world of Raspberry Pi synth sound, so be sure to watch the video to see what Floyd gets up to while turning a Raspberry Pi 3 into a virtual analogue synthesiser.
Be sure to check out Floyd’s other videos for more synthy goodness, and comment on his video if you’d like him to experiment further with Raspberry Pi. (The answer is yes, yes we would ![]()
![]() )
)
*[Editor’s note: it’s spelled with a z in US English, and with an s in UK English. You’re welcome, Alex.]
The post Using a Raspberry Pi as a synthesiser appeared first on Raspberry Pi.
TL;DR: we made a fully automated luxury gay space communist type-in-listing book. Buy it now and get it in time for Christmas.
![]()
Back in the dawn of time, in the late 1980s, I grew up on a diet of type-in computer game listings. From the BBC Micro User Guide, to The Micro User magazine, to the ubiquitous Usborne books: an hour or two of painstaking copying and a little imagination would provide you with an experience which wasn’t a million miles away from what you could buy on the shelves of your local computer store.
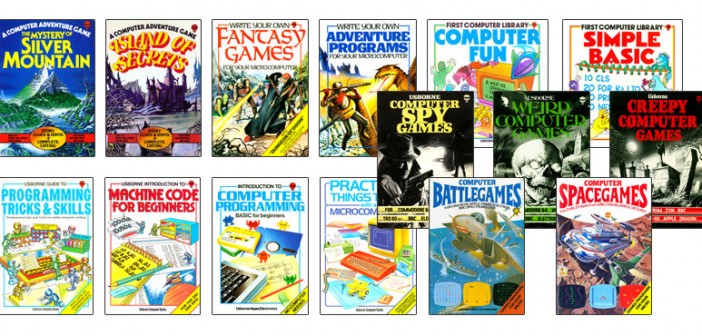
Can you believe they did “Machine Code for Beginners”?
The simple act of typing in a game helped to familiarise you with a programming language (usually a dialect of BASIC), and by making mistakes you could start to understand what other, more intentional changes might accomplish. Some of the earliest games I wrote started off as heavily modified versions of type-in listings; in fact, one of these made a sneaky reappearance on this blog last year.
Fast forward to the present day, and aside from regular appearances in our own MagPi and Wireframe magazines, type-in listings have faded from view. Commercial games, even casual ones, have become much more sophisticated, beyond what you might expect to be able to enter into a computer in a reasonable amount of time. At the same time, tools like Unity remove the need to develop every title from the ground up.
But there’s still a lot to be said for the immediacy of the type-in experience. Three years ago, we asked ourselves whether we could make a type-in game listing book for the modern era. The end result, of which we’re launching the first volume today, is Code the Classics. David Crookes and Liz Upton will take you behind the scenes of the creation of five classic arcade games, and then I’ll show you how to implement a simple Python game inspired by each one.

Cavern

Substitute Soccer
Developing retro arcade games has been a hobby of mine since those early BBC Micro days, and I spent many happy evenings developing these titles, ably assisted by Andrew Gillett and Sean Tracey. It was important to us that these games be as close as possible to the standard of modern commercial casual games. With this in mind, we invited Dan Malone, famous among many other things for his work with The Bitmap Brothers, to provide graphics, and long-time game audio pro Allister Brimble to provide music and sound effects. I’ve known Dan for nearly twenty years, and have admired Allister’s work since childhood; it was an enormous pleasure to work with them, and we took the opportunity to snag interviews with them both, which you’ll also find in the book. Here’s Dan to offer you a taster.
Meet the artist behind Code the Classics
Subscribe to our YouTube channel: http://rpf.io/ytsub Help us reach a wider audience by translating our video content: http://rpf.io/yttranslate Buy a Raspberry Pi from one of our Approved Resellers: http://rpf.io/ytproducts Find out more about the #RaspberryPi Foundation: Raspberry Pi http://rpf.io/ytrpi Code Club UK http://rpf.io/ytccuk Code Club International http://rpf.io/ytcci CoderDojo http://rpf.io/ytcd Check out our free online training courses: http://rpf.io/ytfl Find your local Raspberry Jam event: http://rpf.io/ytjam Work through our free online projects: http://rpf.io/ytprojects Do you have a question about your Raspberry Pi?
We’ve pushed the boat out on the production values for the book itself too: think of it as an object from a parallel universe where Usborne made luxury hardbound coffee-table type-in listing books rather than paperbacks.
![]()
![]()
![]()
![]()
So although, like all our books, you can download this one for free, you’ll really want a physical copy of Code the Classics to have, and to hold, and to leave on your bedside table to club intruders with.
And while the listings are rather long, and fully-commented versions are available on GitHub, perhaps you should think about spending a rainy afternoon actually typing one in.
The post Code the Classics on sale now appeared first on Raspberry Pi.
Check out Super Make Something’s awesome NeoPixel LED mirror: a 576 RGB LED display that converts images via the Raspberry Pi Camera Module and Raspberry Pi 3B+ into a pixelated light show.
Neopixel LED Mirror (Python, Raspberry Pi, Arduino, 3D Printing, Laser Cutting!) DIY How To
Time to pull out all the stops for the biggest Super Make Something project to date! Using 3D printing, laser cutting, a Raspberry Pi, computer vision, Python, and nearly 600 Neopixel LEDs, I build a low resolution LED mirror that displays your reflection on a massive 3 foot by 3 foot grid made from an array of 24 by 24 RGB LEDs!
If you’re into cool uses of tech, you may be aware of Daniel Rozin, the creative artist building mechanical mirrors out of wooden panels, trash, and…penguins, to name but a few of his wonderful builds.

Yup, this is a mechanical mirror made of toy penguins.
Inspired by Daniel Rozin’s work, Alex, the person behind Super Make Something, put an RGB LED spin on the concept, producing this stunning mirror that thoroughly impressed visitors at Cleveland Maker Faire last month.
“Inspired by Danny Rozin’s mechanical mirrors, this 3 foot by 3 foot mirror is powered by a Raspberry Pi, and uses Python and OpenCV computer vision libraries to process captured images in real time to light up 576 individual RGB LEDs!” Alex explains on Instagram. “Also onboard are nearly 600 3D-printed squares to diffuse the light from each NeoPixel, as well as 16 laser-cut panels to hold everything in place!”
The video above gives a brilliantly detailed explanation of how Alex made the, so we highly recommend giving it a watch if you’re feeling inspired to make your own.
Seriously, we really want to make one of these for Raspberry Pi Towers!
As always, be sure to subscribe to Super Make Something on YouTube and leave a comment on the video if, like us, you love the project. Most online makers are producing content such as this with very little return on their investment, so every like and subscriber really does make a difference.
The post Really, really awesome Raspberry Pi NeoPixel LED mirror appeared first on Raspberry Pi.
If there’s one thing we Brits love, it’s an ugly Christmas sweater. Jim Bennett, a Senior Cloud Advocate at Microsoft, has taken his ugly sweater game to the next level by adding IoT-controlled, Twitter-connected LEDs thanks to a Raspberry Pi Zero.
IoT is Fun for Everyone! (Ugly Sweater Edition)
An Ugly Sweater is great-but what’s even better (https://aka.ms/IoTShow/UglySweater) is an IoT-enabled Ugly Sweater. In this episode of the IoT Show, Olivier Bloch is joined by Jim Bennett, a Senior Cloud Advocate at Microsoft. Jim has built an Ugly Sweater using Azure IoT Central, Microsoft’s IoT app platform, and a Raspberry Pi Zero.
Jim upgraded his ugly sweater to become IoT-compatible using Microsoft’s IoT app platform Azure IoT Central, Adafruit’s programmable NeoPixel LED Dots Strand and, of course, our sweet baby, the Raspberry Pi Zero W.
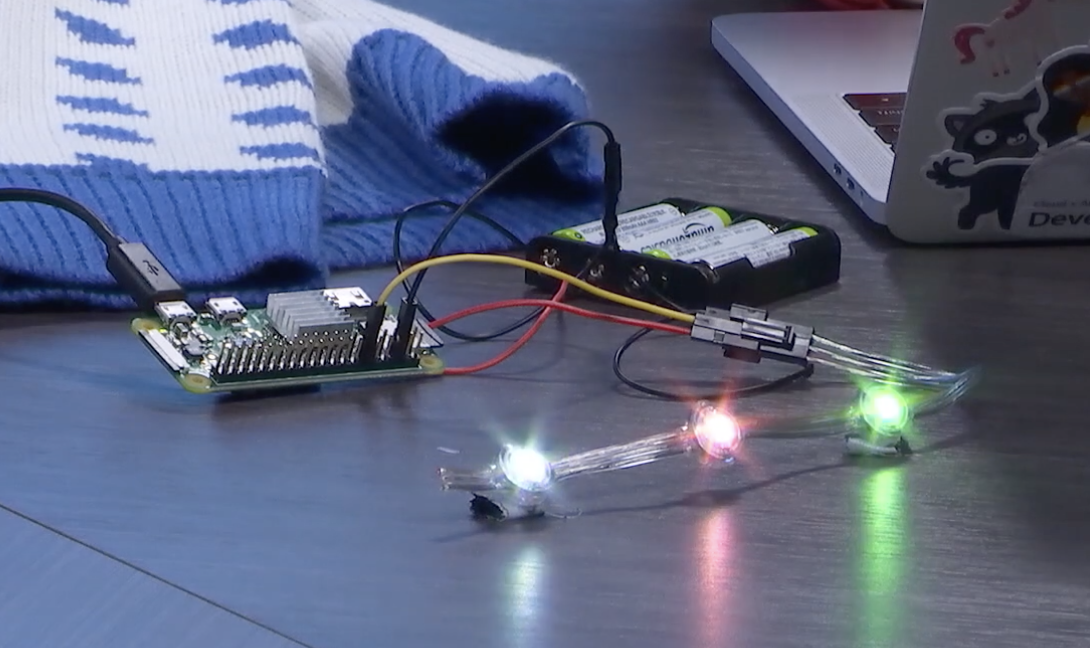
After sewing the LED strand into the ugly sweater and connecting it to Raspberry Pi Zero, Jim was able to control the colour of the LEDs. Taking it one step further, he then built a list of commands within Azure IoT Central and linked the Raspberry Pi Zero to a Twitter account to create the IoT element of the project.
Watch the video above for full details on the project, and find all the code on Github.
The post IoT ugly Christmas sweaters appeared first on Raspberry Pi.
Learn how to create the turn-based combat system found in games like Pokémon, Final Fantasy, and Undertale. Raspberry Pi’s Rik Cross shows you how.
With their emphasis on trading and collecting as well as turn-based combat, the Pokémon games helped bring RPG concepts to the masses.
In the late 1970s, high school student Richard Garriott made a little game called Akalabeth. Programmed in Applesoft BASIC, it helped set the template for the role-playing genre on computers. Even today, turn-based combat is still a common sight in games, with this autumn’s Pokémon Sword and Shield revolving around a battle system which sees opponents take turns to plan and execute attacks or defensive moves.
The turn-based combat system in this article is text-only, and works by allowing players to choose to defend against or attack their opponent in turn. The battle ends when only one player has some health remaining.
Each Player taking part in the battle is added to the static players list as it’s created. Players have a name, a health value (initially set to 100) and a Boolean defending value (initially set to False) to indicate whether a player is using their shield. Players also have an inputmethod attribute, which is the function used for getting player input for making various choices in the game. This function is passed to the object when created, and means that we can have human players that give their input through the keyboard, as well as computer players that make choices (in our case simply by making a random choice between the available options).
Richard Garriott’s Akalabeth laid the groundwork for Ultima, and was one of the earliest CRPGs.
A base Action class specifies an action owner and an opponent, as well as an execute() method which has no effect on the game. Subclasses of the base class override this execute() method to specify the effect the action has on the owner and/or the opponent of the action. As a basic example, two actions have been created: Defend, which sets the owner’s defending attribute to True, and Attack, which sets the owner’s defending attribute to False, and lowers the opponent’s health by a random amount depending on whether or not they are defending.
Players take turns to choose a single action to perform in the battle, starting with the human ‘Hero’ player. The choose_action() method is used to decide what to do next (in this case either attack or defend), as well as an opponent if the player has chosen to attack. A player can only be selected as an opponent if they have a health value greater than 0, and are therefore still in the game. This choose_action() method returns an Action, which is then executed using its execute() method. A few time.sleep() commands have also been thrown in here to ramp up the suspense!
After each player has had their turn, a check is done to make sure that at least two players still have a health value greater than 0, and therefore that the battle can continue. If so, the static get_next_player() method finds the next player still in the game to take their turn in the battle, otherwise, the game ends and the winner is announced.
Our example battle can be easily extended in lots of interesting ways. The AI for choosing an action could also be made more sophisticated, by looking at opponents’ health or defending attributes before choosing an action. You could also give each action a ‘cost’, and give players a number of action ‘points’ per turn. Chosen actions would be added to a list, until all of the points have been used. These actions would then be executed one after the other, before moving on to the next player’s turn.
Here’s Rik’s code, which gets a simple turn-based combat system running in Python. To get it working on your system, you’ll first need to install Pygame Zero. And to download the full code, go here.
You can read more features like this one in Wireframe issue 28, available now at Tesco, WHSmith, all good independent UK newsagents, and the Raspberry Pi Store, Cambridge.
Or you can buy Wireframe directly from Raspberry Pi Press — delivery is available worldwide. And if you’d like a handy digital version of the magazine, you can also download issue 28 for free in PDF format.
![]()
Make sure to follow Wireframe on Twitter and Facebook for updates and exclusive offers and giveaways. Subscribe on the Wireframe website to save up to 49% compared to newsstand pricing!
The post Create a turn-based combat system | Wireframe #28 appeared first on Raspberry Pi.
On 29 February 2020, the Raspberry Pi Foundation will celebrate the eighth birthday of the Raspberry Pi computer (or its second birthday, depending on how strict you are about counting leap years).
Like any parent, we feel like time has flown by, and it’s remarkable to think how far we’ve come in such a short space of time.
Since launching the credit-card–sized $35 Raspberry Pi Model B, we have sold 30 million high-quality, low-cost computers worldwide. Raspberry Pi has become the third best-selling general-purpose computer ever, behind only the Mac and the PC.
![]()
Our latest model, Raspberry Pi 4 Model B, is still the size of a credit card and still costs $35, but it’s around 20 times faster, with more and speedier connectivity, as well as the neater board design that we introduced in 2014. Raspberry Pi computers are used everywhere from homes, schools, and factories to penguin colonies, volcanoes, and the International Space Station.
In many ways, what’s been even more remarkable than the success of the product is the amazing community that has formed around our tiny, low-cost computer. These are the makers, educators, hobbyists, and entrepreneurs from all walks of life and all corners of the globe who share our passion for inspiring the next generation of digital creators. You can often read about them on this blog and in the official community magazine, The MagPi. You can also meet them in person at a Raspberry Jam.
Meet up with other Raspberry Pi enthusiasts!
Raspberry Jams are community-led meetups that bring people together to share, connect, and learn from each other. The first one was held in Manchester in 2012, and so far Jams have been held in more than 70 countries — and that’s just the ones we know about.
While Jams take place throughout the year, there’s a special tradition of Jams celebrating the birthday of the Raspberry Pi computer. This year, there were over 130 Raspberry Jam events in 39 countries, attended by 8000 people. Now that’s a party!
Next year, because it’s a big birthday, we’ll be sending a special box of swag to any Jam that is taking place between Saturday 15 February and Sunday 15 March 2020.
It’s really simple to register your Birthday Jam: just fill in the Raspberry Jam submission form, including a valid event information URL linking to a webpage with more information about your event. (This is an excellent example of a Jam event listing.)
![]()
We’d prefer you to link to a public ticketing system (e.g. Eventbrite) if possible, but we know some libraries and community centres have restrictions that prevent them from doing this.
In order to ensure that your pack reaches you in time, we need you to register your Birthday Jam at least six weeks before your event.
As always, if you have any questions, please don’t hesitate to ask us via jam@raspberrypi.org.
The post Celebrate the Raspberry Pi’s 8th birthday at a Raspberry Jam appeared first on Raspberry Pi.
Stuck for what to buy your friends and family this Christmas? Whether you’re looking to introduce someone to Raspberry Pi and coding, or trying to find the perfect gift for the tech-mad hobbyist in your life, our Christmas Shopping Guide 2019 will help you complete your shopping list. So, let’s get started…

They’ve asked for a Raspberry Pi but not told you which one they want? You know they like coding but don’t know where to start? They’re an avid baker and you think they may have spelt ‘pie’ wrong on their Christmas list? No problem, we’ve got you sorted.
 With everything you need to get started using Raspberry Pi 4, the Raspberry Pi 4 Desktop Kit contains our official mouse, keyboard with an integrated USB hub, USB-C power adapter, case, two micro HDMI leads, our Beginner’s Guide and, of course, the 4GB Raspberry Pi 4. Available from our Approved Resellers and the Raspberry Pi Store, Cambridge, the Desktop Kit is the perfect gift for anyone who’s wanting to get started with coding and digital making, or who’s simply looking to upgrade their current home computer to a smaller, less power-hungry setup.
Visit the Raspberry Pi Store, Cambridge, or find your nearest Approved Reseller online.
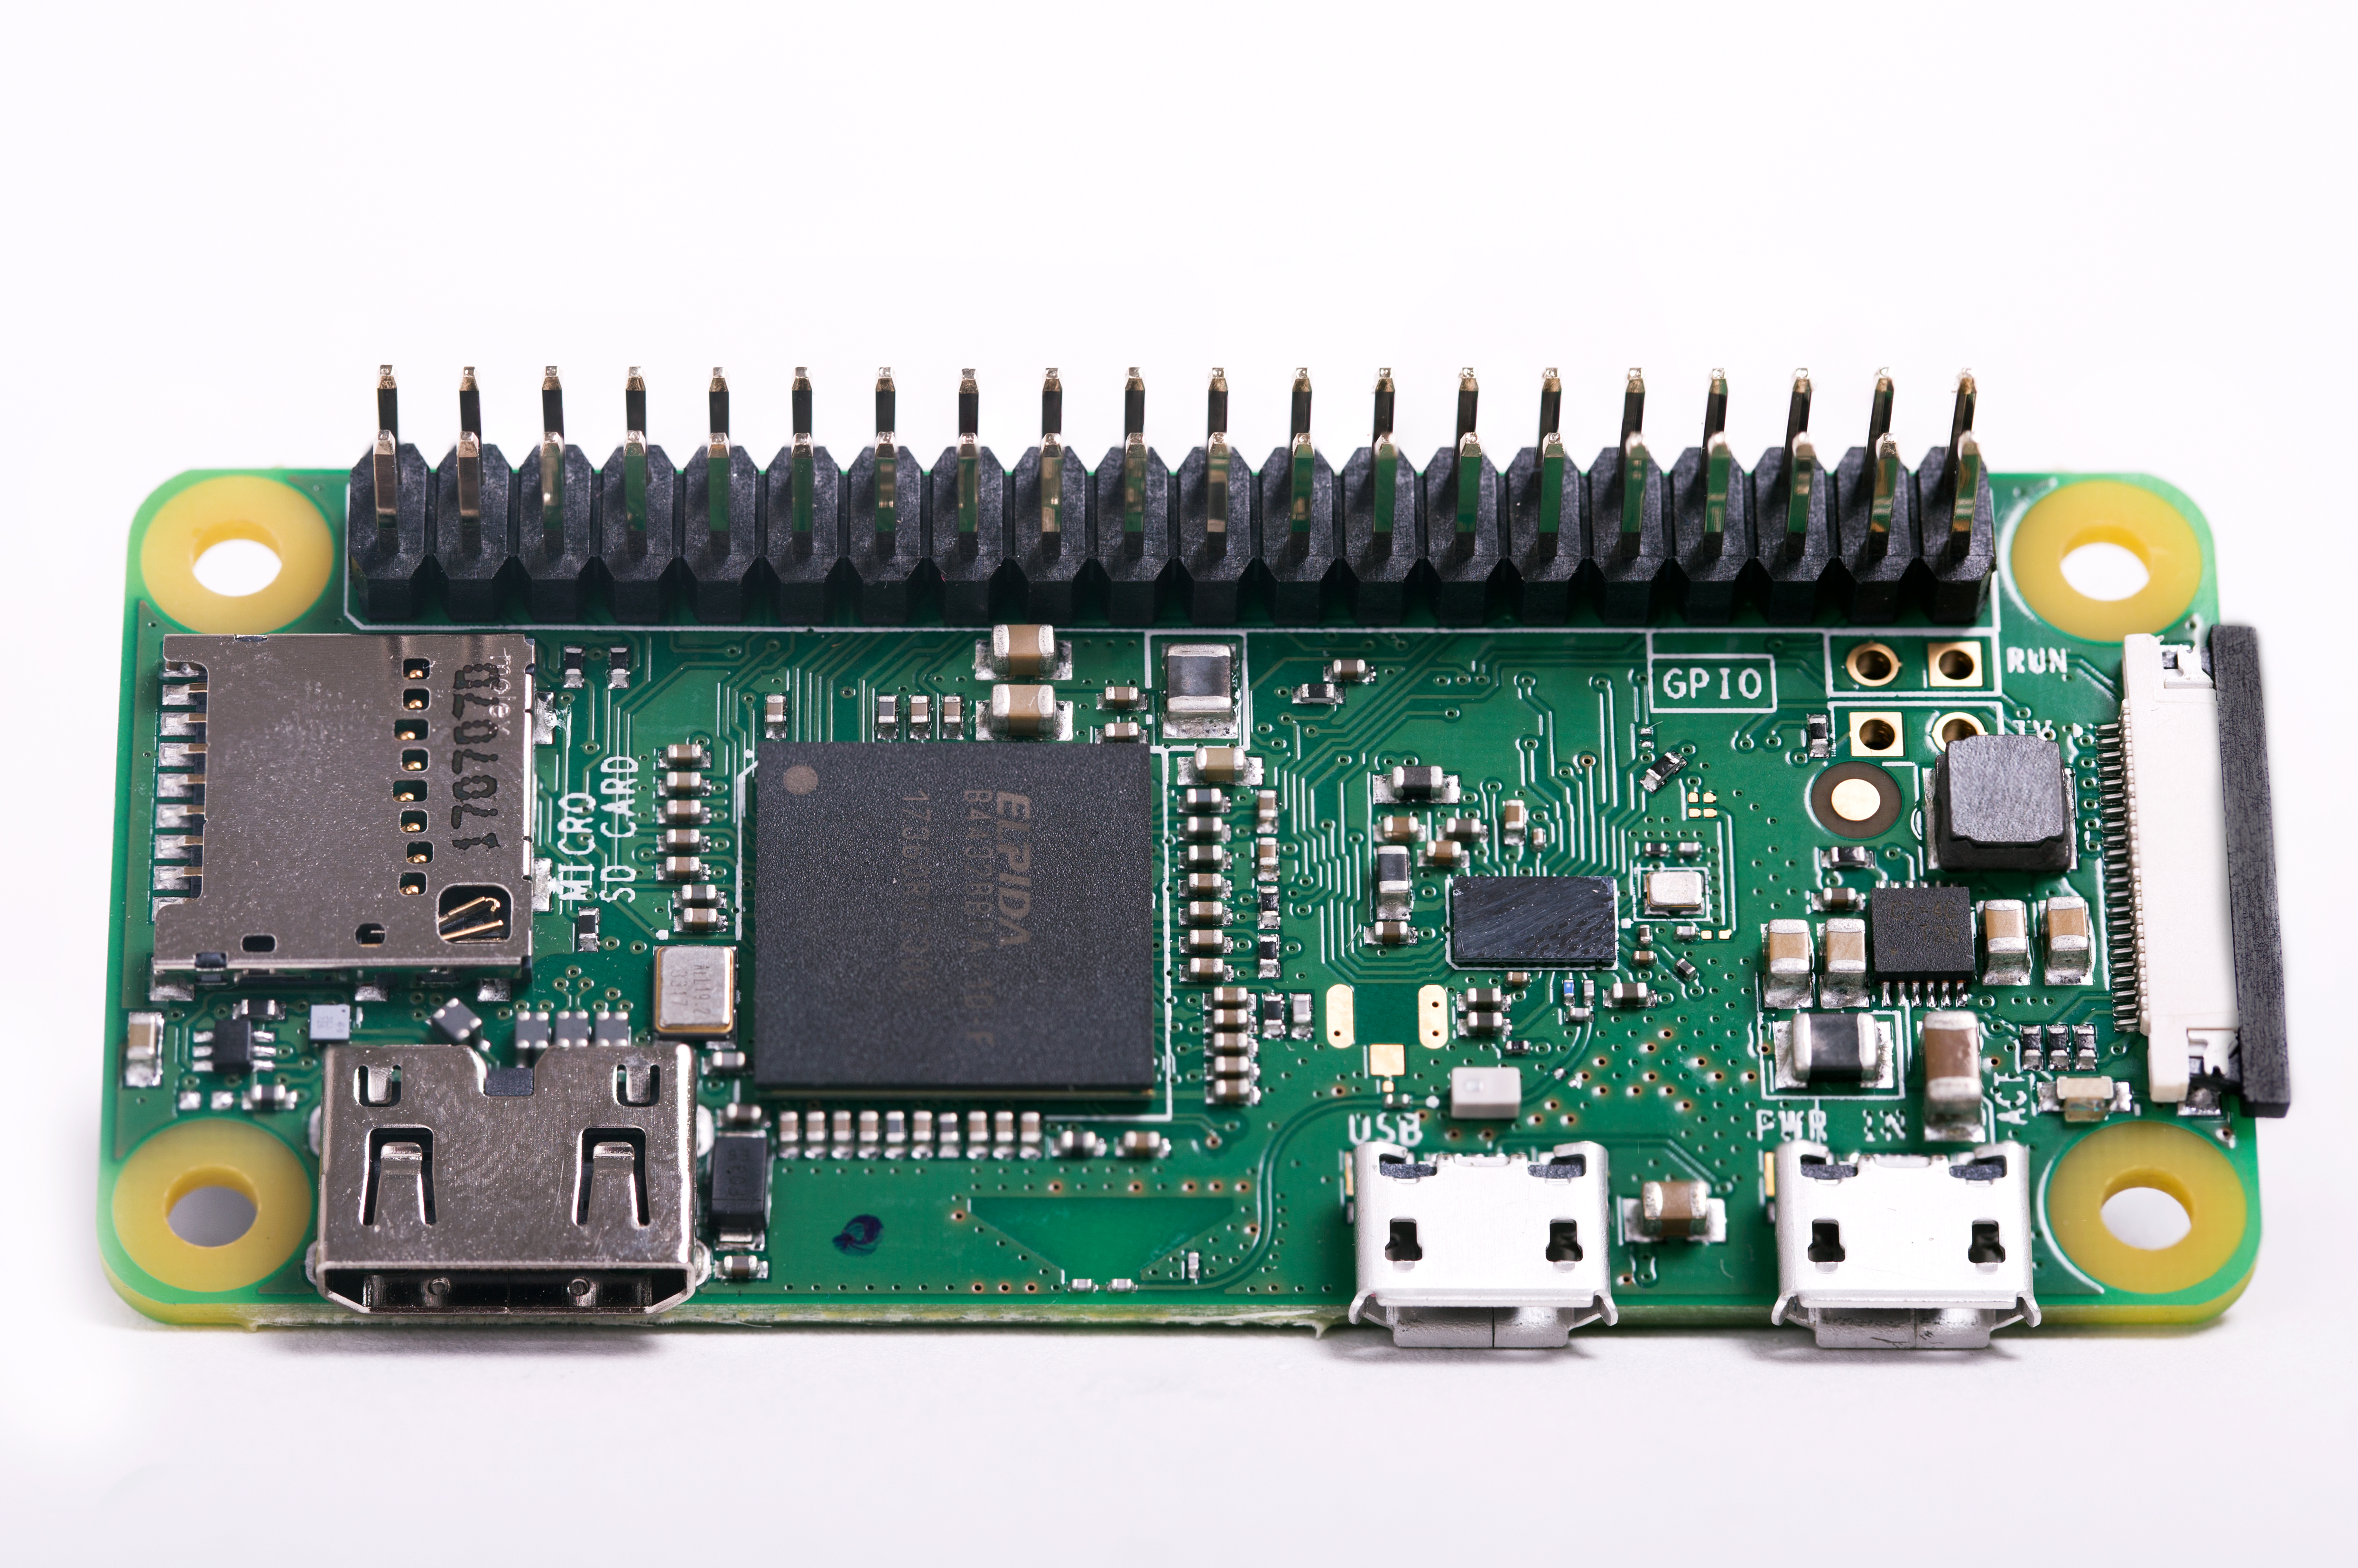
The smallest Raspberry Pi still packs a punch despite its size and price. For $10, Raspberry Pi Zero W is perfect for embedding into projects and, with onboard Bluetooth and wireless LAN, there are fewer cables to worry about. Buy a Raspberry Pi Zero W with or without pre-soldered header pins, and pop it in someone’s stocking this Christmas as a great maker surprise.
Visit the Raspberry Pi Store, Cambridge, or find your nearest Approved Reseller online.
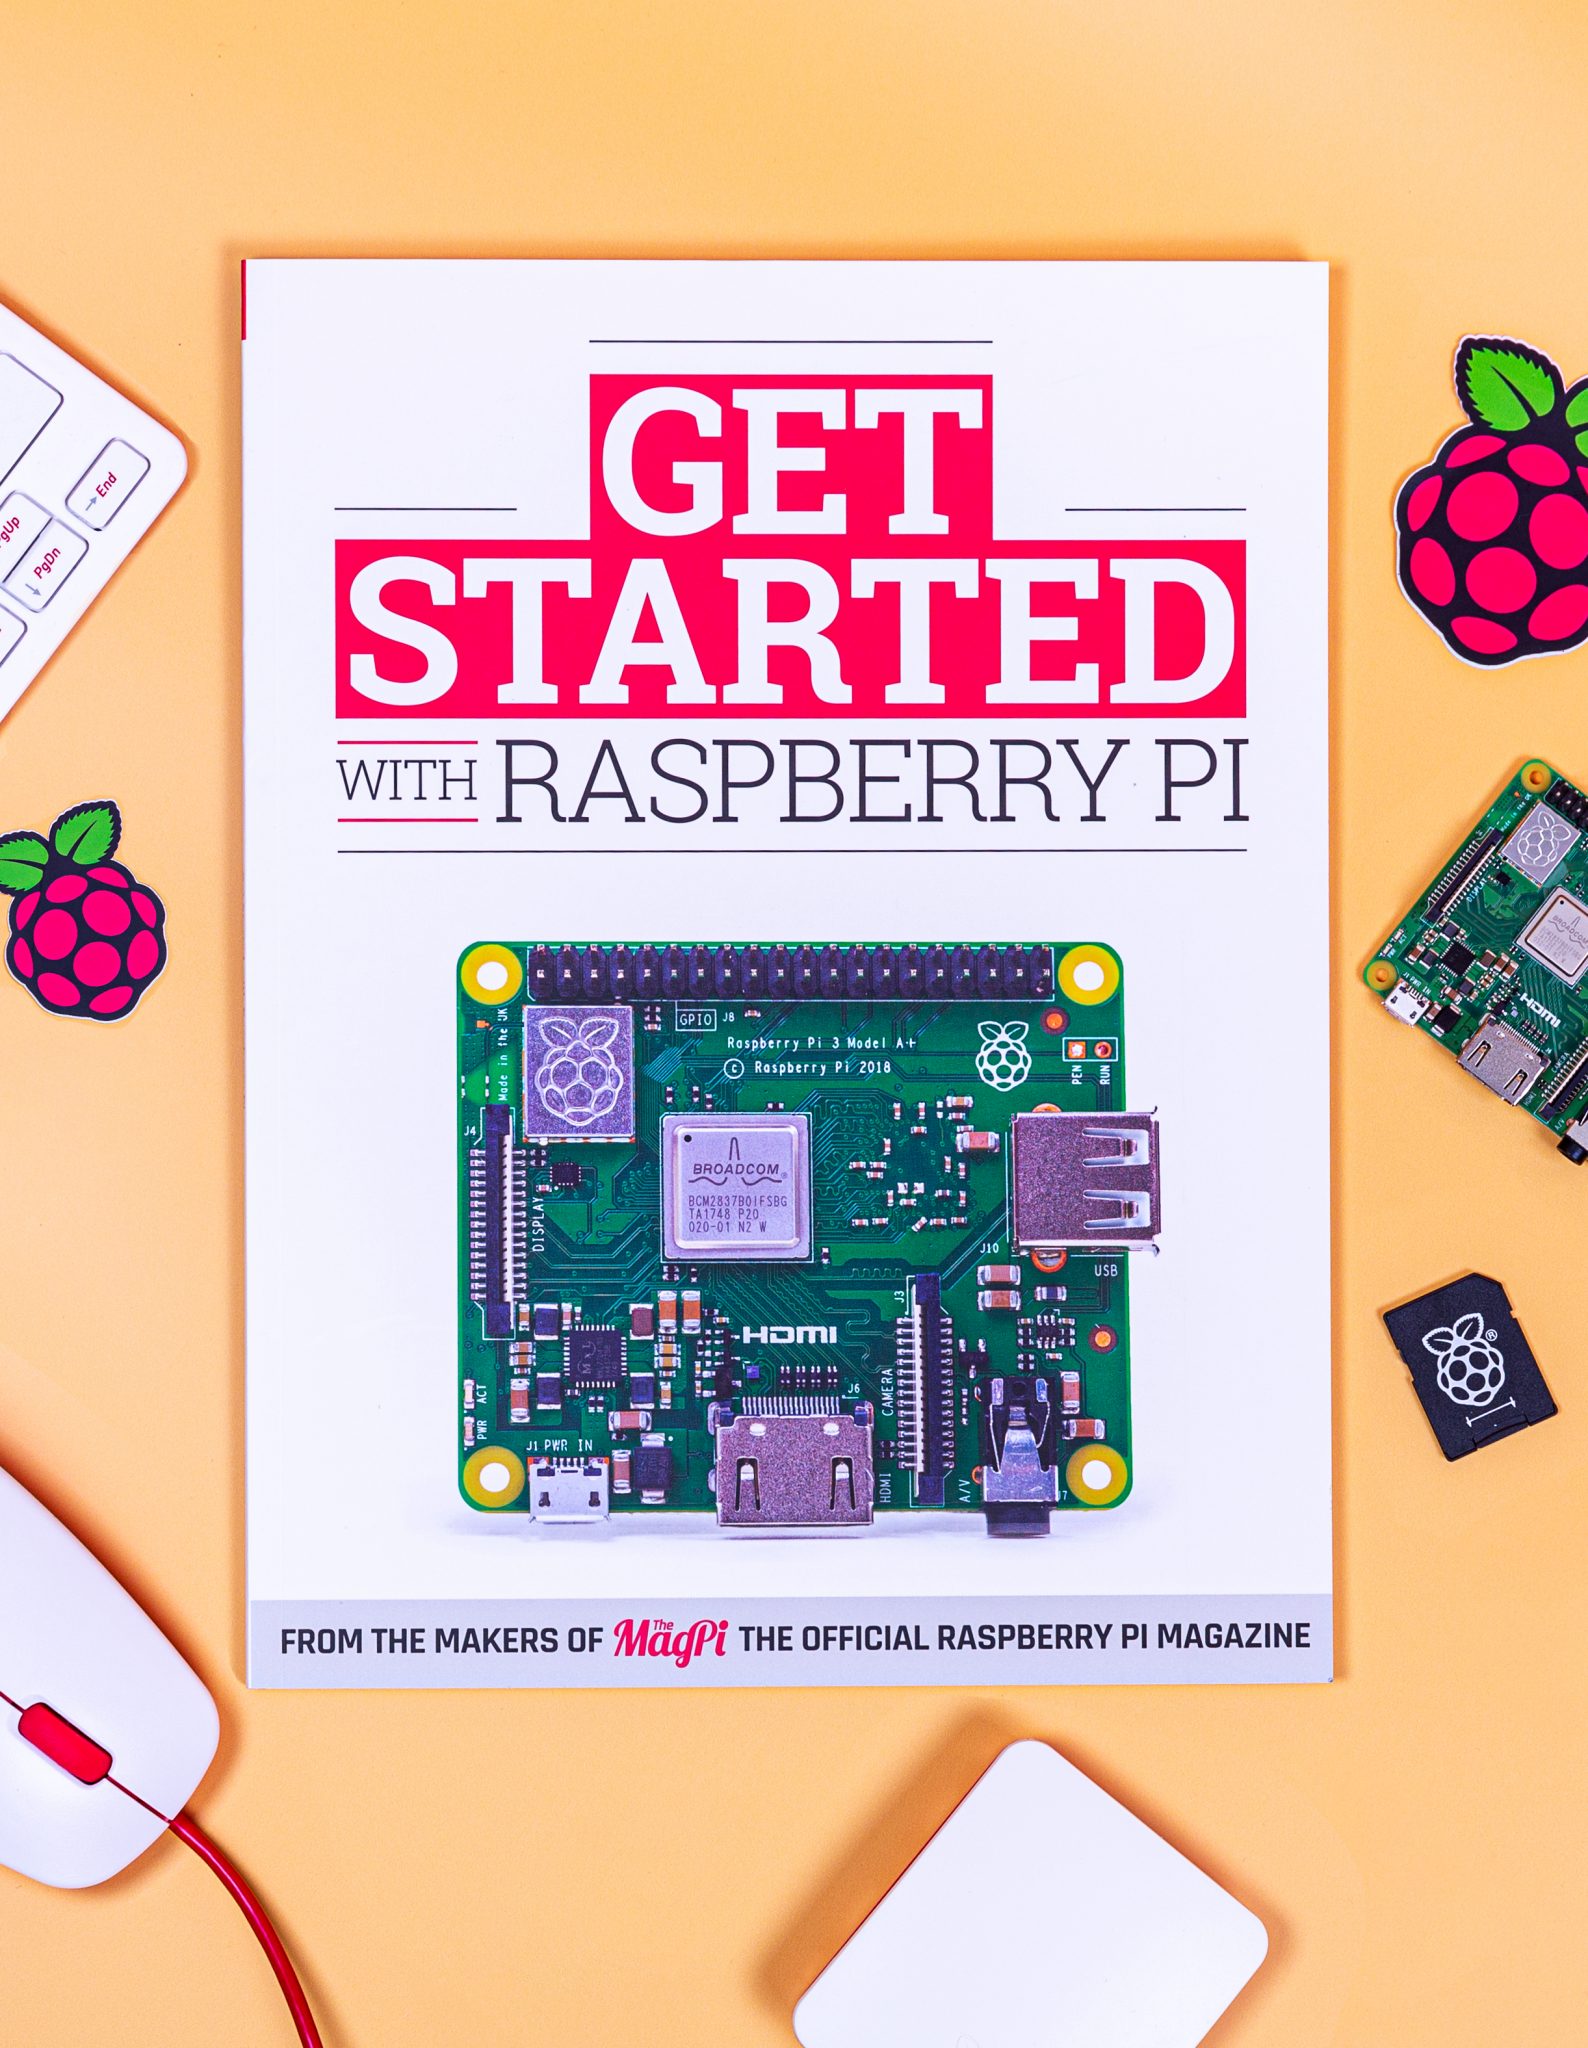
This isn’t just a book: it’s a book with a computer on the front. Getting Started with Raspberry Pi is a great gift for anyone curious about coding and, at £35, it’s a pretty affordable gift to give this festive season. Alongside the 116-page getting-started guide, the package also contains a Raspberry Pi 3A+, official case, and 16GB micro SD card pre-loaded with NOOBs. Raspberry Pi 3A+ can be powered with a good-quality micro USB phone charger, and it can be connected to any TV or computer display via standard HDMI. Grab a keyboard and mouse — you’ll be surprised how many people have a keyboard and mouse lying around — and you’re good to go!
Order your gift today from the Raspberry Pi Press online store, with international shipping available.
A full range of all Raspberry Pi variants, official accessories, and add-ons can be found on our products page.
Don’t be lazy, make your own!
Raspberry Pi Press has released a small library’s worth of publications these last few months — have you ordered all your copies yet?
Pre-orders are now open for our glorious Code the Classics, so secure your copy now for the 13 December release date, with free UK shipping. And, while you’re on our Raspberry Pi Press page, check out our latest range of publications to suit all techy interests: Retro Gaming with Raspberry Pi will show the budding gamer in your life how to build their own Raspberry Pi retro arcade to play their Code the Classics favourites on, while Book of Making 2 and Raspberry Pi Projects Book 5 will inspire them to make all manner of amazing projects, from electronics and woodworking to crafts and rockets.
If they’re already full to the brim with Raspberry Pi, why not treat them to our Get Started with Arduino guide so they can expand upon their electronics skills. We also offer a host of established publications at discounted prices, including Sophy Wong’s Wearable Tech Projects, An Introduction to C & GUI Programming, and previous volumes of the Book of Making and the Raspberry Pi Projects Book.
Visit the Raspberry Pi Press online store, or head to the Raspberry Pi Store, Cambridge to find all our publications. You may also find a selection in your local WHSmith, Sainsbury’s, or Barnes & Noble.
Subscriptions are available for all of our magazines. 12-month subscribers to The MagPi magazine will receive a free Raspberry Pi, while a 12-month subscription to HackSpace magazine will net you a free Adafruit Circuit Playground Express.

Subscribers to Wireframe magazine, Custom PC magazine, and Digital SLR Photography will save up to 49% compared to newsstand prices, with many subscription options to choose from.
Everyone needs a Babbage Bear. Your new Babs will come complete with their own Raspberry Pi-branded shirt. And, with some felt, stuffing, and a stapler, you can make them as festive as ours in no time!
Order yours online, or buy Babbage at the Raspberry Pi Store, Cambridge.

This newest iteration of The Pi Hut 3D Xmas Tree includes programmable RGB LEDs! Simply detach the two halves of the tree from their frame, slot them together, and place them onto the GPIO pins of your Raspberry Pi. With the provided libraries of code, the tree will be lit up and merry before you know it.
How about programming it to flash to your favourite Christmas song? Get yours today from The Pi Hut and the Raspberry Pi Store, Cambridge.

“Pirate Audio Speaker,” Pimoroni explain “is perfect for making a Lilliputian radio, sound effect player, or even as a teeny-weeny games console!”
Attach this HAT to any 40-pin Raspberry Pi and start creating a whole host of wonderful audio-visual projects — such as a Christmas #1 jukebox — to get you in the mood for your office party.
Available from the Pimoroni website and the Raspberry Pi Store, Cambridge.
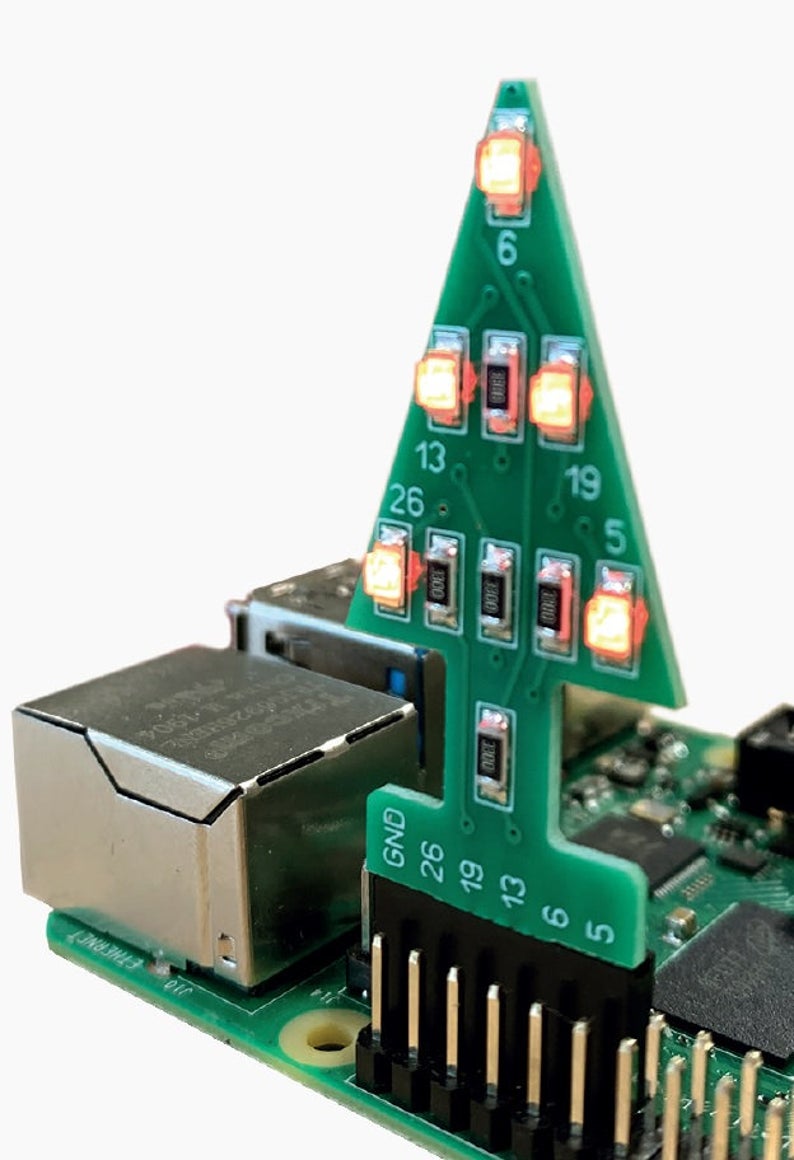
This super-cute GPIO add-on allows users to write their own light shows via GPIO. Available for £4 from the Raspberry Pi Store, Cambridge, and the PocketMoneyTronics website, it’s a nice festive addition to any coders stocking.
Full instructions are provided with the kit, and are also available online. Buy the kit pre-soldered or loose, depending on your giftee’s soldering skills.
Visit the websites of all our Approved Resellers for more great Raspberry Pi gifts. Find your local Approved Reseller by selecting your country from the dropdown menu on any Raspberry Pi Products page.
Fill their maker kit this festive season, with a whole host of great components and tools. A soldering iron is a great way for coders to start bringing their projects out into the real world, allowing them to permanently add sensors, lights, buttons, etc. to their Raspberry Pi. They’ll also need one if they want to add header pins to the $5 Raspberry Pi Zero and $10 Raspberry Pi Zero W.

You can never have enough LEDs. Available in a variety of sizes and colours, you can find packs of LEDs online or in your local electronics store.
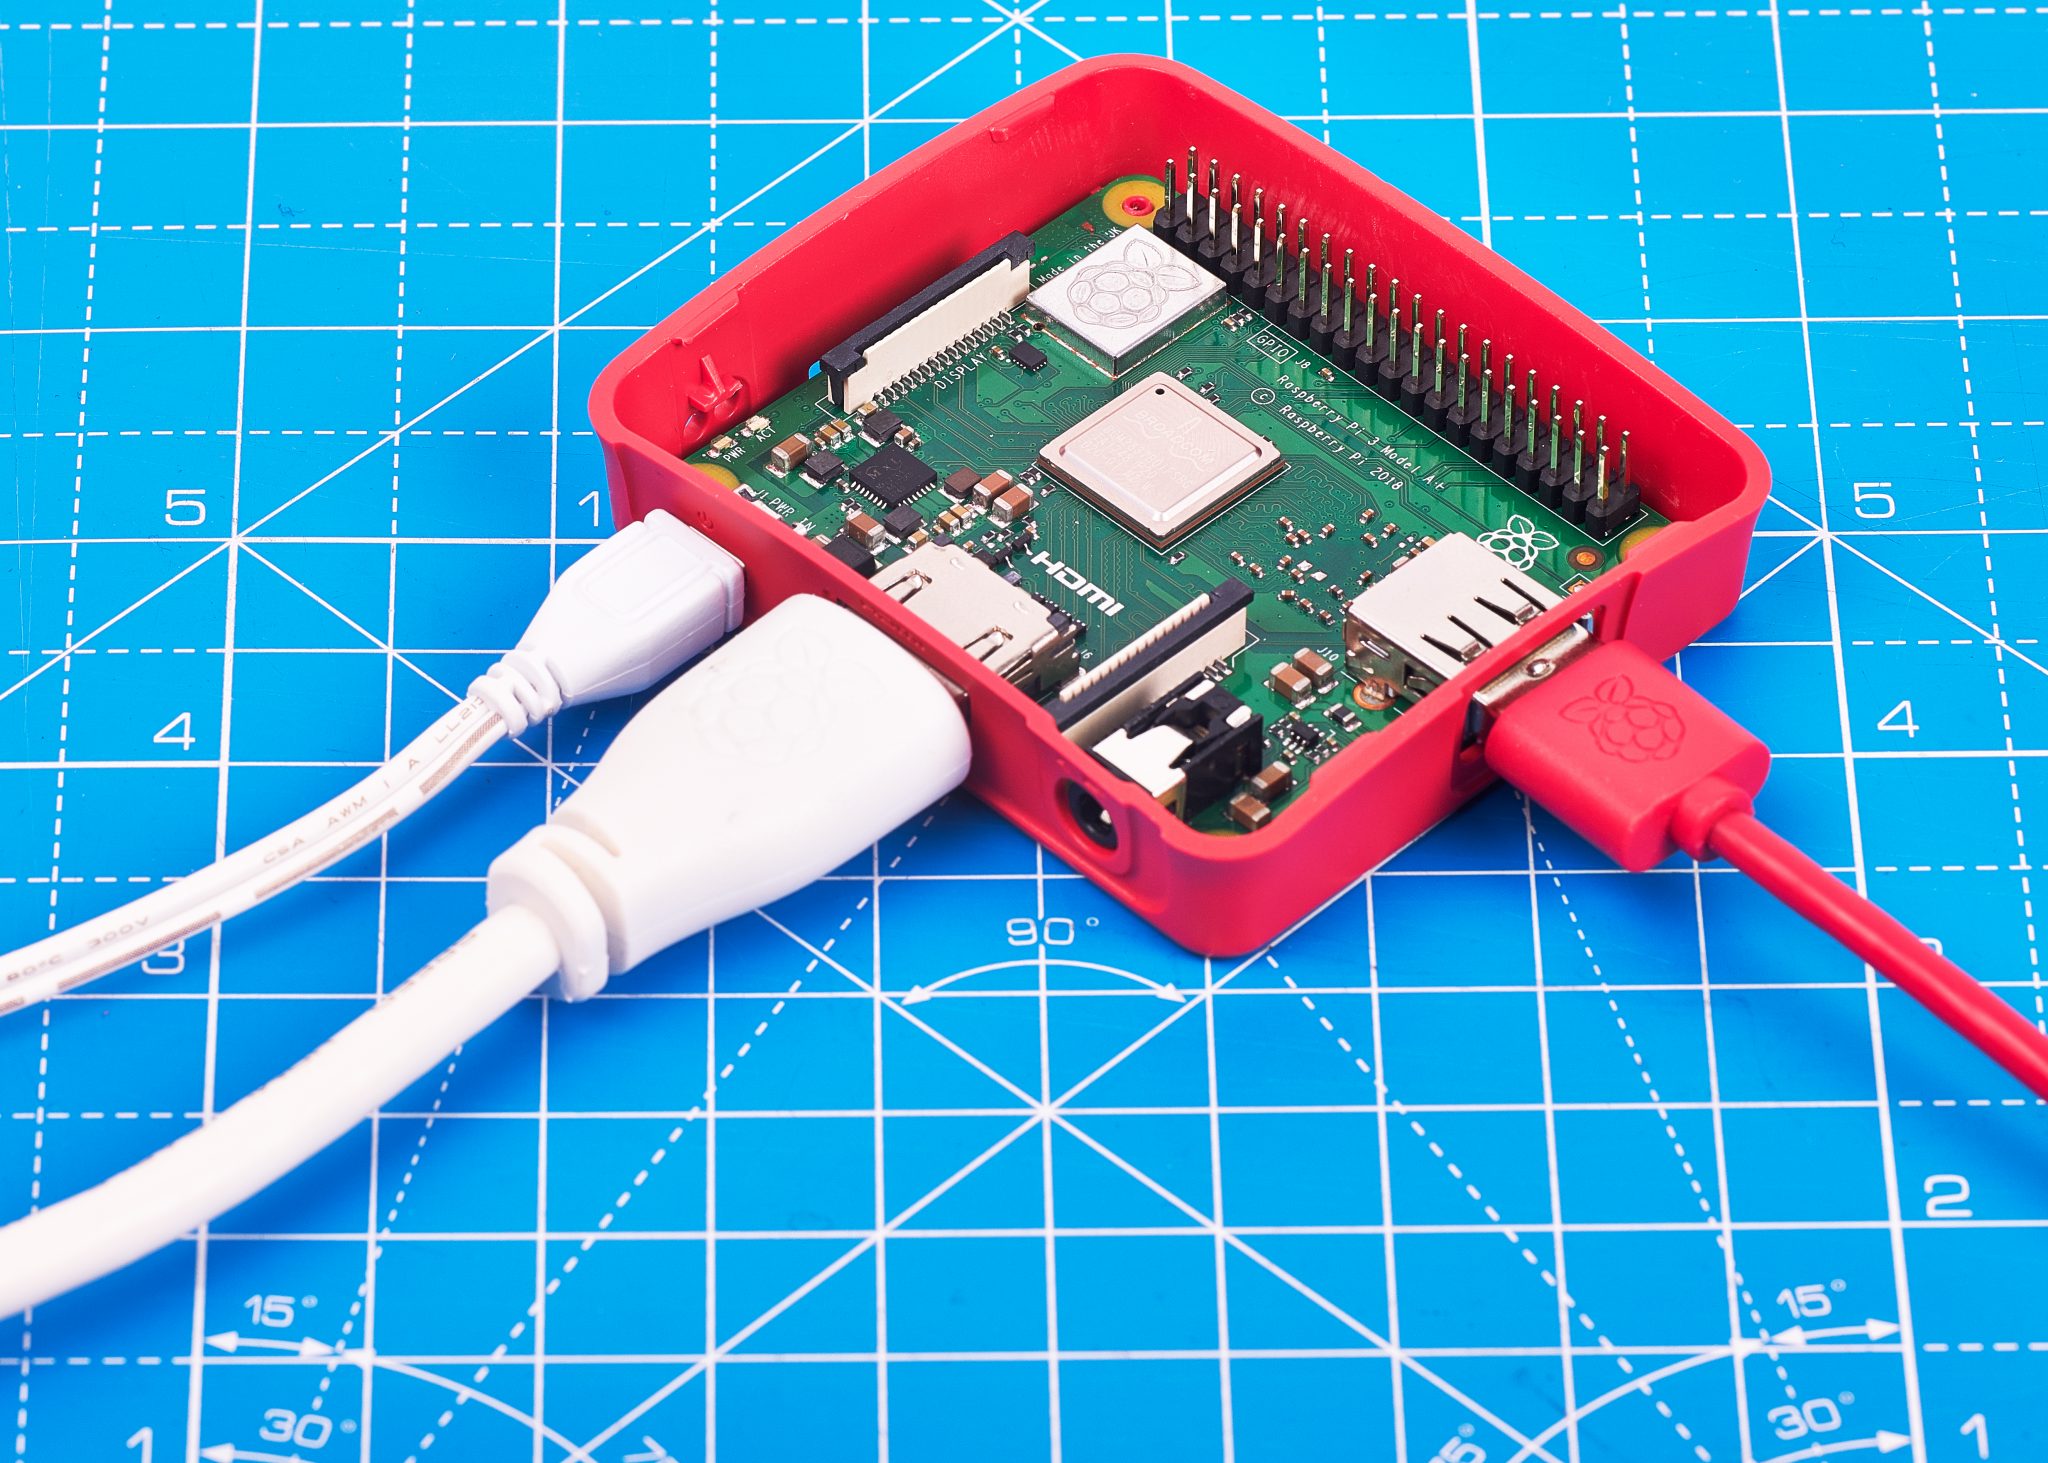
Never underestimate the importance of a cutting mat. Not only will it save your tabletop from craft knife cuts and soldering iron burns, but they also look great in photos for when its time to show of their latest project!

If you plan on making online purchases via Amazon, please consider selecting the Raspberry Pi Foundation via Amazon Smile! Your items will still be the same cost to you, but Amazon will donate a portion of the purchase price to help us continue to make free computer science education available to adults and young people everywhere.
smile. before amazon in the Amazon web address you use in your country, so give that a try. If that doesn’t work, try searching for Amazon Smile via your prefered search engine.We wanted to give you a gift this festive season, so we asked the incredibly talented Sam Alder to design an illustration for you to print or use as your desktop wallpaper.

The poster is completely free for you to use and can be opened by clicking on the image above. We just ask that you don’t sell it, print it onto a t-shirt or mug, tattoo it onto your body, or manipulate it. But do feel free to print it as a poster for your home, classroom, or office, or to upload it as your computer wallpaper. And, when you do, be sure to take a photo and share it with us on social media.
You can also download a wider version of the image.
Happy gift-giving this 2019!
The post Raspberry Pi Christmas Shopping Guide 2019 appeared first on Raspberry Pi.
If our recent release of Retro Gaming with Raspberry Pi, Getting Started with Arduino, and Coding the Classics isn’t enough for you, today sees the release of TWO MORE publications from Raspberry Pi Press!
If you’re looking for Raspberry Pi inspiration, volume 5 of the ever popular Raspberry Pi Projects Book is for you. Packed full of ideas, projects, and incredible builds, The Official Raspberry Pi Projects Book Volume 5 is the perfect read for any budding coder, maker, or fan of cool stuff.
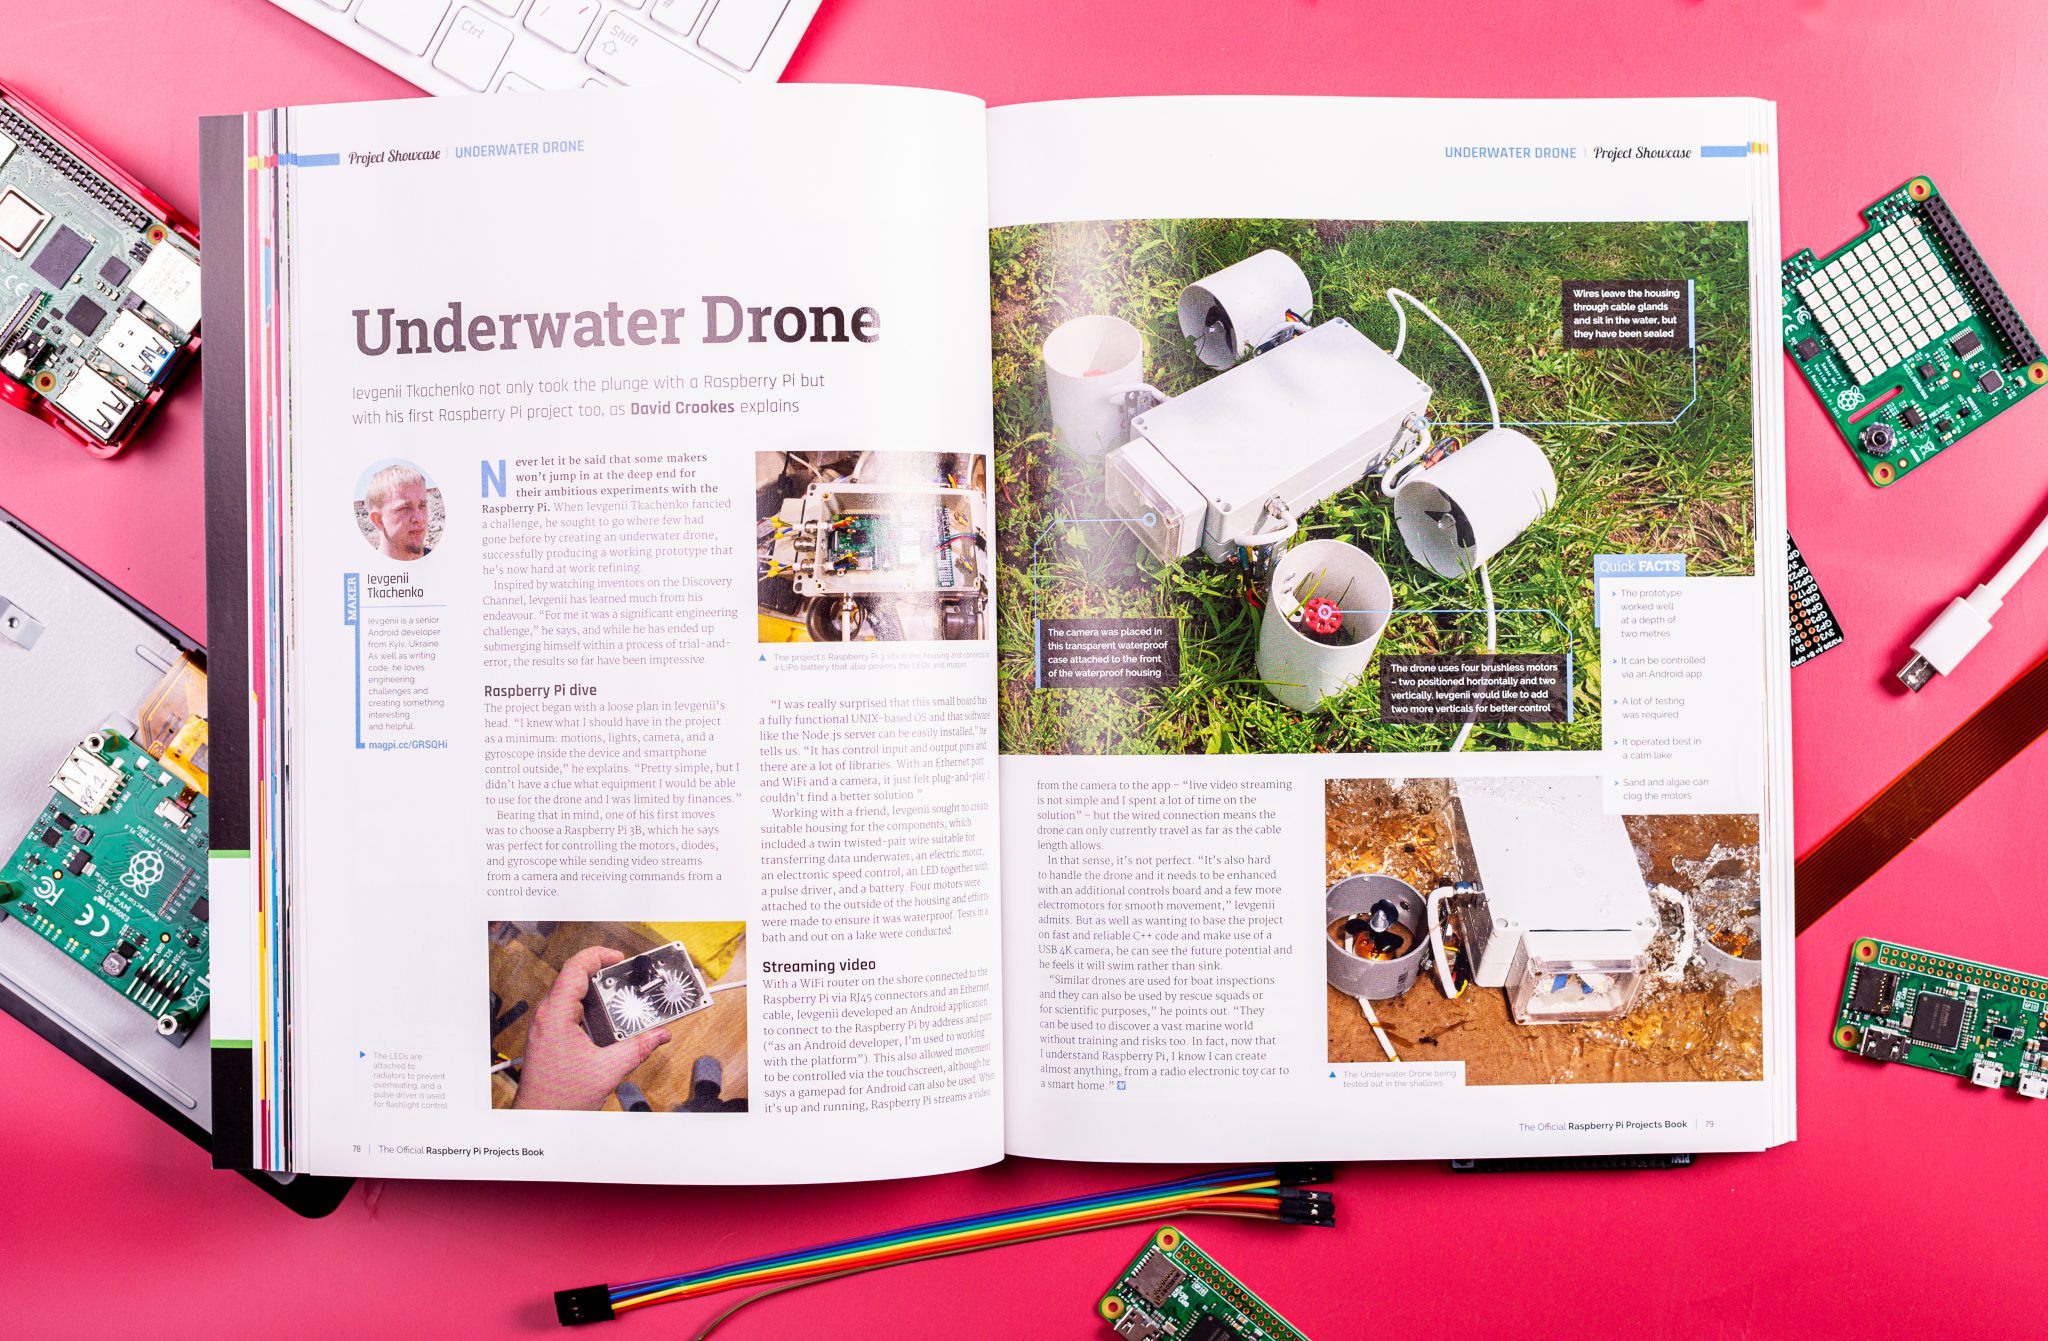
Buy The Official Raspberry Pi Projects Book Volume 5 directly from the Raspberry Pi Press online store today with FREE WORLDWIDE SHIPPING, or pick up your copy from the Raspberry Pi Store, Cambridge; local UK newsagents and supermarkets such as WHSmith and Sainsbury’s; or from Barnes & Noble in the US in the next few weeks.
If you’d like to sample The Official Raspberry Pi Projects Book Volume 5, you can download the PDF from The MagPi website.
Much like The Official Raspberry Pi Projects Book Volume 5, Book of Making Volume 2 collects together some of the very best projects and tutorials from the makersphere, whether they involve wood- and metalwork or fine electronics and 3D printing. If you’re a maker hobbyist, or simply a fan of awesome projects and unusual builds, Book of Making Volume 2 is the publication for you.
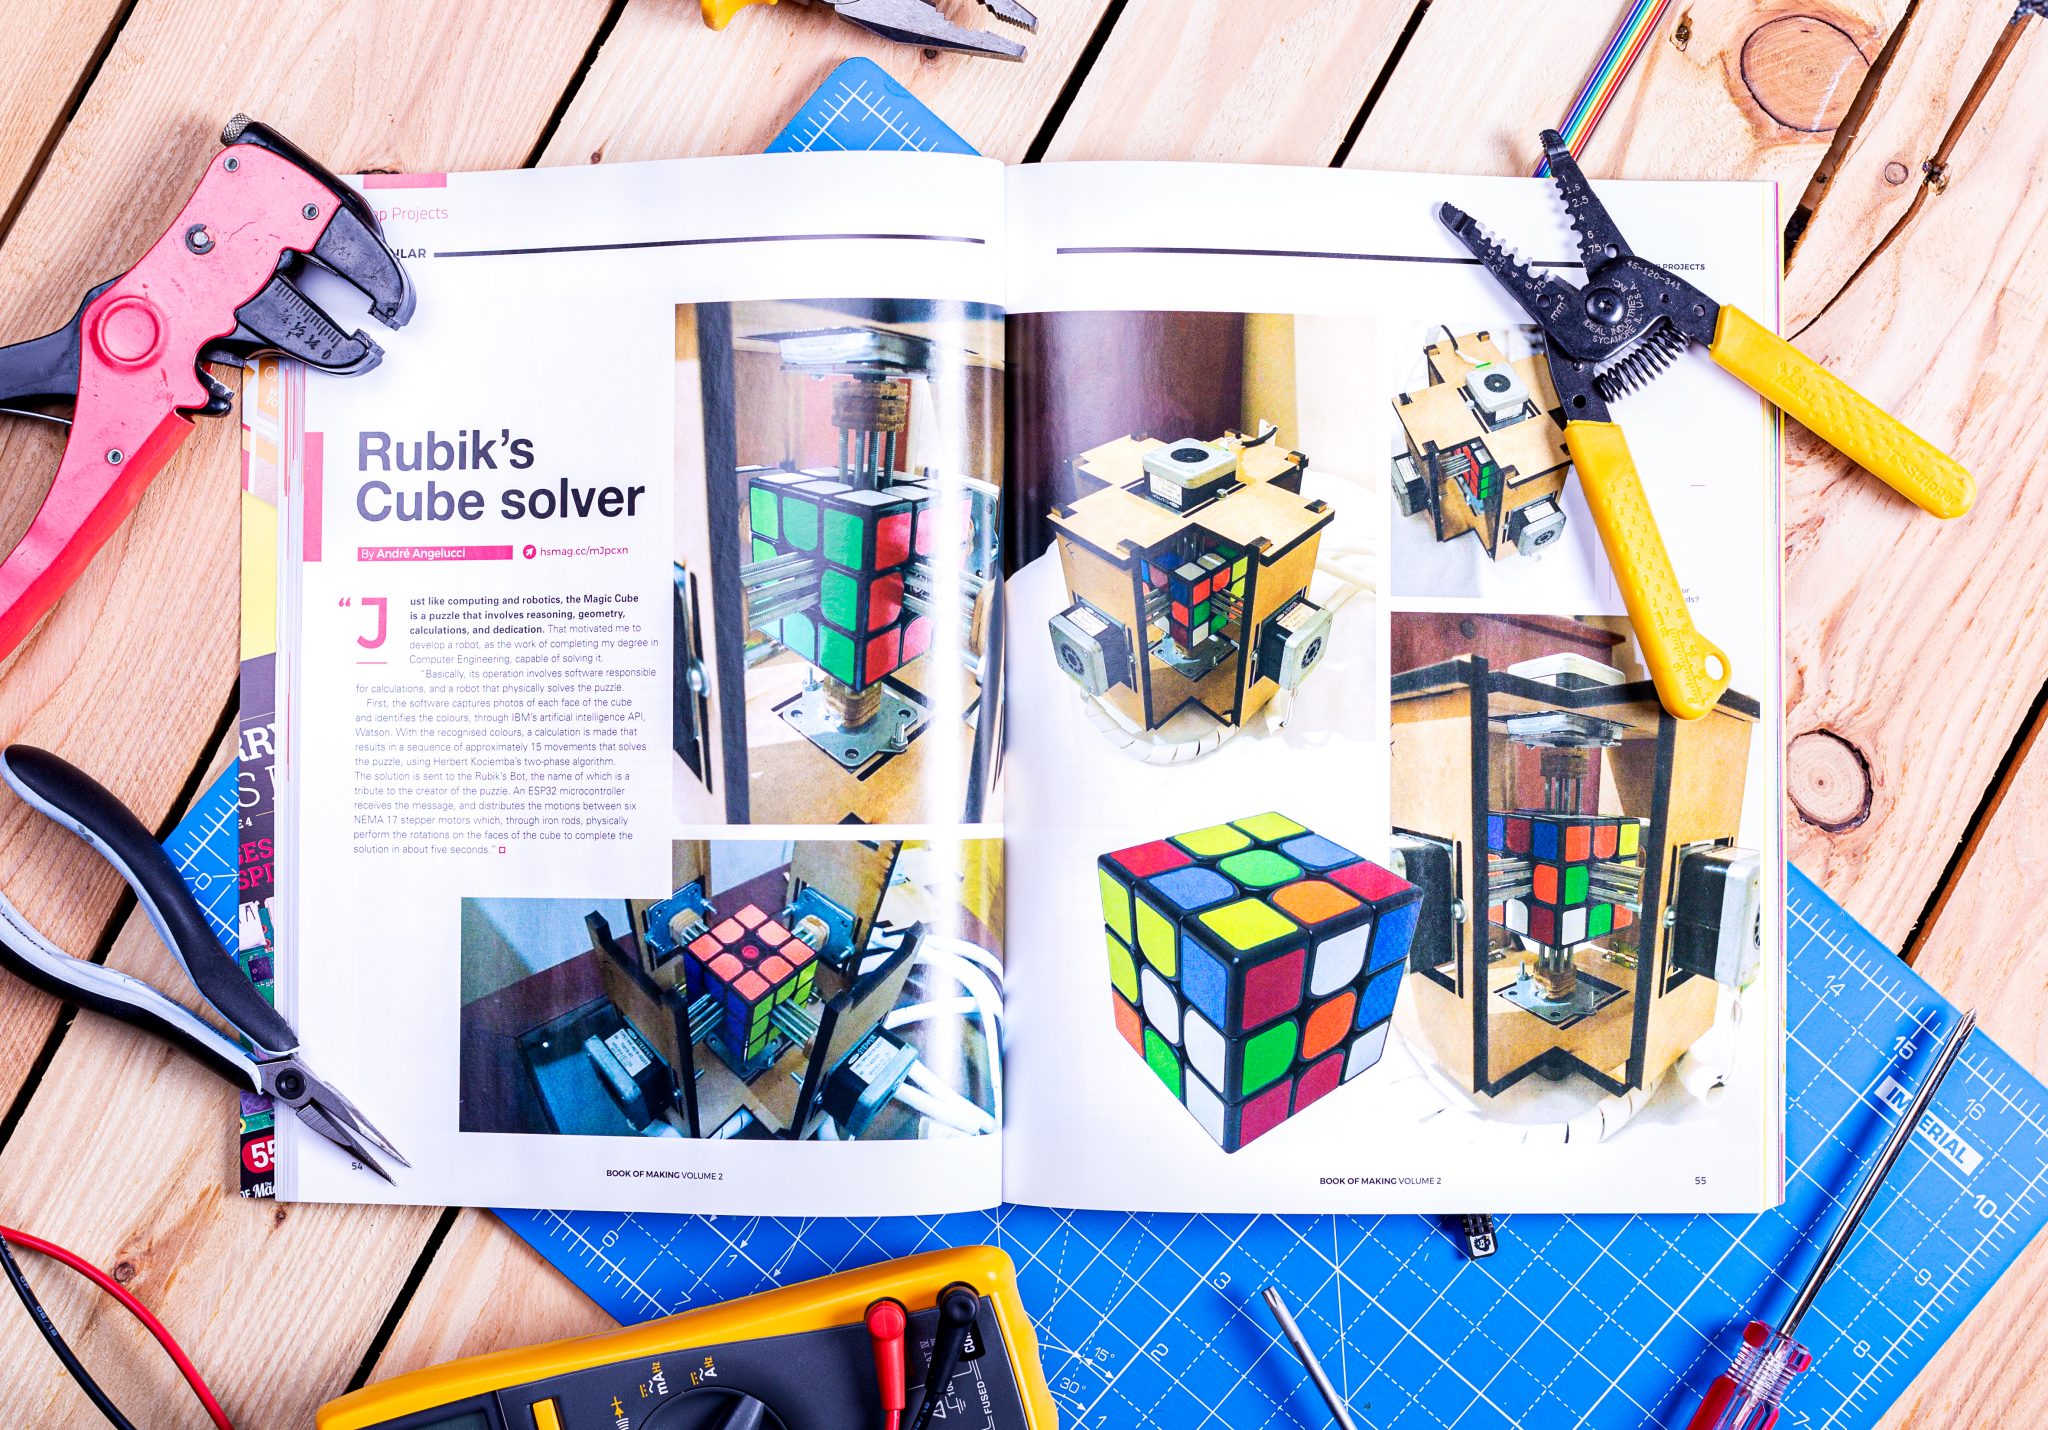
You can buy Book of Making Volume 2 directly from the Raspberry Pi Press online store today, again with FREE WORLDWIDE SHIPPING. It’ll also be available from the Raspberry Pi Store, Cambridge; local UK newsagents and supermarkets such as WHSmith and Sainsbury’s; or Barnes & Noble in the US in the next few weeks.
You can also download the free PDF from HackSpace magazine’s website.
The post More new books from The MagPi and HackSpace magazines appeared first on Raspberry Pi.
Last week, lots and lots of you shared your Raspberry Pi builds with us on social media using the hashtag #IUseMyRaspberryPiFor. Jay Wainwright from Liverpool noticed the conversation and got in touch to tell us about The Nest Box, which uses Raspberry Pi to bring impressively high-quality images and video from British bird boxes to your Facebook feed.
![]()
Jay runs a small network of livestreaming nest box cameras, with three currently sited and another three in the pipeline; excitingly, the new ones will include a kestrel box and a barn owl box! During the spring, all the cameras stream live to The Nest Box’s Facebook page, which has steadily built a solid following of several thousand wildlife fans.
![]()
The Nest Box’s setup uses a Raspberry Pi and Camera Module, along with a Raspberry Pi PoE HAT to provide both power and internet connectivity, so there’s only one cable connection to weatherproof. There’s also a custom HAT that Jay has designed to control LED lights and to govern the Raspberry Pi Camera Module’s IR filter, ensuring high-quality images both during the day and at night. To top it all off, he has written some Python code to record visitors to the nest boxes and go into live streaming mode whenever the action is happening.
As we can see from this nest box design for swifts, shown on the project’s crowdfunding profile, plenty of thought has evidently been put into the design of the boxes so that they provide tempting quarters for their feathered occupants while also accommodating all the electronic components.
![]()
Follow The Nest Box on Facebook to add British birds into your social media mix — whatever you’ve got now, I’ll bet all tomorrow’s coffees that it’ll be an improvement. And if you’re using Raspberry Pi for a wildlife project, or you’ve got plans along those lines, let us know in the comments.
The post The Nest Box: DIY Springwatch with Raspberry Pi appeared first on Raspberry Pi.
Today is Giving Tuesday. Giving Tuesday takes place on the day following the well-known shopping days of Black Friday and Cyber Monday, as a celebration of the generosity of the human spirit. It’s your chance to give something back, or to pay it forward, whichever feels right to you.
There is now plenty of evidence for what we all know intuitively to be true: giving makes you happy.
Whether it’s giving gifts for Christmas, volunteering your time for a cause that you care about, or donating some of your hard-earned cash to support a nonprofit organisation, there’s a proven neural link between generosity and happiness (if you want to check the science, this recent study is a good place to start).
Help young people get creative with coding and hardware!
This link certainly exists for the tens of thousands of people who give their time to support young people at Code Clubs and CodeDojos; whenever I ask volunteers why they give their time, they consistently talk about the feeling of joy they experience when they see a young person having a breakthrough and learning something new.
We’re coming to the end of another remarkable year at the Raspberry Pi Foundation, and I wanted to use this Giving Tuesday to say thank you to all of our supporters.
You can become part of a movement that empowers young people to express themselves through creative tech projects.
Taken together, that’s millions more young people learning how to create with digital technologies, many of whom wouldn’t otherwise have had the opportunity to discover the power of digital making.
We couldn’t achieve any of this without the incredible generosity of our supporters, who give their time, expertise, and money to bring our work to life.
If you’d like to experience some of the unadulterated joy that comes with supporting the mission of the Raspberry Pi Foundation, it couldn’t be easier:
If you want to get involved in supporting the next generation of digital makers, you can support us with a one-off or regular donation: www.raspberrypi.org/donate
Thank you, and happy Giving Tuesday!
The post Support the Raspberry Pi Foundation this #GivingTuesday appeared first on Raspberry Pi.
Today, we are proud to announce Code the Classics, the latest (and long-awaited) publication from Raspberry Pi Press.
Pre-order Code the Classics today
Subscribe to our YouTube channel: http://rpf.io/ytsub Help us reach a wider audience by translating our video content: http://rpf.io/yttranslate Buy a Raspberry Pi from one of our Approved Resellers: http://rpf.io/ytproducts Find out more about the #RaspberryPi Foundation: Raspberry Pi http://rpf.io/ytrpi Code Club UK http://rpf.io/ytccuk Code Club International http://rpf.io/ytcci CoderDojo http://rpf.io/ytcd Check out our free online training courses: http://rpf.io/ytfl Find your local Raspberry Jam event: http://rpf.io/ytjam Work through our free online projects: http://rpf.io/ytprojects Do you have a question about your Raspberry Pi?
Code the Classics not only tells the stories of some of the seminal video games of the 1970s and 1980s, but shows you how to create your own games inspired by them using Python and Pygame Zero, following examples programmed by Raspberry Pi founder Eben Upton.
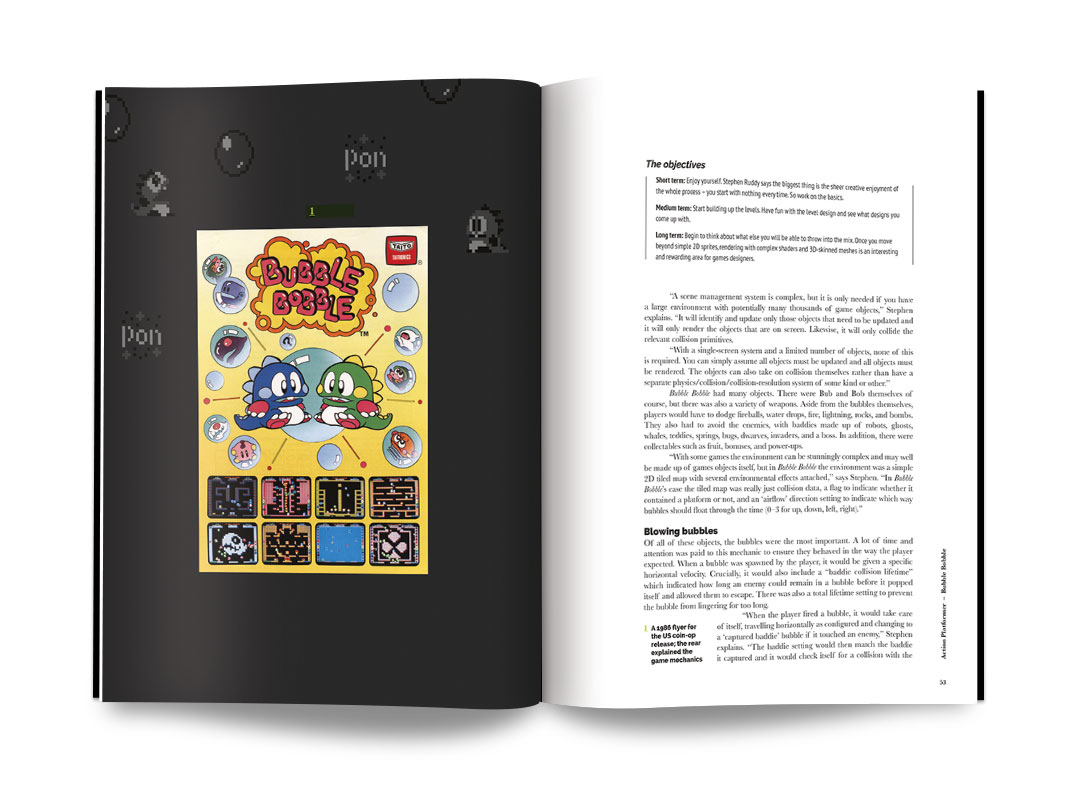
Get game design tips and tricks from the masters. Explore the code listings and find out how they work.
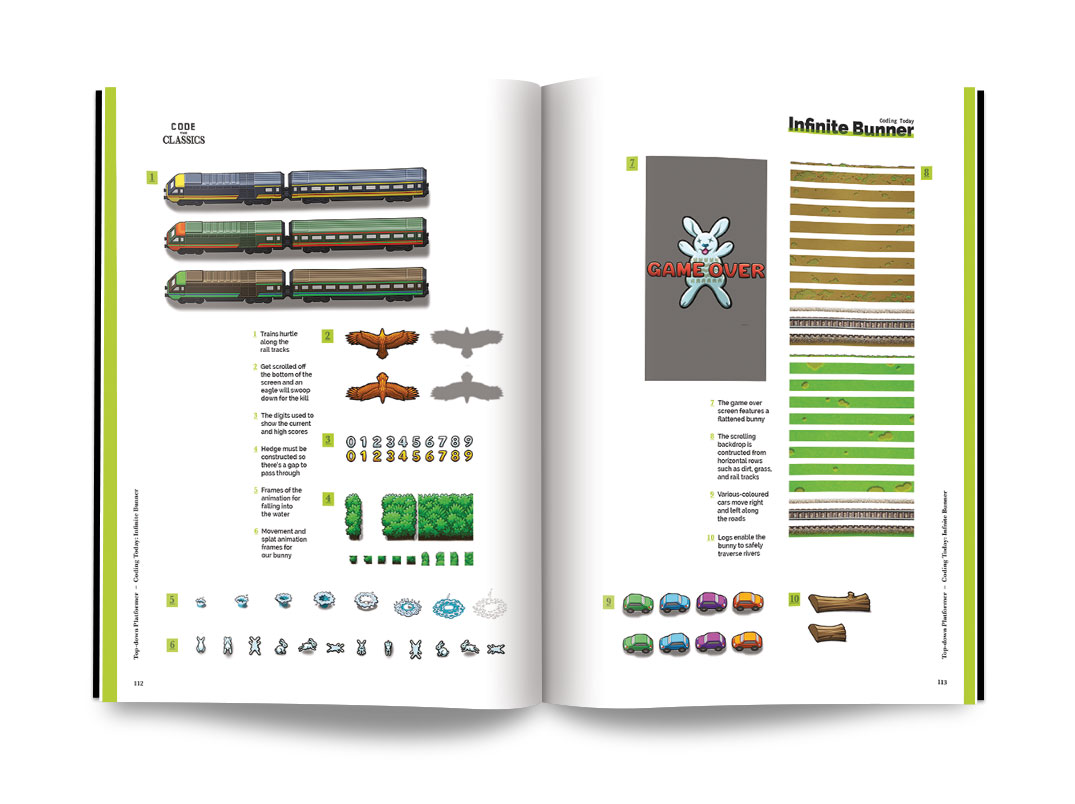 Learn how to code your own games with Pygame Zero. Download and play games examples by Eben Upton.
Code the Classics is available to pre-order now from the Raspberry Pi Press online store, and it will be released in time for Christmas on 13 December. Pre-order today for FREE UK shipping.
Code the Classics is the perfect gift for anyone with fond memories of the video games of the 1970s and 1980s, and it’s also a brilliant way for young coders to get into understanding the code mechanics behind gaming, helping to inspire them to create their own.
The post Pre-order Code the Classics today! appeared first on Raspberry Pi.
In this project, we’ll make a pair of NFC data cufflinks, ideal for storing a website URL, a password, or a secret message. This project is perfect for a sartorial spy who loves dry Martinis, and anyone who can’t remember their WiFi password.
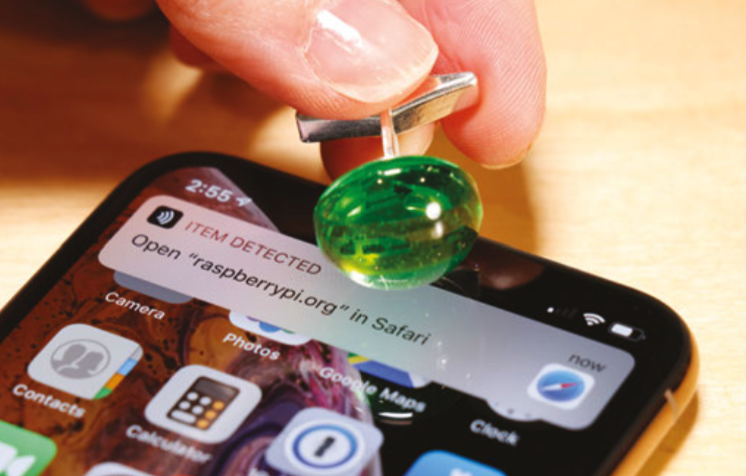
NFC stands for near-field communication, and is a protocol that allows two devices to communicate wirelessly when they are physically near each other. An evolution of RFID, NFC is becoming increasingly popular in consumer technology, and is already commonly used in contactless payment systems and identification badges. NFC wristbands are also being used to create enhanced experiences for visitors at theme parks and other venues.
The rise of NFC hasn’t bypassed hobbyists and tinkerers, and companies like Pimoroni and Adafruit sell components that make it relatively easy to add NFC functionality to your projects. Here, we’ll make use of tiny NFC tags that can be read and written to by a smartphone or external NFC reader. The tags can be read through a non-metal barrier, like plastic, so we’ll embed the tag in resin to make an elegant cabochon for our cufflink. When complete, holding the cufflink to your smartphone or NFC reader will let you read or write data to the chip inside.
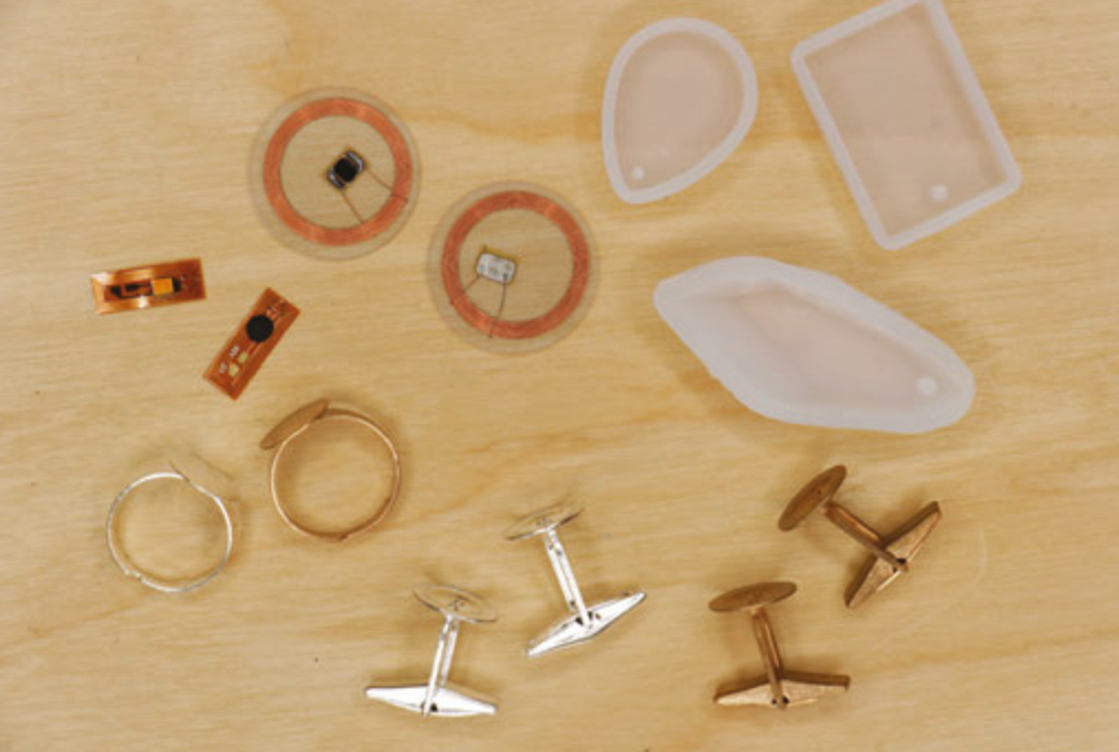
For this project we used the smallest NFC tags we could find, micro NFC/RFID transponders from Adafruit (product number 2800). These 15.6mm x 6mm flexible tags are formatted with the now standard NDEF format, and will work as-is with newer phones and most NFC readers. If you happen to pick up older Mifare Classic formatted tags, they may need to be reformatted as NDEF to work with your reader/writer. Reformatting isn’t a function of most NFC read/write apps, but it can be done with Adafruit’s PN532 NFC/RFID controller breakout board or shield.
If this is your first time working with resin epoxy, get ready for a new, fun kind of mess! Resin epoxy comes in two parts that must be mixed together in equal proportions before use. Once mixed, the resin will be workable for a short period of time before entering the curing phase and hardening completely. Figuring out exactly how much resin to mix up is definitely an art. There are even some online tools available to help calculate this. For a small project like this, just make sure you mix up a bit more than you think you’ll need.

You don’t want to run out during the pour and have to quickly mix up more at the last minute. If you’re tinting your resin, you definitely want to pour all of your pieces from the same mix, as it’s almost impossible to match the colour of one batch of resin to another.
All of this means you’ll undoubtedly end up with more than just two cabochons for one pair of cufflinks, and if you’re going to make a mess anyway, why not go big? Pick up a few extra NFC tags and plan to pour some other pieces, like pendants or key chain fobs. These make great holiday or birthday gifts that are both technologically advanced and crafty at the same time!
Resin-cast jewellery has been made for decades and there are loads of options for resin moulds available at craft stores and online. The best moulds for resin are made of silicone. Flexible silicone moulds make it easy to remove the hardened pieces, and produce ultra-shiny surfaces. Cufflink blanks, ring blanks, and pendant bails can also be purchased at jewellery supply stores. Refer to your moulds when choosing cufflink and ring blanks, to make sure that the blanks will work with the size of cabochon you’ve chosen to cast, and vice versa.
Start by gathering your materials and setting up your workspace for working with resin. There will be a lot of stirring, pouring, and drips, and things are likely to get messy! Cover your work surface with paper and keep some paper towels nearby. Read and heed the safety warnings on your resin and hardener. Although some resins are considered non-toxic when used as directed, it’s always a good idea to work in a well-ventilated area and wear nitrile gloves to keep the resin off of your skin while working.
Once the two-part resin is mixed together, you will have a limited amount of time to pour the resin before it hardens, so planning and timing is key. Check the ‘pot life’ indicated on your resin; this is the amount of working time you’ll have after mixing before the resin begins to harden. Our resin had a pot life of 30 minutes. It can be helpful to set up a timer so you can keep track of time while you work.
If you have multiple moulds, decide which ones you will use before mixing, and make sure your NFC tags will fit into the shapes you plan to use. If you are making matching cufflinks, remember that you’ll need two identical shapes. Our tiny 15.6mm tags fit perfectly into 16mm cabochons. Remember that you will mix more resin than you need for just two cufflink cabochons, so it’s good to have extra moulds in front of you to pour into.
Unwrap the NFC tags and make sure they are clean and ready to be embedded in the resin. For a light-up effect, you may want to combine a data tag with an LED tag, like we did in one of our extra pieces. The back of the NFC LED nail sticker is adhesive, so it was easy to stick it directly to the larger data tag.
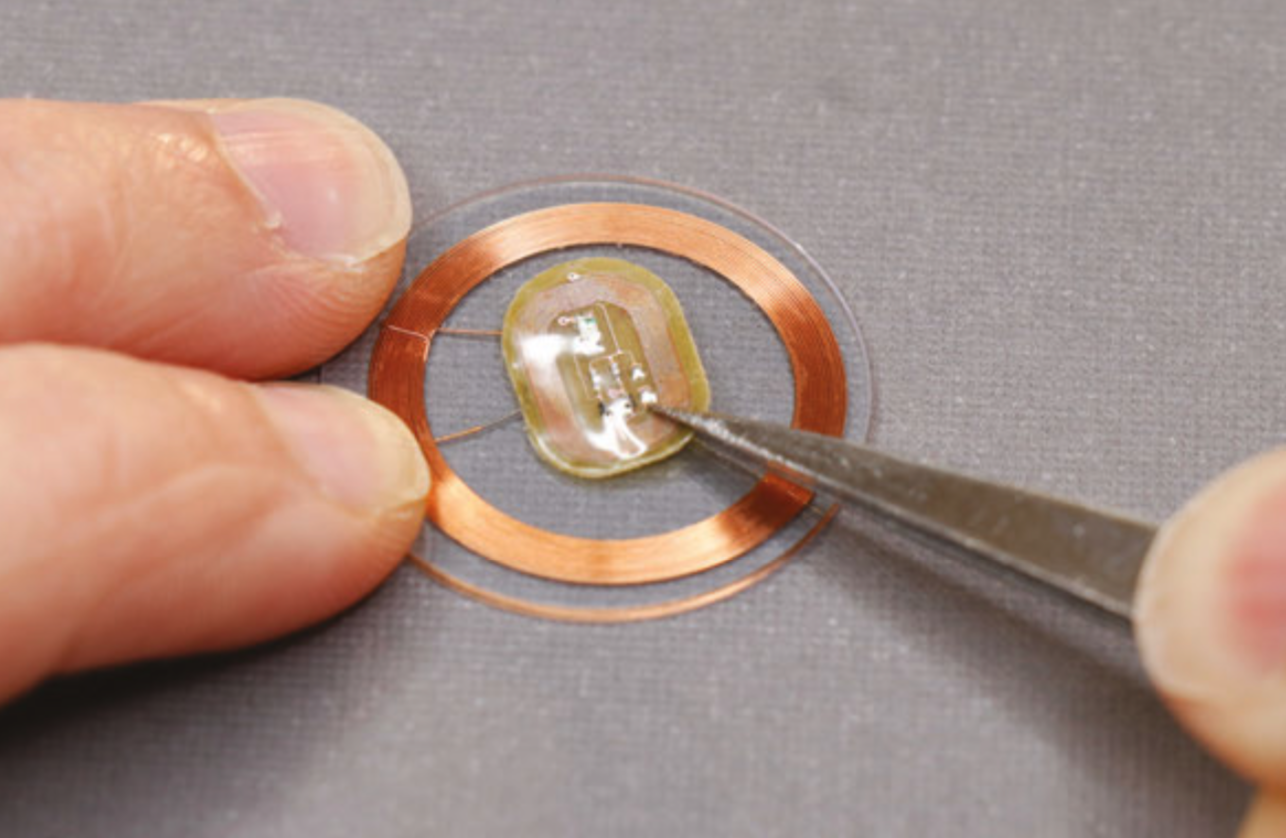
We mixed up about 6oz (170g) of resin, then tinted it green for a tech-emerald look. This was plenty for two cabochons and three to four extra shapes. Follow the manufacturer’s instructions to mix up your resin. Generally, it’s a 1:1 ratio by volume. A good method for this is to pour each part into matching containers, up to the same measuring mark. Then, pour both into a third cup and stir. Stir slowly, but thoroughly, for at least two or three minutes, making sure to scrape the sides of your mixing cup often. If the resin is not completely and evenly mixed, it will not cure properly. If tinting your resin, add the tint to your mixed resin one drop at a time, slowly deepening the colour to your preference.
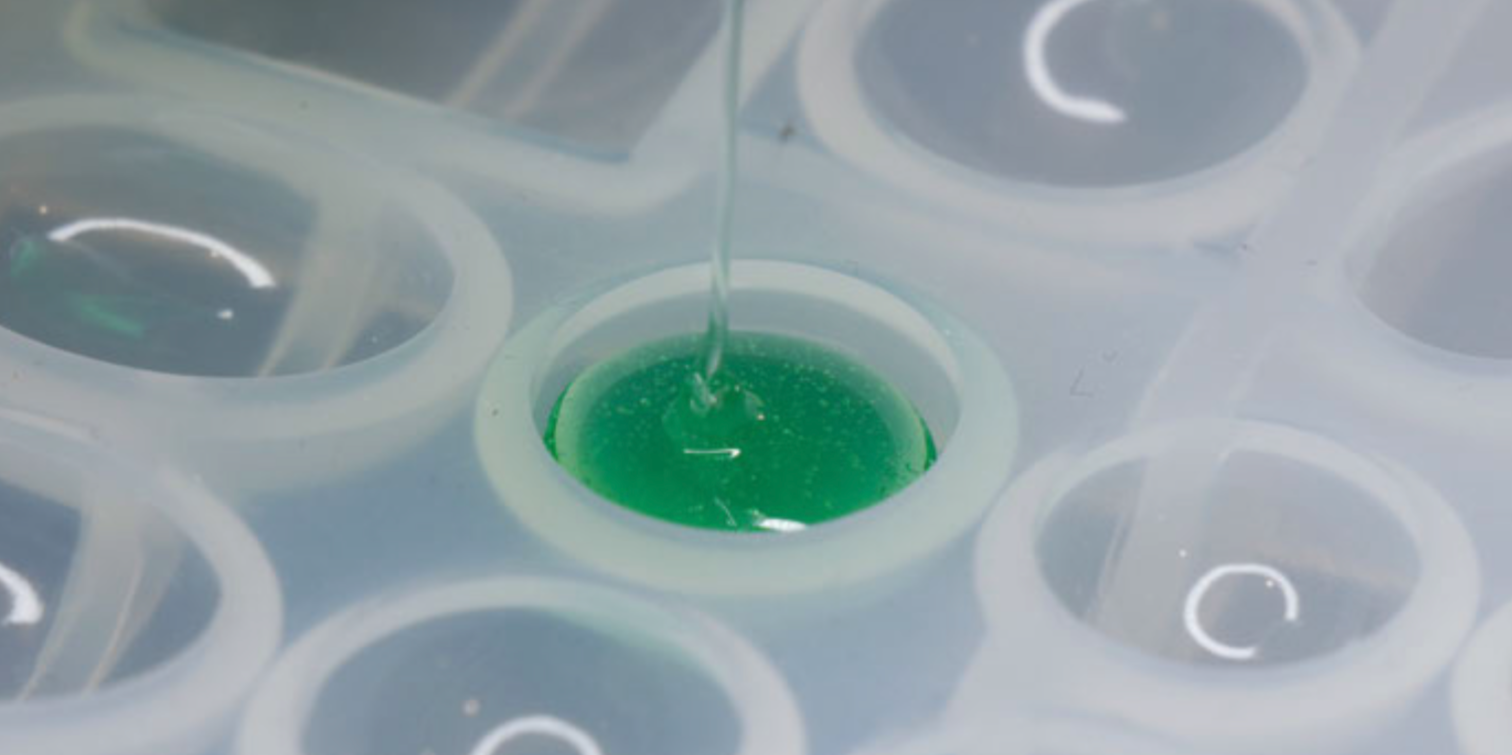
Once your resin is mixed and tinted, you’ll notice lots of tiny bubbles that have been incorporated while you were stirring. Let the mixture rest for a few minutes so the bubbles can float to the top, then use a stick to move the bubbles to the side of your container and pop them.
When you’ve removed as many bubbles as possible, it’s time to pour! Place your moulds on a level surface where they’ll be able to sit undisturbed for the amount of time required to cure (check the manufacturer’s instructions; ours specified 24 hours curing time). Pour the resin in a thin stream into the deepest point of your mould, and let it slowly rise to just below the top lip of your mould. Don’t overfill the mould, or the resin will bow and have a convex bottom when you remove it from the mould. Pouring the resin in a thin stream can help pop larger bubbles that are still in the mix.
With the resin in your mould, you can slide the NFC tag into place. Using tweezers, dip the tag into your unpoured resin to coat it first – this will help the resin in your mould accept the tag without adding too many bubbles. Then, gently slide the tag into the mould and centre it in the resin. It will want to slowly sink to the bottom of the mould, and ideally it stays centred on the way down. You may need to wiggle it back into place with your tweezers or a thin stick, but try not to introduce any new bubbles.
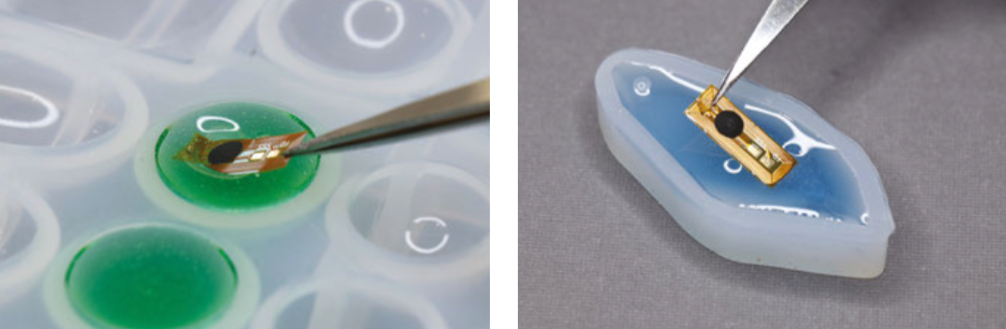
After your resin is poured and the NFC tags are in place, let the resin sit in the moulds for about ten minutes. This is enough time for most of the bubbles to rise to the top surface. Then, spray a fine mist of isopropyl alcohol over the resin to pop the bubbles. This step is optional, but we noticed that it really helped achieve clearer results.
Repeat this process for all the moulds you want to pour and add NFC tags to. Check them after a few minutes to make sure your tag hasn’t slid out of place, and remember to keep an eye on your pot life timer. Finish all your fiddling and bubble popping before the resin starts to harden. Then, leave your resin to cure for the amount of time specified in your resin’s instructions.
When the resin has completely hardened, it’s time for the exciting part: removing the cured resin from the moulds. If using silicone moulds, your piece should release from the mould without much fuss. Gently flex the silicone to let air seep between the hardened resin and the wall of the mould. Then you should be able to carefully pull the resin piece out of the mould.
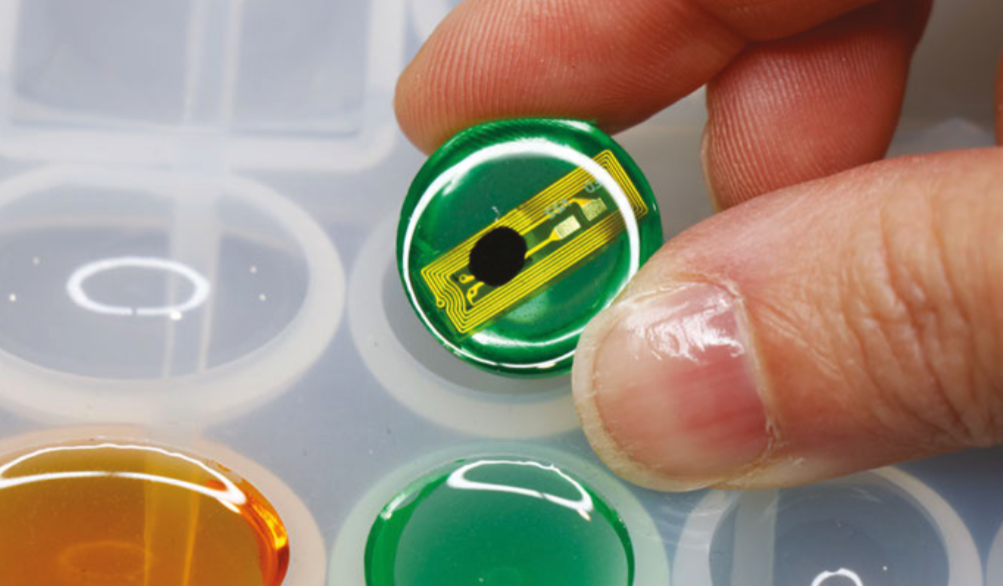
Take a moment to admire your shiny cabochons! If you discover that you’ve over-poured your moulds, or the resin has crept up the sides of the mould, making a curved back, don’t worry. Resin can be wet-sanded; just be sure to keep both the sandpaper and the piece underwater while sanding, and wear a mask to keep from inhaling resin particles.
Use glue to affix the flat-backed cabochons to the cufflink blanks. We used E6000, which is an industrial-strength adhesive that works great on plastics. Again, be sure to work in a well-ventilated area, and wear a respirator while working with E6000.
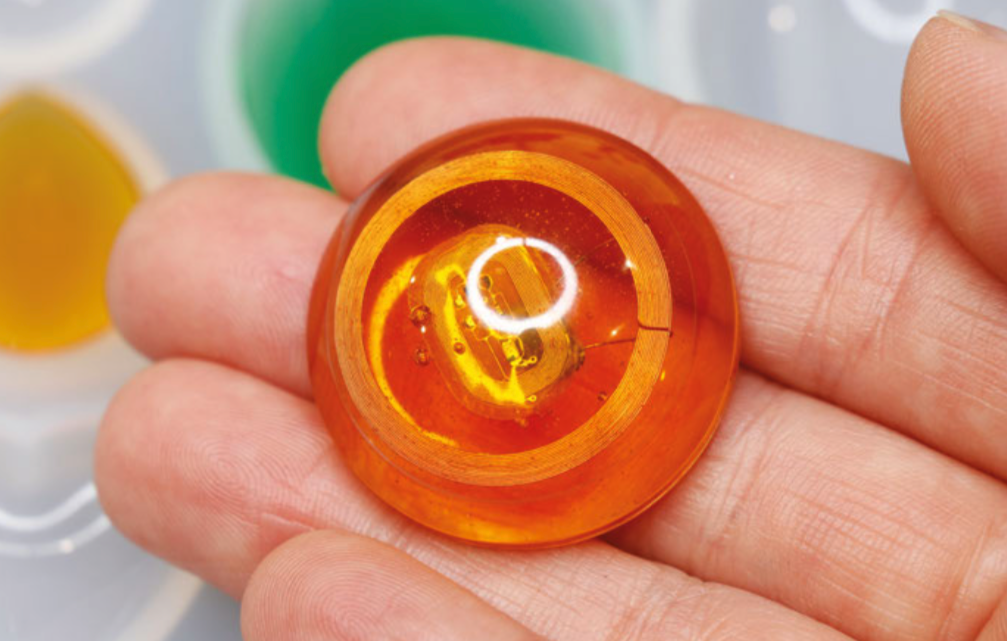
Apply the glue to the cufflink blank and hold the cabochon in place while the glue sets. Make two, and you’re done! You could also glue the cabochons to ring blanks to make NFC data rings. For pendants, you can use jewellery findings like bails and jump rings to make necklaces or key-chain fobs.
Now that you’ve made your NFC cufflinks, you can load them with data like a website, a password, or a secret message. There are a few methods for doing this. If you have an NFC-capable smartphone, such as an Android phone, you won’t need any additional hardware. You can download a free app like NFC Tools to write and read data on your cufflink. NFC Tasks, another free app, lets you create automatic actions for your phone to perform when the NFC tag is read.
If you have an iPhone, (at the time of publishing of this article) you cannot write directly to NFC tags from your phone. But don’t worry! You can still join the NFC fun by purchasing a USB NFC reader/writer. You’ll be able to read and write to NFC tags with your computer using the NFC Tools desktop app. Your author purchased the NFC reader/writer shown here for about $35 on Amazon.com. You can still use NFC Tools on your iPhone to read tags, and the latest version of iOS, 12.1, supports background NFC tag reading. Some basic actions, like opening a URL in a browser, can now be performed right from the home screen or lock screen – pretty cool!
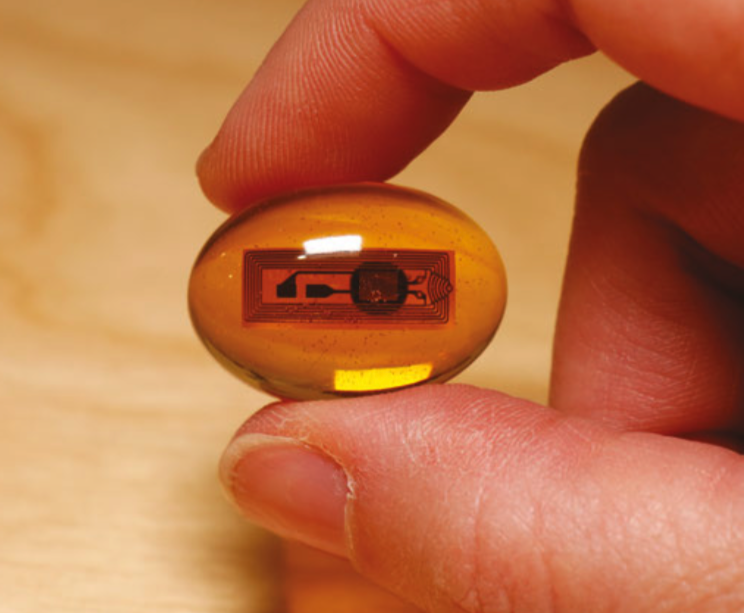
For a more custom hardware/software approach, try Adafruit’s PN532 NFC/RFID controller breakout board, which lets you add NFC functionality to Raspberry Pi or Arduino projects. It takes some soldering and programming to set up, but this breakout gives you lower-level control of the NFC tag, and is supported by an Adafruit NFC Arduino library. The library includes handy example code for reading and writing to tags, and reformatting Mifare Classic tags with the NDEF format.
Sport your new cufflinks at your next dressy event, and you’ll be both covert and classy! Or, gift these to your favourite snappy dresser, loaded with a secret message for their eyes only. Heading to a conference? Instead of handing out a business card to connect with someone, hold your wrist over their smartphone to bring up your webpage. It’s not magic, it’s technology!
You can find more tutorials like this in Wearable Tech Projects by Sophy Wong, a HackSpace magazine publication. Wearable Tech Projects is on sale now from the Raspberry Pi Press online store, and it’s available as part of the Raspberry Pi Store Black Friday sale this weekend.

The post Make your own NFC data cufflinks appeared first on Raspberry Pi.
Raspberry Pi 4 just got a lot cooler! The last four months of firmware updates have taken over half a watt out of idle power and nearly a watt out of fully loaded power. For The MagPi magazine, Gareth Halfacree gets testing.
![]()
Raspberry Pi 4 launched with a wealth of new features to tempt users into upgrading: a more powerful CPU and GPU, more memory, Gigabit Ethernet, and USB 3.0 support. More processing power means more electrical power, and Raspberry Pi 4 is the most power-hungry member of the family.
The launch of a new Raspberry Pi model is only the beginning of the story. Development is continuous, with new software and firmware improving each board long after it has rolled off the factory floor.
Raspberry Pi 4 is no exception: since launch, there has been a series of updates which have reduced its power needs and, in doing so, enabled it to run considerably cooler. These updates apply to any Raspberry Pi 4, whether you picked one up on launch day or are only just now making a purchase.
This feature takes a look at how each successive firmware release has improved Raspberry Pi 4, using a synthetic workload designed – unlike a real-world task – to make the system-on-chip (SoC) get as hot as possible in as short a time as possible.
Read on to see what wonders a simple firmware update can work.
To test how well each firmware revision handles the heat, a power-hungry synthetic workload was devised to represent a worst-case scenario: the stress-ng CPU stress-testing utility places all four CPU cores under heavy and continuous load. Meanwhile, the glxgears tool exercises the GPU. Both tools can be installed by typing the following at the Terminal:
sudo apt install stress-ng mesa-utils
The CPU workload can be run with the following command:
stress-ng --cpu 0 --cpu-method fft
The command will run for a full day at default settings; to cancel, press CTRL+C on the keyboard.
To run the GPU workload, type:
glxgears -fullscreen
This will display a 3D animation of moving gears, filling the entire screen. To close it, press ALT+F4 on the keyboard.
For more information on how both tools work, type:
man stress-ngman glxgears
During the testing for this feature, both of the above workloads are run simultaneously for ten minutes. Afterwards, Raspberry Pi is allowed to cool for five minutes.
The thermal imagery was taken at idle, then again after 60 seconds of the stress-ng load alone.
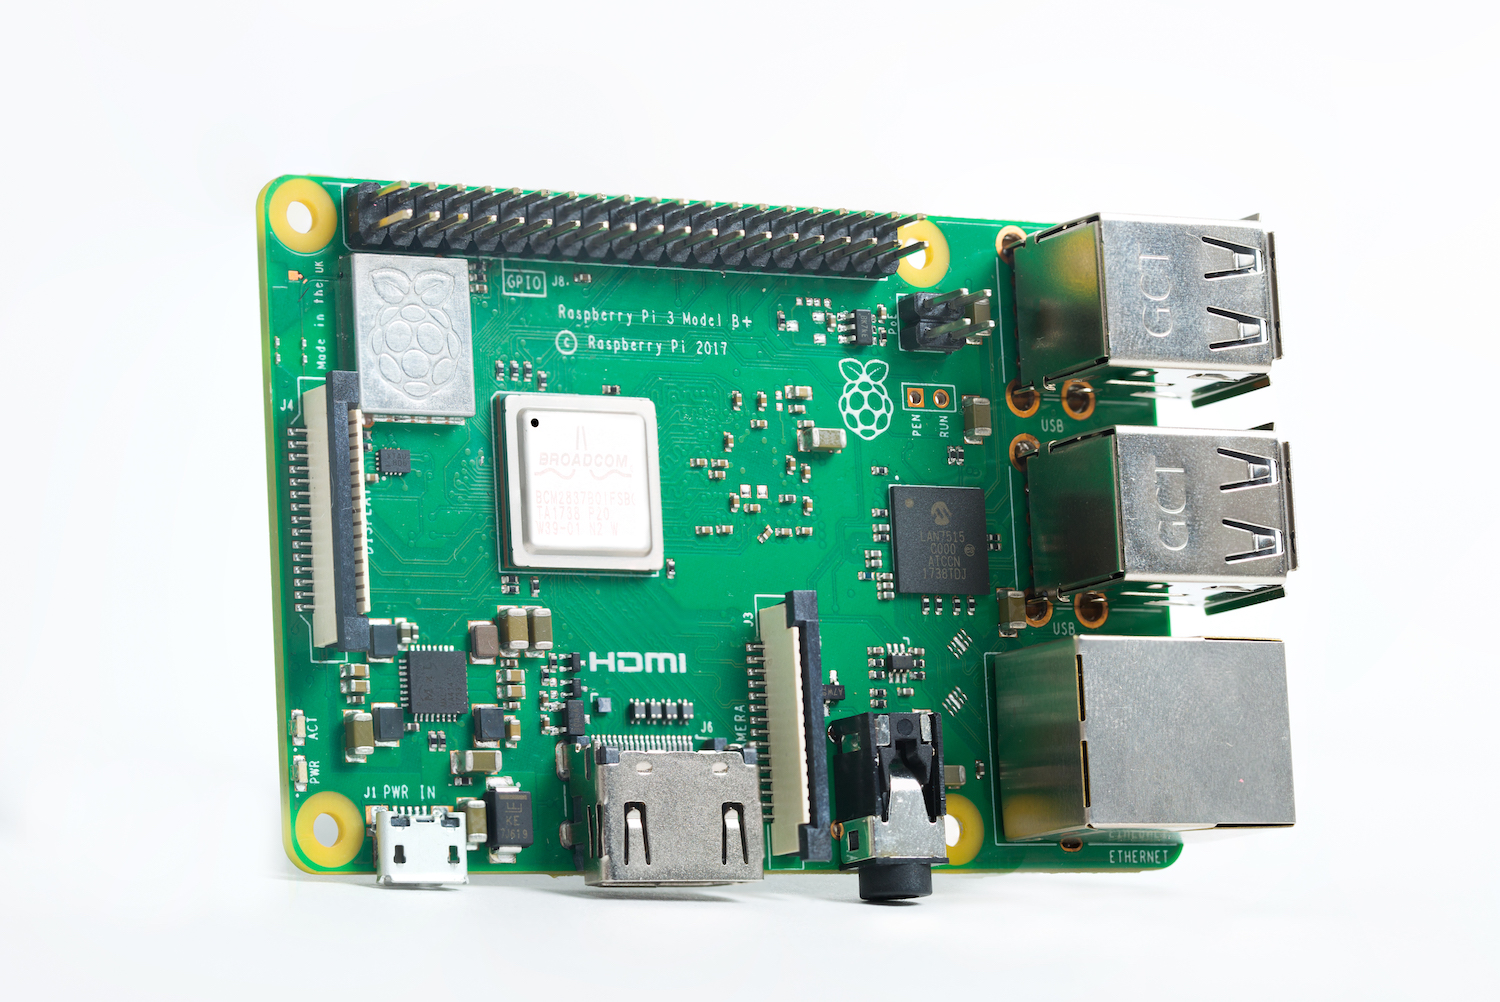
Already well established, Raspberry Pi 3 Model B+ was the device to beat
Before Raspberry Pi 4 came on the scene, Raspberry Pi 3 Model B+ was the must-have single-board computer. Benefiting from all the work that had gone into the earlier Raspberry Pi 3 Model B alongside improved hardware, Raspberry Pi 3B+ was – and still is – a popular device. Let’s see how well it performs before testing Raspberry Pi 4.
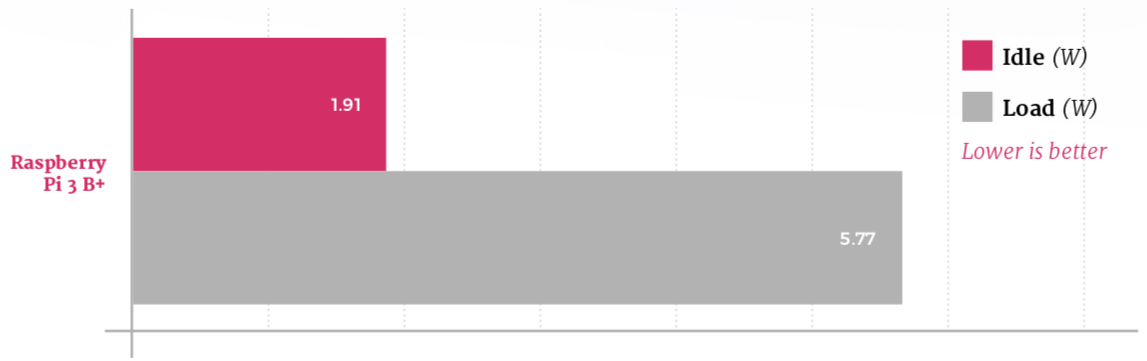
An efficient processor and an improved design for the power circuitry compared to its predecessor help keep Raspberry Pi 3B+ power draw down: at idle, the board draws just 1.91W; when running the synthetic workload, that increases to 5.77W.
A thermal camera shows where the power goes. At idle, the system-on-chip is relatively cool while the combined USB and Ethernet controller to the middle-right is a noticeable hot spot; at load, measured after 60 seconds of a CPU-intensive synthetic workload, the SoC is by far the hottest component at 58.1°C.

This chart measures Raspberry Pi 3B+ CPU speed and temperature during a ten-minute power-intensive synthetic workload. The test runs on both the CPU and GPU, and is followed by a five-minute cooldown. Raspberry Pi 3B+ quickly reaches the ‘soft throttle’ point of 60°C, designed to prevent the SoC hitting the hard-throttle maximum limit of 80°C, and the CPU remains throttled at 1.2GHz for the duration of the benchmark run.
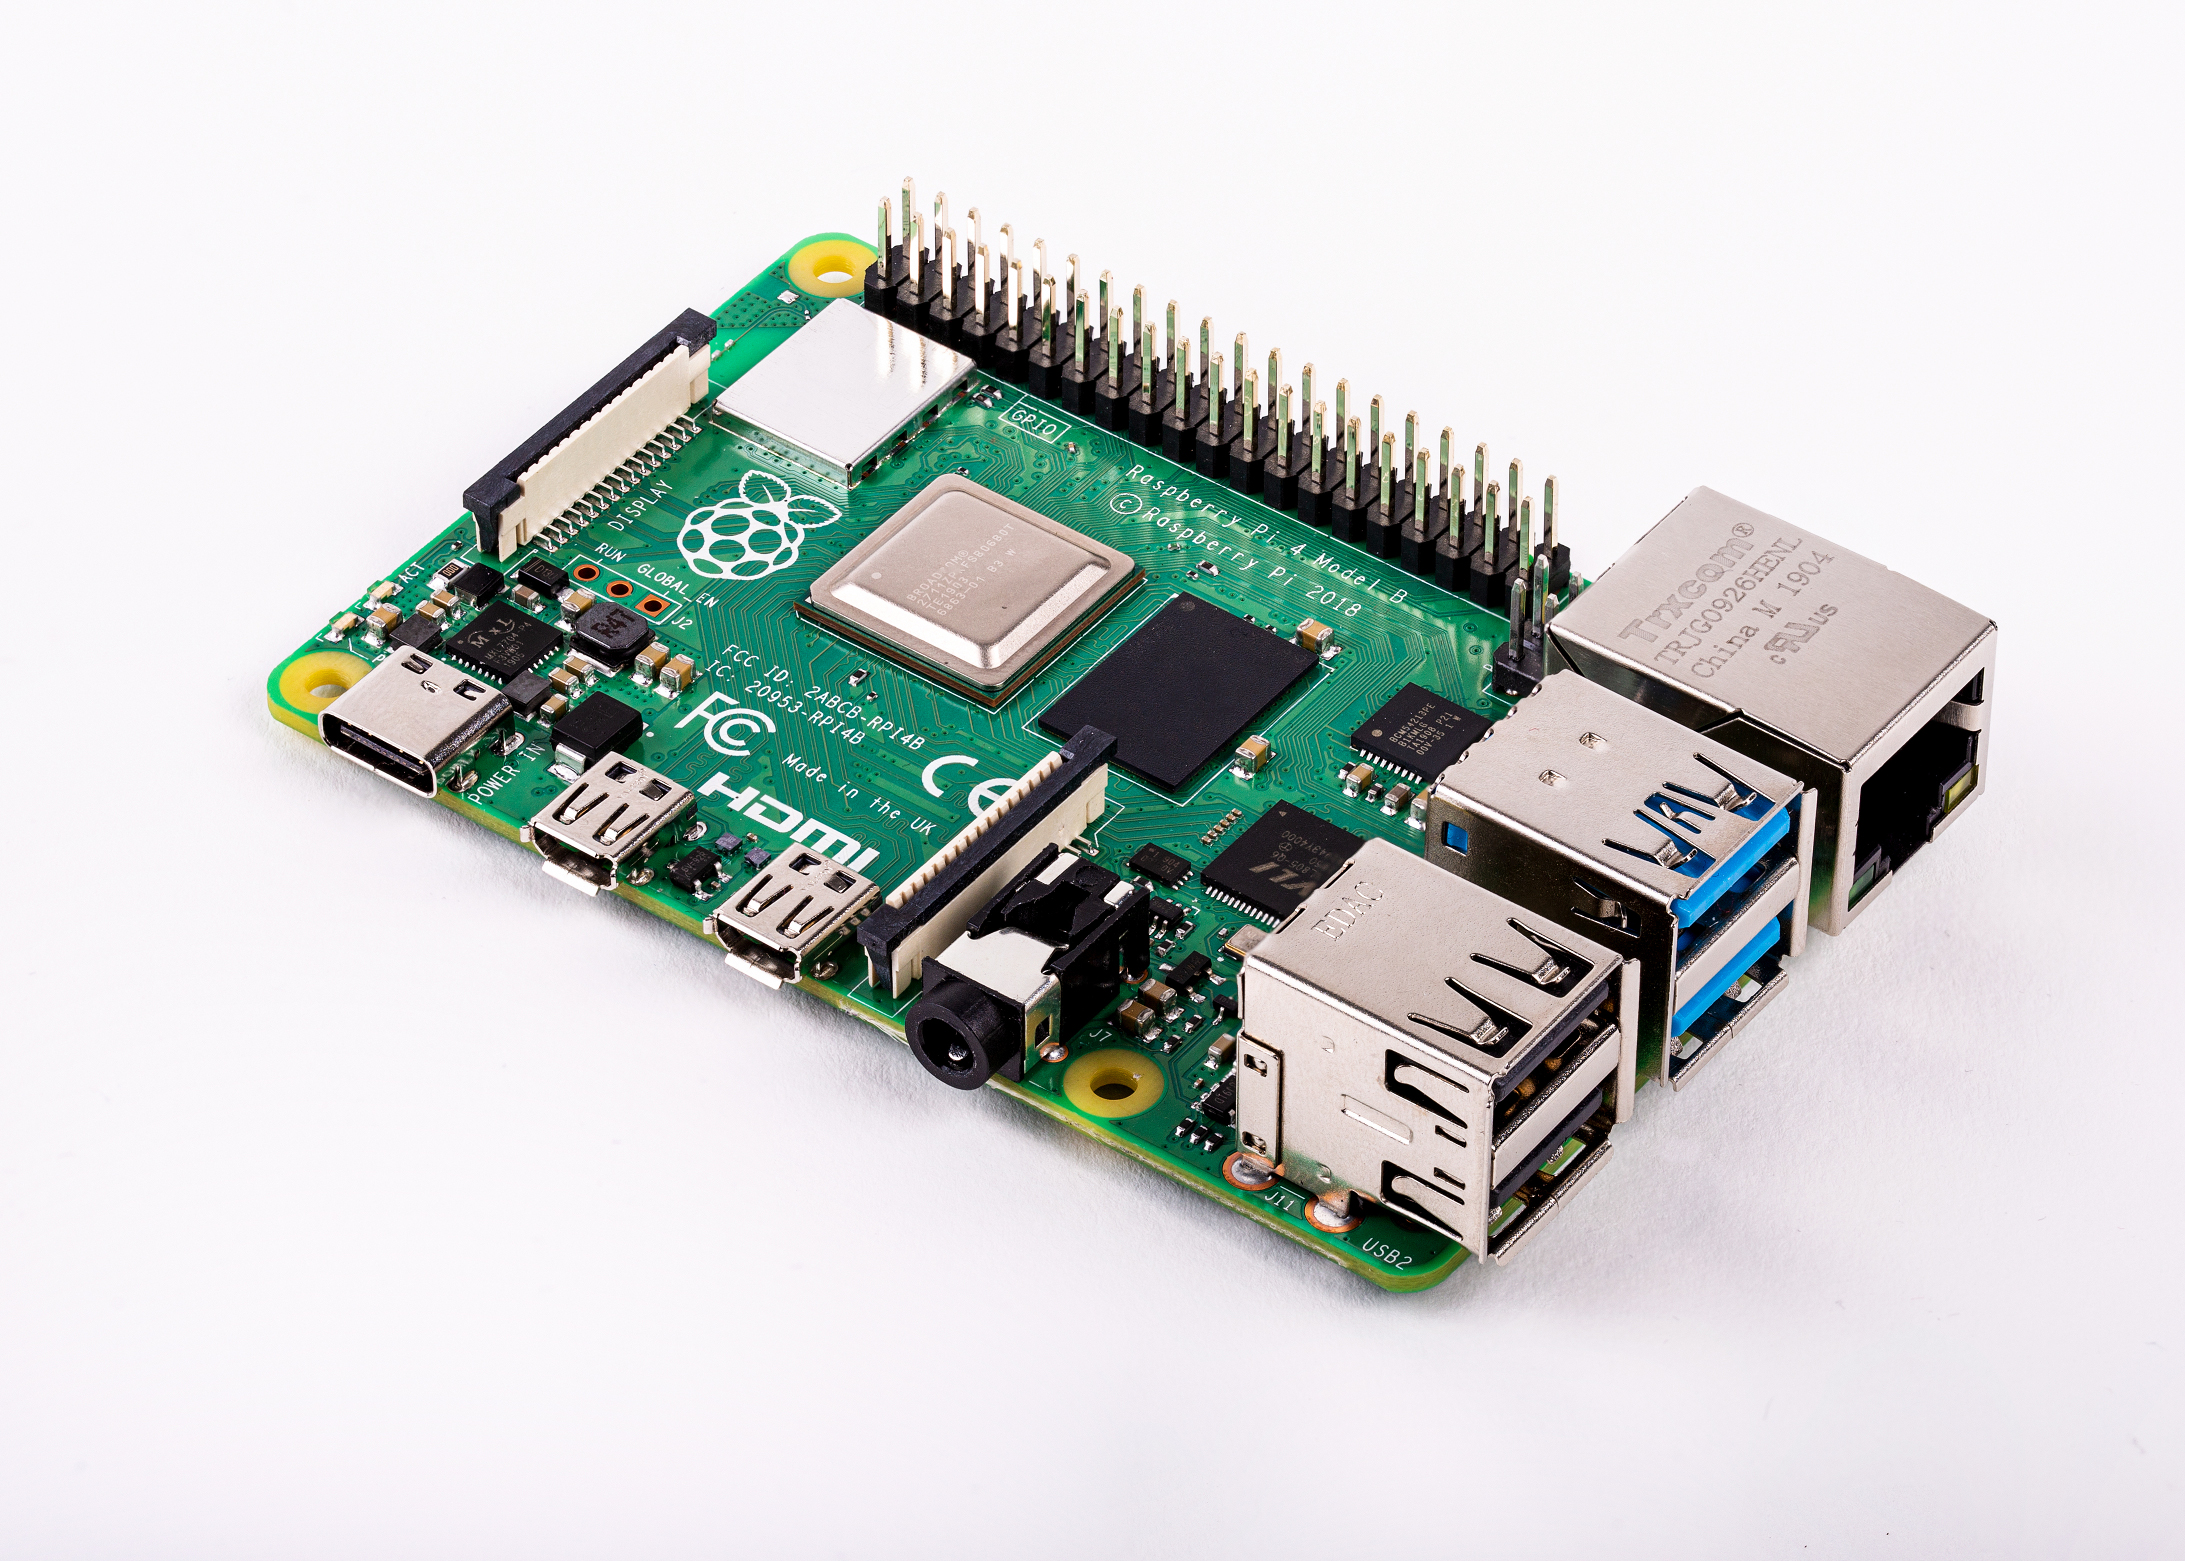
The fastest Raspberry Pi ever made demanded the most power
Raspberry Pi 4 Model B launched with a range of improvements over Raspberry Pi 3B+, including a considerably more powerful CPU, a new GPU, up to four times the memory, and USB 3.0 ports. All that new hardware came at a cost: higher power draw and heat output. So let’s see how Raspberry Pi 4 performed at launch.
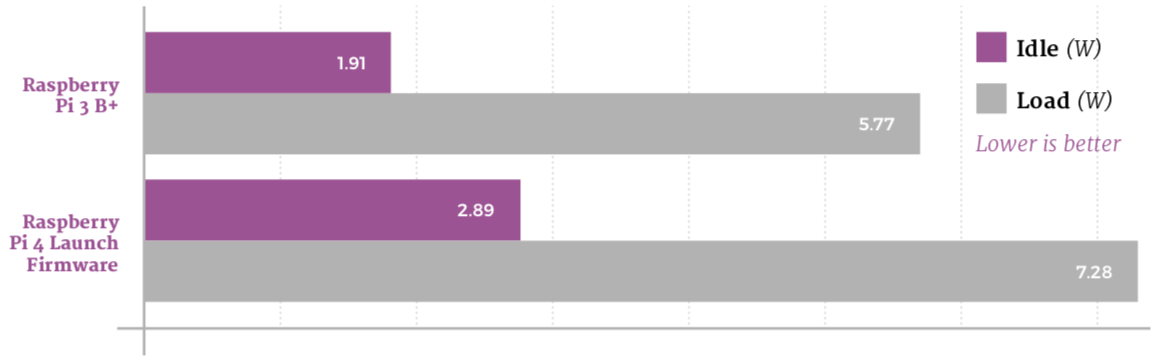
There’s no denying it, Raspberry Pi 4 was a hungry beast at launch. Even idling at the Raspbian desktop, the board draws 2.89W, hitting a peak of 7.28W under a worst-case synthetic CPU and GPU workload – a hefty increase over Raspberry Pi 3 B+.
Thermal imaging shows that Raspberry Pi 4, using the launch-day firmware, runs hot even at idle, with hot spots at the USB controller to the middle-right and power-management circuitry to the bottom-left. Under a heavy synthetic load, the SoC hits 72.1°C by the 60-second mark.

Raspberry Pi 4 manages to go longer than Raspberry Pi 3 B+ before the synthetic workload causes it to throttle; but throttle it does after just 65 seconds. As the workload runs, the CPU drops from 1.5GHz to a stable 1GHz, then dips as low as 750MHz towards the end.
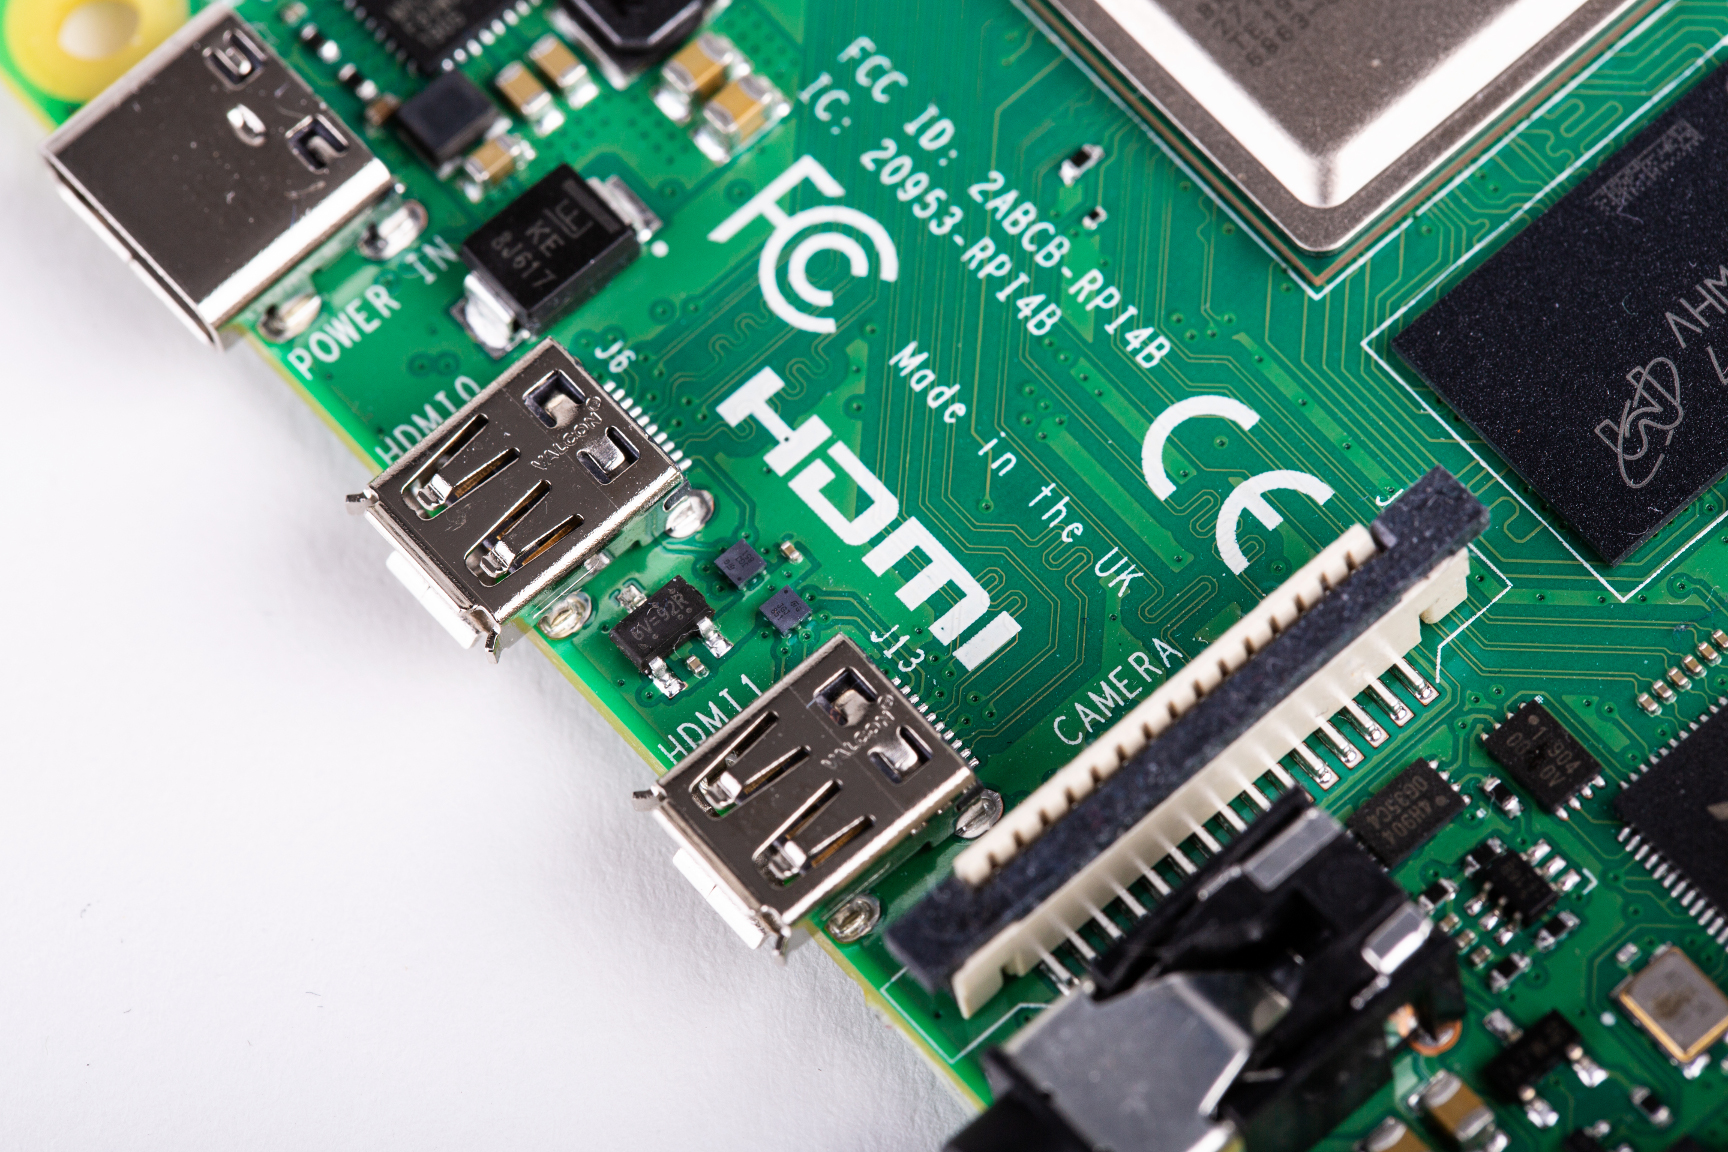
USB power management brings some relief for Raspberry Pi heat
The first major firmware update developed for Raspberry Pi 4 brought power management features to the Via Labs Inc. (VLI) USB controller. The VLI controller is responsible for handling the two USB 3.0 ports, and the firmware update allowed it to run cooler.
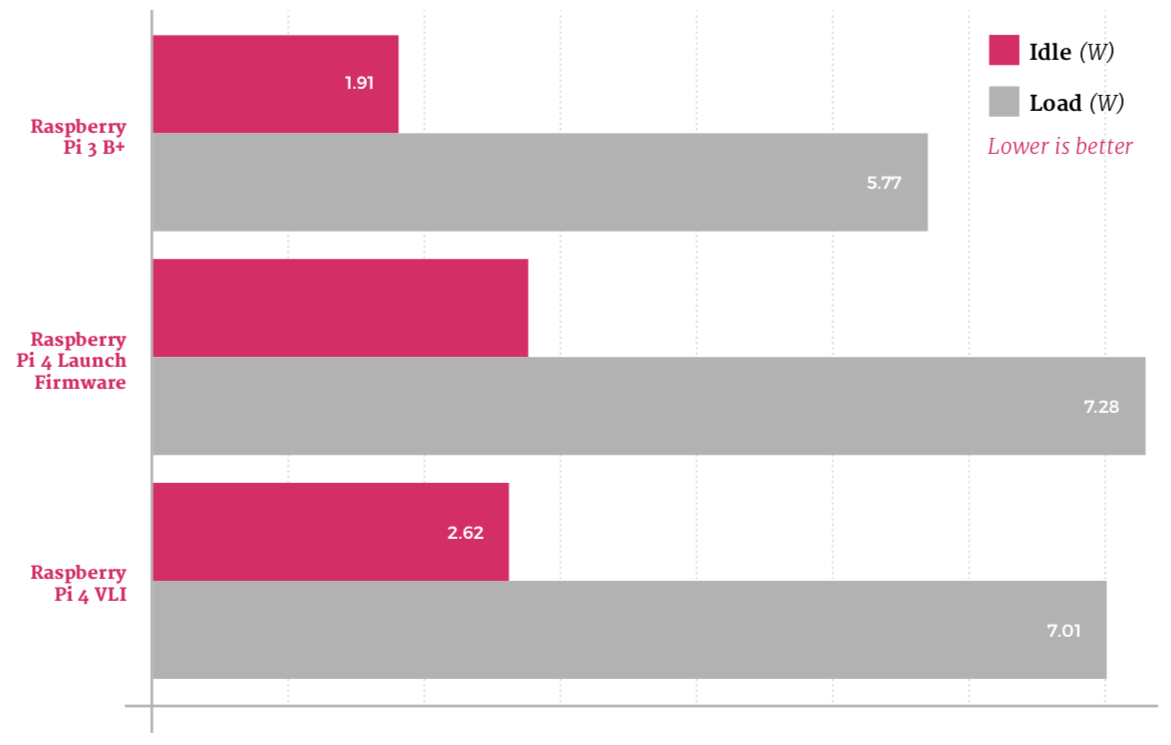
Even without anything connected to Raspberry Pi 4’s USB 3.0 ports, the VLI firmware upgrade has a noticeable impact: idle power draw has dropped to 2.62W, while the worst-case draw under a heavy synthetic workload sits at 7.01W.
The biggest impact on heat is seen, unsurprisingly, on the VLI chip to the middle-right; the VLI firmware helps keep the SoC in the centre and the power-management circuitry at the bottom-left cooler than the launch firmware. The SoC reached 71.4°C under load – a small, but measurable, improvement.

Enabling power management on the VLI chip has a dramatic impact on performance in the worst-case synthetic workload: the throttle point is pushed back to 77 seconds, the CPU spends more time at its full 1.5GHz speed, and it doesn’t drop to 750MHz at all. The SoC also cools marginally more rapidly at the end of the test.

With VLI tamed, it’s the memory’s turn now
The next firmware update, designed to be used alongside the VLI power management features, changes how Raspberry Pi 4’s memory – LPDDR4 SDRAM – operates. While having no impact on performance, it helps to push the power draw down still further at both idle and load.
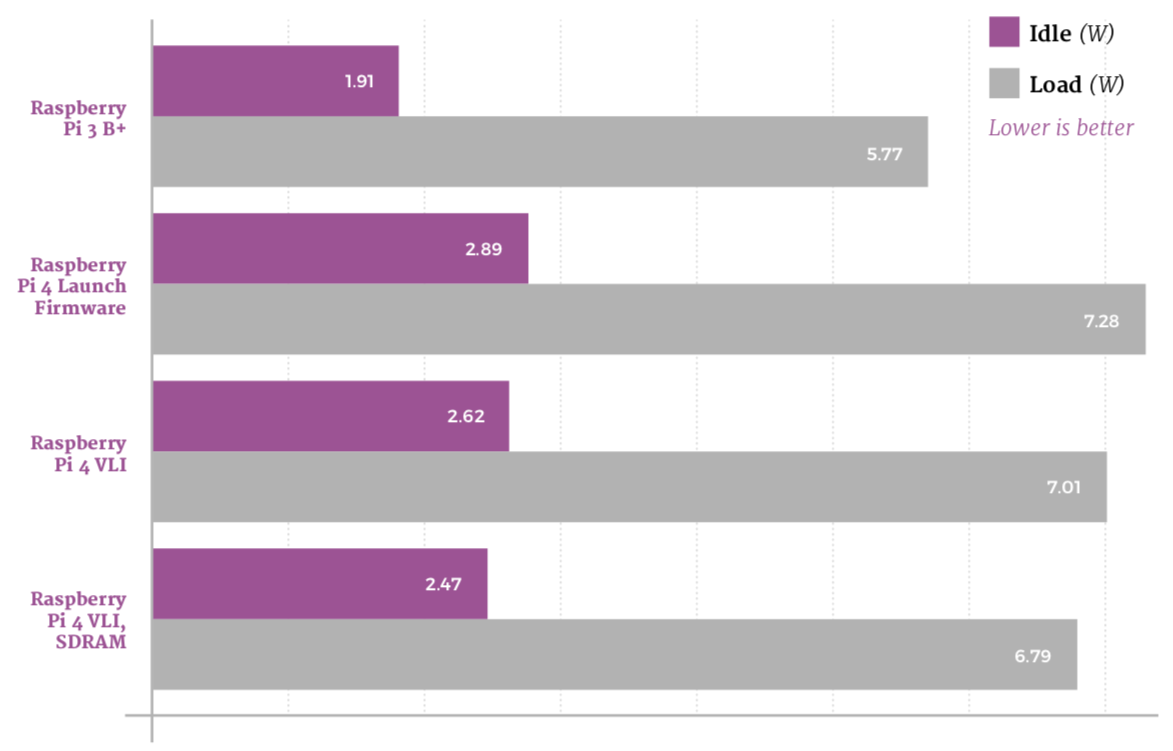
As with the VLI update, the SDRAM update brings a welcome drop in power draw at both idle and load. Raspberry Pi 4 now draws 2.47W at idle and 6.79W running a worst-case synthetic load – a real improvement from the 7.28W at launch.
Thermal imaging shows the biggest improvement yet, with both the SoC and the power-management circuitry running considerably cooler at idle after the installation of this update. After 60 seconds of load, the SoC is noticeably cooler at 68.8°C – a drop of nearly 3°C over the VLI firmware alone.

A cooler SoC means better performance: the throttle point under the worst-case synthetic workload is pushed back to 109 seconds, after which Raspberry Pi 4 continues to bounce between full 1.5GHz and throttled 1GHz speeds for the entire ten-minute benchmark run – bringing the average speed up considerably.
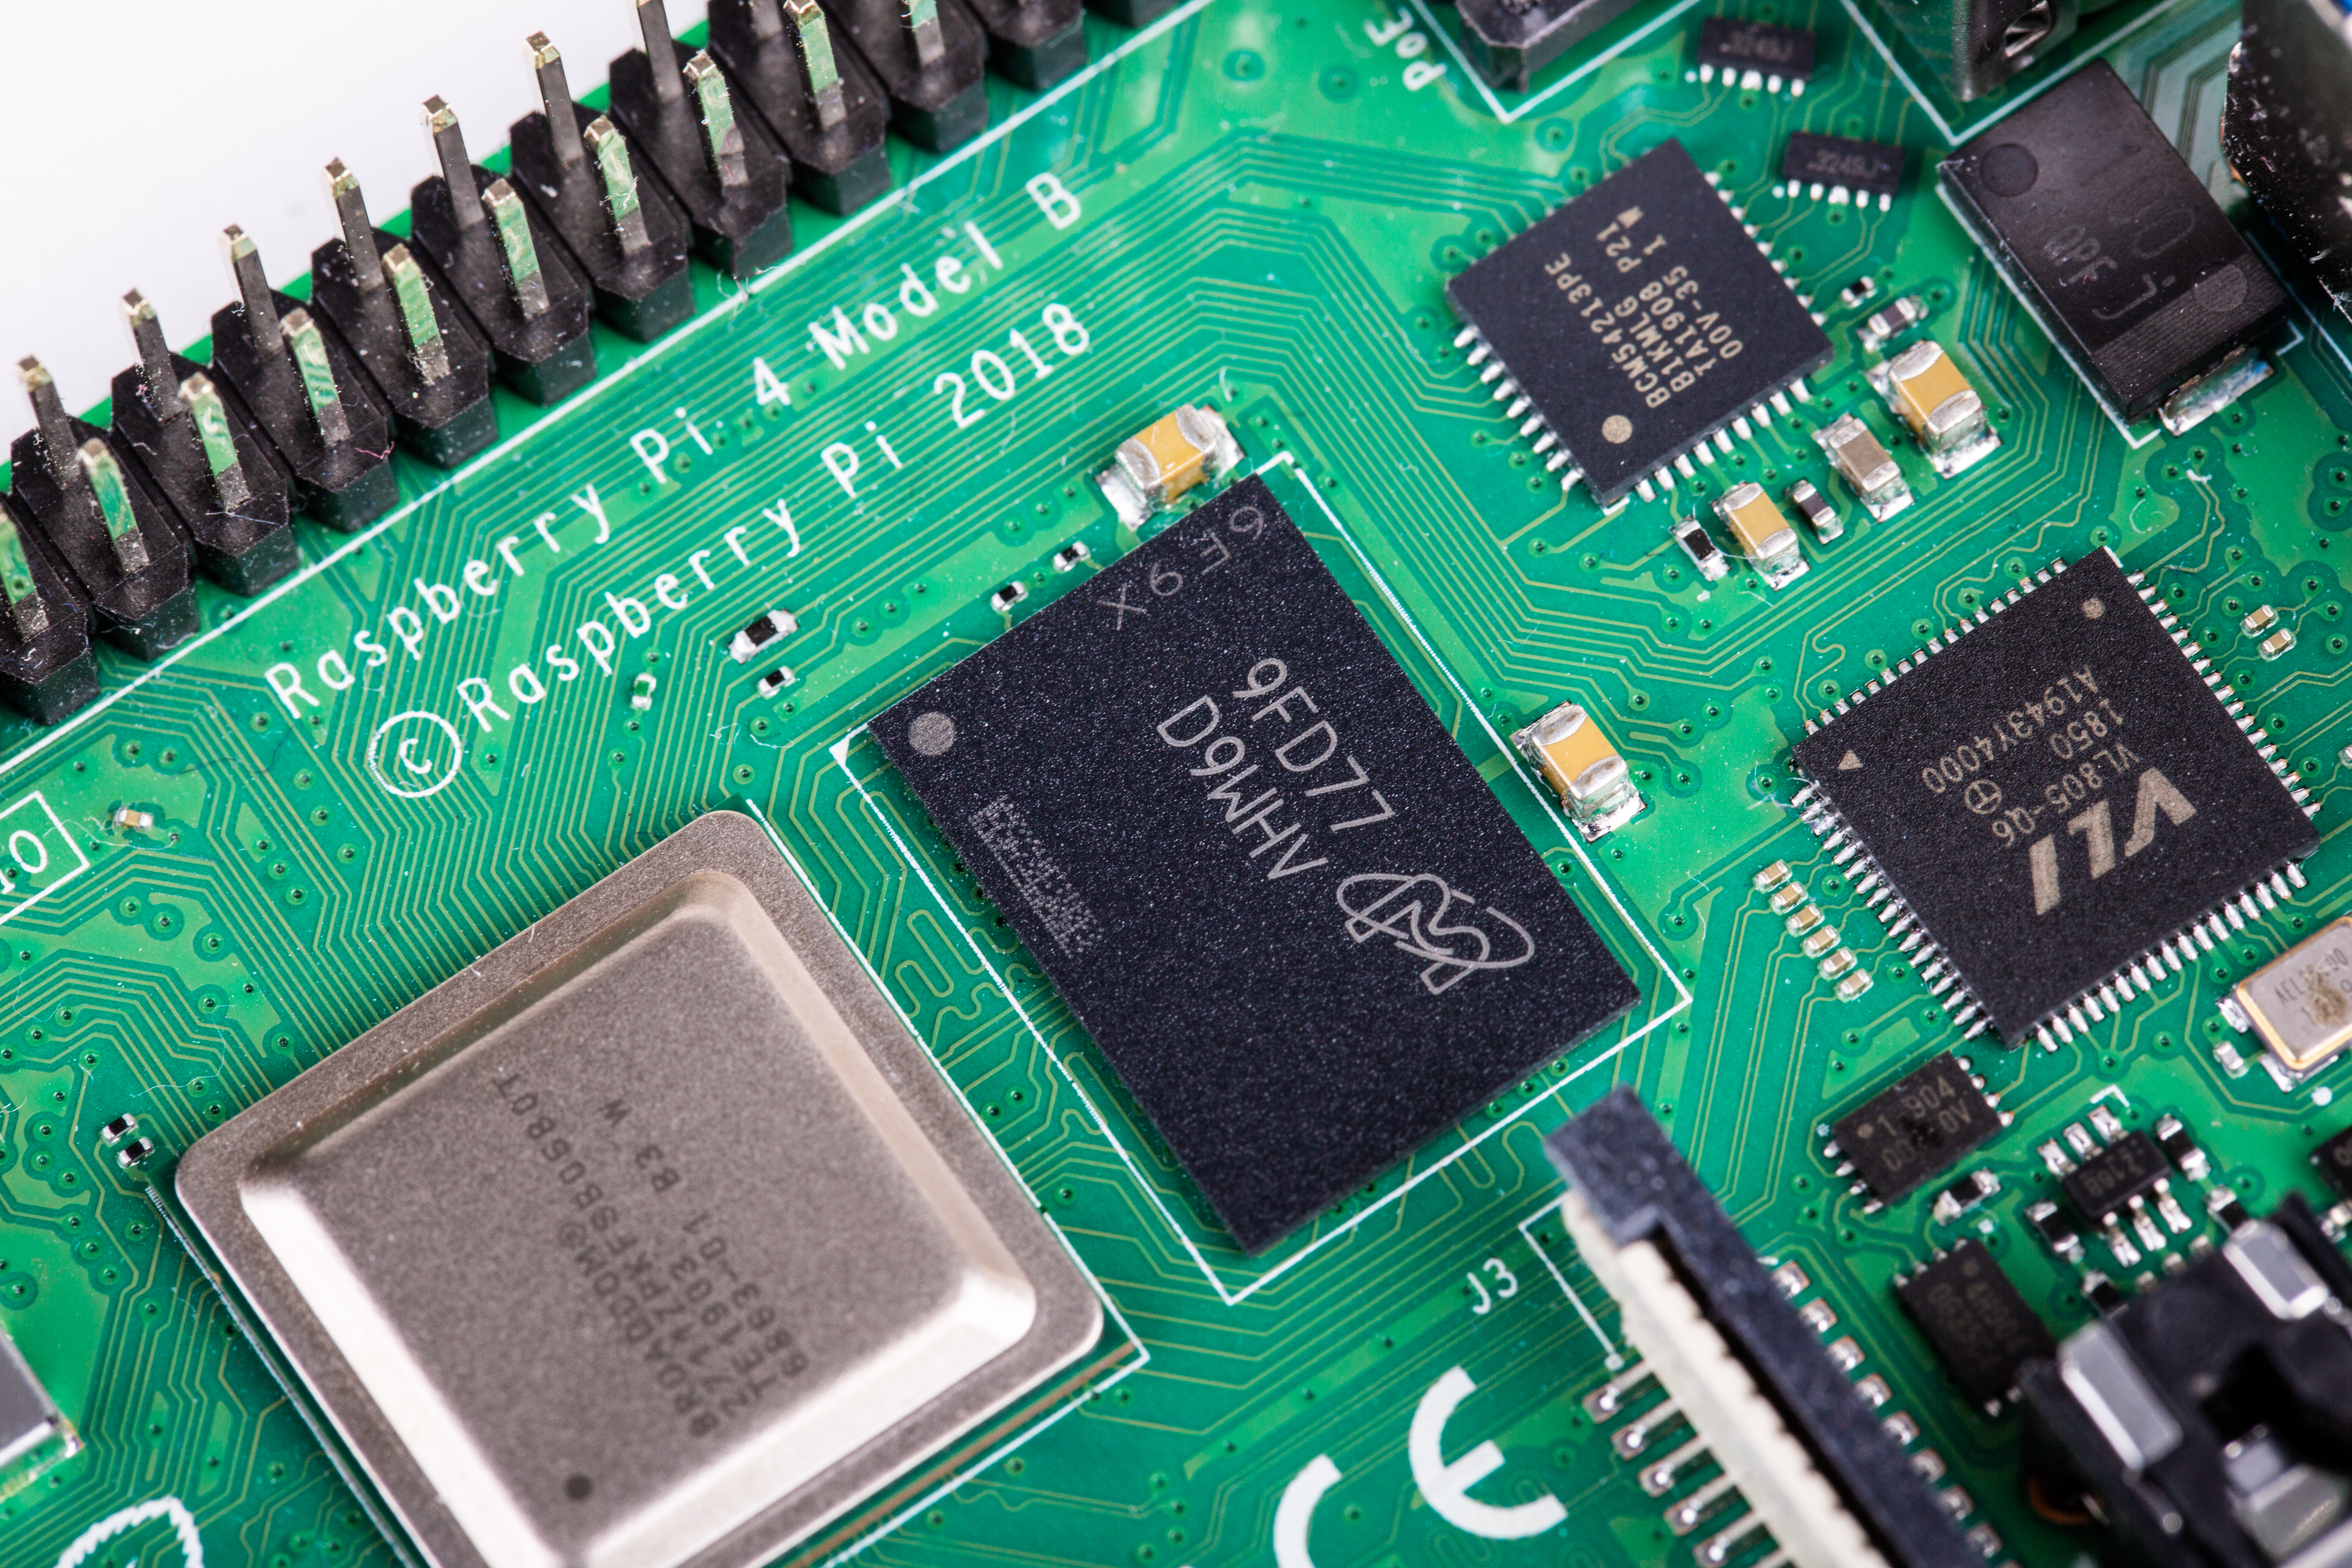
September 2019’s firmware update includes several changes, while bringing with it the VLI power management and SDRAM firmware updates. The biggest change is how the BCM2711B0 SoC on Raspberry Pi 4 increases and decreases its clock-speed in response to demand and temperature.
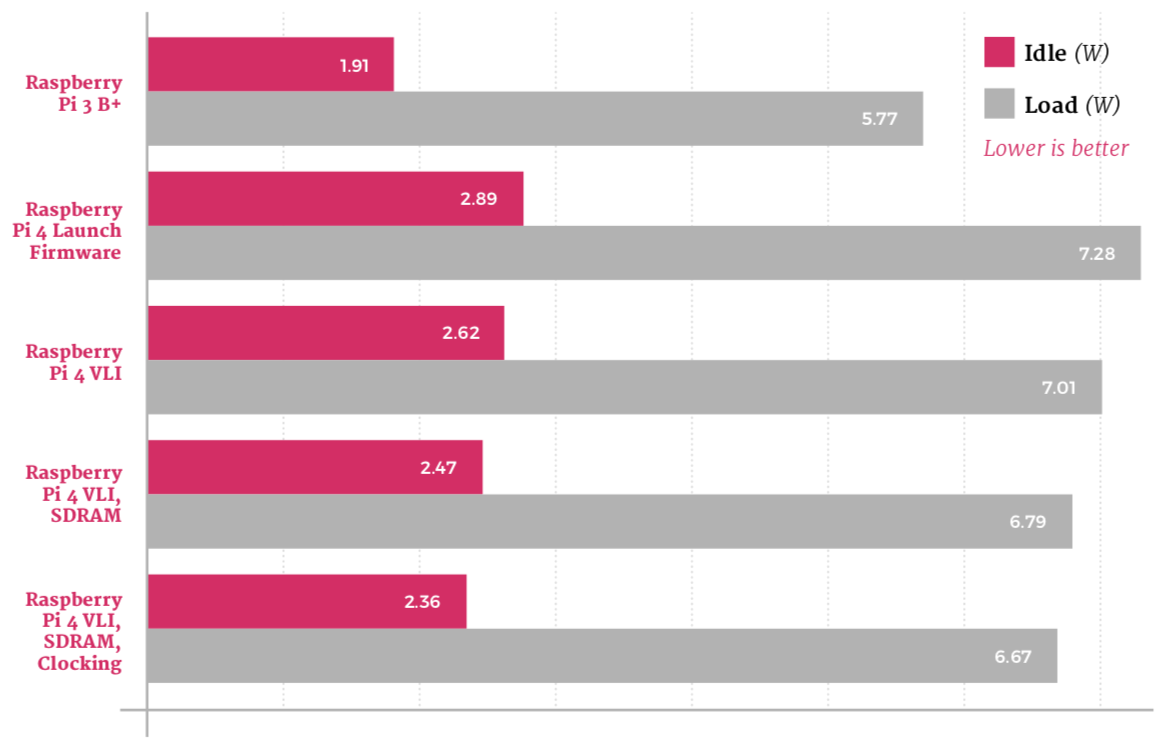
The September firmware update has incremental improvements: idle power draw is down to 2.36W and load under the worst-case synthetic workload to a peak of 6.67W, all without any reduction in raw performance or loss of functionality.
Improved processor clocking brings a noticeable drop in idle temperature throughout the circuit board. At load, everything’s improved – the SoC peaked at 65°C after 60 seconds of the synthetic workload, while both the VLI chip and the power-management circuitry are clearly cooler than under previous firmwares.
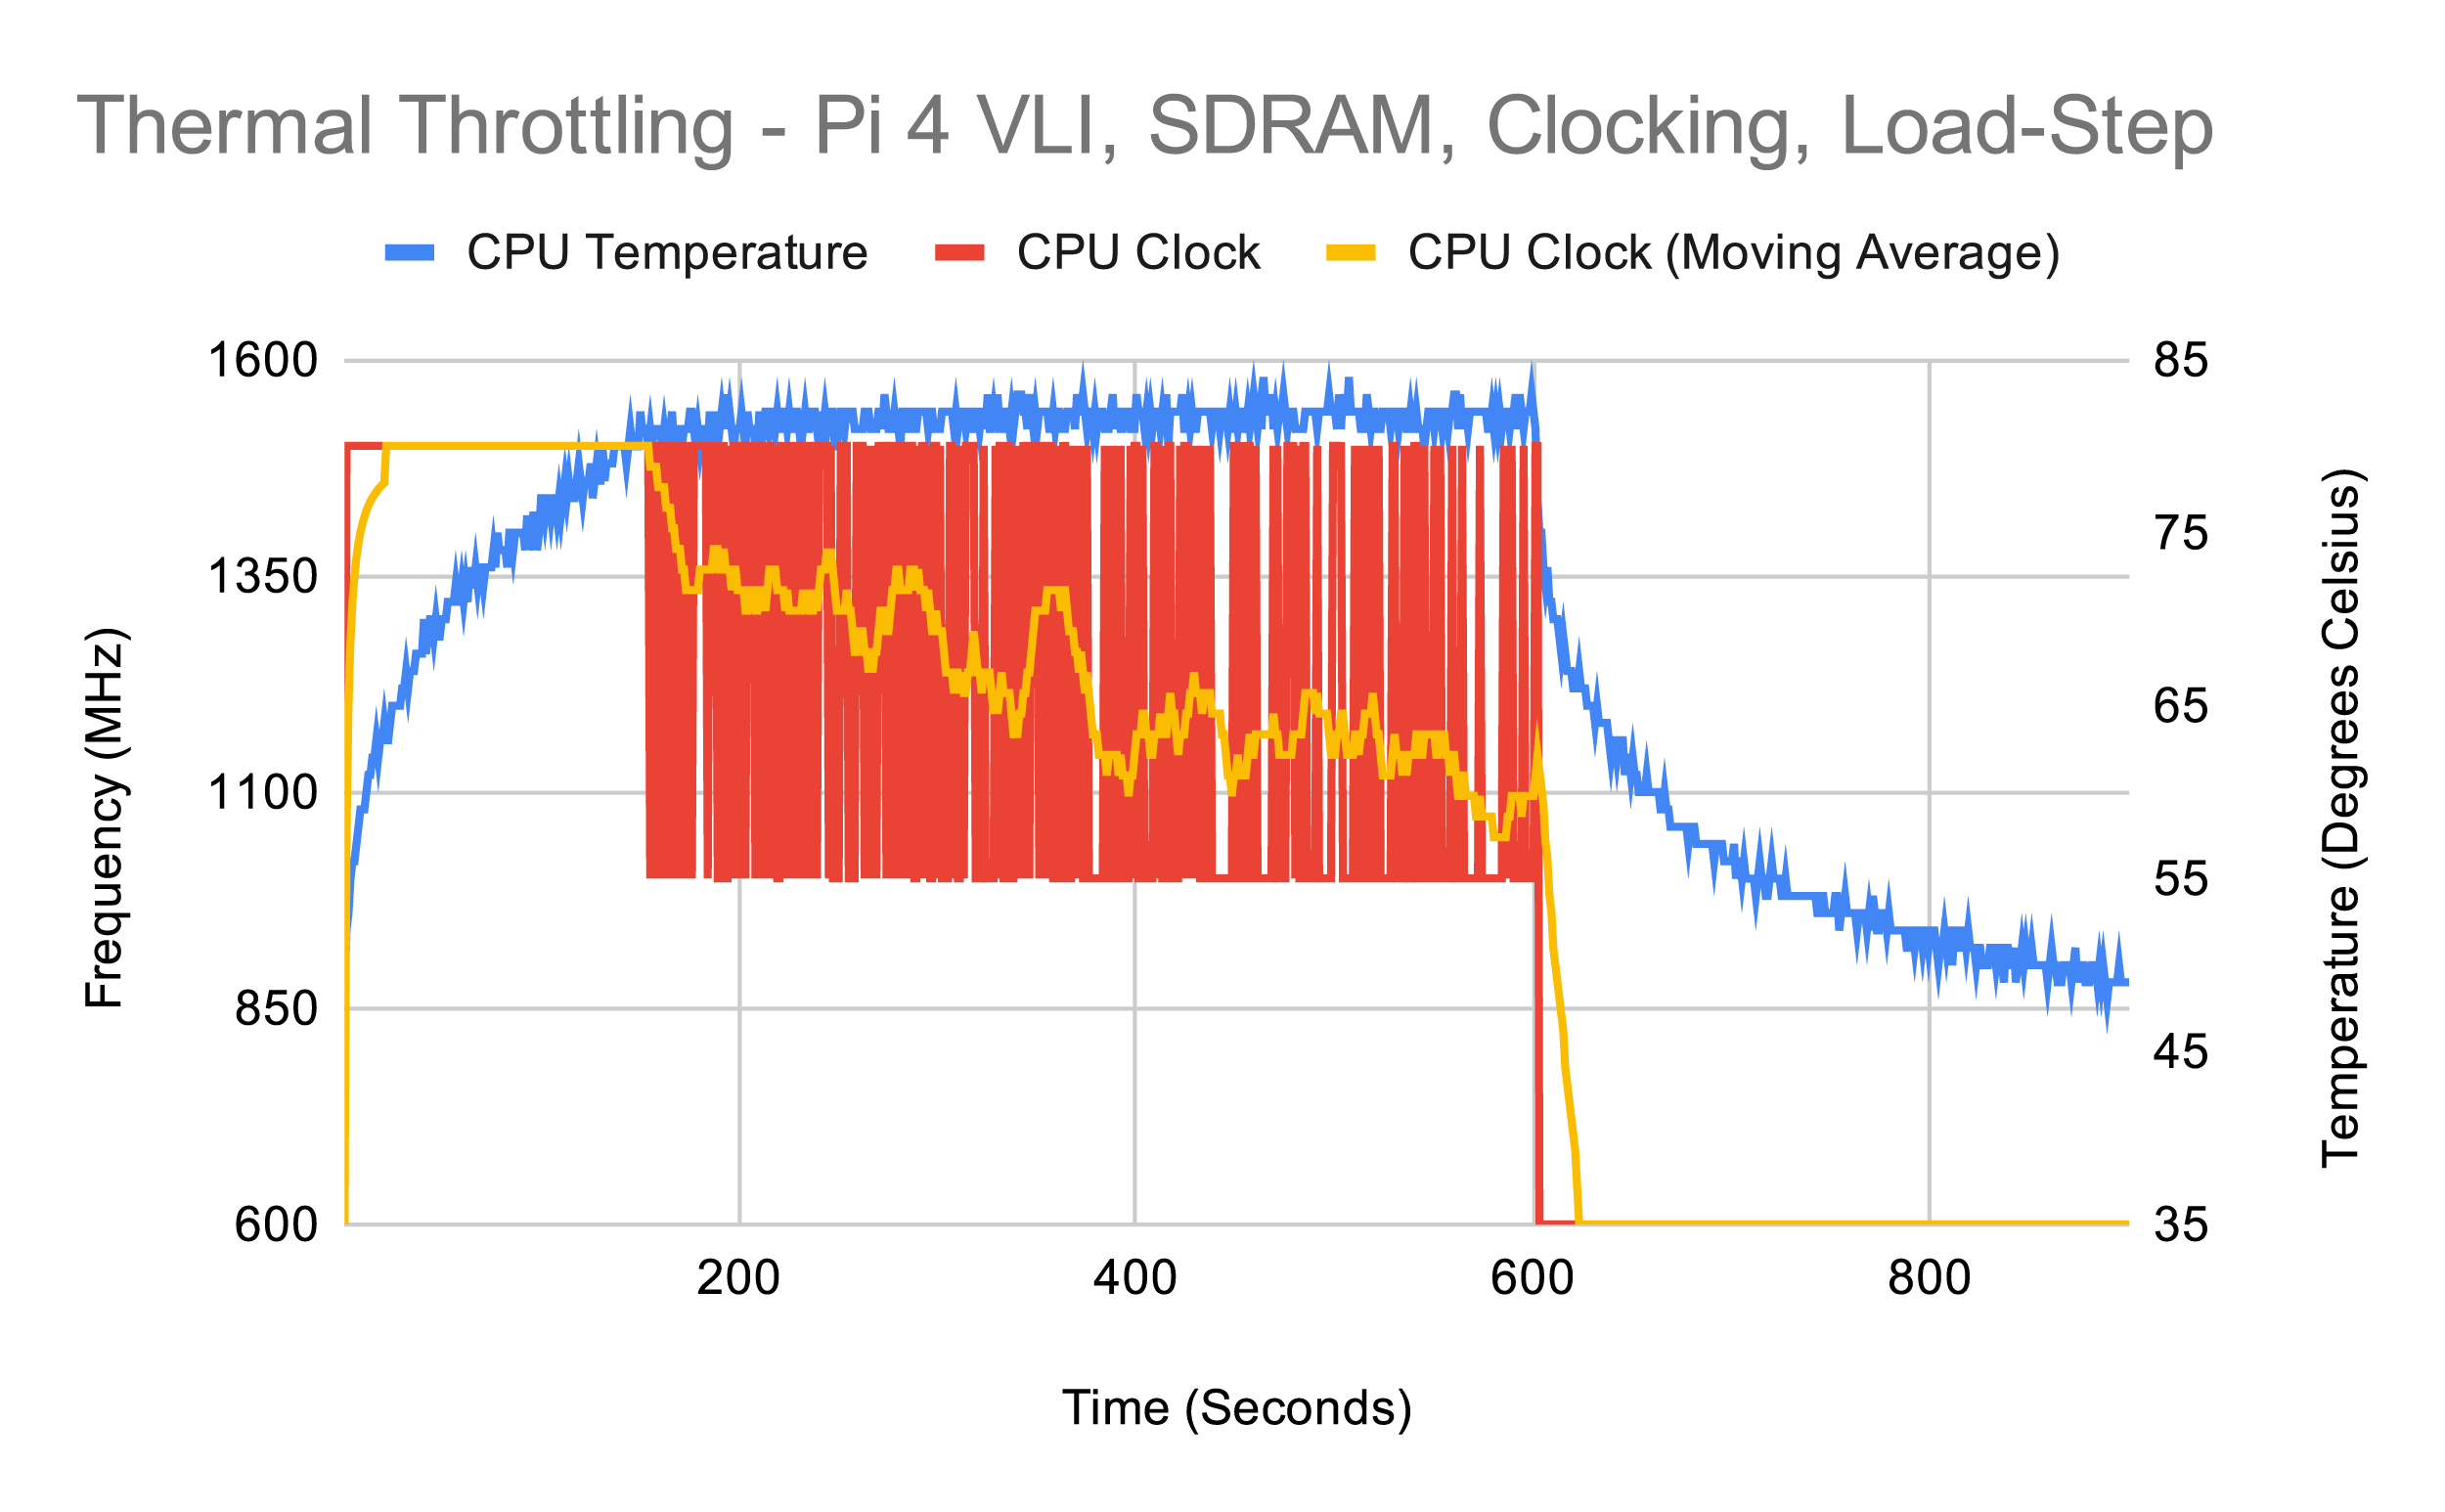
With this firmware, Raspberry Pi 4’s throttle point under the worst-case synthetic workload is pushed back all the way to 155 seconds – more than double the time the launch-day firmware took to hit the same point. The overall average speed is also brought up, thanks to more aggressive clocking back up to 1.5GHz.
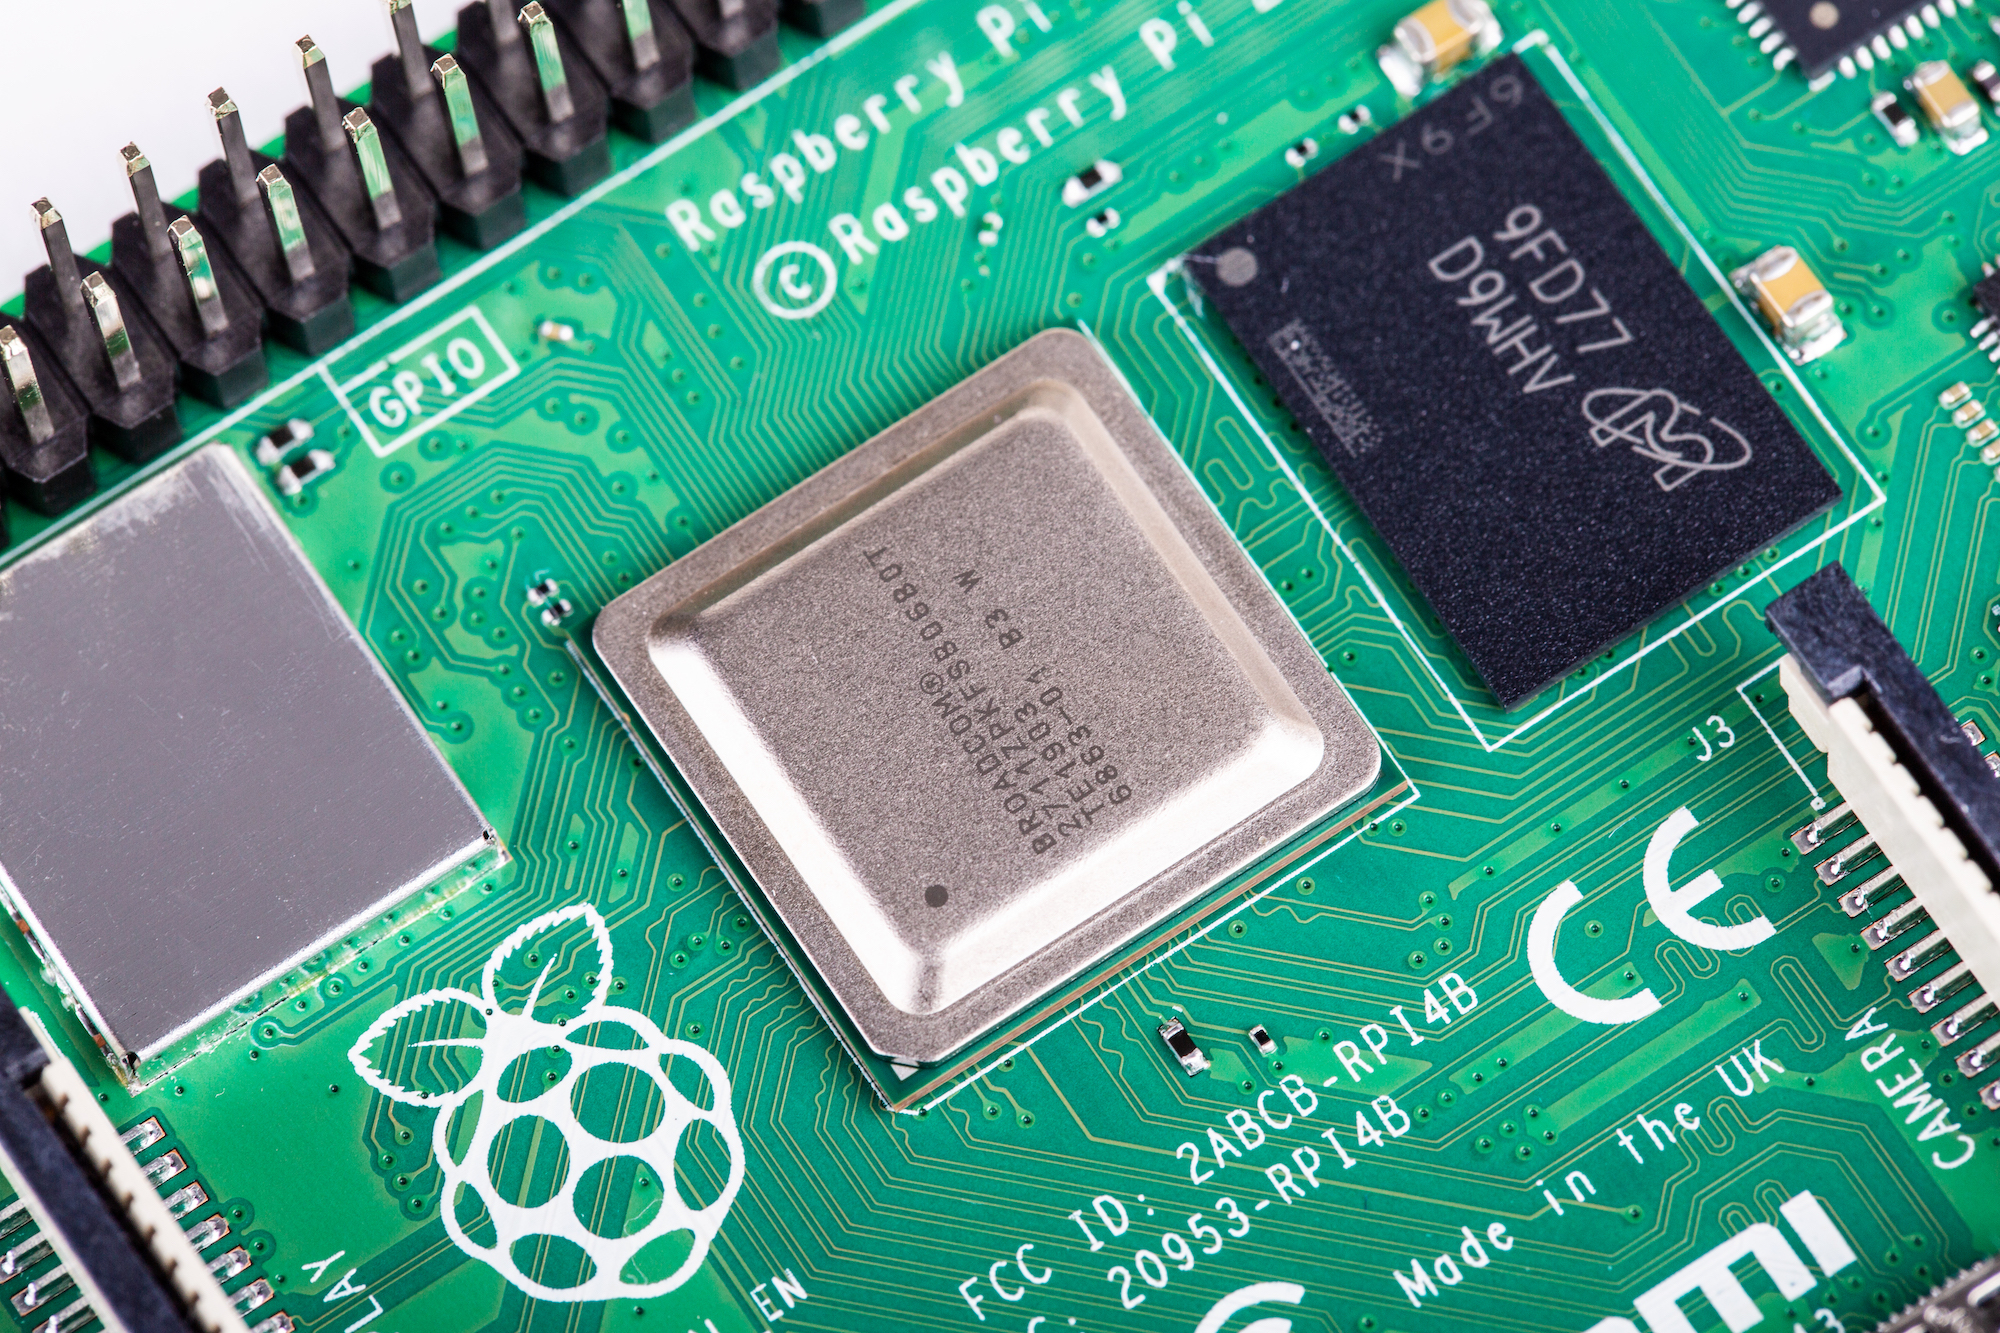
Currently in testing, this beta release is cutting-edge
Nobody at Raspberry Pi is resting on their laurels. Beta firmware is in testing and due for public release soon. It brings with it many improvements, including finer-grained control over SoC operating voltages and optimised clocking for the HDMI video state machines.
To upgrade your Raspberry Pi to the latest firmware, open a Terminal window and enter:
sudo apt updatesudo apt full-upgrade
Now restart Raspberry Pi using:
sudo shutdown - r now
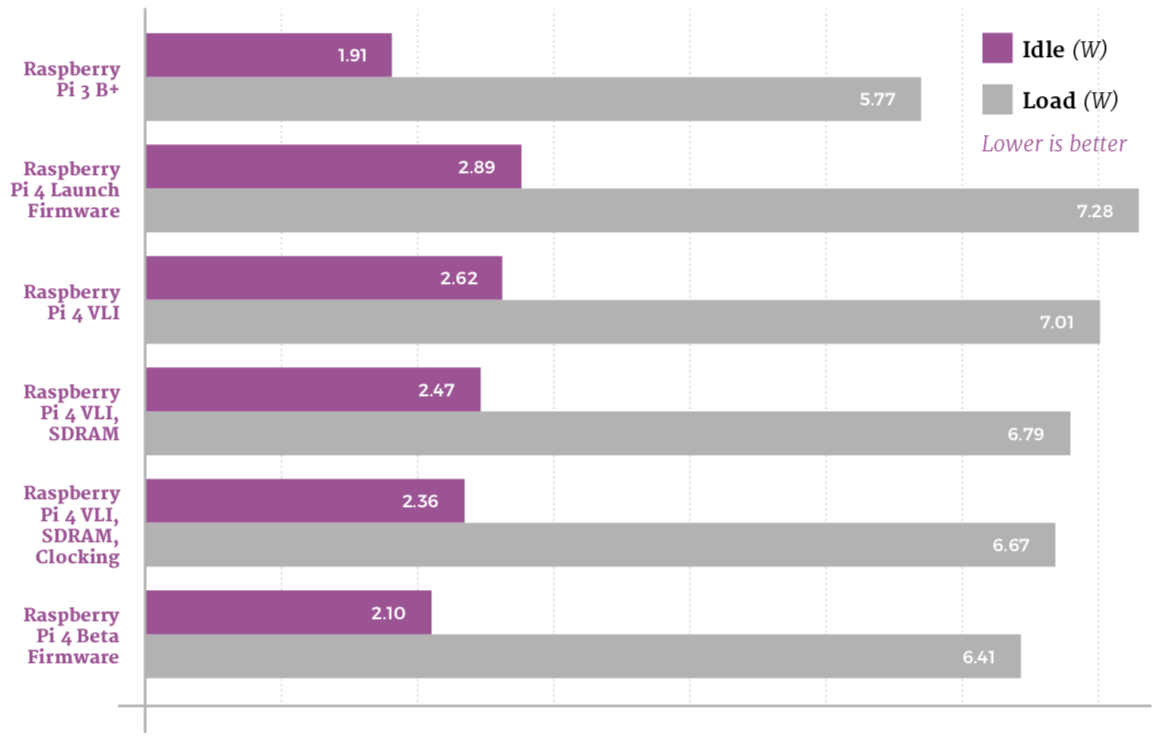
The beta firmware decreases power draw at idle to reduce overall power usage, while tweaking the voltage of the SoC to drop power draw at load without harming performance. The result: a drop to 2.1W idle, and 6.41W at load – the best yet.
The improvements made at idle are clear to see on thermal imaging: the majority of Raspberry Pi 4’s circuit board is below the bottom 35°C measurement point for the first time. After 60 seconds of load, there’s a smaller but still measurable improvement, with a peak measured temperature of 64.8°C.
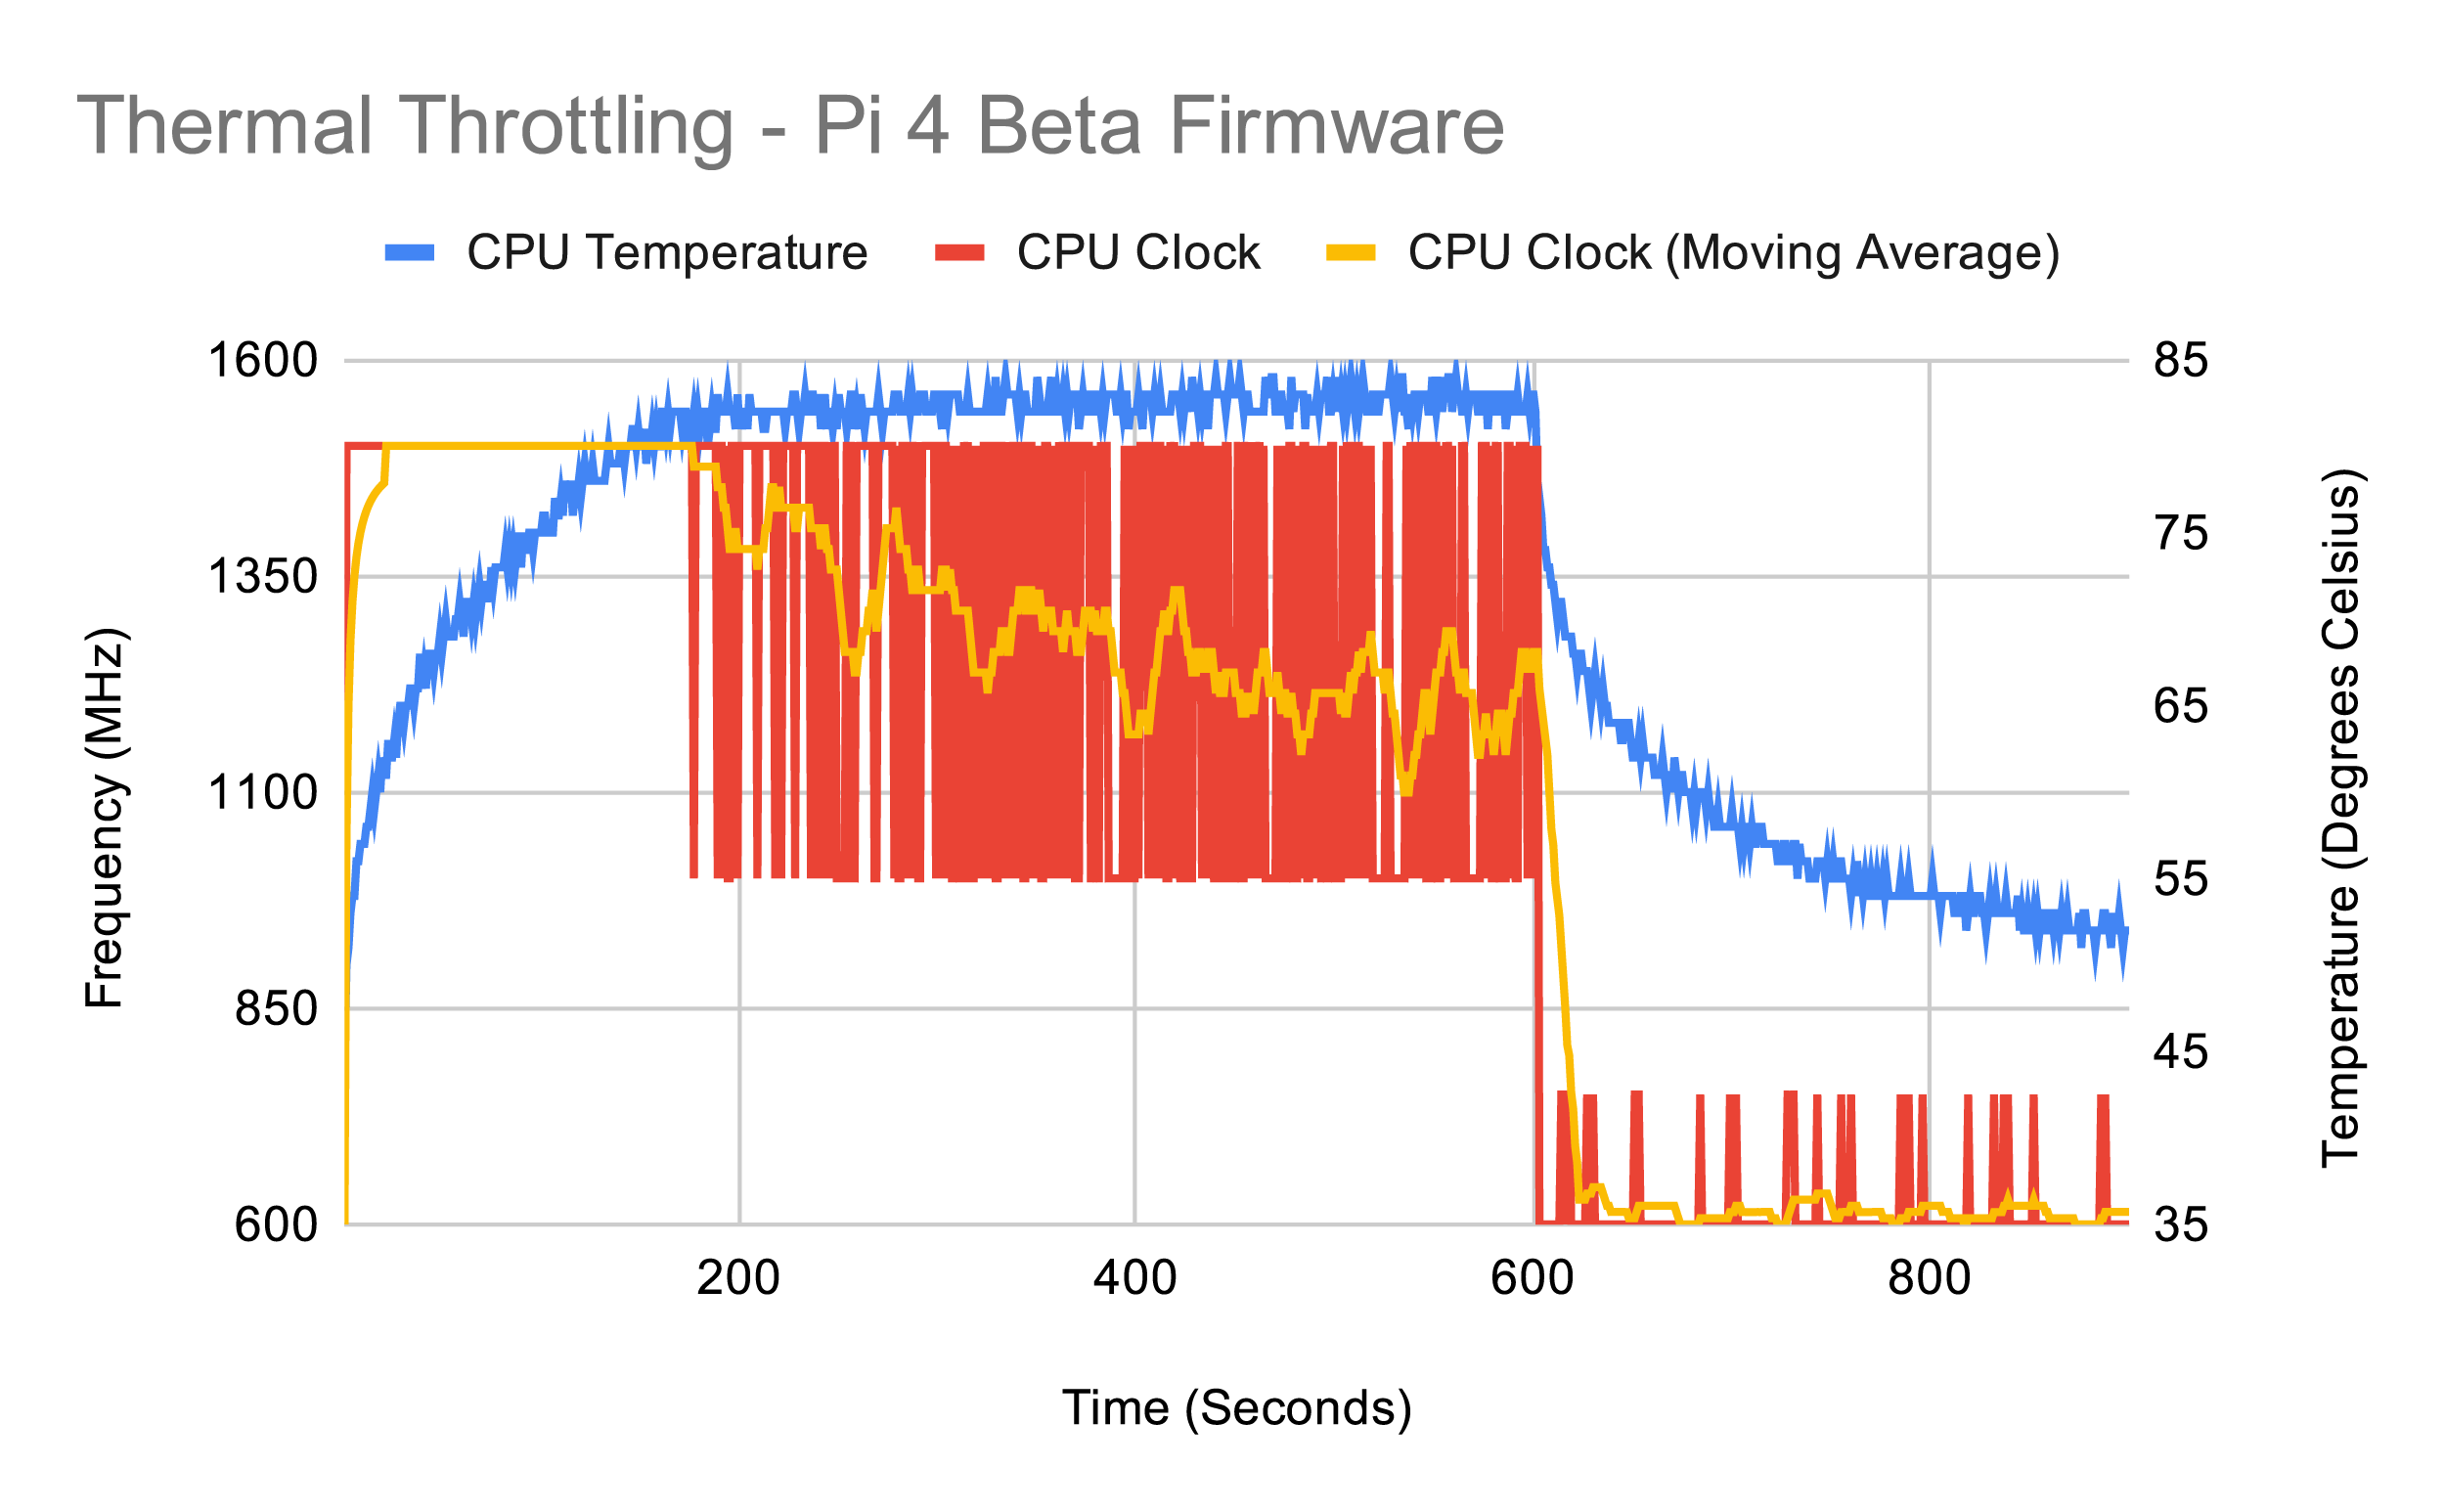
While Raspberry Pi 4 does still throttle with the beta firmware, thanks to the heavy demands of the synthetic workload used for testing, it delivers the best results yet: throttling occurs at the 177s mark while the new clocking controls bring the average clock speed up markedly. The firmware also allows Raspberry Pi 4 to up-clock more at idle, improving the performance of background tasks.
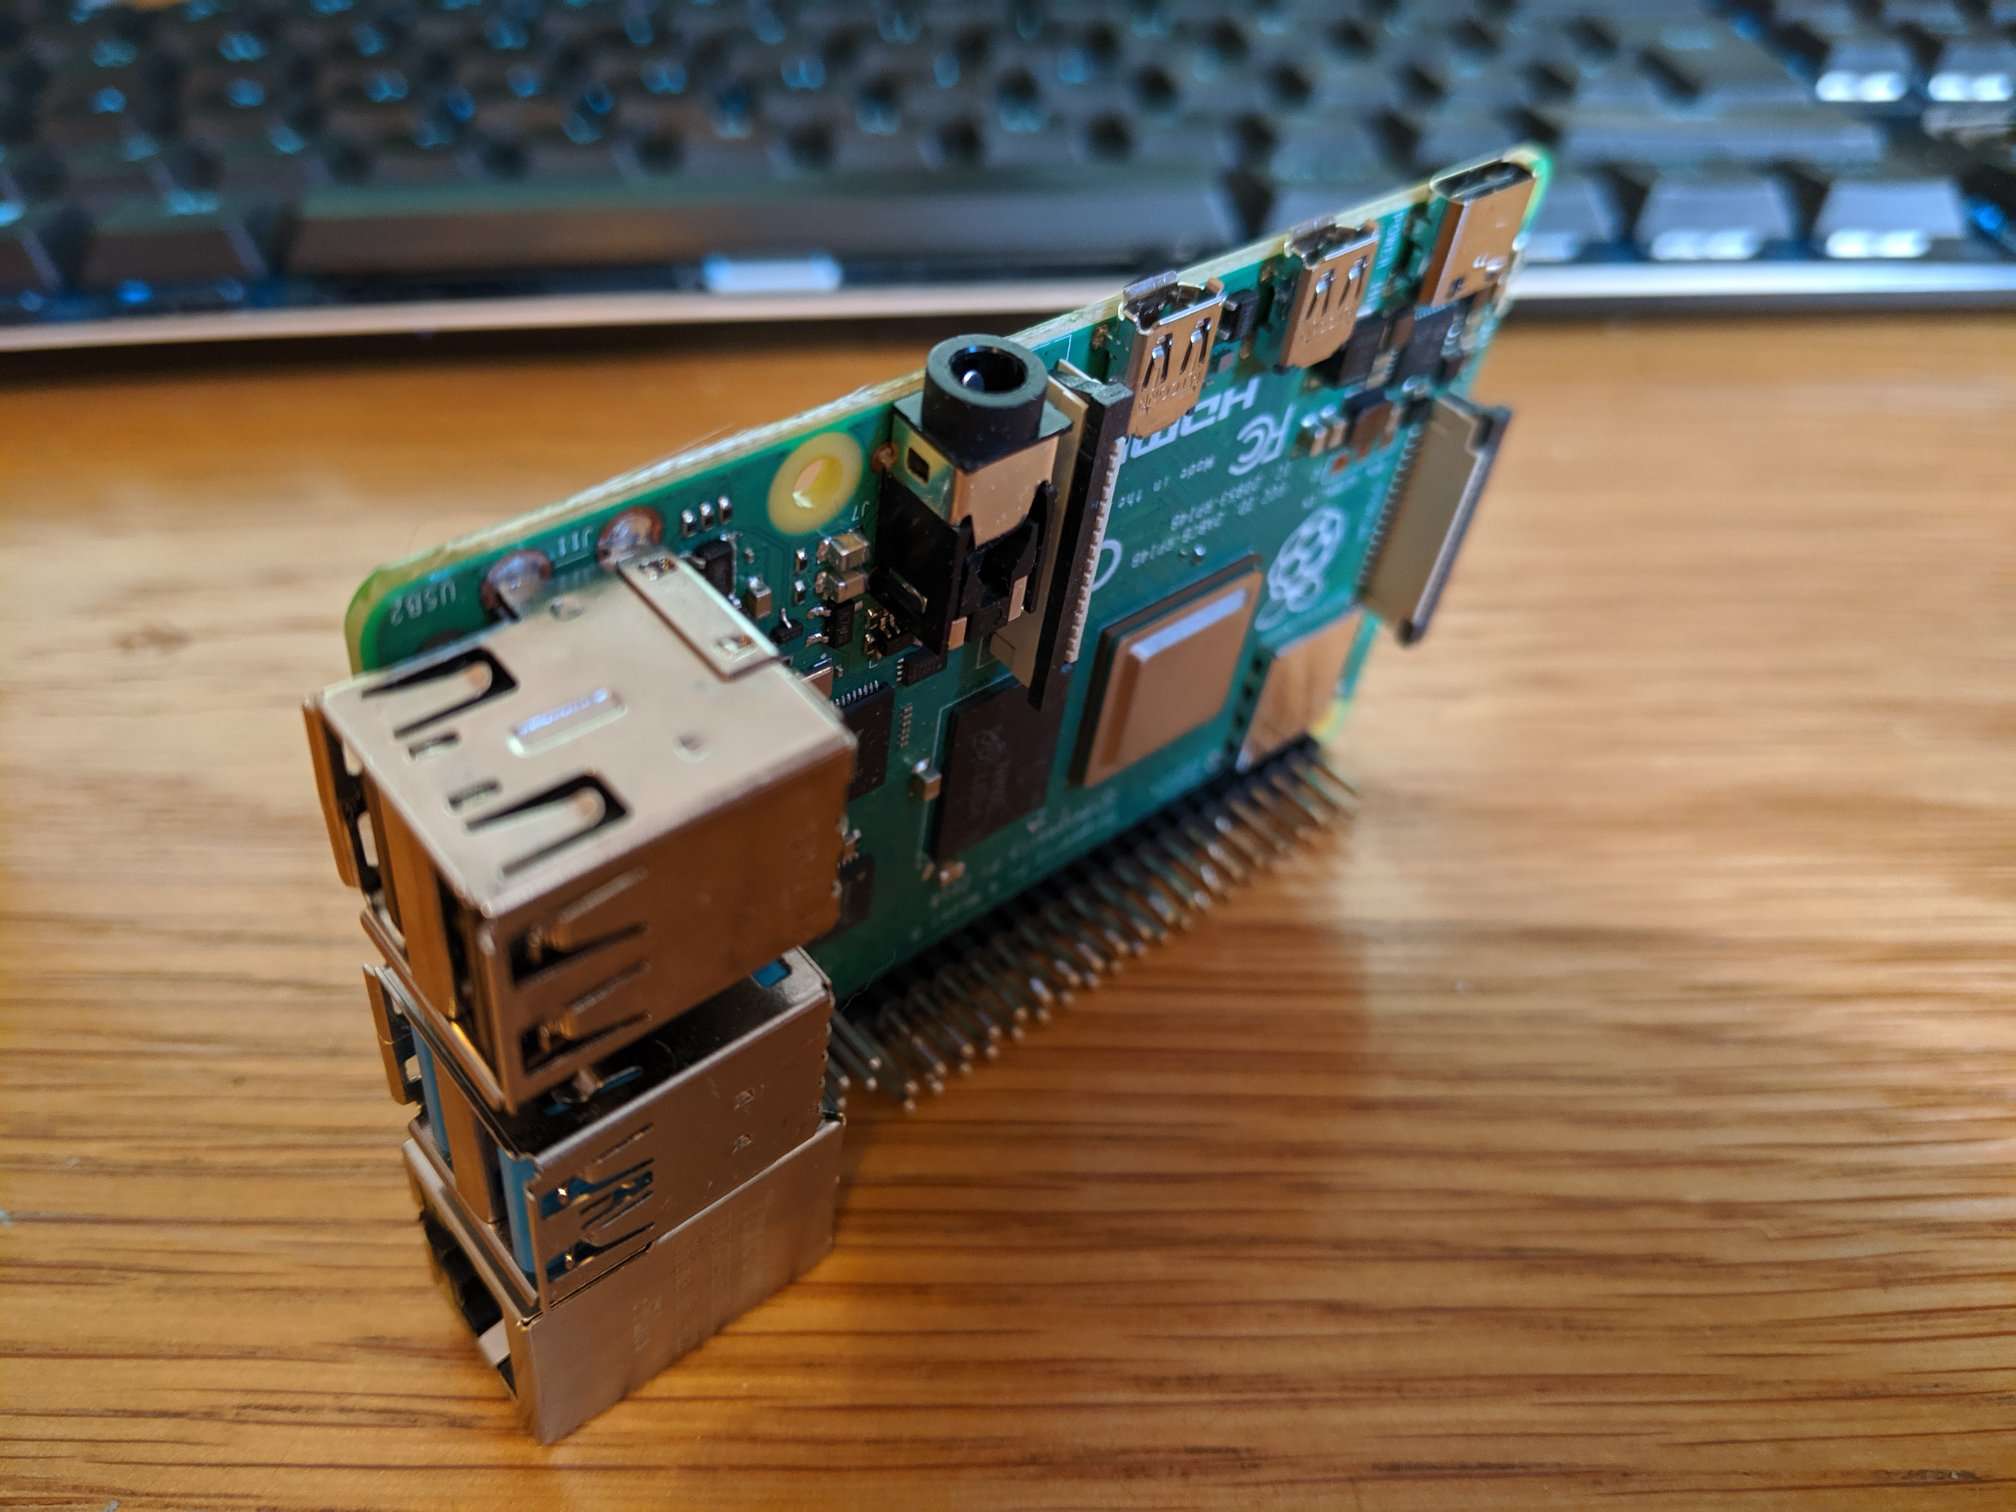
Firmware upgrades offer great gains, but what about putting Raspberry Pi on its side?
While running the latest firmware will result in considerable power draw and heat management improvements, there’s a trick to unlock even greater gains: adjusting the orientation of Raspberry Pi. For this test, Raspberry Pi 4 with the beta firmware installed was stood upright with the GPIO header at the bottom and the power and HDMI ports at the top.

Simply moving Raspberry Pi 4 into a vertical orientation has an immediate impact: the SoC idles around 2°C lower than the previous best and heats a lot more slowly – allowing it to run the synthetic workload for longer without throttling and maintain a dramatically improved average clock speed.
There are several factors at work: having the components oriented vertically improves convection, allowing the surrounding air to draw the heat away more quickly, while lifting the rear of the board from a heat-insulating desk surface dramatically increases the available surface area for cooling.
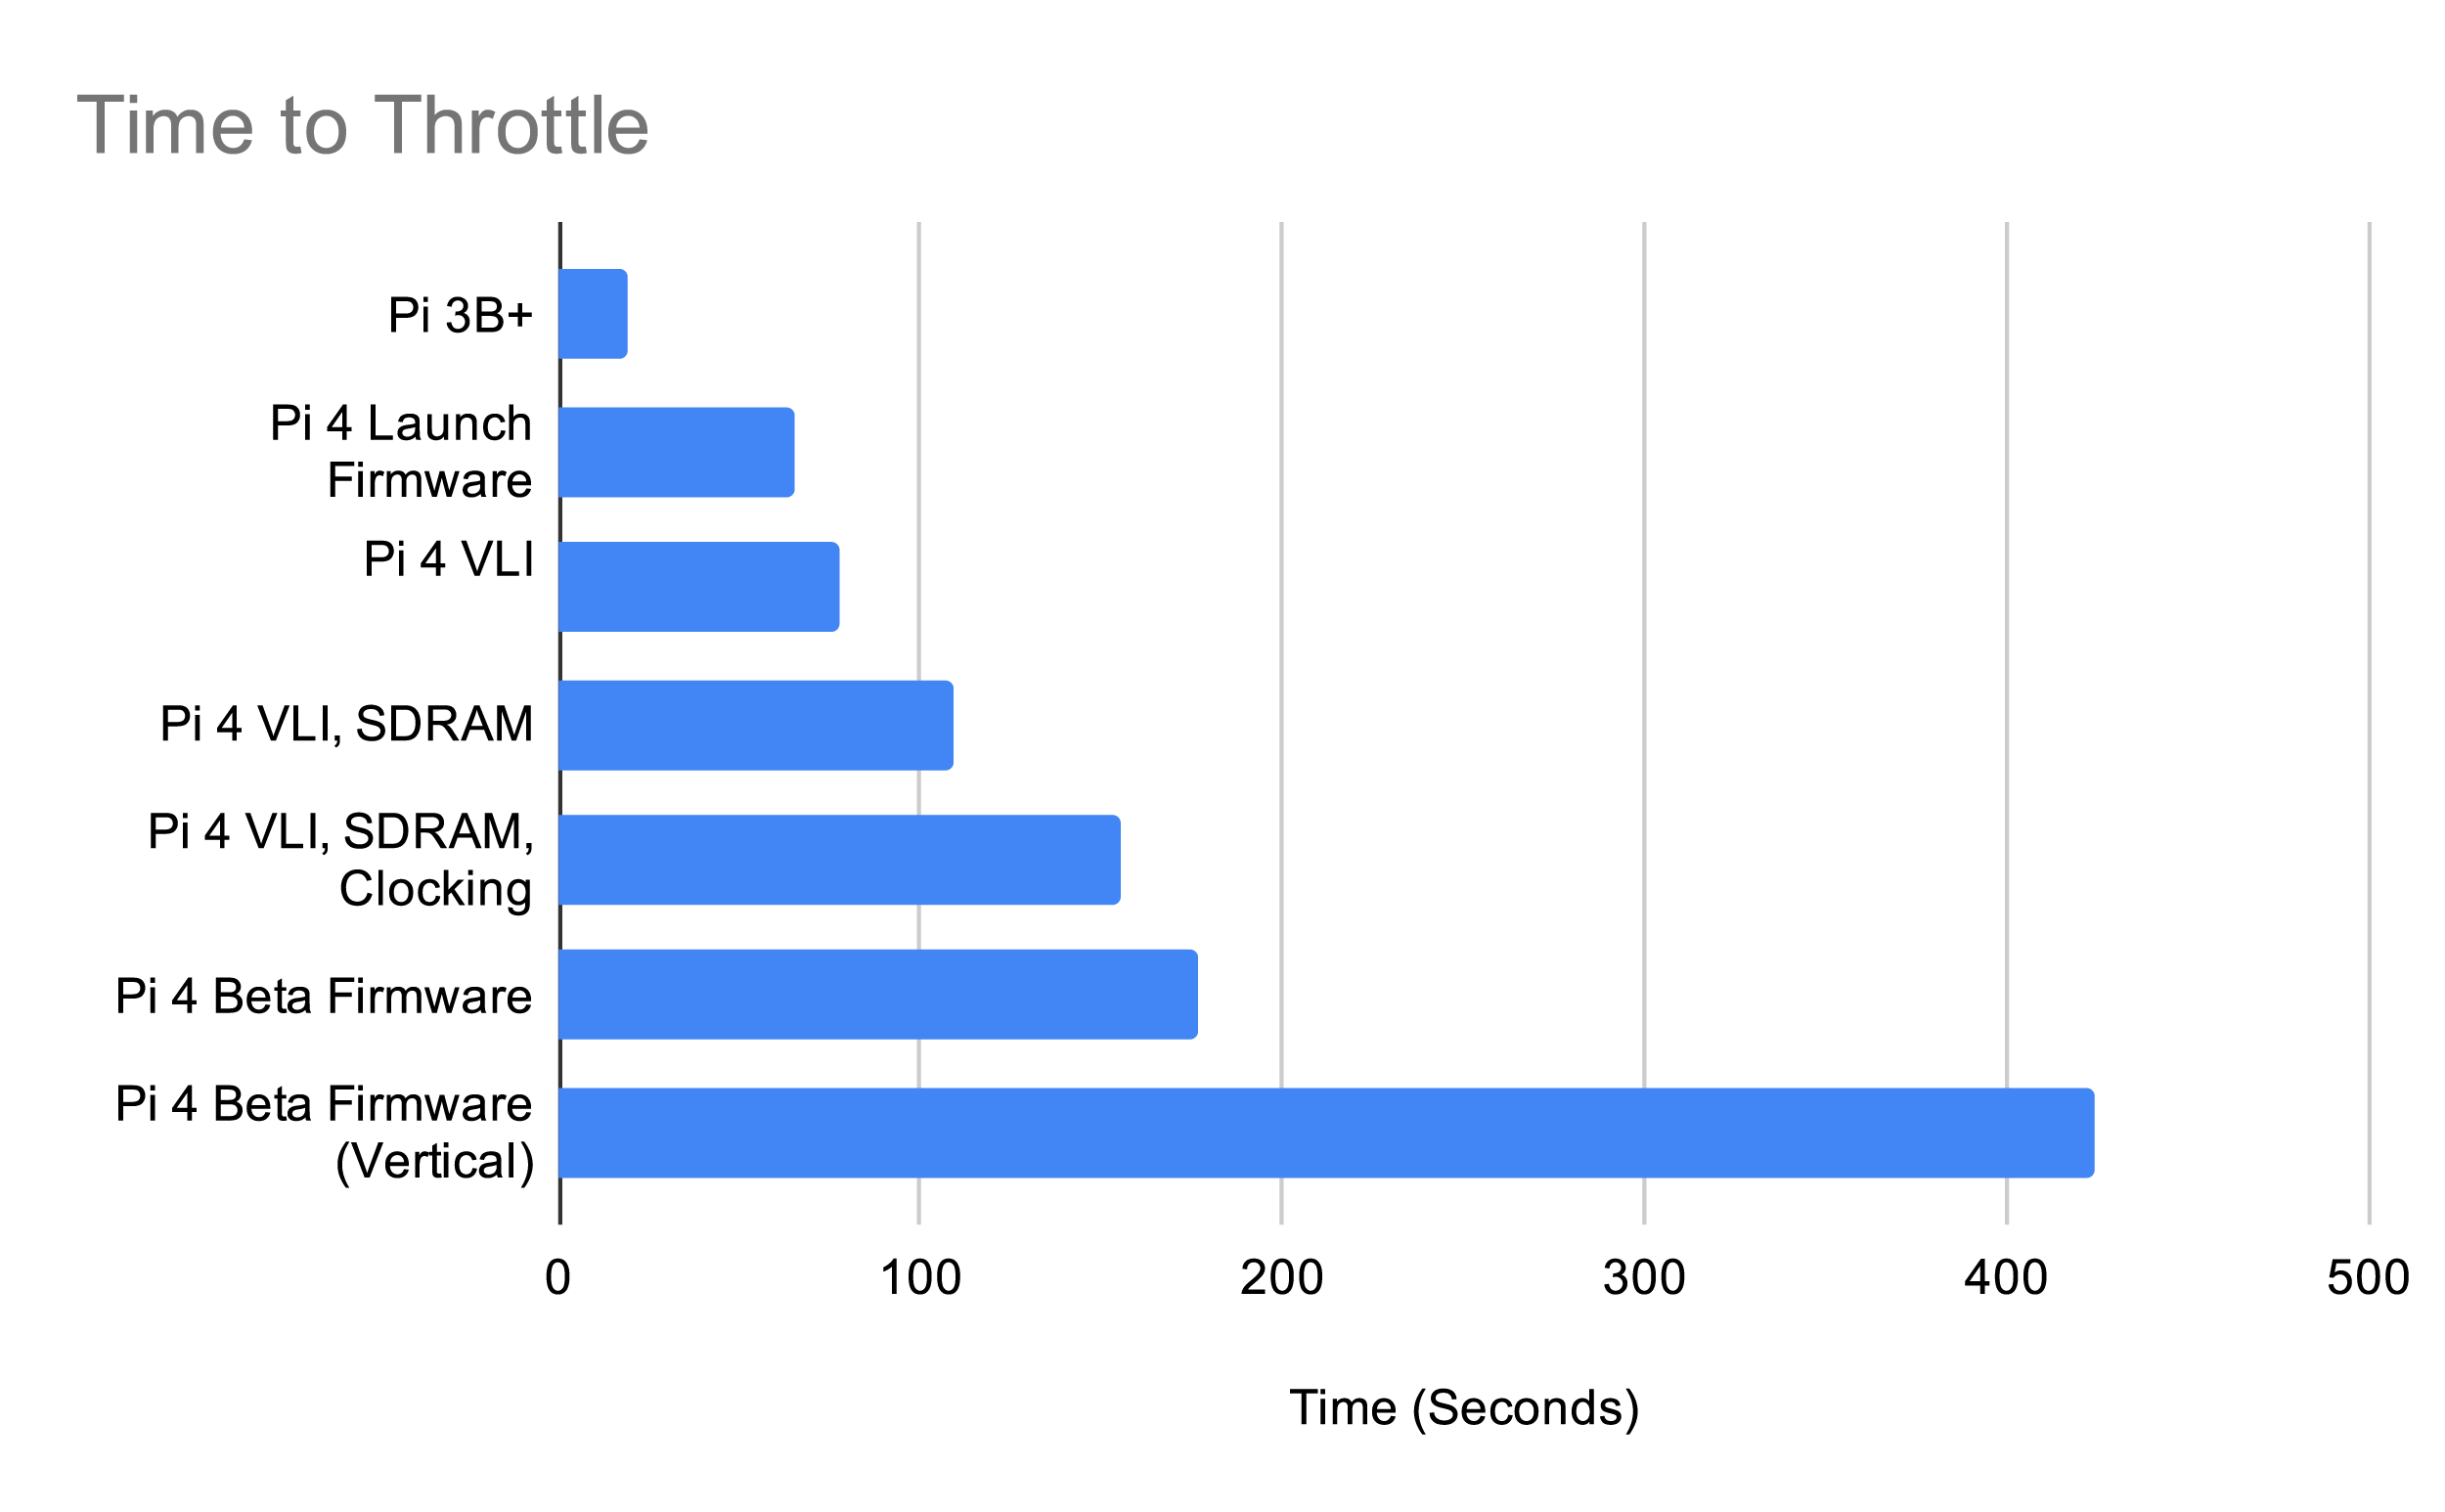
This chart shows how long it took to reach the throttle point under the synthetic workload. Raspberry Pi 3B+ sits at the bottom, soft-throttling after just 19 seconds. Each successive firmware update for Raspberry Pi 4, meanwhile, pushes the throttle point further and further – though the biggest impact can be achieved simply by adjusting Raspberry Pi’s orientation.
Synthetic benchmarks aside, how do the boards perform with real workloads?
Looking at the previous pages, it’s hard to get a real idea of the difference in performance between Raspberry Pi 3B+ and Raspberry Pi 4. The synthetic benchmark chosen for the thermal throttle tests performs power-hungry operations which are rarely seen in real-world workloads, and repeats them over and over again with no end.
In this test, both Raspberry Pi 3B+ and Raspberry Pi 4 are given the task of compiling the Linux kernel from its source code. It’s a good example of a CPU-heavy workload which occurs in the real world, and is much more realistic than the deliberately taxing synthetic workload of earlier tests.
With this workload, Raspberry Pi 4 easily emerges the victor. Despite its CPU running only 100MHz faster than Raspberry Pi 3B+ at its full speed, it’s considerably more efficient – and, combined with the ability to run without hitting its thermal throttle point, completes the task in nearly half the time.
Raspberry Pi 3B+ throttles very early on in the benchmark compilation test and remains at a steady 1.2GHz until a brief period of cooling, as the compiler switches from a CPU-heavy workload to a storage-heavy workload, allows it to briefly spike back to its 1.4GHz default again. Compilation finished in 5097 seconds – one hour, 24 minutes, and 57 seconds.
The difference between the synthetic and real-world workloads is clear to see: at no point during the compilation did Raspberry Pi 4 reach a high enough temperature to throttle, remaining at its full 1.5GHz throughout – bar, as with Raspberry Pi 3 B+, a brief period when a change in compiler workload allowed it to drop to its idle speeds. Compilation finished in 2660 seconds – 44 minutes and 20 seconds.
This article is from today’s brand-new issue of The MagPi magazine, the official Raspberry Pi magazine. Buy it from all good newsagents, Raspberry Pi Press, and the Raspberry Pi Store, Cambridge.

Subscribe to pay less per issue and support our work, or download the free PDF to give it a try first.
The post Thermal testing Raspberry Pi 4 appeared first on Raspberry Pi.
Yesterday, we asked you to share your Raspberry Pi builds on social media using the hashtag #IUseMyRaspberryPiFor. The result was amazing, with so many of you sharing some really interesting projects, inspiring both us, and others, to get creative.
While we can’t share them all here today, we picked out some to highlight, and we strongly recommend you check out the hashtag on Twitter to see them all.
$danielKraft; on Twitter
Live digital audio effects processing with @blokaslabs MODEP #IUseMyRaspberryPiFor https://t.co/7HVhxns2p1
We see a lot of music-based Raspberry Pi projects, from guitar pedals to radios, soundboards, and capacitive-touch fruit baskets. This effects processor for Daniel Kraft’s drum kit will have many of the musically inclined members of Raspberry Pi Towers getting code-happy in no time.
Matt Nayler on Twitter
IUseMyRaspberryPiFor monitoring the wildlife in my garden.
Matt uses his Raspberry Pi to monitor wildlife in his garden. Add a motion sensor and a camera to your Raspberry Pi, and you’ve made your own nature camera trap.
Pierre-yves Baloche on Twitter
IUseMyRaspberryPiFor building autonomous robots, securing our house Internet access, picturing wildlife in our garden, but mostly to introduce IT to my daughter and how much can be accomplished and learned through it (creativity, patience,…), all thanks to the community :-) !
Pierre-Yves Baloche uses his Raspberry Pi for a multitude of tasks, including as a tool to introduce his daughter to technology, and to the technical and non-technical skills that come with learning to make stuff.
Sarvottam Kumar on Twitter
I’m using raspberry pi for building a visual guide for visually impaired people. It is portable and fully voice-controlled. It can be used for most of the daily life activities. #IUseMyRaspberryPiFor #RaspberryPi
This project from Sarvottam Kumar [edited to correct attribution] is a great example of how Raspberry Pi can be used to create low-cost accessibility aids.
selftronics on Twitter
This is how planespotters use their TVs.
Our colleagues at the Raspberry Pi North America office have a similar setup for plane spotting.
Patrick Fitzgerald on Twitter
IUseMyRaspberryPiFor monitoring and managing my bearded dragon’s vivarium.
Patrick uses a Raspberry Pi to monitor a bearded dragons vivarium. We really appreciate this photo, because bearded dragons are awesome!
Nathan Chantrell on Twitter
IUseMyRaspberryPiFor Loads of things! Everything from home automation with Node-RED, HA touch screens, sensor monitoring with InfluxDB/Grafana, VoIP PBX, Octoprint, fixed & pan/tilt cameras, control of a Cambridge Audio amp, UniFi controller, PiHole, probably missed loads!
Nathan uses a Raspberry Pi for just about everything! Great work!
IUseMyRaspberryPiFor Remote controlling my 3D printer and recording timelapses as it prints. Just like now! #octoprint @Creality3dprint
Phil uses a Raspberry Pi to run Octoprint, allowing for remote control of a 3D printer. We do this too in the Raspberry Pi Foundation makerspace.
As we said, there are simply too many projects to share in one blog post. However, we found some great blog-fodder that we’ll be writing more about in the near future — keep your eyes peeled.
It’s not too late to share your Raspberry Pi project using #IUseMyRaspberryPiFor, so keep posting!
The post Your amazing Raspberry Pi projects #IUseMyRaspberryPiFor appeared first on Raspberry Pi.
Our very own Brian made this lovely What is a Raspberry Pi? video for our YouTube channel. Thanks, Brian.
What is a Pi FINAL
Subscribe to our YouTube channel: http://rpf.io/ytsub Help us reach a wider audience by translating our video content: http://rpf.io/yttranslate Buy a Raspberry Pi from one of our Approved Resellers: http://rpf.io/ytproducts Find out more about the #RaspberryPi Foundation: Raspberry Pi http://rpf.io/ytrpi Code Club UK http://rpf.io/ytccuk Code Club International http://rpf.io/ytcci CoderDojo http://rpf.io/ytcd Check out our free online training courses: http://rpf.io/ytfl Find your local Raspberry Jam event: http://rpf.io/ytjam Work through our free online projects: http://rpf.io/ytprojects Do you have a question about your Raspberry Pi?
What do you do with your Raspberry Pi? Use #IUseMyRaspberryPiFor on social media so we can see!
The post What do you use your Raspberry Pi for? appeared first on Raspberry Pi.
Guide a frog across busy roads and rivers. Mark Vanstone shows you how to code a simple remake of Konami’s arcade game, Frogger.
Konami’s original Frogger: so iconic, it even featured in a 1998 episode of Seinfeld.
Why did the frog cross the road? Because Frogger would be a pretty boring game if it didn’t. Released in 1981 by Konami, the game appeared in assorted bars, sports halls, and arcades across the world, and became an instant hit. The concept was simple: players used the joystick to move a succession of frogs from the bottom of the screen to the top, avoiding a variety of hazards – cars, lorries, and later, the occasional crocodile. Each frog had to be safely manoeuvred to one of five alcoves within a time limit, while extra points were awarded for eating flies along the way.
Before Frogger, Konami mainly focused on churning out clones of other hit arcade games like Space Invaders and Breakout; Frogger was one of its earliest original ideas, and the simplicity of its concept saw it ported to just about every home system available at the time. (Ironically, Konami’s game would fall victim to repeated cloning by other developers.) Decades later, developers still take inspiration from it; Hipster Whale’s Crossy Road turned Frogger into an endless running game; earlier this year, Konami returned to the creative well with Frogger in Toy Town, released on Apple Arcade.
We can recreate much of Frogger’s gameplay in just a few lines of Pygame Zero code. The key elements are the frog’s movement, which use the arrow keys, vehicles that move across the screen, and floating objects – logs and turtles – moving in opposite directions. Our background graphic will provide the road, river, and grass for our frog to move over. The frog’s movement will be triggered from an on_key_down() function, and as the frog moves, we switch to a second frame with legs outstretched, reverting back to a sitting position after a short delay. We can use the inbuilt Actor properties to change the image and set the angle of rotation.
In our Frogger homage, we move the frog with the arrow keys to avoid the traffic, and jump onto the floating logs and turtles.
For all the other moving elements, we can also use Pygame Zero Actors; we just need to make an array for our cars with different graphics for the various rows, and an array for our floating objects in the same way.
In our update() function, we need to move each Actor according to which row it’s in, and when an Actor disappears off the screen, set the x coordinate so that it reappears on the opposite side.
Handling the logic of the frog moving across the road is quite easy; we just check for collision with each of the cars, and if the frog hits a car, then we have a squashed frog. The river crossing is a little more complicated. Each time the frog moves on the river, we need to make sure that it’s on a floating Actor. We therefore check to make sure that the frog is in collision with one of the floating elements, otherwise it’s game over.
There are lots of other elements you could add to the example shown here: the original arcade game provided several frogs to guide to their alcoves on the other side of the river, while crocodiles also popped up from time to time to add a bit more danger. Pygame Zero has all the tools you need to make a fully functional version of Konami’s hit.
Here’s Mark’s code, which gets a Frogger homage running in Python. To get it working on your system, you’ll first need to install Pygame Zero. And to download the full code, go here.
You can read more features like this one in Wireframe issue 27, available now at Tesco, WHSmith, all good independent UK newsagents, and the Raspberry Pi Store, Cambridge.
Or you can buy Wireframe directly from Raspberry Pi Press — delivery is available worldwide. And if you’d like a handy digital version of the magazine, you can also download issue 27 for free in PDF format.
![]()
Make sure to follow Wireframe on Twitter and Facebook for updates and exclusive offers and giveaways. Subscribe on the Wireframe website to save up to 49% compared to newsstand pricing!
The post Code a Frogger-style road-crossing game | Wireframe #27 appeared first on Raspberry Pi.
Technology should be for everyone, but it has to be built by everyone to be for everyone. At Raspberry Pi, we work to empower everyone to become a tech creator and shape our collective digital future, and we hope that our work will help to increase the tech sector’s diversity.
Today, part of our team is attending WeAreTheCity’s WeAreTechWomen conference to spread the word about our free programming courses and encourage more women to share their digital skills with the next generation.
I asked Carrie Anne Philbin, our Director of Educator Support, and Vanessa Vallely OBE, Managing Director at WeAreTheCity, about their thoughts on how we can make the tech sector more diverse, and what part role models, education, and professional development play in this.
Vanessa, WeAreTheCity helps organisations foster a strong female workforce, and provides opportunities for women to network and develop their skills. Why do you think it’s important for women and people from minority backgrounds to support each other in the professional world?
Vanessa Vallely: I believe it is important for everyone to support each other. It is important that we work as a collective and collaborate, as at the end of the day we are all trying to achieve the same goal. 17% women in tech [in the UK] is not enough.
“We want more women in tech, and we want them to represent all aspects of society.” – Vanessa Vallely OBE
We cannot be what we cannot see, therefore asking women who are already working in tech to stand up and own their role model status is a great start.
What can individuals do to address the lack of diversity in the tech sector?
Carrie Anne Philbin: Firstly, let’s recognise that we need the tech sector to be more representative of the population of the world. It’s problematic to have a small subsection of society be the controllers of a growing digital world.
Then, we need to be the change we want to see in the industry. Let’s try different avenues and then let’s be open about our challenges and successes.
![]()
VV: I believe every woman in the tech sector is a role model to future generations. There are a number of things individuals can do, for example go back to their schools and tell their tech stories, or contribute/write blogs. This doesn’t just raise their profile, it puts their story out there for others to aspire to. I think this is really important, especially if the individual is from a background where role models are less visible. There are lots of different organisations and networks that facilitate individuals getting involved in their school or early career initiatives which has made it easier to get involved and give back.
CAP: As a woman in the computing field, I think it is important that I hold the door open for other women coming through in my wake, and that I highlight where I can, great work by others.
Ever since I realised that my skills and knowledge in computing were useful and allowed me to be creative in a whole new way, I’ve championed computer science as a subject that everyone should experience. Once you’ve created your first computer program or built your first network, you’ll never want to stop.
![]()
Carrie Anne, how does your coding session at WATC’s WeAreTechWomen conference today tie into this?
CAP: At the Raspberry Pi Foundation, I spend a lot of time thinking about how to teach computing well, and about how young people can have great learning experiences so they can become the makers and creators of tomorrow.
“Technology is not a mystery, nor is it hard to learn. I want to dispel this myth for everyone regardless of gender, ethnicity, or economic status.” – Carrie Anne Philbin
During my session at WeAreTechWomen, I hope to support attendees to write their first creative python program, based on a project I wrote for Code Club to create a virtual pet. It is my hope that the session will be the spark of inspiration that gets more women and men from diverse backgrounds excited about being creators of technology.
You’ve built a career in tech education as a teacher, YouTuber, and Director at Raspberry Pi. How can beginners get comfortable creating with tech?
CAP: There isn’t anything magical about technology, and once you know this, you can start to explore with confidence, much like our ancestors when they learned that the earth was round and not flat.
“Phrases like ‘I’m not good with technology’ or ‘It’s all too complicated for me’ are reassuring to say in a society where the accepted view is that maths and science are hard, and where this view is reinforced by our media. But it is OK to be a beginner, it is OK to learn something new, and it is OK to play, explore, fail, and succeed on the journey.” – Carrie Anne Philbin
However you like to learn, be it on your own or with others, there is a way that suits you! I’ve always been quite project-minded: I have ideas about things I want to make, and then go and see if I can. This is how I stumbled across the Raspberry Pi in 2012 — it seemed like an accessible and cheap way to make my automation dreams come true. It also wasn’t too bad at randomly generating poems.
![]()
Aside from teacher-led instruction or independent exploration, another way is to learn with others in a relaxed and informal setting. If you’re a young person, then clubs like Code Club and CoderDojo are perfect. If you’re an adult, then attending a Raspberry Jam or conferences like WeAreTechWomen can provide a supportive environment.
“By being kinder to ourselves and seeing ourselves as life-long learners, it is easier to overcome insecurity and build confidence.” – Carrie Anne Philbin
A great way to approach new learning is at your own pace, and thanks to technology, we have access to online training courses with great videos, exercises, and discussion — many of these are completely free and let you connect with a community of learners as well.
How do you think educating the next generation about computing will change the makeup of the tech sector?
CAP: We’re in an exciting phase for computing education. The world has woken up to the importance of equipping our young people with the knowledge and skills for an ever increasing digital landscape. This means computer science is gaining more prominence in school curricula and giving all children the opportunity to discover the subject.
“Education can be democratising, and I expect to see the makeup of the tech sector reflect this movement in the next five to twenty years.” – Carrie Anne Philbin
Unlike physics or music, computing is still a relatively young field, so we need to do more research into what is encouraging and what isn’t, particularly when we work with young people in schools or clubs.
![]()
We’re still learning how to teach computing, and particularly programming, well to encourage greater diversity, so it’s great to see such a vast Gender Balance in Computing research project underway as part of the National Centre for Computing Education here in England. It’s not too late for schools in England to get involved in this project either…
The post “17% women in tech is not enough” appeared first on Raspberry Pi.
Yes, you read that title right, and no, you haven’t accidentally stumbled upon the Arduino Foundation’s website. Today, we’re pleased to announce a new addition to the Raspberry Pi Press family: Get Started with Arduino, a complete how-to guide to help you get hands on with the other pocket-sized board.

Why not? Our mission is to put the power of computing and digital making into the hands of people all over the world. Whether you’re using a Raspberry Pi, an Arduino, or any other piece of digital making kit, if you’re creating with tech, we’re happy. And Raspberry Pi and Arduino make wonderful project partners for all kinds of build.
Get Started with Arduino is packed full of how-tos and project tutorials to help you get better acquainted with the little blue microcontroller. Whether you’re brand new to digital making, a die-hard Raspberry Pi fan looking to expand your maker skillset, or simply a bit of a bookworm, Get Started with Arduino is a super addition to your bookshelves.
Arduino is a microcontroller, while Raspberry Pi is a full computer. Microcontrollers don’t usually run a mainstream operating system, but they’re extremely power-efficient, so they can be great for projects that can’t stay plugged into the mains. You need to use a separate computer to set up your Arduino, but you can do everything on a Raspberry Pi itself… including setting up an Arduino. As we said, the two work really well together in some projects: for example, you might build a robot where the Raspberry Pi handles intensive processing tasks and provides you with a friendly environment for developing your code, while the Arduino handles precise real-time control of the motors.
Get Started with Arduino is out now! It’s available from the Raspberry Pi Press website with free international shipping, from the Raspberry Pi Store in Cambridge, and from WHSmith in the UK; it’ll reach Barnes & Noble stores in the US in a week or so.

HackSpace magazine issue #25 is also out today, available from the Raspberry Pi Press website, the Raspberry Pi Store in Cambridge, and every newsagent that’s worth its salt.
And, if that’s not enough, Wireframe magazine issue 27 is also out today, and it too is available from Raspberry Pi Press, the Raspberry Pi Store, and newsagents across the UK.
In case you missed it, on Monday we released Retro Gaming with Raspberry Pi, your one-stop guide to creating and playing classic retro games on your Raspberry Pi.
For getting this far in today’s blog, here’s your reward: Get Started with Arduino, HackSpace magazine, Wireframe magazine and Retro Gaming with Raspberry Pi are all available as free PDF downloads. However, when you buy our publications, you’re supporting the work of the Raspberry Pi Foundation to bring computing to everyone, as well as the continued production of even more great magazines and special edition books. So, you know what to do.
The post Get started with… Arduino? appeared first on Raspberry Pi.
In Hello World issue 11, Pen Holland and Sarah Wyse discuss how educators and students can get closer to the natural world while honing maths and computing skills. Using a Raspberry Pi, you too can join this citizen science collaboration.
Connectedness to nature as measured by the Nature Connection Index is currently the lowest in young people aged 16-24, with everyone aged 8-34 reporting lower connectedness, compared to the 35+ age groups.
Although there is some positive correlation between individuals living in the same households, parents are now less likely to raise their children where they grew up themselves, and as such they may be less knowledgeable about local species. Connecting with nature does not have to mean a trip out into the wilds: urban ecology is increasingly popular in research, and even the most determined of city dwellers is likely to pass a municipal tree or two during their day.
The positive association between connectedness to nature and wellbeing should encourage us all to appreciate and explore our local environments. However, being at one with the natural world doesn’t preclude an abundance of enjoyable science and technology. For example, the authors’ overriding memory of GCSE maths involves triangles – a lot of triangles – combined with frequent musings over how this could possibly ever be useful in the real world. Fast forward 20 years, and we’ve spent more time than we’d like to count surrounded by triangles, chanting ‘SOH CAH TOA’ in the name of ecology.
The Seed Eater project arose from research into how fast winged seeds (samaras) fall, in order to predict how far they might travel across a landscape, and hence understand how quickly populations of invasive trees might spread. In the past, ecologists have measured the terminal velocity of seeds using stopwatches and lasers, but stopwatches are inaccurate, and lasers are expensive.
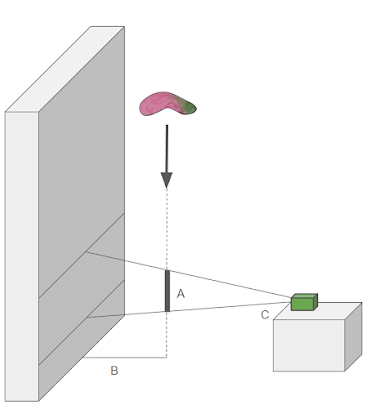
Timestamped images in which the seed appears tell us the time taken for it to fall through the field of view (A). The distance at which the seed lands from the wall (B) and the viewing angle of the camera (C) are used to calculate distance travelled by the seed while in view. Finally, the speed at which the seed is travelling can be calculated as distance/time.
Enter stage left, Pieter the Seed Eater; a low-cost device fitted with a Raspberry Pi computer and camera that captures a sequence of images, assesses which timestamped images contain a falling seed, and then calculates how far the seed fell, and hence how fast it was travelling.
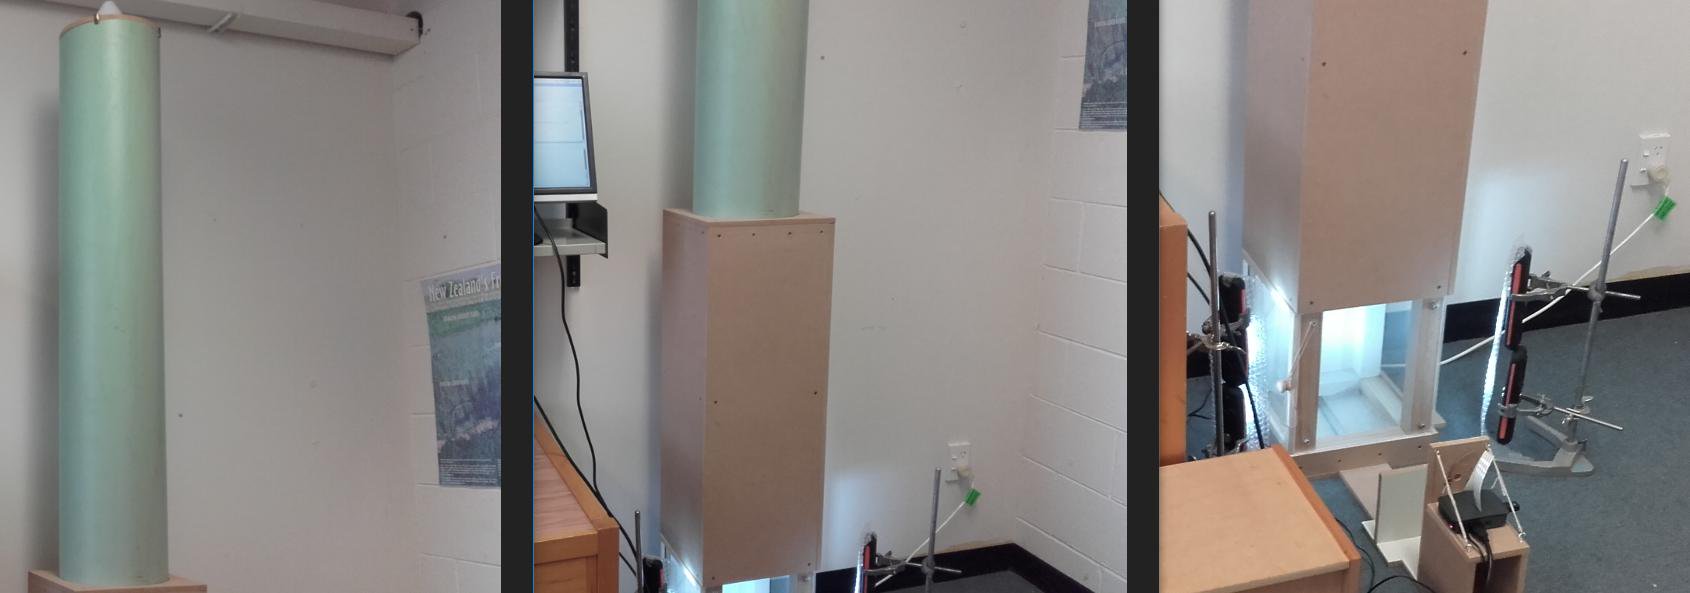
Pieter the Seed Eater was introduced in issue 10 of Hello World, and if you missed that, you can download a free PDF copy of the magazine from the website.
Pieter the Seed Eater was designed to measure the terminal velocity of pine (Pinus species) seeds from invasive trees in New Zealand, with a particular interest in the variation in falling speeds among seeds from the same cones, between different cones on the same tree, between trees in the same population, and between populations across the landscape. His diet is now expanding to take in a whole range of pine species, but there are many other species of tree around the world that also have winged seeds, in a variety of fascinating shapes.
To help emphasise the connections between nature and STEM, and because Pieter doesn’t have time to eat all the seeds, we are making cross-curricular resources available to support teaching activities. These range from tree identification and seed collection, through seed dispersal experiments and Seed Eater engineering, to terminal velocity measurements and understanding population spread.

There are several ways to measure tree height, which can be a stimulating discussion and activity. Fire arrows attached to string over high branches, go exploring on Google street view, or use trigonometry, making measurements in a variety of simple or sophisticated ways. Are they all equally accurate? Would they all work on isolated trees and in a dense forest?
These draw on links from elsewhere (for example, the tree identification keys provided by the Natural History Museum, and helicopter seed templates hosted by STEM Learning UK), as well as new material designed specifically for Pieter the Seed Eater, and more general cross-curricular activities related to ecology. In addition, participants can contribute their data to an online database and explore questions about their data using visualisation tools for dispersal equations and population spread.
The teaching resources fall into four main categories:
Each section contains background information, suggested activities for groups and individuals, data recording sheets, and stretch activities for students to carry out in class or at home. The resources are provided as Google slides under a Creative Commons license so that you can edit and adapt them for your own educational needs, with links to the National Curriculum highlighted throughout (thanks to Mary Howell, professional development leader at STEM Learning UK) and interactive graphics hosted online to help understand some of the concepts and equations more easily. Python code for the Seed Eater can be downloaded or written from scratch (or in Scratch!), so that you can set up the device or let students engineer it from first principles. It will need some calibration, but that is all part of the learning experience, and the resources come with some troubleshooting ideas to get started.
Relevant resources are available here. These are currently aimed at Key Stage 3 (age 11-14) and 4 (14-16), but will be developed and extended as time passes, feedback is incorporated, and new requests are made.
Ultimately, we would like to reach Key Stage 1 to sixth form and beyond, and develop the project into a citizen science collaboration in which people around the world share information about their local trees and seeds with the global community.
We welcome feedback and engagement with the project from anyone who is interested in taking part – get in touch via Twitter or email pen.holland@york.ac.uk.
Hello World is available now as a FREE PDF download. UK-based educators can also subscribe to receive Hello World directly to their door in all its shiny printed goodness. Visit the Hello World website for more information.

The post Exploring the interface of ecology, mathematics, and digital making | Hello World #11 appeared first on Raspberry Pi.
I’m currently (re)learning how to knit. Here are some textile-themed Raspberry Pi projects for the yarn-curious.
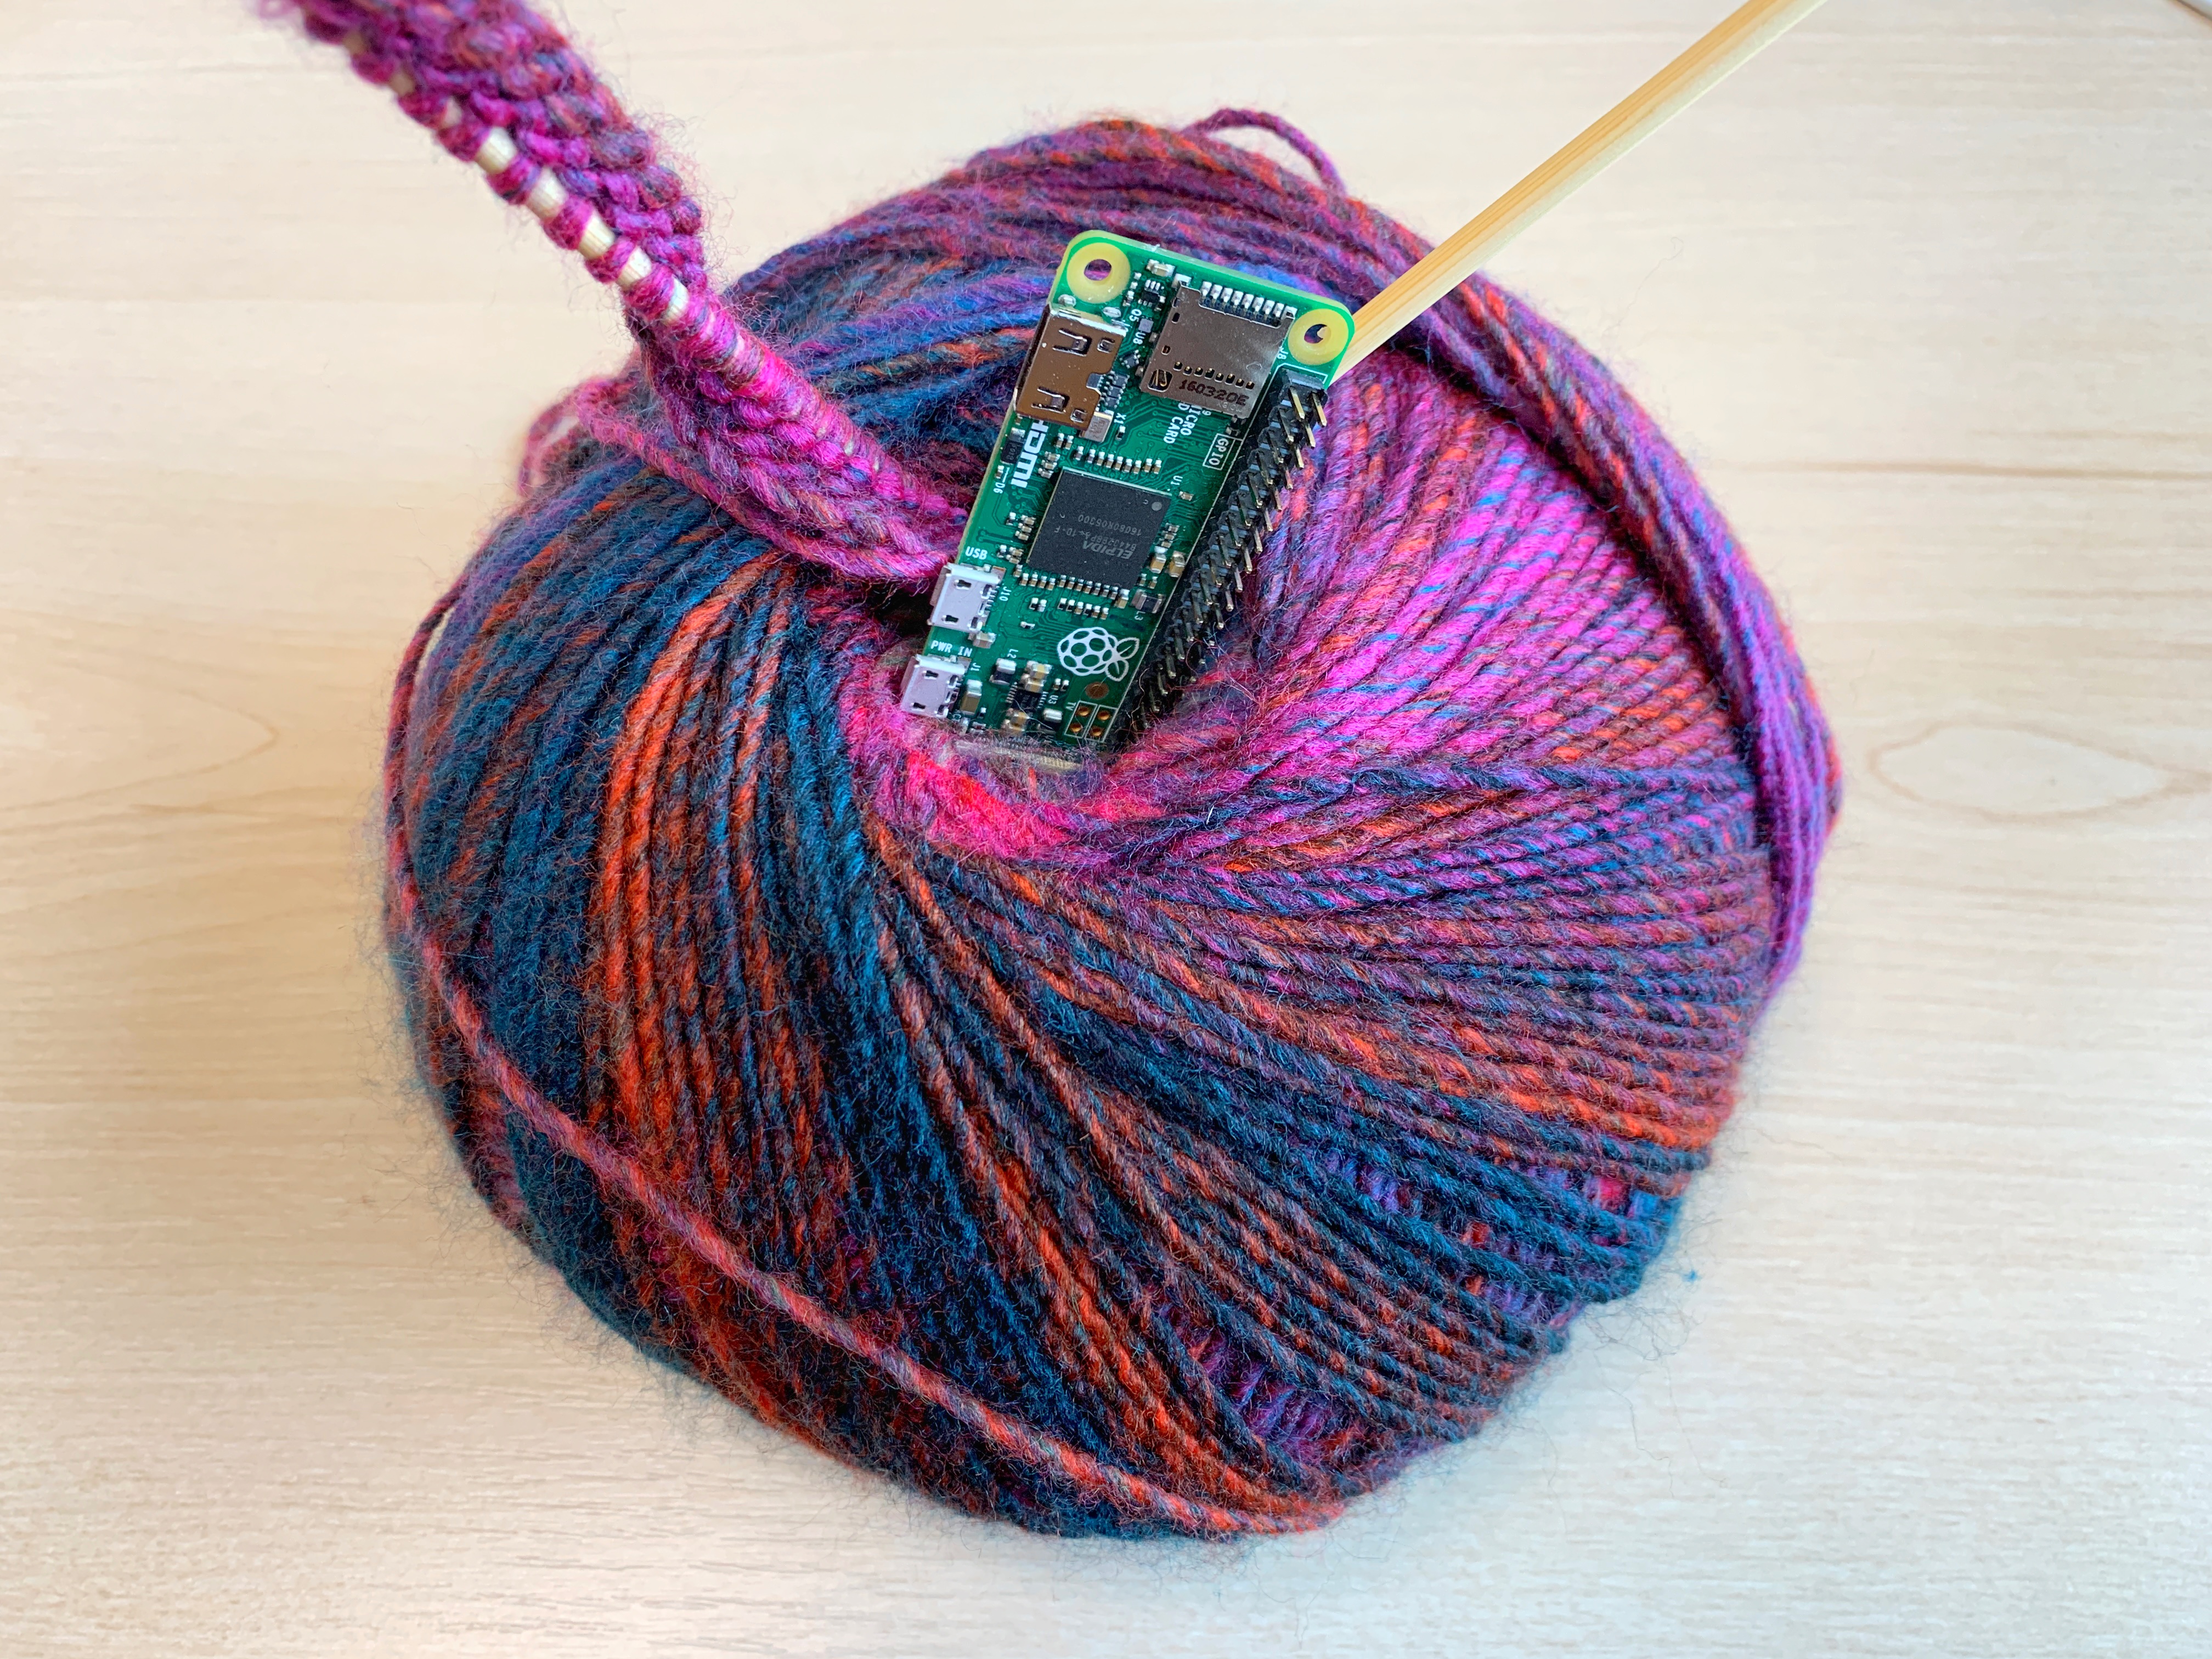
Loom Operation
The general sequence of events for running my Raspberry Pi controlled loom. The project was really a proof of concept idea rather than an actual production model. This video is intended to supplement my blog at www.photographic-perspectives.com Sorry, there is not audio with this.
Fred Hoefler has taken a desktop loom and added a Raspberry Pi to automate it. Read more in our blog post.
Knitting Printer! (slowest speed)
Printing a scarf on a Brother KM950i knitting machine from the 1980’s. To do this I have a Brother Motor arm to push the carriage back and forth and a homemade colour changer that automatically selects the colour on the left (the white and purple device with the LED).
The moment we saw Sarah Spencer‘s knitted Stargazing tapestry, we knew we needed to know more. A couple of emails later, and here’s Sarah with a guest blog post telling you all you need to know about her hacking adventure with a 1980s knitting machine and a Raspberry Pi.
Hendrix College Raspberry Pi Bake-Off
Uploaded by Hendrix College on 2014-04-08.
Cyndi Minister runs The Twisted Purl, a yarn company in Arkansas. She’s also a bit of a geek, and when her ankles became sore from too much work at the treadle, she hit on the idea of making a Raspberry Pi-powered spinning wheel for her hand-made yarn. Read more.
Loom Computer (Jacquard Simulator)
Raspberry Pi based Jacquard Loom simulator on display at Macclesfield Silk Museum (http://http://www.silkmacclesfield.org.uk).
Next time you’re out shopping for curtain fabric, or buying intricately woven cushion covers, step back for a moment and think about the computing history you’re holding in your hands. Computing’s everywhere. Find out more here.
The post Fabric-licious Raspberry Pi projects appeared first on Raspberry Pi.
Raspberry Pi Press is delighted to announce the release of the latest addition to your bookshelf: Retro Gaming with Raspberry Pi!
Retro Gaming with Raspberry Pi
Subscribe to our YouTube channel: http://rpf.io/ytsub Help us reach a wider audience by translating our video content: http://rpf.io/yttranslate Buy a Raspberry Pi from one of our Approved Resellers: http://rpf.io/ytproducts Find out more about the #RaspberryPi Foundation: Raspberry Pi http://rpf.io/ytrpi Code Club UK http://rpf.io/ytccuk Code Club International http://rpf.io/ytcci CoderDojo http://rpf.io/ytcd Check out our free online training courses: http://rpf.io/ytfl Find your local Raspberry Jam event: http://rpf.io/ytjam Work through our free online projects: http://rpf.io/ytprojects Do you have a question about your Raspberry Pi?
This 164-page book shows you how to set up a Raspberry Pi to play classic games; and how to build your own portable console, a full-size arcade cabinet, and a pinball machine with clear step-by-step guides.
You’ll learn how to program your own games using Python and Pygame Zero, allowing you to recreate some of your favourite retro games, as well as learning how lines of code can produce gorgeous graphics and hours of nostalgia-driven fun.
If that’s not enough, you’ll also find reviews of some of the best retro gamer kit, such as cases and controllers; tips on setting up emulators; and showcases of some gorgeous retro-fit Raspberry Pi systems.
If you’d like to buy Retro Gaming with Raspberry Pi as a physical book (and we do recommend you do – it’ll make a fantastic stocking-filler), you can purchase it now from the Raspberry Pi Press website with free international shipping, or from the Raspberry Pi Store, Cambridge.
As with all Raspberry Pi Press publications, Retro Gaming with Raspberry Pi is available now as a free PDF, ready for you to download from The MagPi website.
The post New book: Retro Gaming with Raspberry Pi appeared first on Raspberry Pi.
The Raspberry Pi 4 Desktop Kit is the perfect gift for any budding maker, coder, or Raspberry Pi fanatic. Get yours today from Raspberry Pi Approved Resellers across the globe, and the Raspberry Pi Store, Cambridge.
What’s inside the Raspberry Pi 4 Desktop Kit?
Subscribe to our YouTube channel: http://rpf.io/ytsub Help us reach a wider audience by translating our video content: http://rpf.io/yttranslate Buy a Raspberry Pi from one of our Approved Resellers: http://rpf.io/ytproducts Find out more about the #RaspberryPi Foundation: Raspberry Pi http://rpf.io/ytrpi Code Club UK http://rpf.io/ytccuk Code Club International http://rpf.io/ytcci CoderDojo http://rpf.io/ytcd Check out our free online training courses: http://rpf.io/ytfl Find your local Raspberry Jam event: http://rpf.io/ytjam Work through our free online projects: http://rpf.io/ytprojects Do you have a question about your Raspberry Pi?
The Official Raspberry Pi 4 Desktop Kit includes all you need to hook up your Raspberry Pi to an HDMI monitor or TV and get started.
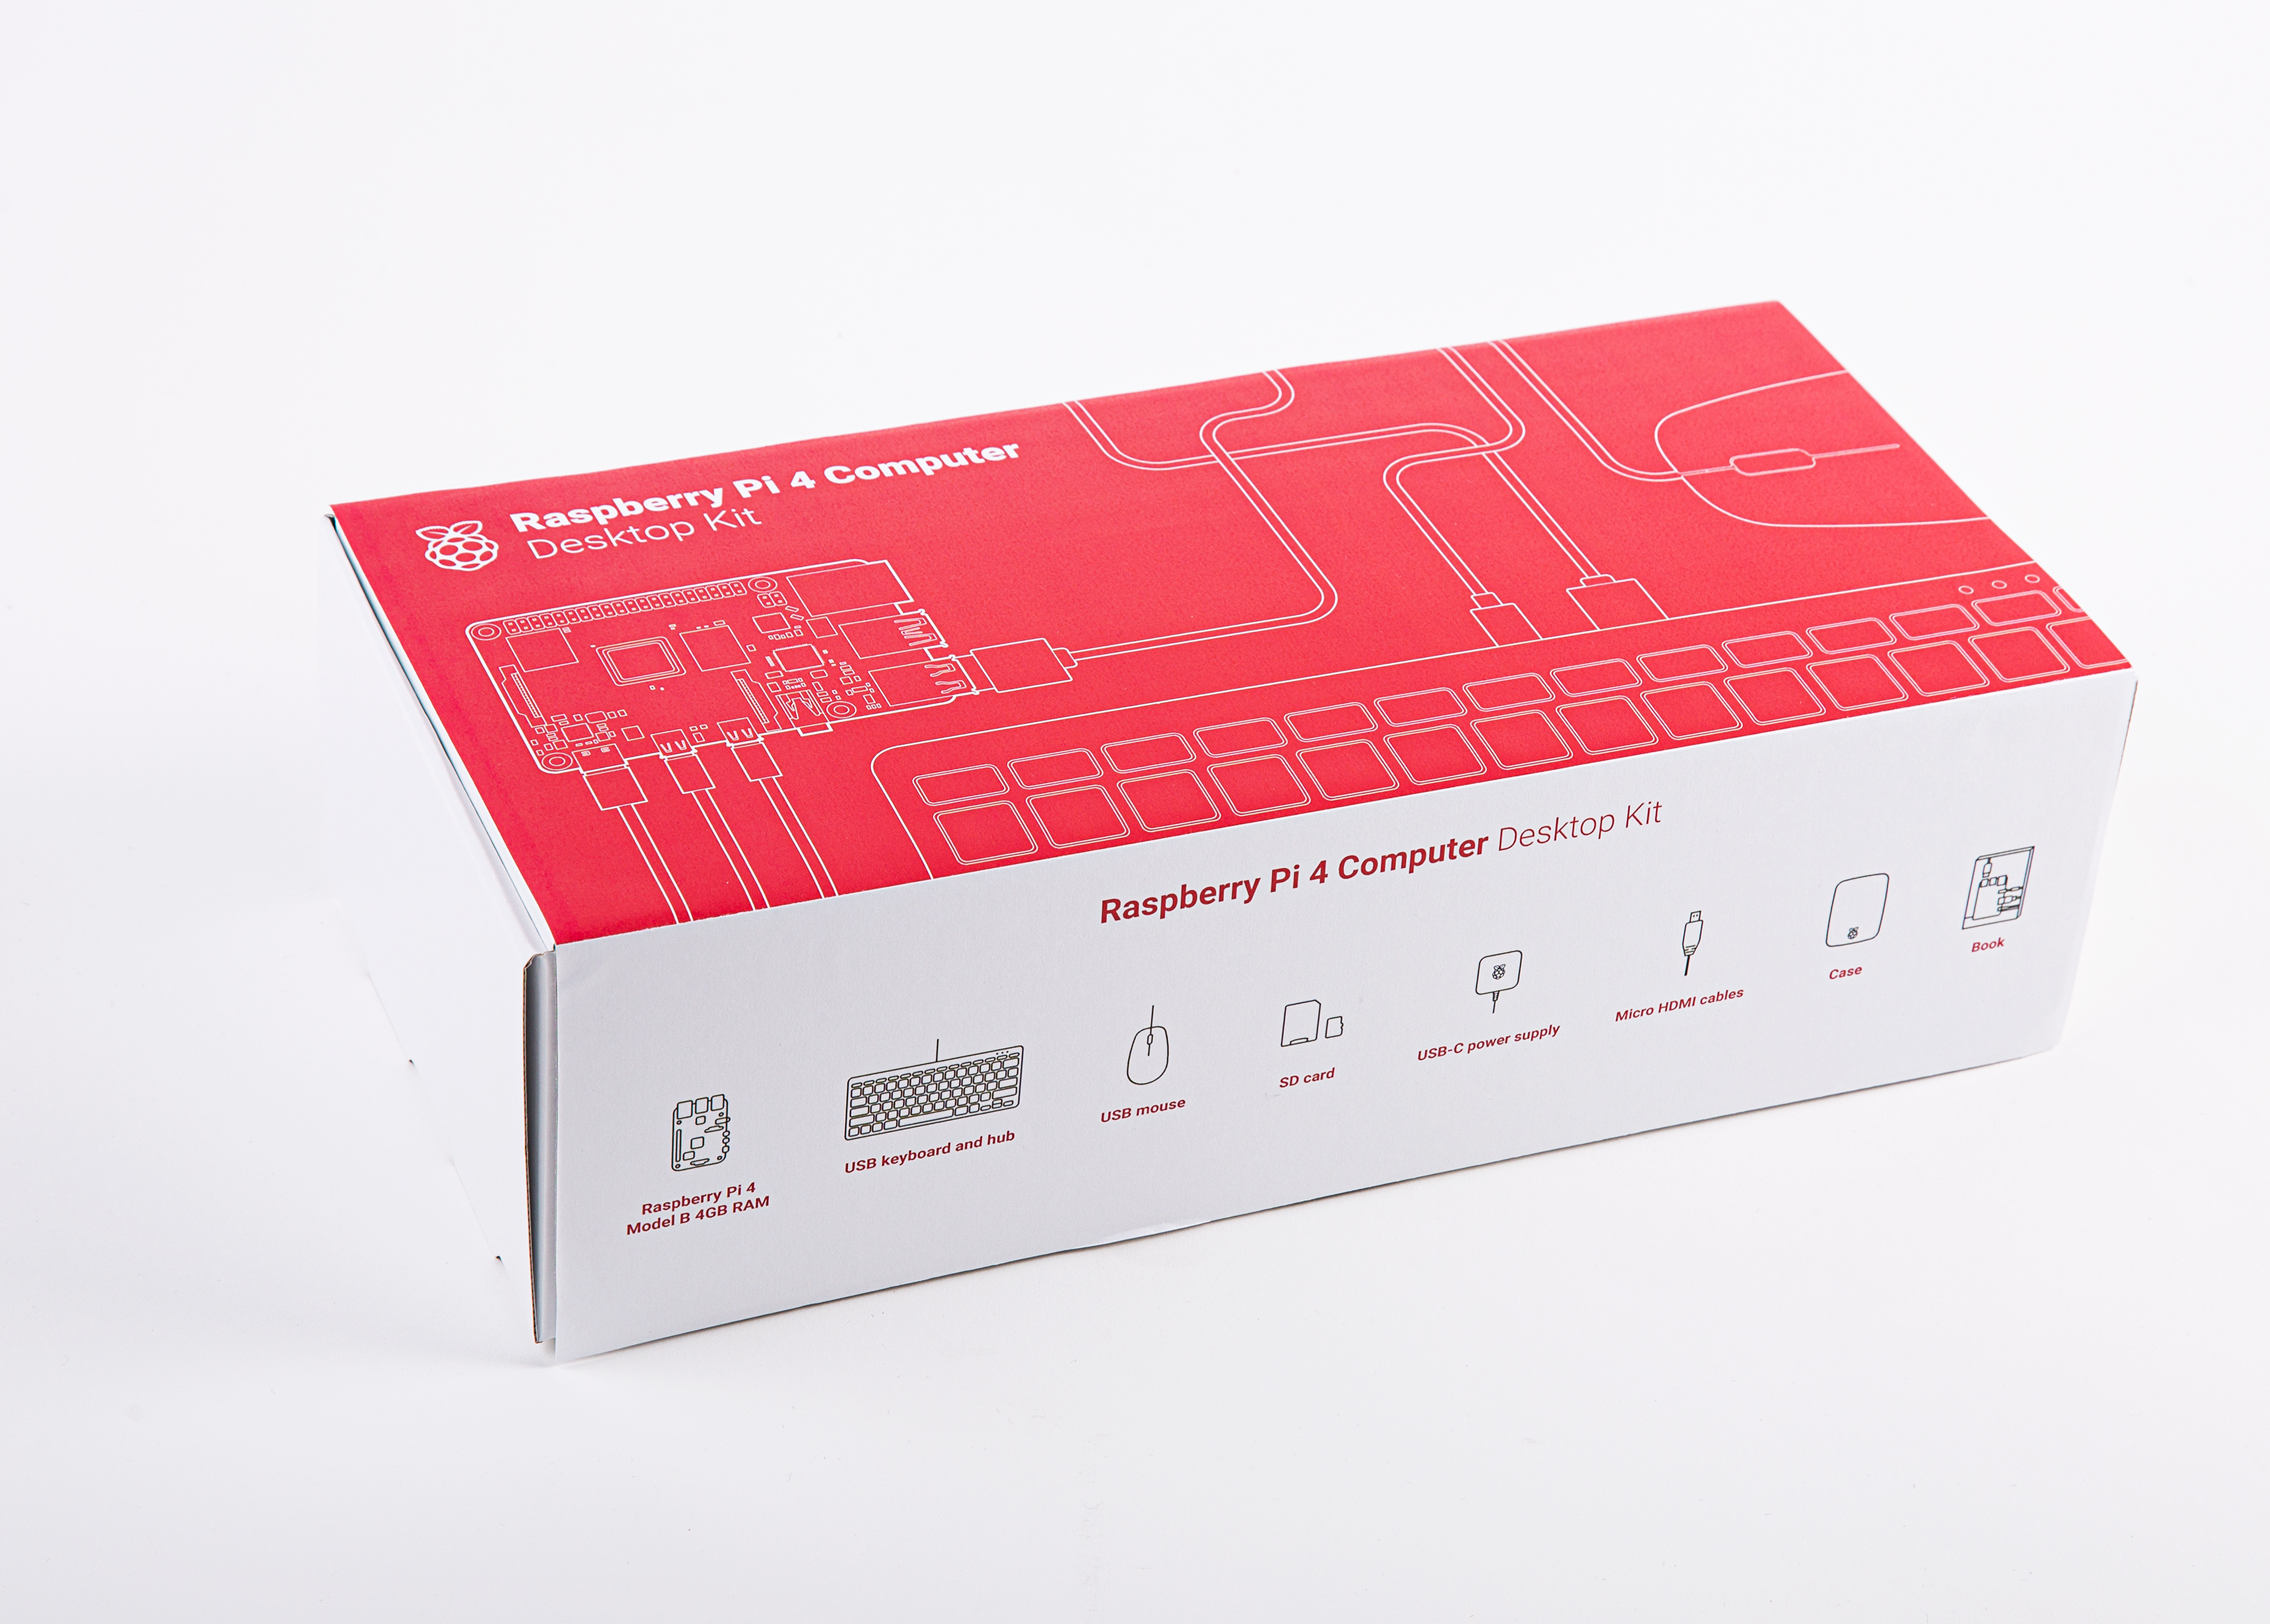
Raspberry Pi Desktop Kit
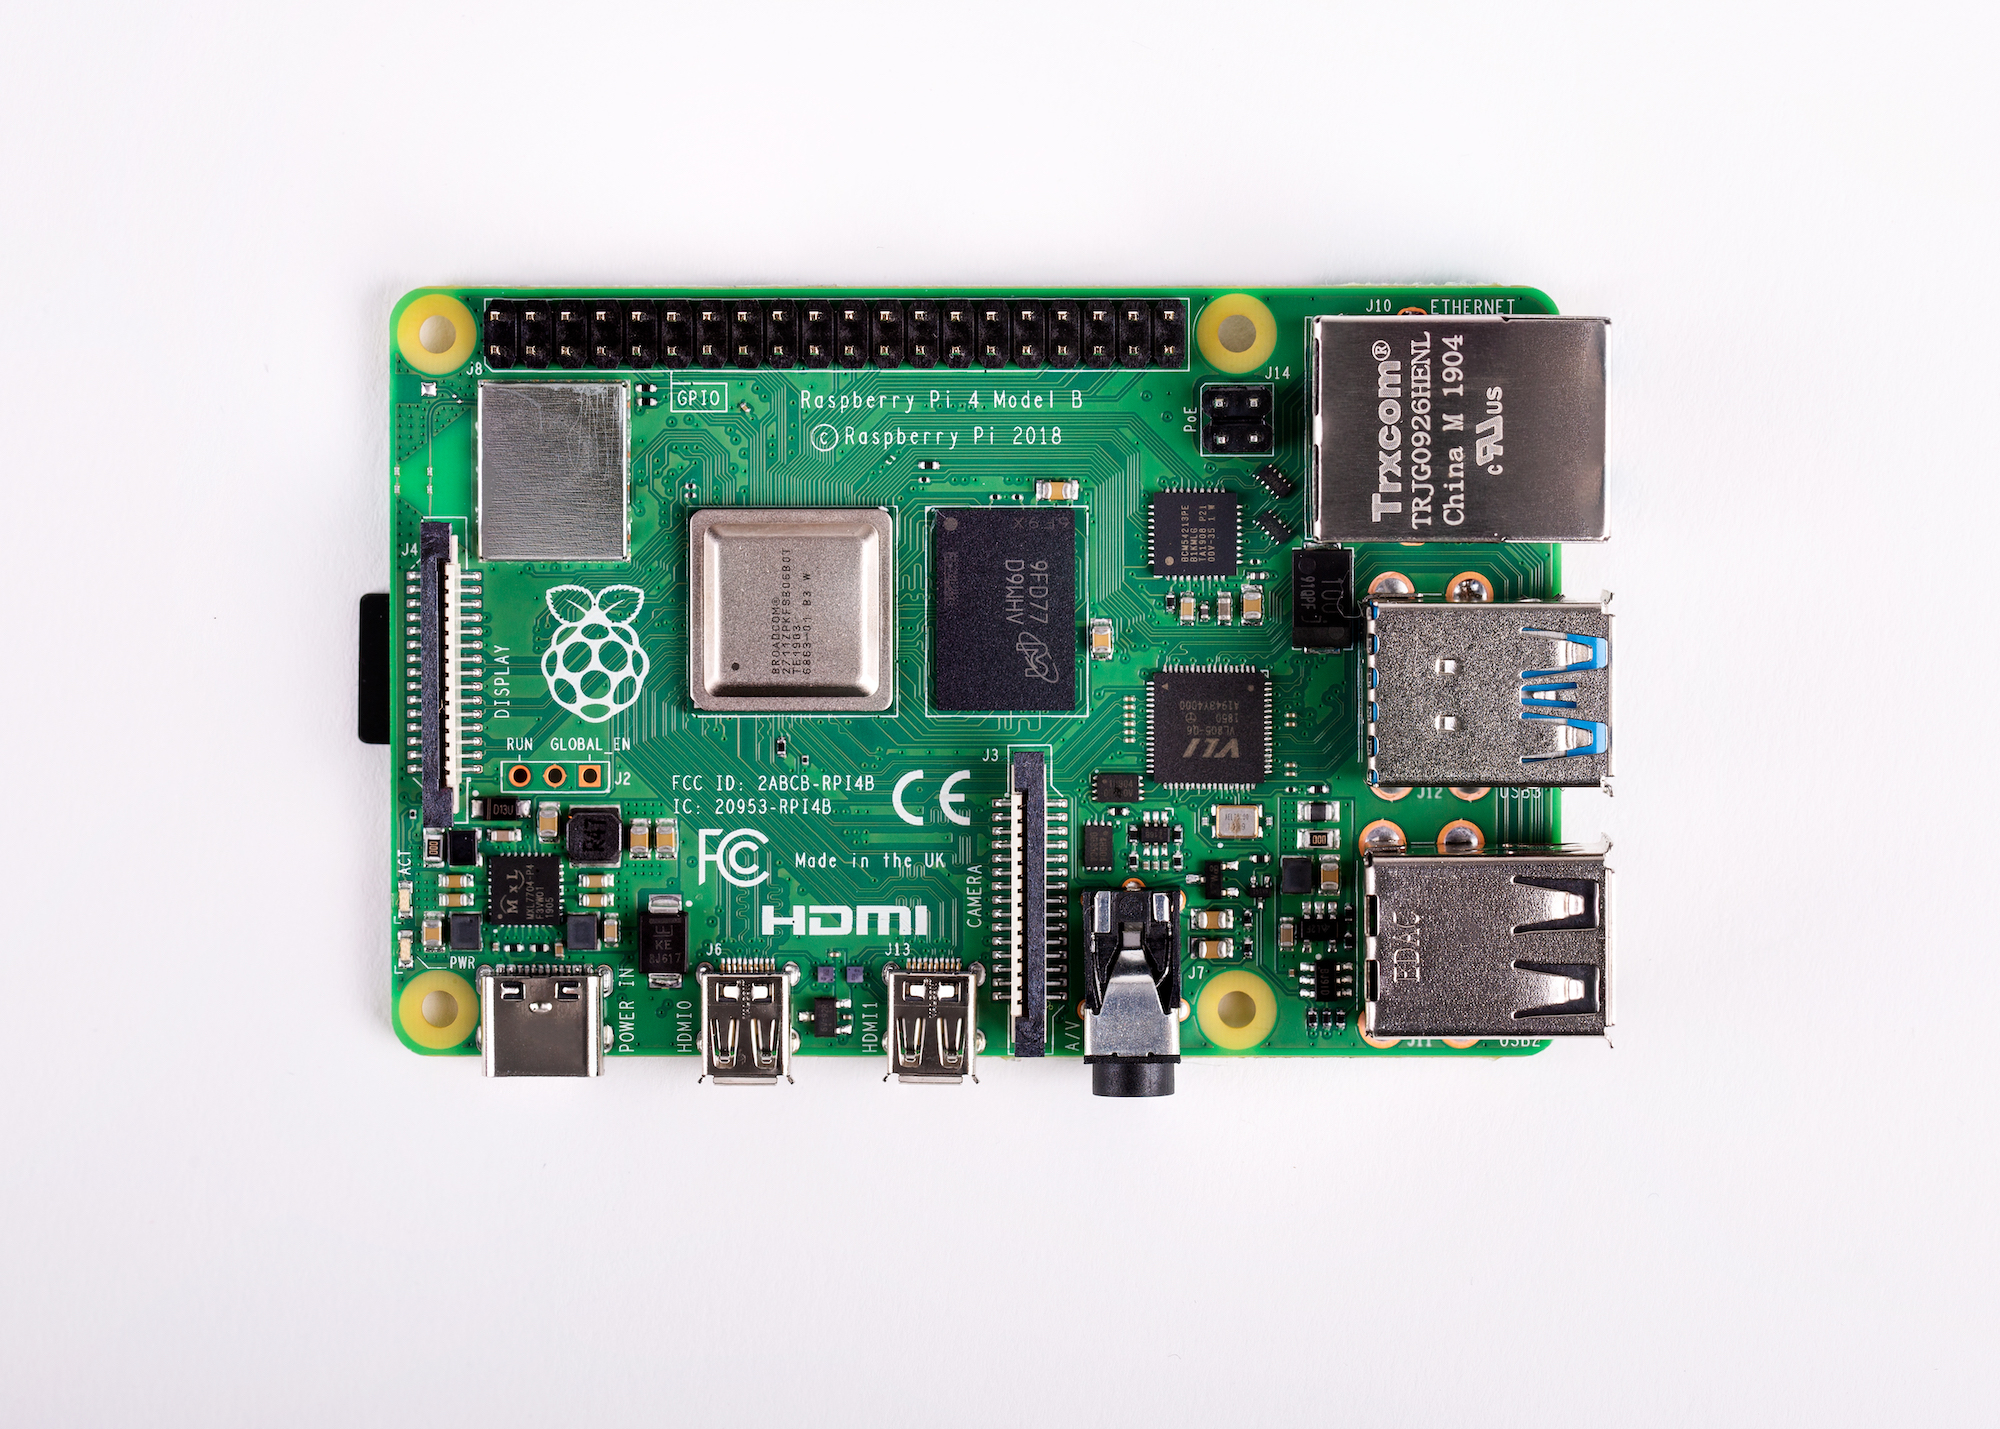
Released earlier this year, the Raspberry Pi 4 is the latest development from the Raspberry Pi team. Available in 1GB, 2GB and 4GB variants, the Raspberry Pi Desktop Kit is powerful enough to replace your humble desktop computer.
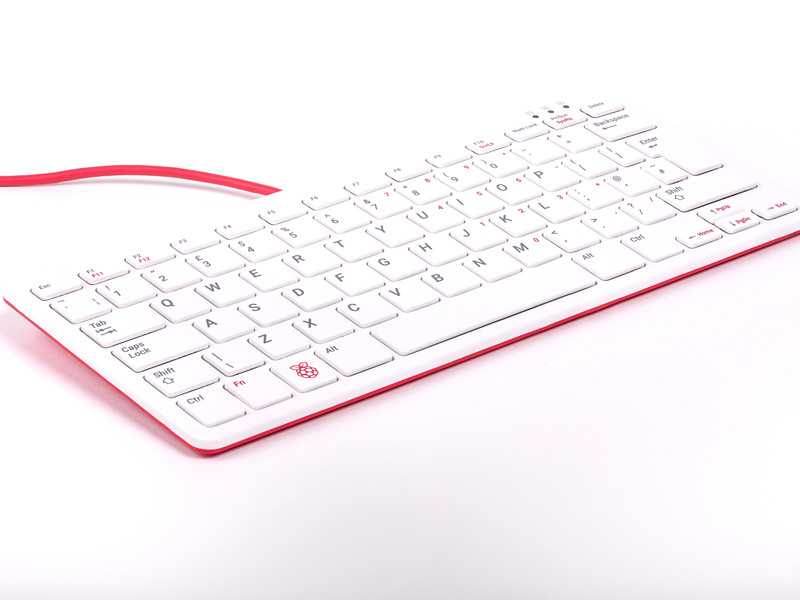
Snazzy Raspberry Pi keyboard
Designed with Raspberry Pi users in mind, the new official keyboard is both aesthetically and functionally pleasing. Available in various language layouts, the keyboard also contains a USB hub, allowing for better cable management on the go.

Natty Raspberry Pi mouse
Light-weight and comfortable to use, the official mouse is the perfect pairing for our keyboard.
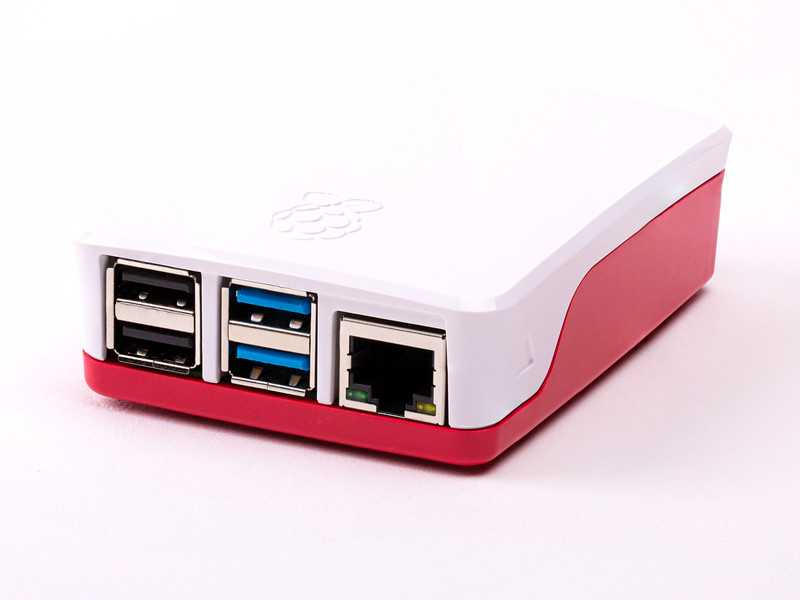
Or this side?
Protect your Raspberry Pi from dust and tea spills with the newly-designed Raspberry Pi 4 case. How did we design it? Find out more here.

Updated for the new Raspberry Pi 4, our Official Beginners Guide contains all the information needed to get up and running with your new computer and provides several projects to introduce you to the world of coding. It’s great, but don’t take our word for it; Wired said “The beginners guide that comes with the Desktop Kit is the nicest documentation I’ve seen with any hardware, possibly ever. ”

We’ve updated the Raspberry Pis power supply to USB-C, allowing your new computer to receive all the juice it needs to run while supporting add-ons like HATs and other components.
Plugin and get started. With the NOOBS pre-loaded on a micro SD card, you can get up and running straight away, without the need to spend time installing your OS.

Two?! The Raspberry Pi 4 includes two micro HDMI connectors, which means you can run two monitors from one device.
We’re a charity. 100% of the profit we make when you purchase official Raspberry Pi products goes to support the work of the Raspberry Pi Foundation, and its mission to put the power of computing and digital making into the hands of people all over the world. Thank you!
To find your nearest Raspberry Pi Approved reseller, visit our products page or the Raspberry Pi Store, Cambridge. We’re constantly working with new suppliers to ensure more availability of Raspberry Pi products across the world.
Un-unboxing the Raspberry Pi 4 Desktop Kit
Subscribe to our YouTube channel: http://rpf.io/ytsub Help us reach a wider audience by translating our video content: http://rpf.io/yttranslate Buy a Raspberry Pi from one of our Approved Resellers: http://rpf.io/ytproducts Find out more about the #RaspberryPi Foundation: Raspberry Pi http://rpf.io/ytrpi Code Club UK http://rpf.io/ytccuk Code Club International http://rpf.io/ytcci CoderDojo http://rpf.io/ytcd Check out our free online training courses: http://rpf.io/ytfl Find your local Raspberry Jam event: http://rpf.io/ytjam Work through our free online projects: http://rpf.io/ytprojects Do you have a question about your Raspberry Pi?
The post What’s inside the Raspberry Pi 4 Desktop Kit? appeared first on Raspberry Pi.
New to the Raspberry Pi Store, Cambridge: T-shirts made using Raspberry Pis in Rapanui’s sustainable factory.
Oli Wilkin – our Glorious Retail Guru, to give him his formal title – has been hard at work this year bringing the Raspberry Pi Store, Cambridge, to life. Open since February, the store continues to evolve as it introduces our credit card-sized computer to a high-street audience. Oli and the store team are always talking to customers, exploring new ideas, and making changes. Here’s Oli on the latest development: Rapanui clothing, made sustainably with the help of Raspberry Pis.
Rapanui 2
Subscribe to our YouTube channel: http://rpf.io/ytsub Help us reach a wider audience by translating our video content: http://rpf.io/yttranslate Buy a Raspberry Pi from one of our Approved Resellers: http://rpf.io/ytproducts Find out more about the #RaspberryPi Foundation: Raspberry Pi http://rpf.io/ytrpi Code Club UK http://rpf.io/ytccuk Code Club International http://rpf.io/ytcci CoderDojo http://rpf.io/ytcd Check out our free online training courses: http://rpf.io/ytfl Find your local Raspberry Jam event: http://rpf.io/ytjam Work through our free online projects: http://rpf.io/ytprojects Do you have a question about your Raspberry Pi?
Brothers Mart and Rob started bespoke clothing company Rapanui in a garden shed on the Isle of Wight, with an initial investment of £200 (about $257 US). Ten years later, Rapanui has grown to a fully fledged factory providing over 100 jobs. Their vision to create a sustainable clothing brand has seen them increase Rapanui’s offering from T-shirts to a much wider range of clothing, including jumpers, socks, and jackets. Another reason we like them a lot is that the factory uses over 100 Raspberry Pis with a wide variety of functions.
Rapanui’s early early days weres not without their challenges. Mart and Rob found early on that every improvement in sustainability came with a price tag. They realised that they could use technology to help keep costs down without cutting corners:
Along the way, we needed a real low-cost option for us to be able to get computing in and around the place. Someone said,
“Oh, you should check out Raspberry Pi.”
“What’s that?”
“It’s a computer, and costs twenty quid or something, and it’s the size of a credit card.”
“OK – that can’t be true!”
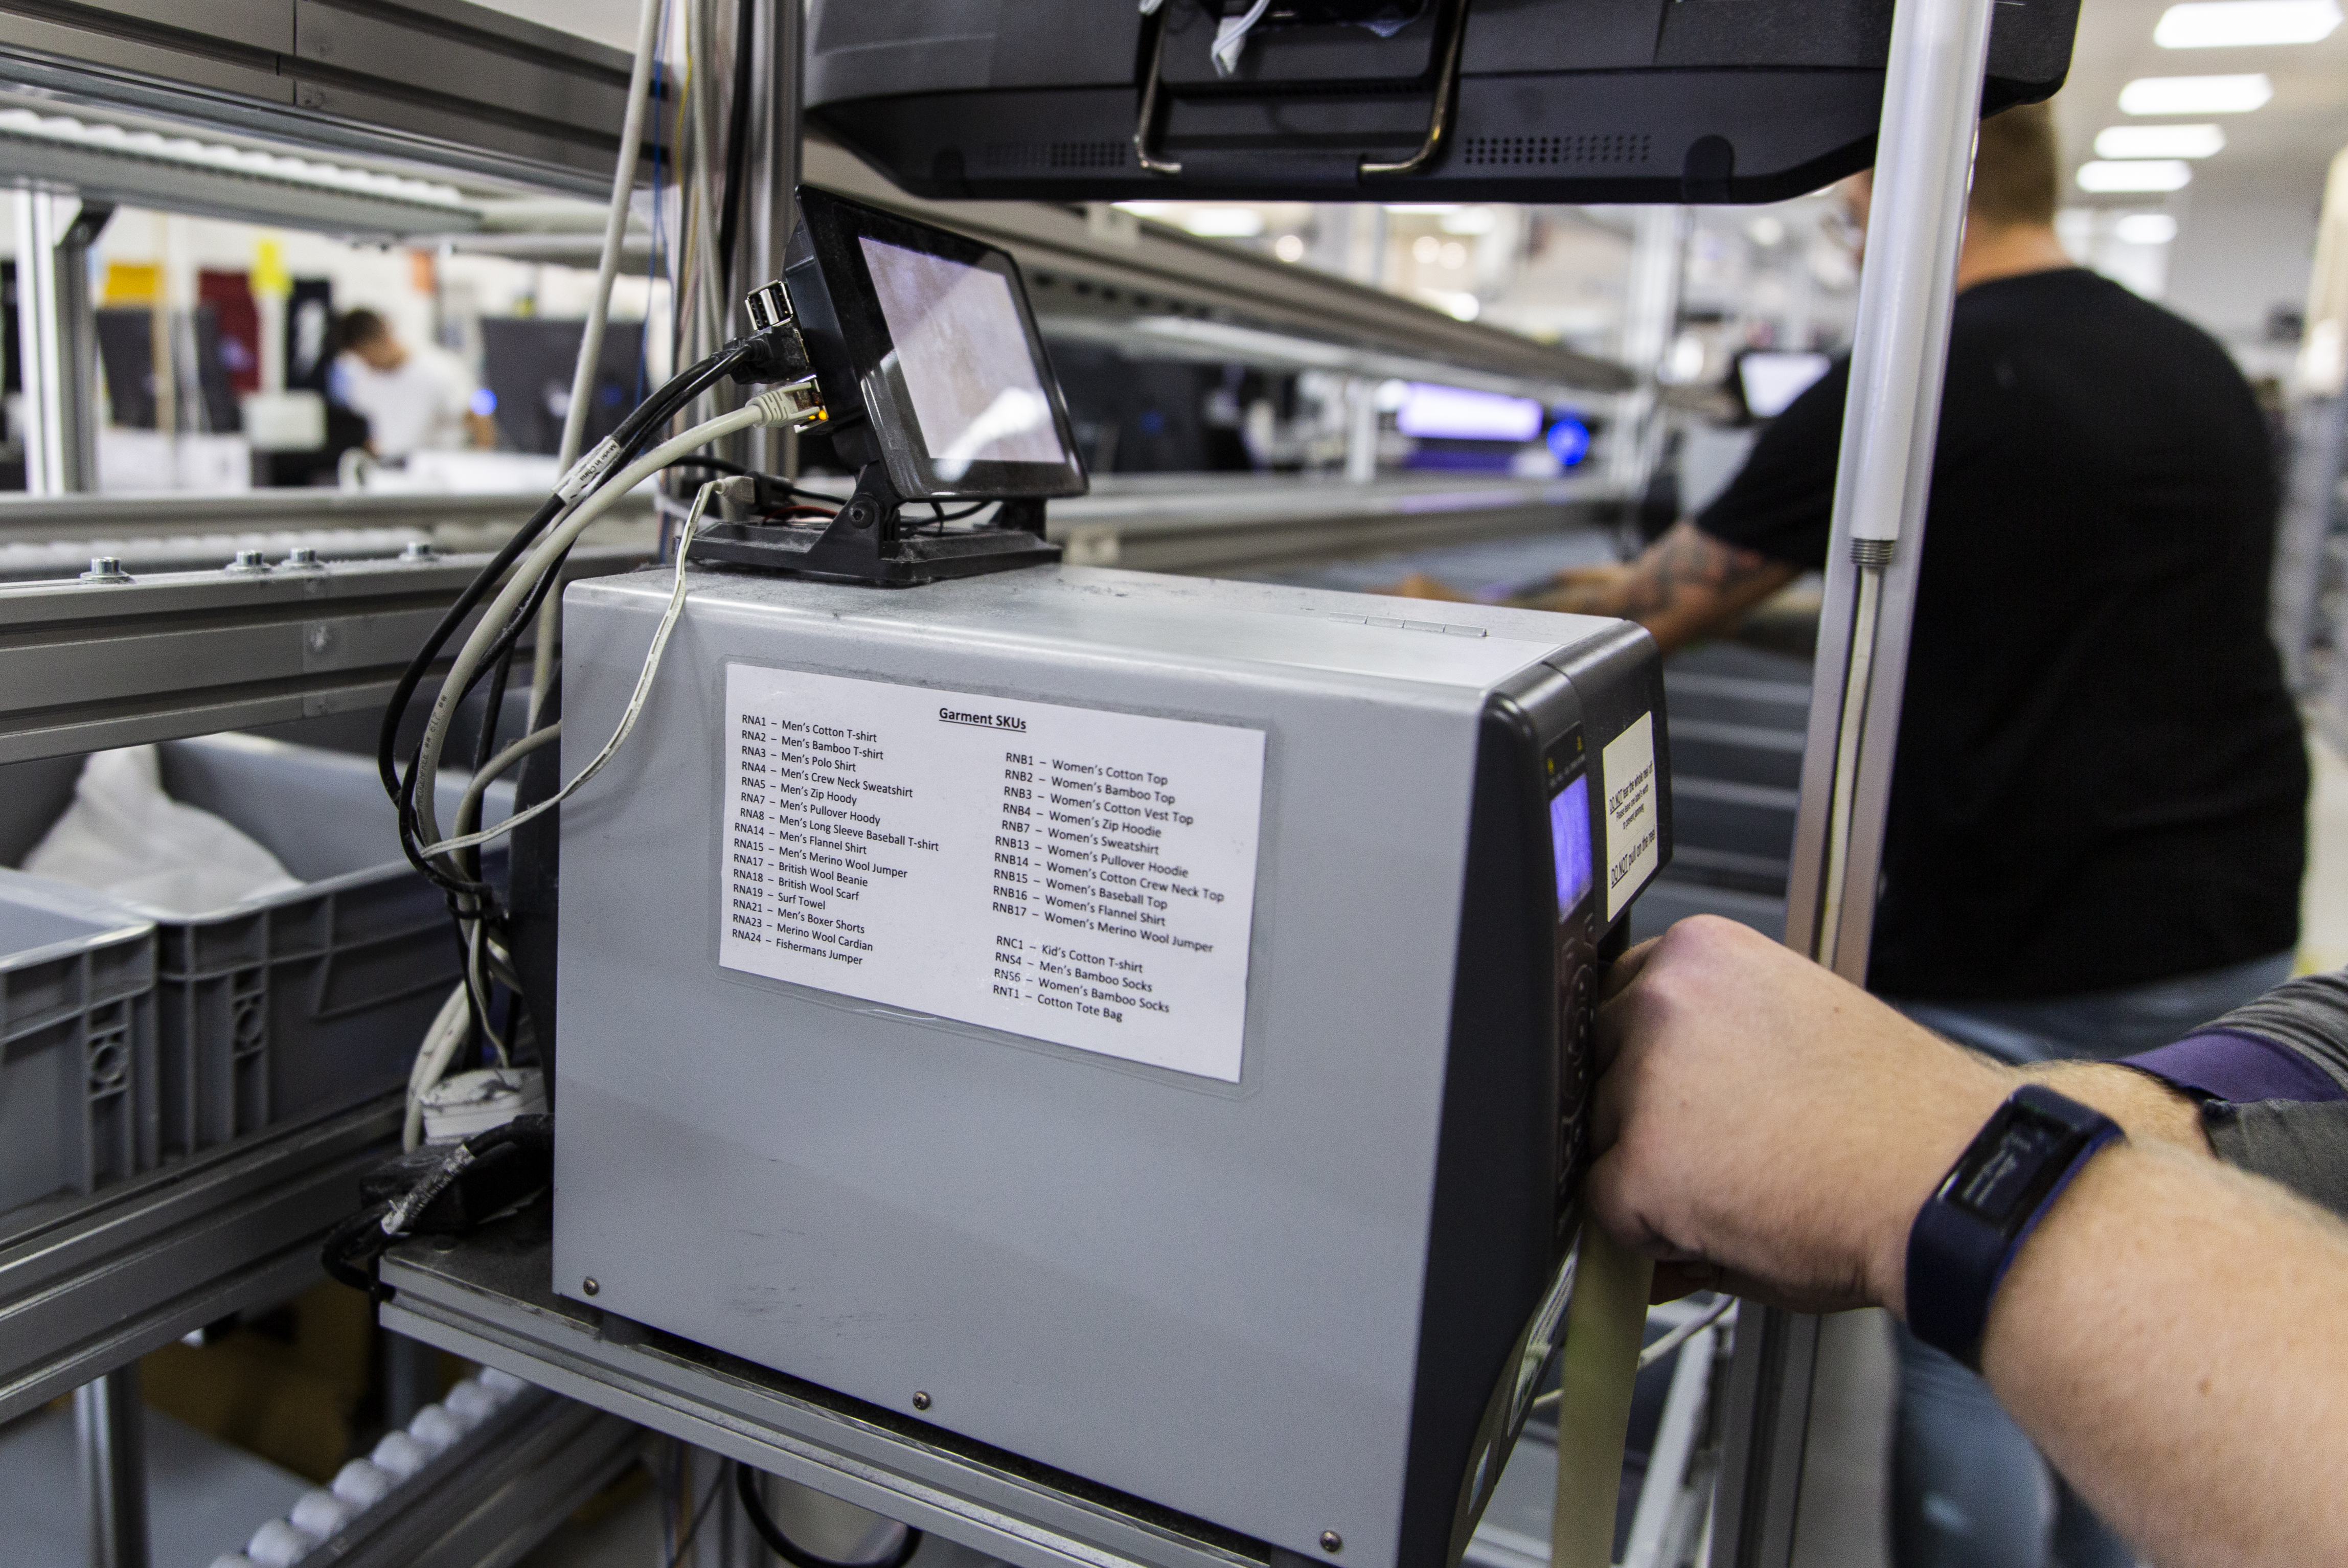
We got one, and it just blew our mind, because there’s no limit to what we could do with it.
– Mart
The Raspberry Pis are supporting things like productivity improvements, order tracking, workload prioritisation, and smart lighting. All employees are encouraged to try coding when they start working for Rapanui, and they’re empowered to change their workplace to make it smarter and more efficient.
As Mart explains,
In the world today, there’s a lot of issues around environment and sustainability, which feel like compromises – you want to do your bit, but it costs more. What this kind of technology allows us to do is make things cost less because you can create these massive efficiencies through technology, and that’s what enables you to be able to afford the things that you want to do with sustainability, without having to compromise on price.
All of the organic cotton that Rapanui uses is fully traced from India to the Isle of Wight, where it is turned into amazing quality branded items for their customers. Once a garment has come to the end of its life, a customer can simply scan the QR code on the inside label, and this QR code generates a Freepost address. This allows the customer to send their item back to Rapanui for a webshop credit, thus creating a circular economy.

All of this makes us very pleased to be working with Rapanui to print the T-shirts you buy in the Raspberry Pi store.
Rapanui – from workshop to store
Subscribe to our YouTube channel: http://rpf.io/ytsub Help us reach a wider audience by translating our video content: http://rpf.io/yttranslate Buy a Raspberry Pi from one of our Approved Resellers: http://rpf.io/ytproducts Find out more about the #RaspberryPi Foundation: Raspberry Pi http://rpf.io/ytrpi Code Club UK http://rpf.io/ytccuk Code Club International http://rpf.io/ytcci CoderDojo http://rpf.io/ytcd Check out our free online training courses: http://rpf.io/ytfl Find your local Raspberry Jam event: http://rpf.io/ytjam Work through our free online projects: http://rpf.io/ytprojects Do you have a question about your Raspberry Pi?
We have started with our Raspberry Pi 4 T-shirt, and others will follow. Our hope is that all our T-shirts will be fully sustainable and better for you, our customers.
The post Sustainable clothing with Rapanui and Raspberry Pi appeared first on Raspberry Pi.
With the 75th anniversary of the D-Day landings very much in the news this year, Adam Clark found himself interested in all things relating to that era. So it wasn’t long before he found himself on the Internet Archive listening to some of the amazing recordings of radio broadcasts from that time. In this month’s HackSpace magazine, Adam details how he built his WW2 radio-broadcast time machine using a Raspberry Pi Zero W, and provides you with the code to build your own.
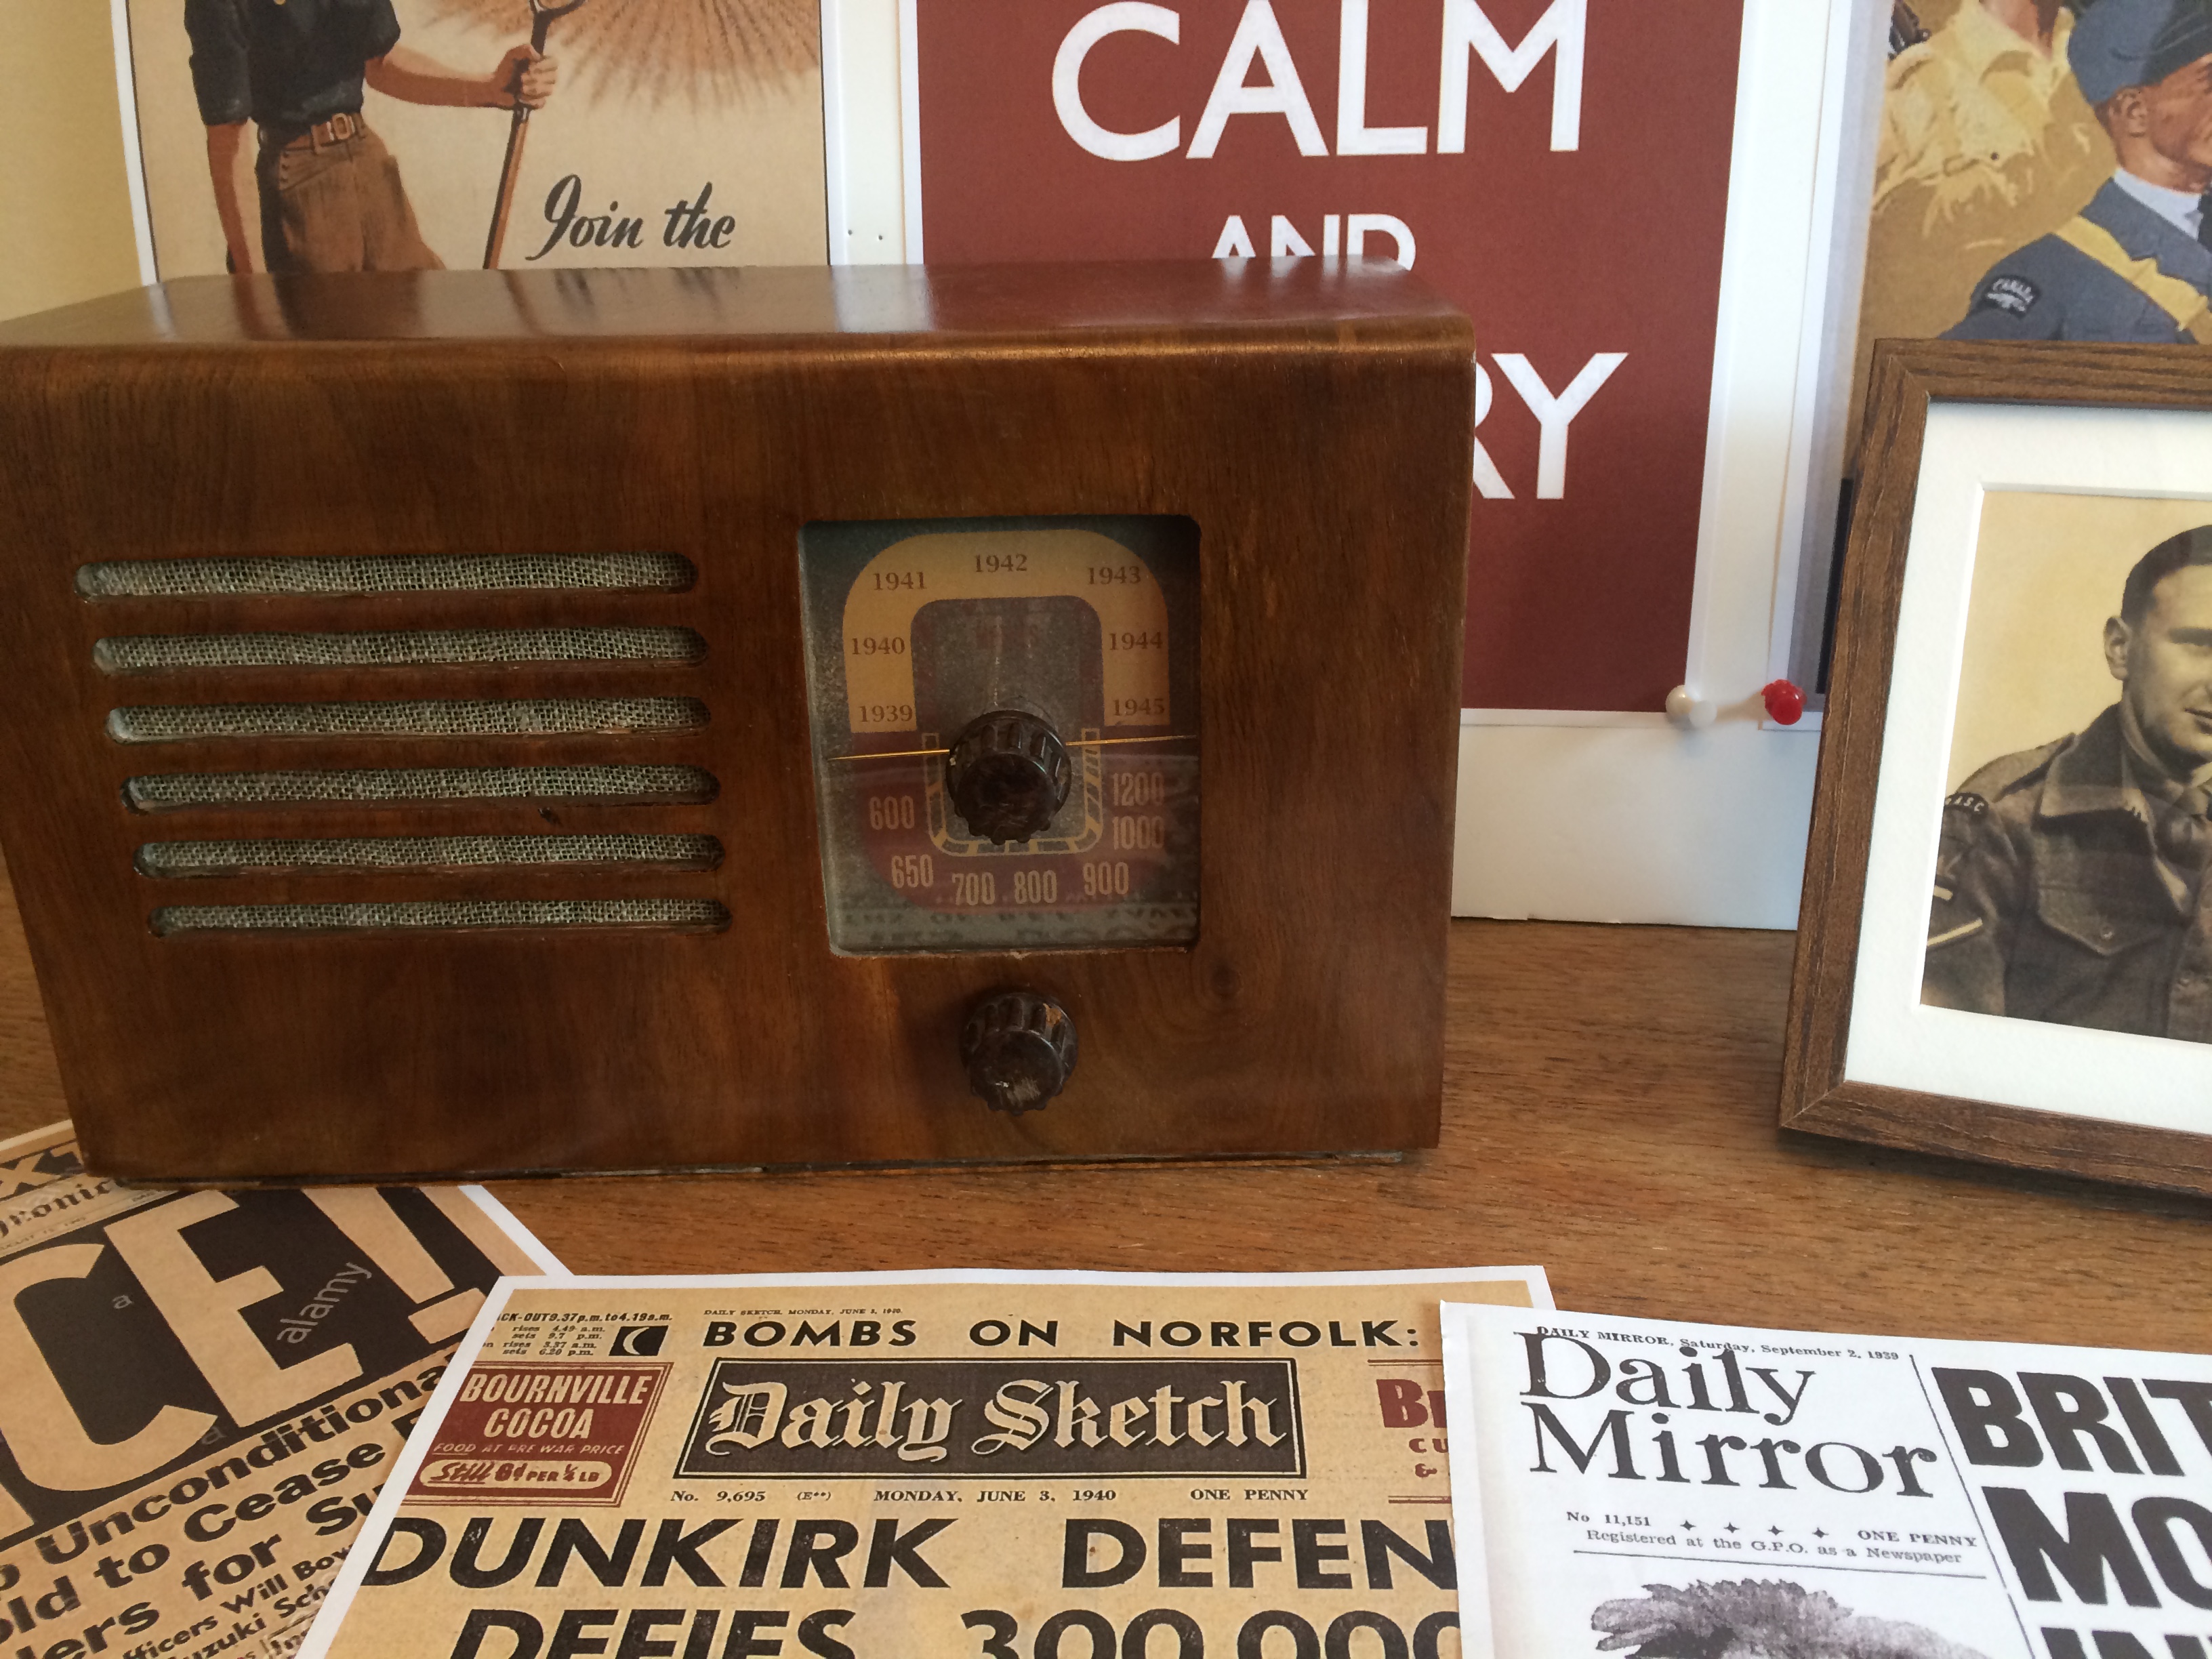
As good as the recordings on the Internet Archive were, it felt as if something was missing by listening to them on a modern laptop, so I wanted something to play them back on that was more evocative of that time, and would perhaps capture the feeling of listening to them on a radio set.
I also wanted to make the collection portable and to make the interface for selecting and playing the tracks as easy as possible – this wasn’t going to be screen-based!
Another important consideration was to house the project in something that would not look out of place in the living room, and not to give away the fact that it was being powered by modern tech.
So I came up with the idea of using an original radio as the project case, and to use as many of the original knobs and dials as possible. I also had the idea to repurpose the frequency dial to select individual years of the war and to play broadcasts from whichever year was selected.
Of course, the Raspberry Pi was immediately the first option to run all this, and ideally, I wanted to use a Raspberry Pi Zero to keep the costs down and perhaps to allow expansion in the future outside of being a standalone playback device.
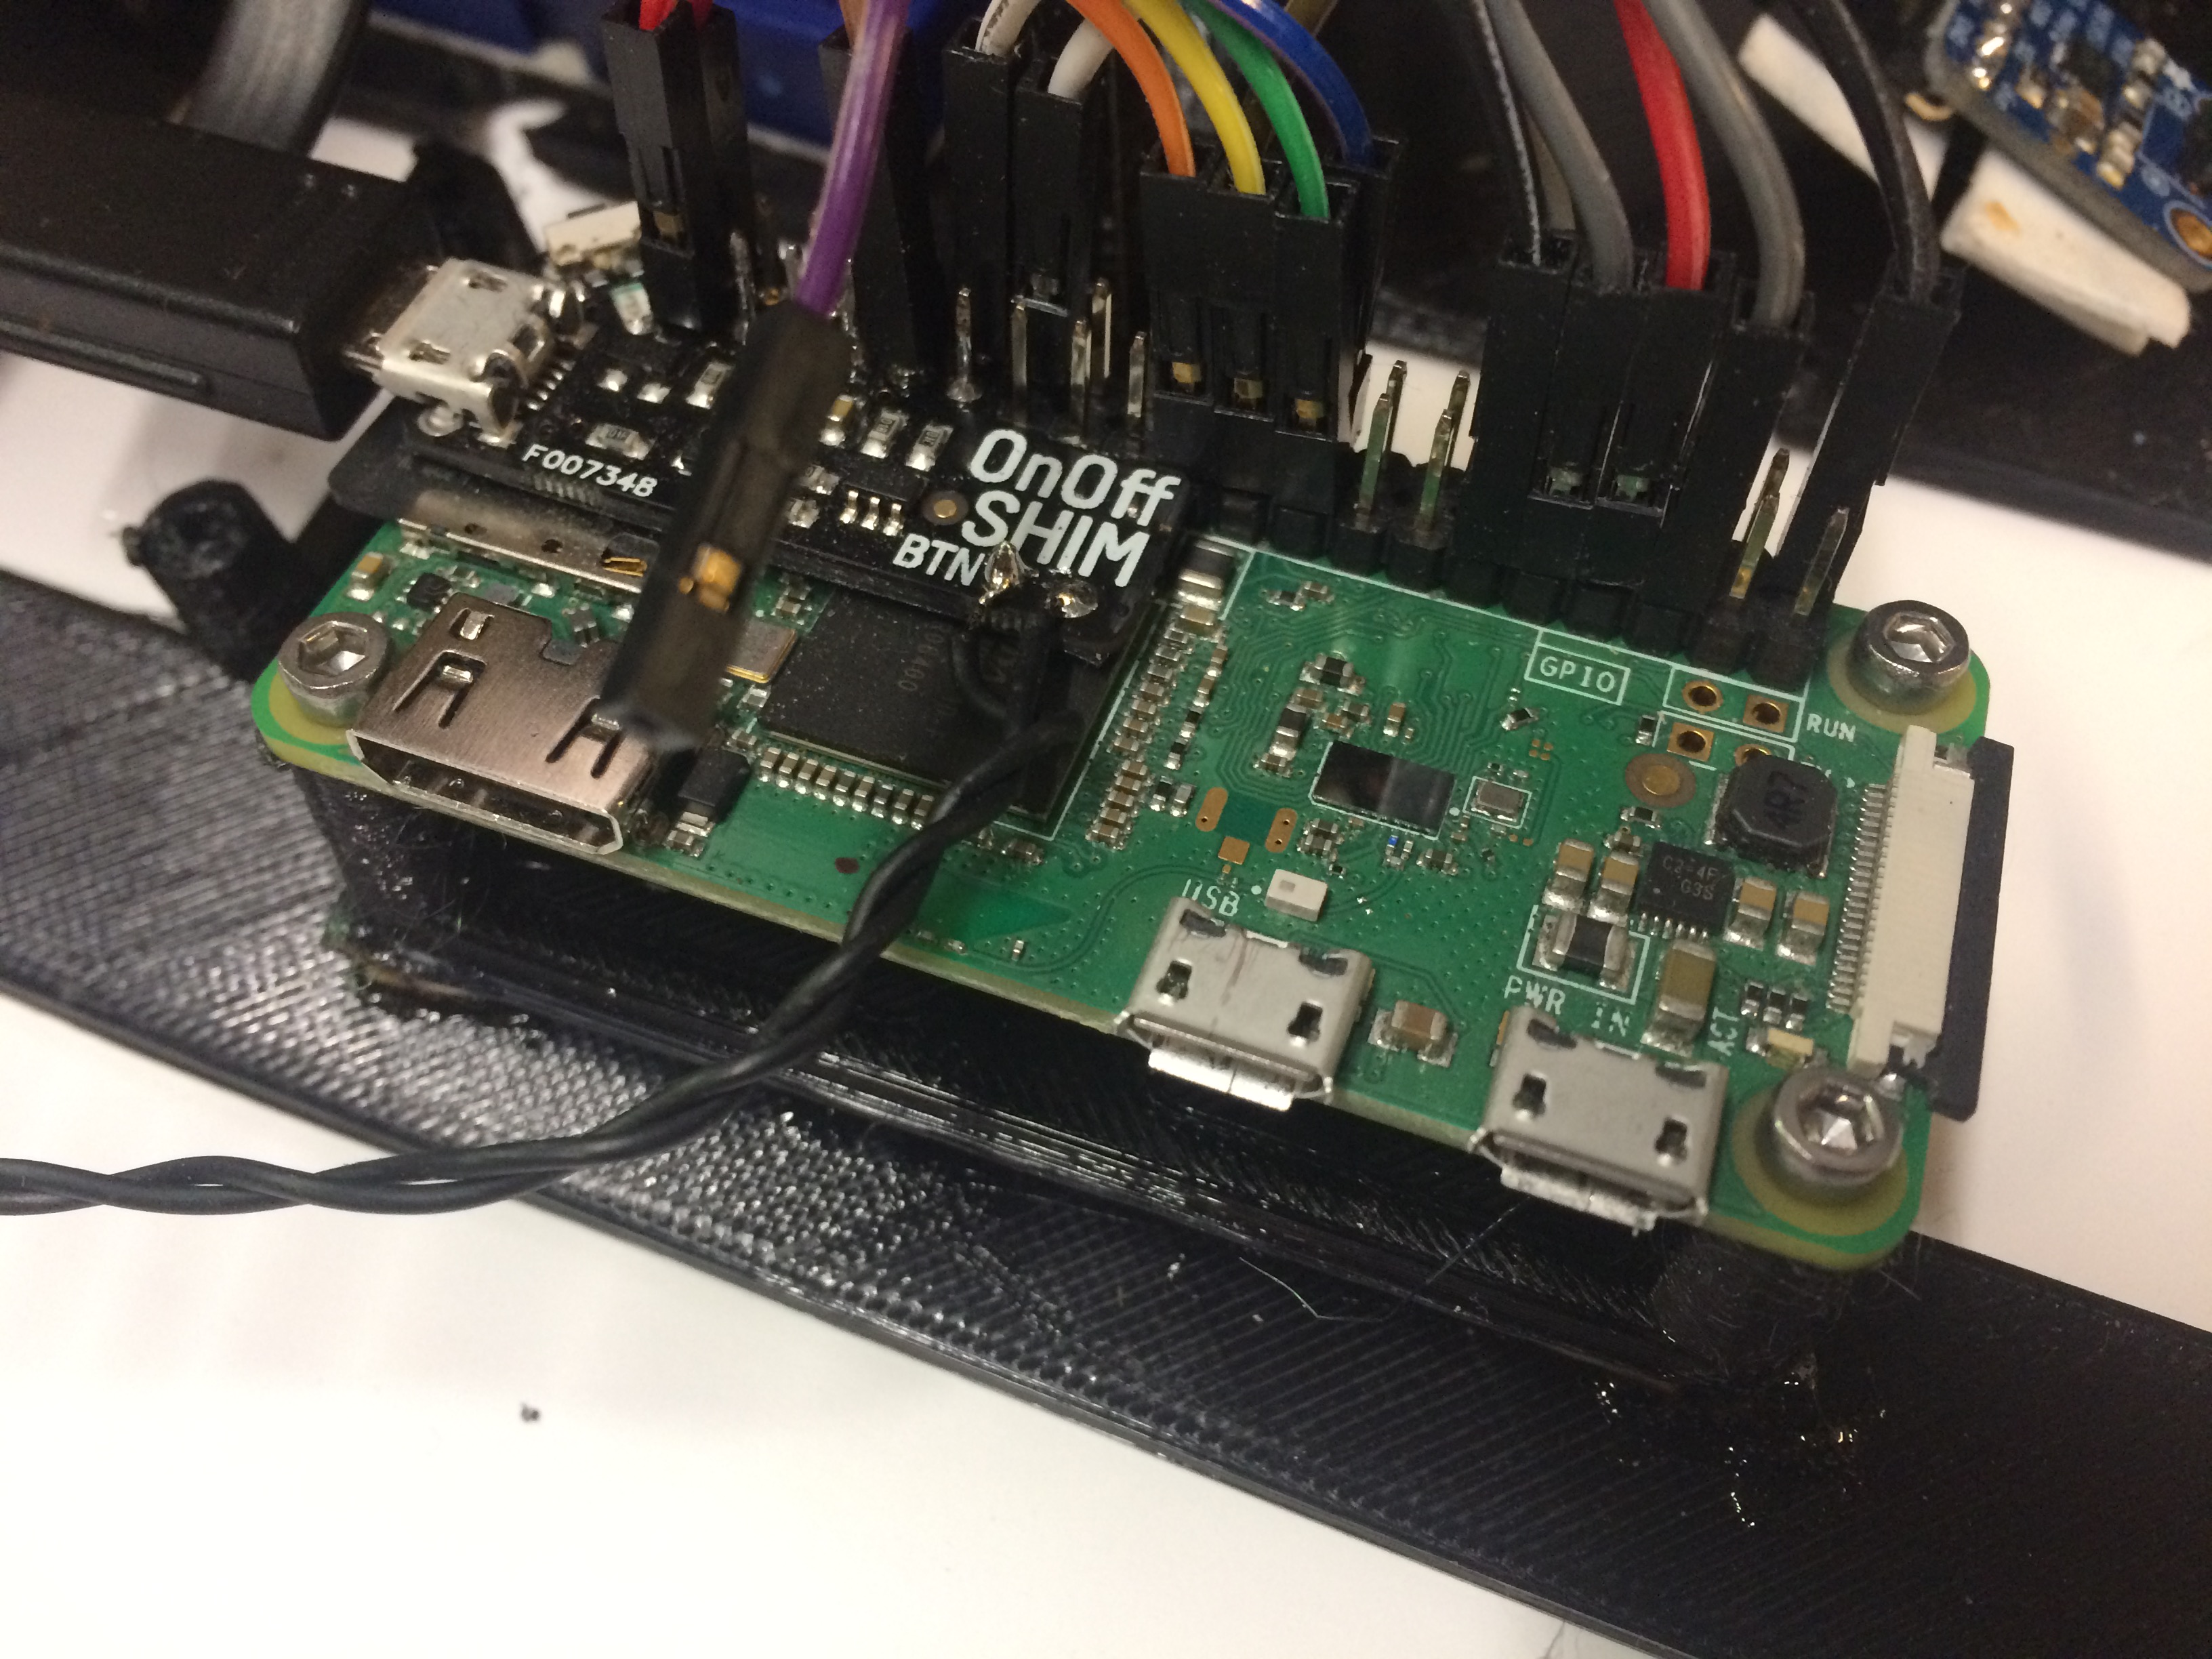
Right off the bat, I knew that I would have a couple of obstacles to overcome as the Raspberry Pi Zero doesn’t have an easy way to play audio out, and I also wanted to have analogue inputs for the controls. So the first thing was to get some audio playing to see if this was possible.
The first obstacle was to find a satisfactory way to playback audio. In the past, I have had some success using PWM pins, but this needs a low-pass filter as well as an amplifier, and the quality of audio was never as good as I’d hoped for.
The other alternative is to use one of the many HATs available, but these come at a price as they are normally aimed at more serious quality of audio. I wanted to keep the cost down, so these were excluded as an option. The other option was to use a mono I2S 3W amplifier breakout board – MAX98357A from Adafruit – which is extremely simple to use.
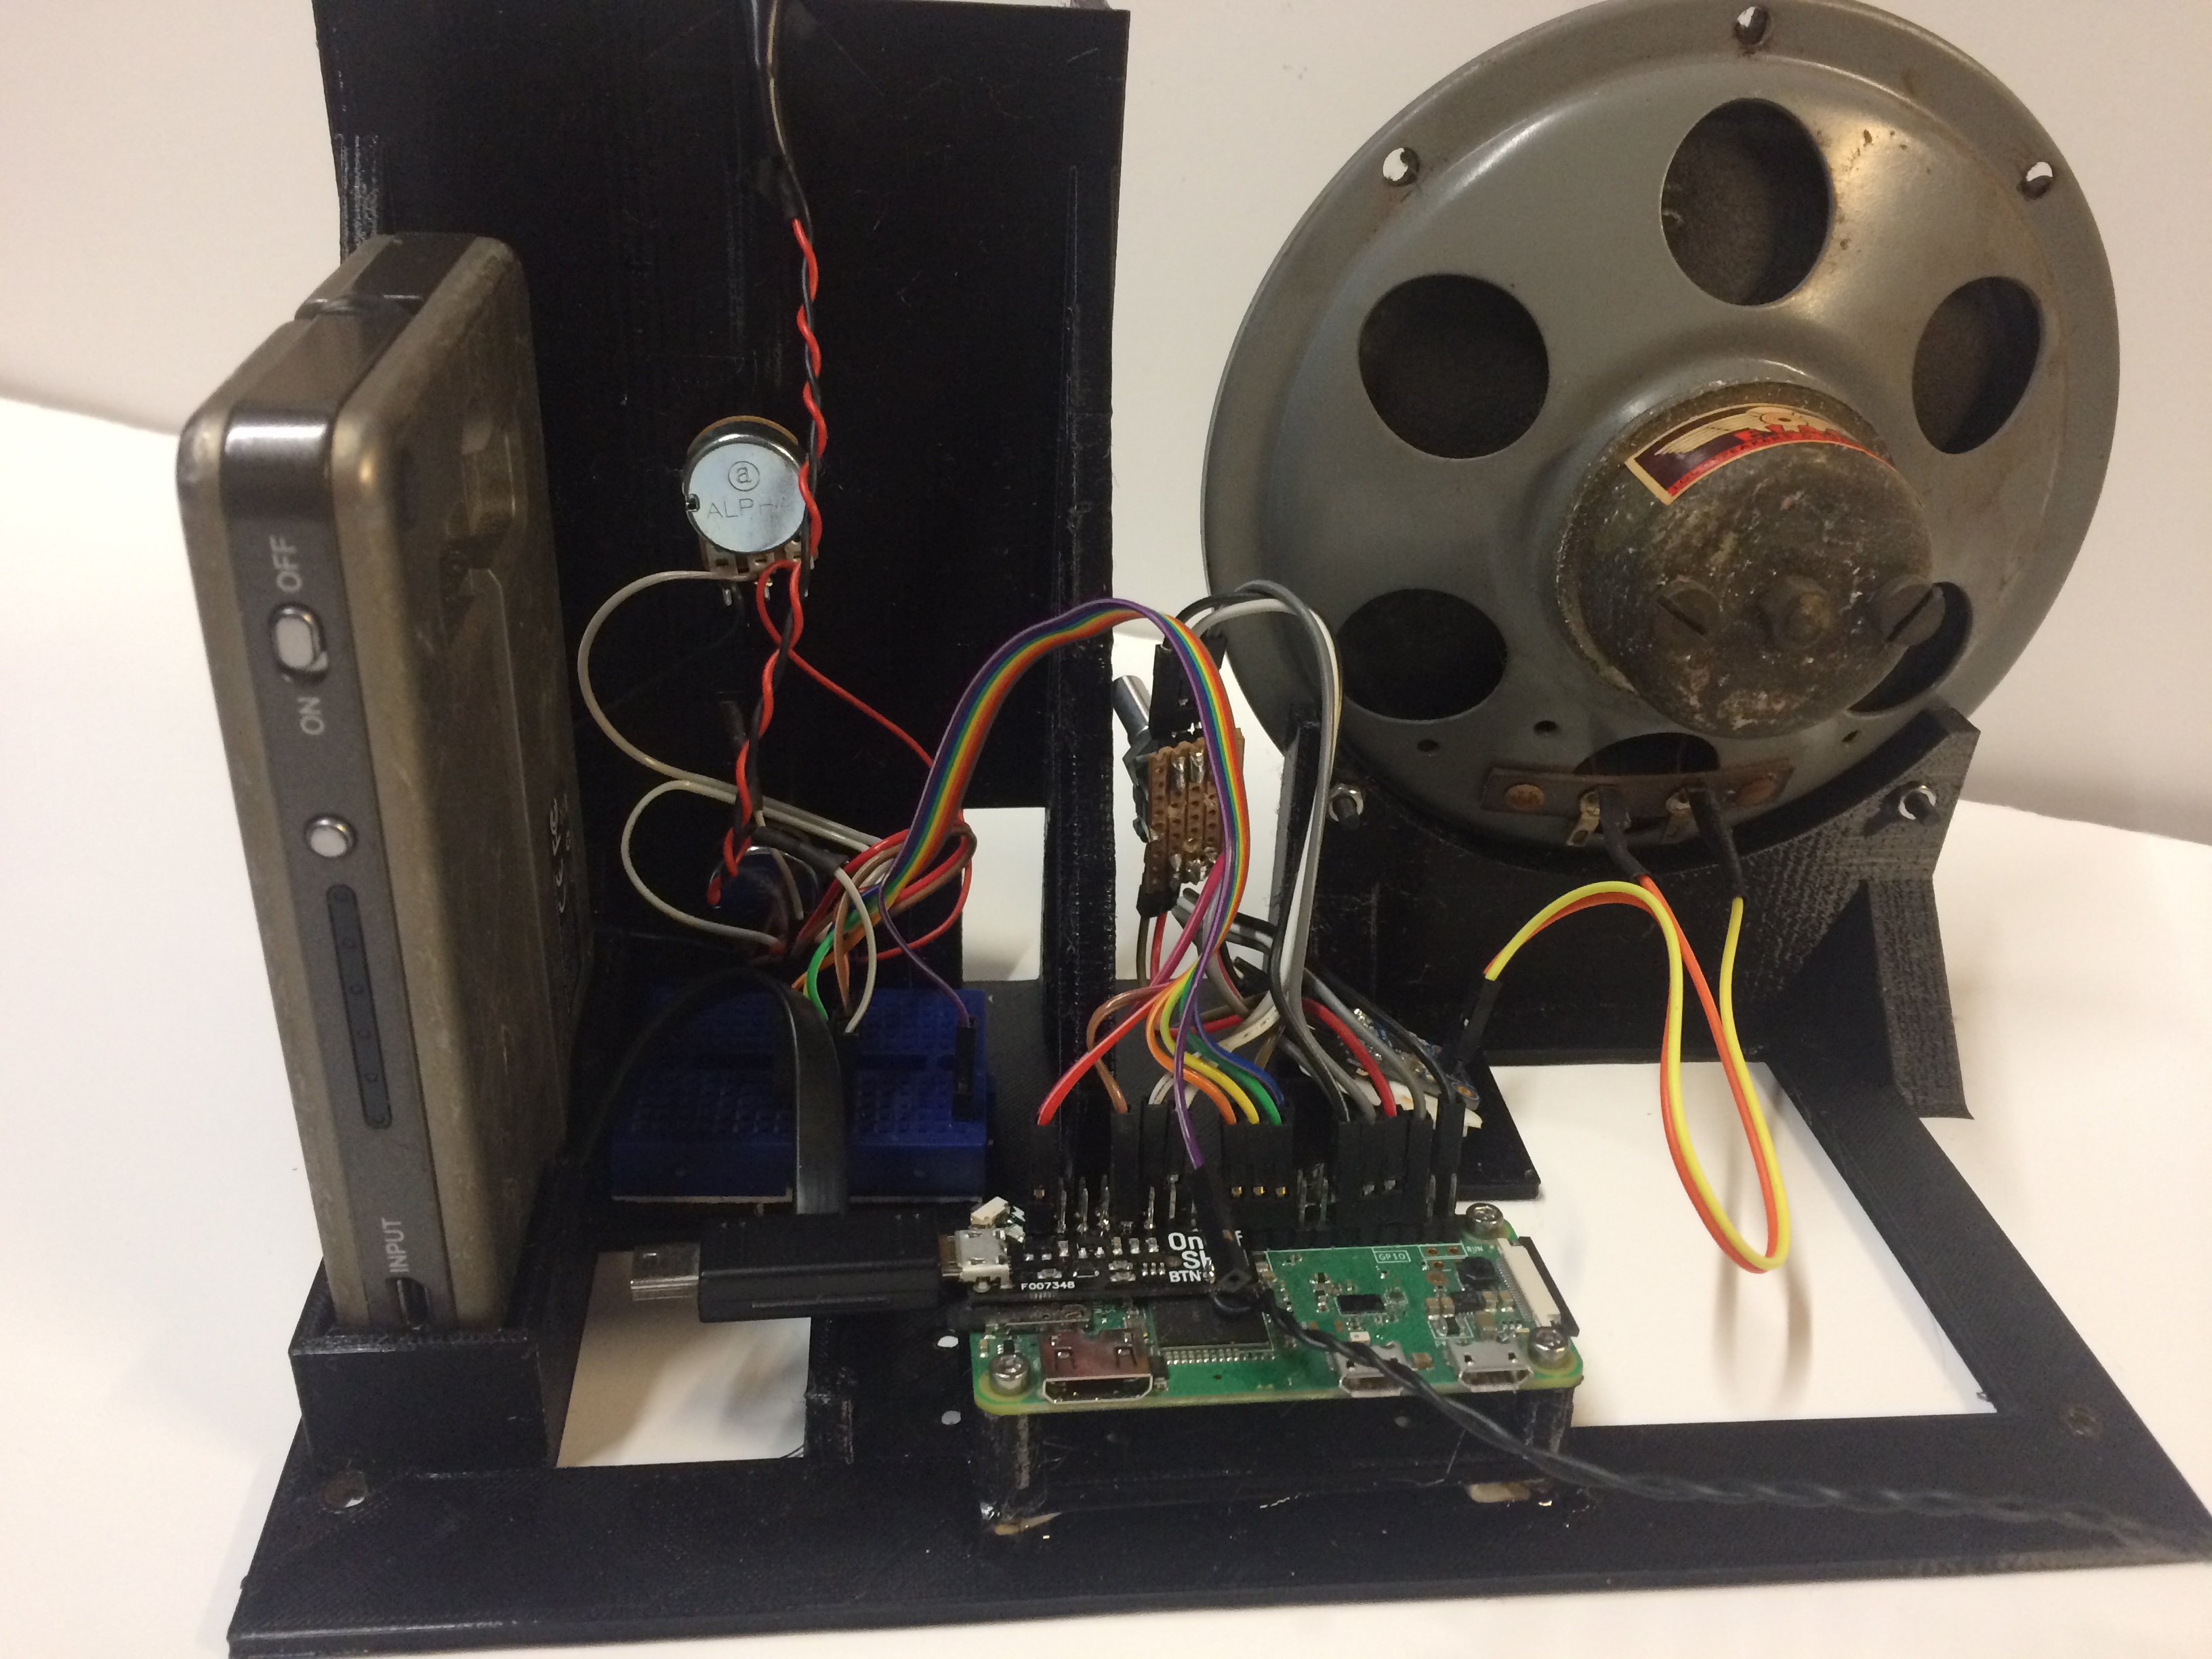
As the BBC didn’t start broadcasting stereo commercially until the late 1950s, this was also very apt for the radio (which only has one speaker).
Connecting up this board is very easy – it just requires three GPIO pins, power, and the speaker. For this, I just soldered some female jumper leads to the breakout board and connected them to the header pins of the Raspberry Pi Zero. There are detailed instructions on the Adafruit website for this which basically entails running their install script.
I’d now got a nice playback device that would easily play the MP3 files downloaded from archive.org and so the next task was to find a suitable second-hand radio set.
After a lot of searching on auction sites, I eventually found a radio that was going to be suitable: wasn’t too large, was constructed from wood, and looked old enough to convince the casual observer. I had to settle for something that actually came from the early 1950s, but it drew on design influences from earlier years and wasn’t too large as a lot of the real period ones tended to be (and it was only £15). This is a fun project, so a bit of leeway was fine by me in this respect.

When the radio arrived, my first thought as a tinkerer was perhaps I should get the valves running, but a quick piece of research turned up that I’d probably have to replace all the resistors and capacitors and all the old wiring and then hope that the valves still worked. Then discovering that the design used a live chassis running at 240 V soon convinced me that I should get back on track and replace everything.
With a few bolts and screws removed, I soon had an empty case.
I then stripped out all the interior components and set about restoring the case and dial glass, seeing what I could use by way of the volume and power controls. Sadly, there didn’t seem to be any way to hook into the old controls, so I needed to design a new chassis to mount all the components, which I did in Tinkercad, an online 3D CAD package. The design was then downloaded and printed on my 3D printer.
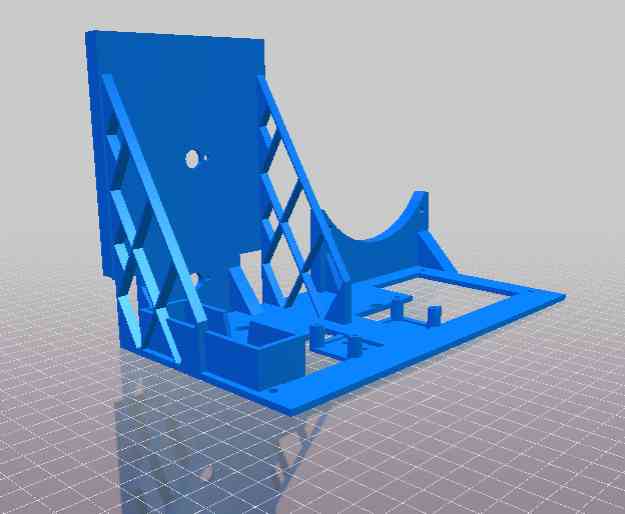
It took a couple of iterations, and during this phase, I wondered if I could use the original speaker. It turned out to be absolutely great, and the audio took on a new quality and brought even more authenticity to the project.
The case itself was pretty worn and faded, and the varnish had cracked, so I decided to strip it back. The surface was actually veneer, but you can still sand this. After a few applications of Nitromors to remove the varnish, it was sanded to remove the scratches and finished off with fine sanding.
The wood around the speaker grille was pretty cracked and had started to delaminate. I carefully removed the speaker grille cloth, and fixed these with a few dabs of wood glue, then used some Tamiya brown paint to colour the edges of the wood to blend it back in with the rest of the case. I was going to buy replacement cloth, but it’s fairly pricey – I had discovered a trick of soaking the cloth overnight in neat washing-up liquid and cold water, and it managed to lift the years of grime out and give it a new lease of life.
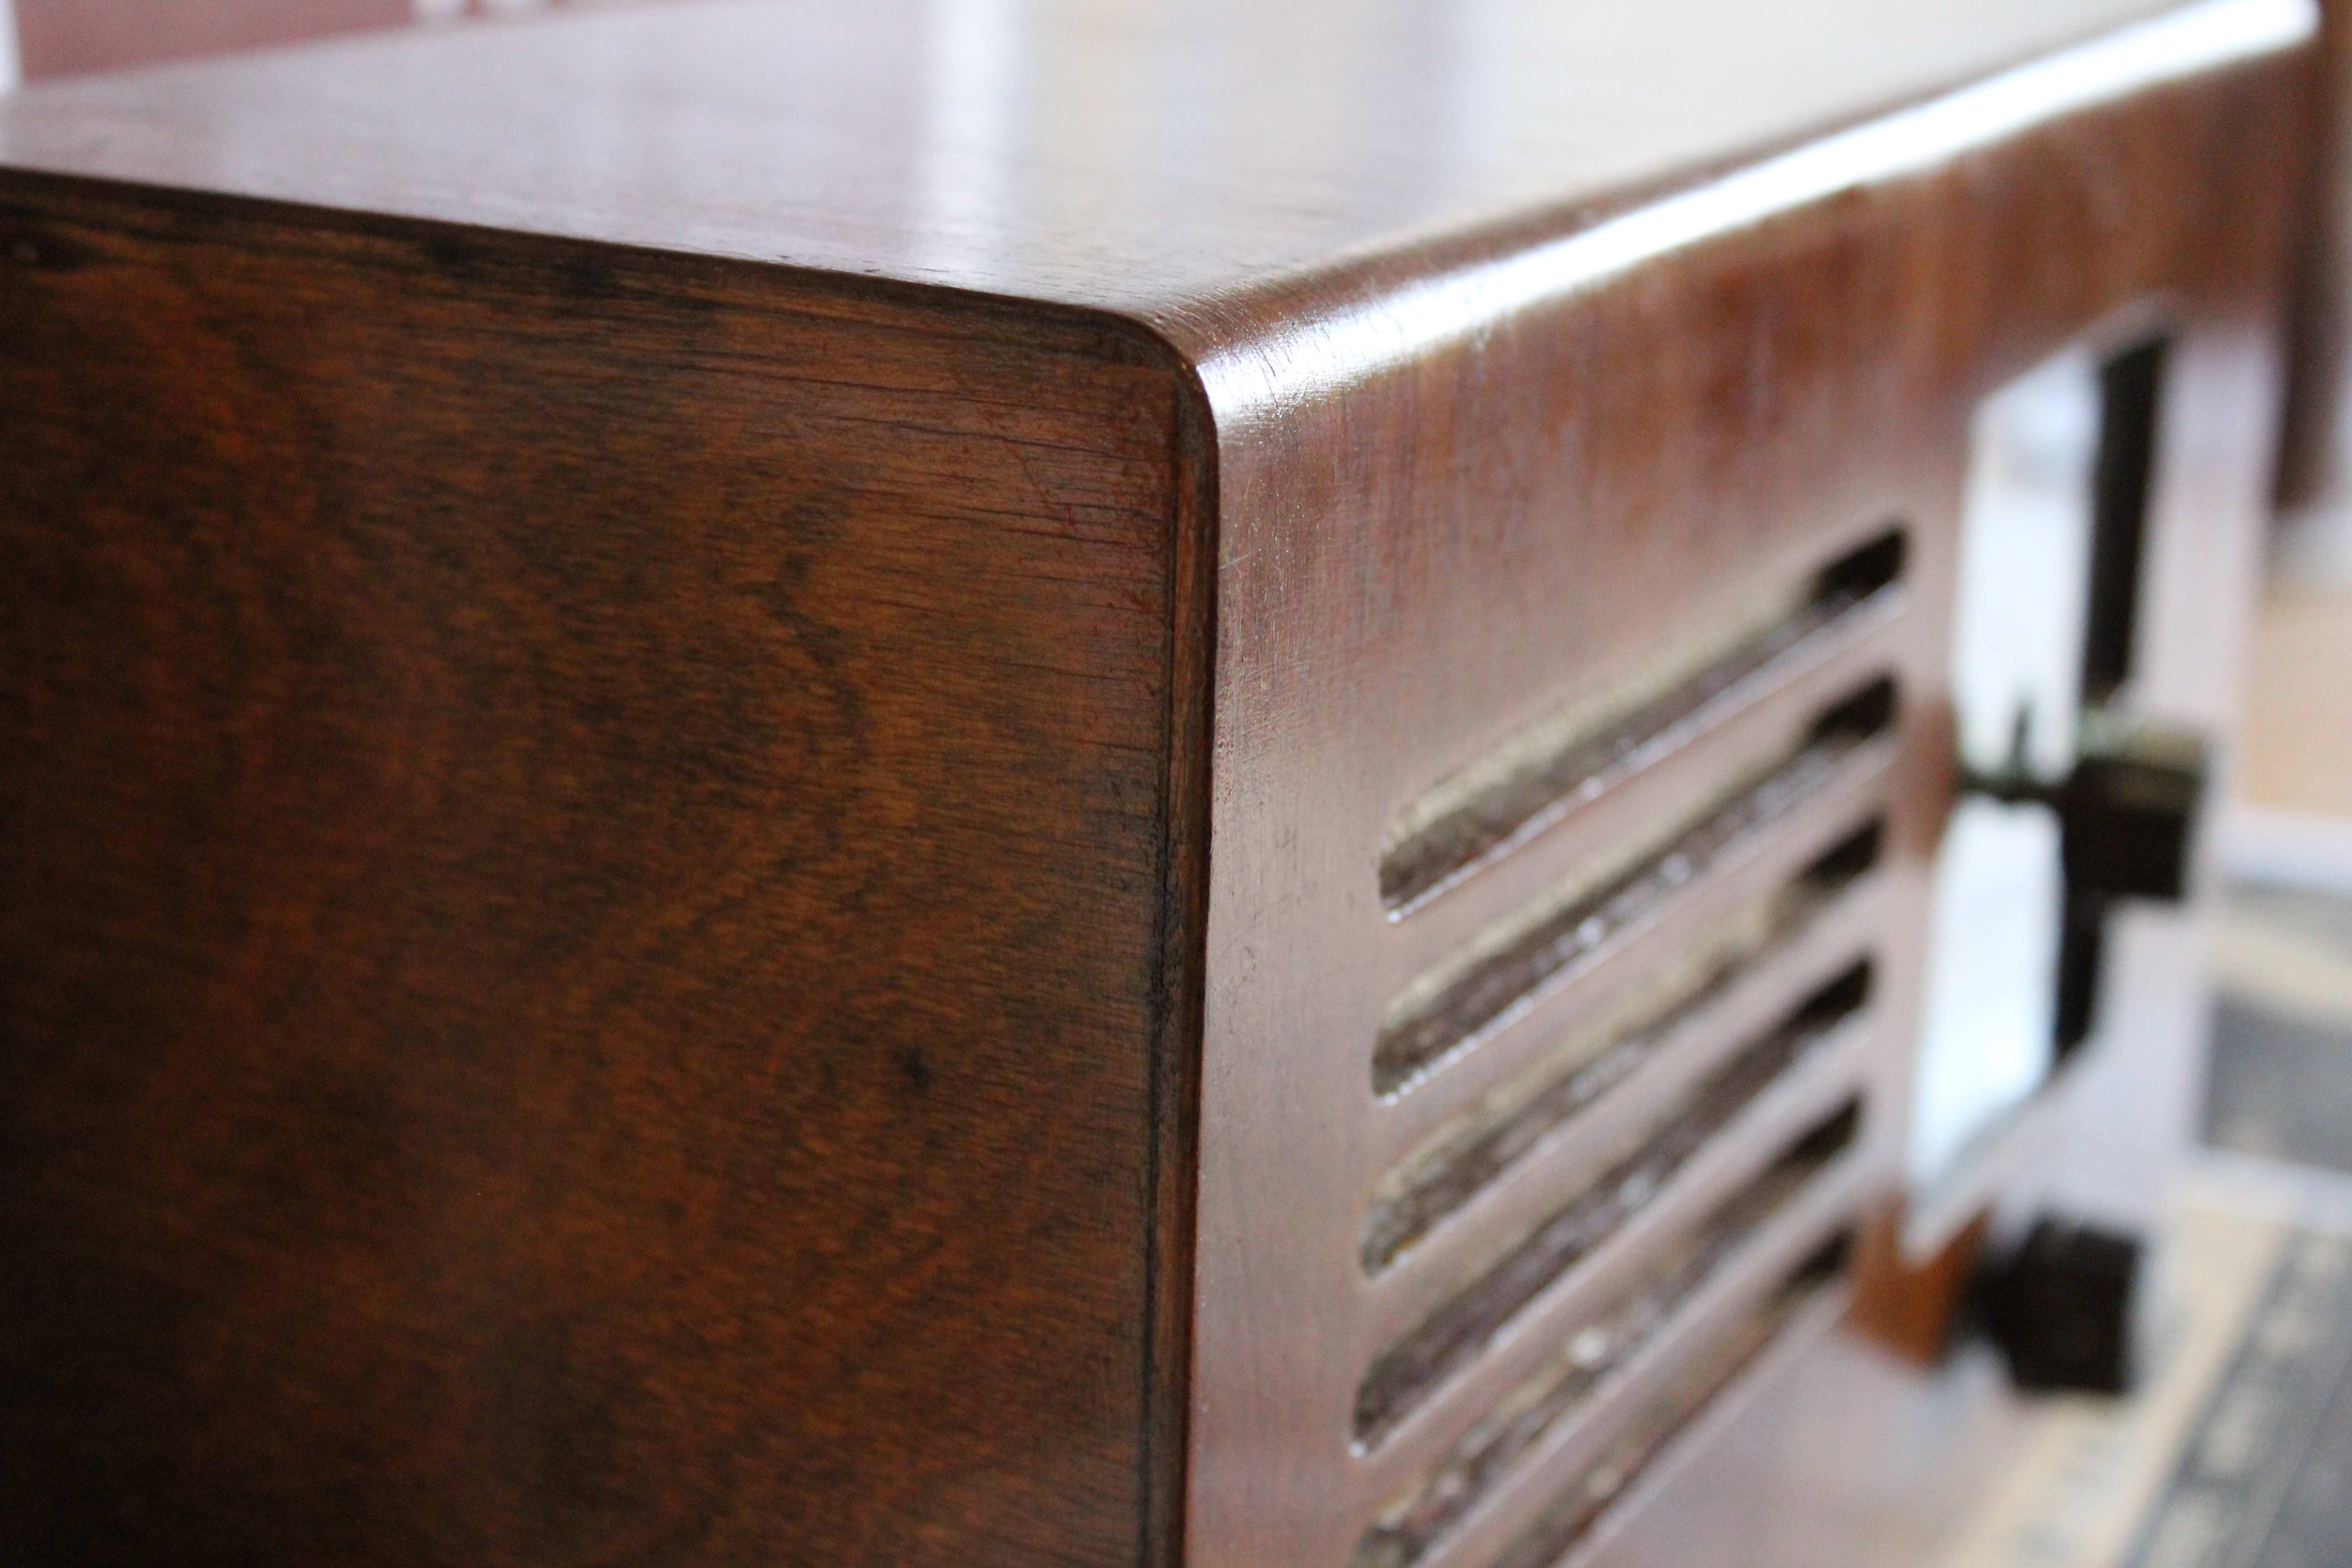
At this point, I should have just varnished or used Danish oil on the case, but bitten by the restoration bug I thought I would have a go at French polishing. This gave me a huge amount of respect for anyone that can do this properly. It’s messy, time-consuming, and a lot of work. I ended up having to do several coats, and with all the polishing involved, this was probably one of the most time-consuming tasks, plus I ended up with some pretty stained fingers as a result.
The rest of the case was pretty easy to clean, and the brass dial pointer polished up nice and shiny with some Silvo polish. The cloth was glued back in place, and the next step was to sort out the dial and glass.
Unfortunately, the original glass was cracked, so a replacement part was cut from some Makrolon sheet, also known as Lexan. I prefer this to acrylic as it’s much easier to cut and far less likely to crack when drilling it. It’s used as machine guards as well and can even be bent if necessary.
With the dial, I scanned it into the PC and then in PaintShop I replaced the existing frequency scale with a range of years running from 1939 to 1945, as the aim was for anyone using the radio to just dial the year they wanted to listen to. The program will then read the value of the potentiometer, and randomly select a file to play from that year.

It was also around about now that I had to come up with some means of having the volume control the sound and an interface for the frequency dial. Again there are always several options to consider, and I originally toyed with using a couple of rotary encoders and using one of these with the built-in push button as the power switch, but eventually decided to just use some potentiometers. Now I just had to come up with an easy way to read the analogue value of the pots and get that into the program.

There are quite a few good analogue-to-digital boards and HATs available, but with simplicity in mind, I chose to use an MCP3002 chip as it was only about £2. This is a two-channel analogue-to-digital converter (ADC) and outputs the data as a 10-bit value onto the SPI bus. This sounds easy when you say it, but it proved to be one of the trickier technical tasks as none of the code around for the four-channel MCP3008 seemed to work for the MCP3002, nor did many of the examples that were around for the MCP3002 – I think I went through about a dozen examples. At long last, I did find some code examples that worked, and with a bit of modification, I had a simple way of reading the values from the two potentiometers. You can download the original code by Stéphane Guerreau from GitHub. To use this on your Raspberry Pi, you’ll also need to run up raspi-config and switch on the SPI interface. Then it is simply a case of hooking up the MCP3002 and connecting the pots between the 3v3 line and ground and reading the voltage level from the wiper of the pots. When coding this, I just opted for some simple if-then statements in cap-Python to determine where the dial was pointing, and just tweaked the values in the code until I got each year to be picked out.
One of the challenges when using a Raspberry Pi in headless mode is that it likes to be shut down in an orderly fashion rather than just having the power cut. There are lots of examples that show how you can hook up a push button to a GPIO pin and initiate a shutdown script, but to get the Raspberry Pi to power back up you need to physically reset the power. To overcome this piece of the puzzle, I use a Pimoroni OnOff SHIM which cleverly lets you press a button to start up, and then press and hold it for a second to start a shutdown. It’s costly in comparison to the price of a Raspberry Pi Zero, but I’ve not found a more convenient option. The power itself is supplied by using an old power bank that I had which is ample enough to power the radio long enough to be shown off, and can be powered by USB connector if longer-term use is required.
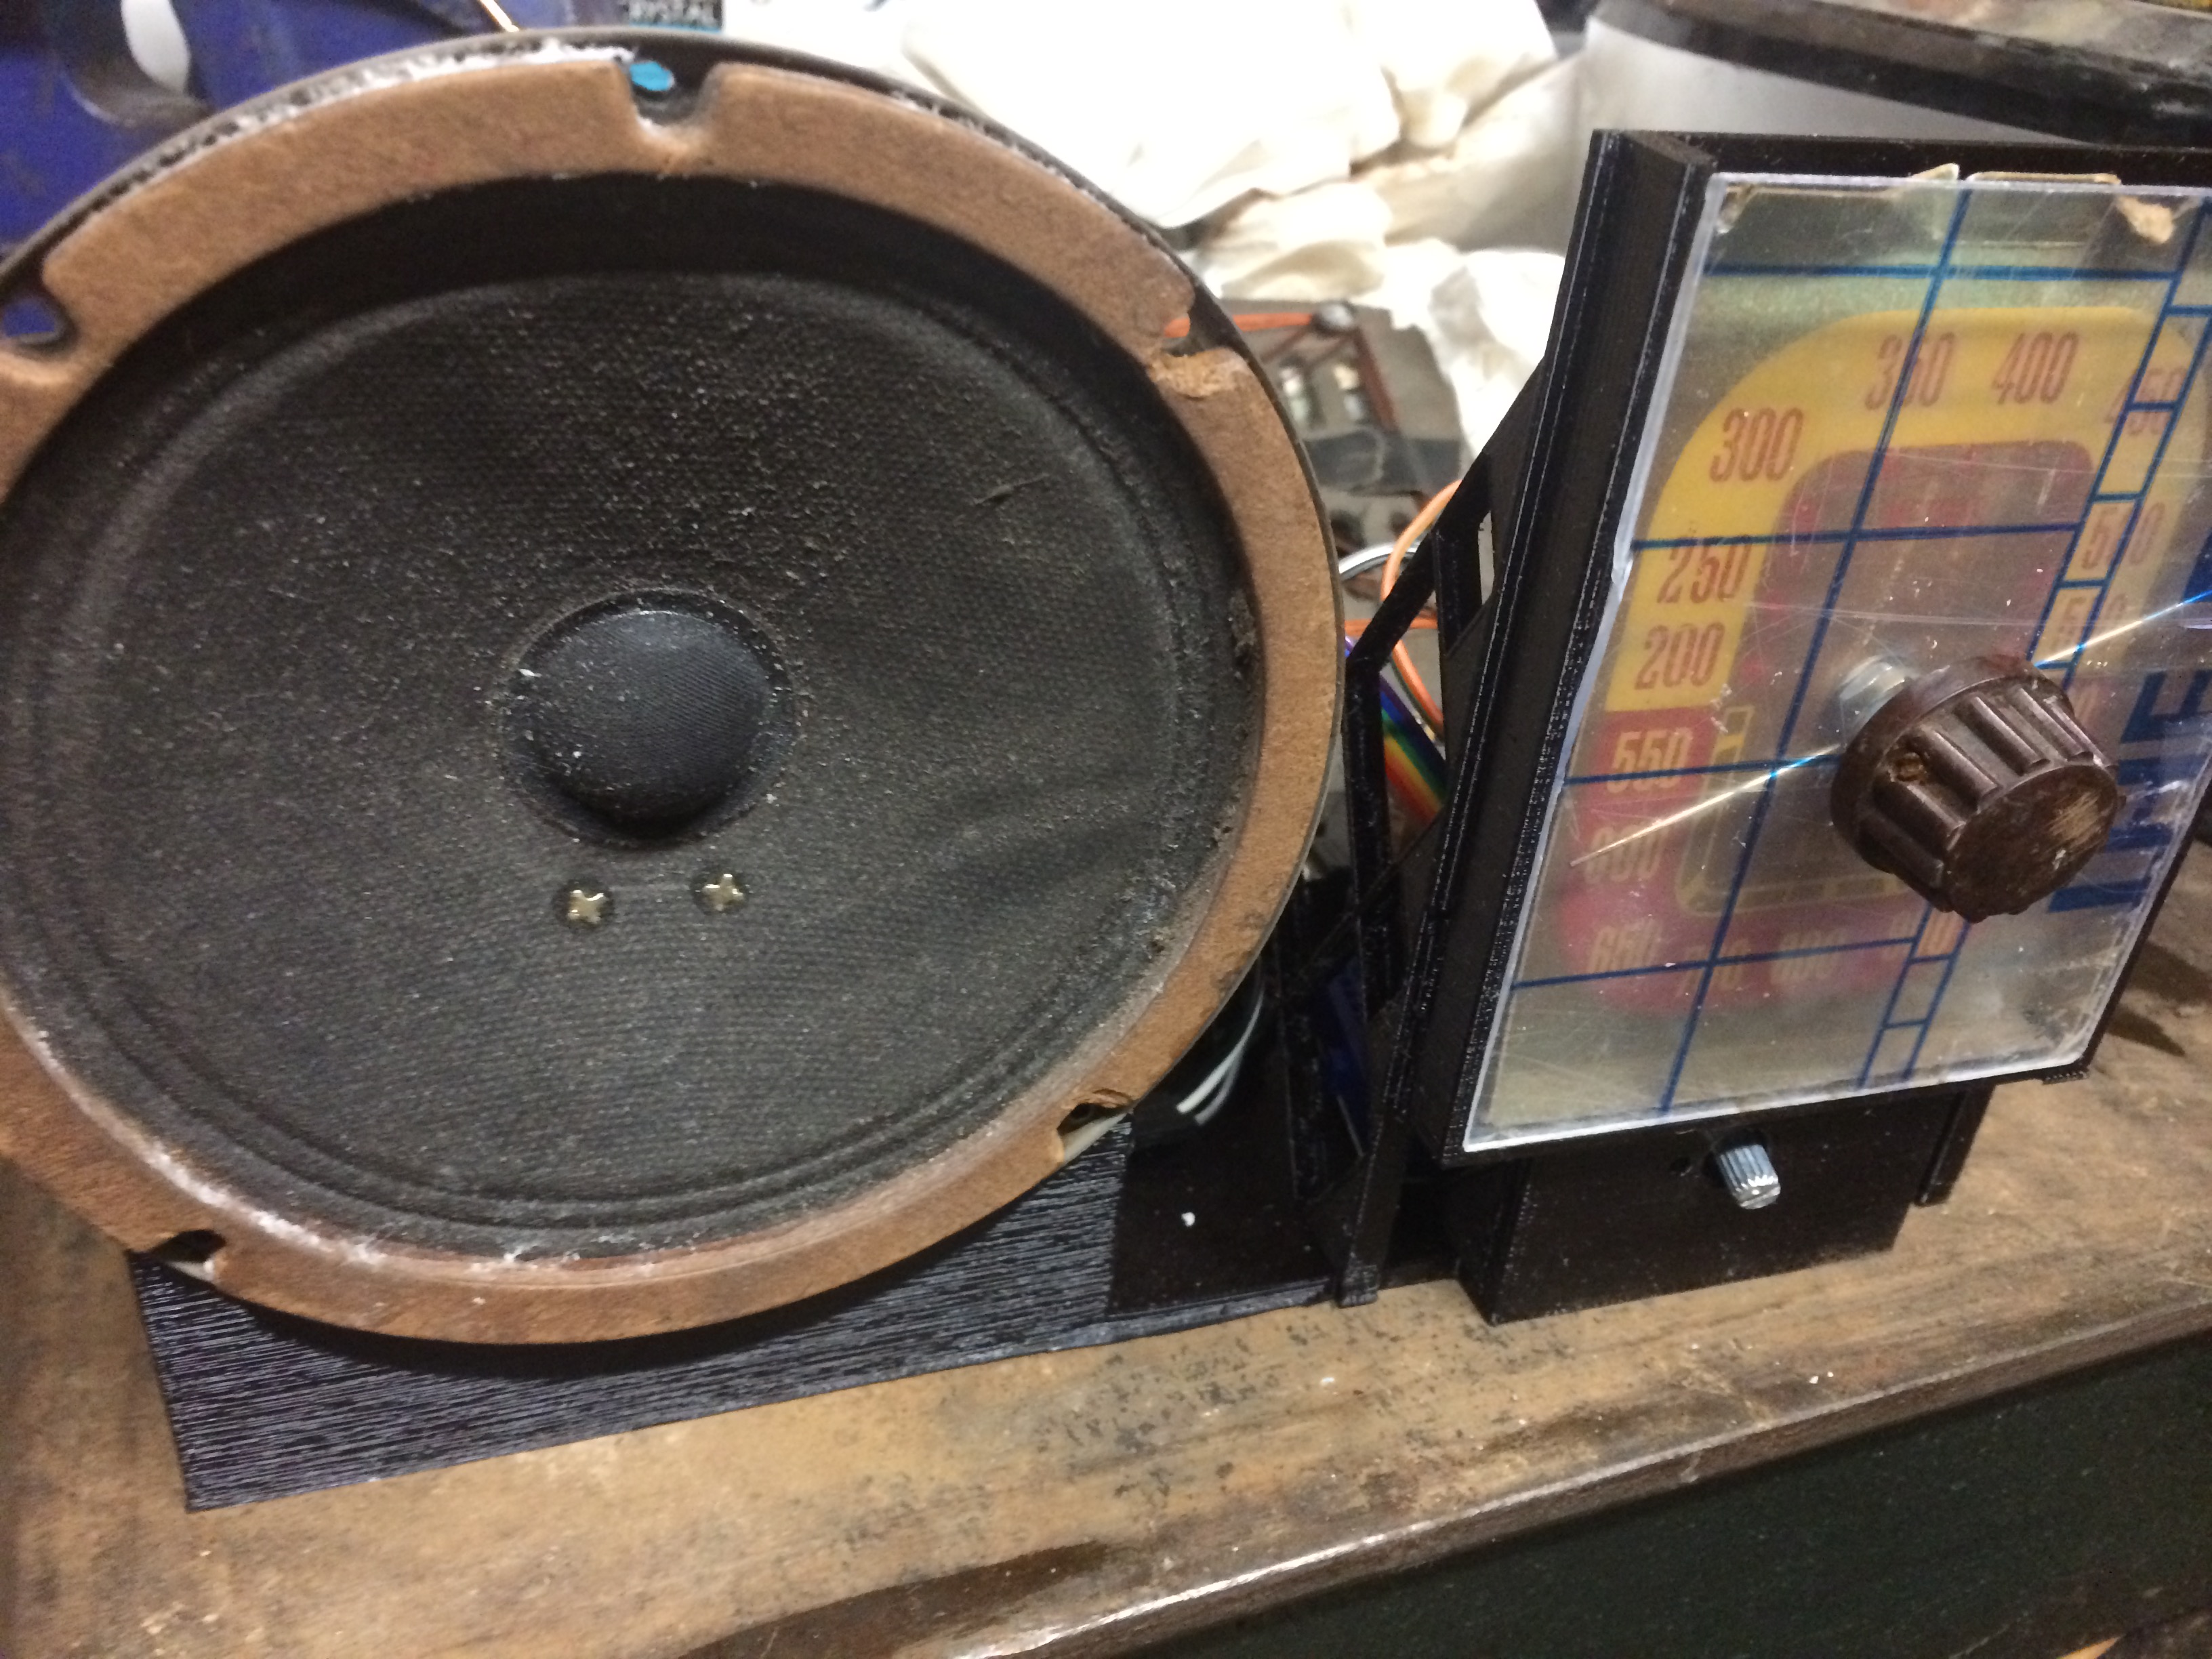
To illuminate the dial, I connected a small LED in series with a 270R resistor to the 3v3 rail so that it would come on as soon as the Raspberry Pi received power, and this lets you easily see when it’s on without waiting for the Raspberry Pi to start up.
If you’re interested in the code Adam used to build his time machine, especially if you’re considering making your own, you’ll find it all in this month’s HackSpace magazine. Download the latest issue for free here, subscribe for more issues here, or visit your local newsagent or the Raspberry Pi Store, Cambridge to pick up the magazine in physical, real-life, in-your-hands print.

The post Listen to World War II radio recordings with a Raspberry Pi Zero appeared first on Raspberry Pi.
When you think of the Scouts, do you think of a self-sufficient young person with heaps of creativity, leadership, initiative, and a strong team ethic? So do we! That’s why we’re so excited about our latest opportunity to bring digital making to young people with the world’s leading youth organisation.
![]()
On 9 and 10 November, a large group of Scouts converged on their global headquarters at Gilwell Park in Surrey to attend a Social Action Hackathon hosted by a great team of digital making educators from the Raspberry Pi Foundation.
The event was to celebrate internet service provider Plusnet’s partnership with the Scout Association, through which Scout groups throughout the UK will be given free WiFi access. This will allow them to work towards tech-based badges, including the Raspberry Pi Foundation’s Digital Maker Staged Activity Badge.
The Social Action Hackathon
Over two days, the Scouts participated in our cutting-edge hackathon, where they were taught authentic agile development techniques; handed a crate of Raspberry Pi computers, electronic components, and construction materials; and given free rein to create something awesome.
![]()
The Social Action Hackathon was designed to directly support the Scout Association’s A Million Hands project, which aims to encourage Scouts to ‘leave the world a little better than they found it’ by engaging with their UK-based charity partners. During the Hackathon, the Scout Association asked the young people to create a technological solution that might benefit one of these important charities, or the people and communities that they support.
Creating with tech
First, participants were shown the capabilities of the technology available to them during the Hackathon by undertaking some short, confidence-boosting programming activities, which got them thinking about what assistive technologies they could create with the resources available. Then, they chose a call-to-action video by one of the A Million Hands charity partners as the basis of their design brief.
![]()
The event was designed to feel like a role-playing game in which teams of Scouts assumed the part of a fledgling technology start-up, who were designing a product for a client which they would bring to market. The teams designed and prototyped their assistive technology through a process used all over the world in technology and software companies, known as agile development methodology.
The fundamental principles of agile development are:
The ‘creation’ phase of the Hackathon consisted of several 90-minute rounds called sprints, each of which began with a team meeting (or stand-up) just as they would in a real agile workplace. Teams broke their project idea down into individual tasks, which were then put into an organisational tool known as a kanban board, which is designed to allow teams to get an instant snapshot of their current progress, and to help them to problem-solve, and adapt or change their current focus and plans at each stand-up meeting.
![]()
The final pitch
As their final task, teams had to present their work to a panel of experts. The four-person panel included the Raspberry Pi Foundation’s Head of Youth Partnerships, Olympia Brown, and television presenter, Reggie Yates, an advocate for Mind, one of the A Million Hands charity partners.
![]()
By completing the Social Action Hackathon, the young people also completed the fifth and most complex stage of the Digital Maker Staged Activity Badge in just two days — a real accomplishment!
Get involved!
If you think your Scout group might like to take their Digital Maker Badge, you can find free curriculum resources for all ages of Scout group, from Beavers to Explorers, on the Raspberry Pi Foundation partner page.
The post Social Action Hackathon with the Scouts appeared first on Raspberry Pi.
After launching our Gender Balance in Computing programme this April, we have been busy recruiting for two trials within a small group of schools around England.
Today, we are opening general recruitment for the programme. This means that all primary and secondary schools in England can now take part in the upcoming trials in this landmark programme. You can register your interest here. Why not do it right now?
![]()
Many young women don’t choose to study computing-related subjects. A variety of factors across primary and secondary education are likely to influence this, including girls feeling like they don’t belong in the subject or its community, a lack of sustained encouragement, and a lack of role models in computing when making their career choices. We are working with schools to better understand and help change this.
The Department for Education has recently funded our Gender Balance in Computing (GBIC) research programme, giving us the amazing opportunity to work with schools to investigate different approaches to engage girls in computing and to help increase the number of girls who select Computer Science at GCSE and A level.
![]()
GBIC is a collaboration between the Raspberry Pi Foundation; STEM Learning; BCS, The Chartered Institute for IT; and the Behavioural Insights Team. It is also part of the National Centre for Computing Education.
Operationally, we will lead the project together with the Behavioural Insights Team, with Apps for Good and Women in Science and Engineering (WISE) also contributing to the project. Trials will run in 2019–2022 in Key Stages 1–4, and over 15,000 pupils and 550 schools will be involved. It will be the largest national research effort to tackle gender balance in computing to date!
The different trials in this programme are related to:
In the non-formal learning trial, which started in September, we seek to strengthen the links between non-formal learning and studying computing at GCSE or A level. The reason for this is that girls are often unaware that their non-formal learning about computing can help them in formal studies. Girls are also better represented in non-formal computing clubs than in formal settings where computing is taught, i.e. they are engaging with computing outside of the classroom, but not in their formal studies. So far in the non-formal learning trial, we have created specific resources for schools running Code Clubs and Apps for Good programmes which signpost the links between non-formal and formal learning of computing, and how these can lead to future career/subject choices later in the participants’ lives.
The belonging trial will tackle girls’ “lack of belonging” because they don’t see themselves represented in computing media coverage. To address this situation, we will work with primary and secondary schools to introduce girls and their parents to positive role models in computer science, deliver testimonials from these role models at key transition points in their education (such as while making their GCSE choices), and encourage the development of peer support networks.
The relevance trial will look at helping learners to see the real-world applications of learning computing. We will support schools to hold stimulus days that engage pupils by helping them to solve real-world problems through technology. We will also encourage pupils to develop projects that solve problems that are relevant to their local area, home, or classroom. The pupils will be able to further explore the real-world applications of computing through newly written classroom resources.
The teaching approach trial is based on the idea that current approaches to teaching computing may not be fully inclusive and so may be less appealing to girls. In Key Stage 1, we will trial a “storytelling around computing” approach. In Key Stage 2 and 3, we will explore different types of teaching approaches to assess what the most effective mix is for engaging girls in the subject.
There is also an innovation trial, which we will develop based on any additional promising research pathways that emerge while the GBIC project progresses.
![]()
By joining our programme, you’ll become part of our GBIC School Network.
This will give your school:
As part of the GBIC School Network, your school will need to:
![]()
Your support is invaluable — together we can work to improve the gender balance in computing!
The post Gender Balance in Computing programme opens to all schools in England appeared first on Raspberry Pi.
Why wear a boring bowler hat when you can add technology to make one of Disney’s most evil pieces of apparel?

Meet the Robinsons is one of Disney’s most underrated movies. Thank you for coming to my TED talk.

What’s not to love? Experimental, futuristic technology, a misunderstood villain, lessons of love and forgiveness aplenty, and a talking T-Rex!
For me, one of the stand-out characters of Meet the Robinsons is DOR-15, a best-of-intentions experiment gone horribly wrong. Designed as a helper hat, DOR-15 instead takes over the mind of whoever is wearing it, hellbent on world domination.
Built using a Raspberry Pi and the MATRIX Voice development board, the real-life DOR-15, from Team MATRIX Labs, may not be ready to take over the world, but it’s still really cool.
With a plethora of built-in audio sensors, the MATRIX Voice directs DOR-15 towards whoever is making sound, while a series of servos wiggle 3D‑printed legs for added creepy.
This project uses ODAS (Open embeddeD Audition System) and some custom code to move a servo motor in the direction of the most concentrated incoming sound in a 180 degree radius. This enables the hat to face a person calling to it.
The added wiggly spider legs come courtesy of this guide by the delightful Jorvon Moss, whom HackSpace readers will remember from issue 21.
In their complete Hackster walkthrough, Team Matrix Lab talk you through how to build your own DOR-15, including all the files needed to 3D‑print the legs.
So, what fictional wonder would you bring to life? Your own working TARDIS? Winifred’s spellbook? Mary Poppins’ handbag? Let us know in the comments below.
The post Real-life DOR-15 bowler hat from Disney’s Meet the Robinsons appeared first on Raspberry Pi.
It was one of gaming’s first boss battles. Mark Vanstone shows you how to recreate the mothership from the 1980 arcade game, Phoenix.
Phoenix’s fifth stage offered a unique challenge in 1980: one of gaming’s first-ever boss battles.
First released in 1980, Phoenix was something of an arcade pioneer. The game was the kind of post-Space Invaders fixed-screen shooter that was ubiquitous at the time: players moved their ship from side to side, shooting at a variety of alien birds of different sizes and attack patterns. The enemies moved swiftly, and the player’s only defence was a temporary shield which could be activated when the birds swooped and strafed the lone defender. But besides all that, Phoenix had a few new ideas of its own: not only did it offer five distinct stages, but it also featured one of the earliest examples of a boss battle – its heavily armoured alien mothership, which required accurate shots to its shields before its weak spot could be exposed.
To recreate Phoenix’s boss, all we need is Pygame Zero. We can get a portrait style window with the WIDTH and HEIGHT variables and throw in some parallax stars (an improvement on the original’s static backdrop) with some blitting in the draw() function. The parallax effect is created by having a static background of stars with a second (repeated) layer of stars moving down the screen.
The mothership itself is made up of several Actor objects which move together down the screen towards the player’s spacecraft, which can be moved right and left using the mouse. There’s the main body of the mothership, in the centre is the alien that we want to shoot, and then we have two sets of moving shields.
Like the original Phoenix, our mothership boss battle has multiple shields that need to be taken out to expose the alien at the core.
In this example, rather than have all the graphics dimensions in multiples of eight (as we always did in the old days), we will make all our shield blocks 20 by 20 pixels, because computers simply don’t need to work in multiples of eight any more. The first set of shields is the purple rotating bar around the middle of the ship. This is made up of 14 Actor blocks which shift one place to the right each time they move. Every other block has a couple of portal windows which makes the rotation obvious, and when a block moves off the right-hand side, it is placed on the far left of the bar.
The second set of shields are in three yellow rows (you may want to add more), the first with 14 blocks, the second with ten blocks, and the last with four. These shield blocks are fixed in place but share a behaviour with the purple bar shields, in that when they are hit by a bullet, they change to a damaged version. There are four levels of damage before they are destroyed and the bullets can pass through. When enough shields have been destroyed for a bullet to reach the alien, the mothership is destroyed (in this version, the alien flashes).
Bullets can be fired by clicking the mouse button. Again, the original game had alien birds flying around the mothership and dive-bombing the player, making it harder to get a good shot in, but this is something you could try adding to the code yourself.
To really bring home that eighties Phoenix arcade experience, you could also add in some atmospheric shooting effects and, to round the whole thing off, have an 8-bit rendition of Beethoven’s Für Elise playing in the background.
Here’s Mark’s code, which gets a simple mothership battle running in Python. To get it working on your system, you’ll first need to install Pygame Zero. And to download the full code, go here.
You can read more features like this one in Wireframe issue 26, available now at Tesco, WHSmith, all good independent UK newsagents, and the Raspberry Pi Store, Cambridge.
Or you can buy Wireframe directly from Raspberry Pi Press — delivery is available worldwide. And if you’d like a handy digital version of the magazine, you can also download issue 26 for free in PDF format.
![]()
Make sure to follow Wireframe on Twitter and Facebook for updates and exclusive offers and giveaways. Subscribe on the Wireframe website to save up to 49% compared to newsstand pricing!
The post Code a Phoenix-style mothership battle | Wireframe #26 appeared first on Raspberry Pi.
Thanks to BBC Box, you might be able to enjoy personalised services without giving up all your data. Sean McManus reports:
One day, you could watch TV shows that are tailored to your interests, thanks to BBC Box. It pulls together personal data from different sources in a household device, and gives you control over which apps may access it.
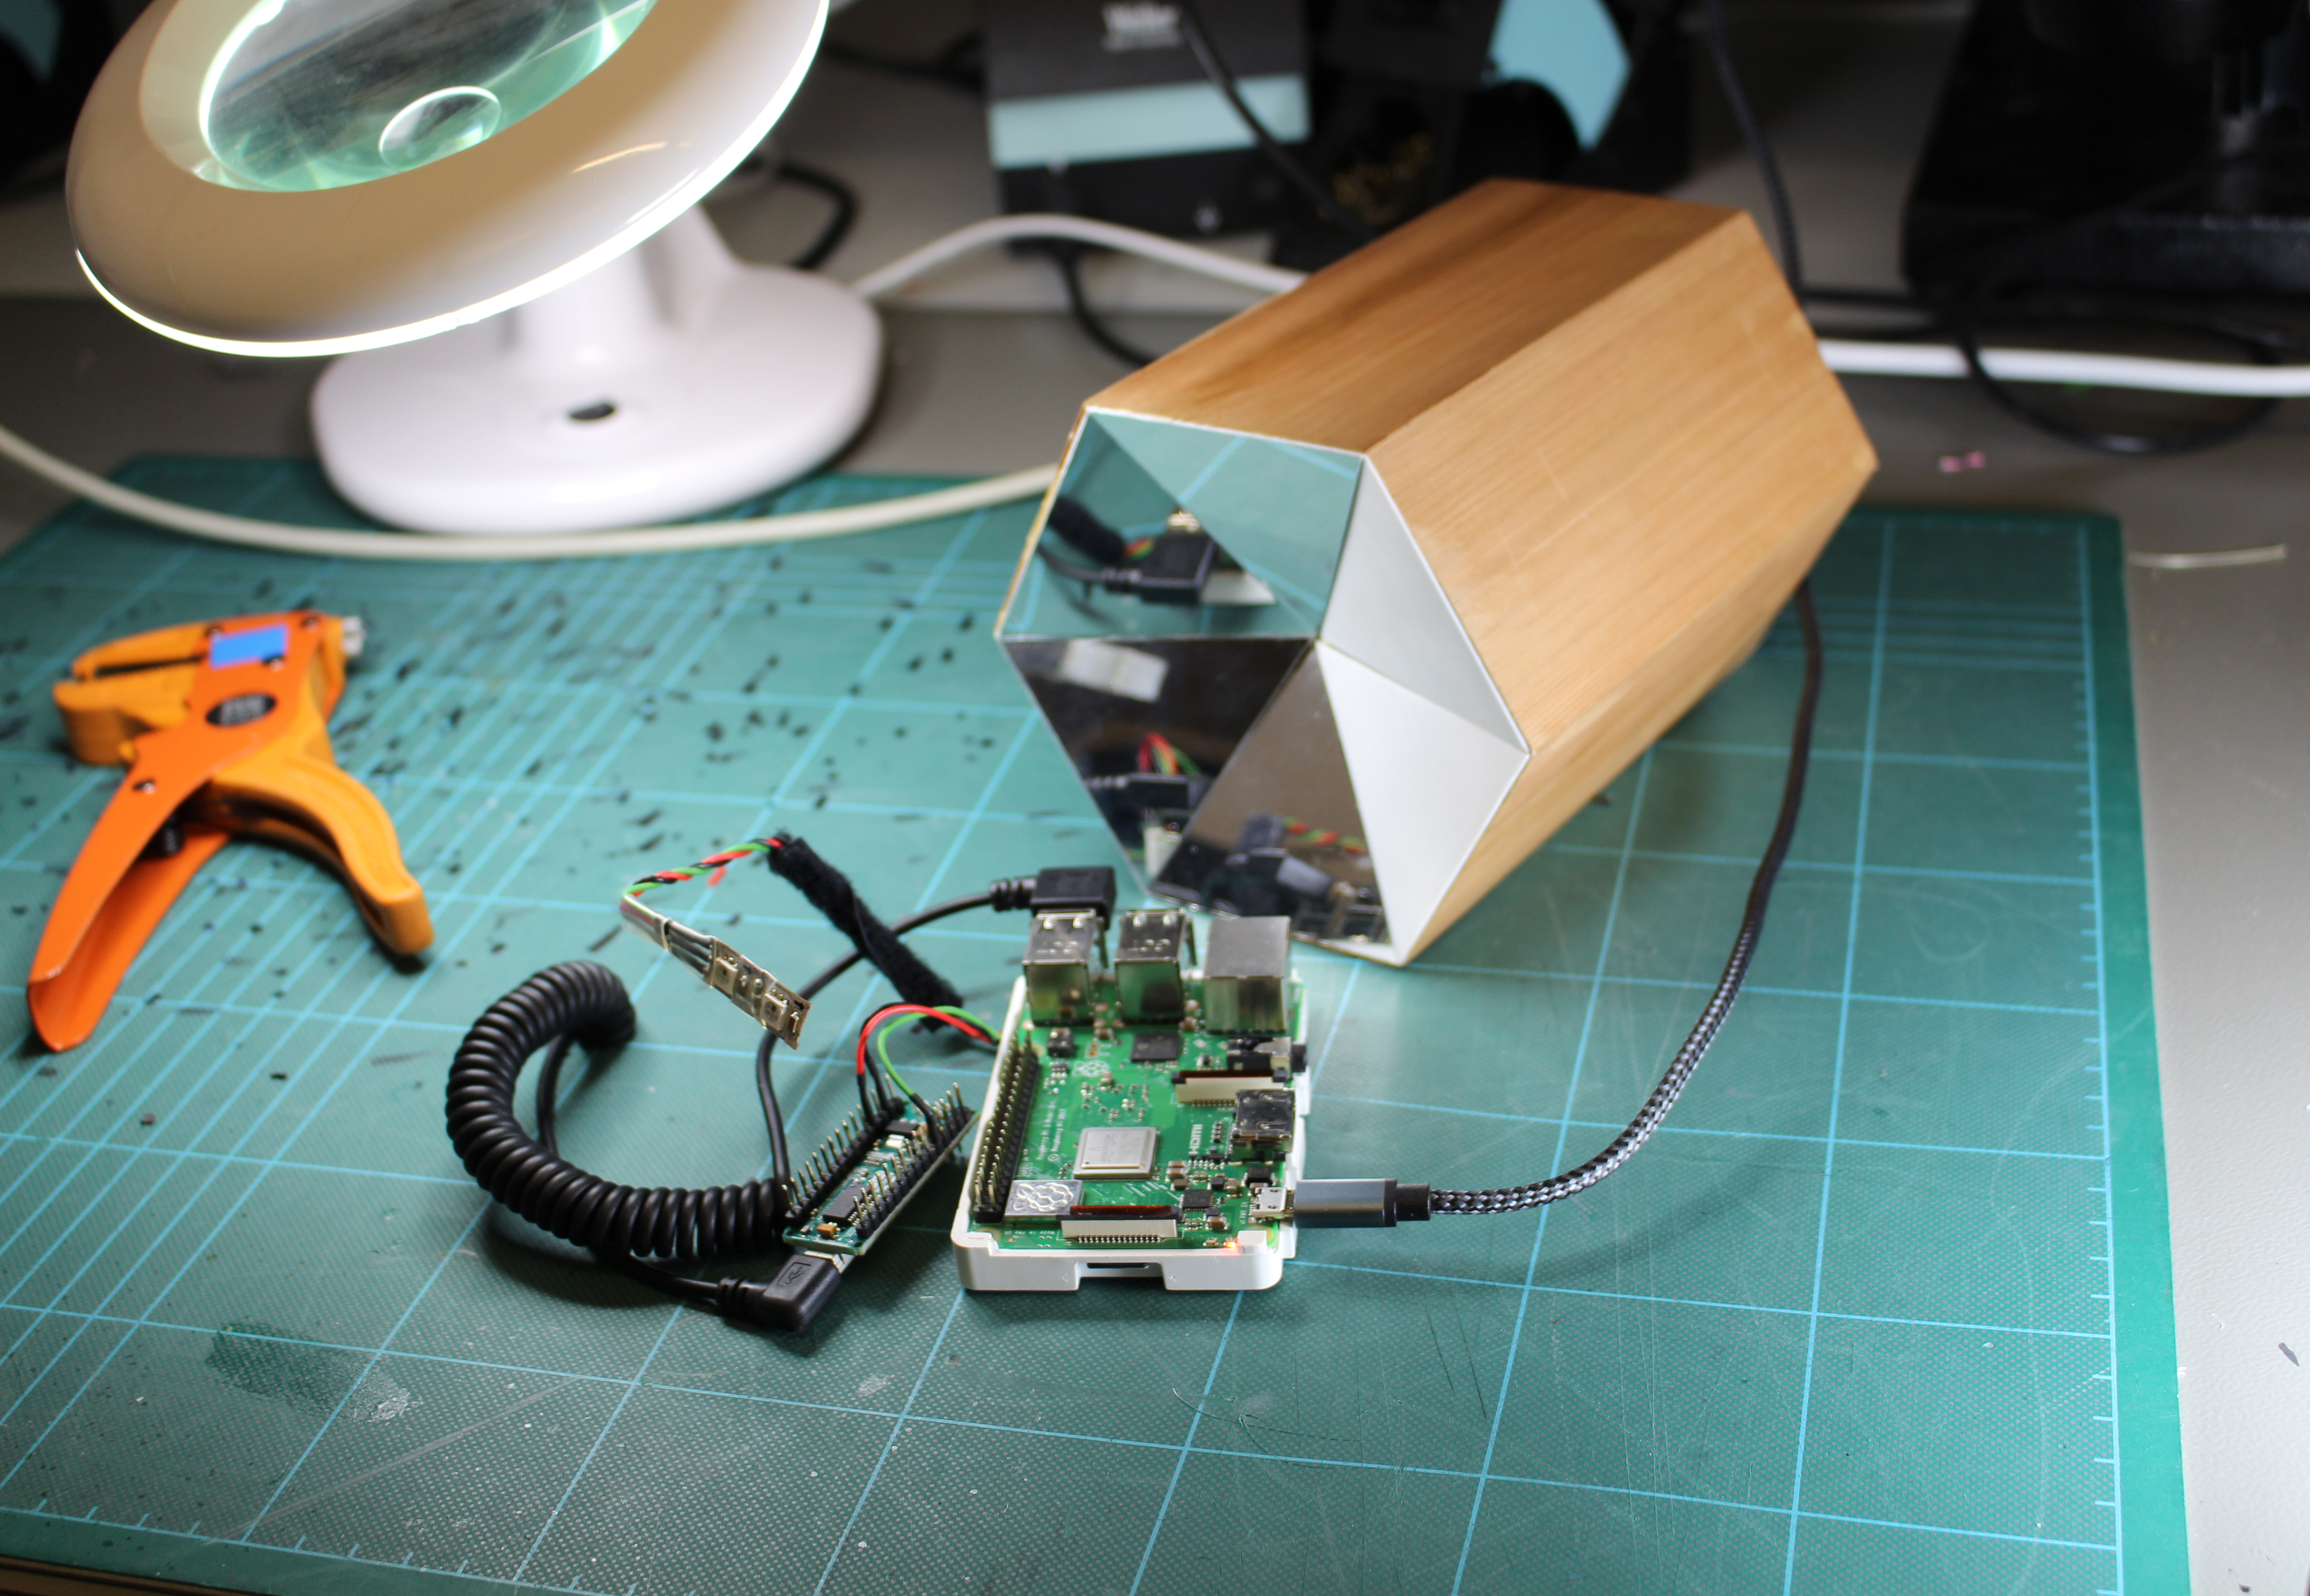
“If we were to create a device like BBC Box and put it out there, it would allow us to create personalised services without holding personal data,” says Max Leonard.
TV shows could be edited on the device to match the user’s interests, without those interests being disclosed to the BBC. One user might see more tech news and less sport news, for example.
BBC Box was partly inspired by a change in the law that gives us all the right to reuse data that companies hold on us. “You can pull out data dumps, but it’s difficult to do anything with them unless you’re a data scientist,” explains Max. “We’re trying to create technologies to enable people to do interesting things with their data, and allow organisations to create services based on that data on your behalf.”
BBC Box is based on Raspberry Pi 3B+, the most powerful model available when this project began. “Raspberry Pi is an amazing prototyping platform,” says Max. “Relatively powerful, inexpensive, with GPIO, and able to run a proper OS. Most importantly, it can fit inside a small box!”

That prototype box is a thing of beauty, a hexagonal tube made of cedar wood. “We created a set of principles for experience and interaction with BBC Box and themes of strength, protection, and ownership came out very strongly,” says Jasmine Cox. “We looked at shapes in nature and architecture that were evocative of these themes (beehives, castles, triangles) and played with how they could be a housing for Raspberry Pi.”
The core software for collating and managing access to data is called Databox. Alpine Linux was chosen because it’s “lightweight, speedy but most importantly secure”, in Max’s words. To get around problems making GPIO access work on Alpine Linux, an Arduino Nano is used to control the LEDs. Storage is a 64GB microSD card, and apps run inside Docker containers, which helps to isolate them from each other.
The BBC has piloted two apps based on BBC Box. One collects your preferred type of TV programme from BBC iPlayer and your preferred music genre from Spotify. That unique combination of data can be used to recommend events you might like from Skiddle’s database.

Another application helps two users to plan a holiday together. It takes their individual preferences and shows them the destinations they both want to visit, with information about them brought in from government and commercial sources. The app protects user privacy, because neither user has to reveal places they’d rather not visit to the other user, or the reason why.
The team is now testing these concepts with users and exploring future technology options for BBC Box.
This article was lovingly yoinked from the latest issue of The MagPi magazine. You can read issue 87 today, for free, right now, by visiting The MagPi website.
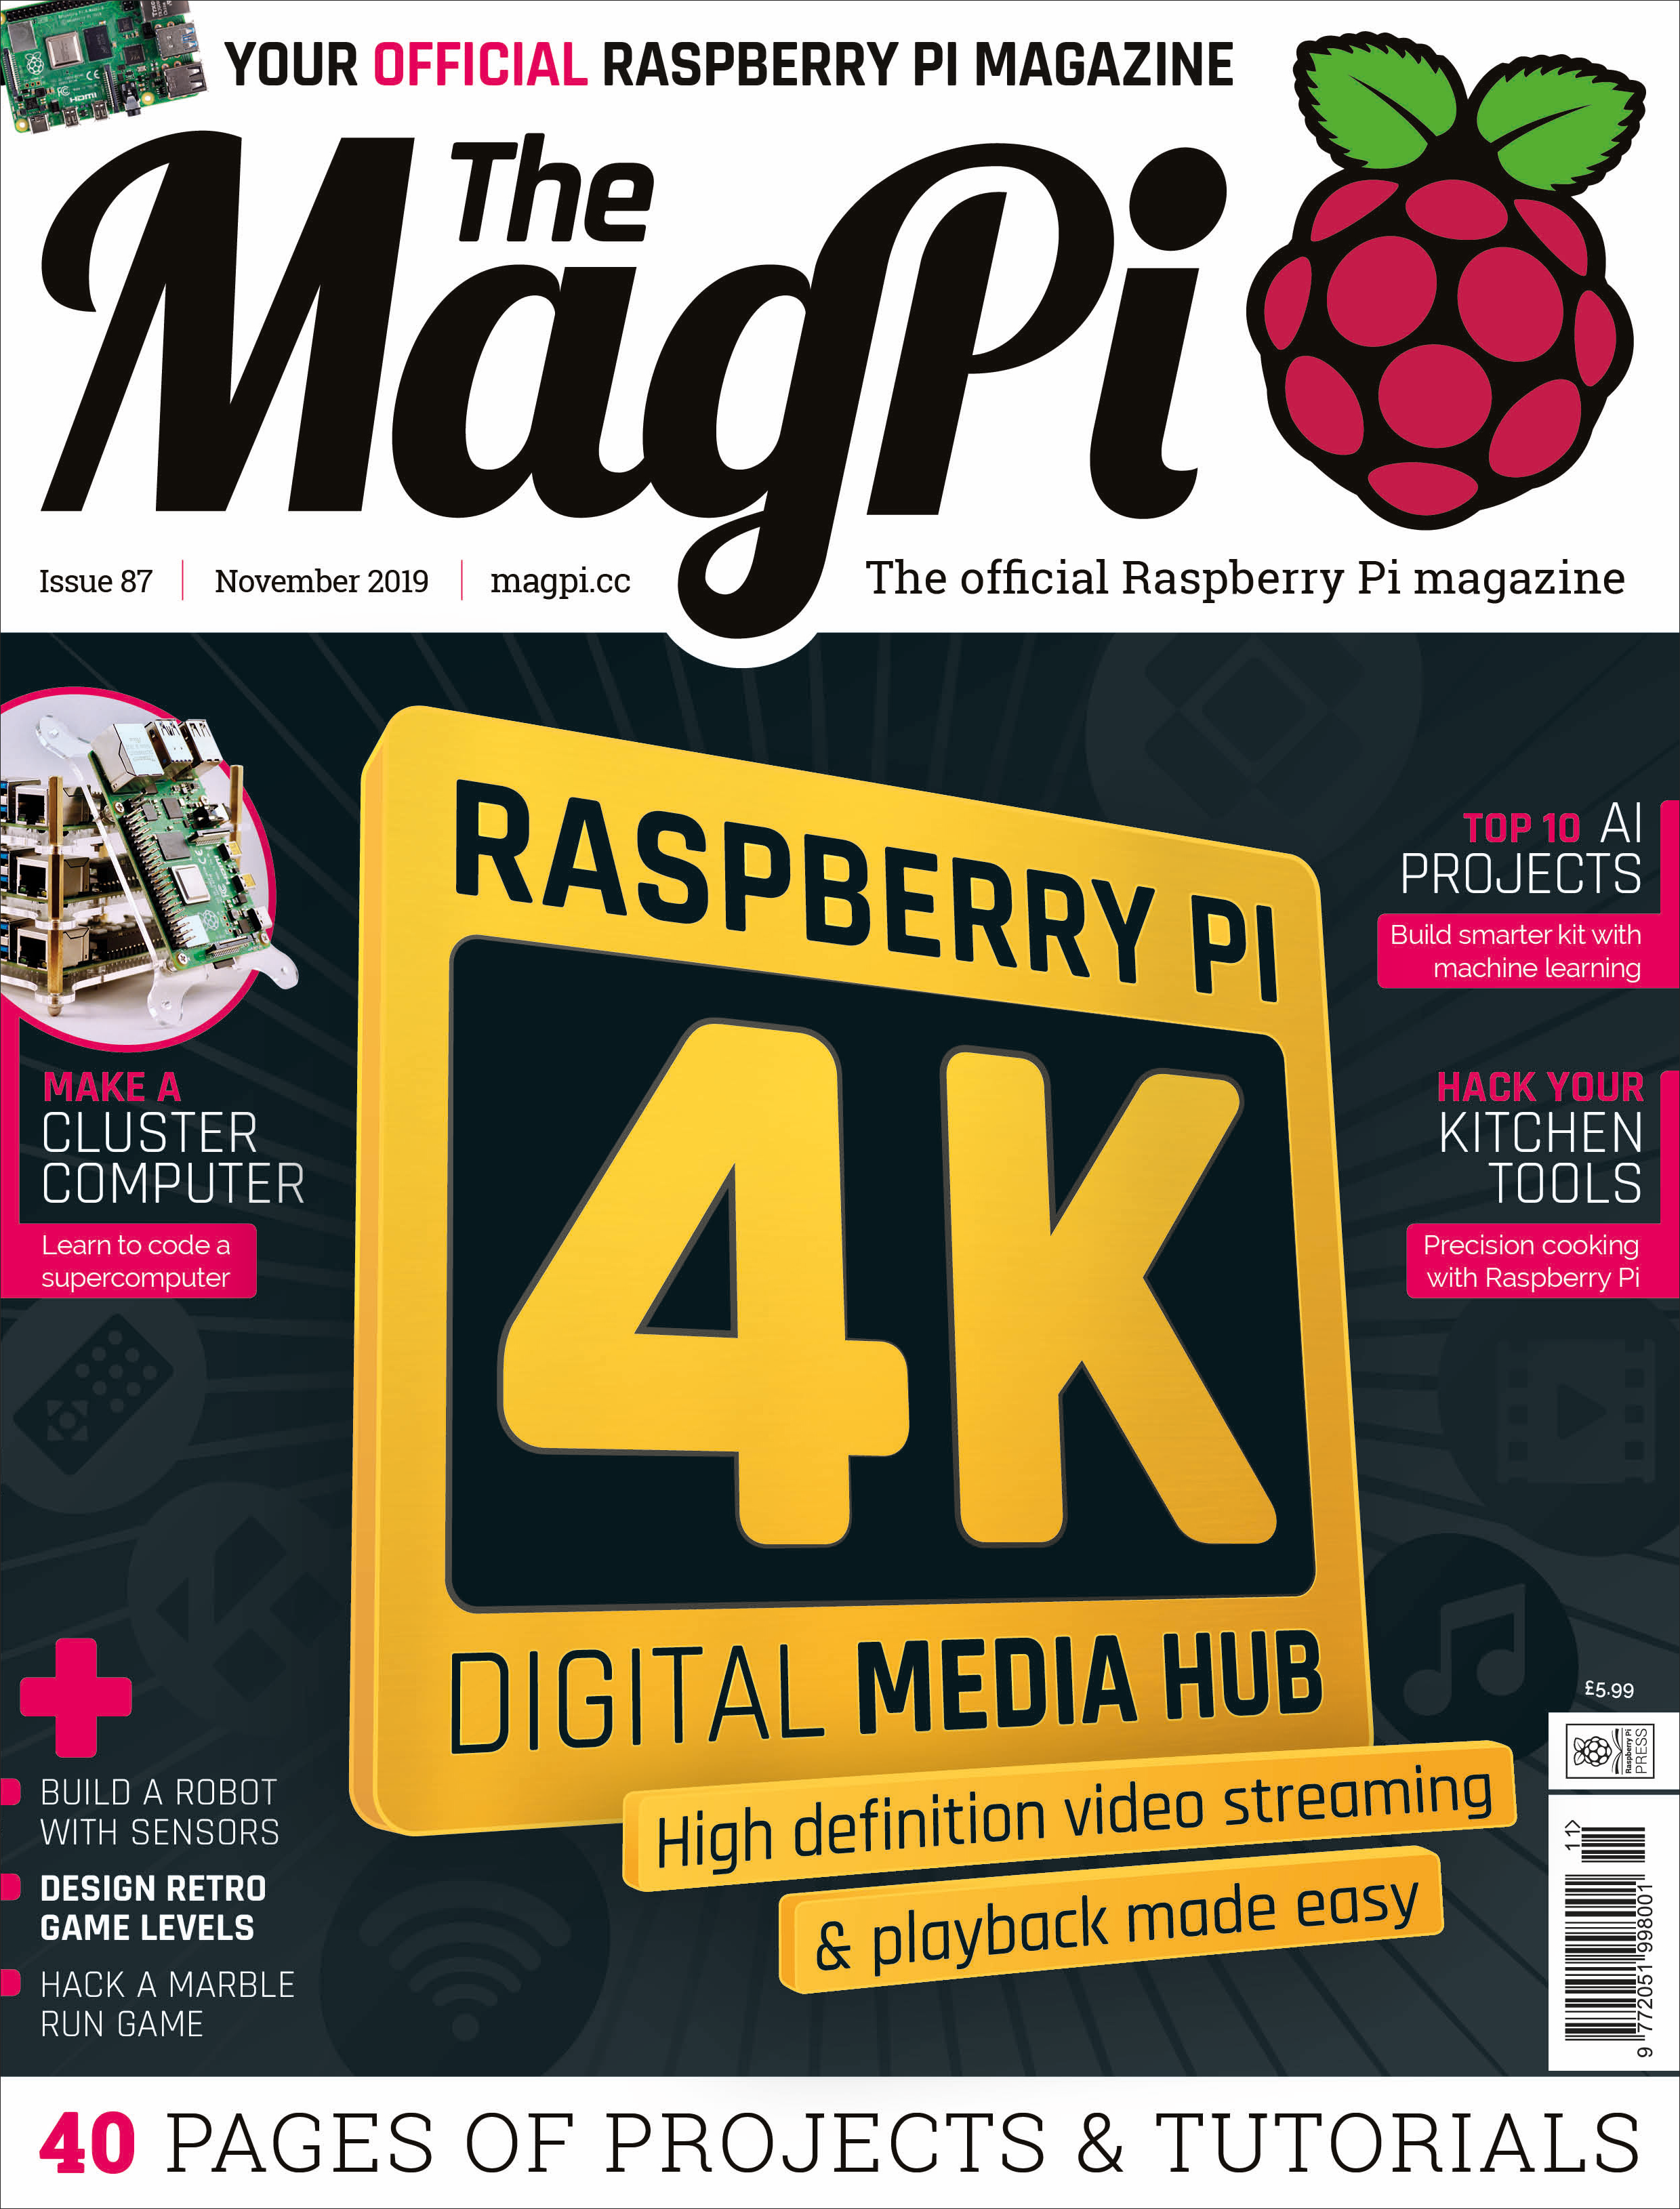
You can also purchase issue 87 from the Raspberry Pi Press website with free worldwide delivery, from the Raspberry Pi Store, Cambridge, and from newsagents and supermarkets across the UK.
The post Securely tailor your TV viewing with BBC Box and Raspberry Pi appeared first on Raspberry Pi.
Today’s blog post started as a deflated “What do I buy my Secret Santa person?” appeal from a friend last night. My answer is this, a nice and early Secret Santa idea guide for anyone stuck with someone for whom they have no idea what to buy.
All the gifts listed below cost £10 or less, and they’re all available from the Raspberry Pi store in Cambridge, UK. Many of them are also available to buy online, but if you’re able to visit our store, you definitely should – we have a couple of in-store exclusives on offer too.
If your Secret Santa limit is set at £5, as many seem to be, we’ve a few ideas that will fit nicely within your budget.
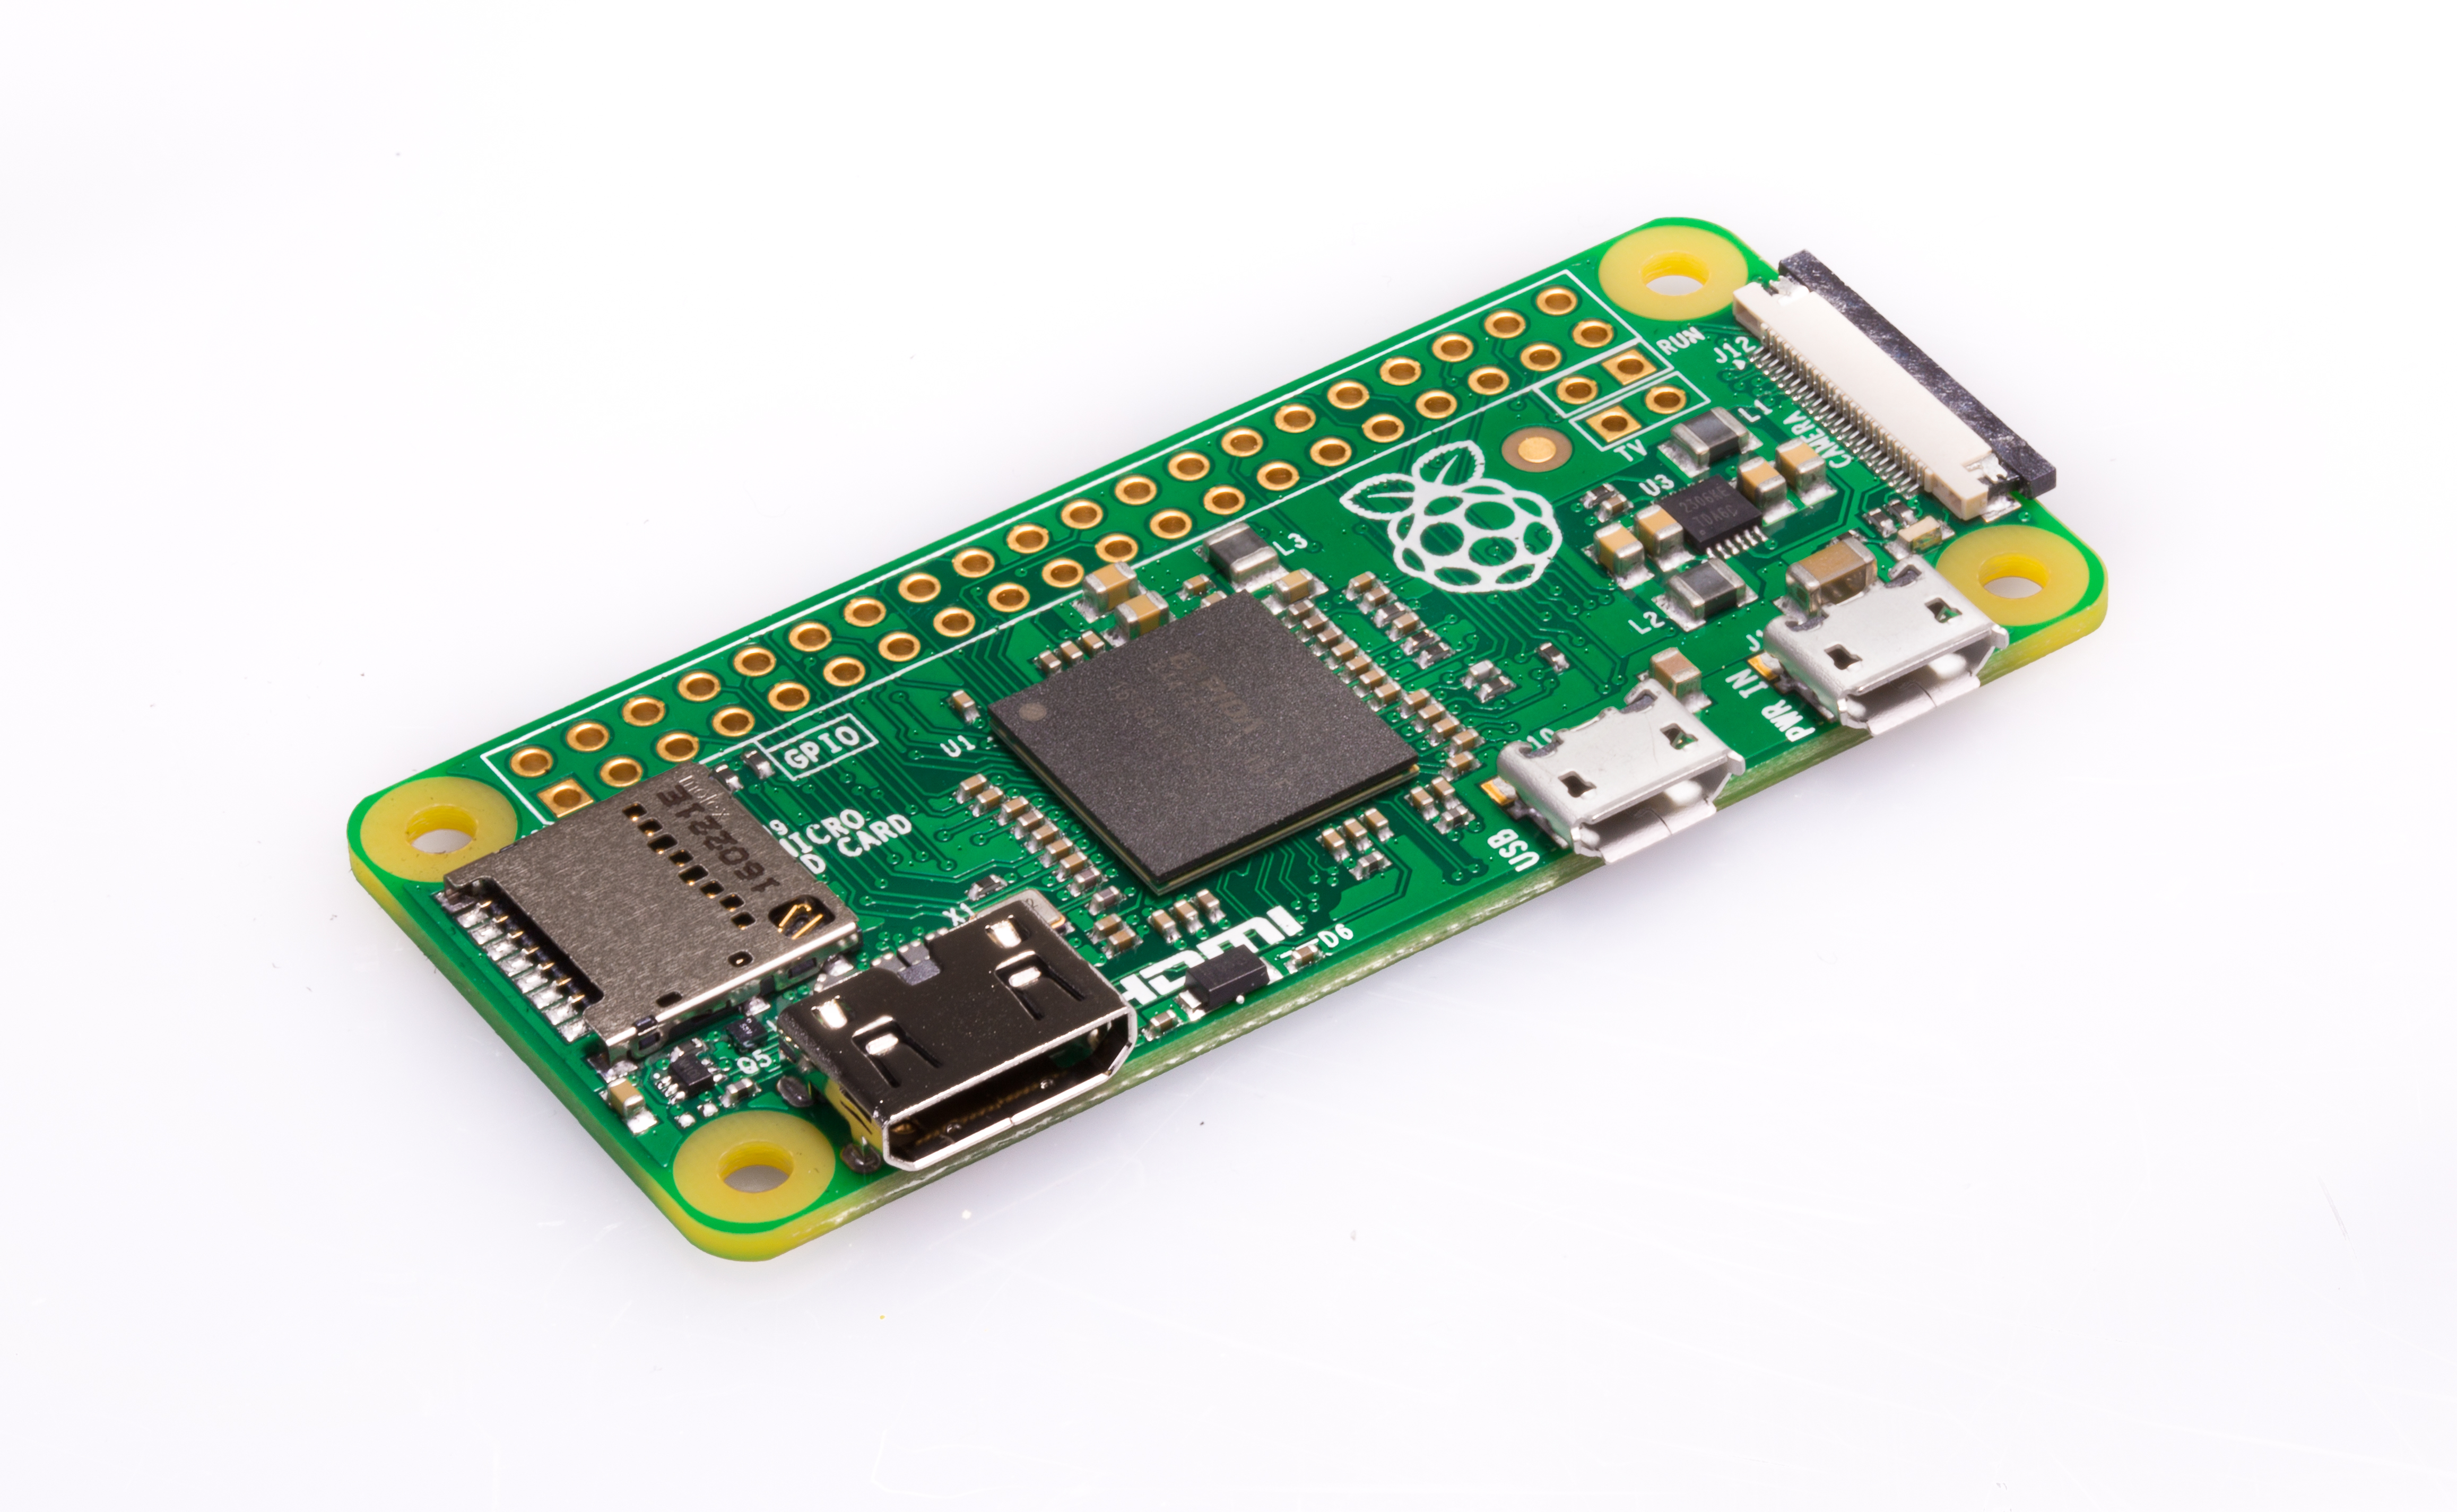
We’ll start with the obvious: Raspberry Pi Zero, our tiny computer that packs a punch without leaving a dent in your finances. At bang on £5, anyone of the electronics/techie persuasion will be delighted to receive this at the office Christmas party.
Help your Secret Santa pick show their love for Raspberry Pi with a Raspberry Pi pin (£3) or sticker pack (£4). They’ll be as on-brand as Pete Lomas (and that’s saying something).
The CamJam Edukit #1 is jam-packed with all the bits you need to get started with digital making, and it’s supported by free downloadable worksheets. It’s a fantastic gift for anyone who’d enjoy learning electronics or expanding their coding know-how. At £5, you can’t go wrong.
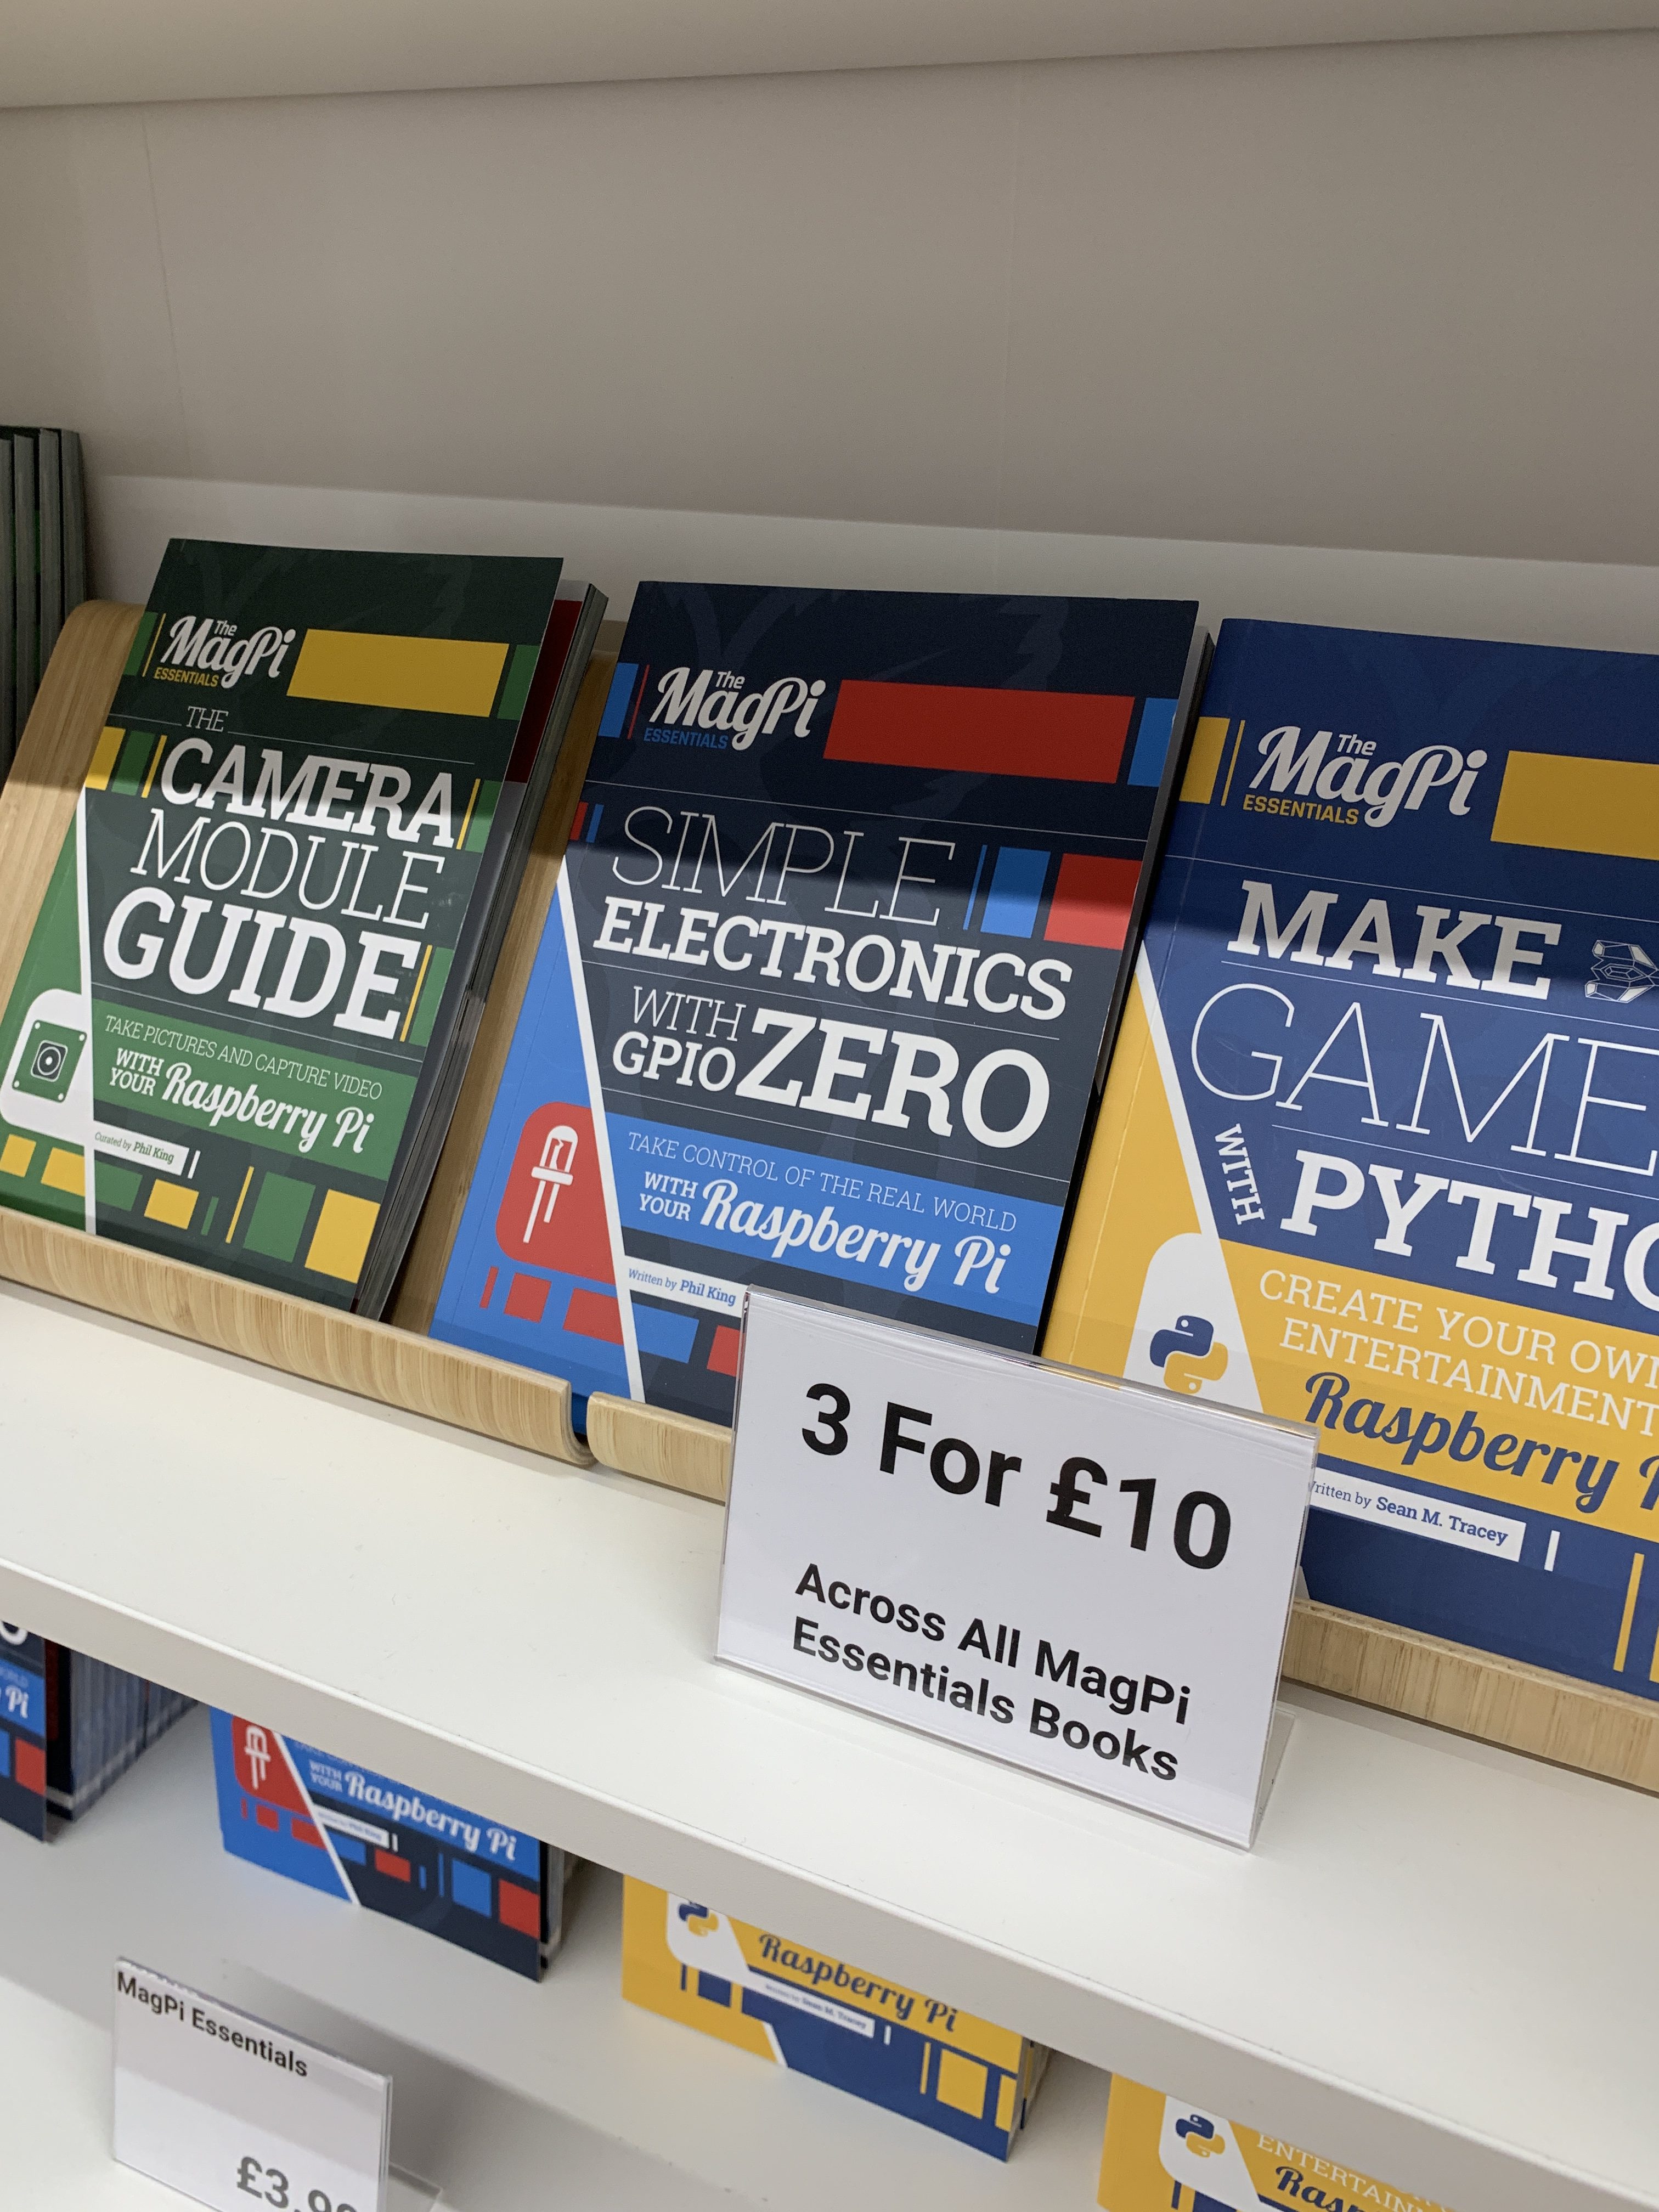
At £3.99 each, the Essentials Guides cover a range of topics, including Learning to code with C, Hacking and making in Minecraft, and Making games in Python. Our in-store offer will score you three guides for £10, which brings us nicely to…
A £10 budget? Check you out!

With added wireless LAN and Bluetooth connectivity, Raspberry Pi Zero W will cost you £9.50, leaving you 50p to buy yourself some sweets for a job well done.
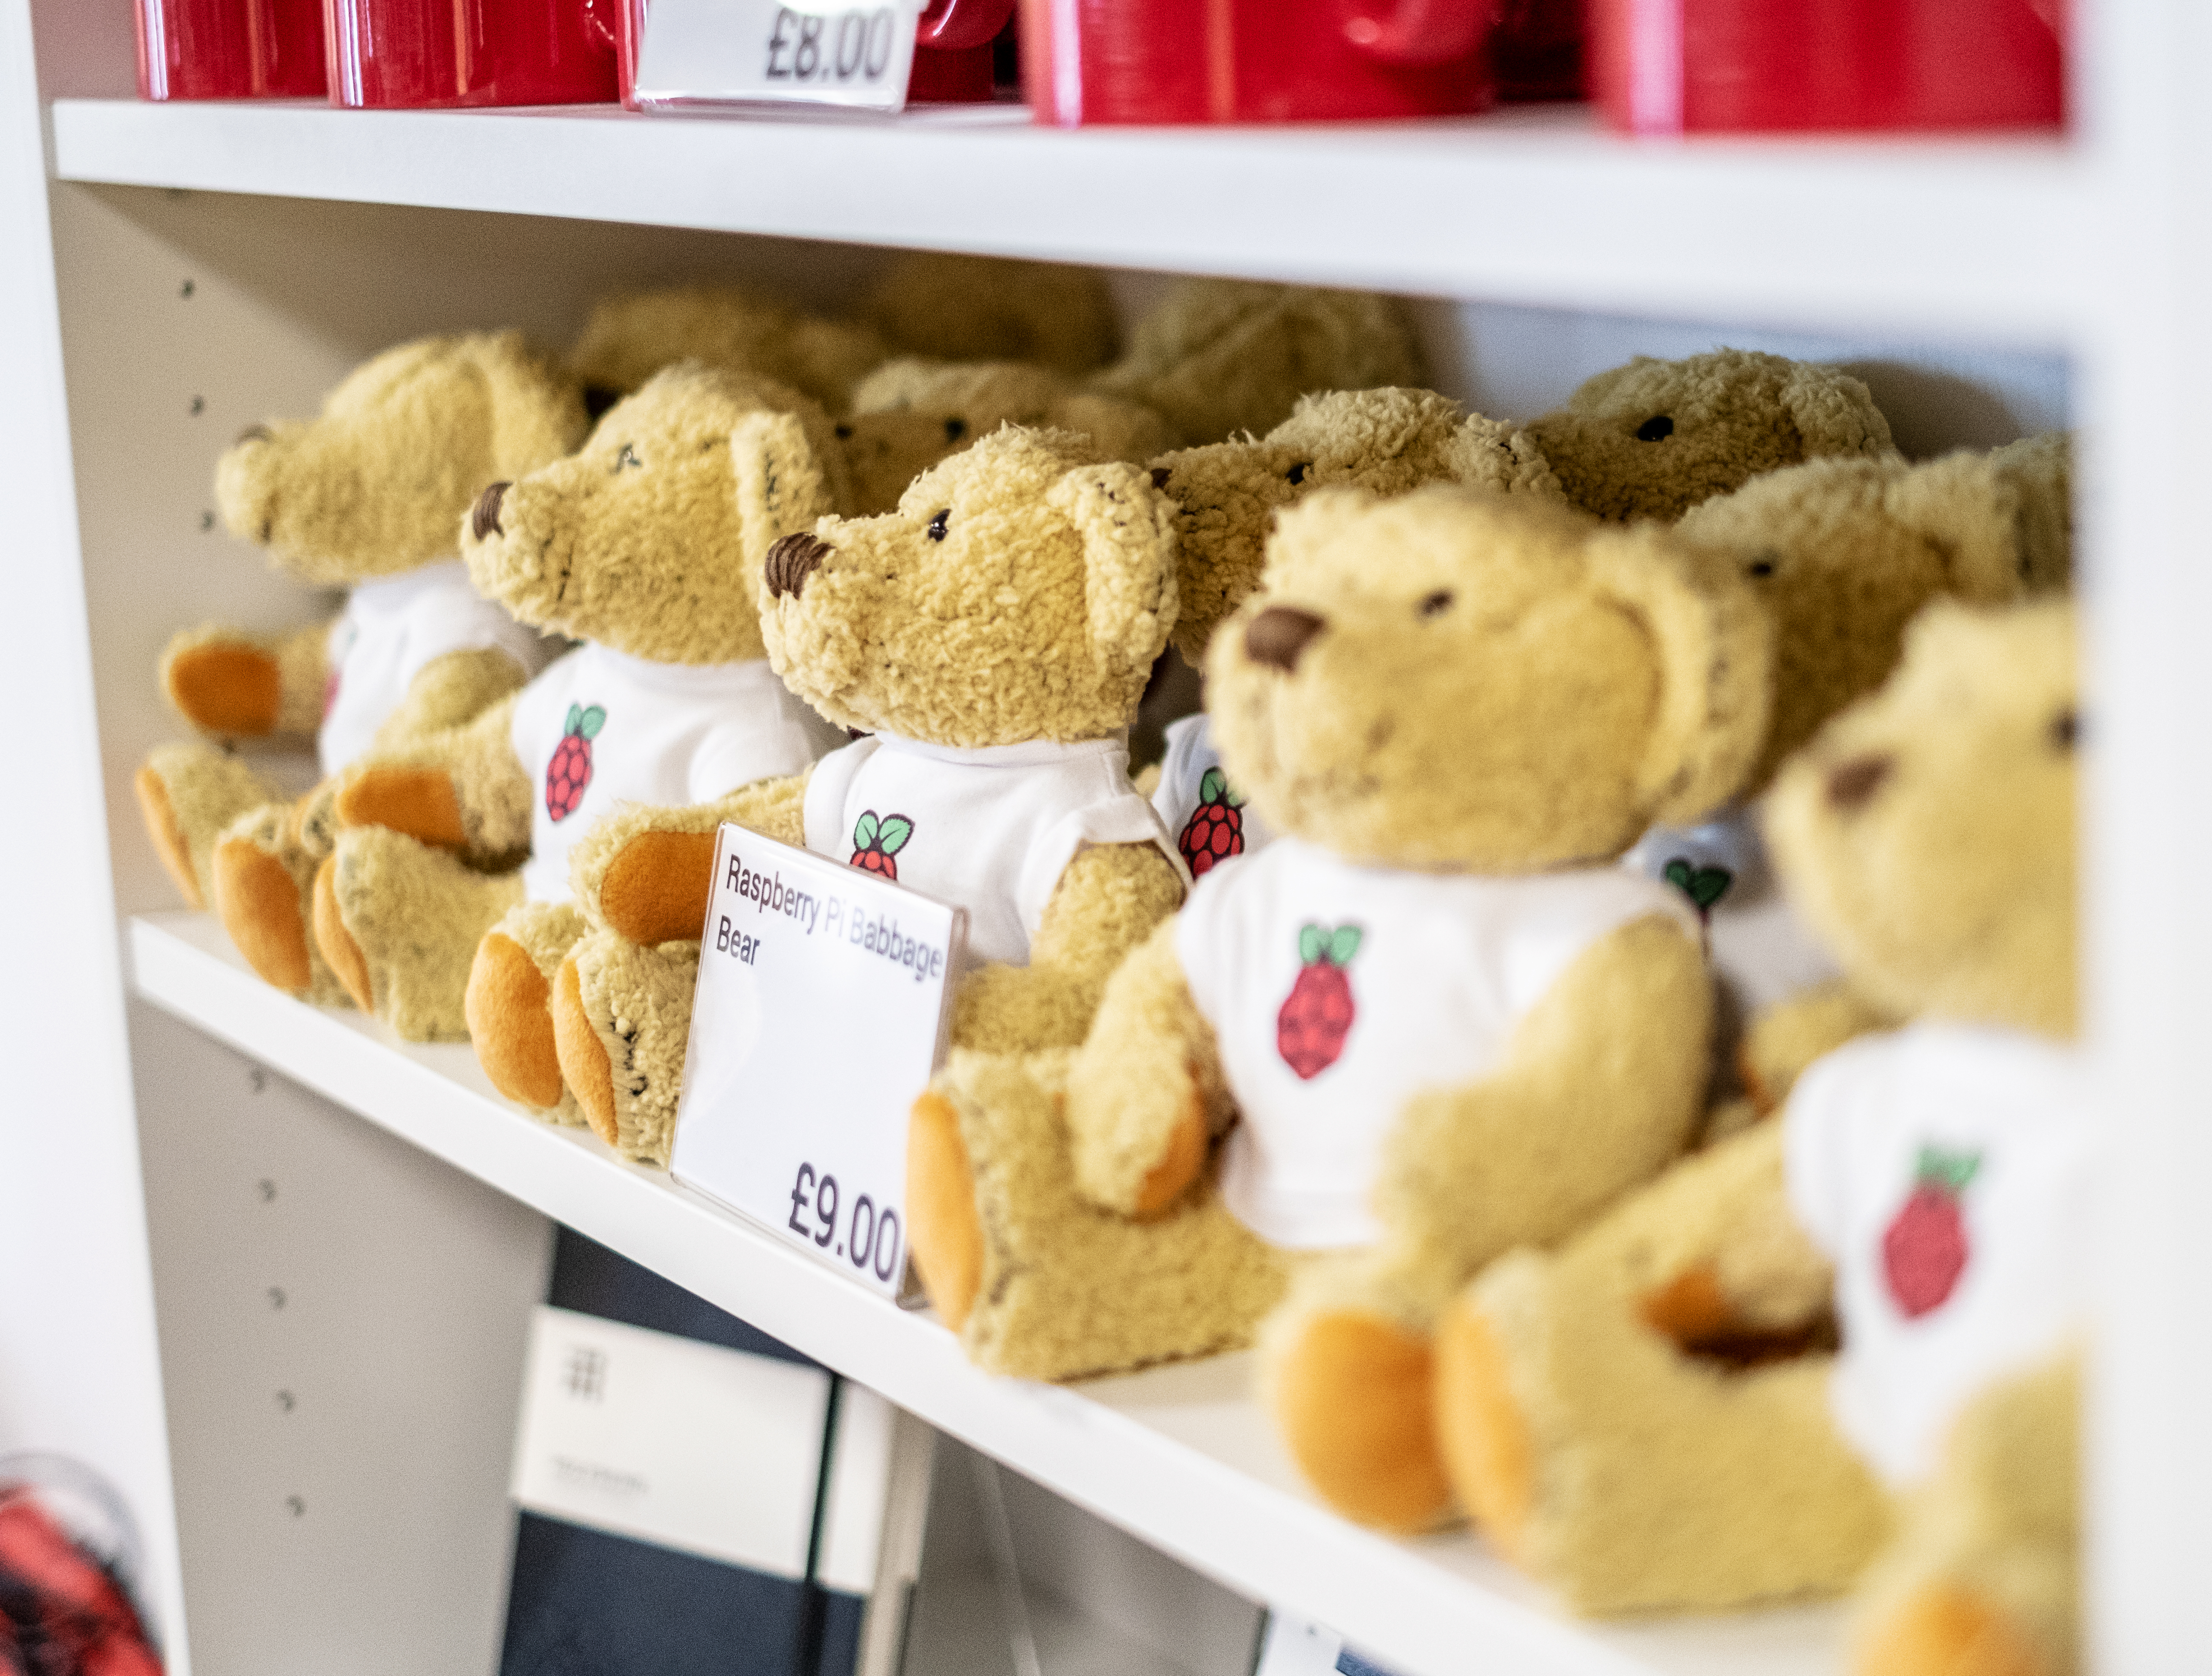
Babbage Bear, for many the face of Raspberry Pi, is the perfect gift for all ages. He’ll cost you £9, as will any of his Adafruit friends.
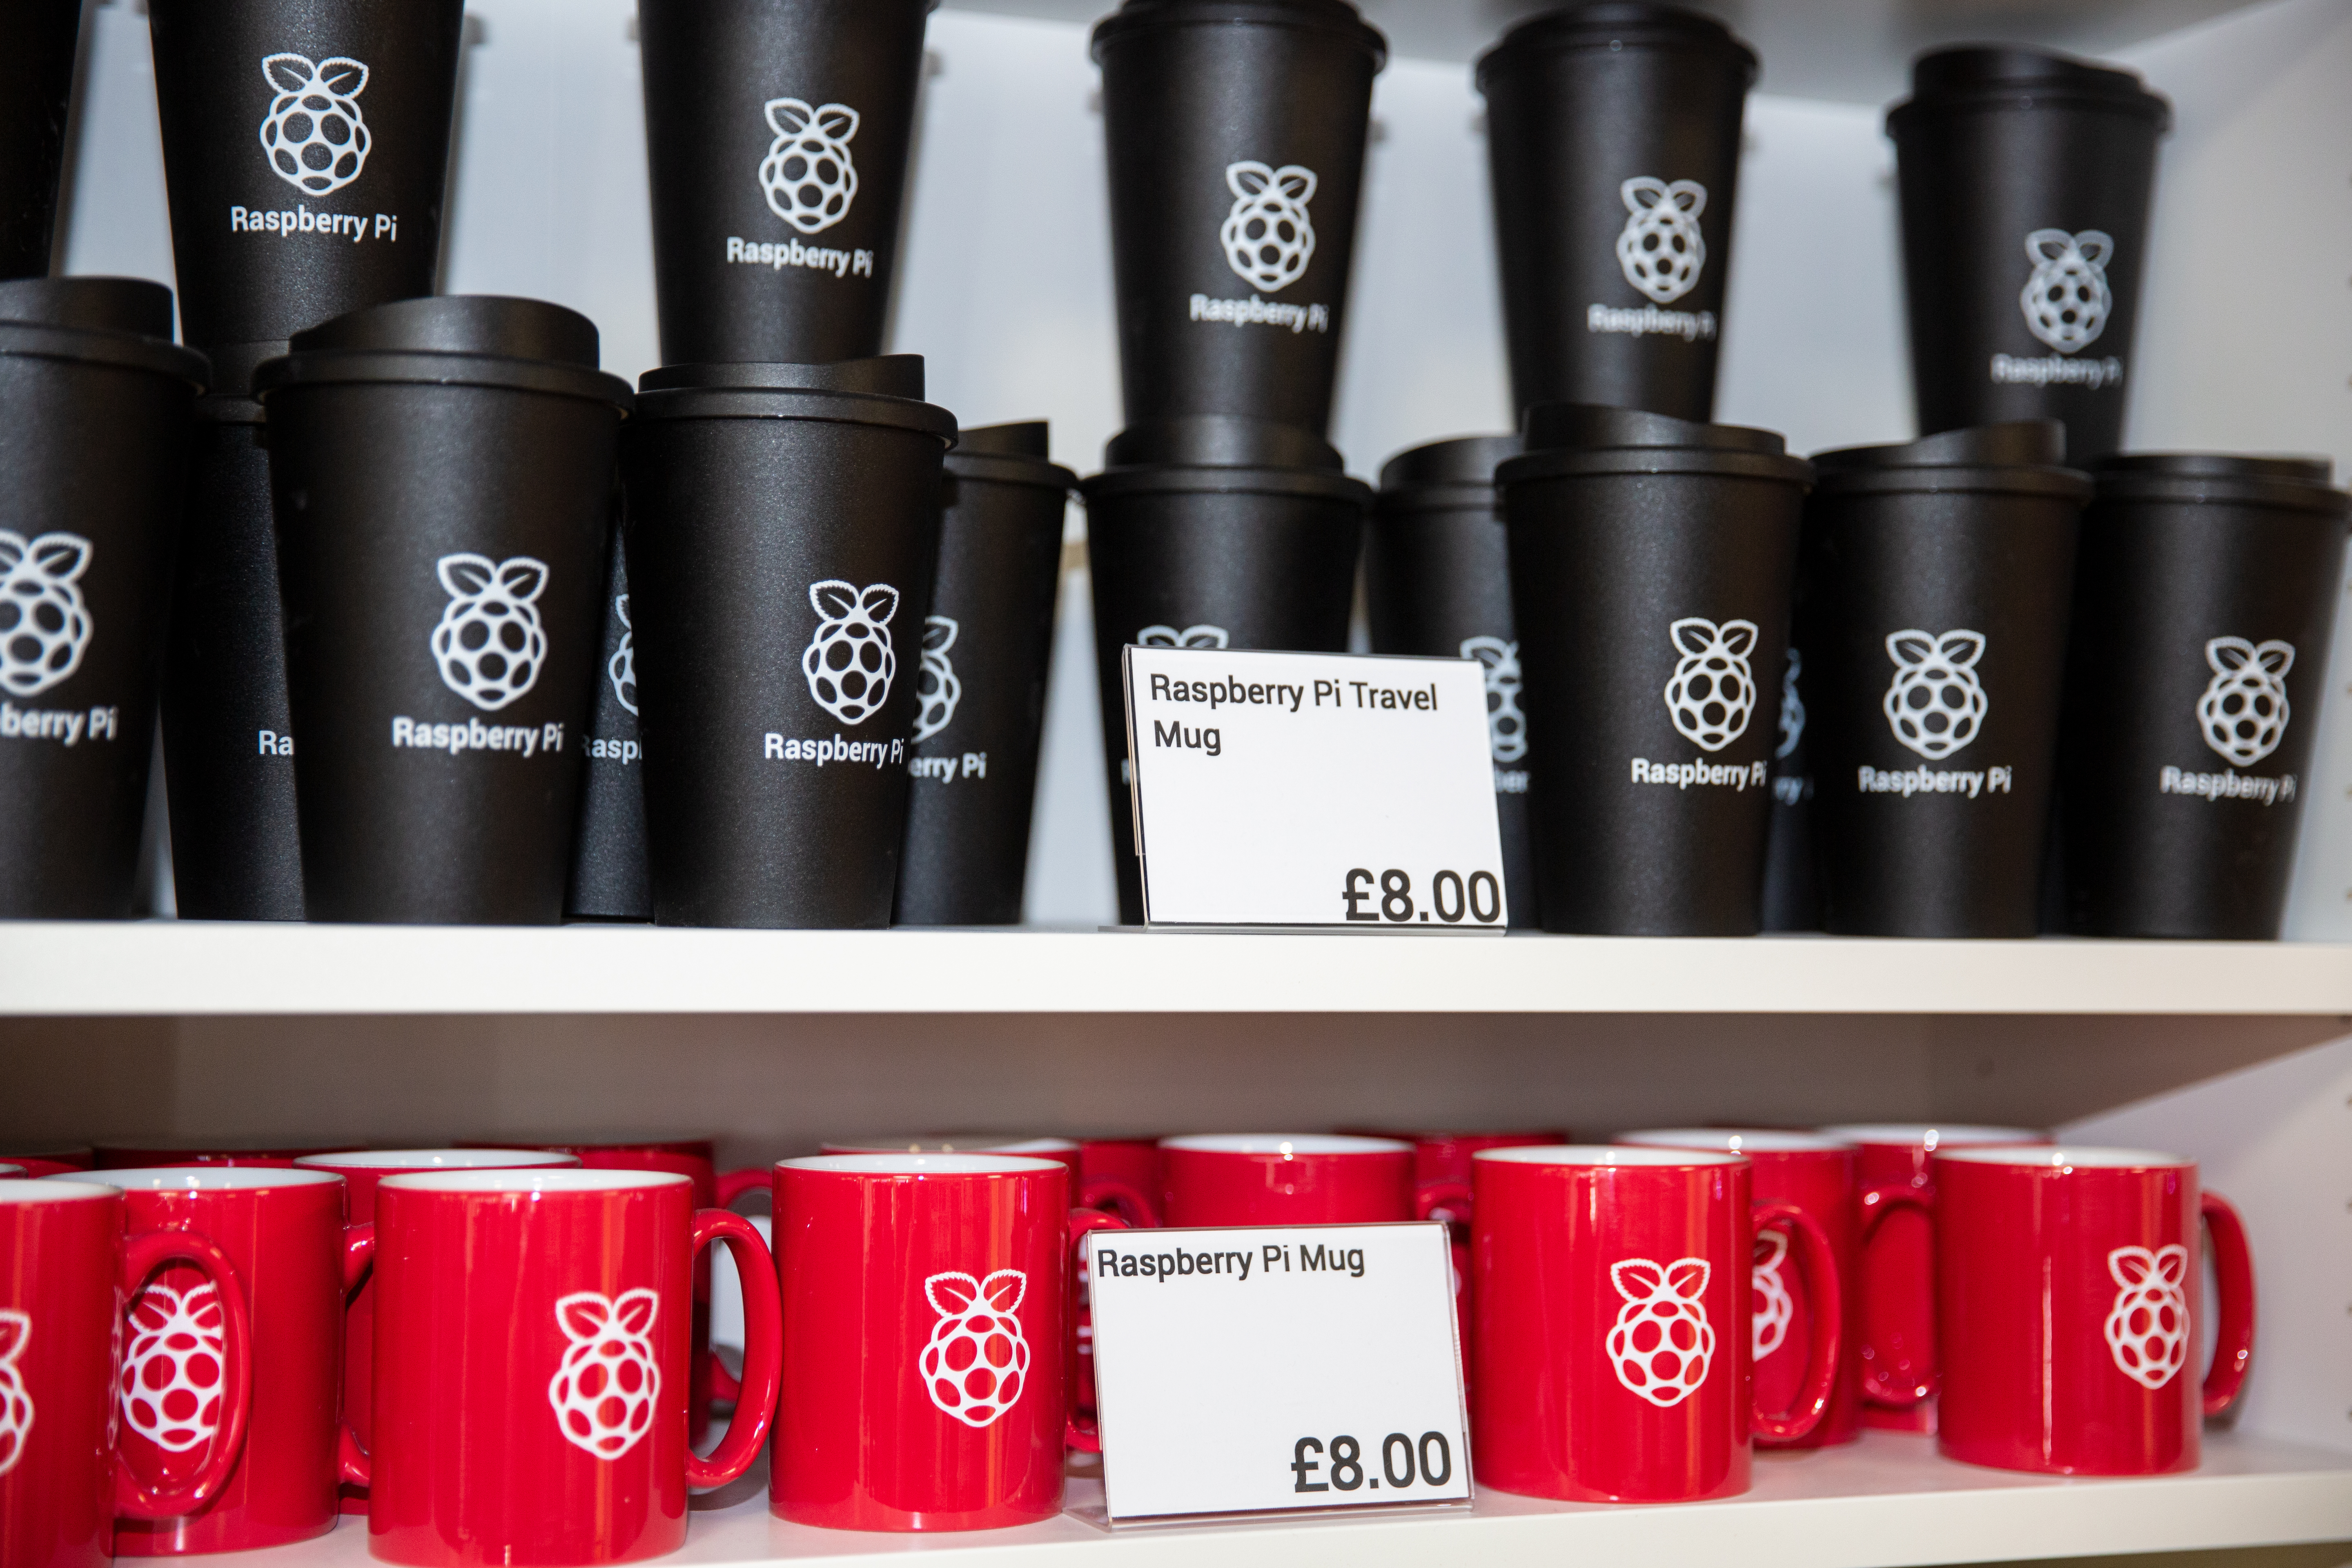
What do you buy for the Raspberry Pi fan who has everything? A store-exclusive travel cup. At £8 each, our branded drinkware is rather swell, even if we do say so ourselves.

Ranging in price from £3.99 to around £15, our Raspberry Pi Press books and magazines are a great gift for anyone looking to learn more about making, electronics, or video gaming.
If you’ve heard your Secret Santa match mention that they like tinkering and making in their spare time, but you don’t think they’ve tried Raspberry Pi yet, this is the book for them. Updated to include the new Raspberry Pi 4 and upgrades to Scratch 3, our Beginner’s Guide will help them get started with this fabulous addition to their toolkit.
These gifts are a little more than £10, and worth every penny. They’d make the perfect gift for anyone who loves making and Raspberry Pi.
The Bearable badges are cute, light-activated LED badges that require no soldering or external computers. Instead, the kit uses conductive thread and sensors, making it a wonderful maker project for anyone, whether or not they’ve done any electronics before. Choose between an adorable sleepy fox and a lovable little bear, both at £15.

Available both as a pre-soldered kit (£15) and as a solder-yourself kit (£12), the 3D Xmas Tree is the ultimate festive HAT for Raspberry Pi. Once it’s assembled, you can use pre-written code to light it up, or code your own light show.

The Raspberry Pi Store now offers gift cards, giving your giftee the chance to pick their own present. Add whatever value you’d like from a minimum of £5, and watch them grin with glee as they begin to plan their next project.
Plus, our wonderful Jack has designed these rather lovely Christmas tote bags, available exclusively in store and as a limited run!
We’ll be publishing our traditional Raspberry Pi gift guide soon. It’ll include all the tech and cool maker stuff your nearest and dearest will love to receive this holiday season, with links to buy online. If you think there’s something we shouldn’t miss, let us know in the comments below.
The post Secret Santa ideas for the Raspberry Pi fan in your office appeared first on Raspberry Pi.
These Raspberry Pis take hourly photographs of snails in plastic container habitats, sharing them to the Snail Habitat website.
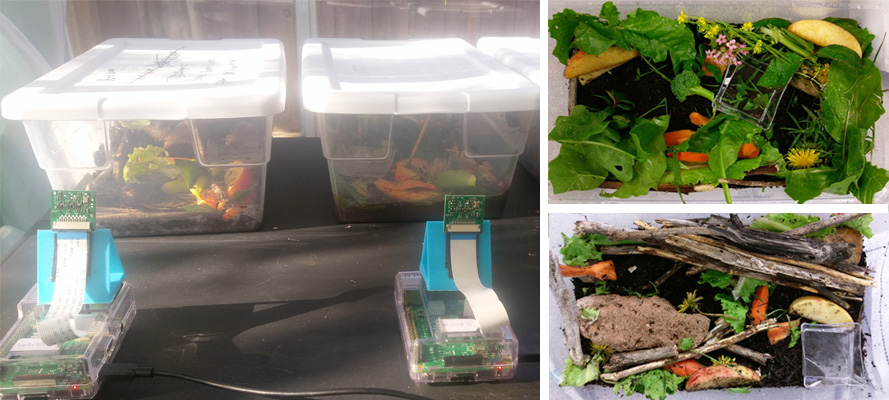
While some might find them kind of icky, I am in love with snails (less so with their homeless cousin, the slug), so this snail habitat project from Mrs Nation’s class is right up my alley.
This project was done in a classroom with 22 students. We broke the kids out into groups and created 5 snail habitats. It would be a great project to do school-wide too, where you create 1 snail habitat per class. This would allow the entire school to get involved and monitor each other’s habitats.
Each snail habitat in Mrs Nation’s class is monitored by a Raspberry Pi and camera module, and Misty Lackie has written specific code to take a photo every hour, uploading the image to the dedicated Snail Habitat website. This allows the class to check in on their mollusc friends without disturbing their environment.
“I would love to see others habitats,” Misty states on the project’s GitHub repo, “so if you create one, please share it and I would be happy to publish it on snailhabitat.com.”

The post Raspberry Pi snail habitats for Mrs Nation’s class appeared first on Raspberry Pi.
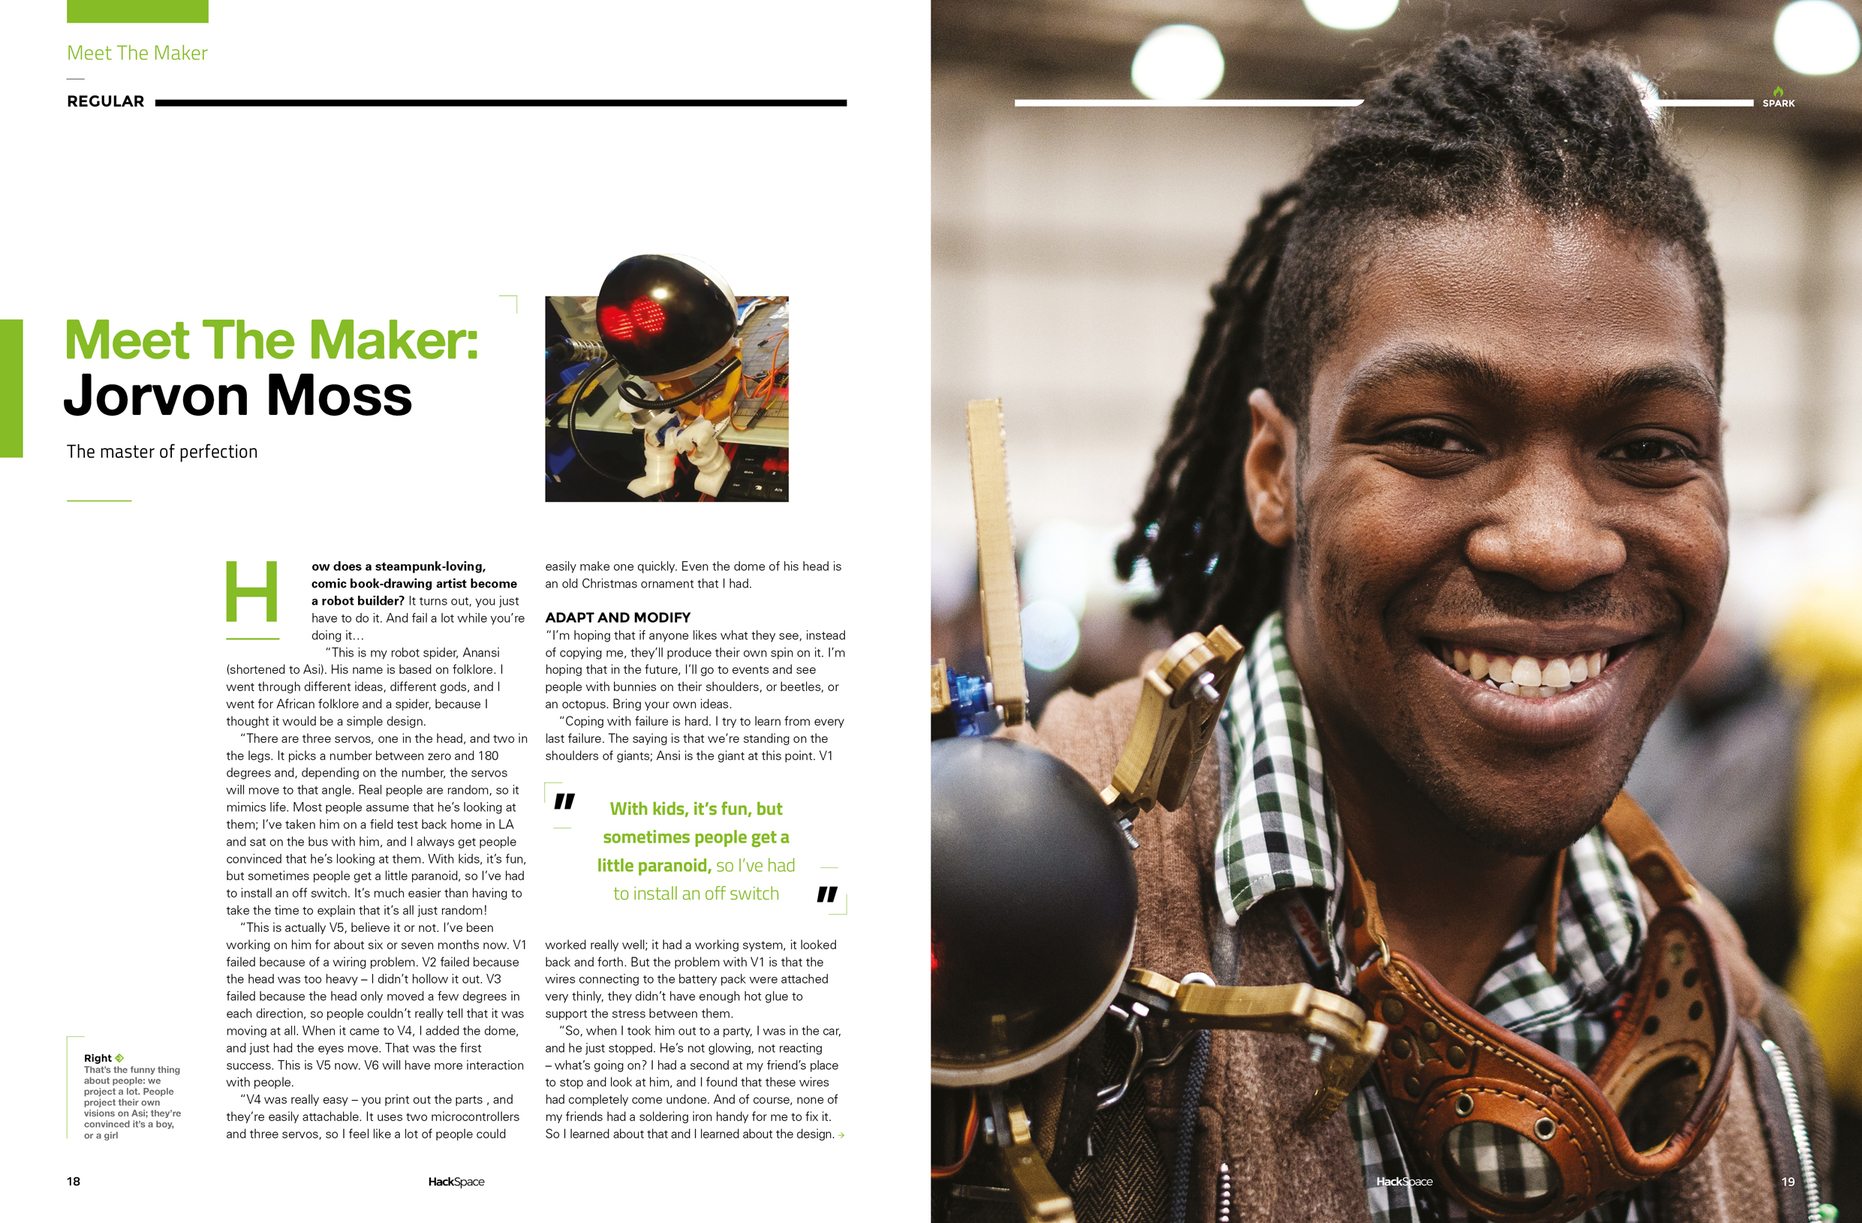