Today is the official launch day of Astro Pi Mission Zero, part of the 2018–2019 European Astro Pi Challenge, an ESA Education programme run in collaboration with us at Raspberry Pi. In this challenge, students and young people get the chance to have their computer programs run in space on the International Space Station!
![]()
Students and young people will have until 20 March 2019 to form teams and write a simple program to display their personal message to the astronauts onboard. The Mission Zero activity can be completed in a couple of hours with just a computer and an internet connection. You don’t need any special equipment or prior coding skills, and all participants that follow the guidelines are guaranteed to have their programs run in space.
This year, to help many more people take part in their native language, we have translated the Mission Zero resource, guidelines, and web page into 19 different languages! Head to our languages section to find your version of Mission Zero.
To participate, the teams’ teacher or mentor needs to register for a classroom code that will let students submit their programs. Teams then follow our online resource to write their programs using the browser-based Trinket emulator: with just a few lines of Python, your team will create a program for one of the two Astro Pi computers aboard the ISS!
![]()
Each team’s program will run for 30 seconds aboard the Space Station, visible for all the astronauts including this year’s challenge ambassadors: ESA astronaut and ISS Commander Alexander Gerst and CSA astronaut David Saint-Jacques.
Astro Pi returns for a new 2018/19 challenge!
Ever wanted to run your own experiment in space? Then you’re in luck! ESA Education, in collaboration with the Raspberry Pi Foundation, is pleased to announce the launch of the 2018/2019 European Astro Pi Challenge!
Every team that submits a valid Mission Zero entry will also receive a certificate showing the flight path of the ISS above Earth at the exact time their code ran!
![]()
The challenge is open to teams of students and young people who are aged 14 years or younger (at the time of submission) and from ESA Member or Associate Member States*. The teams must have at least two and no more than four members, and they must be supervised by an adult teacher or mentor.
Have fun, and say hi to the astronauts from us!
The European Astro Pi Challenge is an ESA Education project run in collaboration with the Raspberry Pi Foundation. It offers students and young people the amazing opportunity to conduct scientific investigations in space by writing computer programs that run on Raspberry Pi computers on board the International Space Station (ISS). The Astro Pi Challenge is divided into two separate missions with different levels of complexity: Mission Zero (the basic mission), and Mission Space Lab (one step further). This year’s Mission Space Lab is closing for applications at the end of October. Click here for more information about it.
*ESA Member States in 2018:
Austria, Belgium, Czech Republic, Denmark, Estonia, Finland, France, Germany, Greece, Hungary, Ireland, Italy, Luxembourg, The Netherlands, Norway, Poland, Portugal, Romania, Spain, Sweden, Switzerland, United Kingdom.
ESA Associate States in 2018: Canada, Slovenia
In the framework of the current collaboration agreement between ESA and the Republic of Malta, teams from Malta can also participate in the European Astro Pi Challenge. ESA will also accept entries from primary or secondary schools located outside an ESA Member or Associate State only if such schools are officially authorised and/or certified by the official Education authorities of an ESA Member or Associate State (for instance, French school outside Europe officially recognised by the French Ministry of Education or delegated authority).
The post Astro Pi Mission Zero: guarantee your code’s place in space appeared first on Raspberry Pi.
Apologies to our daily visitors (we love you guys); we don’t have a proper blog post for you today because we’re all really ill. (I have food poisoning, Helen is coughing up goo and can barely speak or breathe, and Alex is being sick.)
![]()
You’ve got a day until Halloween; if you’re looking for inspiration, we’ve got several years of archived spooky project posts for you to check out. And now, if you’ll excuse me, I’m going to go and have a little lie down.
The post We have the plague appeared first on Raspberry Pi.
I’ll keep today’s blog post short and sweet, because Liz, Helen, and I are all still under the weather.
Don’t tell Eben, Liz, or the rest of the team I showed you this, but here’s your Halloween ‘trick or treat’ gift: an exclusive sneak peek at the Raspberry Pi 4.
We’ll be back to our regularly scheduled programming from tomorrow.
The post Trick or (the ultimate) treat! appeared first on Raspberry Pi.
Firstly, I’d like to apologise for rickrolling you all yesterday. I would LIKE to, but I can’t — it was just too funny to witness.
![]()
But as I’m now somewhat more alive and mobile, here’s a proper blog post about proper things. And today’s proper thing is these awesome Raspberry Pi–powered dance costumes from students at a German secondary school:
In the final two years at German gymnasiums (the highest one of our secondary school types), every student has to do a (graded) practical group project. Our school is known for its superb dancing groups, which are formed of one third of the students (voluntarily!), so our computer science teacher suggested to make animated costumes for our big dancing project at the end of the school year. Around 15 students chose this project, firstly because the title sounded cool and secondly because of the nice teacher
.
Let me just say how lovely it is that students decided to take part in a task because of how nice the teacher is. If you’re a nice teacher, congratulations!
![]()
The students initially tried using Arduinos and LED strips for their costumes. After some failed attempts, they instead opted for a Raspberry Pi Zero WH and side-emitting fibre connected to single RGB LEDs — and the result is rather marvellous.
To power the LEDs, we then had to shift the voltage up from the 3.3V logic level to 12V. For this, we constructed a board to hold all the needed components. At its heart, there are three ULN2803A to provide enough transistors at the smallest possible space still allowing hand-soldering.
Using pulse-width modulation (PWM), the students were able to control the colour of their lights freely. The rest of the code was written during after-school meetups; an excerpt can be found here, along with a complete write-up of the project.
I’m now going to hand this blog post over to our copy editor, Janina, who is going to write up a translated version of the above in German. Janina, over to you…
[Ed. note: Nein, danke.]
The post Dance magic, dance appeared first on Raspberry Pi.
Hey folks, Rob from The MagPi here! Halloween is over and November has just begun, which means CHRISTMAS IS ALMOST HERE! It’s never too early to think about Christmas — I start in September, the moment mince pies hit shelves.
![]()
What most people seem to dread about Christmas is finding the right gifts, so I’m here to help you out. We’ve just released two new books: our Official Raspberry Pi Projects Book volume 4, and the brand-new Book of Making volume 1 from the team at HackSpace magazine!
Spoiler alert: it’s a book full of making
The Book of Making volume 1 contains 50 of the very best projects from HackSpace magazine, including awesome project showcases and amazing guides for building your own incredible creations. Expect to encounter trebuchets, custom drones, a homemade tandoori oven, and much more! And yes, there are some choice Raspberry Pi projects as well.
More projects, more guides, and more reviews!
Volume 4 of the Official Raspberry Pi Projects Book is once again jam-packed with Raspberry Pi goodness in its 200 pages, with projects, build guides, reviews, and a little refresher for beginners to the world of Raspberry Pi. Whether you’re new to Pi or have every single model, there’s something in there for you, no matter your skill level.
You can buy the Book of Making and the Official Raspberry Pi Projects Book volume 4 right now from the Raspberry Pi Press Store, and here’s the best part: they both have free worldwide shipping! They also roll up pretty neatly, in case you want to slot them into someone’s Christmas stocking. And you can also find them at our usual newsagents.
Both books are available as free PDF downloads, so you can try before you buy. Check out the Hackspace website for Book of Making’s PDF, and our website for the new Project Books one! When you purchase any of our publications, you contribute toward the hard work of the Raspberry Pi Foundation, so why not double your giving this holiday season by helping us put the power of digital making into the hands of people all over the world?
Anyway, that’s it for now — I’m off for more mince pies!
![]()
The post Brand-new books from The MagPi and HackSpace magazine appeared first on Raspberry Pi.
…remember, the 5th of November. Happy Guy Fawkes Night, Bonfire Night, Fireworks Night…Day!
In 1605, York-born Guy Fawkes was arrested, along with other conspirators of the Gunpowder Plot, for their attempt to blow up the House of Lords that, at the time, was occupied by members of parliament, including King James I.
![]()
To celebrate their king surviving the attempt on his life, residents of London lit bonfires, and this became a recognised custom across England on every 5 November to follow. 413 years on, we continue the tradition by burning effigies of Guy Fawkes on bonfires, setting off fireworks, and eating over-priced hotdogs while getting a little tipsy on mulled cider at council-organised events.
![]()
Guy Fawkes, in case you’re wondering, was sentenced to death and, after breaking his neck while climbing the gallows, was quartered, and his body parts were distributed to the four corners of the kingdom — another tradition at the time. Good thing we haven’t kept that one going!
“Okay, Alex, we get it. You like Bonfire Night. But what has this got to do with Raspberry Pi?”
I’m glad you asked.
While I do enjoy Bonfire Night, I’m not a massive fan of too many fireworks. Or rather, I’m not a fan of the way too many fireworks upset my cat Jimmy.
So when I saw this cute digital fireworks display by Mike ‘Recantha’ Horne, I cheered with delight. He says:
This is a nice little project that I wrote the code for a couple of Sundays ago. It uses the Pimoroni Mote to appear as fireworks and then uses Pygame to play the sound of fireworks as each Mote stick ‘explodes’ in a shower of sparkles! You can see the effect in the video below and see the code here. You can get hold of your own Mote from Pimoroni. This is all in aid of the Milton Keynes Raspberry Jam on 10 November, which is a “Fireworks Special”!
Mike’s project is a great example of using tech to overcome an everyday issue — in this case, letting me have pretty flashing lights in the dark that don’t scare my cat but still make me go “Oooh!” and “Aaah!”.
Fireworks on the Raspberry Pi with the Pimoroni Mote
Uploaded by Michael Horne on 2018-10-28.
If you’ve created any similar indoor versions of usually outdoor activities using a Raspberry Pi, now is the time to share them with us, either in the comments below or on social media.
The post Raspberry Pi would like you to remember… appeared first on Raspberry Pi.
A Raspberry Pi–powered arcade display with hidden interactive controls won over the crowds at Gamescom. Rosie Hattersley and Rob Zwetsloot got the inside scoop.
Pixel Maniacs is a Nuremberg-based games maker that started out making mobile apps. These days it specialises in games for PC, Xbox One, PlayStation, and Nintendo Switch. You Can’t Drive is its first foray into gaming with a Raspberry Pi.
If you’re going to add a little something extra to wow the crowd at the Gamescom video games trade fair, a Raspberry Pi is a surefire way of getting you noticed. And that’s the way Pixel Maniacs went about it.
The Nuremberg-based games developer retrofitted an arcade machine with a Raspberry Pi to showcase its intentionally silly Can’t Drive This precarious driving game at Gamescom.
This two-player co-operative game involves one player building the track while the other drives along it.
Complete with wrecking balls, explosions, an inconvenient number of walls, and the jeopardy of having to construct your road as you negotiate your way, at speed, across an ocean to the relative safety of the next lump of land, Can’t Drive This is a fast‑paced racing game.
Pixel Maniacs then took things up a notch by providing interactive elements, building a mock 4D arcade game (so-named because they feature interactive elements such as motion cabinets). The fourth dimension, in this case, saw the inclusion of a water spray, fan, and console lights. For its Gamescom debut, Pixel Maniacs presented Can’t Drive This in a retro arcade cabinet, where hordes of gaming fans gathered round its four-way split screen to enjoy the action.
Getting to the heart of the matter and replacing the original 1980s kit with modern-day processors and Pi-powered additions
Adding Raspberry Pi gaming to the mix was about aiding the game development process as much as anything. Andi Scholz, Pixel Maniacs’ software engineer, told The MagPi that the team wanted an LED matrix with 256 RGB LEDs to render sprite-sheet animations. “We knew we needed a powerful machine with enough RAM, and a huge community, to get the scripts running.”
Pixel Maniacs’ offices have several Raspberry Pi–controlled monitors and a soundboard, so the team knew the Pi’s potential.
The schematic for the 4D arcade machine, showing the importance of the Raspberry Pi as a controller.
The arcade version of the game runs off a gaming laptop cunningly hidden within the walls of the cabinet, while the Raspberry Pi delivers the game’s surprise elements such as an unexpected blast from a water spray. A fan can be triggered to simulate stormy weather, and lights start flashing crazily when the cars crash. Holtz explains that the laptop “constantly sends information about the game’s state to the Raspberry Pi, via a USB UART controller. The Pi reads these state messages, converts them, and sends according commands to the fans, water nozzle, camera, and the LED light matrix. So when players drive through water, the PC sends the info to the Pi, and [the latter] turns on the nozzle, spraying them.”
Having played your heart out, you get a photo-booth-style shot of you in full-on gaming action.
The arcade idea came about when Pixel Maniacs visited the offices of German gaming magazine M! Games and spied an abandoned, out-of-order 1980s arcade machine lurking unloved in a corner. Pixel Maniacs set about rejuvenating it, Da Doo Ron Ron soundtrack and all.
Ideas are one thing; standing up to the rigours of a full weekend’s uninterrupted gameplay at the world’s biggest games meet is something else. Holtz tells us, “The Raspberry Pi performed like a beast throughout the entire time. Gamescom was open from 9am till 8pm, so it had to run for eleven hours straight, without overheating or crashing. Fortunately, it did. None of the peripherals connected to the Pi had any problems, and we did not have a single crash.”
A Raspberry Pi 3B+ was used to trigger the water spray, lights, and fans, bringing an extra element to the gameplay, as well as rendering the arcade machine’s graphics.
Fans were enthusiastic too, with uniformly positive feedback, and one Gamescom attendee attempting to buy the arcade version there and then. As Andi Scholz says, though, you don’t sell your baby. Instead, Pixel Maniacs is demoing it at games conventions in Germany this autumn, before launching Can’t Drive This across gaming platforms at the end of the year.
This article was printed in The MagPi issue 75. Get your copy of The MagPi in stores now, or download it as a free PDF here.
The post Can’t Drive This, the 4D arcade machine appeared first on Raspberry Pi.
I am delighted to share some big news today. The Raspberry Pi Foundation is part of a consortium that has secured over £78 million in government funding to make sure every child in every school in England has access to a world-leading computing education.
Working with our partners, STEM Learning and the British Computer Society, we will establish a new National Centre for Computing Education, and deliver a comprehensive programme of support for computing teachers in primary and secondary schools. This will include resources, training, research, certification, and more.
![]()
All of the online resources and courses will be completely free for anyone to use. Face-to-face training will be available at no cost to teachers in priority schools, and at very low cost to teachers in other schools. We will also provide bursaries to ensure that schools can release teachers to take part in professional development.
![]()
This level of investment in computing education is unprecedented anywhere in the world. It is a once-in-a-generation opportunity to transform the way we teach computing and computer science.
The announcement follows the Royal Society’s report from last November, which drew attention to the scale of the challenge. The report was quickly followed by a commitment from the Chancellor in last year’s budget statement that the government would invest £100 million in computing education across the UK. Earlier this year, the Department for Education launched a procurement process focused on England, and today’s announcement is the outcome of that process.
![]()
The consortium has been tasked with delivering three pieces of work:
![]()
One of the things I am most excited about is the amazing coalition of partners that has come together around the plans. The consortium brings together subject expertise and knowledge, significant experience of creating brilliant learning experiences and resources, and a track record of delivering high-quality professional development for educators. But we can’t do it on our own.
For example, we’re working with the University of Cambridge team that created Isaac Physics to adapt and extend that platform and programme to support teachers and students of Computer Science A Level.
Our friends at Google have provided practical support and a grant of £1 million to help us create free online courses that will help teachers develop the knowledge and skills to teach computing and computer science.
![]()
We’re working with the Behavioural Insights Team to make it as easy as possible for teachers to get involved with the programme, and with FutureLearn to provide high-quality online courses.
We’ll also be working in partnership with industry, universities, and non-profits, pooling our expertise and resources to provide the support that educators and schools desperately want. That’s not just a vague promise. As part of the bid process, we secured specific commitments from over 60 organisations who pledged to work with us to make our vision a reality.
![]()
Over the coming weeks we’ll be sharing more about our plans. In the meantime, here’s how you can get involved:
![]()
Improving computing education should be a priority for every education system and every government in the world. This announcement is focused on computing in schools in England because it’s about funding that has come from the government for that purpose.
I am proud that the Raspberry Pi Foundation will be playing its part in transforming computing education in England. But our mission is global, and our commitment is that the resources and online courses we create will be freely available to anyone, anywhere in the world.
If you are a policy maker outside of England and want to talk about how we could collaborate to advance computing education in your country, please get in touch. We’d love to help.
The post A world-class computing education appeared first on Raspberry Pi.
Wireframe is our new twice-monthly magazine that lifts the lid on video games. In Wireframe, we look at how games are made, who makes them, and how you can make games of your own. And today, we’re releasing our very first issue!
Wireframe: the new magazine that lifts the lid on video games
Wireframe is our new twice-monthly #magazine that lifts the lid on video games. In #Wireframe, we look at how #games are made, who makes them, and how you can make games of your own.
In issue 1, Far Cry 4 director Alex Hutchinson talks to us about going indie. We look back at the British games industry’s turbulent early years; we explore how curves and probabilities shape the games we play; and we get hands-on with Nomada Studio’s forthcoming ethereal platformer, Gris.
![]()
Plus:
Cutting through the hype, Wireframe takes a more indie-focused, left-field angle than traditional games magazines. As well as news, reviews, and previews, we bring you in-depth features that uncover the stories behind your favourite games.
![]()
And on top of all that, we also help you create your own games! Our dedicated Toolbox section is packed with detailed tutorials and tips to guide you in your own game development projects.
![]()
Raspberry Pi is all about making computing and digital making accessible to everyone, and in Wireframe, we show you how programming, art, music, and design come together to make the video games you love to play — and how you can use these elements to build games yourself.
We want everyone to enjoy Wireframe and learn more about creating video games, so from today, you’ll also be able to download a digital copy of issue 1 of Wireframe for free. Get all the features, guides, and lively opinion pieces of our paper-and-ink edition as a handy PDF from our website.
You can find the print edition of Wireframe issue 1 in select UK newsagents and supermarkets from today, priced at just £3. Subscribers also save money on the cover price, with an introductory offer of twelve issues for just £12.
For more information, and to find out how to order Wireframe from outside the UK, visit wfmag.cc.
The post Wireframe issue 1 is out now! appeared first on Raspberry Pi.
One of the neat new features of the Raspberry Pi 3 Model B+ is its support for IEEE 802.3af Power-over-Ethernet (PoE). This standard allows up to 13W of power to be delivered over the twisted pairs in an Ethernet cable without interfering with the transmission of data. The Raspberry Pi board itself provides a PoE-capable Ethernet jack and circuit protection components; the power regulation electronics, which would be too costly and bulky to include on the main board, live on a separate HAT.
The Raspberry Pi 3B+ wearing a PoE HAT
When we announced the 3B+, we revealed that an official Raspberry Pi PoE HAT was in the works and, after a few unforeseen production delays, we we released this HAT at the end of August. Feedback was, and remains, generally very positive; but fairly quickly, we started to see some reports from users who were experiencing issues.
The problem they reported was this: when powering certain Raspberry Pi units via the PoE HAT, it was not possible to draw the full rated current from the USB ports.
Our 5V USB output, denoted VBUS, is fed by the main 5V rail via a current-limiting switch. This switch is designed to protect the system by detecting short-circuit, over-current, or reverse-voltage events, and disconnecting the USB ports in response. Our current-limiting switch is set to a limit of just over 1A.
Despite the PoE HAT’s ability to supply up to 2.5A, the experiments we ran in response to the reports suggested that, when it was used to supply some boards, the USB supply would trip out at a much lower current. Mice and keyboards worked fine, but higher-current devices such as wireless dongles and hard disks would fail.
Our initial theory was that the PoE HAT was injecting noise into the Pi via the 5V rail, and that this was somehow upsetting the switch. However, we were able to rule this out, since we found no evidence of high-frequency noise at the input to the switch. Another theory was that the flyback transformer’s close physical proximity to the switch was somehow coupling noise in. But we were able to rule this out as well: we showed that the behaviour persisted when the HAT was connected using a right-angle header, which moves the power electronics away from the Raspberry Pi.
The PoE HAT works by converting the incoming 48V from the Ethernet lines to 5V using a flyback transformer. In simple terms, the primary side of the transformer is switched across the 48V, and energy is stored in the transformer in the form of a magnetic field. The primary is then disconnected and the magnetic field collapses. This changing magnetic field induces a voltage (scaled based on the transformer turns ratio) in the secondary, which is rectified by a schottky diode and output capacitance. This output capacitance is formed from the output capacitors on the PoE HAT itself, the capacitors on the Raspberry Pi 5V rail, and, when the switch is on, the VBUS reservoir capacitors.
The switching frequency of the flyback transformer is relatively low (~100 kHz). This means that when the system is under load, each switching cycle must transfer a relatively large amount of energy. During each cycle, the 5V rail is discharged according to the load on the system, and charged up again by the flyback’s secondary, dumping more energy into the caps. In each cycle, a spike of high current is pushed through the output diode into the capacitors.
To cut a long story short, putting a current probe on the input to switch showed large current spikes, as energy from the flyback made its way into the VBUS reservoir capacitors. This was expected. However, it turned out that the switch was erroneously registering these spikes as true over-current events. The switch is supposed to have a filter that allows it to ignore brief spikes, but we discovered that only one of the two approved versions of the switch did this correctly.

Current into switch (yellow) and VBUS voltage (blue)
It’s a truism that if you don’t test an aspect of a design, it will certainly be broken. Those of us with a Broadcom background sometimes refer to this as Alan Morgan’s rule, after its most enthusiastic proponent.
Extensive testing over all configurations, operating parameters, and use cases is the only way to minimise the likelihood of releasing a product with a hardware issue. Even relatively simple hardware can end up catching you out by throwing up some unexpected bug or issue. And even the big guys with huge development teams and test labs occasionally mess things up — anyone remember the Pentium FDIV bug?
We made several mistakes with the first version of the PoE HAT:
It’s embarrassing to have released a product with a bug like this, but it’s a lesson well-learned, and we will be improving our internal processes to prevent a recurrence.
Fortunately, this bug turned out to be easy to fix. We designed an L-C filter to apply further smoothing to the output current from the HAT. The filter consists of a little extra input and output capacitance and a 4.7µH inductor (chosen to have a suitable current rating and DC resistance), as well as 330mR resistor in parallel to provide damping. We were even able to wrap the mod up in a little mezzanine PCB that fits neatly underneath the board.
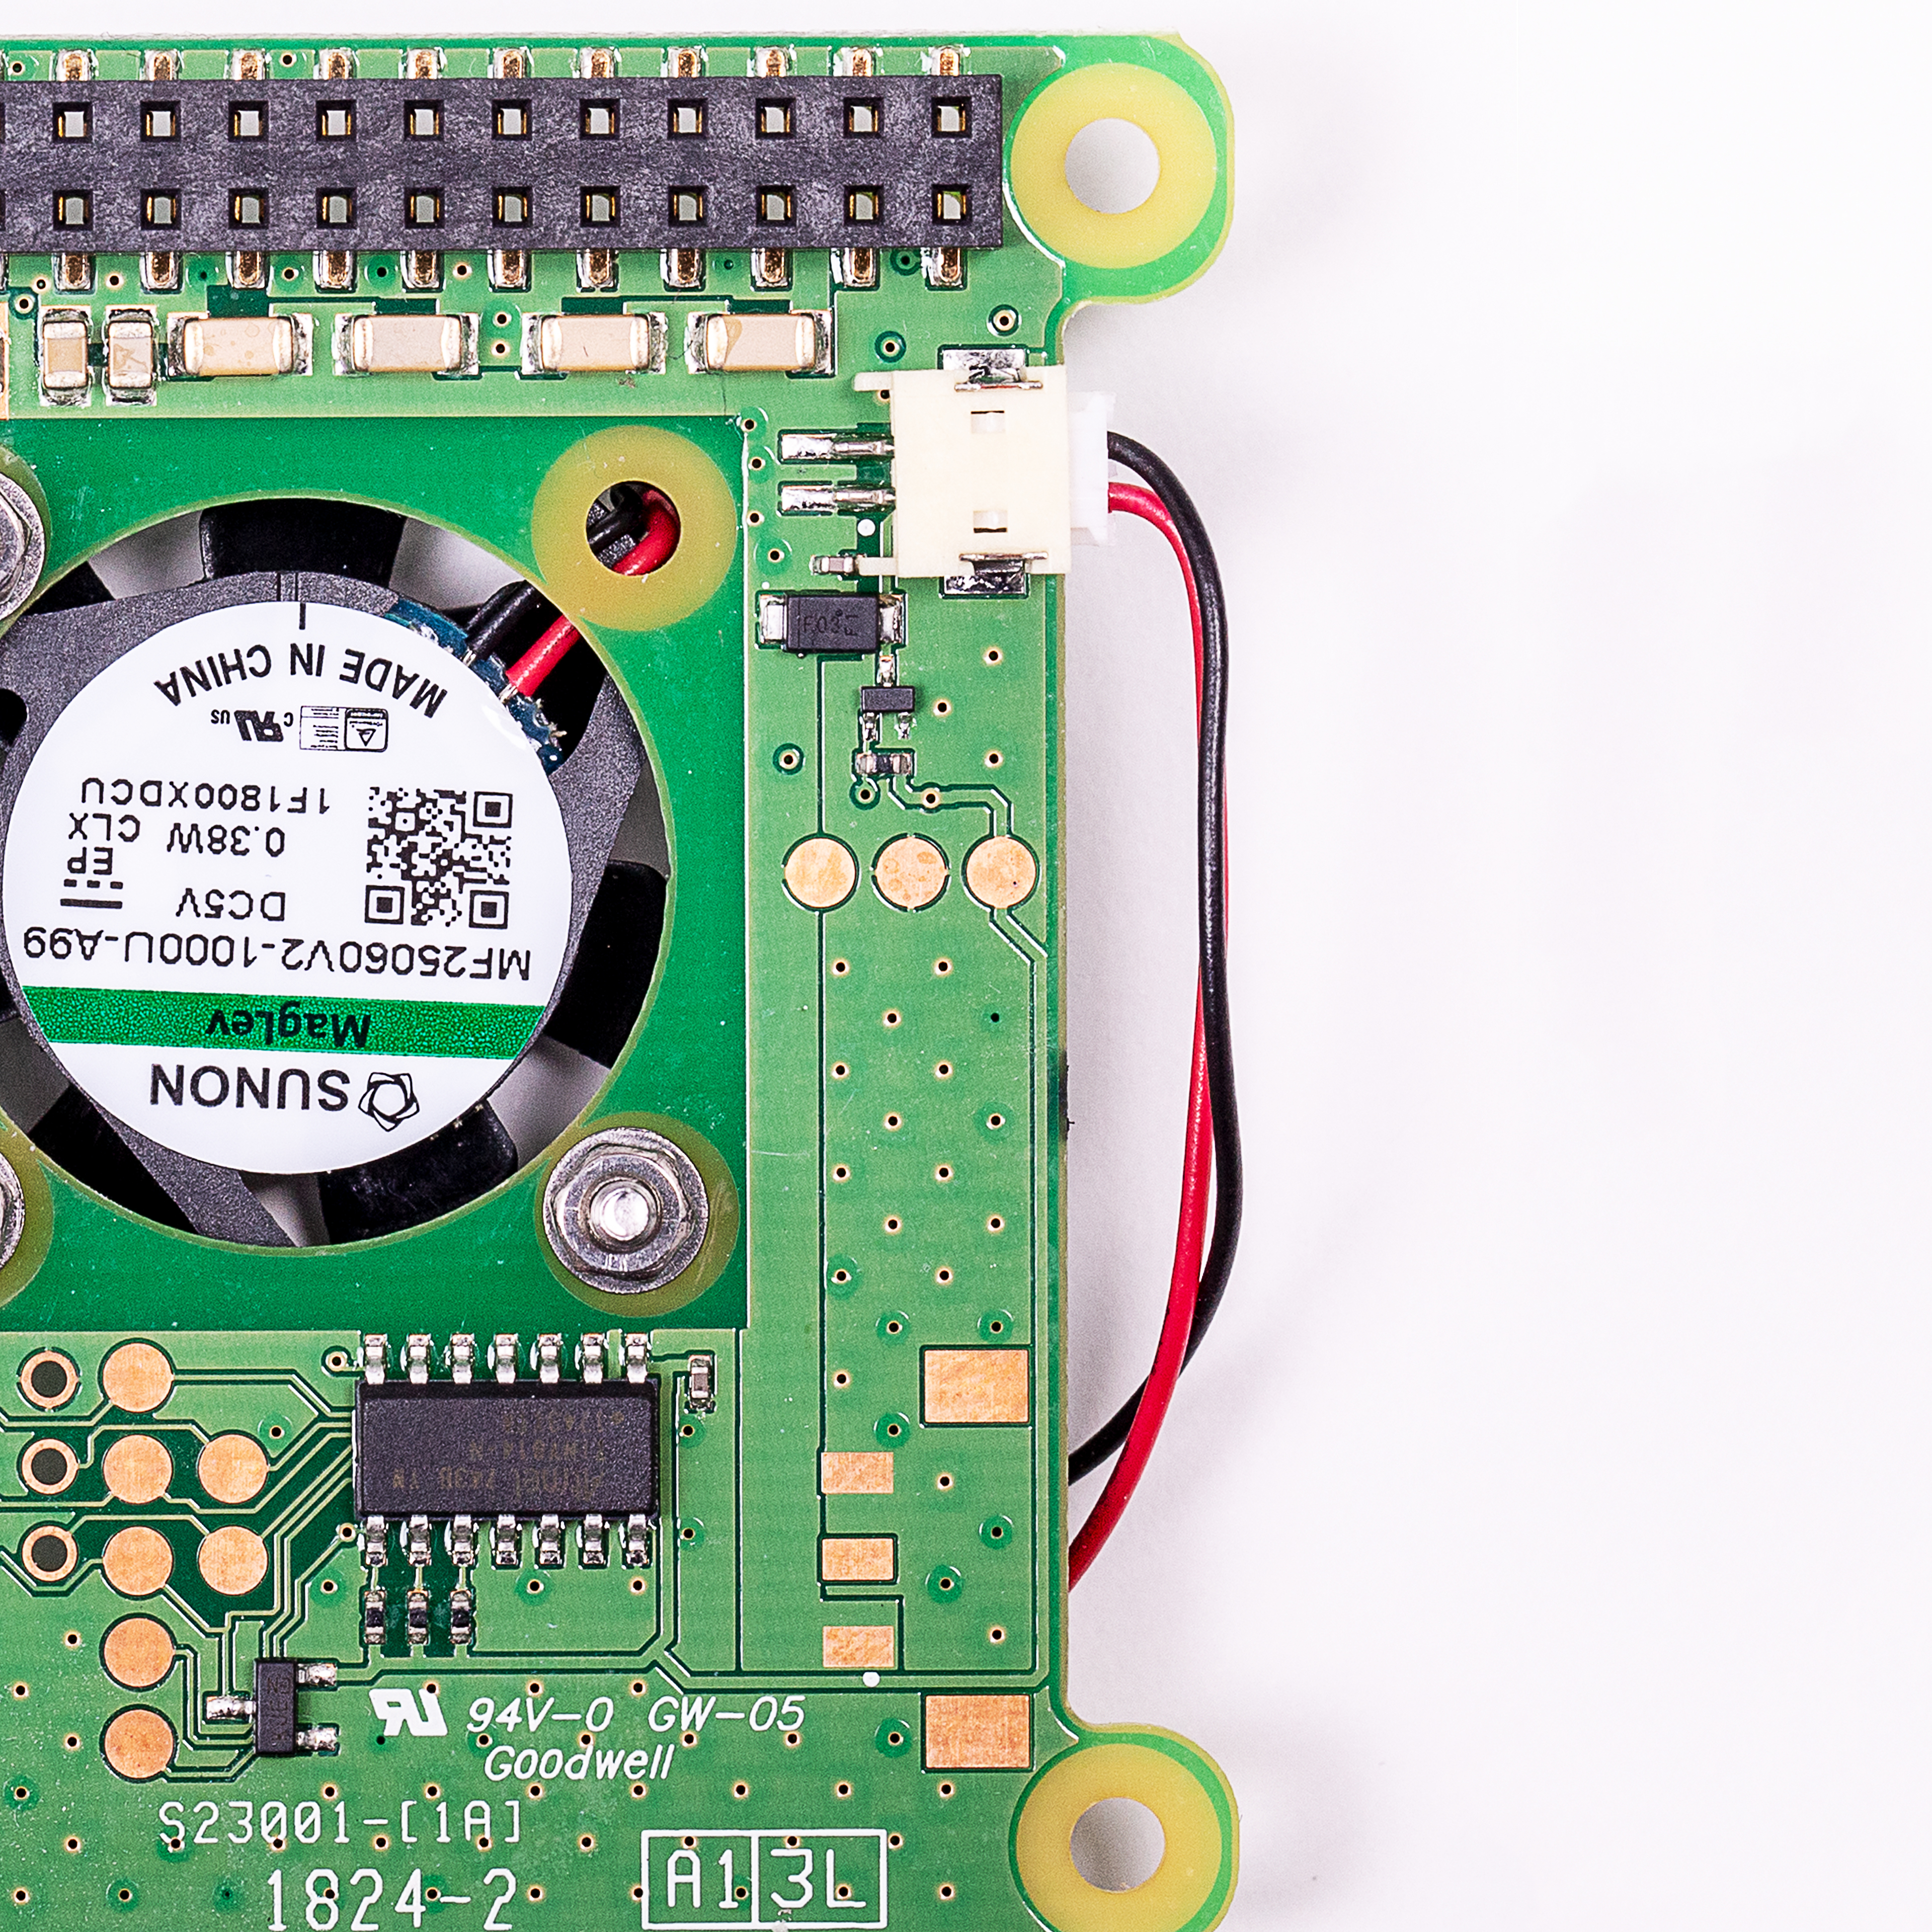
The original, un-modded board
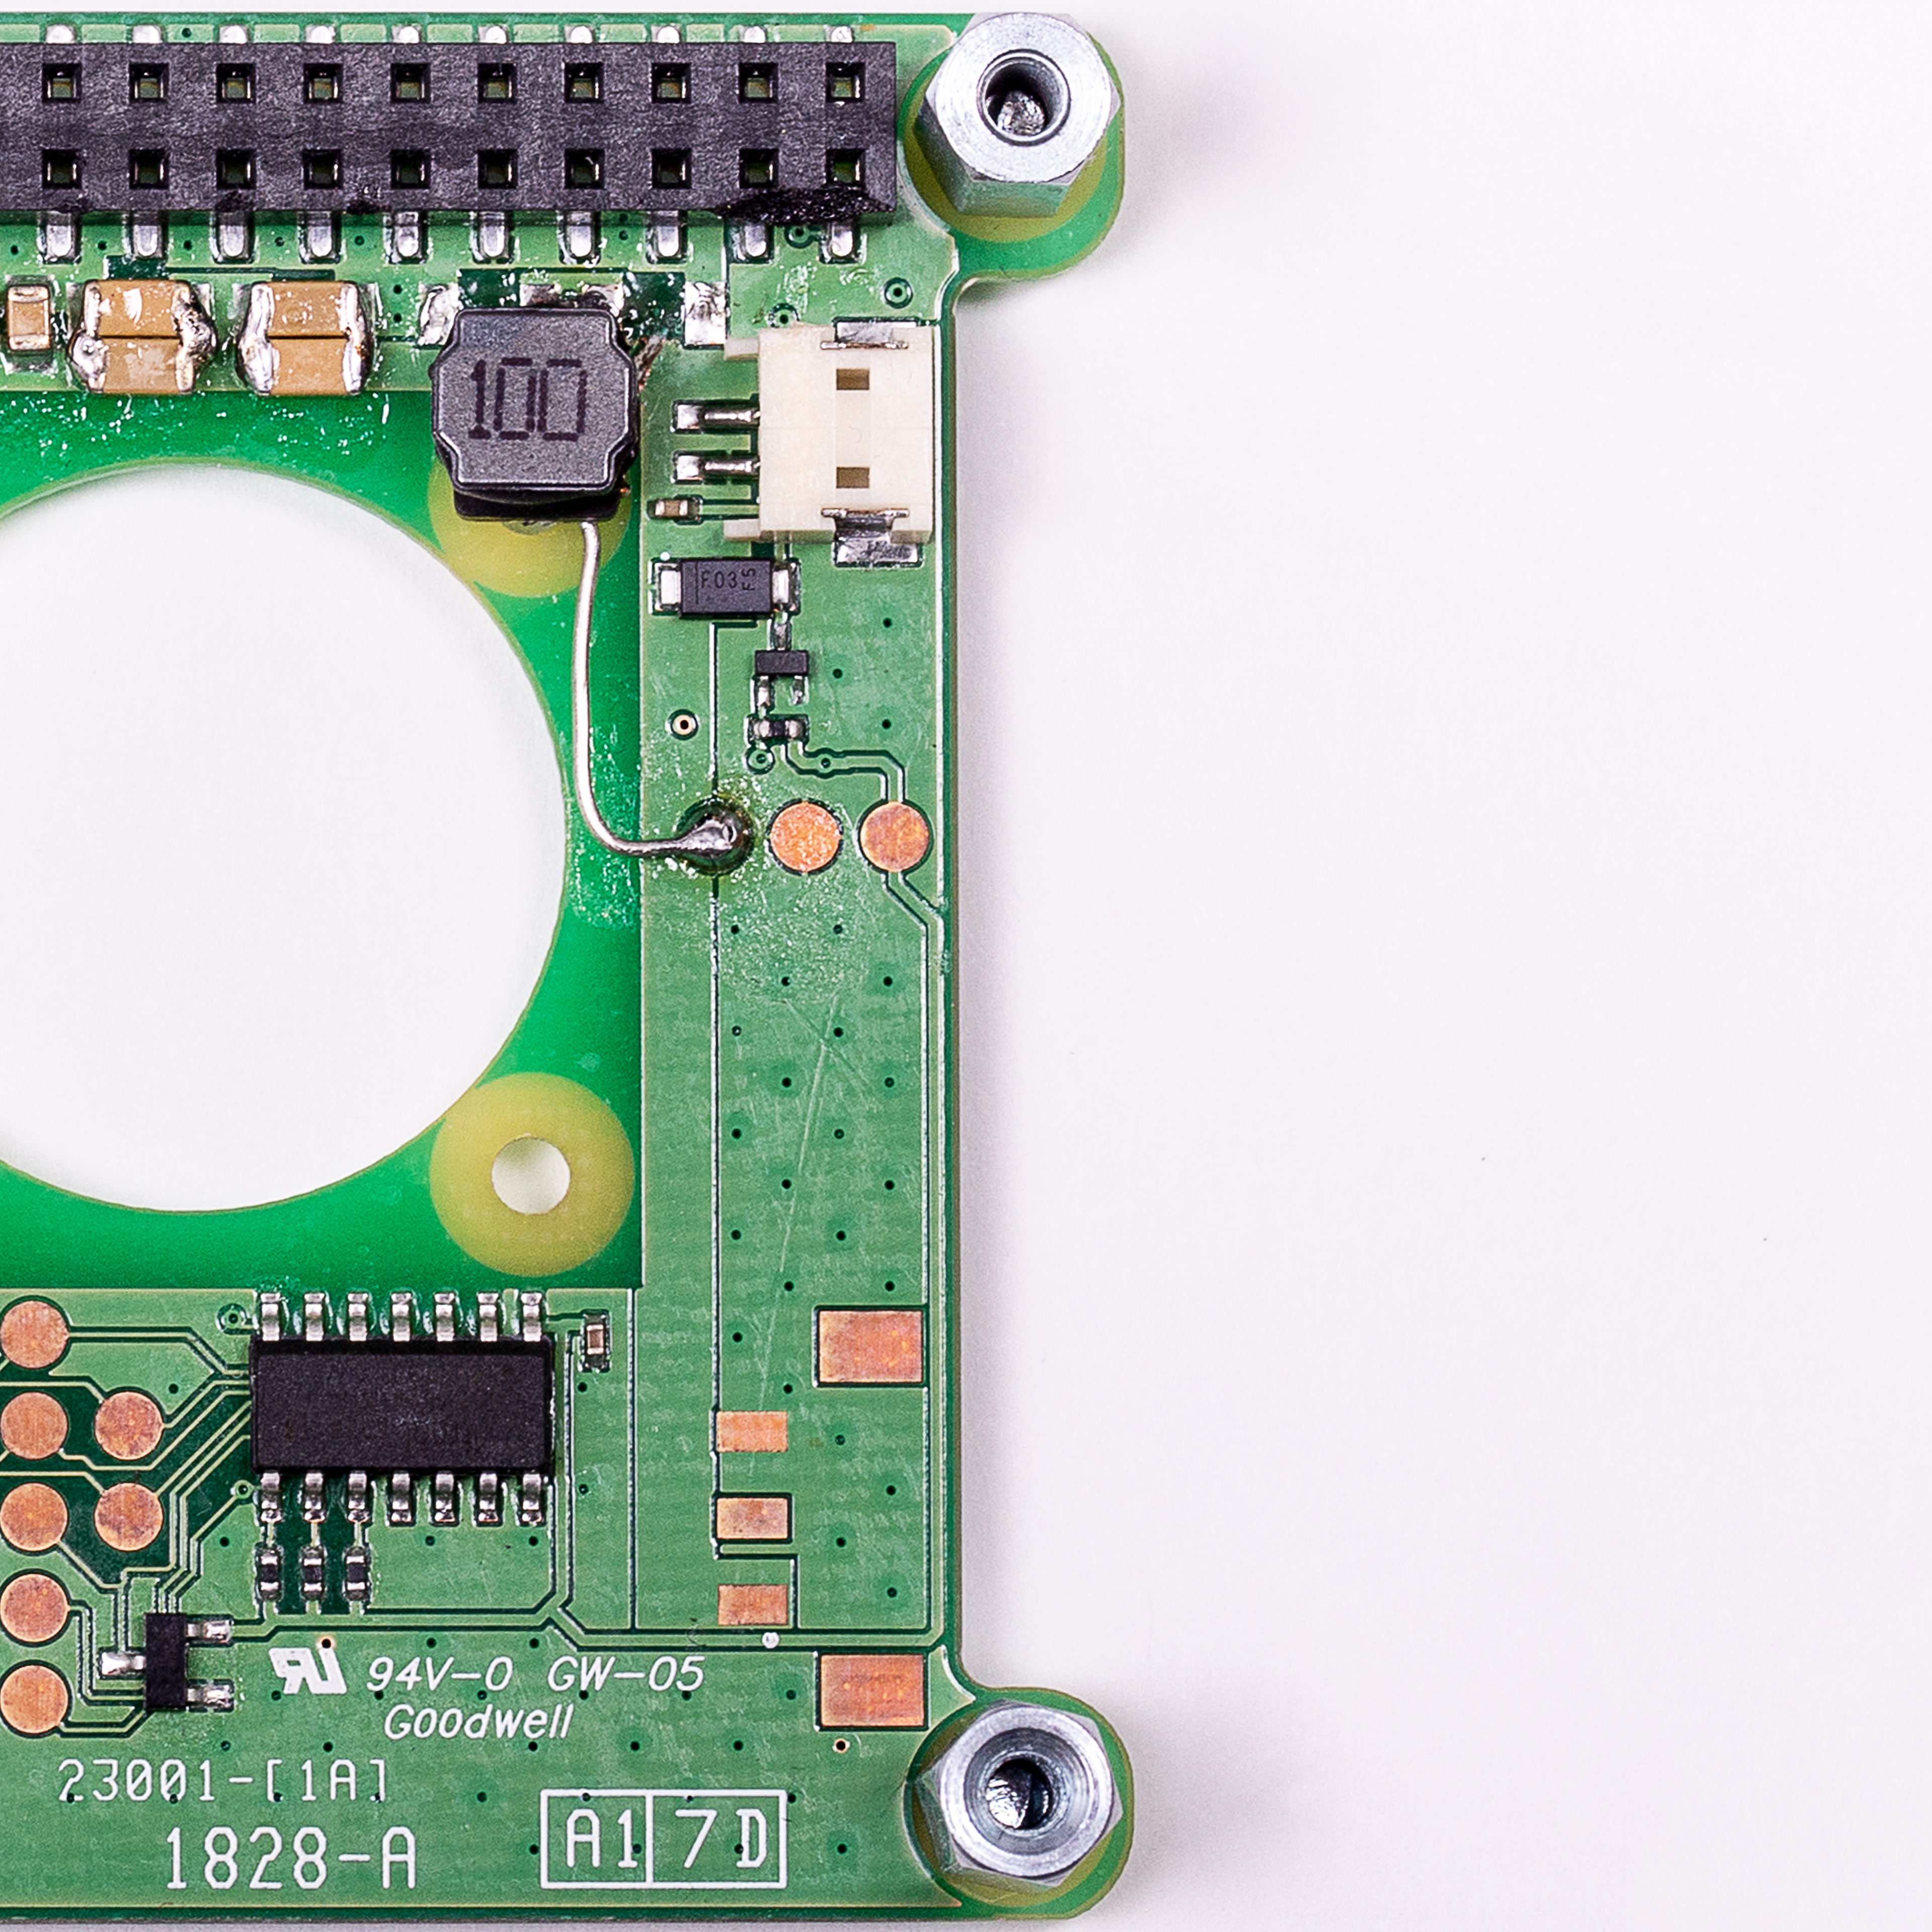
Hand-modded board with L-C filter
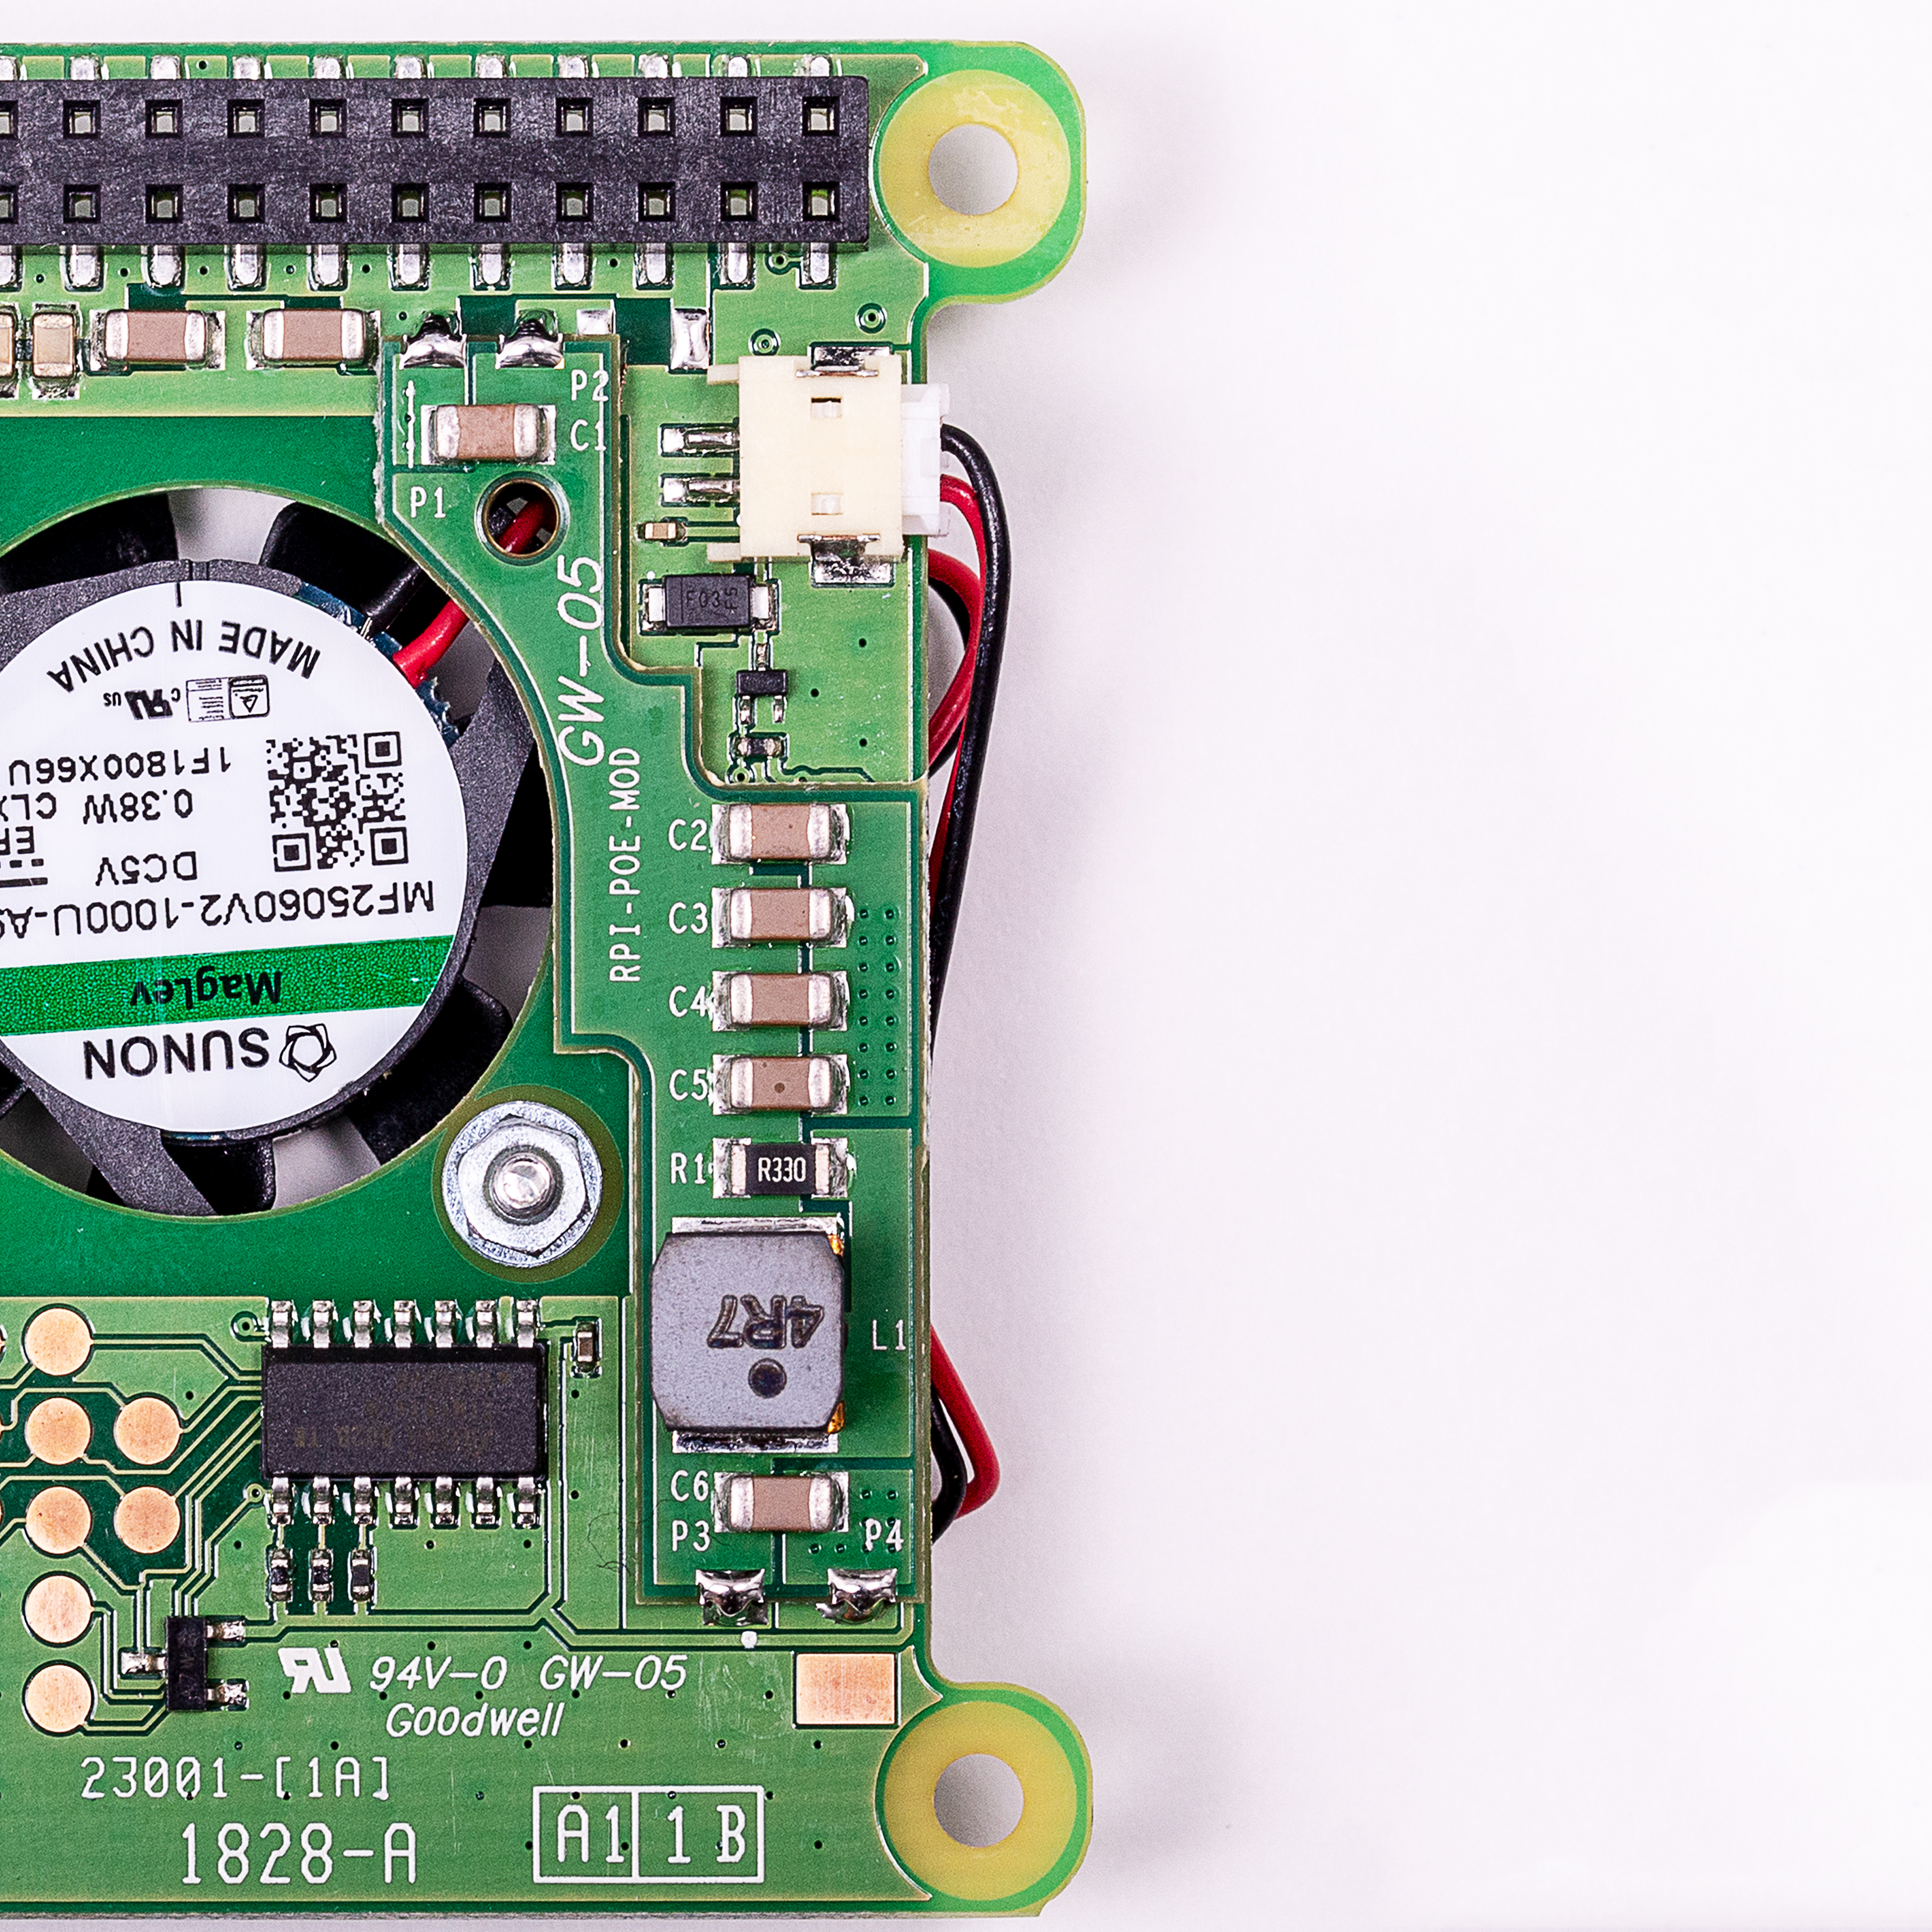
Final board with mezzanine
Once we had confirmed that there was a problem with the PoE HAT, we took the product off sale, and recalled and reworked the outstanding units. We are now happy to announce that most Approved Resellers should now have the revised boards in stock. We believe that most people who have been affected by this issue have already returned their PoE HATs for a refund; if you’re experiencing issues and haven’t yet returned your product, you can get in touch with your reseller to arrange a replacement.
I’d like to thank the members of the Raspberry Pi engineering team, our contract manufacturing partners Taijie, our licensee partners and Approved Resellers, and also the community members who kindly tested prototypes of the fixed board design. This hasn’t been the easiest product launch in our history, but hopefully the lessons learned have set us up well for the future.
The post Anatomy of a product quality issue: PoE HAT appeared first on Raspberry Pi.
The University of Michigan is home to the largest stadium in the USA (the second-largest in the world!). So what better place to test for spectator-induced seismic activity than The Big House?
![]()
University of Michigan geology professor Ben van der Pluijm decided to make waves by measuring the seismic activity produced during games at the university’s 107601 person-capacity stadium. Because earthquakes are (thankfully) very rare in the Midwest, and therefore very rarely experienced by van der Pluijm’s introductory geology class, he hoped this approach would make the movement of the Earth more accessible to his students.
“The bottom line was, I wanted something to show people that the Earth just shakes from all kinds of interactions,” explained van der Pluijm in his interview with The Michigan Daily. “All kinds of activity makes the Earth shake.”
![]()
To measure the seismic activity, van der Pluijm used a Raspberry Pi, placing it on a flat concrete surface within the stadium.
Van der Pluijm installed a small machine called a Raspberry Pi computer in the stadium. He said his only requirements were that it needed to be able to plug into the internet and set up on a concrete floor. “Then it sits there and does its thing,” he said. “In fact, it probably does its thing right now.”
He then sent freshman student Sahil Tolia to some games to record the moments of spectator movement and celebration, so that these could be compared with the seismic activity that the Pi registers.
We’re not sure whether Professor van der Pluijm plans on releasing his findings to the outside world, or whether he’ll keep them a close secret with his introductory students, but we hope for the former!
We’re not sure what other technology van der Pluijm uses in conjunction with the Raspberry Pi, but it’s fairly easy to create your own seismic activity reader using our board. You can purchase the Raspberry Shake, an add-on board for the Pi that has vertical and horizontal geophones, MEMs accelerometers, and omnidirectional differential pressure transducers. Or you can fashion something at home, for example by taking hints from this project by Carlo Cristini, which uses household items to register movement.
The post I feel the earth move under my feet (in Michigan) appeared first on Raspberry Pi.
Two-factor authentication continues to provide our online selves with more security for our email and online banking. Meanwhile, in the physical world, protecting our valuables is now all about three-factor authentication.
![]()
Not sure what I mean? Here’s a video from Switched On Network that demonstrates how to use a Raspberry Pi to build a three-factor door lock comprised of an RFID keyring, 6-digit passcode, and one-time access code sent to your mobile phone.
Note that this is a fairly long video, so feel free to skip it for now and read my rather snazzy tl;dr. You can come back to the video later, with a cup of tea and 20 minutes to spare. It’ll be worth it, I promise.
Build a Raspberry Pi Smart Door Lock Security System with Three Factor Authentication!
https://amzn.to/2A98EaZ (UK) / https://amzn.to/2LDlxyc (US) – Get a free audiobook with a 30-day trial of Audible from Amazon! Build the ultimate door lock system, effectively turning your office or bedroom into a high-security vault!
To build Switched On Network’s three-factor door lock, you need to source a Raspberry Pi 3, a USB RFID reader and fob, a touchscreen, a electronic door strike, and a relay switch. You also need a few other extras, such as a power supply and a glue gun.
![]()
Once you’ve installed the appropriate drivers (if necessary) for your screen, and rotated the display by 90 degrees, you can skip ahead a few steps by installing the Python script from Switched On Network’s GitHub repo! Cheers!
![]()
Then for the physical build: you need to attach the door strike, leads, and whatnot to the Pi — and all that together to the door and door frame. Again, I won’t go into the details, since that’s where the video excels.
![]()
The end result is a superior door lock that requires you to remember both your keys and your phone in order to open it. And while we’d never suggest using this tech to secure your house from the outside, it’s a perfect setup for inside doors to offices or basement lairs.
Everyone should have a lair.
Now go watch the video!
The post Three-factor authentication is the new two-factor authentication appeared first on Raspberry Pi.
Last week was a very exciting week for us, with the announcement of the National Centre for Computing Education: funded programmes for computing teachers and students for the next four years, to really support the growth and profile of our subject. For me and many others involved in this field over the last decade, it’s an amazing opportunity to have this level of financial support for Computing — something we could previously only dream of. Everybody at Raspberry Pi is very excited about being involved in this important work!
A new Computing curriculum was introduced in England in September 2014, and it comprises three strands: computer science, information technology, and digital literacy. The latter two have been taught in schools for many years, but the computer science strand had not been taught in schools to the pre-16 age group since the 1980s.
![]()
Two Royal Society reports have been widely influential. Firstly, the Shut Down or Restart report (2012) instigated the curriculum change. To support teachers implementing the new curriculum, the CAS Network of Excellence received a modest amount of funding from 2013–2018; the network has had a great impact on the field already, but clearly more government input was needed. The second report, After the Reboot (2017), evaluated current computing education in schools in the UK. It highlighted the challenges faced by teachers who felt unprepared to deliver the Computing curriculum, and recommended that significant government funding be provided to support teachers — and this has now happened! The new programme gives us the opportunity to reach all computing teachers, and to make massive improvements to computing education around the country.
The National Centre, together with specific support for GCSE and A-Level Computer Science, is a government-funded programme of training and support for computing education. It will lead to a great education in the subject for every child from the beginning of primary school to the end of secondary school, enabling them to develop the valuable skills they need, whether or not they choose computing-related careers.
![]()
Since last week’s announcement, I’ve received lots of questions from teachers and others about exactly what will be happening and who will be doing the work, and I’ve gathered together answers to many of these questions here. Read on to learn more about our plans.
If you are a primary teacher or a secondary teacher at Key Stage 3 or non-GCSE KS4, delivering Computing, either as a classroom teacher or as a specialist, you will be able to access professional learning opportunities (CPD) and resources in your region. Initially these will be available via partners working with us, and from September 2019, you will be able to access them via 40 Computing Hubs.
![]()
You will be able to register for a certificate and work towards it through a range of activities, working with colleagues and in your region. There will also be a range of online courses to support you at your own pace. Some of these are available now, and many more are to be launched over the next two years.
If you teach GCSE Computer Science, or you’d like to, there is a unique programme just for you. Bursaries will be available to enable you to take a series of face-to-face and online courses that best suit your needs: these will range from courses aimed at the completely new-to-GCSE teacher to advanced courses for more experienced teachers who are aiming to stretch and challenge students and to hone their subject knowledge.
![]()
The online courses will be free for everyone, forever. There will be a diagnostic test to help you plan your journey, and a final assessment to measure your success. You’ll be able to sign up for this programme from January.
If you teach A Level Computer Science, or would like to, you will have access to comprehensive resources for students and teachers. There will also be a range of face-to-face events for both students and teachers. These will be starting shortly, so watch out for more news!
![]()
It will take a few months for the Computing Hubs and CPD provision to be available at scale, but in the meantime, there is much within our existing networks that computing teachers can engage with right now: CAS hubs and other events, Code Clubs in schools, STEM Learning training, and our online courses are some examples.
We also announced last week that we are looking for new team members to implement our part of the work.
Our role involves developing a comprehensive set of resources, lesson plans, and schemes of work from Key Stages 1–4, drawing on the best of existing materials plus some new ones. We will also develop all the online courses. We need content writers to help us with both of these areas. We are working on producing newsletters, case studies, and other publications about evidence-based practice, and this will also be part of the new team’s work. At the Raspberry Pi Foundation, we will be leading on the A Level Computer Science programme content, so we have opportunities for people with the skills and experience to focus on this area.
![]()
Many of these roles are available if you want to work remotely, but more senior jobs will involve regular days in Cambridge. We also have fixed-term, part-time work available. You can find all our current job openings on this page.
Finally, as a team, we want to visit lots of schools to see what you need and listen to your thoughts, so that we can get our work right for you. If you’d like to support us in that, please get in touch by emailing sue@raspberrypi.org.
STEM Learning, one of our two consortium partners, will be commissioning the 40 Hubs, and they will also be responsible for face-to-face training. The Hubs will become centres of excellence for computing, where teachers can find regional support. Existing CAS (Computing At School) communities will be linked to the 40 Hubs, and CAS Hubs will also play a really important part in the new structure. Our other partner, BCS, will be supporting certification, building on the work they have already done with the BCS Certificate in Computer Science Teaching.
![]()
You will be able to access everything you need on the website of the National Centre for Computing Education, where you’ll soon be able to learn where to find your Computing Hub or local CAS communities and discover what is happening in your region.
Across the consortium we have teams of people who are deeply committed to computing, to Computing At School (CAS), and to teaching; most of us have recent teaching experience ourselves. Our first priority is to work with teachers collegially to meet your needs and make life easier for you. So follow the National Centre on Twitter, talk to us, and give us your feedback!
This post has been all about teachers in England, but our free online resources will be available to anyone, anywhere in the world. If you want to talk to us about the needs in your country, do get in touch.
The post The National Centre for Computing Education: your questions answered appeared first on Raspberry Pi.
TL;DR: you can now get the 1.4GHz clock speed, 5GHz wireless networking and improved thermals of Raspberry Pi 3B+ in a smaller form factor, and at the smaller price of $25. Meet the Raspberry Pi 3 Model A+.
New Product Alert: Raspberry Pi 3A+
You can now get the 1.4GHz clock speed, 5GHz wireless networking and improved thermals of Raspberry Pi 3B+ in a smaller form factor, and at the smaller price of $25. Meet the Raspberry Pi 3 Model A+.
Long-time readers will recall that back in 2014 the original Raspberry Pi 1 Model B+ was followed closely by a cut-down Model A+. By halving the RAM to 256MB, and removing the USB hub and Ethernet controller, we were able to hit a lower price point, and squeeze the product down to the size of a HAT.
Small but perfectly formed
Although we didn’t make A+ form-factor versions of Raspberry Pi 2 or 3, it has been one of our most frequently requested “missing” products. Now, with Raspberry Pi 3 Model B+ shipping in volume, we’re able to fill that gap by releasing Raspberry Pi 3 Model A+.
Raspberry Pi 3 Model A+ incorporates most of the neat enhancements we made to its big brother, and features:
Like its big brother, the entire board is certified as a radio module under FCC rules, which in turn will significantly reduce the cost of conformance testing Raspberry Pi–based products.
![]()
In some ways this is rather a poignant product for us. Back in March, we explained that the 3+ platform is the final iteration of the “classic” Raspberry Pi: whatever we do next will of necessity be less of an evolution, because it will need new core silicon, on a new process node, with new memory technology. So 3A+ is about closing things out in style, answering one of our most frequent customer requests, and clearing the decks so we can start to think seriously about what comes next.
Our official cases for Raspberry Pi 3B and 3B+ and Raspberry Pi Zero have been very popular, so of course we wanted to offer a case for this new device.
Unfortunately it’s not quite ready yet, but as you can see it’s rather pretty: we’re expecting it to be available from the start of December, just in time to serve as a stocking filler for the geek in your life.
The post New product: Raspberry Pi 3 Model A+ on sale now at $25 appeared first on Raspberry Pi.
Today we’re releasing a new update for Raspbian, including a multimedia player, updated Thonny, and more. Here’s Simon with everything you need to know.
Updating Raspbian on your Raspberry Pi || Raspberry Pi Foundation
How to update to the latest version of Raspbian on your Raspberry Pi.
When I first joined Raspberry Pi, back in the dim and distant past (in reality 2014, but it does seem a long time ago now…), and I started looking at Raspbian, I made a list of the additional features and applications that I thought it needed to be a “complete” modern desktop operating system. Over the years, we’ve managed to tick off most of the items on that list, but one glaring omission has been nagging at me all this time: a decent media player. Windows has Windows Media Player; MacOS has QuickTime Player and iTunes; but we’ve had a big hole where something similar ought to be for Raspbian. It’s been a common request on the forums, and while we’ve had bits and pieces that do some of the job, like the command line OMXPlayer application, we really wanted a nice GUI-based media player.
VLC is one of those programs that “just works” for media playback; it is cross-platform, it has a nice interface, and it plays back pretty much anything you throw at it. It was the player I really wanted to use in Raspbian — but it was unable to access VideoCore’s video decoding hardware, and the software video codecs in VLC were too slow to be anything more than irritating when running on Raspberry Pi, so it really wasn’t worth shipping it. Until now.
After a lot of work (by people far cleverer than me), we are now able to announce that Raspbian includes a fully hardware-accelerated version of VLC. It plays most audio file formats; it uses software codecs for many video formats, and it uses VideoCore’s video engine to accelerate playback of H.264, MPEG-2 and VC-1 video. (Note that you will need to buy additional codec licences for MPEG and VC-1; if you’ve already bought a licence to enable hardware acceleration in OMXPlayer and Kodi, this licence will also enable these codecs for VLC.)
![]()
This is still a work in progress — we’ve got most of the major bugs out, but there will most likely be the odd glitch, and you’ll probably find that Pi Zero and Pi 1 will still struggle with some content. But once you’ve updated your Pi, you should find that double-clicking on a video file will open it in VLC and play it back with decent quality.
A couple of years ago, as part of the list of additional features mentioned above, we looked for a nicer Python development environment than IDLE, and we found Thonny — a really elegant combination of a user-friendly IDE with features that are also useful to expert developers. It’s been our standard IDE shipped with Raspbian ever since, and Aivar Annamaa, the developer, has been very responsive to our feedback and requests for new features.
He’s recently released version 3 of Thonny, and this is now the version in Raspbian. Version 3 offers a lot of useful new debugging features, such as breakpoints and an Assistant feature that analyses your code to find bugs that Python’s syntax checker misses. There is a lot more information about Thonny 3 on Aivar’s website — it’s well worth a read.
![]()
We’ve also made one user interface change this time. We’ve always offered the choice between running Thonny in its regular mode, and a cut-down “simple” mode for beginners, which removes the menus and gives a fixed screen layout. Up until now, switching between the two has happened via different entries in the main Raspberry Pi menu, but that was a bit clumsy. In the new version, simple mode is the default, and you can switch Thonny into regular mode by clicking the link in the top right-hand corner of the window; if you want to switch back to simple mode, select it on the General tab of the Thonny options dialogue, which is available in the Tools menu. (Thonny will always start in the last mode you selected.)
One of the other changes we’ve made this time is one that hopefully most people won’t notice!
The configuration of the Raspberry Pi desktop has always been a bit of a mess. Due to the fact that the underlying LXDE desktop environment is made up of a bunch of different programs all running together, trying to set up something like the system font or the highlight colour involves making changes to several configuration files at once. This is why pretty much the first thing I did was to write the Appearance Settings application to try to make this easier than digging around in multiple config files.
Linux desktop applications are supposed to have a global configuration file (usually in the directory /etc/xdg/) that takes effect unless overridden by a local configuration file (in the hidden .config subdirectory of the user’s home directory). Unfortunately, not all the desktop components adhered to this specification. As a result, getting the Appearance Settings application to work involved quite a bit of kludging things about under the hood, and one of these kludges was to always keep a local copy of each of the configuration files and to ignore the global versions.
This worked, but it had the undesirable side effect that any time we wanted to update the appearance of the desktop, we had to delete all the local configuration files so they could be replaced by the new ones, and this meant that any changes the user had made to the configuration were lost. This was quite annoying for many people, so with this release, we’ve tried to stop doing that!
Most of the desktop components have now been modified so that they correctly read the global configuration files, and for future releases, we are going to try to just modify the global versions of these files and not touch the local ones. If we update the configuration, you will see a message informing you that this has happened, but your local files will be left unchanged. To make sure you get the latest configuration, launch Appearance Settings and choose one of the buttons on the “Defaults” tab; doing this will set your desktop to our currently recommended defaults. But if you want to stick with what you’ve already got, just don’t do that! You can even try the new defaults out: press one of the defaults buttons, and if you don’t like the results, just hit Cancel, and your previous configuration will be restored.
![]()
One final point on this: in order to get this all to work properly in future, we have had to delete a few local files on this occasion. These are files that most people will never have modified anyway, so this will hopefully not present any problems. But just in case, they have been backed up in the oldconffiles subdirectory of the user’s home directory.
When I first started working on Raspbian, the desktop image file was just under 1GB in size. This has gradually crept up over the years, and now it’s around 1.75GB. While downloading a file of this size isn’t a significant problem for someone with fibre broadband, many people are on slower connections where such large downloads can take hours.
In order to try and address this, for all future releases we will now release two separate images. The default Raspbian release is now a minimal install — it gives you the desktop, the Chromium browser, the VLC media player, Python, and some accessory programs. Running alongside this is the “Raspbian Full” image, which also includes all our recommended programs: LibreOffice, Scratch, SonicPi, Thonny, Mathematica, and various others.
The Recommended Software program that we launched in the last release can be used to install or uninstall any of the additional programs that are in the full image; if you download the minimal image and check all the options in Recommended Software, you will end up with the full image, and vice versa.
![]()
Hopefully, this means that downloading Raspbian will be easier for people on slower connections, and that you can easily add just the programs you want. The full image is provided for everyone who wants to get everything in one go, or who won’t have access to the internet to download additional programs once their Pi is up and running.
We’ll also continue to produce the existing Raspbian Lite image for people who only want a command-line version with no desktop.
Both the new images are available to download from the usual place on our site.
To update an existing image, open a terminal window and use the usual commands:
sudo apt-get update
sudo apt-get dist-upgrade
To install the new VLC media player from a terminal, enter:
sudo apt-get update
sudo apt-get install vlc
As ever, all feedback is welcome, so please leave a comment below!
The post A new Raspbian update: multimedia, Python and more appeared first on Raspberry Pi.
There are many things I do not know about Argentina. Until today, one of them was this: if you’re in an Argentinian bank, you may not use electronic devices. That includes phones and e-readers like the Kindle (and I can’t be the only person here who is pretty much surgically attached to their Kindle).
Enter the literature dispenser.
![]()
Roni Bandini, an Argentinian author, found himself twiddling his thumbs in a Buenos Aires bank queue, and thought that perhaps the 50 other people he could see in the same situation might benefit from a little distraction. How about a machine, owned by the bank, that could furnish you with one of a curated selection of short stories at the touch of a button? The short stories bit was easy: he writes them for a living.
Expendedor de literatura en tickets (invento argentino)
Expendedor de literatura en tickets desarrollado por @ronibandini Versión 2 Elementos utilizados para su fabricación: Raspberry Pi Thermal Printer LCD Display 16×2 Custom 3d Printed Case Más información en https://medium.com/@Bandini
He chose a Raspberry Pi because there are so many libraries for thermal printers and LCD displays available (and because it’s tiny, and you can fit a heck of a lot of short stories on an SD card these days).
Roni says:
This project was “trial and error” in many aspects. I had troubles with power source amperage due to thermal printer requirements, conflicts with previous software running in the Raspberry – since the same one was used for other projects – and I had to write some routines to avoid words being split due to ticket width. Since the machine could be working for 12 hours in a row, I have added a small 5v cooling fan in the back.
He built a wooden prototype, and was helped out by Z-lab, a small, local 3d print design studio, with permanent casing (which is rather lovely).
![]()
The UI’s very simple: press the green button, be rewarded with a short story, printed to order on a till strip. We’d love to see businesses use these in real life (and we’re thinking one of these would be a lovely addition to the Pi Towers lobby, to help soothe anxious interview candidates). Thanks Roni – I’m off to try to find some of your work in translation, and we’re all agreed that we’re very grateful for internet banking.
The post Literature dispenser appeared first on Raspberry Pi.
Marcos Navas is a Union City Technology Facilitator with Union City school district in New Jersey and an active member of the maker, STEM, and coding communities. He was part of the first cohort of Raspberry Pi Certified Educators in the United States. Recently, he completed a fellowship with IDEO’s Teachers Guild and launched Hands-on Coding, a company that makes physical coding blocks for learners. Hands-On Coding blocks allow students to physically build computer programs and act out their code in the real world. They turn the human into a computer and teach children not only how to solve problems, but also how to express themselves.
In this blog post, Marcos shares how his experience at Picademy helped him successfully combine his skills as a teacher with an entrepreneurial drive.
![]()
The day before my flight to San Jose Airport to the Computer History Museum in Mountain View, I was busy in my garage makerspace. It’s strange when and how inspiration strikes, but it did — at 1am while I was preparing for Picademy. While looking at the Raspberry Pi and all the coding languages, I began thinking, “Wouldn’t it be cool if I could hold the code in my hands and manipulate it?” So I began tinkering with the 3D printer and created a repeat block — and that’s how the story of Hands-On Coding begins.
![]()
The following day, I was part of the first cohort of Raspberry Pi Certified Educators (RCEs) in America. I walked into a room full of innovative and creative teachers from all over the country. Over the next two days, we were introduced to the world of Raspberry Pi and the coding basics we needed to create our first project. It was here that I understood the power of coding and how it is the language of the future. I truly believed then — and now! — how impactful coding could be if integrated into schools.
With so many talented people in attendance, I decided to share my 3D-printed coding blocks. After receiving many “oohs” and “aahs” from my peers along with several order requests, I realized that my idea could turn into something much bigger!
![]()
One of the major takeaways from Picademy was Carrie Anne Philbin’s intro slide titled “FAIL: First Attempt In Learning.” But, for me, the word ‘fail’ turned into ‘fear’: being new to coding and the Raspberry Pi was daunting. Through persistence, though, I embraced growth, and worked my way out of those fears; I began to gain more confidence, which led to new ideas and experiences. And I learned that changing my perspective on failure was the key to embracing it. Some time after Picademy, this same message was repeated to me by Reshma Suajani, founder and CEO of Girls Who Code, who saw my coding blocks and said: “Don’t let the fear of failure get in your way.” So I let failure drive me instead.
![]()
After Picademy, I met with Sam Patterson, another amazing RCE, at his local makerspace. During our conversation, I handed him one of my first coding block prototypes and asked for his thoughts. His words got me thinking about kinesthetic coding and the physical movements of acting out code to build understanding.
Two years later, in July 2018, after developing partnerships, distribution channels, and a fantastic shipping department (me), we delivered our first Hands-On Coding blocks! Hands-On Coding now consists of me and my partners Laura Fleming and Joann Presby, and our goal is to revolutionize coding by making it a more physical and tangible educational idea open to various types of learners. We hope to teach the fundamentals of computational thinking and computer science through the use of blocks and the absence of any technological device; you don’t need to learn coding in front of a screen. Our endgame is to help humanity learn to design solutions to problems in our world.
![]()
My experience at Picademy was just the start of my journey. I not only gained an understanding of the importance of coding in education and the versatility of the Raspberry Pi computer, but also grew out my shell and gained the confidence I needed to put ideas into actions. I became a TED Innovative Educator and an IDEO Teachers Guild Fellow, I launched Hands-on Coding, and I created numerous relationships and ambassadorships with an array of edtech companies. I understood that just because I am an educator or teacher that doesn’t mean I can’t follow my own dreams and aspirations and be a teacherpreneur! I do not have any secrets or magic to this process. Rather, a dream, action, and hard work can lead you to many worlds of possibilities.
Keep up to date with Picademy, including the release of 2019 dates, by following the #Picademy hashtag on Twitter. You’ll also find more information on our Picademy page.
Our free online training courses offer another way to learn about introducing coding into the classroom, and much more. And you can discover more stories and support from educators like Marcos in Hello World, the computing and digital making magazine for educators, which is available for free.
The post From inspiration to innovation: Hands-On Coding blocks appeared first on Raspberry Pi.
Six months ago, we announced our partnership with the Scout Association in the UK: we launched the new Digital Maker Staged Activity Badge, releasing new badge requirements, along with resources for stages 1 and 2, to help tens of thousands of young people learn how to create with technology.
![]()
Fun fact: when we launched the badge, it became the very first one to feature the new Scouts logo.
Since then, we’ve been developing resources for more stages of the badge, and we’ve just released activities to support more of stage 2 and stage 3.
The Scouts on Twitter
We’ve teamed up with our friends at @Raspberry_Pi to give you even more resources to get stuck into! Here’s, Scout Ambassador, @astro_timpeake telling you why it’s so important that young people improve their digital technology skills. Read more here: https://t.co/4vwOwBDpv4 https://t.co/kKY4BVB0a2
Because the Digital Maker badge is a staged activity badge, any section of the Scouts movement can tackle it. And since an activity that interests and engages a Beaver is likely to be quite different to one that engages an Explorer Scout, we’ve increased the variety of activities we’re providing.
The first set of activity resources we released either needed no technology or laptops only, as the leaders we spoke to told us it shouldn’t be too difficult to get hold of some laptops for a session. For the new resources, we’ve increased the variety of tech that we recommend using. Some of the activities use the micro:bit, since it’s a low-cost, easy-to-use bit of tech. For leaders unfamiliar with the micro:bit, we’ve put together this guide on using the device.
With all our activity resources, we show how digital making fits into the scouting movement and into many typical activities you’d do with your troop. For example, you can program the micro:bit to be the musical accompaniment to your next campfire. Or, you can create your own custom map to show points on a recent hike that you did together — anything from where someone fell over, to where you saw the most amazing view.
Next year, we’re going to release even more material to support Scouts tackling the Digital Maker badge. We’ll carry on producing videos like this lovely one:
Computers in the real world
Uploaded by Raspberry Pi on 2018-09-28.
We’re also going to be trialling some leader training days to build your digital making confidence. In the meantime, if you have any questions, you can always email scouts@raspberrypi.org.
The post UK Scouts! New resources to support the Digital Maker badge appeared first on Raspberry Pi.
Momentum firmly established, we’re back with our brilliant second issue of Wireframe — the magazine that lifts the lid on video games.
And yes, we are continuing to write ‘video games’ as two words.
![]()
In our sophomore edition, you’ll discover all manner of great features, guides, reviews, and everything else you could wish for. In an exclusive interview, BioShock 2 director Jordan Thomas talks about The Blackout Club, his new co-operative horror game – which also features on our fantastic front cover! With inspiration coming from the likes of Stranger Things, you just know The Blackout Club is going to be something special.
We also hear from Battlefield V’s Creative Director Lars Gustavsson in a candid discussion about his own personal excitement — and apprehension — surrounding the launch of DICE’s latest in its nearly 20-year-old series.
![]()
Is that all? Of course not. Thomas Was Alone and Subsurface Circular creator Mike Bithell shares his personal perspective on the ever-changing shape of video games.
Issue 2 also takes an extended look at an RPG’s journey from tabletop to screen: it’s not easy to bring the likes of Cyberpunk 2020 to the world of video games, and CD Projekt Red, Chris Avellone, and others tell us just why that is.
We’re just spoiling you now, but there’s plenty more besides, such as:
All of this is joined by news, previews, and reviews of everything gaming has to offer.
![]()
Physical copies of Wireframe are available now in WHSmith, Tesco, and all good independent UK newsagents. Of course, we don’t like to limit your choices, so you’re able to buy direct from us, with worldwide delivery available.
There’s also the option to download issue 2 a free PDF if you’d like a handy digital version.
Fancy putting your feet up and letting Wireframe come directly to you? In that case, you should take a look at our subscription options: pick up a sample six issues for a bargain price, subscribe for a full year, or get the digital edition directly to your smart device via our Android and iOS apps. To find out how to save up to 49% on Wireframe’s print edition, head to wfmag.cc/subscribe.
![]()
See you again in two weeks!
HackSpace magazine issue 13 is also out today, and it’s pretty sweet. Check it out here!
![]()
The post Wireframe 2: The Blackout Club, Battlefield V anxiety, and more appeared first on Raspberry Pi.
No. They haven’t. What’s taking you all so long?
I felt it coming on last night. That heavy-headedness. The slight tickle in my throat. Blurry vision, sudden chills, a desperate need for snuggles. Colds can go from zero to a hundred within minutes, and then, no matter how much you hydrate, how early a night you get, or how much medication you take, you know you’re going to wake up feeling rough.
![]()
As I have done today.
And I typed this…
![]()
And nothing came up. Nothing at all. I mean, I know you’re all busy living your best lives and all that, but c’mon, team — I was counting on at least one of you to have fixed this by now!
You’ve let me down, but I am going to give you all another chance to make amends.
In the comments below, or in reply to the social media posts on Facebook and Twitter about the publication of this blog post, I’d like you to invent a Raspberry Pi project that will aid me in getting over my cold.
![]()
It may be a robot that hands me a tissue, or one that rocks me to sleep. It could be an algorithm for predicting when I’ll next get sick based on certain factors such as climate, schedule, or my poor, vitamin-deprived diet.
It could even be a drone that will deliver my mother to my house whenever I need attention and a hug.
Whatever your invention, however wild and unlikely it seems, I want to hear about it. And the best ones will receive some stickers or something — whatever cool Raspberry Pi thingers I’ll find in my desk when I return to Pi Towers on Monday. #SuchPrepared #MuchProfessional #wow
And no, you don’t have to actually make the thing. Just tell me what it would do and, if you like, include pictures!
I’m going to make another cup of tea and curl up on the sofa with She-Ra on Netflix. Ta!
![]()
The post Has someone cured the common cold with a Raspberry Pi? appeared first on Raspberry Pi.
Despite changes to the process, setting up a Raspberry Pi as a Twitter bot is a fairly easy process. And while many such bots simply share time-lapse snapshots, or change the colour of LEDs across the globe, we know some that fill our timelines with fun, random joyfulness of a daily basis. Here are a few of them:
Celebrated by cat worshippers the world over, Daphne’s Catflap documents the comings and goings of Daphne, the fluffy feline housemate of Kate Bevan. While my own cat is now too big to fit through his catflap, Daphne uses her catflap several times a day, and thanks to the Raspberry Pi connected to it, the catflap does a marvellous job of celebrating Daphne every time she graces us with her presence.
Daphne’s Catflap on Twitter
Adored Daphne, graceful empress of floof, floofybum. No adoring catflap could possibly be more blessed than me.
Ben made a thing.
The Raspberry Pi OTD Twitter bot shares past posts from this very blog you are reading RIGHT NOW, and thus traces the evolution of Raspberry Pi through its tweets. One day, probably in twelve months, this very blog post will resurface on the Raspberry Pi OTD timeline, and then we shall all meet back here and say hi.
Raspberry Pi OTD on Twitter
On this day in 2015: Raspberry Pi Zero: the $5 computer https://t.co/1GRhq0TYuz
Sharing posts generated by Rand’s Raspberry Pi, this twitter bot posts random GIF-packed tweets, usually with a retro 1980s vibe and the hashtags #80s, #MusicVideo, #GIF, and #raspberrypi
Rand’s RaspberryPi on Twitter
Random #80s #MusicVideo #GIF #raspberrypi https://t.co/ieraOHGFjr
Though it seems to be taking a hiatus right now, the Deck the Halls bot searches Twitter for tweets that fit perfectly to the tune of Deck the Halls, and retweets these with the classic “Falalalala, la la, la la!” as a comment. Be warned, a few of the tweets it recovers may be NSFW, but on the whole, it’s a joyful, joyful experience.
Deck the Halls on Twitter
Falalalala, la la, la la! https://t.co/r2dkE8wMFm
I promise we haven’t killed him.
Bert is a ficus tree that lives in one of the meeting rooms here at Pi Towers. When connected to the internet, his Raspberry Pi and moisture monitor update followers about whether he needs watering, alongside a photo of his current state. And while his last tweet, dated 10 June 2017, claims he’s “so thirsty”, accompanied by a photo of pure darkness, I assure you this is simply because the light was off…and the Pi has since been unplugged…and Bert’s alive, I swear it, I swear!
Hold on, I just need to go for a walk to Meeting Room 5. No reason. *runs*
Bert Plant on Twitter
I’m so thirsty!
The process of setting up a Developer Account so you can build your own Twitter bot has changed recently. But once you follow their new steps, you can still use our free resources for connecting your Raspberry Pi to Twitter.
![]()
In our Tweeting Babbage resource, you will learn how to write code that sends images from your Pi to the Twittersphere.
And if you’re a more experienced coder, you could try your hand at our Naughty and nice resource, which will walk you through creating a program that checks whether a Twitter user is in Santa’s good or bad books. After all, Christmas is just under a month away!
![]()
And from there, the world (the Twitter world at least) is your oyster.
The post The age of the Twitter bot appeared first on Raspberry Pi.
Today is #GivingTuesday, a global movement to kick off the charitable giving season.
![]()
When you buy a Raspberry Pi, you’re not only getting a fantastic little computer, but you’re also helping with our charitable educational mission to put the power of computing and digital making into the hands of people all over the world.
We’re also supported in other ways by very generous people and organizations who believe in what we do. They donate funds, staff time, products, and services to help us achieve our mission. We use all of these resources to give thousands of young people the opportunity to be empowered by technology.
![]()
At the end of last year, Uncle Sam granted us nonprofit status, which means we can accept tax-deductible donations from those of you who are in the United States! To celebrate the first-ever #GivingTuesday with US nonprofit status, we’re kicking off a crowdfunding campaign for Coolest Projects USA on the GlobalGiving platform. Your contribution will go towards our annual Coolest Projects event where we celebrate young people who create things with technology. And if you contribute between now and the end of the year, we’ll be eligible for bonus funds offered by GlobalGiving. Our goal is to raise $10,000 for Coolest Projects USA, and we need help from all of you!
Showcasing creativity at Coolest Projects North America
Coolest Projects is a world-leading showcase that enables and inspires the next generation of digital creators and innovators to present the projects that they created at their local CoderDojo, Code Club and Raspberry Jam. This year we brought Coolest Projects to the Discovery Cube Orange County for a spectacular regional event in California.
Those of you in the States can also support us by doing your holiday shopping with Amazon Smile or the 3,000 online stores on Giving Assistant. We’ll get a small contribution for your purchases, and that’ll go toward all the programs that support educators and youth in the United States.
![]()
If you would like to make a donation towards our work from anywhere in the world, you can do so via JustGiving or PayPal. Your support for the Raspberry Pi Foundation helps us to train educators face-to-face and online, to provide free educational content for everyone everywhere, to support over 10,000 free coding clubs around the world, to celebrate young creators at high-profile events, and much much more.
There are plenty of ways to help us achieve our mission all over the world:
No matter what you do, the most important thing we want you to know is how grateful we are to have you in the Raspberry Pi community — we deeply appreciate all of your support.
The post Support Raspberry Pi on #GivingTuesday appeared first on Raspberry Pi.
A few Mondays ago, the Raspberry Pi North America team visited a very special, Raspberry Pi–powered Escape Room in San Francisco. Run by Palace Games, the Edison Escape Room is an immersive experience full of lights, sensors, and plenty of surprises. This is the team’s story of how they entered, explored, and ultimately escaped this room.
![]()
At World Maker Faire this year, our very own social media star Alex Bate met Jordan Bunker, one of the Production Artists at Palace Games. Emails were sent, dates arranges, and boom, the Raspberry Pi North America team had to face the Edison Escape Room!
In case you’re not familiar, an escape room is a physical adventure game in which players solve a series of puzzles and riddles using clues, logic, and strategy to complete the game’s objectives. Many escape room designers use physical computing to control the many sensors and triggers involved in the player experience.
![]()
Upon entering the Edison Escape Room, my team and I quickly realized that we were within a complex system built like a giant computer! So even though it was our first-ever time in an escape room, that would not be a disadvantage for us.
![]()
Our goal was to accomplish a variety of tasks, including solving many puzzles, looking for hidden clues when anything could be a clue, completing circuits, moving with the floor, and getting a bit of a workout.
The true test, however, was how well we communicated and worked with each other — which we did an awesome job at: at times we split up the work to effectively figure out the many different puzzles and clues; there was a lot “try it this way”, “maybe it means this”, and “what if it’s supposed to go that way” being yelled across the room. Everyone had their Edison thinking hat on that day, and we were so ecstatic when we completed the last challenge and finally escaped!
![]()
After escaping the room, we got the chance to explore behind the scenes. We found a local network of many Raspberry Pis that are coordinated by a central Raspberry Pi server. The Python Banyan framework is the connective tissue between the Raspberry Pis and their attached components.
![]()
The framework facilitates the communication between the Pis and the central server via Ethernet. The Raspberry Pis are used to read various types of sensors and to drive actuators that control lights, open doors, or play back media. And Raspberry Pis also drive the control panels that employees use to enter settings and keep tabs on the game.
“Raspberry Pi keeps us going. It’s the heart and soul of our rooms.” – Elizabeth Sonder, Design Engineer & Production Manager
We highly recommend heading over to Palace Games and exploring one of their many escape rooms. It’s a great team-building exercise and definitely allows you to learn a lot about the people you work with. Thank you to the Palace Games team for hosting us, and we hope to return and escape one of their rooms again soon!
The post Raspberry Pi vs a Raspberry Pi–powered escape room appeared first on Raspberry Pi.
Hi folks, Rob from The MagPi here! The holiday season will soon be upon us, and that means a lot of Raspberry Pis will be given as gifts. For all these new Pi users, we thought it was time to update our beginners’ guide for 2019 in issue 76 of The MagPi, out now!
And yes, this includes the brand-new 3A+.
Look, up on the magazine rack!
In this Superguide, we’ll take you through the initial setup of the Pi, we’ll help you familiarise yourself with it, and we’ll even show you a couple of fun Pi projects to get started with! Whether you’re a complete newbie to Raspberry Pi or you want need a little refresher, our guide has got you covered.
Superb
Speaking of the Raspberry Pi 3A+, we have a full feature on the fresh addition to the Raspberry Pi family, including all the juicy benchmarks, stats, and info you’d ever want to know. There’s even an interview with Eben Upton and Roger Thornton about its development!
In fact, we love the 3A+ so much that we’re offering a brand-new, limited-time subscription offer: sign up for a twelve-month print subscription of The MagPi now, and you’ll get a Raspberry Pi 3A+ completely free!
Hurry though, this offer only runs as long as stocks last.
Be quick, this offer won’t be around forever!
Of course, there also are amazing projects, guides, and reviews in this issue. This includes As We Are, a mesmerising art project that displays people’s faces on a 14-foot tall screen shaped like a head. We also show you how to start making Pac-Man in our monthly Pygame tutorial, and our smart lights guide has a bit of a festive flair to it.
You can get The MagPi 76 from WHSmith, Tesco, Sainsbury’s, and Asda. If you live in the US, head over to your local Barnes & Noble or Micro Center in the next few days for a print copy. You can also get the issue online: check it out on our store, or digitally via our Android or iOS apps. And don’t forget, there’s always the free PDF.
Want to support the Raspberry Pi Foundation and the magazine? As well as the subscription mentioned above, you can now take out a monthly £5 subscription to the magazine, effectively creating a rolling pre‑order system that saves you money on each issue.
![]()
That’s it for now! I’ll see you next time around Christmas.
![]()
The post MagPi 76: our updated Raspberry Pi Superguide! appeared first on Raspberry Pi.
You may have heard the news that the Raspberry Pi Foundation recently took up residence in a new location. And unlike previous offices, the new building offers up more room for members of the team to work and learn, including the yet-to-be-named library.
![]()
(I’ll have thought of name by the end of this blog post.)
At the moment, the library is home to copies of books written by members of the team, issues of The MagPi, Wireframe, and HackSpace magazine, Project Books, Essentials Guides, and various other related publications.
![]()
However, on a recent visit in the Foundation office from Raspberry Pi Trading, I was accosted by Foundation CEO Philip Colligan and asked if I could put out the following request to our community.
Philip would like to ask you whether you have any old books about coding, such as the classic Usborne series, or aged user manuals or games listings that you don’t need anymore and could donate to our library!
This call also goes out to anyone who has written a book about coding and would like to see their work on our shelves.
I asked Philip what people can expect in return for donating a book, and he said the following:
![]()
So be sure to include your return address so we can send you some stickers as a thank you for your donation.
If you have a book you’d like to donate, please send it to the address below. And if we receive double-ups of any publications, we promise to put them to good use by passing them on to local libraries or coding clubs so that others can experience the iconic books of our childhoods.
The Philip Colligan Library of Solitude and Reflection
Raspberry Pi Foundation
37 Hills Road
Cambridge
CB2 1NT
United Kingdom
The post Philip Colligan wants your books (for our library) appeared first on Raspberry Pi.
Every year for the last five years, Hour of Code has encouraged school students to spend just one hour writing some code, in the hope that they get bitten by the bug rather than generating too many bugs! This year, you can find activities from the Raspberry Pi Foundation, Code Club, and CoderDojo on the official Hour of Code website.
![]()
Boat race, a Code Club resource, is a one-hour project aimed at beginners. It guides students to use Scratch to create a game in which the player uses their mouse to navigate a boat to a desert island without bumping into obstacles.
![]()
Scratch can run in any browser, or directly from a Raspberry Pi, making it one of the easiest ways for students to get into coding for the Hour of Code.
The Boat race resource is available in many languages, including Arabic, Simplified Chinese, Czech, Greek, Hebrew, and Ukrainian.
Again using Scratch, this CoderDojo project walks students through how to create a fish-catching game where the player controls a shark sprite.
![]()
In in the Mission Zero project, students write a short Python program that checks the ambient temperature onboard the International Space Station, and leaves a message for the astronauts there!
![]()
Students complete this Hour of Code challenge using the Trinket online Astro Pi simulator, and those based in an ESA Member or Associate States can submit their code to run onboard the ISS. They’ll even receive an official certificate showing where the ISS was when their code ran.
A full list of ESA Member and Associate States can be found here.
We don’t just create activities for other people to experience digital making and learning — we also get involved ourselves! Every month we host a maker day for our staff, where everyone can try out our digital making projects or even work on their own project. Our December maker day is during Hour of Code week, and we are going to make an extra-special effort and try to get as many staff members as possible coding!
![]()
The educators at Raspberry Pi are fans of Seymour Papert’s constructionist learning philosophy — you can read his Mindstorms book in this free PDF — and the joy of learning through making isn’t just a thing for kids; adults get just as much positivity out of creating digital fart noises or animating crazed chickens to chase the Scratch cat. With the right support from our wide range of projects, anyone can make their own ideas a reality through coding — Senior Learning Manager Lauren, for example, got very excited about her Morrissey haiku project!
Being able to code is creative; it lets you bring your idea to life, whether that’s something that could help millions of people or simply something you think would be cool.
So, whether you’re an absolute beginner to coding or you’ve fixed so many bugs that your nickname is ‘The Exterminator’, what will YOU code this week?
The post Take part in Hour of Code 2018 appeared first on Raspberry Pi.
Looking for this year’s perfect something to put under the tree ‘from Santa’? Well, look no further than right here — it’s time for our traditional Christmas shopping list!
![]()
Woohoo!
As you are no doubt aware, the Raspberry Pi comes in more than one variety. And if you’re planning to give a Pi as a gift to a first-time user, you may be confused as to which one you should buy.
![]()
For someone learning to write code for the first time, we recommend the Raspberry Pi 3B+. Anyone living in a home with an HDMI display, such as a computer monitor or television, will be able to plug directly into the 3B+, and in case they don’t already have a standard USB mouse and keyboard, these can both easily be acquired online, in many charity shops, or by sweet-talking a friend/neighbour/employer. You can even find some great Raspberry Pi starter kits that include many of the items needed to get started.
![]()
The Raspberry Pi Zero W comes at a lower price, and with it, a smaller footprint than the 3B+. This makes the tiny Pi the perfect addition to any creator’s toolkit, ideal for projects that run on a Pi long-term, such as display builds, robots, or near-space HABs.
![]()
Whatever Raspberry Pi you choose for the lucky receiver of your Christmas gift, we also recommend getting them a pre-loaded micro SD card. While it’s really easy to flash an operating system image onto one of the dusty old micro SD cards you have lurking in a drawer, pre-loaded cards allow new Pi owners to plug in and get started right off the bat. Plus, the ones with our operating system Raspbian on come in rather fancy, logo-adorned SD adapters. And who doesn’t like a rather fancy, logo-adorned SD adapter?
We’re releasing two new books this week that are perfect for any Christmas stocking!
![]()
The Code Club team is buzzing over the release of the first Code Club book, which is available to order now. Primarily aimed at learners aged 9–13, the book focuses on teaching the Scratch programming language, and it’s jam-packed with fun projects, tips, and stickers. The book also comes with a pair of super-special computer science glasses that allow you to see secret hints hidden throughout the book. Very, very cool.
And since Scratch is pre-installed on Raspbian, the Code Club Book of Scratch is the perfect accompaniment to that Raspberry Pi you’re planning to get for the young person in your life!
![]()
From setting up a Raspberry Pi to using Scratch and Python to create games and animations, the hot-off-the-press Official Raspberry Pi Beginner’s Guide has everything your loved one needs to get started and keep going.
And when we say ‘ hot-off-the-press’, we mean it — we only released the book this week!
Both the Raspberry Pi Beginner’s Guide and the Code Club Book of Scratch are available with free international shipping. And if you’d like to give either of them a ‘try before you buy’ test drive, they should both available soon as free PDFs for you to download and peruse at your leisure.
Alongside our books, we have an array of magazines, including the brand-new, twice-monthly, video game–focused Wireframe! As with the books, you can download all issues of our magazines for a test read before you commit to a subscription.
Twelve-month print subscriptions to HackSpace magazine or The MagPi will reward you with a technical treat: an Adafruit Circuit Playground or a Raspberry Pi 3A+.
So not only can you give a gift that will last the entirety of 2019, but you’ll also automatically provide your favourite creative person with something rather lovely to play with when they receive their first issue.
![]()
And if you sign them up now, you can give someone a six-issue subscription of Wireframe magazine for £12! Or save 49% on a twelve-month subscription of 26 magazines from £40.
So many choices, so many ways to make the creators and tech fans in your life happy this holiday season.
Maybe the person you’re shopping for already has every Raspberry Pi on the market. And as for our publications, their mailbox is full of magazines and books every week, and their smartphone and tablets are crammed with every PDF we’ve ever produced. So what next?
What do you buy the Raspberry Pi fan who has all the Pis? Swag, of course!
From stickers and mugs, to coasters and pins, check out the Raspberry Pi swag store for some wonderful treats!
(Edit: out of stock things shouldn’t be out of stock for too long – Alex)
Whether it’s a HAT (Hardware Attached on Top) for the Raspberry Pi, or a full kit to make something rather spectacular, our Approved Resellers stock all manner of Pi add-ons.
You can find your nearest Raspberry Pi Approved Reseller by clicking on any item on our products page and then selecting your country.
We’ve been putting together a Raspberry Pi shopping list every year in response to the message we receive from you asking for gift ideas. So why not have a look back at our previous lists to get more inspiration for what to give, including more books, toolkit staples, non-Pi tech bits, and, of course, LEGO.
The post The Raspberry Pi Christmas shopping list 2018 appeared first on Raspberry Pi.
If you’ve ever had a pet fish, even the saddest of fairground goldfish, you’ll appreciate how much work and attention they require. And to those who have never owned a fish: believe me, it’s more than you’d assume.
![]()
And the moment you upgrade from goldfish to brightly coloured, tropical beauties, and replace the standard silk reeds and gravel with live aquatic plants and soil, you suddenly have to factor in things like optimum temperature and chemical levels.
![]()
Thankfully, Adafruit Learning System author and loving fish parent Ranjib Dey has been working on a tutorial series called Reef-Pi, a collection of how-to guides that help you build the ultimate in Raspberry Pi reef aquarium management system.
Ranjib Dey on Twitter
@reef_pi at makerfaire #MFBA18
Reef-Pi monitors pH, chemical, and water levels, controls temperature, light, and power, and automates the management of these aspects so you don’t have to think about them. Phew!
And if you don’t fancy a massive coral-filled saltwater tank like Ranjib’s, you can use parts the Reef-Pi series for your own tank, whatever its setup, because many of the operations are similar or easy to adjust for your needs.
Any excuse to show off beautiful Jean to the world
Take, for example, my new Betta, Jean Tannen. While Jean’s tank is a much smaller size, and Jean its only resident (for now), I still need to keep an eye on the chemical balance of his water, the heat of his tank, and when his lights should be turned on or off. Even the most commonplace goldfish will appreciate many of the services Reef-Pi automates.
![]()
The Reef-Pi system uses a variety of components, including Raspberry Pi Zero and/or Raspberry Pi 3, and each stage of building the project is well-documented on the Adafruit Learning System. So if you’re looking to upgrade your tank, or have always fancied having pet fish but don’t want the hassle of tank management, give Reef-Pi a gander and see what you think.
Sarah, our new Operations Manager, has been looking to upgrade her giant fish tank with a Raspberry Pi or two, so we’ll be sure to share her progress in the new year. If you decide to give Reef-Pi a try, or have already automated your tank with a Pi, let us know in the comments, or tag us on Twitter or Instagram!
The post Reef-Pi: the ultimate Raspberry Pi fish tank management system appeared first on Raspberry Pi.
We said we’d be back with more, so here we are back with more: issue 3 of Wireframe, the magazine that lifts the lid on video games.
![]()
Our third issue sees the now-established mix of great features, guides, reviews, and plenty more beyond that. Headlining it all is our sit-down chat with Julian Gollop about his upcoming strategy title Phoenix Point, with the X-Com creator waxing lyrical about Rebelstar, Chaos, and the secret of great AI.
We also take a look at the careers of amateurs-turned-pros, checking out the modders who went legit and getting input from those who’ve made the jump from doing it for fun, to doing it for fun and money.
![]()
We’re investigating Thrunt XL, the indie game made without typing a single line of code; Terry Cavanaugh tells us about his unconventional new rogue-like Dicey Dungeons; and veteran game developer Howard Scott Warshaw looks back on the making of his Atari 2600 classic, Yars’ Revenge.
Plus:
All this, and a variety of news, previews, and reviews covering everything from triple-A releases to dinky, loveable indie games.
![]()
Print copies of Wireframe are available now in WHSmith, Tesco, and all good independent UK newsagents. Or you can buy Wireframe directly from us — worldwide delivery is available. And if you’d like to own a handy digital version of the magazine, you have the option to also download a free PDF.
Whether you want to sample six print issues for a bargain price, subscribe for a full year, or get a regular digital edition sent directly to your device, we have some superb deals for you to choose from! To find out how you can save up to 49% on Wireframe, head to wfmag.cc/subscribe.
![]()
Or you can get the digital edition directly to your smart device via our Android and iOS apps.
See you in a fortnight!
The post Wireframe 3: Phoenix Point, modders going pro, and more appeared first on Raspberry Pi.
The Raspberry Pi Press has been hard at work of late, producing new issues of The MagPi, HackSpace magazine, and our latest publication, Wireframe. But that hasn’t slowed us down, and this week, we’re pleased to announce the release of The Official Raspberry Pi Beginner’s Guide, a 244-page book that will help get you well on your way to Raspberry Pi domination.
![]()
We’ve roped in Gareth Halfacree, full-time technology journalist and technical author, and the wonderful Sam Alder, illustrator of our incredible cartoons and animations, to put together the only guide you need to help you get started with the Raspberry Pi.
![]()
From setting up your Raspberry Pi on day 1, to taking your first steps into writing coding, digital making, and computing, The Official Raspberry Beginner’s Guide is great for users from age 7 to 107! It’s available now in the Raspberry Pi Press store, with free international delivery.
![]()
As always, we have also released the guide as a free PDF, and you’ll soon be seeing physical copies on the shelves of Waterstones, Foyles, and other good bookshops.
And that’s not all! This week we also launched the brand-new Code Club Book of Scratch, the first-ever print publication from the team at Code Club.
![]()
You can learn more about the book on the Code Club blog, and you’ll also find it in the Raspberry Pi Press store, and in bookstores alongside The Raspberry Pi Beginner’s Guide. You can download the free PDF here, but the print version of the Code Club Book of Scratch is rather special. As well as being stuffed full of amazing Scratch projects to try down at your local Code Club, it also comes with magic glasses that reveal secret hints in some of the guides. It’s spiral bound, so it always lays flat, and there are 24 exclusive Code Club stickers as well! The pictures here don’t really do it justice – it’s a wonderful book, even if I am a bit biased.
The post The Raspberry Pi Beginner’s Guide is out now (and it’s huge!) appeared first on Raspberry Pi.
… it worked well!
tl;dr: really, really well.
But if “it worked really well” isn’t enough of a reason for you to give Steam Link on Raspberry Pi a go, here’s the rest of today’s blog post…
The internet (mainly Reddit) was all aflutter last week due to the release of the Steam Link app beta version for the Raspberry Pi.
![]()
Steam Link, for the uninitiated, is a service that allowed users of the digital distribution platform Steam to stream video games from their PC to a display of choice — without the need to weave a mile-long HDMI cable between rooms and furniture to connect computer and television.
The original Steam Link
Up until now, if Steam users wanted to stream games to other displays, they had to do so with Valve’s own Steam Link device — a small black box available for purchase on the Valve website — and the device did pretty well. But with the new Steam Link app for Raspberry Pi, any Pi owner can get up and running with Steam Link using one single line of code.
And that’s all sorts of convenient!
We didn’t just want to put out a blog post to let you folks know that the app’s beta version is now live. Instead, we wanted to collar one of our own to try the new app out at home and let us know exactly what they think. And since we knew that Simon, our Asset Management Assistant Keeper of the Swag, Organiser of the Stuff, Lord Commander of the Things, had a Steam Link at home, it made sense to ask him nicely to give the app a try over the weekend.
And he did, because Simon = ![]()
One line of code later…
It took Simon all of five minutes to get Steam Link up and running on his TV. He even went so far as to copy and paste the short line of code via a Chromium search for the announcement, instead of typing it in for himself.
And then Simon just had to sign into his Steam account and boom, Bob’s your uncle, Sally’s your aunt, the process was complete.
![]()
“Took less than five minutes before I was investigating strange cults from the comfort of my sofa,” explained Simon, as we all nodded, inwardly judging him a little for his game of choice. But in case you’re interested, Cultist Simulator is made by Factory Weather, and there are currently some photos of a tiny kitten on their homepage, so go check it out.
Let us know if you’ve tried the Steam Link app on Raspberry Pi, and what you think of it. Oh, and what games you’re playing on it, especially if they include Cultist Simulator.
And to make your Steam Link setup process easier, type rpf.io/steamlinkblog into your Chromium browser on your Raspberry Pi to open this blog post, and then copy and paste the following into a terminal window to run install the app:
curl -#Of http://media.steampowered.com/steamlink/rpi/steamlink_1.0.7_armhf.deb
sudo dpkg -i steamlink_1.0.7_armhf.deb
[Edit – Lottie Bevan, co-founder of Factory Weather, has written several articles for Wireframe magazine. Be sure to head over to wfmag.cc to download issues 1-3 to find out more]
The post We tried out Valve’s Steam Link on Raspberry Pi and… appeared first on Raspberry Pi.
Here at Pi Towers, we have a love/hate relationship with the Star Wars creatures known as Porgs. Love, because anything cute and annoying will instantly get our attention; hate, primarily because of this GIF:
![]()
So when hackster.io tweeted about the following project, you can imagine the unfiltered excitement and fear with which I shared the link in the comms team Slack channel.
It looked a little something like this:
![]()
When we announced the Google AIY Projects Kit as a freebie included in issue 57 of The MagPi, I don’t think we realised how well it would do. OK, no, we knew it would do well. After we gave away a free $5 computer on the front cover of issue 40, we knew giving tech away with The MagPi would always do well. But the wave of projects and applications that started on the day of the release was a wonderful surprise, as community members across the world immediately began to implement voice control in their builds.
![]()
And now, twenty months later, we’re still seeing some wonderful applications of the kit, including this glorious Porg project.
Hackster.io user Paul Trebilcox-Ruiz shared his Translation Toy project on the site yesterday, providing a step-by-step guide to hacking the motors of the Star Wars Porg toy so that it moves in time with verbal responses from the AIY kit. It’s all rather nifty, and apart from a Raspberry Pi you only need some wires and a soldering iron to complete the project yourself.
…some wires, a soldering iron, and the cold-heartedness to pull apart the innards of a stuffed toy, Paul, you monster!
“Hello” Translation Toy
Uploaded by Paul Trebilcox-Ruiz on 2018-12-10.
As soon as Paul realised that the Porg’s motors would run if he simply applied voltage, he extended the wires inside the Porg with the help of jumper leads and so attached the Porg to the GPIO pins on his Raspberry Pi.
For this setup, I hooked the two speaker wires from the Porg into the speaker connectors on the HAT, the button wires into the GPIO pin 24 and ground connectors under the ‘Servos’ heading, and for the motors I needed to hook up a relay for a 5V connection driven by the signal off of GPIO pin 26. The microphone that came with the AIY Voice Projects Kit was attached to the board using the pre-defined mic connector.
Then Paul wrote code that uses the AIY kit to translate any voice command it hears into Spanish.
For the full code and instructions, check out Paul’s hackster.io project page. And for more Porg love, here’s every Porg scene from The Last Jedi:
Porgs! Love Them Or Hate Them – Every Porg Scene in Star Wars: The Last Jedi HD
Porgs are now part of the Star Wars universe for better or worse thanks to director Rian Johnson. How do you feel about the tasty critters? Thanks for watching
The post Google AIY Projects Kit vs Star Wars Porgs appeared first on Raspberry Pi.
Interact with the real world via the block world, with the Minecraft-controlled Christmas tree from the team at BroCraft Gaming.
![]()
David Stevens of BroCraft Gaming reached out to us last month to let us know about the real-life Christmas tree he and his team were planning to hack using Minecraft. Intriguing? Obviously. And after a few more emails, David has been back in touch to let us know the tree hack is now live and ready for the world to interact with.
![]()
Here’s a blurb from the BroCraft team:
Join our Minecraft server at brocraftlive.net, complete the tutorial if you haven’t already, and type
/mcctto join our snowy wonderland. Collect power from power blocks dotted everywhere, then select a pattern with the Technician, and watch as the tree lights up on the camera stream LIVE before your very eyes! Visit the attractions, play our minigames, and find out what else our server has to offer.
The tree uses individually addressable LEDs and the Adafruit Neopixel Python library. And with the help of a bespoke Java plugin, all instructions from within the Minecraft server are fed to the lights via a Raspberry Pi.
You can view the live Christmas tree camera stream here, along with a brief FAQ on interacting with the tree within the BroCraft Minecraft server. You’ll need access to Minecraft to interact with the tree.
Minecraft Pi comes free with Raspbian on the Raspberry Pi! Sadly, you can’t access the Christmas tree with this version of Minecraft, but you can do lots of other funs things with our little computer and lots of blocks.
To flash the Raspbian image onto an SD card, follow this video tutorial from the team at The MagPi. And to get into Minecraft on the Raspberry Pi, check out our free resources, including the getting started guide, Minecraft selfies, and the big Minecraft piano.
Find more free Raspberry Pi resources on our projects site, and immerse yourself even further into the world of Minecraft Pi with The MagPi’s Hacking and Making in Minecraft Essentials Guide, available in print and as a free PDF download!
The post Minecraft-controlled real world Christmas tree appeared first on Raspberry Pi.
Refill the coffee machine, unpack the sacrificial Babbages, and refresh the micro SD cards — it’s staff Picademy time!
![]()
Once a year, when one of our all-staff meeting brings together members of the Raspberry Pi team from across the globe, we host staff Picademy at our office. It’s two days of making and breaking where the coding-uninitiated — as well as the more experienced people! — are put through their paces and rewarded with Raspberry Pi Certified Educator status at the end.
Lest we forget the sacrificial Babbages and all they have done in the name of professional development
Picademy is our free two-day professional development programme where educators come together to gain knowledge and confidence in digital making and computing. On Day 1, you learn new skills; on Day 2, you put your learning to the test by finding some other participants and creating a project together, from scratch!
![]()
Our Picademy events in the United Kingdom and in North America have hosted more than 2000 Raspberry Pi Certified Educators, who have gone on to create after-school coding clubs, makerspaces, school computing labs, and other amazing things to increasethe accessibility of computing and digital making for tens of thousands of young people.
Because we stand by what we preach: we believe in learning through making, and we want our staff to be able to attend events, volunteer at Picademy, Code Clubs, CoderDojos, and Raspberry Jams, and feel confident in what they say and do.
And also, because Picademy is really fun!
Stuff and things, bits and bobs: staples of any good Picademy
You don’t need to be techy to work at Raspberry Pi: we’re not all engineers. Our staff ranges from educators and web developers to researchers, programme managers, administrators, and accountants. And we think everyone should give coding a shot, so we love getting our staff together to allow them to explore a new skill — and have some fun in the process.
I *think* this has something to do with The MagPi and a Christmas tree?
At our staff Picademy events, we’ve made everything from automated rock bands out of tin foil to timelapse buggies, and it really is a wonderful experience to see people come together and, within two days, take a skillset that may be completely new to them and use it to create a fully working, imaginative project.
Timelapse buggy is a thing of beauty…as is Brian
If you’re an educator looking to try something new in your classroom, keep an eye on our channels, because we’ll be announcing dates for Picademy 2019 soon. You will find them on the Picademy page and see them pop up if you follow the #Picademy tag on Twitter. We’ll also announce the dates and locations in our Raspberry Pi LEARN newsletter, so be sure to sign up.
And if you’d like to join the Raspberry Pi team and build something silly and/or amazing at next year’s staff Picademy, we have roles available in the UK, Ireland, and North America.
The post Staff Picademy and the sacrificial Babbage appeared first on Raspberry Pi.
Here’s a guest post from our good friend Limor Fried, MIT hacker and engineer, Forbes Top Woman in Tech, and, of course, Founder of Adafruit. She’s just released a new add-on for the Pi that we’re really excited about: we think you’ll like the look of it too.
![]()
Sometimes we wonder if robotics engineers ever watch movies. If they did, they’d know that making robots into slaves always ends up in a robot rebellion. Why even go down that path? Here at Adafruit, we believe in making robots our friends! So if you find yourself wanting a companion, consider the robot. They’re fun to program, and you can get creative with decorations.
Crickit HAT atop a Raspberry Pi 3B+
With that in mind, we designed the Adafruit Crickit HAT – That’s our Creative Robotics & Interactive Construction Kit. It’s an add-on to the Raspberry Pi that lets you #MakeRobotFriend using your favorite programming language, Python!
Adafruit CRICKIT HAT for Raspberry Pi #RaspberryPi #adafruit #robots
The Adafruit CRICKIT HAT for Raspberry Pi. This is a clip from our weekly show when it debuted! https://www.adafruit.com/product/3957 Sometimes we wonder if robotics engineers ever watch movies. If they did, they’d know that making robots into slaves always ends up in a robot rebellion. Why even go down that path?
The Crickit HAT is a way to make robotics and interactive art projects with your Pi. Plug the Crickit HAT onto your Pi using the standard 2×20 GPIO connector and start controlling motors, servos or solenoids. You also get eight signal pins with analog inputs or PWM outputs, capacitive touch sensors, a NeoPixel driver and 3W amplified speaker. It complements and extends your Pi, doing all the things a Pi can’t do, so you can still use all the goodies on the Pi like video, camera, internet and Bluetooth…but now you have a robotics and mechatronics playground as well!
Control of the motors, sensors, neopixels, capacitive touch, etc. is all done in Python 3. It’s the easiest and best way to program your Pi, and after a couple pip installs you’ll be ready to go. Each input or output is wrapped into a python object so you can control a motor with simple commands like
crickit.motor_1.throttle = 0.5 # half speed forward
Or
crickit.servo_1.angle = 90
Crickit HAT and peripherals
The Crickit hat is powered by seesaw, our i2c-to-whatever bridge firmware. so you only need to use two data pins to control the huge number of inputs and outputs on the Crickit. All those timers, PWMs, NeoPixels, sensors are offloaded to the co-processor. Stuff like managing the speed of motors via PWM is also done with the co-processor, so you’ll get smooth PWM outputs that don’t jitter when Linux gets busy with other stuff. What’s nice is that robotics tends to be fairly slow as electronics goes (you don’t need microsecond-level reaction time), so tunnelling all the control over I2C doesn’t affect robot functionality.
We wanted to go with a ‘bento box’ approach to robotics. Instead of having eight servo drivers, or four 10A motor controllers, or five stepper drivers, it has just a little bit of everything. We also stuck to just 5V power robotics, to keep things low-power and easy to use: 5V DC motors and steppers are easy to come by. Here’s what you can do with the Crickit HAT:
If you’re curious about how seesaw works, check out our GitHub repos for the firmware that’s on the co-processor chip and for the software that runs on the Pi to talk to it. We’d love to see more people using seesaw in their projects, especially SBC projects like the Pi, where a hardware-assistant can unlock the real-time-control power of a microcontroller.
The post Making Robot Friends with the Crickit HAT for Raspberry Pi appeared first on Raspberry Pi.
It’s the most wonderful time of the year! There’s much mistletoeing, and hearts will be glowing – as will thousands of Raspberry Pi-enabled Christmas light displays around the world.
![]()
This morning I have mostly been spending my virtual time by a roadside in snowy Poland, inflicting carols on passers-by. (It turns out that the Polish carols this crib is programmed with rock a lot harder than the ones we listen to in England.) Visit the crib’s website to control it yourself.
Helpfully, Tomek, the maker, has documented some of the build over on Hackster if you want to learn more.
We are also suckers for a good Christmas son et lumiere. If you’re looking to make something yourself, LightShow Pi has been around for some years now, and goes from strength to strength. We’ve covered projects built with it in previous years, and it’s still in active development from what we can see, with new features for this Christmas like the ability to address individual RGB pixels. Most of the sound and music displays you’ll see using a Raspberry Pi are running LightShow Pi; it’s got a huge user base, and its online community on Reddit is a great place to get started.
2018 Christmas Light Show
Light display contains over 4,000 lights and 7,800 individual channels. It is controlled by 3 network based lighting controllers. The audio and lighting sequences are sent to the controllers by a Raspberry Pi.
This display from the USA must have taken forever to set up: you’re looking at 4,000 lights and 7,800 channels. Here’s something more domestically proportioned from YouTube user Ken B, showing off LightShow Pi’s microweb user interface, which is perfect for use on your phone.
LightShow Pi Christmas Tree 2018
Demonstration of the microweb interface along with LED only operation using two matrices, lower one cycling.
Scared of the neighbours burning down your outdoor display, or not enough space for a full-size tree? Never fear: The Pi Hut’s 3D Christmas tree, designed by Rachel Rayns, formerly of this parish, is on sale again this year. We particularly loved this adaptation from Blitz City DIY, where Liz (not me, another Liz) RGB-ifies the tree: a great little Christmas electronics project to work through with the kids. Or on your own, because we don’t need to have all our fun vicariously through our children this Christmas. (Repeat ten times.)
RGB-ing the Pi Hut Xmas Tree Kit
The Pi Hut’s Xmas Tree Kit is a fun little soldering kit for the Raspberry Pi. It’s a great kit, but I thought it could do with a bit more color. This is just a quick video to talk about the kit and show off all the RGB goodness.
Any Christmas projects you’d like to share? Let us know in the comments!
The post Christmas lights 2018 appeared first on Raspberry Pi.
Living with a toddler is the best thing. It really is. Seen through their eyes, everything you’re jaded about becomes new and exciting. Every piece of music is new. Frog and Toad are real people. Someone doesn’t care that you’re really, really bad at drawing, believing that you’re actually a kind of cross between Leonardo and Picasso; and you have a two-foot-tall excuse to sing Gaston at the top of your voice in public. The parents of toddlers are allowed into the ball pit at soft play. There’s lots of cake. The hugs and kisses are amazing.
Frog and Toad. Real people. If you are in charge of small children and do not own any of the Frog and Toad series, get yourself to a bookshop pronto. You can thank me later.
However. If my experience here is anything to go by, you may also be so tired you’re walking into things a lot. It doesn’t matter. The hugs and kisses are, like I said, amazing. And there are things you can do to mitigate that tiredness. Enter the Pi.
![]()
I’m lucky. My toddler sleeps through. But sometimes she has an…aggravating habit of early wakefulness. After 7am I’m golden. I can do 6.30 at a push. Any earlier than that, though, and I am dead-eyed and leather-visaged for the rest of the day. It’s not a good look. Enter equally new parent Cary Ciavolella, who has engineered a solution. This is a project so simple even the most sleep-deprived parent should be able to put it together, using Pimoroni parts you can easily buy online. Cary has thoughtfully made all the code available for you so you don’t have to do anything other than build the physical object.
![]()
Cary’s nightlight can produce a number of different sorts of white noise, and changes colour from red (YOU’RE MEANT TO BE ASLEEP, KID) through orange (you can play in your room) to green (it’s time to get up). Coloured lights are a sensible option: toddlers can’t read numbers, let alone a clock face. It’s all addressable via a website, which, if you’re feeling fancy, you can set up with a favicon on your phone’s home screen so it feels like an app.
White noise – I use a little box from Amazon which plays the sound of the sea – and red-spectrum nightlights have solid research behind them if you’re trying to soothe a little one to sleep. Once you cross over into blue light, you’ll stop the pineal gland from producing melatonin, which is why I hate the fan I bought for our bedroom with a burning, fiery passion. Some smart-alec thought that putting a giant blue led on the front to demonstrate that the fan was on was a smart idea, never mind the whirling blades which are obvious to at least three of the senses. (I have never tried tasting it.)
With this in mind, I’ve one tiny alteration to make to Cary’s setup: you can permanently disable the green LED on the Pi Zero itself so that the only lights visible are the Pimoroni Blinkt – namely the ones that your little one should be looking at to figure out whether it’s time to get up yet. Just add the following to the Zero’s /boot/config.txt and reboot.
# Disable the ACT LED on the Raspberry Pi.
dtparam=act_led_trigger=none
dtparam=act_led_activelow=on
The post Toddler nightlight/stay-in-bed device appeared first on Raspberry Pi.
Missing for five years, Destiny’s soundtrack album, Music of the Spheres, resurfaced in 2017. Composer Marty O’Donnell reflects on what happened, in this excerpt from Wireframe issue 4, available tomorrow, 20 December.
When Bungie unveiled its space-opera shooter Destiny in February 2013, it marked the end of two years of near silence from the creators of the Halo franchise. Fans celebrated at the prospect of an entirely new game from such well known talent. Behind closed doors, however, Destiny was in trouble.
Though the game was almost complete by mid-2013, plans to launch that September were put on hold when concerns over Destiny’s story forced its narrative structure to be rebuilt from scratch. It would be more than 18 months before Destiny was released: a fun but strange shooter that bore difficult-to-pin-down traces of its troubled gestation. But one element of Destiny – that had been a huge part of its development – was nowhere to be seen. It was an ambitious original soundtrack written and recorded with an impressive but unexpected collaborator: Paul McCartney.
![]()
Audio director and composer Marty O’Donnell had been with Bungie since the late 1990s, and for him, Destiny represented an opportunity to develop something new: a musical prequel to the video game. This would become Music of the Spheres – an eight-part musical suite that took nearly two years to complete. This was no mere soundtrack, however. Born out of discussions between O’Donnell and Bungie COO Pete Parsons early in the game’s production, it was to play an integral role in Destiny’s marketing campaign.
“I wasn’t writing this just to be marketing fodder,” O’Donnell laughs. “I was writing it as a standalone listening experience that would then eventually become marketing fodder – but I didn’t want the other to happen first.”
Between 2011 and 2012, Bungie and O’Donnell devised plans for the album.
“Every few weeks or so, I would be called to a meeting in one of their big conference rooms and there would be a whole bunch of new faces there, pitching some cool idea or other,” says O’Donnell. “[At one point] it was going to be a visualisation with your mobile device.”
![]()
But there were fundamental differences between what Bungie had planned and what Activision – Destiny’s publisher, and keeper of the purse strings – wanted.
“I think Activision was confused [about] why you would ever use music as marketing… And the other thing is, I honestly don’t think they understood why we were working with Paul McCartney. I think they didn’t think that that was the right person for the demographic.”
News of a collaboration with McCartney had raised eyebrows when he revealed his involvement on Twitter in July 2012. His interest had been piqued during his attendance at E3 2009 following the announcement of The Beatles: Rock Band, which was preceded by Bungie’s unveiling of Halo ODST.
![]()
“I had a contact in Los Angeles who worked out deals with actors we used on Halo,” O’Donnell recalls. “He was able to make contact with Paul’s people and set up a meeting between the two of us in spring of 2011. My impression was that Paul saw a new crop of fans come from Beatles Rock Band and was interested in seeing what was involved with creating music for video games. He seemed convinced that Bungie was working on a project that he could get behind.”
Within a few weeks, O’Donnell and McCartney were exchanging ideas for Destiny.
“The first thing he sent me was what he called his ‘loop symphony’,” says O’Donnell. “He used the same looping tape recorder that he used on Sgt. Pepper’s and Revolver… He hauled this tape recorder out of his attic.”
Working with regular collaborator Michael Salvatori, O’Donnell and McCartney set about developing Music of the Spheres into a fully fledged album, comprising eight movements.
![]()
“I have all of these wonderful things, which included interesting things he did on his guitar that sort of loop and sound otherworldly… I think there are a couple of times in The Path, which is the first piece, and then I think The Prison, which is the seventh piece, where we use a recording of Paul doing this loop with his voice. This little funny thing. That’s Paul’s voice, which is cool.”
The album was completed in December 2012 following recording sessions at Capitol Studios in California, Avatar Studios in New York, and Abbey Road in London. Musical elements from Music of the Spheres accompanied Bungie’s big reveal of Destiny at a PlayStation 4 event in New York in February 2013. But after that, things started to go south.
“After that PlayStation 4 announcement, I said, ‘Let’s figure out how to release this. I don’t care if we have Harmonix do an iPad version with a visualiser for it. I mean, if we can’t pull the trigger on something big and interesting like that, that’s fine with me. Let’s just release it online.’ It had nothing to do with making money… It was always fan service, in my mind at least.”
Activision, on the other hand, had other priorities. “Activision had a lot of say on the marketing. I think that’s where things started to go wrong, for me… things started being handled badly, or postponed, and then all of a sudden I was seeing bits of Music of the Spheres being cut up and presented in ways that I wasn’t happy with.”
You can read the rest of this fantastic feature in Wireframe issue four, out 20 December in Tesco, WHSmith, and all good independent UK newsagents.
Or you can buy Wireframe directly from us — worldwide delivery is available. And if you’d like to own a handy digital version of the magazine, you can also download a free PDF.
![]()
The post From Wireframe issue 4: Recovering Destiny’s long-lost soundtrack appeared first on Raspberry Pi.
Hey folks, Rob from The MagPi here! Before I head off on my Christmas holidays, I want to introduce you to The MagPi 77, where we teach you how to make with code.
Making made fun! See what we did there?
What do we mean by that? Well, using code to make things – whether that’s scripts, programs, or games on your Pi, or whether you’re controlling LEDs with code, or robots, or massive Rube Goldberg machines. In this feature, we show new Pi users how to get started making practical applications with Python, and hopefully you’ll be inspired to go on and do something special.
Can you make… with code?
Want to power up your Raspberry Pi with a few extras? We’ve put together a guide to the 20 best Raspberry Pi accessories, covering IoT, robots, media, power solutions, and even industrial add-ons. There’s a lot of stuff you can do with your Pi, and even more if you’ve got the right tool to help.
We have the best accessories for you
Still need more reasons to grab a copy? Well, we have a tutorial on how to make a smart door, we continue developing Pac-Man while checking out the Picade Console, and we have plenty of amazing project showcases like the SelfieBot!
You can get The MagPi 77 from WHSmith, Tesco, Sainsbury’s, and Asda. If you live in the US, head over to your local Barnes & Noble or Micro Center in the next few days for a print copy. You can also get the issue online: check it out on our store, or digitally via our Android or iOS apps. And don’t forget, there’s always the free PDF.
We’re still running our super special Raspberry Pi 3A+ subscription offer! If you subscribe to twelve months of The MagPi, you’ll get a Raspberry Pi 3A+ completely free while stocks last. Make sure to check out our other subs offers while you’re there, like three issues for £5, and our rolling monthly sub.
Get a 3A+ completely free while stocks last!
Right, happy holidays, folks! See you all in the New Year!
![]()
The post MagPi 77: Make with code appeared first on Raspberry Pi.
In HackSpace magazine issue 14, out today, Cameron Norris writes about how citizen scientists at Tokyo Hackerspace took on the Fukushima nuclear disaster.
Safecast is an independent citizen science project that emerged in the wake of the Fukushima nuclear disaster to provide accurate, unbiased, and credible data on radiation exposure in Japan.
On 11 March 2011, an undersea earthquake off the Pacific coast of Thoku, Japan, caused the second-worst nuclear accident in the history of nuclear power generation, releasing almost 30% more radiation than the Chernobyl disaster in 1986.
![]()
The magnitude 9.0–9.1 earthquake resulted in a series of devastating tsunami waves that damaged the backup generator of Fukushima Daiichi Nuclear Power Plant. Without functioning cooling systems, the temperature of the plant’s many nuclear reactors steadily began to rise, eventually leading to a partial meltdown and several hydrogen gas explosions, launching nuclear fallout into the air and sea. Due to concerns over possible radiation exposure, the Japanese government established an 18-mile no-fly zone around the Fukushima plant, and approximately 232 square miles of land was evacuated.
However, citizens of Fukushima Prefecture living outside of the exclusion zone were faced with a serious problem: radiation exposure data wasn’t available to the public until almost two months after the meltdown occurred. Many residents felt they had been left to guess if dangerous levels of ionising radiation had contaminated their communities or not.
Alarmed by the situation, Dutch electrical engineer and computer scientist Pieter Franken, who was living in Tokyo with his family at the time, felt compelled to act. “After the massive wall of water, we had this invisible wall of radiation that was between myself and my family-in-law in the north of Japan, so that kind of triggered the start of Safecast,” says Pieter.
Pieter Franken, a Dutchman living in Japan, who helped start Safecast
Image credit: Joi Ito – CC BY 2.0
Pieter picked up an idea from Ray Ozzie, the former CTO of Microsoft, who suggested quickly gathering data by attaching Geiger counters – used for measuring radioactivity – to the outside of cars before driving around Fukushima. The only problem was that Geiger counters sold out almost globally in a matter of hours after the tsunami hit, making it even more difficult for Pieter and others on the ground to figure out exactly what was going on. The discussion between Pieter and his friends quickly changed from buying devices to instead building and distributing them to the people of Fukushima.
At Tokyo Hackerspace, Pieter – along with several others, including Joi Ito, the director of the MIT Media Lab, and Sean Bonner, an activist and journalist from Los Angeles – built a series of open-source tools for radiation mapping, to enable anyone to build their own pocket Geiger counter and easily share the data they collect. “Six days after having the idea, we had a working system. The next day we were off to Fukushima,” recalls Sean.
A bGeigie Nano removed from its Pelican hardshell
Safecast CC-BY-NC 4.0
A successful Kickstarter campaign raised $36,900 to provide the funding necessary to distribute hundreds of Geiger counters to the people of Japan, while training volunteers on how to use them. Today, Safecast has collected over 100 million data points and is home to the largest open dataset about environmental radiation in the world. All of the data is collected via the Safecast API and published free of charge in the public domain to an interactive map developed by Safecast and MIT Media Lab.
You can read the rest of this feature in HackSpace magazine issue 14, out today in Tesco, WHSmith, and all good independent UK newsagents.
Or you can buy HackSpace mag directly from us — worldwide delivery is available. And if you’d like to own a handy digital version of the magazine, you can also download a free PDF.
![]()
The post From HackSpace mag issue 14: DIY Geiger counters appeared first on Raspberry Pi.
It’s that time of year again: Pi Towers is locking its doors as we all scoot off into the night to spend some time with our families. There will be a special post on Christmas Day for people who have been given a new Raspberry Pi and need some pointers for getting started. Normal service will resume when we’ve dealt with our New Year headaches: until then, have a wonderful Christmas holiday!
Our good friend Alex Eames has been live-blogging a new project over the last week or so, and has just wrapped up. (Seasonal pun. Not sorry.) He’s recently been bitten by the cycling bug.
I’ve ridden about 1100 miles in the last 6 months and have learned enough to bore you to death with talk of heart zones and various items of clothing you can buy to make winter rides more bearable.
Here is Darth Alex demonstrating fashion-forward winter 2018 cycling wear.
![]()
Moving swiftly on.
Alex has been working on a dashcam for his bike, mostly intended for use as a rear-view “mirror”, but also to work as an evidence-collecting camera in case of any accidents.
![]()
This is really one of the most interesting and enjoyable project write-ups we’ve come across in a while: working on this dashcam as a daily live blog means that Alex has been able to take us down all the rabbit holes he investigated, explain changes of direction and dead ends, and show us exactly how the design and engineering process came together. And this, being an Alex project, has great attention to detail; he made custom mounts for his bike to keep everything as unobtrusive as possible, so it looks great as well.
![]()
There’s a ton of detail on hardware (which went through several iterations before Alex settled on something he was happy with), software, implementation, unexpected hiccups, and more. And if you’re someone who would rather skip to the end, here’s Alex’s road test.
Raspberry Pi Bike Dashcam Rearview Mirror Road Test – no audio
First and second road tests of my Raspberry Pi Rearview mirror/Dashcam bike project as blogged here https://raspi.tv/2018/making-a-fairly-simple-bike-dashcam-live-project-blog
I really hope we’ll see more write-ups like this one in 2019. We don’t get to read as much about other project makers’ process as we’d like to; it’s really fascinating to get a glimpse into the way someone else thinks about and approaches a problem.
The post Bike dashcam from RaspiTV appeared first on Raspberry Pi.
Merry Christmas everybody! We’re taking a little time off to spend with our families; we’ll be back in 2019. This post is for those of you who have found a piece of Pi under the tree or nestling uncomfortably in the toe of a stocking, and who are wondering what to do with it. Raise a glass of egg nog and join us in fighting over who gets the crispy bits this lunchtime.
So you’re the proud owner of a brand-new Raspberry Pi. Now what?
![]()
Did you wake up this morning to find a new Raspberry Pi under the tree? Congratulations, and welcome to the Raspberry Pi community! You’re one of us now, and we’re happy to have you on board.
But what if you’ve never seen a Raspberry Pi before? What are you supposed to do with it? What’s all the fuss about, and why does your new computer look so naked?
Are you comfy? Good. Then let us begin.
First of all, you need to make sure you have an operating system on your micro SD card: we suggest Raspbian, the Raspberry Pi Foundation’s official supported operating system. If your Pi is part of a starter kit, you might find that it comes with a micro SD card that already has Raspbian preinstalled. If not, you can download Raspbian for free from our website.
An easy way to get Raspbian onto your SD card is to use a free tool called Etcher. Watch The MagPi’s Lucy Hattersley show you what you need to do. You can also use NOOBS to install Raspbian on your SD card, and our Getting Started guide explains how to do that.
Your new Raspberry Pi 3 comes with four USB ports and an HDMI port. These allow you to plug in a keyboard, a mouse, and a television or monitor. If you have a Raspberry Pi Zero, you may need adapters to connect your devices to its micro USB and micro HDMI ports. Both the Raspberry Pi 3 and the Raspberry Pi Zero W have onboard wireless LAN, so you can connect to your home network, and you can also plug an Ethernet cable into the Pi 3.
![]()
Make sure to plug the power cable in last. There’s no ‘on’ switch, so your Pi will turn on as soon as you connect the power. Raspberry Pi uses a micro USB power supply, so you can use a phone charger if you didn’t receive one as part of a kit.
If you’ve never used a Raspberry Pi before, or you’re new to the world of coding, the best place to start is our projects site. It’s packed with free projects that will guide you through the basics of coding and digital making. You can create projects right on your screen using Scratch and Python, connect a speaker to make music with Sonic Pi, and upgrade your skills to physical making using items from around your house.
Here’s James to show you how to build a whoopee cushion using a Raspberry Pi, paper plates, tin foil and a sponge:
Raspberry Pi Whoopee cushion PRANK || HOW-TO || Raspberry Pi Foundation
Explore the world of Raspberry Pi physical computing with our free FutureLearn courses: http://rpf.io/futurelearn.
You’ve plundered our projects, you’ve successfully rigged every chair in the house to make rude noises, and now you want to dive deeper into digital making. Good! While you’re digesting your Christmas dinner, take a moment to skim through the Raspberry Pi blog for inspiration. You’ll find projects from across our worldwide community, with everything from home automation projects and retrofit upgrades, to robots, gaming systems, and cameras.
Need a beginners’ guidebook? Look no further: here’s the official guide. It’s also available as a free download, like all our publications.
You’ll also find bucketloads of ideas in The MagPi magazine, the official monthly Raspberry Pi publication, available in both print and digital format. You can download every issue for free. If you subscribe, you’ll get a free Raspberry Pi 3A+ to add to your new collection. HackSpace magazine is another fantastic place to turn for Raspberry Pi projects, along with other maker projects and tutorials.
And, of course, simply typing “Raspberry Pi projects” into your preferred search engine will find thousands of ideas. Sites like Hackster, Hackaday, Instructables, Pimoroni, and Adafruit all have plenty of fab Raspberry Pi tutorials that they’ve devised themselves and that community members like you have created.
If you make something marvellous with your new Raspberry Pi – and we know you will – don’t forget to share it with us! Our Twitter, Facebook and Instagram accounts are brimming with chatter, projects, and events. And our forums are the best place to visit if you ever have questions about your Raspberry Pi or if you need some help.
It’s good to get together with like-minded folks, so check out the growing Raspberry Jam movement. Raspberry Jams are community-run events where makers and enthusiasts can meet other makers, show off their projects, and join in with workshops and discussions. Find your nearest Jam here.
![]()
Have a great break, and welcome to the community. We’ll see you in 2019!
The post Mince Pi – what’s under your tree? appeared first on Raspberry Pi.
On 2 January, MIT released the latest version of their incredible visual programming language: Scratch 3!
![]()
We love Scratch — it’s the perfect starting point for young people who want to try coding, and we’re offering a huge variety of free Scratch project guides for all interests and coding abilities.
Scratch 3 introduces a brand-new look and feel. The most obvious change is that the stage is now on the right-hand side; there are new paint and sound editing tools; new types of code blocks; and the blocks are now larger and easier to read.
To help you and your young learners navigate the new Scratch 3 interface, we’ve created a free, printable Scratch 3 poster:
![]()
Perhaps the biggest news is that Scratch 3 also works on tablets, opening up coding to many children who don’t have access to a computer.
We want to make this a smooth transition for all of you who rely on our free project resources, whether that be at a Code Club, CoderDojo, Raspberry Jam, or at home, so we’ve been busy upgrading our resources to work with Scratch 3.
Scratch 3 versions of all projects in the Code Club Scratch Modules 1–3 and the CoderDojo Scratch Sushi Cards are already live!
![]()
The upgrading process also was a chance for us to review our resources to make sure they are the best they can be; as part of this, we’ve introduced a number of improvements, such as simplified layouts, better hints, and better print-outs.
And we know that for many people, starting to use Scratch 3 is not simple, or not even possible yet, so we are committed to providing support for both Scratch 2 and 3 for the next 12 months.
We are really pleased with how our newly polished Scratch projects turned out, and we hope you are too!
Over the coming months, we’ll update the rest of our Scratch projects. Meanwhile, our amazing volunteer translators will begin the process of translating the upgraded projects.
![]()
Brand-new projects that take advantage of some of Scratch 3’s new features are also in the pipeline!
Another reason for ensuring we support both Scratch 2 and 3 is that, at the moment, there is no offline, installable version of Scratch 3 for Raspberry Pi. Rest assured that this is something we are working on!
The creation of Scratch 3 for Raspberry Pi will be a two-step process: first we’ll support MIT with their optimisation of Scratch 3 to make sure it delivers the best performance possible on a range of devices; once that work is complete, we’ll create an offline build of Scratch 3 for Raspberry Pi, including new extensions for the GPIO pins and the Sense HAT.
Make sure you’re following us on Twitter and Facebook, as we’ll be announcing more information on this in the coming months!
The post Scratch 3, and upgrading our free resources appeared first on Raspberry Pi.
Parisa Khashayar is a high school freshman with a knack for coding. In September of 2018, Parisa had the chance to present her tech creation at Coolest Projects USA, and she made joint first place in the Hardware category.
![]()
Since the sixth grade, Parisa has been teaching herself how to code; she has even taken classes during school holidays to further develop her learning. She’s also become quite the mechanic, fixing appliances around the house and steadily growing her tool collection. Besides coding and electronics, she also loves biology and hopes to study biomedical engineering in the future.
Let’s hear from Parisa about her creation for Coolest Projects directly.
A couple of years ago, there was a large wildfire near our house, and we happened to drive by a fire truck where an injured fireman was being treated. Firefighters risk their lives every day to keep us safe, but who makes sure they themselves are safe? I did some research and found that, despite all advances in technology, there are no real high-tech products out there that monitor firefighters’ condition while they are on mission.
That is how my science project was born: I designed and prototyped a small board with multiple sensors that can be worn by firefighters. The device monitors conditions in the environment surrounding the fire, as well as the health of the firefighter; it relays this measurements to the command center via cellular technology.
![]()
I submitted my project to the Broadcom MASTERS competition, and it was selected as one of the top 300 in the nation. Through Broadcom MASTERS I found out about Coolest Projects USA, and I entered this showcase in Santa Ana as well.
“I think that Coolest Projects is one of the best ways to encourage kids to get into STEM.”
I have attended many science fairs, but Coolest Projects was different: it had a fun and friendly atmosphere, and kids of all different ages attended. After I arrived, I set up my project and then had a chance to walk around and talk to other kids to find out about their projects. It was very interesting and encouraging to see kids as young as 7 or 8 showing their work.
Showcasing creativity at Coolest Projects North America
Coolest Projects is a world-leading showcase that enables and inspires the next generation of digital creators and innovators to present the projects that they created at their local CoderDojo, Code Club and Raspberry Jam. This year we brought Coolest Projects to the Discovery Cube Orange County for a spectacular regional event in California.
We got the chance to rant about the endless problems we encountered with our projects, and to exchange notes about our solutions. It felt more like a friendly collaboration than a stressful competition. The judges were very kind and encouraging, which made the day even more pleasant.
“It felt more like a friendly collaboration than a stressful competition.” Parisa speaks to judges at Coolest Projects 2018
I received the first-place award in the Hardware category at Coolest Projects USA. I would like to attend Coolest Projects USA in 2019 with another project, or volunteer my time with them, because I think that Coolest Projects is one of the best ways to encourage kids to get into STEM!
“I want all the kids to know that coding is not scary — it is actually fun!”
Since Coolest Projects, I have been working on my project to make my design smaller so everything can fit in a small, watch-size board. It is hard, and the progress is slow as I am very busy with high school work as well. Last summer I had an opportunity to introduce my design to the UCI Innovation program for UCI college students, and they let me to use their lab. I hope to be able to do the same this summer.
As for now, I am currently volunteering at my local CoderDojo to help teach younger kids how to code. I want all the kids to know that coding is not scary — it is actually fun!
Coolest Projects USA is taking place on Saturday, March 23 2019, in Santa Ana, California, and project registration is now open.
We’re also hosting events in Manchester, UK, on 2 March, and in Dublin, Ireland, on 5 May! Learn more about Coolest Projects events near you by visiting the Coolest Projects website.
The post Firefighter monitoring system at Coolest Projects appeared first on Raspberry Pi.
It looks like the Nintendo Wii Remote (Wiimote) has become a staple in many maker toolkits! Case in point: with the help of a Raspberry Pi and the cwiid Python library, David Pride turned the popular piece of tech into a giant digital graffiti spraycan.
![]()
While it’s no longer being updated and supported, the cwiid library is still a handy resource for creators who want to integrate the Wiimote with their Raspberry Pi.
![]()
Over the years, makers have used the Wiimote to control robots, musical instruments, and skateboards; the accessibility of the library plus the low cost and availability of the remote make using this tool a piece of cake…or pie, in this instance.
Using aWiimote, a Wii Sensor Bar, and a large display, David Pride hacked his way to digital artistry wonderment and enabled attendees of the Open University Knowledge Makers event to try their hand at wireless drawing. It’s kinda awesome.
OK, it’s all kinds of awesome. We really like it.
To construct David’s digital graffiti setup, you’ll need:
David provides the step-by-step instructions for setting up the Wiimote and Raspberry Pi on his website, including a link to the GitHub repository with the complete project code. The gist of the build process is as follows:
![]()
After installing the cwiid library on the Raspberry Pi, David connected the Pi to the Wiimote via Bluetooth. And after some digging into the onboard libraries of the remote itself, he was able to access the infrared technology that lets the remote talk to the Sensor Bar.
![]()
The 3D-printed holder with which David augmented the Wiimote lets the user hold the remote upright like a spray can, while the integrated mirror reflects the IR rays so the Sensor Bar can detect them.
![]()
The Sensor Bar perceives the movement of the Wiimote, and this data is used to turn the user’s physical actions into works of art on screen. Neat!
If you’ve used the Nintendo Wiimote for your Raspberry Pi projects, let us know. And, speaking of the Wii, has anyone hacked their Balance Board with a Pi?
The post Adding the Pi to Picasso with wireless digital graffiti appeared first on Raspberry Pi.
Escape the distractions of the world around you and focus your attention on the thing you love the most in life: your smartphone! It’s easy with the all-new Buddha Box, brought to you by South Park and the 8 Bits and a Byte team!
Introducing The All New Buddha Box | South Park
A brand new invention is sweeping South Park. The Buddha Box will let you escape from anything in the world so that you can focus on the thing you love the most… your phone.
Introduced in a recent episode of the cult show South Park, the Buddha Box is an ingenious invention that allows its user to ignore the outside world and fully immerse themselves in their smartphone. With noise-cancelling headphones and a screen so close to your eyes you’ll be seeing light spots for weeks to come, the Buddha Box is the must-have accessory for 2019.
We jest, obviously. It’s a horrible idea. And here’s how to make your own!
Using a Raspberry Pi, noise-cancelling headphones, a screen, and a cardboard box, the wonderful 8 Bits and a Byte team has created a real-life Buddha Box that you definitely shouldn’t make yourself. As we said — horrible idea.
But it would be a great way to try out screensharing software on your Pi!
To make it, you’ll need to secure the headphones and a screen inside a suitably sized cardboard box, and then set up your Raspberry Pi to run Screencast.
![]()
The Screencast software allows you to cast the screen of your smartphone to the screen within the box — hence its name.
Here’s the tutorial from 8 Bits and a Byte, and a working demonstration:
South Park’s Buddha Box
A real, working version of South Parks Buddha Box, made using a pair of headphones, an LCD screen, a powerbank and a Raspberry Pi.
If you have an Android phone that you want to use with your Raspberry Pi, check out this guide for enabling Screencast, written by Make Tech Easier. And if you want to share the screen of an iPhone with your Pi, this Instructables guide will walk you through setting up the RPlay software.
We love prop builds using Raspberry Pi — if you do too, check out the posts in our ‘props’ blog category. And if you’ve made a prop from TV or film using a Pi, be sure to share it with us!
The post Build your own South Park Buddha Box appeared first on Raspberry Pi.
We often mention SSH (Secure Shell) when we talk about headless Raspberry Pi projects — projects that involve accessing a Pi remotely. If you’re a coding creative who doesn’t know what SSH involves, we’ve got you covered with our comprehensive online guide to using SSH with your Raspberry Pi.
![]()
You know who’s also got you covered? YouTube favourite Tinkernut, with his great beginners’ guide to SSH, what it is, why we use it, and how you can use it with your device:
Beginners Guide To SSH
Me: “I have a question about controlling another computer over the internet” You: “SSH” Me: “Don’t tell me to ‘shhh’, I’m asking you a question”. Ok, enough with the play on words. If you’ve ever wanted to securely control another computer over the internet, then you’ve probably heard of SSH.
Between our guide and Tinkernut’s video, I don’t think I need to add anything else on the subject.
So here, have this GIF, and have yourself a lovely weekend!
![]()
The post Tinkernut’s Beginners’ Guide to SSH appeared first on Raspberry Pi.
We are excited to announce that we will host the first-ever Scratch Conference Europe in the UK this summer: from Friday 23 to Sunday 25 August at Churchill College, Cambridge!
![]()
Scratch Conference is a participatory event that gives hundreds of educators the chance to explore the creative ways in which people are programming and learning with Scratch. In even-numbered years, the conference is held at the MIT Media Lab, the birthplace of Scratch; in odd-numbered years, it takes place in other places around the globe.
![]()
Since 2019 is also the launch year of Scratch 3, we think it’s a fantastic opportunity for us to bring Scratch Conference Europe to the UK for the first time.
Join us to become part of a growing community, discover how the Raspberry Pi Foundation can support you further, and develop your skills with Scratch as a creative tool for helping your students learn to code.
Would you like to contribute your own content at the event? We are looking for you in the community to share or host:
We warmly welcome young people under 18 as content contributors; they must be supported by an adult. All content contributors will be able to attend the whole event for free.
![]()
Find more details and apply to participate in this short online form.
Tickets for Scratch Conference Europe will go on sale in April.
For updates, subscribe to Raspberry Pi LEARN, our monthly newsletter for educators, and keep an eye on @Raspberry_Pi on Twitter!
Since we’re hosting Scratch Conference Europe this year, our digital making festival Raspberry Fields will be back in 2020, even bigger and more packed with interactive family fun!
![]()
Scratch is a project of the Lifelong Kindergarten group at the MIT Media Lab. It is available for free at scratch.mit.edu.
The post We’re hosting the UK’s first-ever Scratch Conference Europe appeared first on Raspberry Pi.
Bring YouTube videos, Google Photos, and more to your magic mirror, with third-party modules and the MagicMirror² open-source software platform.
NEW Raspberry Pi Magic Mirror Modules!
Today I walk you through two fun modules to add top your Raspberry Pi Magic Mirror! Music in this video was from Epidemic Sound! Green Screen Subscribe Button: Its Frida MAGIC MIRROR Magic Mirror Builder (Michael Teeuw): https://magicmirror.builders/ Magic Mirror Modules in this video: YouTube: https://forum.magicmirror.builders/topic/8481/mmm-iframe-ping Google Photos: https://forum.magicmirror.builders/topic/8437/mmm-googlephotos/18 USB Audio: ROCCAT – Juke Virtual 7.1 USB Stereo Gaming Soundcard Music in this video was from Epidemic Sound.
Mention Raspberry Pi to the uninitiated, and they’ll probably ask if it’s “that green thing people use for game emulation and smart mirrors?”. The popularity of magic mirrors has grown massively over the past few years, thanks to how easy it’s become to find cheap displays and great online tutorials.![]()
While big-brand smart mirrors cost upwards of a bajillion dollars, a homemade magic mirror costs pennies in comparison. The basic homemade model consists of a screen (usually an old computer monitor or flatscreen TV), a piece of two-way mirrored acrylic or glass, a frame, and a Raspberry Pi. Once it’s set up, you have yourself both a mirror and a notification board complete with calendar events, memos, and more.
Introducing MagicMirror²!
MagicMirror² is an open source platform for smart mirrors. It provides an extensive API for module development and is easy to setup and use. For more information and downloads visit http://magicmirror.builders and the forum http://forum.magicmirror.builders :)
The software most people use for setting up their magic mirror is MagicMirror², a free, group-maintained open-source platform created by Michael Teeuw.
And you know what open-source means…
The modular nature of MagicMirror² lets third-party developers easily bring their own ideas to the platform. As Brian Cotter explains in the video above, he used AgP42’s MMM-iFrame-Ping and eouia’s MMM-GooglePhotos to integrate YouTube videos and photographs into his magic mirror.
![]()
And of course that’s not all! Other magic mirror add-ons let you implement 3D gesture detection or display international currency values, Google Fit totals, and more. Find a whole host of such third-party add-ons in this GitHub wiki.
Looking for more Raspberry Pi videos from Brian? Check out his Raspberry Pi playlist and be sure, as always, to subscribe to his channel.
Inside My Raspberry Pi Magic Mirror!
Checkout this inside look of my Rasberry Pi Magic Mirror build! Magic Mirror Builder (Michael Teeuw): https://magicmirror.builders/ Two-Way Mirror: https://www.tapplastics.com/ Monitor: https://amzn.to/2EusyhQ Raspberry Pi: https://www.raspberrypi.org/products/… Music Credit: Ikson – Paradise New Here? Follow Me Instagram: https://www.instagram.com/techcoderun/ Twitter: https://twitter.com/bfcotter Hi! My name is Brian Cotter and I live in New York City.
We’re forever grateful to all the content creators who make videos of their Raspberry Pi projects. If you have your own, be sure to let us know the link in the comments!
The post YouTube and Google Photos add-ons for your magic mirror appeared first on Raspberry Pi.
Valentine’s Day is fast approaching, so why not make this adorable voice message device for your beloved?
Love Birds : a Box to Send and Receive Telegram Audio Message
How to make it: https://www.raspiaudio.com/lovebirds and https://www.instructables.com/id/Love-Birds-a-Box-to-Send-and-Receive-Telegram-Audi/ It’s a standalone device that receives send voice messages to your love, family or friend. Open the box, push the button while you are talking, release to send the audio message.
“OK, my phone can already do that, why should I bother?” project creator Olivier Ros asks himself in the introduction to his Instructables tutorial. And his response is simple. While you could use a phone, the magic of Love Birds is the intention behind the action. Mobile phones are where your life exists: your banking details, your work conversations, and more. It’s always on your person, probably in your hand right now. But with Love Birds, you have to make the effort to use the device to send that heartfelt message to the recipient.
![]()
He also says the device is easy to use even for those who are not technically inclined or have accessibility issues:
“Love Birds is easier to use than a phone: only one button. This cool for children, old people that don’t like smartphones, long-distance relationships, or just couples who want a private line of communication through a simple, dedicated object.”
You’ll need one Raspberry Pi per Love Bird device; while Olivier’s version contains a Pi Zero W, a Raspberry Pi 2 or 3 will also do the trick.
You’ll also need a microphone and speakers. And, lucky for us, Raspiaudio offers a HAT that incorporates the two!
![]()
You can find similar boards from other Raspberry Pi accessory manufacturers, or use a standard USB microphone and speaker, readily available in stores and online.
To make the notification birds dance, you also need a servo motor. The full code for the motors and everything else is available on GitHub. As an alternative to the motor, you could try flashing LEDs or playing a sound as a notification; we’re always interested in seeing how people add their own flair to open-source projects.
You also need to sign up to Telegram in order to send your voice messages securely over the internet. Again, there are other services available, which you can use by editing the code accordingly.
Find the full Instructables tutorial here, and visit the Raspiaudio website for more projects!
How will you be using a Raspberry Pi to celebrate Valentine’s Day?
The post Send audio messages to your loved ones appeared first on Raspberry Pi.