Recently, I learned about the NGINX Unit and decided to try it on my DjangoTricks website. Unit is a web server developed by people from NGINX, with pluggable support for Python (WSGI and ASGI), Ruby, Node.js, PHP, and a few other languages. I wanted to see whether it's really easy to set it up, have it locally on my Mac and the remote Ubuntu server, and try out the ASGI features of Django, allowing real-time communication. Also, I wanted to see whether Django is faster with Unit than with NGINX and Gunicorn. This article is about my findings.
Unit service uses HTTP requests to read and update its configuration. The configuration is a single JSON file that you can upload to the Unit service via a command line from the same computer or modify its values by keys in the JSON structure.
Normally, the docs suggest using the curl command to update the configuration. However, as I am using Ansible to deploy my Django websites, I wanted to create a script I could later copy to other projects. I used Google Gemini to convert bash commands from the documentation to Ansible directives and corrected its mistakes.
The trickiest part for me was to figure out how to use Let's Encrypt certificates in the simplest way possible. The docs are extensive and comprehensible, but sometimes, they dig into technical details that are unnecessary for a common Django developer.
Also, it's worth mentioning that the Unit plugin version must match your Python version in the virtual environment. It was unexpected for me when Brew installed Python 3.12 with unit-python3 and then required my project to use Python 3.12 instead of Python 3.10 (which I used for the DjangoTricks website). So I had to recreate my virtual environment and probably will have problems later with pip-compile-multi when I prepare packages for the production server, still running Python 3.10.
Below are the instructions I used to set up the NGINX Unit with my existing DjangoTricks website on Ubuntu 22.04. For simplicity, I am writing plain Terminal commands instead of analogous Ansible directives.
Follow the installation instructions from documentation to install unit, unit-dev, unit-python3.10, and whatever other plugins you want. Make sure the service is running.
Create a temporary JSON configuration file /var/webapps/djangotricks/unit-config/unit-config-pre.json, which will allow Let's Encrypt certbot to access the .well-known directory for domain confirmation:
{
  "listeners": {
    "*:80": {
      "pass": "routes/acme"
    }
  },
  "routes": {
    "acme": [
      {
        "match": {
          "uri": "/.well-known/acme-challenge/*"
        },
        "action": {
          "share": "/var/www/letsencrypt/$uri"
        }
      }
    ]
  }
}
Install it to Unit:
$ curl -X PUT --data-binary @/var/webapps/djangotricks/unit-config/unit-config-pre.json \
--unix-socket /var/run/control.unit.sock http://localhost/config
If you make any mistakes in the configuration, it will be rejected with an error message and not executed.
Create Let's Encrypt certificates:
$ certbot certonly -n --webroot -w /var/www/letsencrypt/ -m hello@djangotricks.com \
--agree-tos --no-verify-ssl -d djangotricks.com -d www.djangotricks.com
Create a bundle that is required by the NGINX Unit:
cat /etc/letsencrypt/live/djangotricks.com/fullchain.pem \
/etc/letsencrypt/live/djangotricks.com/privkey.pem > \
/var/webapps/djangotricks/unit-config/bundle1.pem
Install certificate to NGINX Unit as certbot1:
curl -X PUT --data-binary @/var/webapps/djangotricks/unit-config/bundle1.pem \
--unix-socket /var/run/control.unit.sock http://localhost/certificates/certbot1Create a JSON configuration file /var/webapps/djangotricks/unit-config/unit-config.json which will use your SSL certificate and will serve your Django project:
{
  "listeners": {
    "*:80": {
      "pass": "routes/main"
    },
    "*:443": {
      "pass": "routes/main",
      "tls": {
        "certificate": "certbot1"
      }
    }
  },
  "routes": {
    "main": [
      {
        "match": {
          "host": [
            "djangotricks.com",
            "www.djangotricks.com"
          ],
          "uri": "/.well-known/acme-challenge/*"
        },
        "action": {
          "share": "/var/www/letsencrypt/$uri"
        }
      },
      {
        "match": {
          "host": [
            "djangotricks.com",
            "www.djangotricks.com"
          ],
        },
        "action": {
          "pass": "applications/django"
        }
      },
      {
        "action": {
          "return": 444
        }
      }
    ]
  },
  "applications": {
    "django": {
      "type": "python",
      "path": "/var/webapps/djangotricks/project/djangotricks",
      "home": "/var/webapps/djangotricks/venv/",
      "module": "djangotricks.wsgi",
      "environment": {
        "DJANGO_SETTINGS_MODULE": "djangotricks.settings.production"
      },
      "user": "djangotricks",
      "group": "users"
    }
  }
}
In this configuration, HTTP requests can only be used for certification validation, and HTTPS requests point to the Django project if the domain used is correct. In other cases, the status "444 - No Response" is returned. (It's for preventing access for hackers who point their domains to your IP address).
In the NGINX Unit, switching between WSGI and ASGI is literally a matter of changing one letter from "w" to "a" in the line about the Django application module, from:
"module": "djangotricks.wsgi",to:
"module": "djangotricks.asgi",I could have easily served the static files in this configuration here, too, but my STATIC_URL contains a dynamic part to force retrieval of new files from the server instead of the browser cache. So, I used WhiteNoise to serve the static files.
For redirection from djangotricks.com to www.djangotricks.com, I also chose to use PREPEND_WWW = True setting instead of Unit directives.
And here, finally, installing it to Unit (it will overwrite the previous configuration):
$ curl -X PUT --data-binary @/var/webapps/djangotricks/unit-config/unit-config.json \
--unix-socket /var/run/control.unit.sock http://localhost/configDjangoTricks is a pretty small website; therefore, I couldn't do extensive benchmarks, but I checked two cases: how a filtered list view performs with NGINX and Gunicorn vs. NGINX Unit, and how you can replace NGINX, Gunicorn, and Huey background tasks with ASGI requests using NGINX Unit.
First of all, the https://www.djangotricks.com/tricks/?categories=development&technologies=django-4-2 returned the HTML result on average in 139 ms on NGINX with Gunicorn, whereas it was on average 140 ms with NGINX Unit using WSGI and 149 ms with NGINX Unit using ASGI. So, the NGINX Unit with WSGI is 0.72% slower than NGINX with Gunicorn, and the NGINX Unit with ASGI is 7.19% slower than NGINX with Gunicorn.
However, when I checked https://www.djangotricks.com/detect-django-version/ how it performs with background tasks and continuous Ajax requests until the result is retrieved vs. asynchronous checking using ASGI, I went on average from 6.62 s to 0.75 s. Of course, it depends on the timeout of the continuous Ajax request, but generally, a real-time ASGI setup can improve the user experience significantly.
Although NGINX Unit with Python is slightly (unnoticeably) slower than NGINX with Gunicorn, it allows Django developers to use asynchronous requests and implement real-time user experience. Also, you could probably have a Django website and Matomo analytics or WordPress blog on the same server. The NGINX Unit configuration is relatively easy to understand, and you can script the process for reusability.
Cover Image by Volker Meyer.
When I initially created my MVP (minimal viable product) for 1st things 1st, I considered the whole Django project to be about prioritization. After a few years, I realized that the Django project is about SaaS (software as a service), and prioritization is just a part of all functionalities necessary for a SaaS to function. I ended up needing to rename apps to have clean and better-organized code. Here is how I did that.
Ensure you have the latest git pull and execute all database migrations.
Put django-rename-app into pip requirements and install them or just run:
(venv)$ pip install django-rename-appPut the app into INSTALLED_APPS in your settings:
INSTALLED_APPS = [
    # …
    "django_rename_app",
]Rename the oldapp as newapp in your apps and templates.
Rename the app in all your imports, relations, migrations, and template paths.
You can do a global search for oldapp and then check case by case where you need to rename that term to newapp, and where not.
Run the management command rename_app:
(env)$ python manage.py rename_app oldapp newappThis command renames the app prefix the app tables and the records in django_content_type and django_migrations tables.
If you plan to update staging or production servers, add the rename_app command before running migrations in your deployment scripts (Ansible, Docker, etc.)
Lastly, create an empty database migration for the app with custom code to update indexes and foreign-key constraints.
(env)$ python manage.py makemigrations newapp --empty --name rename_indexesFill the migration with the following code:
# newapp/migrations/0002_rename_indexes.py
from django.db import migrations


def named_tuple_fetch_all(cursor):
    "Return all rows from a cursor as a namedtuple"
    from collections import namedtuple

    desc = cursor.description
    Result = namedtuple("Result", [col[0] for col in desc])
    return [Result(*row) for row in cursor.fetchall()]


def rename_indexes(apps, schema_editor):
    from django.db import connection

    with connection.cursor() as cursor:
        cursor.execute(
            """SELECT indexname FROM pg_indexes
            WHERE tablename LIKE 'newapp%'"""
        )
        for result in named_tuple_fetch_all(cursor):
            old_index_name = result.indexname
            new_index_name = old_index_name.replace(
                "oldapp_", "newapp_", 1
            )
            cursor.execute(
                f"""ALTER INDEX IF EXISTS {old_index_name}
                RENAME TO {new_index_name}"""
            )


def rename_foreignkeys(apps, schema_editor):
    from django.db import connection

    with connection.cursor() as cursor:
        cursor.execute(
            """SELECT table_name, constraint_name
            FROM information_schema.key_column_usage
            WHERE constraint_catalog=CURRENT_CATALOG
            AND table_name LIKE 'newapp%'
            AND position_in_unique_constraint notnull"""
        )
        for result in named_tuple_fetch_all(cursor):
            table_name = result.table_name
            old_foreignkey_name = result.constraint_name
            new_foreignkey_name = old_foreignkey_name.replace(
                "oldapp_", "newapp_", 1
            )
            cursor.execute(
                f"""ALTER TABLE {table_name}
                RENAME CONSTRAINT {old_foreignkey_name}
                TO {new_foreignkey_name}"""
            )


class Migration(migrations.Migration):

    dependencies = [
        ("newapp", "0001_initial"),
    ]

    operations = [
        migrations.RunPython(rename_indexes, migrations.RunPython.noop),
        migrations.RunPython(rename_foreignkeys, migrations.RunPython.noop),
    ]
Run the migrations:
(env)$ python manage.py migrateIf something doesn't work as wanted, migrate back, fix the code, and migrate again. You can unmigrate by migrating to one step before the last migration, for example:
(env)$ python manage.py migrate 0001After applying the migration in all necessary environments, you can clean them up by removing django-rename-app from your pip requirements and deployment scripts.
It's rarely possible to build a system that meets all your needs from the beginning. Proper systems always require continuous improvement and refactoring. Using a combination of Django migrations and django-rename-app, you can work on your websites in an Agile, clean, and flexible way.
Happy coding!
Cover photo by freestocks.
As you might know, I have been developing, providing, and supporting the prioritization tool 1st things 1st. One of the essential features to implement was exporting calculated priorities to other productivity tools. Usually, building an export from one app to another takes 1-2 weeks for me. But this time, I decided to go a better route and use Zapier to export priorities to almost all possible apps in a similar amount of time. Whaaat!?? In this article, I will tell you how.
The no-code tool Zapier takes input from a wide variety of web apps and outputs it to many other apps. Optionally you can filter the input based on conditions. Or format the input differently (for example, convert HTML to Markdown). In addition, you can stack the output actions one after the other. Usually, people use 2-3 steps for their automation, but there are power users who create 50-step workflows.
The input is managed by Zapier's triggers. The output is controlled by Zapier's actions. These can be configured at the website UI or using a command-line tool. I used the UI as this was my first integration. Trigger events accept a JSON feed of objects with unique IDs. Each new item there is treated as a new input item. With a free tier, the triggers are checked every 15 minutes. Multiple triggers are handled in parallel, and the sorting order of execution is not guaranteed. As it is crucial to have the sorting order correct for 1st things 1st priorities, people from Zapier support suggested providing each priority with a 1-minute interval to make sure the priorities get listed in the target app sequentially.
The most challenging part of Zapier integration was setting up OAuth 2.0 provider. Even though I used a third-party Django app django-oauth-toolkit for that. Zapier accepts other authentication options too, but this one is the least demanding for the end-users.
OAuth 2.0 allows users of one application to use specific data of another application while keeping private information private. You might have used the OAuth 2.0 client directly or via a wrapper for connecting to Twitter apps. For Zapier, one has to set OAuth 2.0 provider.
The official tutorial for setting up OAuth 2.0 provider with django-oauth-toolkit is a good start. However, one problem with it is that by default, any registered user can create OAuth 2.0 applications at your Django website, where in reality, you need just one global application.
First of all, I wanted to allow OAuth 2.0 application creation only for superusers.
For that, I created a new Django app oauth2_provider_adjustments with modified views and URLs to use instead of the ones from django-oauth-toolkit.
The views related to OAuth 2.0 app creation extended this SuperUserOnlyMixin instead of LoginRequiredMixin:
from django.contrib.auth.mixins import AccessMixin

class SuperUserOnlyMixin(AccessMixin):
    def dispatch(self, request, *args, **kwargs):
        if not request.user.is_superuser:
            return self.handle_no_permission()
        return super().dispatch(request, *args, **kwargs)
Then I replaced the default oauth2_provider URLs:
urlpatterns = [
    # …
    path("o/", include("oauth2_provider.urls", namespace="oauth2_provider")),
]
with my custom ones:
urlpatterns = [
    # …
    path("o/", include("oauth2_provider_adjustments.urls", namespace="oauth2_provider")),
]
I set the new OAuth 2.0 application by going to /o/applications/register/ and filling in this info:
Name: Zapier
Client type: Confidential
Authorization grant type: Authorization code
Redirect uris: https://zapier.com/dashboard/auth/oauth/return/1stThings1stCLIAPI/ (copied from Zapier)
Algorithm: No OIDC support
If you have some expertise in the setup choices and see any flaws, let me know.
Zapier requires creating a test view that will return anything to check if there are no errors authenticating a user with OAuth 2.0. So I made a simple JSON view like this:
from django.http.response import JsonResponse


def user_info(request, *args, **kwargs):
    if not request.user.is_authenticated:
        return JsonResponse(
            {
                "error": "User not authenticated",
            },
            status=200,
        )
    return JsonResponse(
        {
            "first_name": request.user.first_name,
            "last_name": request.user.last_name,
        },
        status=200,
    )
Also, I had to have login and registration views for those cases when the user's session was not present.
Lastly, at Zapier, I had to set these values for OAuth 2.0:
Client ID: The Client ID from registered app
Client Secret: The Client Secret from registered app
Authorization URL: https://apps.1st-things-1st.com/o/authorize/
Scope: read write
Access Token Request: https://apps.1st-things-1st.com/o/token/
Refresh Token Request: https://apps.1st-things-1st.com/o/token/
I want to automatically refresh on unauthorized error:
Checked
Test: https://apps.1st-things-1st.com/user-info/
Connection Label: {{first_name}} {{last_name}}
There are two types of triggers in Zapier:
The feeds for triggers should (ideally) be paginated. But without meta information for the item count, page number, following page URL, etc., you would usually have with django-rest-framework or other REST frameworks. Provide only an array of objects with unique IDs for each page. The only field name that matters is "id" – others can be anything. Here is an example:
[
    {
        "id": "39T7NsgQarYf",
        "project": "5xPrQbPZNvJv",
        "title": "01. Custom landing pages for several project types (83%)",
        "plain_title": "Custom landing pages for several project types",
        "description": "",
        "score": 83,
        "priority": 1,
        "category": "Choose"
    },
    {
        "id": "4wBSgq3spS49",
        "project": "5xPrQbPZNvJv",
        "title": "02. Zapier integration (79%)",
        "plain_title": "Zapier integration",
        "description": "",
        "score": 79,
        "priority": 2,
        "category": "Choose"
    },
    {
        "id": "6WvwwB7QAnVS",
        "project": "5xPrQbPZNvJv",
        "title": "03. Electron.js desktop app for several project types (42%)",
        "plain_title": "Electron.js desktop app for several project types",
        "description": "",
        "score": 41,
        "priority": 3,
        "category": "Consider"
    }
]
The feeds should list items in reverse order for the (A) type of triggers: the newest things go at the beginning. The pagination is only used to cut the number of items: the second and further pages of the paginated list are ignored by Zapier.
In my specific case of priorities, the order matters, and no items should be lost in the void. So I listed the priorities sequentially (not newest first) and set the number of items per page unrealistically high so that you basically get all the things on the first page of the feed.
The feeds for the triggers of (B) type are normally paginated from the first page until the page returns empty results. The order should be alphabetical, chronological, or by sorting order field, whatever makes sense. There you need just two fields, the ID and the title of the item (but more fields are allowed too), for example:
[
    {
        "id": "5xPrQbPZNvJv",
        "title": "1st things 1st",
        "owner": "Aidas Bendoraitis"
    },
    {
        "id": "VEXGzThxL6Sr",
        "title": "Make Impact",
        "owner": "Aidas Bendoraitis"
    },
    {
        "id": "WoqQbuhdUHGF",
        "title": "DjangoTricks website",
        "owner": "Aidas Bendoraitis"
    },
]
I used django-rest-framework to implement the API because of the batteries included, such as browsable API, permissions, serialization, pagination, etc.
For the specific Zapier requirements, I had to write a custom pagination class, SimplePagination, to use with my API lists. It did two things: omitted the meta section and showed an empty list instead of a 404 error for pages that didn't have any results:
from django.core.paginator import InvalidPage

from rest_framework.pagination import PageNumberPagination
from rest_framework.response import Response


class SimplePagination(PageNumberPagination):
    page_size = 20

    def get_paginated_response(self, data):
        return Response(data)  # <-- Simple pagination without meta

    def get_paginated_response_schema(self, schema):
        return schema  # <-- Simple pagination without meta

    def paginate_queryset(self, queryset, request, view=None):
        """
        Paginate a queryset if required, either returning a
        page object, or `None` if pagination is not configured for this view.
        """
        page_size = self.get_page_size(request)
        if not page_size:
            return None

        paginator = self.django_paginator_class(queryset, page_size)
        page_number = self.get_page_number(request, paginator)

        try:
            self.page = paginator.page(page_number)
        except InvalidPage as exc:
            msg = self.invalid_page_message.format(
                page_number=page_number, message=str(exc)
            )
            return []  # <-- If no items found, don't raise NotFound error

        if paginator.num_pages > 1 and self.template is not None:
            # The browsable API should display pagination controls.
            self.display_page_controls = True

        self.request = request
        return list(self.page)
To preserve the order of items, I had to make the priorities appear one by one at 1-minute intervals. I did that by having a Boolean field exported_to_zapier at the priorities. The API showed priorities only if that field was set to True, which wasn't the case by default. Then, background tasks were scheduled 1 minute after each other, triggered by a button click at 1st things 1st, which set the exported_to_zapier to True for each next priority. I was using huey, but the same can be achieved with Celery, cron jobs, or other background task manager:
# zapier_api/tasks.py
from django.conf import settings
from django.utils.translation import gettext
from huey.contrib.djhuey import db_task


@db_task()
def export_next_initiative_to_zapier(project_id):
    from evaluations.models import Initiative

    next_initiatives = Initiative.objects.filter(
        project__pk=project_id,
        exported_to_zapier=False,
    ).order_by("-total_weight", "order")
    count = next_initiatives.count()
    if count > 0:
        next_initiative = next_initiatives.first()
        next_initiative.exported_to_zapier = True
        next_initiative.save(update_fields=["exported_to_zapier"])

        if count > 1:
            result = export_next_initiative_to_zapier.schedule(
                kwargs={"project_id": project_id},
                delay=settings.ZAPIER_EXPORT_DELAY,
            )
            result(blocking=False)
One gotcha: Zapier starts pagination from 0, whereas django-rest-framework starts pagination from 1. To make them work together, I had to modify the API request (written in JavaScript) at Zapier trigger configuration:
const options = {
  url: 'https://apps.1st-things-1st.com/api/v1/projects/',
  method: 'GET',
  headers: {
    'Accept': 'application/json',
    'Authorization': `Bearer ${bundle.authData.access_token}`
  },
  params: {
    'page': bundle.meta.page + 1  // <-- The custom line for pagination
  }
}

return z.request(options)
  .then((response) => {
    response.throwForStatus();
    const results = response.json;

    // You can do any parsing you need for results here before returning them

    return results;
});For the v1 of Zapier integration, I didn't need any Zapier actions, so they are yet something to explore, experiment with, and learn about. But the Zapier triggers seem already pretty helpful and a big win compared to individual exports without this tool.
If you want to try the result, do this:
Cover photo by Anna Nekrashevich
When you have some generic functionality like anything commentable, likable, or upvotable, it’s common to use Generic Relations in Django. The problem with Generic Relations is that they create the relationships at the application level instead of the database level, and that requires a lot of database queries if you want to aggregate content that shares the generic functionality. There is another way that I will show you in this article.
I learned this technique at my first job in 2002 and then rediscovered it again with Django a few years ago. The trick is to have a generic Item model where every other autonomous model has a one-to-one relation to the Item. Moreover, the Item model has an item_type field, allowing you to recognize the backward one-to-one relationship.
Then whenever you need to have some generic categories, you link them to the Item. Whenever you create generic functionality like media gallery, comments, likes, or upvotes, you attach them to the Item. Whenever you need to work with permissions, publishing status, or workflows, you deal with the Item. Whenever you need to create a global search or trash bin, you work with the Item instances.
Let’s have a look at some code.
First, I'll create the items app with two models: the previously mentioned Item and the abstract model ItemBase with the one-to-one relation for various models to inherit:
# items/models.py
import sys

from django.db import models
from django.apps import apps

if "makemigrations" in sys.argv:
    from django.utils.translation import gettext_noop as _
else:
    from django.utils.translation import gettext_lazy as _


class Item(models.Model):
    """
    A generic model for all autonomous models to link to.

    Currently these autonomous models are available:
    - content.Post
    - companies.Company
    - accounts.User
    """
    ITEM_TYPE_CHOICES = (
        ("content.Post", _("Post")),
        ("companies.Company", _("Company")),
        ("accounts.User", _("User")),
    )
    item_type = models.CharField(
        max_length=200, choices=ITEM_TYPE_CHOICES, editable=False, db_index=True
    )

    class Meta:
        verbose_name = _("Item")
        verbose_name_plural = _("Items")

    def __str__(self):
        content_object_title = (
            str(self.content_object) if self.content_object else "BROKEN REFERENCE"
        )
        return (
            f"{content_object_title} ({self.get_item_type_display()})"
        )

    @property
    def content_object(self):
        app_label, model_name = self.item_type.split(".")
        model = apps.get_model(app_label, model_name)
        return model.objects.filter(item=self).first()


class ItemBase(models.Model):
    """
    An abstract model for the autonomous models that will link to the Item.
    """
    item = models.OneToOneField(
        Item,
        verbose_name=_("Item"),
        editable=False,
        blank=True,
        null=True,
        on_delete=models.CASCADE,
        related_name="%(app_label)s_%(class)s",
    )

    class Meta:
        abstract = True

    def save(self, *args, **kwargs):
        if not self.item:
            model = type(self)
            item = Item.objects.create(
                item_type=f"{model._meta.app_label}.{model.__name__}"
            )
            self.item = item
        super().save()

    def delete(self, *args, **kwargs):
        if self.item:
            self.item.delete()
        super().delete(*args, **kwargs)
Then let's create some autonomous models that will have one-to-one relations with the Item. By "autonomous models," I mean those which are enough by themselves, such as posts, companies, or accounts. Models like types, categories, tags, or likes, wouldn't be autonomous.
Second, I create the content app with the Post model. This model extends ItemBase which will create the one-to-one relation on save, and will define the item_type as content.Post:
# content/models.py
import sys

from django.contrib.auth.base_user import BaseUserManager
from django.db import models
from django.contrib.auth.models import AbstractUser

if "makemigrations" in sys.argv:
    from django.utils.translation import gettext_noop as _
else:
    from django.utils.translation import gettext_lazy as _

from items.models import ItemBase


class Post(ItemBase):
    title = models.CharField(_("Title"), max_length=255)
    slug = models.SlugField(_("Slug"), max_length=255)
    content = models.TextField(_("Content"))

    class Meta:
        verbose_name = _("Post")
        verbose_name_plural = _("Posts")
Third, I create the companies app with the Company model. This model also extends ItemBase which will create the one-to-one relation on save, and will define the item_type as companies.Company:
# companies/models.py
import sys

from django.contrib.auth.base_user import BaseUserManager
from django.db import models
from django.contrib.auth.models import AbstractUser

if "makemigrations" in sys.argv:
    from django.utils.translation import gettext_noop as _
else:
    from django.utils.translation import gettext_lazy as _

from items.models import ItemBase


class Company(ItemBase):
    name = models.CharField(_("Name"), max_length=255)
    slug = models.SlugField(_("Slug"), max_length=255)
    description = models.TextField(_("Description"))

    class Meta:
        verbose_name = _("Company")
        verbose_name_plural = _("Companies")
Fourth, I'll have a more extensive example with the accounts app containing the User model. This model extends AbstractUser from django.contrib.auth as well as ItemBase for the one-to-one relation. The item_type set at the Item model will be accounts.User:
# accounts/models.py
import sys

from django.db import models
from django.contrib.auth.base_user import BaseUserManager
from django.contrib.auth.models import AbstractUser

if "makemigrations" in sys.argv:
    from django.utils.translation import gettext_noop as _
else:
    from django.utils.translation import gettext_lazy as _

from items.models import ItemBase


class UserManager(BaseUserManager):
    def create_user(self, username="", email="", password="", **extra_fields):
        if not email:
            raise ValueError("Enter an email address")
        email = self.normalize_email(email)
        user = self.model(username=username, email=email, **extra_fields)
        user.set_password(password)
        user.save(using=self._db)
        return user

    def create_superuser(self, username="", email="", password=""):
        user = self.create_user(email=email, password=password, username=username)
        user.is_superuser = True
        user.is_staff = True
        user.save(using=self._db)
        return user


class User(AbstractUser, ItemBase):
    # change username to non-editable non-required field
    username = models.CharField(
        _("Username"), max_length=150, editable=False, blank=True
    )
    # change email to unique and required field
    email = models.EmailField(_("Email address"), unique=True)
    bio = models.TextField(_("Bio"))

    USERNAME_FIELD = "email"
    REQUIRED_FIELDS = []

    objects = UserManager()
I will use the Django shell to create several autonomous model instances and the related Items too:
>>> from content.models import Post
>>> from companies.models import Company
>>> from accounts.models import User
>>> from items.models import Item
>>> post = Post.objects.create(
...     title="Hello, World!",
...     slug="hello-world",
...     content="Lorem ipsum…",
... )
>>> company = Company.objects.create(
...     name="Aidas & Co",
...     slug="aidas-co",
...     description="Lorem ipsum…",
... )
>>> user = User.objects.create_user(
...     username="aidas",
...     email="aidas@example.com",
...     password="jdf234oha&6sfhasdfh",
... )
>>> Item.objects.count()
3Lastly, here is an example of having posts, companies, and users in a single view. For that, we will use the Item queryset with annotations:
from django import forms
from django.db import models
from django.shortcuts import render
from django.utils.translation import gettext, gettext_lazy as _

from .models import Item


class SearchForm(forms.Form):
    q = forms.CharField(label=_("Search"), required=False)


def all_items(request):
    qs = Item.objects.annotate(
        title=models.Case(
            models.When(
                item_type="content.Post",
                then="content_post__title",
            ),
            models.When(
                item_type="companies.Company",
                then="companies_company__name",
            ),
            models.When(
                item_type="accounts.User",
                then="accounts_user__email",
            ),
            default=models.Value(gettext("<Untitled>")),
        ),
        description=models.Case(
            models.When(
                item_type="content.Post",
                then="content_post__content",
            ),
            models.When(
                item_type="companies.Company",
                then="companies_company__description",
            ),
            models.When(
                item_type="accounts.User",
                then="accounts_user__bio",
                ),
            default=models.Value(""),
        ),
    )

    form = SearchForm(data=request.GET, prefix="search")
    if form.is_valid():
        query = form.cleaned_data["q"]
        if query:
            qs = qs.annotate(
                search=SearchVector(
                    "title",
                    "description",
                )
            ).filter(search=query)

    context = {
        "queryset": qs,
        "search_form": form,
    }
    return render(request, "items/all_items.html", context)
You can have generic functionality and still avoid multiple hits to the database by using the Item one-to-one approach instead of generic relations.
The name of the Item model can be different, and you can even have multiple such models for various purposes, for example, TaggedItem for tags only.
Do you use anything similar in your projects?
Do you see how this approach could be improved?
Let me know in the comments!
Cover picture by Pixabay
For more than a decade, I was focused only on the technical part of website building with Django. In the process, I have built a bunch of interesting cultural websites. But I always felt that those sleepless nights were not worthy of the impact.
They say, "Don’t work hard, work smart!" I agree with that phrase, and for me it's not about working less hours. For me, it's working as much as necessary, but on things that matter most.
So after years of collecting facts about life, I connected the dots and came up with make-impact.org – a social donation platform, which became one of the most important long-term projects. All my planning goes around this project.
And I believe I am not the only programmer who sometimes feels that they want to make a positive impact with their skills. So I brainstormed 17 Django project ideas. You can choose one and realize it as a hobby project, open-source platform, startup, or non-profit organization; alone, with a team of developers, or collaborating with some non-technical people.
The job market is pretty competitive, and not all people can keep up with the train. You could build a job search website for jobs that don't require high education or lots of working experience. It could be helpful for people with language barriers, harsh living conditions, or those who are very young or very old. You could build it for your city, region, or country.
Get inspired from Too Good To Go and build a progressive web app for your city about discounted restaurant meals and shop products whose expiration date is close to the end, but they are still good to eat.
Build a website for setting your personal health improvement goals and tracking the progress. For example, maybe one wants to start eating more particular vegetables every week, jogging daily, lose or gain weight, or get rid of unhealthy addictions. Let people choose their health goals and check in with each progressive step. Allow using the website anonymously.
Some people don't have access to schools in general or miss some classes because of illnesses. You could build a global and open wiki-based primary and elementary school education website for children and adults. It should be translatable and localizable. It would also be interesting to compare the same subject teachings in different countries side-by-side.
You could build a website with a video chat providing psychological support to discriminated or violently abused women. The help could be given by professionals or emphatic volunteers. The technical part can be implemented using django-channels, WebSockets, and WebRTC.
Rain harvesting is one of the available ways to solve the problem of the lack of drinking water. There could be a platform comparing rain-harvesting companies all around the world. What are the installation prices? What are the countries they are working with? How many people have they saved? This website would allow people to find the most optimal company to build a rain harvesting system for them.
Use the Open Charge Map API and create a progressive web app that shows the nearest electric car charging station and how to get there.
As remote jobs are getting more and more popular, there is still a matter of trust between the employees and employers. "Will the job taker complete their job in a good quality?" "Will the company pay the employee on time?" There are Escrow services to fix this issue. These are third parties that take and hold the money until the job is done. You could build a remote job search website promoting the usage of Escrow.com or another escrow service provider.
You could build a website listing coworking spaces and cafes with free wifi in your city. It should include the map, price ranges, details if registration is required, and other information necessary for remote workers.
There could be a social website listing the most admired companies to work for in your country. Companies could be rated by working conditions, salary equality, growth opportunities, work relations, and other criteria. Anyone could suggest such a company, and they would be rated by their current and former employees anonymously.
The cost of accommodation is a critical problem in many locations of the world. You could develop a website that lists examples of tiny houses and their building schemas and instructions.
You could work on a product catalog with links to online shops, selling things produced from collected plastic. For example, these sunglasses are made of plastic collected from the ocean. Where available, you could use affiliate marketing links.
You could work on a website for climate-change migrants with information about getting registered, housing, education, and jobs in a new city or country with better climate conditions.
Scrape parts of FishBase and create a website about fishes, fishing, and overfishing in your region or the world. Engage people about the marine world and inform them about the damage done by overfishing.
Create an E-commerce shop or Software as a Service and integrate RaaS (Reforestation as a Service). Let a tree be planted for every sale.
Create a progressive web app about positive parenting. For inspiration and information check this article.
Create a forum with topic voting and automatic hate speech detection and flagging. For example, maybe you could use a combination of Sentiment analysis from text-processing.com and usage of profanity words to find negativity in forum posts.
I hope this post inspired you. If you decided to start a startup with one of those ideas, don't forget to do your research at first. What are the competitors in your area? What would be your unique selling point? Etc.
Also, it would be interesting to hear your thoughts. Which of the projects would seem to you the most crucial? Which of them would you like to work on?
Cover photo by Joshua Fuller
This is a guest post by Serhii Kushchenko, Python/Django developer and data analyst. He is skillful in SQL, Python, Django, RESTful APIs, statistics, and machine learning.
This post aims to demonstrate the creation and processing of the large and complex form in Django using django-crispy-forms. The form contains several buttons that require executing different actions during the processing phase. Also, in the form, the number of rows and columns is not static but varies depending on some conditions. In our case, the set of rows and columns changes depending on the number of instances (columns) associated with the main object (data schema) in a many-to-one relationship.
The django-crispy-forms documentation includes a page Updating layouts on the go. That page is quite helpful. However, it does not contain any detailed example of a working project. IMHO such an example is much needed. I hope my project serves as a helpful addition to the official Django Crispy Forms documentation. Feel free to copy-paste the pieces of code that you find applicable.
Please see the full codebase here. It is ready for Heroku deployment.
Suppose we have a database with information about people: name, surname, phone numbers, place of work, companies owned, etc. The task is not to process the data but to work with meta-information about that data.
Different users may need to extract varying information from the database. These users do not want to write and run SQL queries. They demand some simple and more visual solutions. The assignment is to make it possible for users to create the data schemas visually. In other words, to develop such a form and make it fully functioning.

Using their schemas, users will be able to CRUD data in the database. However, these operations are beyond the scope of the current project.
Different columns can have their specific parameters. For example, integer columns have lower and upper bounds. It is necessary to develop functionality for editing those parameters for all types of columns. For that editing, forms are used that arise after clicking the "Edit details" button on the main form.
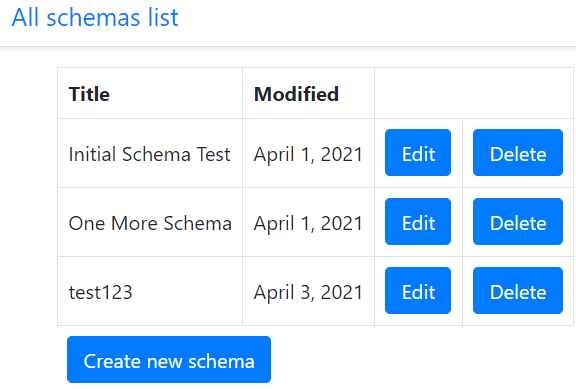
Moreover, we have to develop a form "Create new schema" and a page with a list of all available schemas.
Described below:
The task described above can be better solved using JavaScript together with Django forms. It would reduce the number of requests to the server and increase the speed of the application. So the user experience would improve. However, the project aimed to create an advanced example of working with Django Crispy Forms.
Here you can learn the following tricks:
According to the task, the number of columns in the schemas can be different. The users add new columns and delete existing columns. Also, they can change the type and order of columns. The columns and schemas have a many-to-one relationship that is described using the Foreign Key in Django models.
The picture shows that every schema has its name, 'Column separator' field, and 'String character' field. Also, it would be nice to save the date of the last schema modification. The following code from schemas\models.py file is pretty simple.
INTEGER_CH = "IntegerColumn"
FULLNAME_CH = "FullNameColumn"
JOB_CH = "JobColumn"
PHONE_CH = "PhoneColumn"
COMPANY_CH = "CompanyColumn"
COLUMN_TYPE_CHOICES = [
    (INTEGER_CH, "Integer"),
    (FULLNAME_CH, "Full Name"),
    (JOB_CH, "Job"),
    (PHONE_CH, "Phone"),
    (COMPANY_CH, "Company"),
]

DOUBLE_QUOTE = '"'
SINGLE_QUOTE = "'"
STRING_CHARACTER_CHOICES = [
    (DOUBLE_QUOTE, 'Double-quote(")'),
    (SINGLE_QUOTE, "Single-quote(')"),
]

COMMA = ","
SEMICOLON = ";"
COLUMN_SEPARATOR_CHOICES = [(COMMA, "Comma(,)"), (SEMICOLON, "Semicolon(;)")]


class DataSchemas(models.Model):

    name = models.CharField(max_length=100)
    column_separator = models.CharField(
        max_length=1,
        choices=COLUMN_SEPARATOR_CHOICES,
        default=COMMA,
    )
    string_character = models.CharField(
        max_length=1,
        choices=STRING_CHARACTER_CHOICES,
        default=DOUBLE_QUOTE,
    )
    modif_date = models.DateField(auto_now=True)

    def get_absolute_url(self):
        return reverse("schema_add_update", args=[str(self.id)])
Each column has a name, type, and order. All of these fields are in the base SchemaColumn(models.Model) class. This class cannot be abstract because in such a case, the code schema.schemacolumn_set.all() would not work.
Columns of type integer, first and last name, job, company, and phone number are implemented as classes derived from the base class SchemaColumn.
class SchemaColumn(models.Model):
    name = models.CharField(max_length=100)
    schema = models.ForeignKey(DataSchemas, on_delete=models.CASCADE)
    order = models.PositiveIntegerField()

    class Meta:
        unique_together = [["schema", "name"], ["schema", "order"]]

    def save(self, *args, **kwargs):
        self.validate_unique()
        super(SchemaColumn, self).save(*args, **kwargs)


class IntegerColumn(SchemaColumn):
    range_low = models.IntegerField(blank=True, null=True, default=-20)
    range_high = models.IntegerField(blank=True, null=True, default=40)


class FullNameColumn(SchemaColumn):
    first_name = models.CharField(max_length=10, blank=True, null=True)
    last_name = models.CharField(max_length=15, blank=True, null=True)


class JobColumn(SchemaColumn):
    job_name = models.CharField(max_length=100, blank=True, null=True)


class CompanyColumn(SchemaColumn):
    company_name = models.CharField(max_length=100, blank=True, null=True)


class PhoneColumn(SchemaColumn):
    phone_regex = RegexValidator(
        regex=r"^\+?1?\d{9,15}$",
        message="Phone number must be entered in the format: '+999999999'. Up to 15 digits allowed.",
    )
    phone_number = models.CharField(
        validators=[phone_regex], max_length=17, blank=True, null=True
) # validators should be a listThe schema editing form is quite complex. We do not use the Django built-in ModelForm class here because it is not flexible enough. Our class DataSchemaForm is a derivative of the forms.Form class. Of course, django-crispy-forms was very helpful and even essential.
from crispy_forms.layout import (
    Layout,
    Submit,
    Row,
    Column,
    Fieldset,
    Field,
    Hidden,
    ButtonHolder,
    HTML,
)
The type of column in the form depends on the class of the column. How to determine that class? The problems can arise if we use the built-in isinstance() function for derived classes such as our various column types. The following code demonstrates how the subclass check was implemented in the forms.py file when generating the form.
INTEGER_CH = "IntegerColumn"
FULLNAME_CH = "FullNameColumn"
JOB_CH = "JobColumn"
PHONE_CH = "PhoneColumn"
COMPANY_CH = "CompanyColumn"
COLUMN_TYPE_CHOICES = [
    (INTEGER_CH, "Integer"),
    (FULLNAME_CH, "Full Name"),
    (JOB_CH, "Job"),
    (PHONE_CH, "Phone"),
    (COMPANY_CH, "Company"),
]

subclasses = [
    str(subclass).split(".")[-1][:-2].lower()
    for subclass in SchemaColumn.__subclasses__()
]

# yes, somewhat redundant
column_type_switcher = {
    "integercolumn": INTEGER_CH,
    "fullnamecolumn": FULLNAME_CH,
    "jobcolumn": JOB_CH,
    "companycolumn": COMPANY_CH,
    "phonecolumn": PHONE_CH,
}

column_type_field_name = "col_type_%s" % (column.pk,)
self.fields[column_type_field_name] = forms.ChoiceField(
    label="Column type", choices=COLUMN_TYPE_CHOICES
)
for subclass in subclasses:
    if hasattr(column, subclass):
        self.fields[column_type_field_name].initial = [
            column_type_switcher.get(subclass)
        ]
        break
The function that generates the schema editing form may get the primary key of the existing schema. If such a key is not available, then the function creates a new schema and its first column. After that, the user can change the parameters of the schema, as well as add new columns.
if schema_pk:
    schema = DataSchemas.objects.get(pk=schema_pk)
else:
    # no existing schema primary key passed from the caller,
    # so create new schema and its first column
    # with default parameters
    schema = DataSchemas.objects.create(name="New Schema")
    int1 = IntegerColumn.objects.create(
        name="First Column",
        schema=schema,
        order=1,
        range_low=-20,
        range_high=40,
    )

self.fields["name"].initial = schema.name
self.fields["column_separator"].initial = schema.column_separator
self.fields["string_character"].initial = schema.string_character
In addition to the schema editing form, the application also contains a list of all created schemas.
There is nothing special about that page, so I will not describe it in detail here. Pleas see the full code and templates at https://github.com/s-kust/django-advanced-forms.
The picture shows that the schema editing form contains several types of buttons:
We need to determine which button the user pressed and perform the required action.
During the form creation, the required action is encoded in the names of all the buttons. Also, the column primary key or schema primary key is encoded there. For example, delete_btn = 'delete_col_%s' % (column.pk,) or submit_form_btn = 'submit_form_%s' % (schema.pk,).
The name of the button can be found in the request.POST data only if the user has pressed that button. The following code from the views.py file searches for the button name in the request.POST data and calls the required function. A well-known method is used to implement the Python analog of switch-case statement.
btn_functions = {
    "add_new_col": process_btn_add_column,
    "delete_col": process_btn_delete_column,
    "edit_col": process_btn_edit_column_details,
    "submit_form": process_btn_submit_form,
    "save_column_chng": process_btn_save_chng_column,
}
btn_pressed = None

# source of key.startswith idea - https://stackoverflow.com/questions/13101853/select-post-get-parameters-with-regular-expression
for key in request.POST:
    if key.startswith("delete_col_"):
        btn_pressed = "delete_col"
    if key.startswith("edit_col_"):
        btn_pressed = "edit_col"
    if key.startswith("add_column_btn_"):
        btn_pressed = "add_new_col"
    if key.startswith("submit_form_"):
        btn_pressed = "submit_form"
    if key.startswith("save_column_chng_btn_"):
        btn_pressed = "save_column_chng"

    if btn_pressed is not None:
        func_to_call = self.btn_functions.get(btn_pressed)
        self.pk, form = func_to_call(self, key, form_data=request.POST)
breakDifferent types of columns have their specific parameters. For example, integer columns have lower and upper bounds. Phone columns have the phone number field that requires validation before saving. The number of different types of columns can increase over time.
How to handle the Edit Details button click? The straightforward solution is to make individual ModelForm classes for each type of column. However, it would violate the DRY principle. Perhaps, in this case, the use of metaprogramming is justified.
def get_general_column_form(self, model_class, column_pk):
    class ColumnFormGeneral(ModelForm):
        def __init__(self, *args, **kwargs):
           super(ColumnFormGeneral, self).__init__(*args, **kwargs)
           self.helper = FormHelper(self)
           save_chng_btn = "save_column_chng_btn_%s" % (column_pk,)
           self.helper.layout.append(Submit(save_chng_btn, "Save changes"))

        class Meta:
           model = model_class
           exclude = ["schema", "order"]

   return ColumnFormGeneral
First, the type of column is determined using its primary key. After that, the get_general_column_form function is called. It returns the customized ModelForm class. Next, an instance of that class is created and used.
column = get_object_or_404(SchemaColumn, pk=column_pk)
for subclass in self.subclasses:
    if hasattr(column, subclass):
        column_model = apps.get_model("schemas", subclass)
        column = get_object_or_404(column_model, pk=column_pk)
        form_class = self.get_general_column_form(column_model, column_pk)
        form = form_class(
            initial=model_to_dict(
                column, fields=[field.name for field in column._meta.fields]
            )
        )
breakThe user may change the type of one or several columns. If it happens, it means that the class of these columns has changed. Here, it is not enough to change the value of some attribute of the object. We have to delete the old object and create a new object belonging to the new class instead. How do we handle it:
form.is_valid() method explicitly.request.POST type. If these types differ, the old column is deleted, and a new one is created instead.# elem is a 'Submit Form' button that the user pressed.
# schema primary key is encoded in its name
# first, let's decode it
self.pk = [int(s) for s in elem.split("_") if s.isdigit()][0]
# form_data is request.POST
form = DataSchemaForm(form_data, schema_pk=self.pk)
if form.is_valid():
schema = get_object_or_404(DataSchemas, pk=self.pk)
schema.name = form.cleaned_data["name"]
schema.column_separator = form.cleaned_data["column_separator"]
schema.string_character = form.cleaned_data["string_character"]
schema.save()
# the following code is in the save_schema_columns(self, schema, form) function
schema_columns = schema.schemacolumn_set.all()
for column in schema_columns:
column_name_field_name = "col_name_%s" % (column.pk,)
column_order_field_name = "col_order_%s" % (column.pk,)
column_type_field_name = "col_type_%s" % (column.pk,)
type_form = form.cleaned_data[column_type_field_name]
type_changed = False
for subclass in self.subclasses:
if hasattr(column, subclass):
type_db = self.column_type_switcher.get(subclass)
if type_db != type_form:
new_class = globals()[type_form]
new_column = new_class()
new_column.name = form.cleaned_data[column_name_field_name]
new_column.order = form.cleaned_data[column_order_field_name]
new_column.schema = schema
column.delete()
new_column.save()
type_changed = True
break
if not type_changed:
column.name = form.cleaned_data[column_name_field_name]
column.order = form.cleaned_data[column_order_field_name]
column.save()I hope this post serves as a helpful addition to the official Django Crispy Forms documentation. Feel free to copy-paste the pieces of code that you find applicable. Also, write comments and share your experience of using Django Crispy Forms.
Cover photo by Juan Pablo Malo.
![]()
For quite some time, I have been building a SaaS product - strategic prioritizer 1st things 1st. It's using Django in the backend and ReactJS in the frontend and communicating between those ends by REST API. Every week I try to make progress with this project, be it a more prominent feature, some content changes, or small styling tweaks. In the past week, I implemented frontend testing with Selenium, and I want to share my journey with you.
1st things 1st allows you to evaluate a list of items by multiple criteria and calculates priorities for you to follow and take action. The service has 4 main steps:
Selenium is a testing tool that mimics user interaction in the browser: you can fill in fields, trigger events, or read out information from the HTML tags. To test the frontend of 1st things 1st with Selenium, I had to
Let's see how I did it.
In 2020, Chrome is the most popular browser, and it's my default browser, so I decided to develop tests using it.
I had to install Selenium with pip into my virtual environment:
(venv)$ pip install seleniumAlso, I needed a binary chromedriver, which makes Selenium talk to your Chrome browser. I downloaded it and placed it under myproject/drivers/chromedriver.
In the Django project configuration, I needed a couple of settings. I usually have separate settings-file for each of the environments, such as:
myproject.settings.local for the local development,myproject.settings.staging for the staging server,myproject.settings.test for testing, andmyproject.settings.production for production.All of them import defaults from a common base, and I have to set only the differences for each environment.
In the myproject.settings.test I added these settings:
WEBSITE_URL = 'http://my.1st-things-1st.127.0.0.1.xip.io:8080'  # no trailing slash

TESTS_SHOW_BROWSER = True
Here for the WEBSITE_URL, I was using the xip.io service. It allows you to create domains dynamically pointing to the localhost or any other IP. The Selenium tests will use this URL.
The TEST_SHOW_BROWSER was my custom setting, telling whether to show a browser while testing the frontend or just to run the tests in the background.
In one of my apps, myproject.apps.evaluations, I created a tests package, and there I placed a test case test_evaluations_frontend.py with the following content:
import os
from time import sleep
from datetime import timedelta

from django.conf import settings
from django.test import LiveServerTestCase
from django.test import override_settings
from django.contrib.auth import get_user_model
from django.utils import timezone

from selenium import webdriver
from selenium.webdriver.chrome.options import Options
from selenium.webdriver.support.ui import WebDriverWait


User = get_user_model()

SHOW_BROWSER = getattr(settings, "TESTS_SHOW_BROWSER", False)


@override_settings(DEBUG=True)
class EvaluationTest(LiveServerTestCase):
    host = settings.WEBSITE_URL.rsplit(":", 1)[0].replace(
        "http://", ""
    )  # domain before port
    port = int(settings.WEBSITE_URL.rsplit(":", 1)[1])  # port
    USER1_USERNAME = "user1"
    USER1_FIRST_NAME = "user1"
    USER1_LAST_NAME = "user1"
    USER1_EMAIL = "user1@example.com"
    USER1_PASSWORD = "change-me"

    @classmethod
    def setUpClass(cls):
        # …

    @classmethod
    def tearDownClass(cls):
        # …

    def wait_until_element_found(self, xpath):
        # …

    def wait_a_little(self, seconds=2):
        # …

    def test_evaluations(self):
        # …
It's a live-server test case, which runs a Django development server under the specified IP and port and then runs the Chrome browser via Selenium and navigates through the DOM and fills in forms.
By default, the LiveServerTestCase runs in non-debug mode, but I want to have the debug mode on so that I could see any causes of server errors. With the @override_settings decorator, I could change the DEBUG setting to True.
The host and port attributes define on which host and port the test server will be running (instead of a 127.0.0.1 and a random port). I extracted those values from the WEBSITE_URL setting.
The test case also had some attributes for the user who will be navigating through the web app.
Let's dig deeper into the code for each method.
Django test cases can have class-level setup and teardown, which run before and after all methods whose names start with test_:
    @classmethod
    def setUpClass(cls):
        super().setUpClass()
        cls.user1 = User.objects.create_user(
            cls.USER1_USERNAME, cls.USER1_EMAIL, cls.USER1_PASSWORD
        )
        # … add subscription for this new user …

        driver_path = os.path.join(settings.BASE_DIR, "drivers", "chromedriver")
        chrome_options = Options()
        if not SHOW_BROWSER:
            chrome_options.add_argument("--headless")
        chrome_options.add_argument("--window-size=1200,800")

        cls.browser = webdriver.Chrome(
            executable_path=driver_path, options=chrome_options
        )
        cls.browser.delete_all_cookies()

    @classmethod
    def tearDownClass(cls):
        super().tearDownClass()
        cls.browser.quit()
        # … delete subscription for the user …
        cls.user1.delete()
In the setup, I created a new user, added a subscription to them, and prepared the Chrome browser to use.
If the TEST_SHOW_BROWSER setting was False, Chrome was running headless, that is, in the background without displaying a browser window.
When the tests were over, the browser closed, and the subscription, as well as the user, were deleted.
I created two utility methods for my Selenium test: wait_until_element_found() and wait_a_little():
    def wait_until_element_found(self, xpath):
        WebDriverWait(self.browser, timeout=10).until(
            lambda x: self.browser.find_element_by_xpath(xpath)
        )

    def wait_a_little(self, seconds=2):
        if SHOW_BROWSER:
            sleep(seconds)
I used the wait_until_element_found(xpath) method to keep the test running while pages switched.
I used the wait_a_little(seconds) method to stop the execution for 2 or more seconds so that I could follow what's on the screen, make some screenshots, or even inspect the DOM in the Web Developer Inspector.
Selenium allows to select DOM elements by ID, name, CSS class, tag name, and other ways, but the most flexible approach, in my opinion, is selecting elements by XPath (XML Path Language).
Contrary to jQuery, ReactJS doesn't use IDs or CSS classes in the markup to update the contents of specific widgets. So the straightforward Selenium's methods for finding elements by IDs or classes won't always work.
XPath is a very flexible and powerful tool. For example, you can:
"//input[@id='id_title']""//div[@aria-label='Blank']""//button[.='Save']""//button[contains(@class,'btn-primary')][.='Save']""(//button[.='yes'])[1]"You can try out XPath syntax and capabilities in Web Developer Console in Chrome and Firefox, using the $x() function, for example:
»  $x("//h1[.='Projects']")
← Array [ h1.display-4.mb-4 ]I started with opening a login page, dismissing cookie consent notification, filling in user credentials into the login form, creating a new project from a blank template, setting title and description, etc.
    def test_evaluations(self):
        self.browser.get(f"{self.live_server_url}/")
        self.wait_until_element_found("//h1[.='Log in or Sign up']")
        # Accept Cookie Consent
        self.wait_until_element_found("//a[.='Got it!']")
        self.browser.find_element_by_xpath("//a[.='Got it!']").click()
        # Log in
        self.browser.find_element_by_id("id_email").send_keys(self.USER1_EMAIL)
        self.browser.find_element_by_id("id_password").send_keys(self.USER1_PASSWORD)
        self.browser.find_element_by_xpath('//button[text()="Log in"]').send_keys(
            "\n"
        )  # submit the form

        self.wait_until_element_found("//h1[.='Projects']")

        # Click on "Add new project"
        self.wait_until_element_found("//a[.='Add new project']")

        self.wait_a_little()
        self.browser.find_element_by_xpath("//a[.='Add new project']").send_keys("\n")

        self.wait_until_element_found("//div[@aria-label='Blank']")

        # Create a project from the project template "Blank"
        self.wait_a_little()
        self.browser.find_element_by_xpath("//div[@aria-label='Blank']").send_keys("\n")

        # Enter project title and description
        self.wait_until_element_found("//input[@id='id_title']")
        self.browser.find_element_by_xpath("//input[@id='id_title']").send_keys(
            "Urgent and Important Activities"
        )
        self.browser.find_element_by_xpath(
            "//textarea[@id='id_description']"
        ).send_keys("I want to find which things to do and which to skip.")
        self.browser.find_element_by_xpath("//button[.='Next']").send_keys("\n")

        # Keep the default verbose names for the criteria and initiatives
        self.wait_until_element_found("//input[@id='id_initiative_verbose_name_plural']")
        self.wait_a_little()
        self.browser.find_element_by_xpath("//button[.='Next']").send_keys("\n")
If TESTS_SHOW_BROWSER was set to True, we would see all this workflow in an opened browser window.
I was creating the test by carefully inspecting the markup in Web Developer Inspector and creating appropriate DOM navigation with XPath. For most of the navigation, I was using send_keys() method, which triggers keyboard events. During the testing, I also noticed that my cookie consent only worked with a mouse click, and I couldn't approve it by the keyboard. That's some room for improving accessibility.
I ran the test with the following command each time I added some more lines:
(venv)$ python manage.py test myproject.apps.evaluations --settings=myproject.settings.testThe test case failed if any command in the test failed. I didn't even need asserts.
Now it was time to add some criteria:
        self.wait_until_element_found("//h2[.='Criteria']")

        # Add new criterion "Urgent" with the evaluation type Yes/No/Maybe
        self.wait_until_element_found("//a[.='Add new criterion']")
        self.browser.find_element_by_xpath("//a[.='Add new criterion']").send_keys("\n")
        self.wait_until_element_found("//input[@id='id_title']")
        self.browser.find_element_by_xpath("//input[@id='id_title']").send_keys(
            "Urgent"
        )
        self.browser.find_element_by_xpath("//input[@id='widget_y']").send_keys(" ")
        self.browser.find_element_by_xpath("//button[.='Save']").send_keys("\n")

        # Add new criterion "Important" with the evaluation type Yes/No/Maybe
        self.wait_until_element_found("//a[.='Add new criterion']")
        self.browser.find_element_by_xpath("//a[.='Add new criterion']").send_keys("\n")
        self.wait_until_element_found("//input[@id='id_title']")
        self.browser.find_element_by_xpath("//input[@id='id_title']").send_keys(
            "Important"
        )
        self.browser.find_element_by_xpath("//input[@id='widget_y']").send_keys(" ")
        self.browser.find_element_by_xpath("//button[.='Save']").send_keys("\n")

        # Click on the button "Done"
        self.wait_until_element_found("//a[.='Done']")
        self.browser.find_element_by_xpath("//a[.='Done']").send_keys("\n")
I added two criteria, "Urgent" and "Important", with evaluation type "Yes/No/Maybe".
![]()
Then I created some activities to evaluate:
        self.wait_until_element_found("//h2[.='Things']")

        # Add new thing "Write a blog post"
        self.wait_until_element_found("//a[.='Add new thing']")
        self.browser.find_element_by_xpath("//a[.='Add new thing']").send_keys("\n")
        self.wait_until_element_found("//input[@id='id_title']")
        self.browser.find_element_by_xpath("//input[@id='id_title']").send_keys(
            "Write a blog post"
        )
        self.browser.find_element_by_xpath("//textarea[@id='id_description']").send_keys(
            "I have an idea of a blog post that I want to write."
        )
        self.browser.find_element_by_xpath("//button[.='Save']").send_keys("\n")

        # Add new thing "Fix a bug"
        self.wait_until_element_found("//a[.='Add new thing']")
        self.browser.find_element_by_xpath("//a[.='Add new thing']").send_keys("\n")
        self.wait_until_element_found("//input[@id='id_title']")
        self.browser.find_element_by_xpath("//input[@id='id_title']").send_keys(
            "Fix a bug"
        )
        self.browser.find_element_by_xpath("//textarea[@id='id_description']").send_keys(
            "There is a critical bug that bothers our clients."
        )
        self.browser.find_element_by_xpath("//button[.='Save']").send_keys("\n")

        # Add new thing "Binge-watch a series"
        self.wait_until_element_found("//a[.='Add new thing']")
        self.browser.find_element_by_xpath("//a[.='Add new thing']").send_keys("\n")
        self.wait_until_element_found("//input[@id='id_title']")
        self.browser.find_element_by_xpath("//input[@id='id_title']").send_keys(
            "Binge-watch a series"
        )
        self.browser.find_element_by_xpath("//textarea[@id='id_description']").send_keys(
            "There is an exciting series that I would like to watch."
        )
        self.browser.find_element_by_xpath("//button[.='Save']").send_keys("\n")

        # Click on the button "Done"
        self.wait_until_element_found("//a[.='Done']")
        self.browser.find_element_by_xpath("//a[.='Done']").send_keys("\n")
These were three activities: "Write a blog post", "Fix a bug", and "Binge-watch a series" with their descriptions:
![]()
In this step, there was a list of widgets to evaluate each thing by each criterion with answers "No", "Maybe", or "Yes". The buttons for those answers had no specific id or CSS class, but I could target them by the text on the button using XPath like "//button[.='maybe']":
        self.wait_until_element_found("//h2[.='Evaluations']")
        self.wait_until_element_found("//button[.='maybe']")

        # Evaluate all things by Urgency
        self.browser.find_element_by_xpath("(//button[.='no'])[1]").send_keys("\n")
        self.wait_until_element_found("//footer[.='Evaluation saved.']")
        self.browser.find_element_by_xpath("(//button[.='yes'])[2]").send_keys("\n")
        self.wait_until_element_found("//footer[.='Evaluation saved.']")
        self.browser.find_element_by_xpath("(//button[.='no'])[3]").send_keys("\n")
        self.wait_until_element_found("//footer[.='Evaluation saved.']")

        # Evaluate all things by Importance
        self.browser.find_element_by_xpath("(//button[.='yes'])[4]").send_keys("\n")
        self.wait_until_element_found("//footer[.='Evaluation saved.']")
        self.browser.find_element_by_xpath("(//button[.='yes'])[5]").send_keys("\n")
        self.wait_until_element_found("//footer[.='Evaluation saved.']")
        self.browser.find_element_by_xpath("(//button[.='maybe'])[6]").send_keys("\n")
        self.wait_until_element_found("//footer[.='Evaluation saved.']")

        # Click on the button "Done"
        self.browser.find_element_by_xpath("//a[.='Done']").send_keys("\n")
![]()
These were my evaluations:
So in the last step, I got the calculated priorities:
        self.wait_until_element_found("//h2[.='Priorities']")

        self.wait_until_element_found("//h5[.='1. Fix a bug (100%)']")
        self.wait_until_element_found("//h5[.='2. Write a blog post (50%)']")
        self.wait_until_element_found("//h5[.='3. Binge-watch a series (25%)']")
self.wait_a_little()![]()
The results looked correct:
LiveServerTestCase.I hope that my journey was useful to you too.
Happy coding!
Thanks a lot to Adam Johnson for the review.
Cover photo by Science in HD.
When you develop a web app or a mobile app with Django, it is common to use the Django REST Framework for communication with the server-side. The client-side makes GET, POST, PUT, and DELETE requests to the REST API to read, create, update, or delete data there. The communication by Ajax is pretty uncomplicated, but how would you upload an image or another file to the server? I will show you that in this article by creating user avatar upload via REST API. Find the full code for this feature on Github.
We will start by installing Pillow for image handling to the virtual environment using the standard pip command:
(venv)$ pip install PillowCreate accounts app with a custom User model:
# myproject/apps/accounts/models.py
import os
import sys
from django.db import models
from django.contrib.auth.models import AbstractUser
from django.utils import timezone
from django.utils.translation import gettext_lazy as _

def upload_to(instance, filename):
    now = timezone.now()
    base, extension = os.path.splitext(filename.lower())
    milliseconds = now.microsecond // 1000
    return f"users/{instance.pk}/{now:%Y%m%d%H%M%S}{milliseconds}{extension}"

class User(AbstractUser):
    # …
    avatar = models.ImageField(_("Avatar"), upload_to=upload_to, blank=True)
You can add there as many fields as you need, but the noteworthy part there is the avatar field.
Update the settings and add the accounts app to INSTALLED_APPS, set the AUTH_USER_MODEL, and the configuration for the static and media directories:
# myproject/settings.py
INSTALLED_APPS = [
    # …
    "myproject.apps.accounts",
]

AUTH_USER_MODEL = "accounts.User"

STATICFILES_DIRS = [os.path.join(BASE_DIR, "myproject", "site_static")]
STATIC_ROOT = os.path.join(BASE_DIR, "myproject", "static")
STATIC_URL = "/static/"
MEDIA_ROOT = os.path.join(BASE_DIR, "myproject", "media")
MEDIA_URL = "/media/"
Next small steps:
makemigrations and migrate management commands.createsuperuser management command.Install Django REST Framework for the REST APIs to your virtual environment, as always, using pip:
(venv)$ pip install djangorestframeworkWe'll be using authentication by tokens in this example. So add Django REST Framework to INSTALLED_APPS in the settings and set TokenAuthentication as the default authentication in the REST_FRAMEWORK configuration:
# myproject/settings.py
INSTALLED_APPS = [
    # …
    "rest_framework",
    "rest_framework.authtoken",
    # …
]

REST_FRAMEWORK = {
    'DEFAULT_AUTHENTICATION_CLASSES': [
        'rest_framework.authentication.TokenAuthentication',
    ]
}In Django REST Framework, serializers are used for data validation, rendering, and saving. They are similar to Django forms. Prepare UserAvatarSerializer for avatar uploads:
# myproject/apps/accounts/serializers.py
from django.contrib.auth import get_user_model
from rest_framework.serializers import ModelSerializer
User = get_user_model()

class UserAvatarSerializer(ModelSerializer):
    class Meta:
        model = User
        fields = ["avatar"]

    def save(self, *args, **kwargs):
        if self.instance.avatar:
            self.instance.avatar.delete()
        return super().save(*args, **kwargs)
Now create an API view UserAvatarUpload for avatar uploads.
# myproject/apps/accounts/views.py
from rest_framework import status
from rest_framework.parsers import MultiPartParser, FormParser
from rest_framework.permissions import IsAuthenticated
from rest_framework.response import Response
from rest_framework.views import APIView
from .serializers import UserAvatarSerializer

class UserAvatarUpload(APIView):
    parser_classes = [MultiPartParser, FormParser]
    permission_classes = [IsAuthenticated]

    def post(self, request, format=None):
        serializer = UserAvatarSerializer(data=request.data, instance=request.user)
        if serializer.is_valid():
            serializer.save()
            return Response(serializer.data, status=status.HTTP_200_OK)
        else:
            return Response(serializer.errors, status=status.HTTP_400_BAD_REQUEST)
Make sure that the view uses MultiPartParser as one of the parser classes. That's necessary for the file transfers.
In the URL configuration, we will need those URL rules:
TemplateView.# myroject/urls.py
from django.conf.urls.static import static
from django.contrib import admin
from django.urls import path
from django.views.generic import TemplateView
from django.conf import settings
from myproject.accounts.views import UserAvatarUpload
from rest_framework.authtoken.views import obtain_auth_token
urlpatterns = [
path("", TemplateView.as_view(template_name="index.html")),
path("api/auth-token/", obtain_auth_token, name="rest_auth_token"),
path("api/user-avatar/", UserAvatarUpload.as_view(), name="rest_user_avatar_upload"),
path("admin/", admin.site.urls),
]
urlpatterns += static(settings.STATIC_URL, document_root=settings.STATIC_ROOT)
urlpatterns += static(settings.MEDIA_URL, document_root=settings.MEDIA_ROOT)I will illustrate the frontend using Bootstrap HTML and Vanilla JavaScript. Of course, you can implement the same using ReactJS, Vue, Angular, or other JavaScript framework and any other CSS framework.
The template for the index page has one login form with username and password or email and password fields (depending on your implementation), and one avatar upload form with a file selection field. Also, it includes a JavaScript file avatar.js for Ajax communication.
{# myproject/templates/index.html #}
<!doctype html>
{% load static %}
<html lang="en">
<head>
    <meta charset="utf-8">
    <meta name="viewport" content="width=device-width, initial-scale=1, shrink-to-fit=no">

    <link rel="stylesheet" href="https://stackpath.bootstrapcdn.com/bootstrap/4.4.1/css/bootstrap.min.css"
          integrity="sha384-Vkoo8x4CGsO3+Hhxv8T/Q5PaXtkKtu6ug5TOeNV6gBiFeWPGFN9MuhOf23Q9Ifjh" crossorigin="anonymous">

    <title>Hello, World!</title>
</head>
<body>
<div class="container">
    <div class="row">
        <div class="col-md-8">
            <p class="text-muted my-3"><small>Open Developer Console for information about responses.</small></p>
            <h1 class="my-3">1. Log in</h1>
            <form id="login_form">
                <div class="form-group">
                    <label for="id_email">Email address</label>
                    <input type="email" class="form-control" id="id_email" aria-describedby="emailHelp"
                           placeholder="Enter email"/>
                </div>
                <div class="form-group">
                    <label for="id_password">Password</label>
                    <input type="password" class="form-control" id="id_password" placeholder="Password"/>
                </div>
                <button type="submit" class="btn btn-primary">Log in</button>
            </form>

            <h1 class="my-3">2. Upload an avatar</h1>
            <form id="avatar_form">
                <div class="form-group">
                    <label for="id_avatar">Choose an image for your avatar</label>
                    <input type="file" class="form-control-file" id="id_avatar"/>
                </div>
                <button type="submit" class="btn btn-primary">Upload</button>
            </form>

        </div>
    </div>
</div>
<script src="{% static 'site/js/avatar.js' %}"></script>
</body>
</html>
Last but not least, create the JavaScript file avatar.js. It contains these things:
// myproject/site_static/site/js/avatar.js
let userToken;

document.getElementById('login_form').addEventListener('submit', function(event) {
    event.preventDefault();
    let email = document.getElementById('id_email').value;
    let password = document.getElementById('id_password').value;

    fetch('http://127.0.0.1:8000/api/auth-token/', {
        method: 'POST',
        headers: {
            'Content-Type': 'application/json',
        },
        body: JSON.stringify({
            "username": email,
            "password": password,
        })
    }).then( response => {
        return response.json();
    }).then(data => {
        console.log(data);
        userToken = data.token;
        console.log('Logged in. Got the token.');
    }).catch((error) => {
        console.error('Error:', error);
    });
});

document.getElementById('avatar_form').addEventListener('submit', function(event) {
    event.preventDefault();
    let input = document.getElementById('id_avatar');

    let data = new FormData();
    data.append('avatar', input.files[0]);

    fetch('http://127.0.0.1:8000/api/user-avatar/', {
        method: 'POST',
        headers: {
            'Authorization': `Token ${userToken}`
        },
        body: data
    }).then(response => {
        return response.json();
    }).then(data => {
        console.log(data);
    }).catch((error) => {
        console.error('Error:', error);
    });
});
In the JavaScript file, we are using fetch API for the REST API requests. The noteworthy part there is the FormData class that we use to send the file to the server.
Now run the local development server and go to the http://127.0.0.1:8000. There you will have something like this:
![]()
As more than a half Internet usage happens on mobile devices, there is a demand to switch from usual HTML websites and platforms to mobile apps. Whether you create a native mobile app, a hybrid app, or Progressive Web App, you will likely have to communicate with the server via REST API or GraphQL. It is pretty clear how to transfer textual data from and to a remote server. But after this exercise, we can also transfer binary files like images, PDF or Word documents, music, and videos.
Happy coding!
Cover Photo by Dan Silva
If you've read my Web Development with Django Cookbook, you might remember a recipe for creating PDF documents using Pisa xhtml2pdf. Well, this library does its job, but it supports only a subset of HTML and CSS features. For example, for multi-column layouts, you have to use tables, like it's 1994.
I needed some fresh and flexible option to generate donation receipts for the donation platform www.make-impact.org and reports for the strategic planner 1st things 1st I have been building. After a quick research I found another much more suitable library. It's called WeasyPrint. In this article, I will tell you how to use it with Django and what's valuable in it.
WeasyPrint uses HTML and CSS 2.1 to create pixel-perfect, or let's rather say point-perfect, PDF documents. WeasyPrint doesn't use WebKit or Gecko but has its own rendering engine. As a proof that it works correctly, it passes the famous among web developers Acid2 test which was created back in the days before HTML5 to check how compatible browsers are with CSS 2 standards.
All supported features (and unsupported exceptions) are listed in the documentation. But my absolute favorites are these:
WeasyPrint needs Python 3.4 or newer. That's great for new Django projects, but might be an obstacle if you want to integrate it into an existing website running on Python 2.7. Can it be the main argumentation for you to upgrade your old Django projects to the new Python version?
WeasyPrint is dependent on several OS libraries: Pango, GdkPixbuf, Cairo, and Libffi. In the documentation, there are understandable one-line instructions how to install them on different operating systems. You can have a problem only if you don't have full control of the server where you are going to deploy your project.
If you need some basic headers and footers for all pages, you can use @page CSS selector for that. If you need extended headers and footers for each page, it's best to combine the PDF document out of separate HTML documents for each page. Examples follow below.
The fun fact, Emojis are drawn using some weird raster single-color font. I don't recommend using them in your PDFs unless you replace them with SVG images.
A technical article is always more valuable when it has some quick code snippets to copy and paste. Here you go!
This snippet generates a donation receipt and shows it directly in the browser. Should the PDF be downloadable immediately, change content disposition from inline to attachment.
# -*- coding: UTF-8 -*-
from __future__ import unicode_literals

from django.http import HttpResponse
from django.template.loader import render_to_string
from django.utils.text import slugify
from django.contrib.auth.decorators import login_required

from weasyprint import HTML
from weasyprint.fonts import FontConfiguration

from .models import Donation

@login_required
def donation_receipt(request, donation_id):
    donation = get_object_or_404(Donation, pk=donation_id, user=request.user)
    response = HttpResponse(content_type="application/pdf")
    response['Content-Disposition'] = "inline; filename={date}-{name}-donation-receipt.pdf".format(
        date=donation.created.strftime('%Y-%m-%d'),
        name=slugify(donation.donor_name),
    )
    html = render_to_string("donations/receipt_pdf.html", {
        'donation': donation,
    })

    font_config = FontConfiguration()
    HTML(string=html).write_pdf(response, font_config=font_config)
return responseYour PDF document can have a footer with an image and text on every page, using background-image and content properties:
{% load staticfiles i18n %}
<link href="https://fonts.googleapis.com/css?family=Playfair+Display:400,400i,700,700i,900" rel="stylesheet" />
<style>
@page {
    size: "A4";
    margin: 2.5cm 1.5cm 3.5cm 1.5cm;
    @bottom-center {
        background: url({% static 'site/img/logo-pdf.svg' %}) no-repeat center top;
        background-size: auto 1.5cm;
        padding-top: 1.8cm;
        content: "{% trans "Donation made via www.make-impact.org" %}";
        font: 10pt "Playfair Display";
        text-align: center;
        vertical-align: top;
    }
}
</style>You can show page numbers in the footer using CSS as follows.
@page {
    margin: 3cm 2cm;
    @top-center {
        content: "Documentation";
    }
    @bottom-right {
        content: "Page " counter(page) " of " counter(pages);
    }
}You can rotate the page to horizontal layout with size: landscape.
@page {
    size: landscape;
}Another option to show an image and text in the header or footer on every page is to use an HTML element with position: fixed. This way you have more flexibility about formatting, but the element on all your pages will have the same content.
<style>
footer {
    position: fixed;
    bottom: -2.5cm;
    width: 100%;
    text-align: center;
    font-size: 10pt;
}
footer img {
    height: 1.5cm;
}
</style>
<footer>
{% with website_url="https://www.make-impact.org" %}
<a href="{{ website_url }}">
<img alt="" src="{% static 'site/img/logo-contoured.svg' %}" />
</a><br />
{% blocktrans %}Donation made via <a href="{{ website_url }}">www.make-impact.org</a>{% endblocktrans %}
{% endwith %}
</footer>When you need to have a document with complex unique headers and footers, it is best to render each page as a separate HTML document and then to combine them into one. This is how to do that:
def letter_pdf(request, letter_id):
    letter = get_object_or_404(Letter, pk=letter_id)
    response = HttpResponse(content_type='application/pdf')
    response['Content-Disposition'] = (
        'inline; '
        f'filename={letter.created:%Y-%m-%d}-letter.pdf'
    )
    COMPONENTS = [
        'letters/pdf/cover.html',
        'letters/pdf/page01.html',
        'letters/pdf/page02.html',
        'letters/pdf/page03.html',
    ]
    documents = []
    font_config = FontConfiguration()
    for template_name in COMPONENTS:
        html = render_to_string(template_name, {
            'letter': letter,
        })
        document = HTML(string=html).render(font_config=font_config)
        documents.append(document)

    all_pages = [page for document in documents for page in document.pages]
    documents[0].copy(all_pages).write_pdf(response)

return responseI believe that WeasyPrint could be used not only for invoices, tickets, or booking confirmations but also for online magazines and small booklets. If you want to see PDF rendering with WeasyPrint in action, make a donation to your chosen organization at www.make-impact.org (when it's ready) and download the donation receipt. Or check the demo account at my.1st-things-1st.com and find the button to download the results of a prioritization project as PDF document.
Cover photo by Daniel Korpai.
A couple of months ago the third release of Django Cookbook was published under the title Django 2 Web Development Cookbook - Third Edition. This edition was thoroughly and progressively re-written by Jake Kronika, the guy who had reviewed my second edition and had added a lot of value to it. I was sure that he wouldn't disappoint the readers, so I invited him to write the update. In this article, I will guide you through the main new highlights of over 500 pages of this new book.
Just like William S. Vincent's books, Django 2 Web Development Cookbook - Third Edition is adapted to Django 2.1 and Python 3.6. So you will be dealing with the state of the art technologies building your Django projects. Unicode strings, f-strings, super() without parameters, HTML5 tags, and object-oriented JavaScript to mention a few are used all over the book. The code is carefully generalized and even more adapted to the Don't-Repeat-Yourself (DRY) principle.
Docker is one of the most popular deployment technologies and Jake gives a good compact introduction how to use it with Django.
12-factor app guidelines suggest saving app configuration in environment variables. In the book, there is a practical example of how to use it.
I introduced multilingual fields in previous editions of the book, but there they had a limitation, that region-specific languages like Australian English or Swiss German were not supported. Now they are!
Schema.org Microdata allows you to define the context of the content more specifically so that the content is more machine-readable. This was new to me and I still don't know the exact practical value of it, but I guess it is related to accessibility, new ways of presenting data via plugins, and Artificial Intelligence.
Since Django 1.11 form fields are rendered using templates instead of Python code and those templates can be customized. There is a recipe that shows you how to do that.
HTML5 has the <picture> tag with <source> children that can be used in combination with the sorl-thumbnail Python package to generate different versions of the image based on your viewport size: load small image on the mobile, middle image on the tablet, and big image on the desktop or smart TV.
In my previous editions, I only showed how to upload a file by Ajax and attach it to a Django model. In Jake's update, it is shown how you can also delete the image.
Since Django 1.11 you can define special requirements for the passwords of your users, for example, have a mix of small and big letters or include at least 1 number and 3 special characters, etc. There is a practical recipe how to do that.
When it comes to branding or copyright protection, it is common to add special watermarks, semitransparent images on top of your normal pictures. Jake added an example, how to do that and it was very interesting to me.
In one recipe it is shown how to login to a Django website using Auth0, which seems to be a passwordless authentication system with integrations of popular connection services like OpenID Connect, Facebook, Google, Github, LinkedIn, PayPal, Yahoo!, and others. I haven't tried that myself yet, but it can be an interesting option for a social website.
It is common to cache websites using Memcached service, but a good alternative is caching with Redis and django-redis. Moreover, you can easily save user sessions there.
In the previous editions, I introduced django-mptt for creating hierarchical structures. However, recently many projects are moving towards its alternative - django-treebeard which has more stability and writing speed. In the book, Jake shows you how to work with it.
There was a lot of new things to learn. For example, for me personally Docker usage was new, and I haven't heard of schema.org microdata and Auth0 which were introduced in this book. All in all, I think, Jake Kronika did an enormous job with this update and it's really worth purchasing this book, especially as there is a winter-holidays sale where you can get the EPUB, MOBI, and PDF with the code examples just for ~ 5 €.
Have a nice Christmas time and come back to this blog next year!
Cover photo by chuttersnap.
In the last three parts of the series of articles about analogies in Python and JavaScript, we explored lots of interesting concepts like serializing to JSON, error handling, using regular expressions, string interpolation, generators, lambdas, and many more. This time we will delve into function arguments, creating classes, using class inheritance, and defining getters and setters of class properties.
Python is very flexible with argument handling for functions: you can set default values there, allow a flexible amount of positional or keyword arguments (*args and **kwargs). When you pass values to a function, you can define by name to which argument that value should be assigned. All that in a way is now possible in JavaScript too.
Default values for function arguments in Python can be defined like this:
from pprint import pprint

def report(post_id, reason='not-relevant'):
    pprint({'post_id': post_id, 'reason': reason})

report(42)
report(post_id=24, reason='spam')
In JavaScript that can be achieved similarly:
function report(post_id, reason='not-relevant') {
    console.log({post_id: post_id, reason: reason});
}

report(42);
report(post_id=24, reason='spam');
Positional arguments in Python can be accepted using the * operator like this:
from pprint import pprint

def add_tags(post_id, *tags):
    pprint({'post_id': post_id, 'tags': tags})

add_tags(42, 'python', 'javascript', 'django')
In JavaScript positional arguments can be accepted using the ... operator:
function add_tags(post_id, ...tags) {
    console.log({post_id: post_id, tags: tags});
}

add_tags(42, 'python', 'javascript', 'django');
Keyword arguments are often used in Python when you want to allow a flexible amount of options:
from pprint import pprint

def create_post(**options):
    pprint(options)

create_post(
    title='Hello, World!',
    content='This is our first post.',
    is_published=True,
)
create_post(
    title='Hello again!',
    content='This is our second post.',
)
A common practice to pass multiple optional arguments to a JavaScript function is through a dictionary object, for example, options.
function create_post(options) {
    console.log(options);
}

create_post({
    'title': 'Hello, World!',
    'content': 'This is our first post.',
    'is_published': true
});
create_post({
    'title': 'Hello again!',
    'content': 'This is our second post.'
});
Python is an object-oriented language. Since ECMAScript 6 standard support, it's also possible to write object-oriented code in JavaScript without hacks and weird prototype syntax.
In Python you would create a class with the constructor and a method to represent its instances textually like this:
class Post(object):
    def __init__(self, id, title):
        self.id = id
        self.title = title

    def __str__(self):
        return self.title

post = Post(42, 'Hello, World!')
isinstance(post, Post) == True
print(post)  # Hello, World!
In JavaScript to create a class with the constructor and a method to represent its instances textually, you would write:
class Post {
    constructor (id, title) {
        this.id = id;
        this.title = title;
    }
    toString() {
        return this.title;
    }
}

post = new Post(42, 'Hello, World!');
post instanceof Post === true;
console.log(post.toString());  // Hello, World!
Now we can create two classes Article and Link in Python that will extend the Post class. Here you can also see how we are using super to call methods from the base Post class.
class Article(Post):
    def __init__(self, id, title, content):
        super(Article, self).__init__(id, title)
        self.content = content

class Link(Post):
    def __init__(self, id, title, url):
        super(Link, self).__init__(id, title)
        self.url = url

    def __str__(self):
        return '{} ({})'.format(
            super(Link, self).__str__(),
            self.url,
        )

article = Article(1, 'Hello, World!', 'This is my first article.')
link = Link(2, 'DjangoTricks', 'https://djangotricks.blogspot.com')
isinstance(article, Post) == True
isinstance(link, Post) == True
print(link)
# DjangoTricks (https://djangotricks.blogspot.com)
In JavaScript the same is also doable by the following code:
class Article extends Post {
    constructor (id, title, content) {
        super(id, title);
        this.content = content;
    }
}

class Link extends Post {
    constructor (id, title, url) {
        super(id, title);
        this.url = url;
    }
    toString() {
        return super.toString() + ' (' + this.url + ')';
    }
}

article = new Article(1, 'Hello, World!', 'This is my first article.');
link = new Link(2, 'DjangoTricks', 'https://djangotricks.blogspot.com');
article instanceof Post === true;
link instanceof Post === true;
console.log(link.toString());
// DjangoTricks (https://djangotricks.blogspot.com)In object oriented programming, classes can have attributes, methods, and properties. Properties are a mixture of attributes and methods. You deal with them as attributes, but in the background they call special getter and setter methods to process data somehow before setting or returning to the caller.
The basic wireframe for getters and setters of the slug property in Python would be like this:
class Post(object):
    def __init__(self, id, title):
        self.id = id
        self.title = title
        self._slug = ''

    @property
    def slug(self):
        return self._slug

    @slug.setter
    def slug(self, value):
        self._slug = value

post = new Post(1, 'Hello, World!')
post.slug = 'hello-world'
print(post.slug)
In JavaScript getters and setters for the slug property can be defined as:
class Post {
    constructor (id, title) {
        this.id = id;
        this.title = title;
        this._slug = '';
    }

    set slug(value) {
        this._slug = value;
    }

    get slug() {
        return this._slug;
    }
}

post = new Post(1, 'Hello, World!');
post.slug = 'hello-world';
console.log(post.slug);As you might have noticed, I am offering a cheat sheet with the full list of equivalents in Python and JavaScript that you saw here described. At least for me, it is much more convenient to have some printed sheet of paper with valuable information next to my laptop, rather than switching among windows or tabs and scrolling to get the right piece of snippet. So I encourage you to get this cheat sheet and improve your programming!
Use it for good!
Cover photo by Andre Benz
Last time we started a new series of articles about analogies in Python and JavaScript. We had a look at lists, arrays, dictionaries, objects, and strings, conditional assignments, and parsing integers. This time we will go through more interesting and more complex things like serializing dictionaries and lists to JSON, operations with regular expressions, as well as raising and catching errors.
When working with APIs it is very usual to serialize objects to JSON format and be able to parse JSON strings.
In Python it is done with the json module like this:
import json
json_data = json.dumps(dictionary, indent=4)
dictionary = json.loads(json_data)
Here we'll indent the nested elements in the JSON string by 4 spaces.
In JavaScript there is a JSON object that has methods to create and parse JSON strings:
json_data = JSON.stringify(dictionary, null, 4);
dictionary = JSON.parse(json_data);Regular expressions are multi-tool that once you master, you can accomplish lots of things.
In the last article, we saw how one can join lists of strings into a single string. But how can you split a long string into lists of strings? What if the delimiter can be not a single character as the comma, but a range of possible variations? This can be done with regular expressions and the split() method.
In Python, the split() method belongs to the regular expression pattern object. This is how you could split a text string into sentences by punctuation marks:
import re

# One or more characters of "!?." followed by whitespace
delimiter = re.compile(r'[!?\.]+\s*')

text = "Hello!!! What's new? Follow me."
sentences = delimiter.split(text)
# sentences == ['Hello', "What's new", 'Follow me', '']
In JavaScript the split() method belongs to the string:
// One or more characters of "!?." followed by whitespace
delimiter = /[!?\.]+\s*/;

text = "Hello!!! What's new? Follow me.";
sentences = text.split(delimiter)
// sentences === ["Hello", "What's new", "Follow me", ""]Regular expressions are often used to validate data from the forms.
For example, to validate if the entered email address is correct, you would need to match it against a regular expression pattern. In Python that would look like this:
import re

# name, "@", and domain
pattern = re.compile(r'([\w.+\-]+)@([\w\-]+\.[\w\-.]+)')

match = pattern.match('hi@example.com')
# match.group(0) == 'hi@example.com'
# match.group(1) == 'hi'
# match.group(2) == 'example.com'
If the text matches the pattern, it returns a match object with the group() method to read the whole matched string, or separate captures of the pattern that were defined with the parenthesis. 0 means getting the whole string, 1 means getting the match in the first group, 2 means getting the match in the second group, and so on. If the text doesn't match the pattern, the None value will be returned.
In JavaScript the match() method belongs to the string and it returns either a match object, or null. Pretty similar:
// name, "@", and domain
pattern = /([\w.+\-]+)@([\w\-]+\.[\w\-.]+)/;

match = 'hi@example.com'.match(pattern);
// match[0] === 'hi@example.com'
// match[1] === 'hi'
// match[2] === 'example.com'
The match object in JavaScript acts as an array. Its value at the zeroth position is the whole matched string. The other indexes correspond to the captures of the pattern defined with the parenthesis.
Moreover, sometimes you need to search if a specific value exists in a string and at which letter position it will be found. That can be done with the search() method.
In Python this method belongs to the regular expression pattern and it returns the match object. The match object has the start() method telling at which letter position the match starts:
text = 'Say hi at hi@example.com'
first_match = pattern.search(text)
if first_match:
    start = first_match.start()  # start == 10
In JavaScript the search() method belongs to the string and it returns just an integer telling at which letter position the match starts. If nothing is found, -1 is returned:
text = 'Say hi at hi@example.com';
first_match = text.search(pattern);
if (first_match > -1) {
    start = first_match;  // start === 10
}
Replacing with regular expressions usually happen when cleaning up data, or adding additional features. For example, we could take some text and make all email addresses clickable.
Python developers would use the sub() method of the regular expression pattern:
html = pattern.sub(
    r'<a href="mailto:\g<0>">\g<0></a>',
    'Say hi at hi@example.com',
)
# html == 'Say hi at <a href="mailto:hi@example.com">hi@example.com</a>'
JavaScript developers would use the replace() method of the string:
html = 'Say hi at hi@example.com'.replace(
    pattern,
    '<a href="mailto:$&">$&</a>',
);
// html === 'Say hi at <a href="mailto:hi@example.com">hi@example.com</a>'
In Python the captures, also called as "backreferences", are accessible in the replacement string as \g<0>, \g<1>, \g<2>, etc. In JavaScript the same is accessible as $&, $1, $2, etc. Backreferences are usually used to wrap some strings or to switch places of different pieces of text.
It is also possible to replace a match with a function call. This can be used to do replacements within replacements or to count or collect some features of a text. For example, using replacements with function calls in JavaScript, I once wrote a fully functional HTML syntax highlighter.
Here let's change all email addresses in a text to UPPERCASE.
In Python, the replacement function receives the match object. We can use its group() method to do something with the matched text and return a text as a replacement:
text = pattern.sub(
    lambda match: match.group(0).upper(),
    'Say hi at hi@example.com',
)
# text == 'Say hi at HI@EXAMPLE.COM'
In JavaScript the replacement function receives the whole match string, the first capture, the second capture, etc. We can do what we need with those values and then return some string as a replacement:
text = 'Say hi at hi@example.com'.replace(
    pattern,
    function(match, p1, p2) {
        return match.toUpperCase();
    }
);
// text === 'Say hi at HI@EXAMPLE.COM'Contrary to Python, client-side JavaScript normally isn't used for saving or reading files or connecting to remote databases. So try..catch blocks are quite rare in JavaScript compared to try..except analogy in Python.
Anyway, error handling can be used with custom user errors implemented and raised in JavaScript libraries and caught in the main code.
The following example in Python shows how to define a custom exception class MyException, how to raise it in a function, and how to catch it and handle in a try..except..finally block:
class MyException(Exception):
    def __init__(self, message):
        self.message = message

    def __str__(self):
        return self.message

def proceed():
    raise MyException('Error happened!')

try:
    proceed()
except MyException as err:
    print('Sorry! {}'.format(err))
finally:
    print('Finishing')
The following example in JavaScript does exactly the same: here we define a MyException class, throw it in a function, and catch it and handle in the try..catch..finally block.
function MyException(message) {
   this.message = message;
   this.toString = function() {
       return this.message;
   }
}

function proceed() {
    throw new MyException('Error happened!');
}

try {
    proceed();
} catch (err) {
    if (err instanceof MyException) {
        console.log('Sorry! ' + err);
    }
} finally {
    console.log('Finishing');
}
The MyException class in both languages has a parameter message and a method to represent itself as a string using the value of the message.
Of course, exceptions should be raised/thrown just in the case of errors. And you define what is an error in your module design.
As I mentioned last time, you can grab a side-by-side comparison of Python and JavaScript that I compiled for you (and my future self). Side by side you will see features from traditional list, array, dictionary, object, and string handling to modern string interpolation, lambdas, generators, sets, classes, and everything else. Use it for good.
In the next part of the series, we will have a look at textual templates, list unpacking, lambda functions, iteration without indexes, generators, and sets. Stay tuned!
Cover photo by Benjamin Hung.
In my Web Development with Django Cookbook section Forms and Views there is a recipe Filtering object lists. It shows you how to filter a Django QuerySet dynamically by different filter parameters selected in a form. From practice, the approach is working well, but with lots of data and complex nested filters, the performance might get slow. You know - because of all those INNER JOINS in SQL, the page might take even 12 seconds to load. And that is not preferable behavior. I know that I could denormalize the database or play with indices to optimize SQL. But I found a better way to increase the loading speed. Recently we started using Elasticsearch for one of the projects and its data filtering performance seems to be enormously faster: in our case, it increased from 2 to 16 times depending on which query parameters you choose.
Elasticsearch is java-based search engine which stores data in JSON format and allows you to query it using special JSON-based query language. Using elasticsearch-dsl and django-elasticsearch-dsl, I can bind my Django models to Elasticsearch indexes and rewrite my object list views to use Elasticsearch queries instead of Django ORM. The API of Elasticsearch DSL is chainable like with Django QuerySets or jQuery functions, and we'll have a look at it soon.
At first, let's install Elasticsearch server. Elasticsearch is quite a complex system, but it comes with convenient configuration defaults.
On macOS you can install and start the server with Homebrew:
$ brew install elasticsearch
$ brew services start elasticsearch
For other platforms, the installation instructions are also quite clear.
Then in your Django project's virtual environment install django-elasticsearch-dsl. I guess, "DSL" stands for "domain specific language".
With pipenv it would be the following from the project's directory:
$ pipenv install django-elasticsearch-dslIf you are using just pip and virtual environment, then you would do this with your project's environment activated.
(venv)$ pip install django-elasticsearch-dslThis, in turn, will install related lower level client libraries: elasticsearch-dsl and elasticsearch-py.
In the Django project settings, add 'django_elasticsearch_dsl' to INSTALLED_APPS.
Finally, add the lines defining default connection configuration there:
ELASTICSEARCH_DSL={
    'default': {
        'hosts': 'localhost:9200'
    },
}For the illustration how to use Elasticsearch with Django, I'll create Author and Book models, and then I will create Elasticsearch index document for the books.
# -*- coding: UTF-8 -*-
from __future__ import unicode_literals

from django.db import models
from django.utils.translation import ugettext_lazy as _
from django.utils.encoding import python_2_unicode_compatible


@python_2_unicode_compatible
class Author(models.Model):
    first_name = models.CharField(_("First name"), max_length=200)
    last_name = models.CharField(_("Last name"), max_length=200)
    author_name = models.CharField(_("Author name"), max_length=200)

    class Meta:
        verbose_name = _("Author")
        verbose_name_plural = _("Authors")
        ordering = ("author_name",)

    def __str__(self):
        return self.author_name


@python_2_unicode_compatible
class Book(models.Model):
    title = models.CharField(_("Title"), max_length=200)
    authors = models.ManyToManyField(Author, verbose_name=_("Authors"))
    publishing_date = models.DateField(_("Publishing date"), blank=True, null=True)
    isbn = models.CharField(_("ISBN"), blank=True, max_length=20)

    class Meta:
        verbose_name = _("Book")
        verbose_name_plural = _("Books")
        ordering = ("title",)

    def __str__(self):
        return self.title
Nothing fancy here. Just an Author model with fields id, first_name, last_name, author_name, and a Book model with fields id, title, authors, publishing_date, and isbn. Let's go to the documents.
In the same directory of your app, create documents.py with the following content:
# -*- coding: UTF-8 -*-
from __future__ import unicode_literals

from django_elasticsearch_dsl import DocType, Index, fields
from .models import Author, Book

# Name of the Elasticsearch index
search_index = Index('library')
# See Elasticsearch Indices API reference for available settings
search_index.settings(
    number_of_shards=1,
    number_of_replicas=0
)


@search_index.doc_type
class BookDocument(DocType):
    authors = fields.NestedField(properties={
        'first_name': fields.TextField(),
        'last_name': fields.TextField(),
        'author_name': fields.TextField(),
        'pk': fields.IntegerField(),
    }, include_in_root=True)

    isbn = fields.KeywordField(
        index='not_analyzed',
    )

    class Meta:
        model = Book # The model associated with this DocType

        # The fields of the model you want to be indexed in Elasticsearch
        fields = [
            'title',
            'publishing_date',
        ]
        related_models = [Author]

    def get_instances_from_related(self, related_instance):
        """If related_models is set, define how to retrieve the Book instance(s) from the related model."""
        if isinstance(related_instance, Author):
            return related_instance.book_set.all()
Here we defined a BookDocument which will have fields: title, publishing_date, authors, and isbn.
The authors will be a list of nested dictionaries at the BookDocument. The isbn will be a KeywordField which means that it will be not tokenized, lowercased, nor otherwise processed and handled the whole as is.
The values for those document fields will be read from the Book model.
Using signals, the document will be automatically updated either when a Book instance or Author instance is added, changed, or deleted. In the method get_instances_from_related(), we tell the search engine which books to update when an author is updated.
When the index document is ready, let's build the index at the server:
(venv)$ python manage.py search_index --rebuildThe concepts of SQL and Elasticsearch queries are quite different. One is working with relational tables and the other works with dictionaries. One is using queries that are kind of human-readable logical sentences and another is using nested JSON structures. One is using the content verbosely and another does string processing in the background and gives search relevance for each result.
Even when there are lots of differences, I will try to draw analogies between Django ORM and elasticsearch-dsl API as close as possible.
Django QuerySet:
queryset = MyModel.objects.all()Elasticsearch query:
search = MyModelDocument.search()Django QuerySet:
queryset = queryset.count()Elasticsearch query:
search = search.count()Django QuerySet:
for item in queryset:
    print(item.title)
Elasticsearch query:
for item in search:
print(item.title)Django QuerySet:
>>> queryset.queryElasticsearch query:
>>> search.to_dict()Django QuerySet:
queryset = queryset.filter(my_field__icontains=value)Elasticsearch query:
search = search.filter('match_phrase', my_field=value)Django QuerySet:
queryset = queryset.filter(my_field__exact=value)Elasticsearch query:
search = search.filter('match', my_field=value)If a field type is a string, not a number, it has to be defined as KeywordField in the index document:
my_field = fields.KeywordField()Django QuerySet:
from django.db import models
queryset = queryset.filter(
    models.Q(my_field=value) |
    models.Q(my_field2=value2)
)
Elasticsearch query:
from elasticsearch_dsl.query import Q
search = search.query(
    Q('match', my_field=value) |
    Q('match', my_field2=value2)
)Django QuerySet:
from django.db import models
queryset = queryset.filter(
    models.Q(my_field=value) &
    models.Q(my_field2=value2)
)
Elasticsearch query:
from elasticsearch_dsl.query import Q
search = search.query(
    Q('match', my_field=value) &
    Q('match', my_field2=value2)
)Django QuerySet:
from datetime import datetime

queryset = queryset.filter(
    published_at__lte=datetime.now(),
)
Elasticsearch query:
from datetime import datetime

search = search.filter(
    'range',
    published_at={'lte': datetime.now()}
)Django QuerySet:
queryset = queryset.filter(
    category__pk=category_id,
)
Elasticsearch query:
from elasticsearch_dsl.query import Q

search = search.filter(
    'nested',
    path='category',
    query=Q('match', category__pk=category_id)
)Django QuerySet:
queryset = queryset.filter(
    category__pk__in=category_ids,
)
Elasticsearch query:
from django.utils.six.moves import reduce
from elasticsearch_dsl.query import Q

search = search.query(
    reduce(operator.ior, [
        Q(
            'nested',
            path='category',
            query=Q('match', category__pk=category_id),
        )
        for category_id in category_ids
    ])
)
Here the reduce() function combines a list of Q() conditions using the bitwise OR operator (|).
Django QuerySet:
queryset = queryset.order_by('-my_field', 'my_field2')Elasticsearch query:
search = search.sort('-my_field', 'my_field2')Django QuerySet:
import operator
from django.utils.six.moves import reduce

filters = []
if value1:
    filters.append(models.Q(
        my_field1=value1,
    ))
if value2:
    filters.append(models.Q(
        my_field2=value2,
    ))
queryset = queryset.filter(
    reduce(operator.iand, filters)
)
Elasticsearch query:
import operator
from django.utils.six.moves import reduce
from elasticsearch_dsl.query import Q

queries = []
if value1:
    queries.append(Q(
        'match',
        my_field1=value1,
    ))
if value2:
    queries.append(Q(
        'match',
        my_field2=value2,
    ))
search = search.query(
    reduce(operator.iand, queries)
)Django QuerySet:
from django.core.paginator import (
    Paginator, Page, EmptyPage, PageNotAnInteger
)

paginator = Paginator(queryset, paginate_by)
page_number = request.GET.get('page')
try:
    page = paginator.page(page_number)
except PageNotAnInteger:
    page = paginator.page(1)
except EmptyPage:
    page = paginator.page(paginator.num_pages)
Elasticsearch query:
from django.core.paginator import (
    Paginator, Page, EmptyPage, PageNotAnInteger
)
from django.utils.functional import LazyObject

class SearchResults(LazyObject):
    def __init__(self, search_object):
        self._wrapped = search_object

    def __len__(self):
        return self._wrapped.count()

    def __getitem__(self, index):
        search_results = self._wrapped[index]
        if isinstance(index, slice):
            search_results = list(search_results)
        return search_results

search_results = SearchResults(search)

paginator = Paginator(search_results, paginate_by)
page_number = request.GET.get('page')
try:
    page = paginator.page(page_number)
except PageNotAnInteger:
    page = paginator.page(1)
except EmptyPage:
    page = paginator.page(paginator.num_pages)
ElasticSearch doesn't work with Django's pagination by default. Therefore, we have to wrap the search query with lazy SearchResults class to provide the necessary functionality.
I built an example with books written about Django. You can download it from Github and test it.
Get Django ORM vs. Elasticsearch DSL Cheat Sheet
Cover photo by Karl Fredrickson.
Isn't it strange that browsing the web you usually access the websites by domain names, however, while developing a Django website, you usually access it through IP address? Wouldn't it be handy to navigate through your local website by domain name too? Let's have a look what possibilities there are to access the local development server by a domain name.
You probably know the following line by heart since the first day of developing with Django and can type it with closed eyes?
(myenv)$ python manage.py runserverWhen you run a management command runserver, it starts a lightweight Django development server which by default listens to HTTP requests on your local machine's port 8000, whereas by default, HTTP websites are running on the 80 and HTTPS websites are running on 443. Enter http://127.0.0.1:8000 in a browser and you can click through your Django project.
Note that this is a local address and it is not accessible from other devices in the network. Other people accessing the same address from their computers will see what is provided by web servers on their own machines, if any web server is running there at all.
Each device in a local network has its own Internet Protocol (IP) address. There are two versions of IP addresses: IPv4, typically formed from 4 decimal numbers separated by dots (e.g. 197.160.2.1), and IPv6, formed from hexadecimal numbers separated by colons (e.g. [fe80::200:f8ff:fe21:67cf]). The IP address can be set automatically and generated dynamically when you connect to the network, or you can set it manually and make it static. For example, the printer in the network will usually have a static address, whereas a mobile phone or tablet will have a dynamically attached IP addresses.
If you want to access a responsive website on your computer from another device in the network, I recommend you to set the IP address manually in the network settings. It is much more convenient to have an address that doesn't change every time you connect to the same network - you can bookmark it or use in different configuration files. Just don't let it clash with the IP addresses of other devices in the network.
Then run the local development server passing IP address 0.0.0.0 and port 8000:
(myenv)$ python manage.py runserver 0.0.0.0:8000The 0.0.0.0 is a special case. It allows you to access the website through any IP address that is assigned to your computer: 0.0.0.0 or 127.0.0.1, or the one that is set in your network settings. To access the website through any of those addresses, you will have to list those IP addresses in your Django setting ALLOWED_HOSTS.
Moreover, this allows you to check the website you are building through your computer's IP address, e.g. http://197.160.2.7:8000, not only from your computer, but from any smartphone, tablet, or another computer in the same local network. Also through the same IP address you can access the website from a virtual machine. For example, by installing Windows in Parallels Desktop on a Mac, you can test how Django websites behave in Opera, Microsoft Edge, or Internet Explorer.
Sometimes you want to address the website you are developing using a unique host name. This is necessary either when you have subdomains which lead to different parts of the website (e.g. http://aidas.example.com should show my profile), or when you need to test social authentication (e.g. using Python Social Auth).
One of the ways to deal with that is configuring a hosts file, which allows to map host names to IP addresses manually. Unfortunately, the hosts file doesn't support wildcard entries, such as <anything>.example.com, so for any new subdomain, you will need to modify the file as a Super User on Unix-based operating systems or as System Administrator on Windows.
A better way is to use a wildcard domain name that points to the IP of local host: 127.0.0.1. You can either set it up yourself at a domain provider, or use one of the available services.
For example, localtest.me by Scott Forsyth allows you to have unlimited wildcard entries pointing to local host. So all of the following domains would show a website at local host:
http://localtest.me:8000
http://myproject.localtest.me:8000
http://aidas.myproject.localtest.me:8000
Whichever domains you need to make work, don't forget to add them to ALLOWED_HOSTS in the Django project settings.
This enables to use authentication at Facebook or payments by PayPal (except the Instant Payment Notification which we'll cover a little later).
Also you can test subdomain resolution. For example, Django context processor might parse the subdomain and add some context variables, or a middleware might parse the subdomain and rewrite the path or redirect to a specific view.
Unfortunately, you can't test the website from an iPhone or iPad, using such address. And setting up your own domain's Address Record (A record) to the static IP of a computer in a local network is too inconvenient.
There is another service - xip.io provided by Basecamp which allows you to use a wild card domain entries pointing to specific IP address.
Supposing that your computer's IP address is 197.160.2.7, all of the following domains would show a website on your computer's local web server:
http://197.160.2.7.xip.io:8000
http://myproject.197.160.2.7.xip.io:8000
http://aidas.myproject.197.160.2.7.xip.io:8000
Add them to ALLOWED_HOSTS in the project settings and you can check the website from any capable device in the local network.
Unless you are using the standard port 80, you will always have to add the port number. Also your website will be shown unsecured under HTTP, not HTTPS, and in some cases you will need to test the Django website under secure conditions, for example, when creating a Facebook canvas app or working with payments.
Sometimes you want to demonstrate your fresh website to other participants at a hackathon. Or you want to share your website temporarily with the interested colleagues or friends. Or you need to test services that use Webhooks - HTTP callbacks, that post data to your server on specific events, like Instant Payment Notification at PayPal or notifications about sent SMS messages at twilio.
One way to do that is to have a remote staging website and to deploy to it very often to test the development results. For that you need a specific domain and server, and probably some automation for deployment. Also you will need to log all activities and edit log files in Terminal - no ability to make use of handy visual PyCharm debugging with breakpoints.
This is quite inconvenient. Luckily, alternatives to this method exist.
Tunnels are systems making your local host open to the public Internet. Tunnels have a frontend - that's the server by which the website will be accessed, and backend - that's your own development machine. By creating a tunnel, you open access through a firewall from a frontend server to local servers running on specified ports.
The best known open source tunnelling systems are ngrok.com, localtunnel.me, and pagekite.net. Let's have a look at each of them.
Although it is not under active development now - the last commit was more than a year ago - ngrok is the most popular one. At the time of writing, it has 10573 GitHub stars. The tool was coded in the go programming language.
The ngrok is a freemium service giving you one persistent session and one randomly generated subdomain for free, but if you want to customize the setup or even install it on your own servers, you have to pay an annual fee.
To start a tunnel for a local Django project, you would type the following in the Terminal:
$ ngrok http 8000Then anybody on the Internet could access your http://127.0.0.1:8000 entering something like https://92832de0.ngrok.io in their browser's address bar.
The default ngrok configuration would also start a special website running at http://localhost:4040 that would show the details of the traffic to and from your Django website.
If you are a paying customer and want to have a custom subdomain for your website, you can start the tunnel typing this in the Terminal:
$ ngrok http -subdomain=myproject 8000This would create a domain like https://myproject.ngrok.io that would show the content of the Django project on your local host.
Using Canonical Name Records (CNAME records) in DNS configuration, it is also possible to create tunnels within ngrok under custom domain names like https://dev.example.com, and even wildcard entries like https://<anything>.dev.example.com.
To restrict access only to specific users, you can also use the Basic authentication with the following command:
$ ngrok http -auth="username:password" 8000This service was created overnight at a hackathon and then published and maintained as it proved to be a useful tool. Localtunnel.me doesn't require any user account, and it creates a temporary access to your localhost under a randomly generated subdomain like https://nkfmosjsgh.localtunnel.me or a custom subdomain like https://myproject.localtunnel.me if it is available. When you close the tunnel, the address is not saved for you for future usage.
Localtunnel is free and open source. If you want or need, you can install the frontend part on your own server, so called "on premise".
To start a tunnel you would normally type the following in the Terminal:
$ lt --port 8000If you need a custom domain, you can also type this instead:
$ lt --port 8000 --subdomain myprojectLocaltunnel is meant to be relatively simple for quick temporary access. Therefore, CNAME configuration and wildcard subdomains are not possible.
Still this project is under active development. It was programmed in Node JS and by the time of writing it received 4832 GitHub Stars.
Pagekite is open source, python based, pay-what-you-want solution. Comparing to the previous projects, it has only 368 GitHub Stars, but is also worth giving a try.
You can start a tunnel with Pagekite, by entering a command with your private user's domain name in the Terminal:
$ pagekite.py 8000 myuser.pagekite.meThis will open a secure access to your local Django project from https://myuser.pagekite.me.
For each project you can then have a separate project's address, like https://myproject-myuser.pagekite.me which can be created starting the tunnel like this:
$ pagekite.py 8000 myproject-myuser.pagekite.meWith Pagekite you can have custom domains like https://dev.example.com for your tunnel using CNAME setting in the domain configuration. It's possible to expose non-web services, for example SSH or Minecraft server, too.
The Basic authentication is available using a command like this:
$ pagekite.py 8000 myproject-myuser.pagekite.me +password/username=passwordIf you want to use tunnelling with your Django project, you will have to do a couple of modifications here and there:
Change the URL configuration to show static and media files even in non DEBUG mode:
# urls.py
# ...
import re
from django.views.static import serve

if settings.STATIC_URL.startswith("/"):
    urlpatterns += [
        url(
            r'^{STATIC_URL}(?P<path>.*)$'.format(STATIC_URL=re.escape(settings.STATIC_URL.lstrip('/'))),
            serve,
            # {'document_root': settings.STATIC_ROOT},
        ),
    ]
if settings.MEDIA_URL.startswith("/"):
    urlpatterns += [
        url(
            r'^{MEDIA_URL}(?P<path>.*)$'.format(MEDIA_URL=re.escape(settings.MEDIA_URL.lstrip('/'))),
            serve,
            {'document_root': settings.MEDIA_ROOT},
        ),
    ]
If you want the static files to get recognized from various apps automatically, omit the {'document_root': settings.STATIC_ROOT}. Otherwise you will have to run collectstatic management command every time you change a CSS, JavaScript, or styling image file.
Have separate settings for the exposed access.
# settings.local_exposed
from .local import *
DEBUG = False
ALLOWED_HOSTS = [...]  # enter the domains of your tunnel's frontend
SECURE_PROXY_SSL_HEADER = ('HTTP_X_FORWARDED_PROTO', 'https')
To use those settings run the following in your virtual environment:
(myenv)$ python manage.py runserver --settings=settings.local_exposed --insecureHere the --insecure directive forces automatic static file recognition from different places in your project even in non DEBUG mode. Leave it out, if you are serving the static files collected by collectstatic command.
This list of security recommendations is by no means complete. Use tunnelling at your own risk.
Do you see any other security issues about using tunnelling with Django development server? Then please share your thoughts in the comments.
When you are developing a responsive website with Django and need to check how it works on a mobile device, you can run the development server with 0.0.0.0:8000 and access it on your Wifi network through the IP address of your computer, or you can use xip.io to analogically check it by a domain name.
When you need to check subdomain resolution, you can use the hosts file, configure your private subdomain pointing directly to your local IP, or use localtest.me, xip.io, or one of the tunnelling services.
When you want to debug Webhooks in order to get notified about executed payments, received messages, or completed serverless processes, you can use ngrok.com, localtunnel.me, pagekite.net or some other tunnelling service. Or of course you can set a staging website with logging, but that makes a lot of hassle debugging.
Perhaps you know some other interesting solutions how to deal with domains and local development server. If you do, don't hesitate to share your tips in the comments.
Cover photo by Michael D Beckwith
Once you have a working project, you have to host it somewhere. One of the most popular deployment platforms nowadays is Heroku. Heroku belongs to a Platform as a Service (PaaS) category of cloud computing services. Every Django project you host on Heroku is running inside a smart container in a fully managed runtime environment. Your project can scale horizontally (adding more computing machines) and you pay for what you use starting with a free tier. Moreover, you won't need much of system administrator's skills to do the deployment - once you do the initial setup, the further deployment is as simple as pushing Git repository to a special heroku remote.
However, there are some gotchas to know before choosing Heroku for your Django project:
Recently I deployed a small Django project on Heroku. To have a quick reference for the future, I summed up the process here providing instructions how to do that for future reference.
Sign up for a Heroku account. Then install Heroku tools for doing all the deployment work in the shell.
To connect your shell with Heroku, type:
$ heroku loginWhen asked, enter your Heroku account's email and password.
Activate your project's virtual environment and install Python packages required for Heroku:
(myproject_env)$ pip install django-toolbeltThis will install django, psycopg2, gunicorn, dj-database-url, static3, and dj-static to your virtual environment.
Install boto and Django Storages to be able to store static and media files on an S3 bucket:
(myproject_env)$ pip install boto
(myproject_env)$ pip install django-storages
Go to your project's directory and create the pip requirements that Heroku will use in the cloud for your project:
(myproject_env)$ pip freeze -l > requirements.txtYou will need two files to tell Heroku what Python version to use and how to start a webserver.
In your project's root directory create a file named runtime.txt with the following content:
python-2.7.11Then at the same location create a file named Procfile with the following content:
web: gunicorn myproject.wsgi --log-file -As mentioned in the "Web Development with Django Cookbook - Second Edition", we keep the developmnent and production settings in separate files both importing the common settings from a base file.
Basically we have myproject/conf/base.py with the settings common for all environments.
Then myproject/conf/dev.py contains the local database and dummy email configuration as follows:
# -*- coding: UTF-8 -*-
from __future__ import unicode_literals
from .base import *

DATABASES = {
    "default": {
        "CONN_MAX_AGE": 0,
        "ENGINE": "django.db.backends.postgresql",
        "HOST": "localhost",
        "NAME": "myproject",
        "PASSWORD": "",
        "PORT": "",
        "USER": "postgres"
    }
}

EMAIL_BACKEND = "django.core.mail.backends.console.EmailBackend"
Lastly for the production settings we need myproject/conf/prod.py with special database configuration, non-debug mode, and unrestrictive allowed hosts as follows:
# -*- coding: UTF-8 -*-
from __future__ import unicode_literals
from .base import *
import dj_database_url

DATABASES = {
    "default": dj_database_url.config()
}

ALLOWED_HOSTS = ["*"]

DEBUG = False
Now let's open myproject/settings.py and add the following content:
# -*- coding: UTF-8 -*-
from __future__ import unicode_literals
from .conf.dev import *
Finally, open the myproject/wsgi.py and change the location of the DJANGO_SETTINGS_MODULE there:
os.environ.setdefault("DJANGO_SETTINGS_MODULE", "myproject.conf.prod")
Create an Amazon S3 bucket myproject.media at the AWS Console (web interface for Amazon Web Services). Go to the properties of the bucket, expand "Permissions" section, click on the "add bucket policy" button and enter the following:
{
    "Version": "2008-10-17",
    "Statement": [
        {
            "Sid": "AllowPublicRead",
            "Effect": "Allow",
            "Principal": {
                "AWS": "*"
            },
            "Action": "s3:GetObject",
            "Resource": "arn:aws:s3:::myproject.media/*"
        }
    ]
}
This ensures that files on the S3 bucket will be accessible publicly without any API keys.
Go back to your Django project and add storages to the INSTALLED_APPS in myproject/conf/base.py:
INSTALLED_APPS = [
    # ...
    "storages",
]
Media files and static files will be stored on different paths under S3 bucket. To implement that, we need to create two Python classes under a new file myproject/s3utils.py as follows:
# -*- coding: UTF-8 -*-
from __future__ import unicode_literals
from storages.backends.s3boto import S3BotoStorage

class StaticS3BotoStorage(S3BotoStorage):
    """
    Storage for static files.
    """

    def __init__(self, *args, **kwargs):
        kwargs['location'] = 'static'
        super(StaticS3BotoStorage, self).__init__(*args, **kwargs)


class MediaS3BotoStorage(S3BotoStorage):
    """
    Storage for uploaded media files.
    """

    def __init__(self, *args, **kwargs):
        kwargs['location'] = 'media'
        super(MediaS3BotoStorage, self).__init__(*args, **kwargs)
Finally, let's edit the myproject/conf/base.py and add AWS settings:
AWS_S3_SECURE_URLS = False       # use http instead of https
AWS_QUERYSTRING_AUTH = False                # don't add complex authentication-related query parameters for requests
AWS_S3_ACCESS_KEY_ID = "..."                # Your S3 Access Key
AWS_S3_SECRET_ACCESS_KEY = "..."            # Your S3 Secret
AWS_STORAGE_BUCKET_NAME = "myproject.media"
AWS_S3_HOST = "s3-eu-west-1.amazonaws.com"  # Change to the media center you chose when creating the bucket

STATICFILES_STORAGE = "myproject.s3utils.StaticS3BotoStorage"
DEFAULT_FILE_STORAGE = "myproject.s3utils.MediaS3BotoStorage"

# the next monkey patch is necessary to allow dots in the bucket names
import ssl
if hasattr(ssl, '_create_unverified_context'):
   ssl._create_default_https_context = ssl._create_unverified_context
Collect static files to the S3 bucket:
(myproject_env)$ python manage.py collectstatic --noinputOpen myproject/conf/prod.py and add the following settings:
EMAIL_USE_TLS = True
EMAIL_HOST = "smtp.gmail.com"
EMAIL_HOST_USER = "myproject@gmail.com"
EMAIL_HOST_PASSWORD = "mygmailpassword"
EMAIL_PORT = 587Commit and push all the changes to your Git origin remote. Personally I prefer using SourceTree to do that, but you can also do that in the command line, PyCharm, or another software.
In your project directory type the following:
(myproject_env)$ heroku create my-unique-projectThis will create a Git remote called "heroku", and a new Heroku project "my-unique-project" which can be later accessed at http://my-unique-project.herokuapp.com.
Push the changes to heroku remote:
(myproject_env)$ git push heroku masterCreate local database dump:
(myproject_env)$ PGPASSWORD=mypassword pg_dump -Fc --no-acl --no-owner -h localhost -U myuser mydb > mydb.dumpUpload the database dump temporarily to some server, for example, S3 bucket: http://myproject.media.s3-eu-west-1.amazonaws.com/mydb.dump. Then import that dump into the Heroku database:
(myproject_env)$ heroku pg:backups restore 'http://myproject.media.s3-eu-west-1.amazonaws.com/mydb.dump' DATABASE_URLRemove the database dump from S3 server.
If your Git repository is not private, put your secret values in environment variables rather than in the Git repository directly.
(myproject_env)$ heroku config:set AWS_S3_ACCESS_KEY_ID=ABCDEFG123
$ heroku config:set AWS_S3_SECRET_ACCESS_KEY=aBcDeFg123
To read out the environment variables you can type:
(myproject_env)$ heroku config
To read out the environment variables in the Python code open myproject/conf/base.py and type:
import os
AWS_S3_ACCESS_KEY_ID = os.environ.get("AWS_S3_ACCESS_KEY_ID", "")
AWS_S3_SECRET_ACCESS_KEY = os.environ.get("AWS_S3_SECRET_ACCESS_KEY", "")
Open your domain settings and set CNAME to "my-unique-project.herokuapp.com".
At last, you are done! Drop in the comments if I missed some part. For the new updates, see the next section.
Push the changes to heroku remote:
(myproject_env)$ git push heroku masterIf you have changed something in the static files, collect them again:
(myproject_env)$ python manage.py collectstatic --noinputCollecting static files to S3 bucket takes quite a long time, so I do not recommend to do that automatically every time when you want to deploy to Heroku.
You can read more about Django on Heroku in the following resources:
Cover photo by Frances Gunn
This week the post office delivered a package that made me very satisfied. It was a box with three paper versions of my "Web Development with Django Cookbook - Second Edition". The book was published at the end of January after months of hard, but fulfilling work in the late evenings and at weekends.
The first Django Cookbook was dealing with Django 1.6. Unfortunately, the support for that version is over. So it made sense to write an update for a newer Django version. The second edition was adapted for Django 1.8 which has a long-term support until April 2018 or later. This edition introduces new features added to Django 1.7 and Django 1.8, such as database migrations, QuerySet expressions, or System Check Framework. Most concepts in this new book should also be working with Django 1.9.
My top 5 favourite new recipes are these:
The book is worth reading for any Django developer, but will be best understood by those who already know the basics of web development with Django. You can learn more about the book and buy it at the Packt website or Amazon.
I thank the Packt Publishing very much for long cooperation in the development of this book. I am especially thankful to acquisition editor Nadeem N. Bagban, content development editors Arwa Manasawala and Sumeet Sawant, and technical editor Bharat Patil. Also I am grateful for insightful feedback from the reviewer Jake Kronika.
What 5 recipes do you find the most useful?
Once you have your Django projects running, you come to situations, when you need to optimize for performance. The rule of thumb is to find the bottlenecks and then to take action to eliminate them by more idiomatic Python code, database denormalization, caching, or other techniques.
What is a bottleneck? Literally it refers to the top narrow part of a bottle. In engineering, bottleneck is a case where the performance or capacity of an entire system is limited by a single or small number of components or resources.
How to find these parts of your code? The most trivial way is to check the current time before specific code execution and after that code execution, and then count the time difference:
from datetime import datetime
start = datetime.now()
# heavy execution ...
end = datetime.now()
d = end - start  # datetime.timedelta object
print d.total_seconds()  # prints something like 7.861985
However, measuring code performance for Django projects like this is inefficient, because you need a lot of such wrappers for your code until you find which part is the most critical. Also you need a lot of manual computation to find the critical parts.
Recently I found line_profiler module that can inspect the performance of the code line by line. By default, to use line_profiler for your functions, you should decorate them with @profile decorator and then to execute the script:
$ kernprof -l some_script_to_profile.py
This script will execute your script, analize the decorated function, and will save results to a binary file that can later be inspected with:
$ python -m line_profiler some_script_to_profile.py.lprof
That's quite complicated, but to use line_profiler for Django views, you can install django-devserver which replaces the original development server of Django and will output the performance calculations immediately in the shell like this:
[30/Jan/2015 02:26:40] "GET /quotes/json/ HTTP/1.1" 200 137
    [sql] 1 queries with 0 duplicates
    [profile] Total time to render was 0.01s
    [profile] Timer unit: 1e-06 s

          Total time: 0.001965 s
          File: /Users/archatas/Projects/quotes_env/project/inspirational/quotes/views.py
          Function: quote_list_json at line 27

          Line #      Hits         Time  Per Hit   % Time  Line Contents
          ==============================================================
              27                                           def quote_list_json(request):
              28         1            2      2.0      0.1      quote_dict_list = []
              29         2         1184    592.0     60.3      for quote in InspirationQuote.objects.all():
              30         1            1      1.0      0.1          quote_dict = {
              31         1            1      1.0      0.1              'author': quote.author,
              32         1            1      1.0      0.1              'quote': quote.quote,
              33         1          363    363.0     18.5              'picture': quote.get_medium_picture_url(),
              34                                                   }
              35         1            1      1.0      0.1          quote_dict_list.append(quote_dict)
              36
              37         1           42     42.0      2.1      json_data = json.dumps(quote_dict_list)
              38         1          370    370.0     18.8      return HttpResponse(json_data, content_type="application/json")
The most interesting data in this table is the "% Time" column, giving an overview in percentage which lines of the Django view function are the most time-consuming. For example, here it says that I should pay the most attention to the QuerySet, the method get_medium_picture_url() and the HttpResponse object.
To setup line profiling, install line_profiler and django-devserver to you virtual environment:
(myproject_env)$ pip install line_profiler
(myproject_env)$ pip install django-devserver
Then make sure that you have the following settings in your settings.py or local_settings.py:
# settings.py
INSTALLED_APPS = (
    # ...
    'devserver',
)

MIDDLEWARE_CLASSES = (
    # ...
    'devserver.middleware.DevServerMiddleware',
)

DEVSERVER_MODULES = (
    'devserver.modules.sql.SQLRealTimeModule',
    'devserver.modules.sql.SQLSummaryModule',
    'devserver.modules.profile.ProfileSummaryModule',

    # Modules not enabled by default
    'devserver.modules.profile.LineProfilerModule',
)

DEVSERVER_AUTO_PROFILE = True  # profiles all views without the need of function decorator
When you execute
(myproject_env)$ python manage.py runserver
it will run the development server from django-devserver and for each visited view, it will show the analysis of code performance. I have tested this setup with Django 1.7, but it should work since Django 1.3.
Do you know any more useful tools to check for performance bottlenecks?