We know crawl spaces are creepy, sweaty, and confining but, hear us out…
You need to keep an eye on the humidity level in your crawl space, as it can seriously affect the whole house’s overall health. It’s ideal to be able to do this remotely (given the creepy, sweaty atmosphere of the space), and a Raspberry Pi allows this.
Jamie Bailey took to Medium to share his Raspberry Pi setup that allows him to monitor the humidity of the crawl space in his home from a mobile device and/or laptop. His setup lets you check on the current humidity level and also see the historical data over time. You can also set alarms to be sent to you via text or email whenever the humidity level exceeds a certain threshold.
Jamie’s walk-through is extensive and includes all the command line code you’ll need too, so make sure to check it out if you attempt this build.
The BME280 sensor has four pins you need to connect to your Raspberry Pi. This will send the humidity data to your Raspberry Pi, which you’ll have already set up to let you know what’s happening remotely.
Once you have all your software sorted and your hardware connected, turn your Raspberry Pi off and take it down to your crawl space (monitor, keyboard, and mouse are no longer necessary). Jamie advises hanging your Raspberry Pi from the floor joists instead of letting it touch the ground, to avoid contact with any water. He put a nail in one of the floor joists and draped the power cord over the nail (see above). Turn your tiny computer on, make sure data starts flowing into your dashboard, and you’ve got yourself remote humidity sensor!
PS We’re English so… is a crawl space the same as an attic or what? Asking for a friend!
The post Remote humidity detector appeared first on Raspberry Pi.
We’re a sentimental bunch and were bowled over by this intricate, musical wedding gift. It’s powered by a Raspberry Pi and has various other bits of geeky goodness under the hood. Honestly, the extra features just keep coming — you’ll see.
This beautifully crafted ‘record player’ plays one pair of newlyweds’ Spotify accounts, and there’s a special visual twist when their ‘first dance’ wedding song plays.
Midway through the build process
First, a little background: the newlyweds, Holly and Dougie, have been sweethearts since early highschool days. Their wedding took place on a farm near the village they grew up in, Fintry in rural Scotland.
3 yrs ago my little sister got married. The phrase "Music is a huge deal" was used a LOT in the lead up to the wedding, so I built them a magic record player that links with their @Spotify accounts, using a @Raspberry_Pi , spare timber and a bit of imagination. #throwbackproject pic.twitter.com/0CfYqPVH67
— Ben Howell (@piffleandwhimsy) May 22, 2020
Throughout the wedding day, the phrase “Music is a huge deal” was repeated often, which gave the bride’s older brother Ben Howell the idea for a homemade, Raspberry Pi–powered gift.
Custom tagline laser-cut and spray-painted
He built the couple a neatly finished music box, known as HD-001 (HD for ‘Holly Dougie’ of course) and home to a ‘smart turntable’. It can connect to a wireless network and has a touch screen where the record label would normally sit. When you lift the lid and switch it on, it asks “Hello. Who’s listening?”
![]()
Once you tap on the picture of either the bride or groom, it accesses their Spotify account and fetches the album artwork of whatever song it plays.
The main brain is Raspberry Pi 3 running Raspberry Pi OS. The interface is built as a web page in mostly PHP and JavaScript. It uses the Spotify API to get the ‘now playing’ track of the bride’s or groom’s account, and to fish out the album artwork URL from the return data so it can display this on a rotating panel.
The audio side is a powered by a 50W Bluetooth amplifier, which is entirely independent from the Raspberry Pi computer.
The enclosure is all custom-designed and built using scrap wood wrapped in green faux leather material. Ben sourced most of the other materials — rubber feet, hinges, switches, metal grille — on Amazon.
The HD-001 also features a hand-built 4-way speaker system and a custom-made speaker grille with that famous phrase “Music is a huge deal” on the front.
The lettering on the grille was laser-cut by a company in Glasgow to order, and Ben spray-painted it metallic grey. The LCD panel and driver board are also from Amazon.
To play and pause music, Ben sourced a tone-arm online and routed cabling from the Raspberry Pi GPIO pins through to a micro-switch where the original needle should sit. That’s how lifting the arm pauses playback, and replacing it resumes the music.
Getting the audio to work
Ben explains: “Essentially, it’s a fancy Bluetooth speaker system disguised as an old-fashioned turntable and designed to behave and work like an old-fashioned turntable (skeuomorphism gone mad!).”
Oh, and our favourite adorable bonus feature? If the first dance song from Holly’s and Dougie’s wedding is played, the album artwork on the LCD panel fades away, to be replaced by a slideshow of photos from their wedding.
We have it on good authority that Ben will entertain anyone who would like to place a pre-order for the HD-002.
The post Raspberry Pi-powered wedding memories record player appeared first on Raspberry Pi.
Along with yesterday’s launch of the new 8GB Raspberry Pi 4, we launched a beta 64-bit ARM version of Debian with the Raspberry Pi Desktop, so you could use all those extra gigabytes. We also updated the 32-bit version of Raspberry Pi OS (the new name for Raspbian), so here’s a quick run-through of what has changed.
NEW Raspberry Pi OS update (May 2020)
An update to the Raspberry Pi Desktop for all our operating system images is also out today, and we’ll have more on that in tomorrow’s blog post. For now, fi…
As many of you know, we have our own publishing company, Raspberry Pi Press, who publish a variety of magazines each month, including The MagPi, HackSpace magazine, and Wireframe. They also publish a wide range of other books and magazines, which are released either to purchase as a physical product (from their website) or as free PDF downloads.
To make all this content more visible and easy to access, we’ve added a new Bookshelf application – you’ll find it in the Help section of the main menu.
![]()
Bookshelf shows the entire current catalogue of free magazines – The MagPi, HackSpace magazine and Wireframe, all with a complete set of back issues – and also all the free books from Raspberry Pi Press. When you run the application, it automatically updates the catalogue and shows any new titles which have been released since you last ran it with a little “new” flash in the corner of the cover.
To read any title, just double-click on it – if it is already on your Raspberry Pi, it will open in Chromium (which, it turns out, is quite a good PDF viewer); if it isn’t, it will download and then open automatically when the download completes. You can see at a glance which titles are downloaded and which are not by the “cloud” icon on the cover of any file which has not been downloaded.
All the PDF files you download are saved in the “Bookshelf” directory in your home directory, so you can also access the files directly from there.
There’s a lot of excellent content produced by Raspberry Pi Press – we hope this makes it easier to find and read.
Edit – some people have reported that Bookshelf incorrectly gives a “disk full” error when running on a system in which the language is not English; a fix for that is being uploaded to apt at the moment, so updating from apt (“sudo apt update” followed by “sudo apt upgrade”) should get the fixed version.
As mentioned in my last blog post (here), one of the areas we are currently trying to improve is accessibility to the Desktop for people with visual impairments. We’ve already added the Orca screen reader (which has had a few bug fixes since the last release which should make it work more reliably in this image), and the second recommendation we had from AbilityNet was to add a screen magnifier.
This proved to be harder than it should have been! I tried a lot of the existing screen magnifier programs that were available for Debian desktops, but none of them really worked that well; I couldn’t find one that worked the way the magnifiers in the likes of MacOS and Ubuntu did, so I ended up writing one (almost) from scratch.
To install it, launch Recommended Applications in the new image and select Magnifier under Universal Access. Once it has installed, reboot.
You’ll see a magnifying glass icon at the right-hand end of the taskbar – to enable the magnifier, click this icon, or use the keyboard shortcut Ctrl-Alt-M. (To turn the magnifier off, just click the icon again or use the same keyboard shortcut.)
![]()
Right-clicking the magnifier icon brings up the magnifier options. You can choose a circular or rectangular window of whatever size you want, and choose by how much you want to zoom the image. The magnifier window can either follow the mouse pointer, or be a static window on the screen. (To move the static window, just drag it with the mouse.)
![]()
Also, in some applications, you can have the magnifier automatically follow the text cursor, or the button focus. Unfortunately, this depends on the application supporting the required accessibility toolkit, which not all applications do, but it works reasonably well in most included applications. One notable exception is Chromium, which is adding accessibility toolkit support in a future release; for now, if you want a web browser which supports the accessibility features, we recommend Firefox, which can be installed by entering the following into a terminal window:
sudo apt install firefox-esr
(Please note that we do not recommend using Firefox on Raspberry Pi OS unless you need accessibility features, as, unlike Chromium, it is not able to use the Raspberry Pi’s hardware to accelerate video playback.)
I don’t have a visual impairment, but I find the magnifier pretty useful in general for looking at the finer details of icons and the like, so I recommend installing it and having a go yourself.
We already know a lot of the things that people are using Raspberry Pi for, but we’ve recently been wondering if we’re missing anything… So we’re now including a short optional questionnaire to ask you, the users, for feedback on what you are doing with your Raspberry Pi in order to make sure we are providing the right support for what people are actually doing.
This questionnaire will automatically be shown the first time you launch the Chromium browser on a new image. There are only four questions, so it won’t take long to complete, and the results are sent to a Google Form which collates the results.
![]()
You’ll notice at the bottom of the questionnaire there is a field which is automatically filled in with a long string of letters and numbers. This is a serial number which is generated from the hardware in your particular Raspberry Pi which means we can filter out multiple responses from the same device (if you install a new image at some point in future, for example). It does not allow us to identify anything about you or your Raspberry Pi, but if you are concerned, you can delete the string before submitting the form.
![]()
As above, this questionnaire is entirely optional – if you don’t want to fill it in, just close Chromium and re-open it and you won’t see it again – but it would be very helpful for future product development if we can get this information, so we’d really appreciate it if as many people as possible would fill it in.
There is also the usual set of bug fixes and small tweaks included in the image, full details of which can be found in the release notes on the download page.
One particular change which it is worth pointing out is that we have made a small change to audio. Raspberry Pi OS uses what is known as ALSA (Advanced Linux Sound Architecture) to control audio devices. Up until now, both the internal audio outputs on Raspberry Pi – the HDMI socket and the headphone jack – have been treated as a single ALSA device, with a Raspberry Pi-specific command used to choose which is active. Going forward, we are treating each output as a separate ALSA device; this makes managing audio from the two HDMI sockets on Raspberry Pi 4 easier and should be more compatible with third-party software. What this means is that after installing the updated image, you may need to use the audio output selector (right-click the volume icon on the taskbar) to re-select your audio output. (There is a known issue with Sonic Pi, which will only use the HDMI output however the selector is set – we’re looking at getting this fixed in a future release.)
Some people have asked how they can switch the audio output from the command line without using the desktop. To do this, you will need to create a file called .asoundrc in your home directory; ALSA looks for this file to determine which audio device it should use by default. If the file does not exist, ALSA uses “card 0” – which is HDMI – as the output device. If you want to set the headphone jack as the default output, create the .asoundrc file with the following contents:
defaults.pcm.card 1
defaults.ctl.card 1
This tells ALSA that “card 1” – the headphone jack – is the default device. To switch back to the HDMI output, either change the ‘1’s in the file to ‘0’s, or just delete the file.
The new image is available for download from the usual place: our Downloads page.
To update an existing image, use the usual terminal command:
sudo apt update
sudo apt full-upgrade
To just install the bookshelf app:
sudo apt update
sudo apt install rp-bookshelf
To just install the magnifier, either find it under Universal Access in Recommended Software, or:
sudo apt update
sudo apt install mage
You’ll need to add the magnifier plugin to the taskbar after installing the program itself. Once you’ve installed the program and rebooted, right-click the taskbar and choose Add/Remove Panel Items; click Add, and select the Magnifier option.
We hope you like the changes — as ever, all feedback is welcome, so please leave a comment below!
The post Latest Raspberry Pi OS update – May 2020 appeared first on Raspberry Pi.
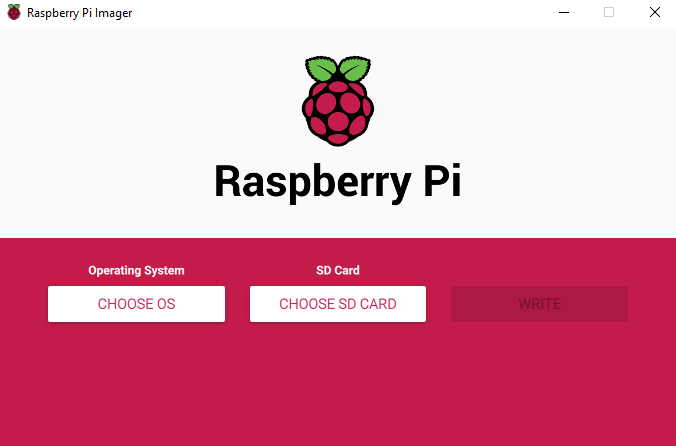
We’ve made a simpler way to image your microSD card with Raspbian, the official Raspberry Pi operating system, and other operating systems. Introducing our new imaging utility, Raspberry Pi Imager.
For me, one of the most important aspects of the Raspberry Pi experience is trying to make it as easy as possible to get started. To this end, since launching the first Raspberry Pi, we’ve added a GUI to our operating system, a wizard to help you set up your Raspberry Pi the first time you boot it, and lots of books and magazines to get people up and running. We’ve even developed the Raspberry Pi Desktop Kit to put all the things you need (yes, Alex, I know – except for a monitor) into a single box to make it as easy as possible!
Despite all these moves towards more simplicity, when it comes to microSD cards, programming them with your favourite Raspberry Pi operating system has always been a little bit tricky.
The main problem comes from the differences between the operating systems that people’s main computers are likely to use: Windows, macOS, and Linux all use different methods of accessing the SD card, which doesn’t help matters. And, for some new Raspberry Pi users, understanding where to find the latest up-to-date image and how to get it onto the microSD card can be a bit confusing, unless you’ve had prior experience with image-flashing tools such as Etcher.
For that reason, we’ve always suggested that you should buy a pre-loaded NOOBS SD card from your Raspberry Pi Approved Reseller.
But what if you want to re-image an existing card?
Image Utility
No Description
From today, Raspberry Pi users will be able to download and use the new Raspberry Pi Imager, available for Windows, macOS and Ubuntu.
The utility is simple to use and super speedy, thanks to some shortcuts we’ve introduced into the mechanics.
Firstly, Raspberry Pi Imager downloads a .JSON file from our website with a list of all current download options, ensuring you are always installing the most up-to-date version.
Once you’ve selected an operating system from the available options, the utility reads the relevant file directly from our website and writes it straight to the SD card. This speeds up the process quite considerably compared to the standard process of reading it from the website, writing it to a file on your hard drive, and then, as a separate step, reading it back from the hard drive and writing it to the SD card.
During this process, Raspberry Pi Imager also caches the downloaded operating system image – that is to say, it saves a local copy on your computer, so you can program additional SD cards without having to download the file again.
Download the Raspberry Pi Imager from our downloads page today.
Raspberry Pi Imager is fully open source and was originally written as a modification of the PiBakery tool, later modified and finished by Floris Bos (the original writer of the NOOBS tool and the PiServer tool). You can see Floris’ other software, for data centres, here.
The post Introducing Raspberry Pi Imager, our new imaging utility appeared first on Raspberry Pi.
Since we first launched Raspberry Pi, an SD card (or microSD card) has always been a vital component. Without an SD card to store the operating system, Raspberry Pi is pretty useless*! Over the ensuing eight years, SD cards have become the default removable storage technology, used in cameras, smartphones, games consoles and all sorts of other devices. Prices have plummeted to the point where smaller size cards are practically given away for free, and at the same time storage capacity has increased to the point where you can store a terabyte on your thumbnail.
However, the fact that SD cards are now so commonplace sometimes conceals the fact that not all SD cards are created equal. SD cards have a speed rating – how fast you can read or write data to the card – and as card sizes have increased, so have speed ratings. If you want to store 4K video from your digital camera, it is important not just that the card is big enough to hold it, but also that you can write it to the card fast enough to keep up with the huge amount of data coming out of the camera.
The speed of an SD card will also directly affect how fast your Raspberry Pi runs, in just the same way as the speed of a hard drive affects how fast a conventional desktop computer runs. The faster you can read data from the card, the faster your Raspberry Pi will boot, and the faster programs will load. Equally, write speed will also affect how well any programs which save large quantities of data run – so it’s important to use a good-quality card.
The speed rating of an SD card should be printed either on the card itself or on the packaging.
The 32GB card shown below is Class 4, denoted by the 4 inside the letter C – this indicates that it can write at 4MB/s.
![]()
The 64GB card shown below is Class 10, and so can write at 10MB/s. It also shows the logo of UHS (“ultra high speed”) Class 1, the 1 inside the letter U, which corresponds to the same speed.
![]()
More recently, speeds have started to be quoted in terms of the intended use of the card, with Class V10 denoting a card intended for video at 10MB/s, for example. But the most recent speed categorisation – and the one most relevant to use in a Raspberry Pi – is the new A (for “application”) speed class. We recommend the use of Class A1 cards (as the one above – see the A1 logo to the right of the Class 10 symbol) in Raspberry Pi – in addition to a write speed of 10MB/s, these support at least 1500 read operations and 500 write operations per second. All the official Raspberry Pi microSD cards we sell meet this specification.
We’ve all heard the stories of people who have bought a large capacity SD card at a too-good-to-be-true price from a dodgy eBay seller, and found that their card labelled as 64GB can only actually hold 2GB of data. But that is at least fairly easy to spot – it’s much harder to work out whether your supposedly fast SD card is actually meeting its specified speed, and unscrupulous manufacturers and sellers often mislabel low quality cards as having unachievable speeds.
Today, as the first part of a new suite of tests which will enable you to perform various diagnostics on your Raspberry Pi hardware, we are releasing a tool which allows you to test your SD card to check that it performs as it should.
To install the new tool, from a terminal do
sudo apt update
sudo apt install agnostics
(“agnostics”? In this case it’s nothing to do with religion! I’ll leave you to work out the pun…)
Once installed, you will find the new application “Raspberry Pi Diagnostics” in the main menu under “Accessories”, and if you launch it, you’ll see a screen like this:
![]()
In future, this screen will show a list of the diagnostic tests, and you will be able to select which you want to run using the checkboxes in the right-hand column. But for now, the only test available is SD Card Speed Test; just press “Run Tests” to start it.
One thing to note is that the write performance of SD cards declines over time. A new card is blank and data can be written to what is effectively “empty” memory, which is fast; but as a card fills up, memory needs to be erased before it can be overwritten, and so writes will become slower the more a card is used. The pass / fail criteria in this test assume a new (or at least freshly formatted) card; don’t be alarmed if the write speed test fails when run on the SD card you’ve been using for six months! If you do notice your Raspberry Pi slowing down over time, it may be worth backing up your SD card using the SD Card Copier tool and reformatting it.
The test takes a minute or so to run on a Raspberry Pi 4 (it’ll take longer on older models), and at the end you’ll see a results screen with either (hopefully) PASS or (if you are less fortunate) FAIL. To see the detailed results of the speed test, press “Show Log”, which will open the test log file in a text editor. (The log file is also written to your home directory as rpdiags.txt.)
![]()
We are testing against the A1 specification, which requires a sequential write speed of 10MB/s, 500 random write operations per second, and 1500 random read operations per second; we run the test up to three times. (Tests of this nature are liable to errors due to other background operations accessing the SD card while the test is running, which can affect the result – by running the test multiple times we try to reduce the likelihood of a single bad run resulting in a fail.)
If the test result was a pass, great! Your SD card is good enough to provide optimum performance in your Raspberry Pi. If it failed, have a look in the log file – you’ll see something like:
Raspberry Pi Diagnostics - version 0.1
Mon Feb 24 09:44:16 2020

Test : SD Card Speed Test
Run 1
prepare-file;0;0;12161;23
seq-write;0;0;4151;8
rand-4k-write;0;0;3046;761
rand-4k-read;9242;2310;0;0
Sequential write speed 4151 kb/s (target 10000) - FAIL
Note that sequential write speed declines over time as a card is used - your card may require reformatting
Random write speed 761 IOPS (target 500) - PASS
Random read speed 2310 IOPS (target 1500) - PASS
Run 2
prepare-file;0;0;8526;16
...
You can see just how your card compares to the stated targets; if it is pretty close to them, then your card is only just below specification and is probably fine to use. But if you are seeing significantly lower scores than the targets, you might want to consider getting another card.
br>
br>
[*] unless you’re using PXE network or USB mass storage boot modes of course.
The post Raspberry Pi SD Card Speed Test appeared first on Raspberry Pi.
The last major release of Raspbian was the Buster version we launched alongside Raspberry Pi 4 last year. There was a minor release a couple of months later, which was mostly just bug-fixes for the first release (hence no blog post), but today’s release has a few changes that we thought it was worth bringing to your attention.
We previously made some significant changes to the PCmanFM file manager included as part of the Raspberry Pi Desktop; we added a cutdown mode which removes a lot of the less commonly used functions, and we set this as the default mode.
One of the things we removed for this mode is the Places view, an optional view for the left-hand pane of the window which provides direct access to a few specific locations in the file system. We felt that the directory browser was more useful, so we chose to show that instead. But one useful feature of Places is that it displays external devices, such as USB drives, and these are somewhat awkward to find in the file manager otherwise.
So for this release, the Places view has been reinstated, but rather than being a separate switchable view, it is a small panel at the top of the directory browser. This hopefully gives the best of both worlds: easy access to USB drives, and a directory view. You can customise what is shown in the Places view on the Layout page of the file manager Preferences dialogue, or you can turn it off completely if you’d rather just have the directory browser.
![]()
There are a few other small changes to the file manager: there is now a new folder icon on the taskbar, and the expanders in the directory browser (the little triangles next to directory names) are now only shown when a directory has subdirectories.
Finally, the folder and file icons used in the file manager have been replaced with some new, cleaner designs. These are designed to make it more obvious at a glance what sort of file an icon represents, and also to fit better with the slightly flatter GUI appearance we moved to for Buster.
One area of the desktop which we have been wanting to improve for some time is accessibility, particularly for those with visual impairments. To this end, we asked the accessibility charity AbilityNet to assess the Raspberry Pi Desktop to see how usable it was for those with disabilities, and where we could make improvements.
They gave us a lot of very helpful feedback, and their number one suggestion was that we needed to make the Orca screen reader work with the desktop.
Orca is an application which uses synthesised speech to read out menus, window titles, button labels, and the like. It’s a standard Linux application, but people who have tried it on Raspberry Pi found that it didn’t actually work with Raspbian. (When I first installed it, all it did was to make slightly alarming growling noises instead of speaking!)
After quite a bit of fiddling and head-scratching, Orca now works as intended. It will read out many of the pre-installed applications, and should work with a lot of other Linux software packages as well.
Unfortunately, there are a few areas where it won’t work. Orca hooks into various user interface toolkits — the software which is used to draw buttons, menus, etc. on the screen. It is fully compatible with the GTK toolkit (which is used for most of the desktop) and Qt (which is used for the VLC media player and the qpdfview PDF viewer). But many applications (such as Thonny, Sonic Pi, and Scratch) are built on toolkits which are not compatible with the screen reader. Also, the current release of Chromium is not compatible with Orca, but the forthcoming version 80 release, which should be available in a few months, will be Orca-compatible. In the meantime, if you want an Orca-compatible browser, you can install Firefox by entering the following into a terminal window:
sudo apt install firefox-esr
(Please note that we do not recommend using Firefox on Raspbian unless you need Orca compatibility, as it is not optimised for video playback on the Pi in the same way as Chromium.)
![]()
Orca doesn’t have a menu entry — the settings dialog shown above can be opened by holding down the Insert key and then pressing the space bar, or by typing orca -s into a terminal window.
Please note that Orca currently doesn’t work with Bluetooth audio devices, so we recommend using it with either the Pi’s own HDMI output or headphone socket, or with a USB or HAT external audio device.
Orca can either be installed from Recommended Software, in the Universal Access category, or by entering the following into a terminal window:
sudo apt install orca
This is hopefully just the start of making the Raspberry Pi Desktop more accessible for those with disabilities, as we are planning to do more work in this area in the future.
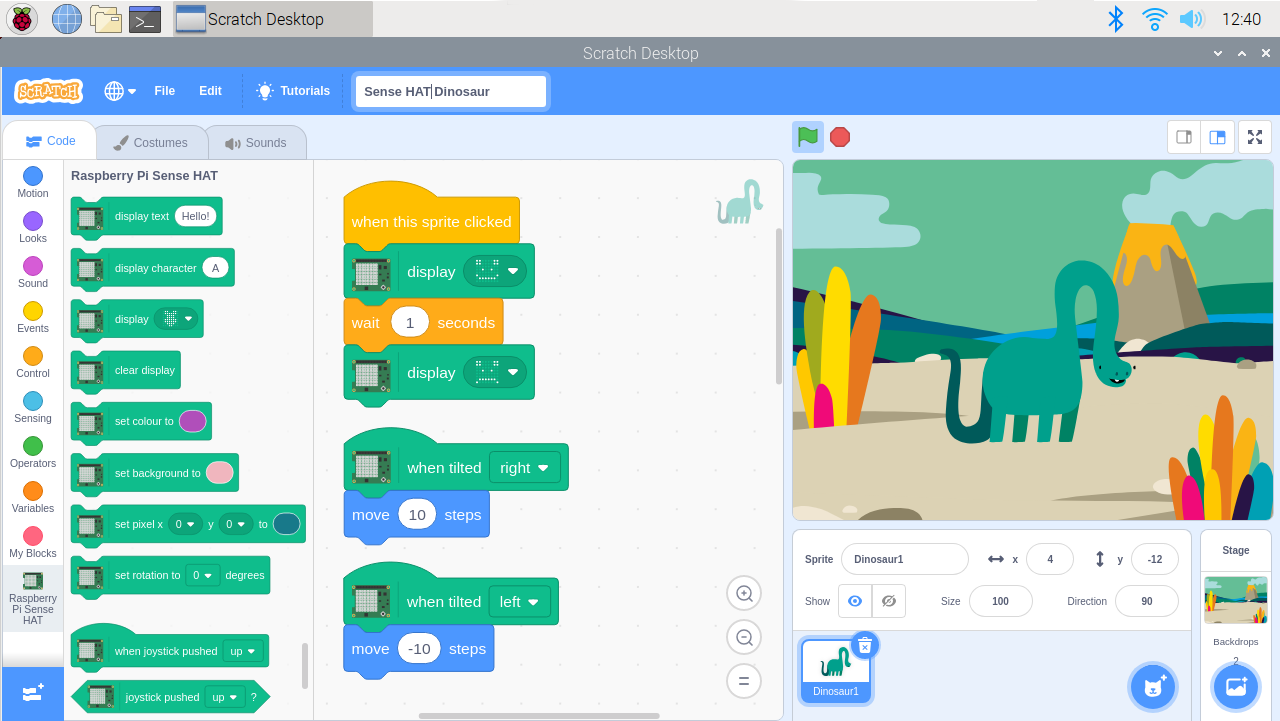
Scratch 3 has added the ability to load a project from the command line at launch (scratch3 filename.sb3).
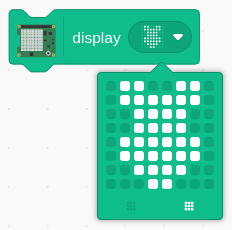
There are also two new blocks in the Sense HAT extension, ‘display stage’ and ‘display sprite’. The first of these shows the current stage on the SenseHAT LED array; the second shows the current sprite on the LEDs.
![]()
A lot of work has been done on Thonny to improve performance, particularly when debugging. In previous releases, setting breakpoints caused performance to slow down significantly — this was particularly obvious when running PyGame Zero games, where the frame rate was very slow. The new version is substantially faster, as you can see if you set breakpoints in any of…
…the Python games from Eben’s book Code the Classics – Volume 1, which are now installable from Recommended Software, and can be found in the Games menu.
![]()
If you want to look at the code for the games, this can be found in /usr/share/code-the-classics.
In previous releases, there was an Audio Device Preferences application in the main menu to enable device-specific settings to be made for external audio devices. This has now been removed; all these settings are now available directly from the volume plugin on the taskbar. With an external device selected as the output or input device, right-click the volume icon and choose the Output Device Settings… or Input Device Settings… option to open the configuration dialog.
![]()
The option to disable the timeout which blanks the screen after a few minutes has been added to Raspberry Pi Configuration. To try and reduce clutter in this application, the options from the System tab are now split across two tabs; all display-related options, including screen blanking, are now on the new Display tab.
![]()
We’ve also been able to reinstate the pixel doubling option for Raspberry Pi 4; this was originally implemented in a manner incompatible with the KMS video driver used on Raspberry Pi 4, but we’ve now found a way to make it work with KMS. (The pixel doubling option is designed to make the Raspberry Pi’s screen easier to use for people with visual disabilities — it doubles the size of every pixel, scaling the entire screen by a factor of two.)
We’ve made one minor change to key shortcuts: in previous versions of Raspbian, the combination Ctrl-Alt-Delete launched the task manager. We felt it might be better to be consistent with the behaviour of Windows PCs since the dawn of time, so now Ctrl-Alt-Delete launches the shutdown options dialog. If you want to access the task manager with a key shortcut, you can now do so using Ctrl-Shift-Escape — also consistent with the behaviour of Windows.
There are also numerous other small bug fixes and robustness improvements across the board.
The new image is available for download from the usual place: our Downloads page.
To update an existing image, use the usual terminal command:
sudo apt update
sudo apt full-upgrade
We hope you like the changes — as ever, all feedback is welcome, so please leave a comment below!
The post A new Raspbian update appeared first on Raspberry Pi.
Hey there! I’ve just come back from a two-week vacation, Liz and Helen are both off sick, and I’m not 100% sure I remember how to do my job.
So, while I figure out how to social media and word write, here’s this absolutely wonderful video from Ian Charnas, showing how he hacked his car windscreen wipers to sync with his stereo.
FINALLY! Wipers Sync to Music
In this video, I modify my car so the windshield wipers sync to the beat of whatever music I’m listening to. You can own this idea!
Ian will be auctioning off the intellectual property rights to his dancing wipers on eBay, will all proceeds going to a charity supporting young makers.
The post Musically synced car windscreen wipers using Raspberry Pi appeared first on Raspberry Pi.
In June we launched Raspberry Pi 4, and it has been selling extremely well, with over 1 million devices already made. We launched the product in a select set of countries in June, and ever since, we’ve been steadily making it available in more and more places; currently, Raspberry Pi 4 is on the market in 55 countries.
There have been many questions around why Raspberry Pi 4 isn’t available in certain countries, and this post will give you some insight into this.
Whenever a company wants to sell a product on a market, it first has to prove that selling it is safe and legal. Compliance requirements vary between different products; rules that would apply to a complicated machine like a car will, naturally, not be the same as those that apply to a pair of trainers (although there is some overlap in the Venn diagram of rules).
Regions of the world within each of which products have to be separately tested
Different countries usually have slightly different sets of regulations, and testing has to be conducted at an accredited facility for the region the company intends to sell the product in.
Compliance for a country is broken into the following: testing, certification, and marking.
Compliance testing requirements vary from country to country; there is no single set of tests or approvals that allow you to sell a product globally. Often, it’s necessary to test the product within the country that compliance is needed for; only some countries accept test reports from other countries.
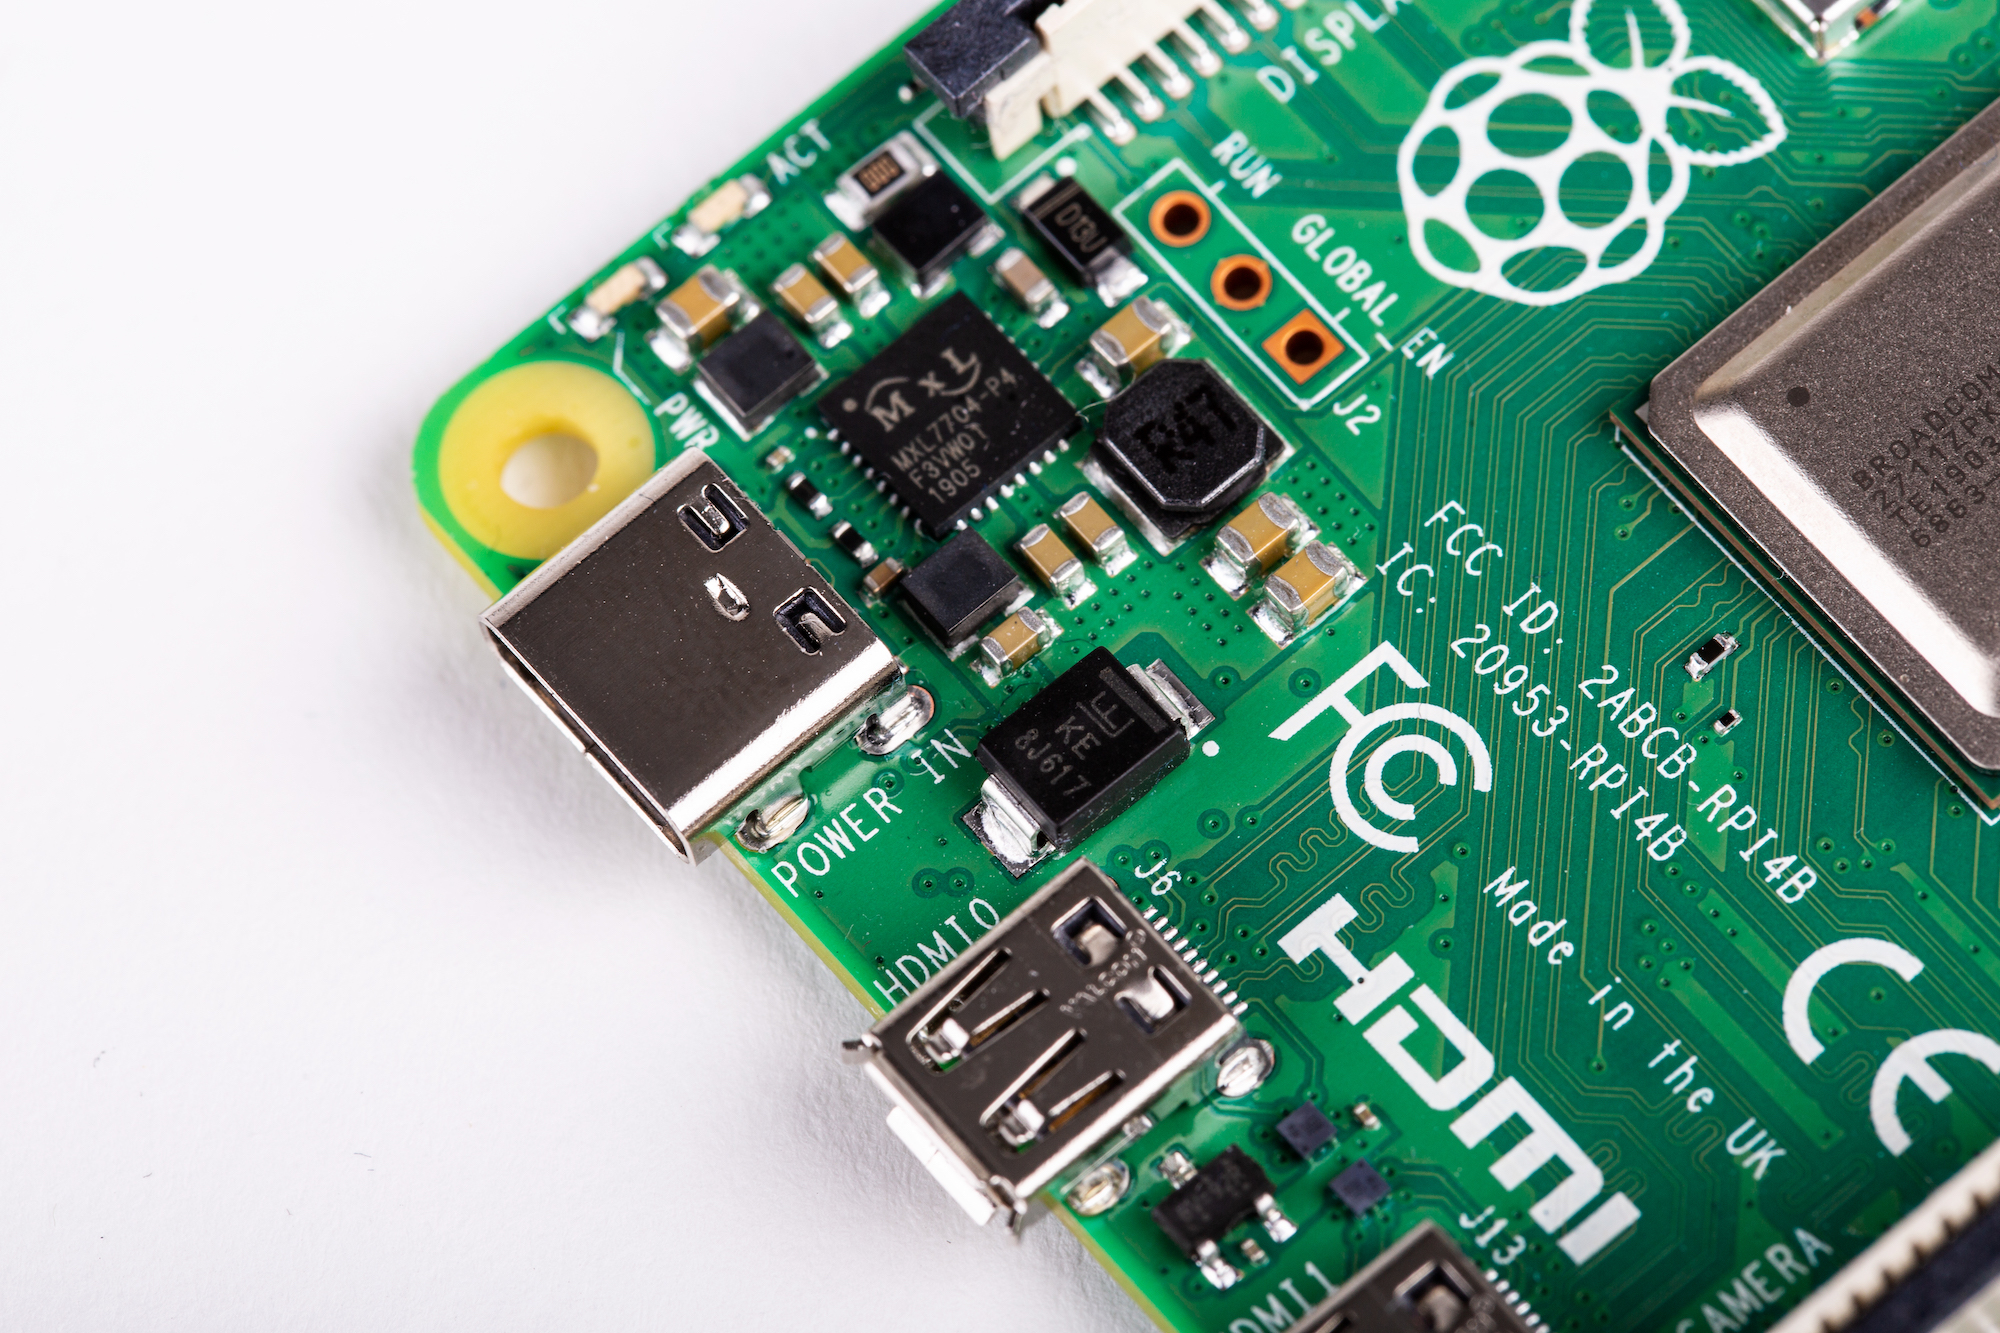
For the launch of Raspberry Pi 4, we tested to EU, FCC (USA), and IC (Canada) regulations, and we’ve used these test reports to apply for compliance in as many countries as possible.
Once testing is complete, a certificate is issued for the product. The time this takes is variable, and some countries post such certificates online publicly so people can search for products.
Testing in the remaining countries that require testing to happen in-country is now complete, and the respective certificates are being granted for Raspberry Pi 4 right now. However, whilst the certificate is being issued, the product isn’t yet compliant; we need to add the regulatory markings for this to happen.
Like testing requirements, product marking requirements may differ from country to country. The main difficulty of marking is that many countries require a unique certificate number to be printed on packaging, leaflets, and the product itself.
Some countries, such as the USA, allow companies to create the certificate number themselves (hence jazzy numbers like 2ABCB-RPI4B), and so we can place these on the product before launch. In other countries, however, the certificate number is issued at the end of the certification process.
For Raspberry Pi 4, we are now at the final stage for compliance: marking. All our certificates have been issued, and we are updating the packaging, leaflet, and product with the various certificate numbers needed to unlock the last few countries.
The countries that we have certificates for that require markings to be added: South Korea, Brazil, Mexico, Taiwan, Chile, and Japan.
The process is beginning, and Raspberry Pi 4 should be available in these markets soon.
We post all our product compliance information online.
This is a broad overview of the compliance process for Raspberry Pi, and there are some details omitted for the sake of clarity. Compliance is a complex and varied task, but it is very important to demonstrate that Raspberry Pi 4 is a compliant, safe, and trustworthy product.
We aim to make Raspberry Pi 4 available in more countries than ever before, ensuring that everyone can take advantage of the amazing features, power, and cost-effectiveness it offers.
The post Compliance, and why Raspberry Pi 4 may not be available in your country yet appeared first on Raspberry Pi.
You can now install and use Scratch 3 Desktop for Raspbian on your Raspberry Pi!
Scratch 3 was released in January this year, and since then we and the Scratch team have put lots of work into creating an offline version for Raspberry Pi.
The new version of Scratch has a significantly improved interface and better functionality compared to previous versions. These improvements come at the cost of needing more processing power to run. Luckily, Raspberry Pi 4 has delivered just that, and with the software improvements in the newest version of Raspbian, Buster, we can now deliver a reliable Scratch 3 experience on our computer.
Scratch 3 needs at least 1GB of RAM to run, and we recommend a Raspberry Pi 4 with at least 2GB RAM. While you can run Scratch 3 on a Raspberry Pi 2, 3, 3B+, or a Raspberry 4 with 1GB RAM, performance on these models is reduced, and depending on what other software you run at the same time, Scratch 3 may fail to start due to lack of memory.
The Scratch team is working to reduce the memory requirements of Scratch 3, so we will hopefully see improvements to this soon.
You can only install Scratch 3 on Raspbian Buster.
How to update Raspbian on your Raspberry Pi
How to update to the latest version of Raspbian on your Raspberry Pi.
Once you’re running the latest version of Buster, you can install Scratch 3 either using the Recommended Software application or apt on the terminal.
Open up the menu, click on Preferences > Recommended Software, and then select Scratch 3 and click on OK.

Open a terminal window, and type in and run the following commands:
sudo apt-get update
sudo apt-get install scratch3
Scratch 3 Desktop for Raspbian comes with new extensions to allow you to control the GPIO pins and Sense HAT with Scratch code!
GPIO extension is a replacement for the existing extension in Scratch 2. Its layout and functionality is very similar, so you can use it as a drop-in replacement.
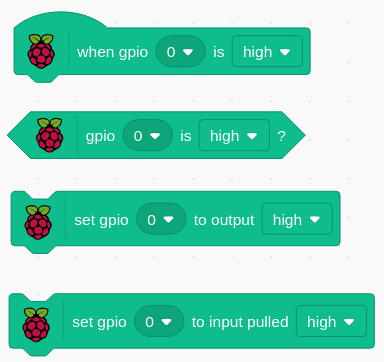
The GPIO extension gives you the flexibility to connect and control a whole host of electronic devices.
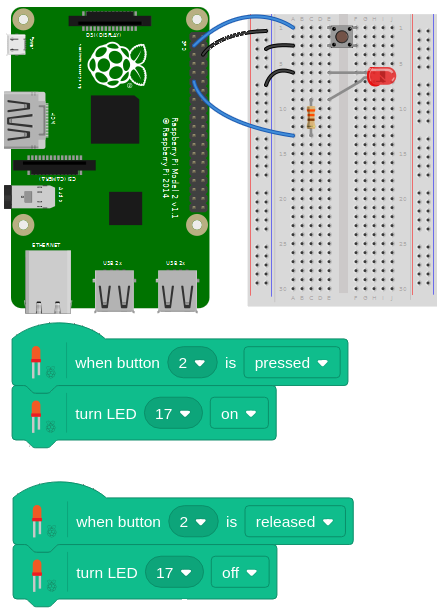
If you are looking to add something simple, like an LED or button controller for a game, you should find the new Simple Electronics extension easier to use than the GPIO extension. The Simple Electronics extension is the first version of a beginner-friendly extension for interacting with Raspberry Pi’s GPIO pins. Taking lessons from the implementation of gpiozero for Python, this new extension provides a simpler way of using electronic components: currently buttons and LEDs.
In this example, an LED connected to GPIO pin 17 is controlled by a button connected between pin 2 and GND.
We’ve improved the Sense HAT extension to take advantage of new features in Scratch 3, and the updated version of the extension also introduces a number of new blocks to allow you to:
The micro:bit and LEGO extensions will become available later on Scratch 3 Desktop. This is because Scratch Link, the software which allows Scratch to talk to Bluetooth devices, is not yet available for Linux-type operating systems like Raspbian. A version of Scratch Link for Raspbian is part of our plans but, as yet, we don’t have a release date.
It has been a long ambition of both the Scratch and Raspberry Pi teams to have Scratch 3 running on Raspberry Pi, and it’s amazing to see it released!
A big thank you to Raspberry Pi engineer Simon Long for building and packaging Scratch 3, and to the Scratch team for their support in getting over some of the problems we faced along the way.
The post Scratch 3 Desktop for Raspbian on Raspberry Pi appeared first on Raspberry Pi.
Hack your existing Raspberry Pi case to fit the layout of your new Raspberry Pi 4, with this handy “How to hack your existing Raspberry Pi case to fit the layout of your new Raspberry Pi 4” video!
Hack your old Raspberry Pi case to fit your Raspberry Pi 4
Hack your existing official Raspberry Pi case to fit the new Raspberry Pi 4, or treat yourself to the new official Raspberry Pi 4 case. The decision is yours!
The post Hack your old Raspberry Pi case for the Raspberry Pi 4 appeared first on Raspberry Pi.
Amid all the furore about the release of a certain new piece of hardware, some people may have missed that we have also released a new version of Raspbian. While this is required for Raspberry Pi 4, we’ve always tried to maintain software backwards-compatibility with older hardware, and so the standard Raspbian image for all models of Raspberry Pi is now based on Buster, the latest version of Debian Linux.
![]()
The first thing to mention about Buster (who was the actual dog in Pixar’s “Toy Story” films, as opposed to the toy one made out of a Slinky…) is that we are actually releasing it slightly in advance of the official Debian release date. The reason for this is that one of the important new features of Raspberry Pi 4 is that the open-source OpenGL video driver is now being used by default, and this was developed using the most recent version of Debian. It would have been a lot of work to port everything required for it back on to Raspbian Stretch, so we decided that we would launch on Raspbian Buster – the only question was whether Buster would be ready before the hardware was!
As it turns out, it wasn’t – not quite. The official launch date for Buster is July 7, so we are a couple of weeks ahead. That said, Buster has been in a “frozen” state for a couple of months now, with only minor changes being made to it, so the version we are releasing is pretty much identical to that which will be officially released by Debian on July 7.
We started using Buster internally in January this year, so it has had a lot of testing on Pi – while we may be releasing it a bit early, you need have no concerns about using it; it’s stable and robust, and you can use apt to update with any changes that do happen between now and July 7 without needing to reinstall everything.
![]()
There are no huge differences between Debian Stretch and Debian Buster. In a sad reflection of the way the world is nowadays, most of the differences are security changes designed to make Buster harder to hack. Any other differences are mostly small incremental changes that most people won’t notice, and this got us thinking…
When we moved from Jessie to Stretch, many people commented that they couldn’t actually see any difference between the two – as most of the changes were “under the hood”, the desktop and applications all looked the same. So we told people “you’ve now got Stretch!” and they said “so what?”
The overall appearance of the desktop hasn’t changed significantly for a few years, and was starting to look a bit dated, so we thought it would be nice to give the appearance a mild refresh for Buster. Then people would at least be able to see that their shiny new operating system looked different from the old one!
There has been a definite trend in the design of most computer graphical user interfaces over recent years to simplify and declutter; to reduce the amount of decoration, so that a button becomes a plain box rather than something that resembles a physical button. You can see this in both desktop OSes like Windows, and in mobile OSes like iOS – so we decided it was time to do something similar.
![]()
The overall appearance of most of the interface elements has been simplified; we’ve reduced things like the curvature of corners and the shading gradients which were used to give a pseudo-3D effect to things like buttons. This “flatter” design looks cleaner and more modern, but it’s a bit of a juggling act; it’s very easy to go too far and to make things look totally flat and boring, so we’ve tried to avoid that. Eben and I have had a mild tussle over this – he wanted as much flatness as possible, and I wanted to retain at least a bit of curvature, so we’ve met somewhere in the middle and produced something we both like!
We’ve also changed the default desktop for a new one of Greg Annandale’s gorgeous photographs, and we’ve moved to a grey highlight colour.
(If you really don’t like the new appearance, it is easy enough to restore the former appearance – the old desktop picture is still installed, as is the old UI theme.)
We’ve been including the excellent Thonny Python development environment in Raspbian for some time now. In this release, it’s now our default Python editor, and to that end, we are no longer including IDLE by default. IDLE has always felt dated and not very pleasant to use, and Thonny is so much nicer that we’d strongly recommend moving to it, if you haven’t already!
![]()
(If you’d like an alternative to Thonny, the Mu Python IDE is also still available in Recommended Software.)
We’ve made some small tweaks to the taskbar. The ‘eject’ icon for removing USB devices is now only shown if you have devices to eject; it’s hidden the rest of the time. Similarly, if you are using one of the earlier Pis without Bluetooth support, the Bluetooth icon is now hidden rather than being greyed out. Also, the CPU activity gauge is no longer shown on the taskbar by default, because this has become less necessary on the more powerful recent Raspberry Pi models. If you’d still like to use it, you can add it back – right-click the taskbar and choose ‘Add / Remove Panel Items’. Press the ‘Add’ button and you’ll find it listed as ‘CPU Usage Monitor’. While you are in there, you’ll also find the new ‘CPU Temperature Monitor’, which you can add if you’re interested in knowing more about what the CPU is up to.
One program which is currently missing from Buster is Mathematica. Don’t worry – this is only a temporary removal! Wolfram are working on getting Mathematica to work properly with Buster, and as soon as it is ready, it’ll be available for installation from Recommended Software.
A few features of the old non-OpenGL video driver (such as pixel doubling and underscan) are not currently supported by the new OpenGL driver, so the settings for these are hidden in Raspberry Pi Configuration if the GL driver is in use. (The GL driver is the default on Raspberry Pi 4 – older Pis will still use the non-GL driver by default. Also, if using a Raspberry Pi 4 headless, we recommend switching back to the non-GL driver – choose ‘Legacy’ under the ‘GL Driver’ setting in ‘Advanced Options’ in raspi-config.)
If the GL driver is in use, there’s a new ‘Screen Configuration’ tool – this enables you to set up the arrangement of multiple monitors on a Raspberry Pi 4. It can also be used to set custom monitor resolutions, which can be used to simulate the effect of pixel doubling.
![]()
Finally, there are a couple of new buttons in ‘Raspberry Pi Configuration’ which control video output options for Raspberry Pi 4. (These are not shown when running on earlier models of Raspberry Pi.) It is not possible on the Raspberry Pi 4 to have both analogue composite video (over the 3.5mm jack) and HDMI output simultaneously, so the analogue video output is disabled by default. 4Kp60 resolution over HDMI is also disabled by default, as this requires faster clock speeds resulting in a higher operating temperature and greater power consumption. The new buttons enable either of these options to be enabled as desired.
As ever with major version changes, our recommendation is that you download a new clean image from the usual place on our site – this will ensure that you are starting from a clean, working Buster system.
We do not recommend upgrading an existing Stretch (or earlier) system to Buster – we can’t know what changes everyone has made to their system, and so have no idea what may break when you move to Buster. However, we have tested the following procedure for upgrading, and it works on a clean version of the last Stretch image we released. That does not guarantee it will work on your system, and we cannot provide support (or be held responsible) for any problems that arise if you try it. You have been warned – make a backup!
1. In the files /etc/apt/sources.list and /etc/apt/sources.list.d/raspi.list, change every use of the word “stretch” to “buster”.
2. In a terminal,
sudo apt update
and then
sudo apt dist-upgrade
3. Wait for the upgrade to complete, answering ‘yes’ to any prompt. There may also be a point at which the install pauses while a page of information is shown on the screen – hold the ‘space’ key to scroll through all of this and then hit ‘q’ to continue.
4. The update will take anywhere from half an hour to several hours, depending on your network speed. When it completes, reboot your Raspberry Pi.
5. When the Pi has rebooted, launch ‘Appearance Settings’ from the main menu, go to the ‘Defaults’ tab, and press whichever ‘Set Defaults’ button is appropriate for your screen size in order to load the new UI theme.
6. Buster will have installed several new applications which we do not support. To remove these, open a terminal window and
sudo apt purge timidity lxmusic gnome-disk-utility deluge-gtk evince wicd wicd-gtk clipit usermode gucharmap gnome-system-tools pavucontrol
We hope that Buster gives a little hint of shiny newness for those of you who aren’t able to get your hands on a Raspberry Pi 4 immediately! As ever, your feedback is welcome – please leave your comments below.
The post Buster – the new version of Raspbian appeared first on Raspberry Pi.
Unlock your inner Rousseau with this gorgeous Raspberry Pi Zero LED piano visualiser.
Piano LED Visualizer
Inspired by Rousseau videos I tried to build my own Piano Visualizer. It is made with Raspberry Pi and WS2812B LED strip. Screen and buttons: Waveshare LCD TFT 1,44” 128x128px.
Fans of the popular YouTube pianist Rousseau would be forgiven for thinking the thumbnail above is of one of his videos. It’s actually of a Raspberry Pi build by Aleksander Evening, who posted this project on Reddit last week as an homage to Rousseau, who is one of his favourite YouTubers.
After connecting the LED strip to the Raspberry Pi Zero W, and setting up the Pi as a Bluetooth MIDI host, Aleksander was almost good to go. There was just one thing standing in his way…
He wanted to use the Synthesia software for visualisations, and, unmodified, this software doesn’t support the MIDI files Aleksander planned to incorporate. Luckily, he found the workaround:
As of today Synthesia doesn’t support MIDI via Bluetooth, it should be added in next update. There is official workaround: you have to replace dll file. You also have to enable light support in Synthesia. In Visualizer settings you have to change “input” to RPI Bluetooth. After that when learning new song next-to-play keys will be illuminated in corresponding colors, blue for left hand and green for right hand.
Phew!
The final piece is a gorgeous mix of LEDs, sound, and animation — worthy of the project’s inspiration. 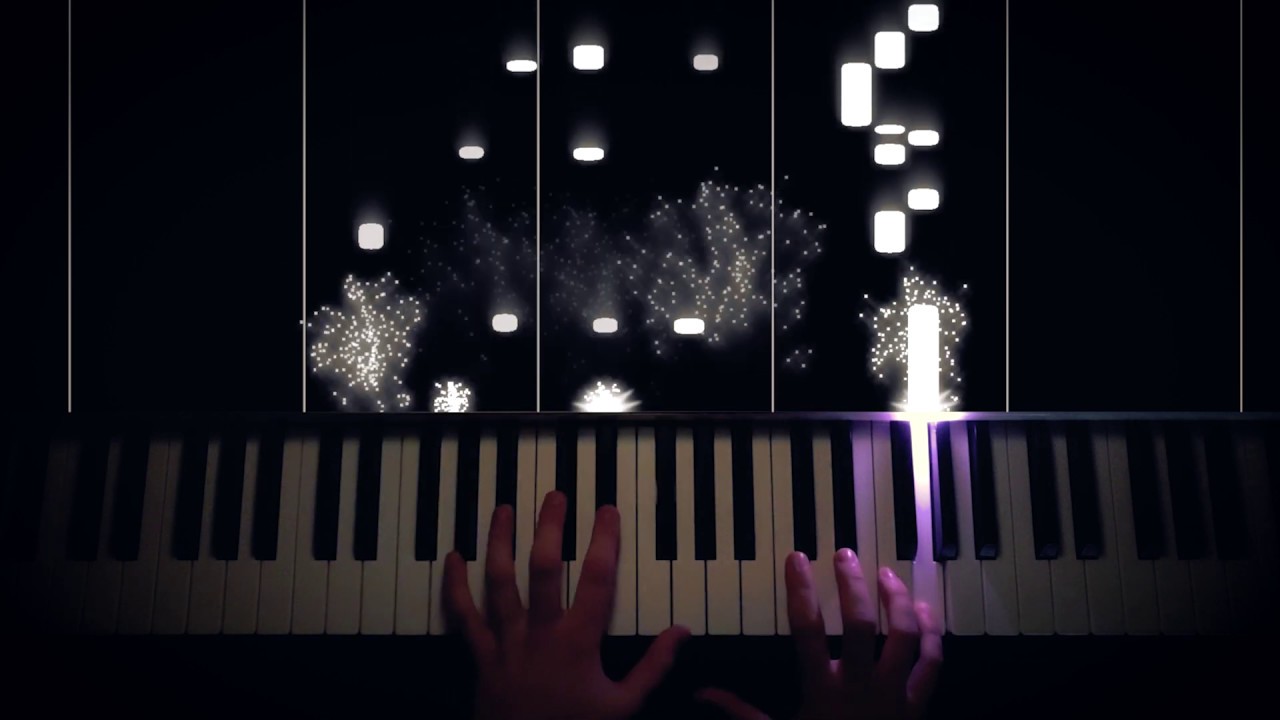
Find more information, including parts, links to the code, and build instructions, on Aleksander’s GitHub repo. And as always, if you build your own, or if you’ve created a Raspberry Pi project in honour of your favourite musician, artist, or YouTuber, we’d love to see it in the comments below.
And now, a little something from Rousseau:
Ludovico Einaudi – Nuvole Bianche
Sheet music: https://mnot.es/2N01Gqt Click the
bell to join the notification squad! ♫ Listen on Spotify: http://spoti.fi/2LdpqK7 ♫ MIDI: https://patreon.com/rousseau ♫ Facebook: http://bit.ly/rousseaufb ♫ Instagram: http://bit.ly/rousseauig ♫ Twitter: http://bit.ly/rousseautw ♫ Buy me a coffee: http://buymeacoff.ee/rousseau Hope you enjoy my performance of Nuvole Bianche by Ludovico Einaudi.
The post Rousseau-inspired Raspberry Pi Zero LED piano visualiser appeared first on Raspberry Pi.
Tired of opening the refrigerator only to find that your favourite snack is missing? Get video evidence of sneaky fridge thieves sent to your phone, with Adrian Rosebeck’s Raspberry Pi security camera project.
Building a Raspberry Pi security camera with OpenCV
Learn how to build a IoT + Raspberry Pi security camera using OpenCV and computer vision. Send TXT/MMS message notifications, images, and video clips when the security camera is triggered. Full tutorial (including code) here: https://www.pyimagesearch.com/2019/03/25/building-a-raspberry-pi-security-camera-with-opencv
Adrian loves hummus. And, as you can see from my author bio, so do I. So it wasn’t hard for me to relate to Adrian’s story about his college roommates often stealing his cherished chickpea dip.
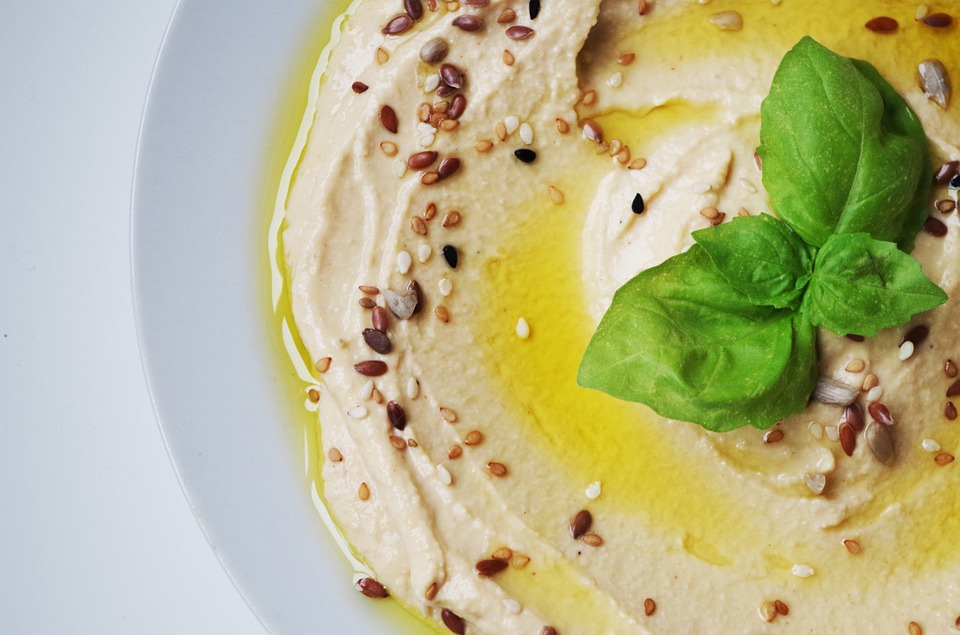
Garlic dessert
“Of course, back then I wasn’t as familiar with computer vision and OpenCV as I am now,” he explains on his blog. “Had I known what I do at present, I would have built a Raspberry Pi security camera to capture the hummus heist in action!”
So, in homage to his time as an undergrad, Adrian decided to finally build that security camera for his fridge, despite now only needing to protect his hummus from his wife. And to build it, he opted to use OpenCV, a Raspberry Pi, and a Raspberry Pi Camera Module.
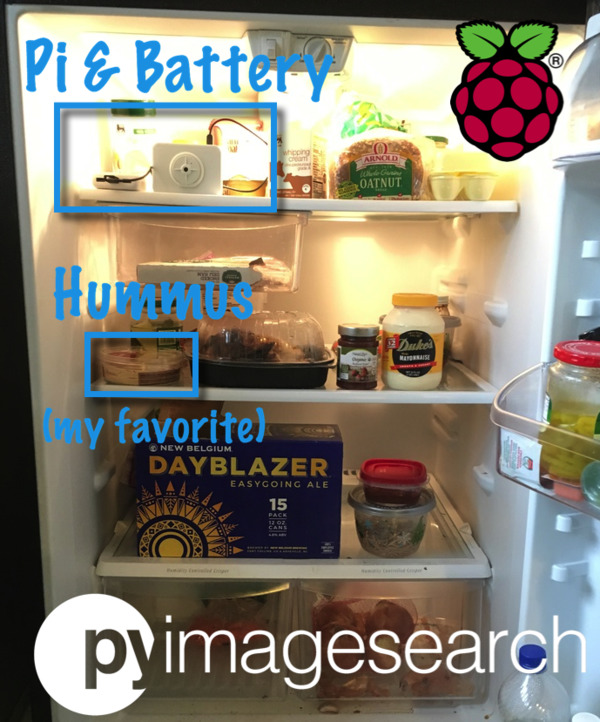
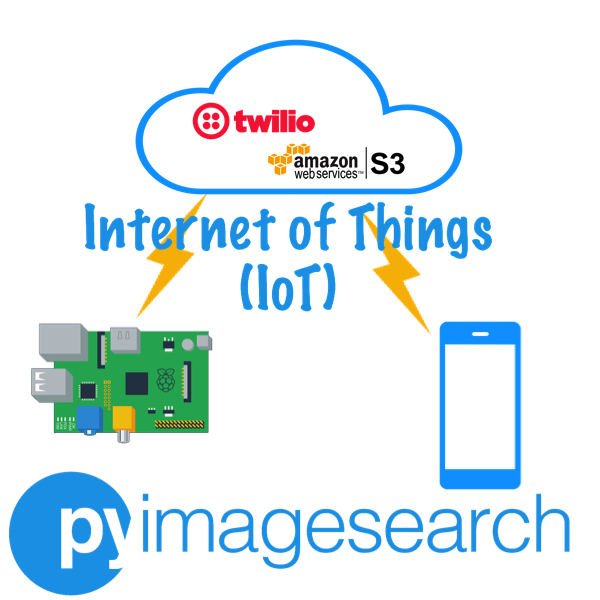
Adrian’s camera is an IoT project: it not only captures footage but also uses Twillo to send that footage, via a cloud service (AWS), to a smartphone.
Because the content of your fridge lives in the dark when you’re not inspecting it, the code for capturing video footage detects light and dark, and records everything that occurs between the fridge door opening and closing. “You could also deploy this inside a mailbox that opens/closes,” suggests Adrian.
Adrian provides all the code for the project on his blog, pyimagesearch, with a full explanation of why each piece of code is used — thanks, Adrian!
For more from Adrian, check out his brilliant deep learning projects: a fully functional Pokémon Pokédex and Santa Detector.
The post Build a security camera with Raspberry Pi and OpenCV appeared first on Raspberry Pi.
You might have heard of RepRap. It’s the project that began at the University of Bath in 2005 with the aim of creating a self-replicating, open-source 3D printer. As is the nature of open source, many other projects have spun off from RepRap, including the Prusa i3. Without RepRap, the field of 3D printing would be much smaller, less advanced, and a lot less open.
Adrian was made an MBE in the New Year Honours list, for services to 3D printing.
We drove many miles through wind and rain to meet Dr Adrian Bowyer, co-founder of the RepRap project who now, along with his daughter Sally, runs RepRap Ltd. The two of them are still pushing boundaries, raising standards, and lowering prices, so we sat down to talk about RepRap and where the 3D printing industry is heading.
It may be an obvious question, but why did you start the RepRap project?
Adrian Bowyer: Curiosity. I have always been interested in the idea of self-replicating machines ever since I was a child. When my university acquired some commercial 3D printers, as soon as they arrived I thought, ah, we’ve got a technology here that is sufficiently versatile that it stands a chance of being able to copy itself. Having had that idea, the very next question that occurs to your brain is: will this work? And that was the genesis of the project. I wanted to find out if we could make a machine that could print a significant fraction of its own parts and self-replicate.
It was literally the case that, at the height of development of RepRap in Bath 2008/2009, I was effectively running, in terms of numbers of staff, the biggest research project in any UK university. I wasn’t paying any of them of course, and they were distributed all over the world, but if you counted them up, there were more of them working with me than were working in any other single research project in any other university in the UK.
What are you doing with RepRap at the moment?
AB: We’re looking at distributed processor RepRaps, so instead of having a single CPU, we put a single CPU on each device in the machine, such as the heaters, the motors, and so on. This isn’t a new idea; other people have tried this in the past. From the perspective of Raspberry Pi, that’s interesting because such a machine wouldn’t need real-time response from the processor that’s at the heart of the machine.
If you’ve got a Linux system running on something, it’s not great for real-time control, because of interrupts. Whereas the sort of system we’re working on would have a Raspberry Pi in the middle, with a load of Arduinos around it. You can hand over the hardware timing to the Arduino, which, being dedicated, can be guaranteed to generate a poll every 20 microseconds or whatever it is. Whereas the thing sitting in the middle, doing the control, just has to be able to respond every few milliseconds. That’s something we’re putting together with Raspberry Pis and Arduinos.
Each Arduino is monitoring and controlling one aspect of the printer
One of the reasons that we want to do it is that we’re looking at making larger machines, and also a machine that not only is a 3D printer, but also incorporates a plasma cutter. Now, the thing about a plasma cutter is that it generates an enormous amount of electronic noise. You get lots of interference from it. So the ideal way to send electrical signals around the machine is not using electricity, but optics. So what we would be doing would be setting up a machine with optical communication between each of its component parts and the controller, so that electrical interference isn’t a problem, and, in order to do that [the system] has to be distributed in the way that I’ve just described.
Where, in general, do you think 3D printing is heading?
AB: The analogy I often draw is with washing clothes, which went through three stages: it started off with us washing our own clothes. In the scullery or the kitchen, you’d wash your clothes once a week. And then in Victorian times, as economies of scale kicked in, there would be a town laundry, where you would send your clothes and they’d come back clean. But now we have a robot in the kitchen that can wash our clothes. It’s come back to us, this time automated.
Making stuff in general, it seems to me, is going through that progression, just 100 years later. It started off that, if you needed a gate hinge, you went to the blacksmith in your village. He would make you a gate hinge. Now if you want a gate hinge, you go to the shop and buy one, and it was made halfway around the world. But if we bring some of that back into our cities, it’s like bringing our washing back from the town laundry into our homes. As long as it’s automated: the rule seems to be that if something is automatable so that people don’t have to pay a lot of attention, and it’s low-cost enough, people can take it back to themselves, and economies of scale get reversed.
This ukulele was printed in two parts. It’s playable, and sounds great.
Finally, congratulations on your MBE!
AB: That’s very kind! The certificate is an impressive thing. Signed by Her Majesty the Queen, and by Prince Philip as the person who is in charge of knighthoods and such.
I’m going up in May to Buckingham Palace to have it pinned on my chest, so that’ll be interesting. The commendation says: “Inventor: for services to 3D printing.” Short and to the point.
The full interview is in HackSpace magazine issue 17, where we also help you develop your Arduino skill, look at an open-source lathe, design a PCB in KiCad, build a polyphonic synthesizer, and much more.
Buy your copy now from the Raspberry Pi Press store, major newsagents in the UK, or Barnes & Noble, Fry’s, or Micro Center in the US. Or, download your free PDF copy from the HackSpace magazine website.
Subscribe today and get three issues for just £5 (in the UK — additional postage charges apply elsewhere)!![]()
The post The future of 3D printing with Dr Adrian Bowyer | HackSpace magazine #17 appeared first on Raspberry Pi.
Forget the iconic conic shape of the lava lamp from the sixties and seventies — Julian Butler’s digital lava lamp gives you all the magic of its predecessor, without any of the hassle!
My programmable digital lava lamp
Showcasing the construction and display modes of my programmable digital lava lamp. Built with the help of Processing software, FadeCandy + Raspberry Pi hardware this lamp can respond to sound and other aspects of it’s environment via wifi etc.
When I was a teenager, we had a lava lamp at home. It was orange, it took an age to get going, and once the lava was in full flow, it radiated with the heat of a thousand suns.
Julian Butler’s modern version is so much better. “Showcasing the construction and display modes of [his] programmable digital lava lamp,” Julian has shared a rather hypnotic video on his YouTube channel. He’s also created a three-part build tutorial about the project.
Inspired by his co-worker’s salt mood lamp, Julian decided to build something similiar, aiming to smoothe out the creases and add more functionality.
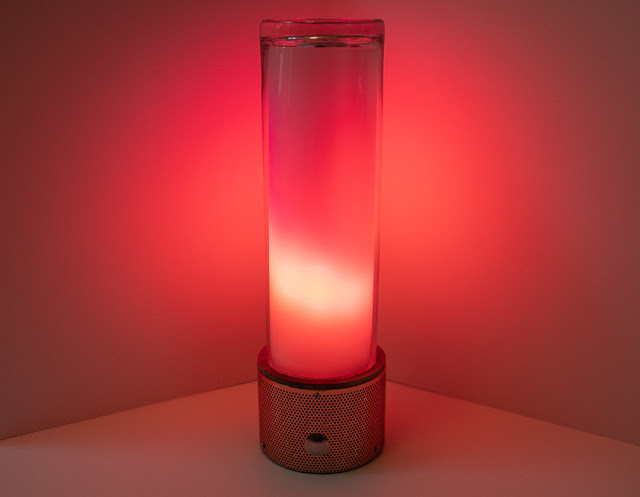
Using a Raspberry Pi and Micah Elizabeth Scott‘s FadeCandy board, plus 120 NeoPixel LEDs, Julian got to work programming lights and prototyping casings until he was happy with the result.
The face of Julian happy with the result
And the result is a beautiful, programmable digital lava lamp: all the mesmerising fun of a regular lava lamp, without the excruciating wait time and significant risk of second-degree burns. Plus, it will never leak, and it can be any colour you like!
Watch Julian’s video, ooh and aah at the swirly-whirly wonderment of his digital creation, and then visit his blog for all the details of how to make your own. Julian has plans to add more interactive elements to the lamp, including voice recognition, and we can’t wait to see the final result!
The post Digital lava lamp! appeared first on Raspberry Pi.
GPIO Zero is a zero-boilerplate Python library that makes physical computing with Python more accessible and helps people progress from zero to hero.
Today, I’m pleased to announce the release of GPIO Zero v1.5.0. It’s packed full of updates, including new features, bug fixes, and lots of improvements to the documentation.
Guido, the creator of Python, happened across the library recently, and he seemed to like it:
Guido van Rossum on Twitter
GPIOzero I love you! https://t.co/w3CnUGx3yO
GPIO Zero started out as a friendly API on top of the RPi.GPIO library, but later we extended it to allow other pin libraries to be used. The pigpio library is supported, and that includes the ability to remotely control GPIO pins over the network, or on a Pi Zero over USB.
This also gave us the opportunity to create a “mock” pin factory, so that we could emulate the effect of pin changes without using real Raspberry Pi hardware. This is useful for prototyping without hardware, and for testing. Try it yourself!
As well as the pin factories we provide with the library (RPi.GPIO, pigpio, RPIO, and native), it’s also possible to write your own. So far, I’m aware of only one custom pin factory, and that has been written by the AIY team at Google, who created their own pin factory for the pins on the AIY Vision Kit. This means that you can connect devices to these pins, and use GPIO Zero to program them, despite the fact they’re not connected to the Pi’s own pins.
If you have lots of experience with RPi.GPIO, you might find this guide on migrating from RPi.GPIO to GPIO Zero handy.
We had identified some issues with the results from the DistanceSensor class, and we dealt with them in two ways. Firstly, GPIO Zero co-author Dave Jones did some work under the hood of the pins API to use timing information provided by underlying drivers, so that timing events from pins will be considerably more accurate (see #655). Secondly, Dave found that RPi.GPIO would often miss edges during callbacks, which threw off the timing, so we now drop missed edges and get better accuracy as a result (see #719).
![]()
The best DistanceSensor results come when using pigpio as your pin factory, so we recommend changing to this if you want more accuracy, especially if you’re using (or deploying to) a Pi 1 or Pi Zero.
A really neat feature of GPIO Zero is the ability to connect devices together easily. One way to do this is to use callback functions:
button.when_pressed = led.on
button.when_released = led.off
Another way is to set the source of one device to the values of another device:
led.source = button.values
In GPIO Zero v1.5, we’ve made connecting devices even easier. You can now use the following method to pair devices together:
led.source = button
Read more about this declarative style of programming in the source/values page in the docs. There are plenty of great examples of how you can create projects with these simple connections:
![]()
An important part of software development is automated testing. You write tests to check your code does what you want it to do, especially checking the edge cases. Then you write the code to implement the features you’ve written tests for. Then after every change you make, you run your old tests to make sure nothing got broken. We have tools for automating this (thanks pytest, tox, coverage, and Travis CI).
But how do you test a GPIO library? Well, most of the GPIO parts of our test suite use the mock pins interface, so we can test our API works as intended, abstracted from how the pins behave. And while Travis CI only runs tests with mock pins, we also do real testing on Raspberry Pi: there are additional tests that ensure the pins do what they’re supposed to. See the docs chapter on development to learn more about this process, and try it for yourself.
You may remember that the last major GPIO Zero release introduced the pinout command line tool. We’ve added some new art for the Pi 3A+ and 3B+:
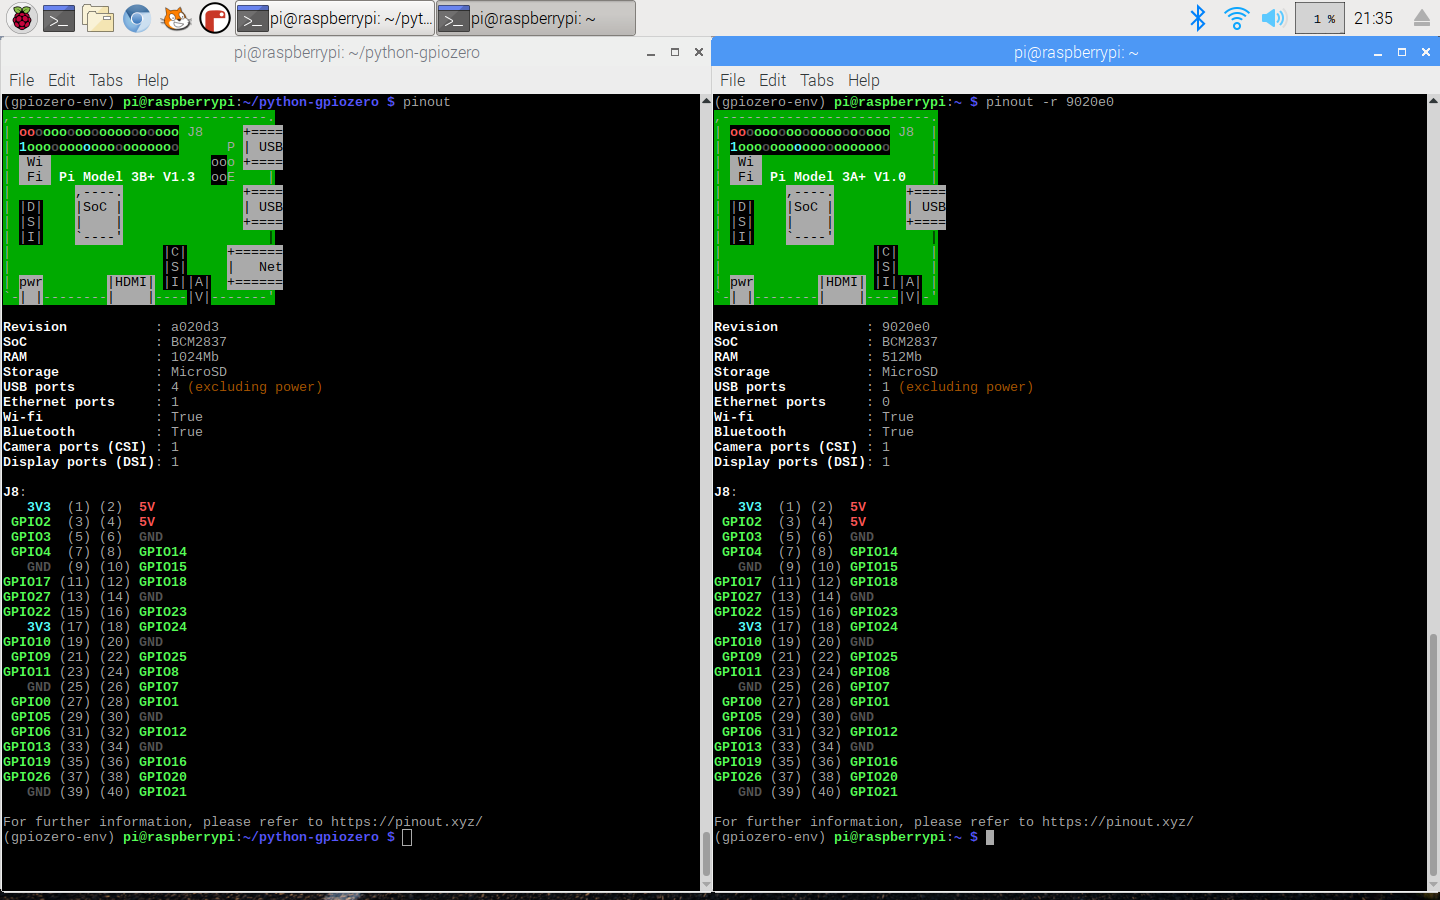
pinout also now supports the -x (or --xyz) option, which opens the website pinout.xyz in your web browser.
The goal of all this is to remove obstacles to physical computing, and Rachel Rayns has designed a wonderful board that makes a great companion to GPIO Zero for people who are learning. Available from The Pi Hut, the PLAY board provides croc-clip connectors for four GPIO pins, GND, and 3V3, along with a set of compatible components:
![]()
Since the board simply breaks out GPIO pins, there’s no special software required. You can use Scratch or Python (or anything else).
This release welcomed seven new contributors to the project, including Claire Pollard from PiBorg and ModMyPi, who provided implementations for TonalBuzzer, PumpkinPi, and the JamHat. We also passed 1000 commits!
![]()
As part of the work Claire did to add support for the Jam HAT, she created a new class for working with its buzzer, which works by setting the PWM frequency to emit a particular tone. I took what Claire provided and added some maths to it, then Dave created a whole Tones module to provide a musical API. You can play buzzy jingles, or you can build a theremin:
GPIO Zero theremin
from gpiozero import TonalBuzzer, DistanceSensor buzzer = TonalBuzzer(20) ds = DistanceSensor(14, 26) buzzer.source = ds
…or you can make a siren:
GPIO Zero TonalBuzzer sine wave
from gpiozero import TonalBuzzer from gpiozero.tools import sin_values buzzer = TonalBuzzer(20) buzzer.source = sin_values()
The Tones API is a really neat way of creating particular buzzer sounds and chaining them together to make tunes, using a variety of musical notations:
>>> from gpiozero.tones import Tone
>>> Tone(440.0)
>>> Tone(69)
>>> Tone('A4')
One of the important things about writing a library to help beginners is knowing when to expect mistakes, and providing help when you can. For example, if a user mistypes an attribute or just gets it wrong – for example, if they type button.pressed = foo instead of button.when_pressed = foo – they wouldn’t usually get an error; it would just set a new attribute. In GPIO Zero, though, we prevent new attributes from being created, so you’d get an error if you tried doing this. We provide an FAQ about this, and explain how to get around it if you really need to.
Similarly, it’s common to see people type button.when_pressed = foo() and actually call the function, which isn’t correct, and will usually have the effect of unsetting the callback (as the function returns None). Because this is valid, the user won’t get an error to call their attention to the mistake.
In this release, we’ve added a warning that you’ll see if you set a callback to None when it was previously None. Hopefully that will be useful to people who make this mistake, helping them quickly notice and rectify it.
Update your Raspberry Pi now to get the latest and greatest GPIO Zero goodness in your (operating) system:
sudo apt update
sudo apt install python3-gpiozero python-gpiozero
Note: it’s currently syncing with the Raspbian repo, so if it’s not available for you yet, it will be soon.
We have plenty more suggestions to be working on. This year we’ll be working on SPI and I2C interfaces, including I2C expander chips. If you’d like to make more suggestions, or contribute yourself, find us over on GitHub.
The post GPIO Zero v1.5 is here! appeared first on Raspberry Pi.
Bring YouTube videos, Google Photos, and more to your magic mirror, with third-party modules and the MagicMirror² open-source software platform.
NEW Raspberry Pi Magic Mirror Modules!
Today I walk you through two fun modules to add top your Raspberry Pi Magic Mirror! Music in this video was from Epidemic Sound! Green Screen Subscribe Button: Its Frida MAGIC MIRROR Magic Mirror Builder (Michael Teeuw): https://magicmirror.builders/ Magic Mirror Modules in this video: YouTube: https://forum.magicmirror.builders/topic/8481/mmm-iframe-ping Google Photos: https://forum.magicmirror.builders/topic/8437/mmm-googlephotos/18 USB Audio: ROCCAT – Juke Virtual 7.1 USB Stereo Gaming Soundcard Music in this video was from Epidemic Sound.
Mention Raspberry Pi to the uninitiated, and they’ll probably ask if it’s “that green thing people use for game emulation and smart mirrors?”. The popularity of magic mirrors has grown massively over the past few years, thanks to how easy it’s become to find cheap displays and great online tutorials.![]()
While big-brand smart mirrors cost upwards of a bajillion dollars, a homemade magic mirror costs pennies in comparison. The basic homemade model consists of a screen (usually an old computer monitor or flatscreen TV), a piece of two-way mirrored acrylic or glass, a frame, and a Raspberry Pi. Once it’s set up, you have yourself both a mirror and a notification board complete with calendar events, memos, and more.
Introducing MagicMirror²!
MagicMirror² is an open source platform for smart mirrors. It provides an extensive API for module development and is easy to setup and use. For more information and downloads visit http://magicmirror.builders and the forum http://forum.magicmirror.builders :)
The software most people use for setting up their magic mirror is MagicMirror², a free, group-maintained open-source platform created by Michael Teeuw.
And you know what open-source means…
The modular nature of MagicMirror² lets third-party developers easily bring their own ideas to the platform. As Brian Cotter explains in the video above, he used AgP42’s MMM-iFrame-Ping and eouia’s MMM-GooglePhotos to integrate YouTube videos and photographs into his magic mirror.
![]()
And of course that’s not all! Other magic mirror add-ons let you implement 3D gesture detection or display international currency values, Google Fit totals, and more. Find a whole host of such third-party add-ons in this GitHub wiki.
Looking for more Raspberry Pi videos from Brian? Check out his Raspberry Pi playlist and be sure, as always, to subscribe to his channel.
Inside My Raspberry Pi Magic Mirror!
Checkout this inside look of my Rasberry Pi Magic Mirror build! Magic Mirror Builder (Michael Teeuw): https://magicmirror.builders/ Two-Way Mirror: https://www.tapplastics.com/ Monitor: https://amzn.to/2EusyhQ Raspberry Pi: https://www.raspberrypi.org/products/… Music Credit: Ikson – Paradise New Here? Follow Me Instagram: https://www.instagram.com/techcoderun/ Twitter: https://twitter.com/bfcotter Hi! My name is Brian Cotter and I live in New York City.
We’re forever grateful to all the content creators who make videos of their Raspberry Pi projects. If you have your own, be sure to let us know the link in the comments!
The post YouTube and Google Photos add-ons for your magic mirror appeared first on Raspberry Pi.
Today we’re releasing a new update for Raspbian, including a multimedia player, updated Thonny, and more. Here’s Simon with everything you need to know.
Updating Raspbian on your Raspberry Pi || Raspberry Pi Foundation
How to update to the latest version of Raspbian on your Raspberry Pi.
When I first joined Raspberry Pi, back in the dim and distant past (in reality 2014, but it does seem a long time ago now…), and I started looking at Raspbian, I made a list of the additional features and applications that I thought it needed to be a “complete” modern desktop operating system. Over the years, we’ve managed to tick off most of the items on that list, but one glaring omission has been nagging at me all this time: a decent media player. Windows has Windows Media Player; MacOS has QuickTime Player and iTunes; but we’ve had a big hole where something similar ought to be for Raspbian. It’s been a common request on the forums, and while we’ve had bits and pieces that do some of the job, like the command line OMXPlayer application, we really wanted a nice GUI-based media player.
VLC is one of those programs that “just works” for media playback; it is cross-platform, it has a nice interface, and it plays back pretty much anything you throw at it. It was the player I really wanted to use in Raspbian — but it was unable to access VideoCore’s video decoding hardware, and the software video codecs in VLC were too slow to be anything more than irritating when running on Raspberry Pi, so it really wasn’t worth shipping it. Until now.
After a lot of work (by people far cleverer than me), we are now able to announce that Raspbian includes a fully hardware-accelerated version of VLC. It plays most audio file formats; it uses software codecs for many video formats, and it uses VideoCore’s video engine to accelerate playback of H.264, MPEG-2 and VC-1 video. (Note that you will need to buy additional codec licences for MPEG and VC-1; if you’ve already bought a licence to enable hardware acceleration in OMXPlayer and Kodi, this licence will also enable these codecs for VLC.)
![]()
This is still a work in progress — we’ve got most of the major bugs out, but there will most likely be the odd glitch, and you’ll probably find that Pi Zero and Pi 1 will still struggle with some content. But once you’ve updated your Pi, you should find that double-clicking on a video file will open it in VLC and play it back with decent quality.
A couple of years ago, as part of the list of additional features mentioned above, we looked for a nicer Python development environment than IDLE, and we found Thonny — a really elegant combination of a user-friendly IDE with features that are also useful to expert developers. It’s been our standard IDE shipped with Raspbian ever since, and Aivar Annamaa, the developer, has been very responsive to our feedback and requests for new features.
He’s recently released version 3 of Thonny, and this is now the version in Raspbian. Version 3 offers a lot of useful new debugging features, such as breakpoints and an Assistant feature that analyses your code to find bugs that Python’s syntax checker misses. There is a lot more information about Thonny 3 on Aivar’s website — it’s well worth a read.
![]()
We’ve also made one user interface change this time. We’ve always offered the choice between running Thonny in its regular mode, and a cut-down “simple” mode for beginners, which removes the menus and gives a fixed screen layout. Up until now, switching between the two has happened via different entries in the main Raspberry Pi menu, but that was a bit clumsy. In the new version, simple mode is the default, and you can switch Thonny into regular mode by clicking the link in the top right-hand corner of the window; if you want to switch back to simple mode, select it on the General tab of the Thonny options dialogue, which is available in the Tools menu. (Thonny will always start in the last mode you selected.)
One of the other changes we’ve made this time is one that hopefully most people won’t notice!
The configuration of the Raspberry Pi desktop has always been a bit of a mess. Due to the fact that the underlying LXDE desktop environment is made up of a bunch of different programs all running together, trying to set up something like the system font or the highlight colour involves making changes to several configuration files at once. This is why pretty much the first thing I did was to write the Appearance Settings application to try to make this easier than digging around in multiple config files.
Linux desktop applications are supposed to have a global configuration file (usually in the directory /etc/xdg/) that takes effect unless overridden by a local configuration file (in the hidden .config subdirectory of the user’s home directory). Unfortunately, not all the desktop components adhered to this specification. As a result, getting the Appearance Settings application to work involved quite a bit of kludging things about under the hood, and one of these kludges was to always keep a local copy of each of the configuration files and to ignore the global versions.
This worked, but it had the undesirable side effect that any time we wanted to update the appearance of the desktop, we had to delete all the local configuration files so they could be replaced by the new ones, and this meant that any changes the user had made to the configuration were lost. This was quite annoying for many people, so with this release, we’ve tried to stop doing that!
Most of the desktop components have now been modified so that they correctly read the global configuration files, and for future releases, we are going to try to just modify the global versions of these files and not touch the local ones. If we update the configuration, you will see a message informing you that this has happened, but your local files will be left unchanged. To make sure you get the latest configuration, launch Appearance Settings and choose one of the buttons on the “Defaults” tab; doing this will set your desktop to our currently recommended defaults. But if you want to stick with what you’ve already got, just don’t do that! You can even try the new defaults out: press one of the defaults buttons, and if you don’t like the results, just hit Cancel, and your previous configuration will be restored.
![]()
One final point on this: in order to get this all to work properly in future, we have had to delete a few local files on this occasion. These are files that most people will never have modified anyway, so this will hopefully not present any problems. But just in case, they have been backed up in the oldconffiles subdirectory of the user’s home directory.
When I first started working on Raspbian, the desktop image file was just under 1GB in size. This has gradually crept up over the years, and now it’s around 1.75GB. While downloading a file of this size isn’t a significant problem for someone with fibre broadband, many people are on slower connections where such large downloads can take hours.
In order to try and address this, for all future releases we will now release two separate images. The default Raspbian release is now a minimal install — it gives you the desktop, the Chromium browser, the VLC media player, Python, and some accessory programs. Running alongside this is the “Raspbian Full” image, which also includes all our recommended programs: LibreOffice, Scratch, SonicPi, Thonny, Mathematica, and various others.
The Recommended Software program that we launched in the last release can be used to install or uninstall any of the additional programs that are in the full image; if you download the minimal image and check all the options in Recommended Software, you will end up with the full image, and vice versa.
![]()
Hopefully, this means that downloading Raspbian will be easier for people on slower connections, and that you can easily add just the programs you want. The full image is provided for everyone who wants to get everything in one go, or who won’t have access to the internet to download additional programs once their Pi is up and running.
We’ll also continue to produce the existing Raspbian Lite image for people who only want a command-line version with no desktop.
Both the new images are available to download from the usual place on our site.
To update an existing image, open a terminal window and use the usual commands:
sudo apt-get update
sudo apt-get dist-upgrade
To install the new VLC media player from a terminal, enter:
sudo apt-get update
sudo apt-get install vlc
As ever, all feedback is welcome, so please leave a comment below!
The post A new Raspbian update: multimedia, Python and more appeared first on Raspberry Pi.