Summer is fast approaching – and that’s the perfect excuse to get building. Whether you want to spy on your local wildlife, upgrade your vegetable patch, or feed your fish when you’re off on a weekend break, Raspberry Pi and a handful of add-ons make a great starting point. The latest issue of The MagPi is packed with some of the most inspirational projects to be found. They include a smart tide monitor, which will tell you when’s the best time to hit the beach, and a clever Heater Meter that can keep an eye on your barbecue while you get on with the prep in the kitchen.
If you’re heading out for any kind of water-based activity (and that includes sitting on the beach), it helps to know whether the tide is in or out and which way it’s heading. Sam Baker’s neat e-ink tide and weather tracker uses Raspberry Pi Zero and an enormous (7.5 in) e-ink display to track the motion of the ocean and upcoming weather conditions, so you don’t arrive at the beach to find the sand submerged.
The return of summer means an addition to your weekly to-do list: mowing the lawn. But not if you build a PiMowBot smart lawn-mower robot. This uses any Raspberry Pi to control an autonomous lawnmower that navigates your garden using GPS and offers optional remote control, so you can keep the lawn trimmed from the comfort of a garden chair.
The hardware, comprising the chassis, cutterbar and so on, is solar-powered and can be 3D-printed, while the software is a €19.99 download. The OBJ (Wavefront OBJect) file patterns for the various parts you’ll need to print are a £29.46 download from Cults3d. You’ll need to buy several components to put it together, as it also relies on a number of sensors, including – aside from the GPS receiver – a temperature and humidity sensor, compass module, and Camera Module.
Although you do need to invest in quite a few parts for the PiMowBot, and spend time assembling them, the project still manages to undercut (sorry!) commercial alternatives, for which prices start at around £500, by a considerable margin.
One thing that’s certain to put a dampener on a summer get-together is barbecued food that’s charred on the outside and raw in the middle. Fortunately, a lot of makers have set themselves the task of solving this problem – which they’ve done with aplomb. Tempiture pairs Raspberry Pi with a breadboard, food probe, and a handful of resistors to produce a wireless grilling thermometer which sends readings to the web. As a barbecue can take hours to get to cooking temperature, this lets you keep an eye on its progress while you’re prepping food in the kitchen.
It’s not your only option, either. PitmasterPi performs a very similar job, taking regular readings to populate a real-time dashboard, and optionally sending emails or texts at crucial moments.
HeaterMeter pairs Raspberry Pi with an Adruino microcontroller, thermal probe, and fan to maintain perfect temperatures, with support for web streaming, graphing, and alerts. What’s particularly appealing about HeaterMeter is that you can choose different starting points for your project, depending on how confident you are. If you’re a dab hand at soldering and reading a circuit diagram, start from scratch with a kit; but if you’re just craving a burger, skip all that and opt for a fully assembled board instead.
One of the best things about summer is the return of a host of migratory birds that desert us in the colder months. And, while foxes and badgers will have been with us throughout the winter, hedgehogs will have been hibernating between late autumn and early spring. Many of these animals are timid, so spotting them requires that you get up early, stay up late, or set up a trail camera which uses motion detection to capture an image when they pass.
This has been a popular use for Raspberry Pi for years, but there are so many ways to go about it, you might be wondering which are the best options. You can pick up all the parts you need to build your own trail camera – aside from the power supply – from The Pi Hut for £110, or the case on its own for £40 if you have most of the other required components knocking around from old projects.
We’ve shared just a few of our favourite summer project ideas here. For the full list, head to page 72 of the latest issue of The MagPi.
You can grab the brand-new issue right now online from the Raspberry Pi Press store, or via our app on Android or iOS. You can also pick it up from supermarkets and newsagents. There’s also a free PDF you can download.
The post Get outside with these Raspberry Pi summer projects appeared first on Raspberry Pi.
The past few months have given us ample opportunity to stare at the creatures that reside outside. In issue 33 of Hackspace Magazine, out today, Rosie Hattersley looks at ways to track them.
It’s been a remarkable spring and early summer, and not just because many of us have had more time than usual to be able to appreciate our surroundings. The weather has been mild, the skies clear, and pollution levels low. As a result, it ought to be a bumper year for plants and wildlife. Unfortunately, the lockdown limited opportunities for embracing unexpectedly good weather while simultaneously making us more aware of the wildlife on our doorsteps.
“It’s a great time to take a fresh look at the world around us”
If you’re the outdoorsy type who likes to get out and stare intently at feathered friends from the comfort of a large shed on the edge of a lagoon, you may have spent the past few months getting to know suburban birds during your exercise walks, rather than ticking off unusual species. As things finally open up, it’s a great time to take a fresh look at the world around us, and some of the projects focused on the creatures we share it with.
Equipped with a Raspberry Pi connected to a camera and USB power bank, we are able to spy on the wildlife in our garden. The Raspberry Pi Camera Module V2 is a good option here (it’s less intrusive than the newer High Quality Camera, though that would make a superb critter-cam). It’s important not to disturb wildlife with lighting, so use an infrared module, such as the NoIR Camera Module, if you want to snap evening or night-time wildlife activity. Connect the Camera Module to the Camera port on Raspberry Pi using the cable provided, then gently pull up the edges of the port’s plastic clip and insert the ribbon cable. Push the clip back into place and the Camera Module will remain attached. Try our ‘Getting started with the Raspberry Pi Camera Module‘.
Set up your Raspberry Pi and let it perform any OS updates needed. (The Raspberry Pi Imager tool can help)
You’ll need a keyboard and mouse to set up the Raspberry Pi, but you can disconnect them at the end. Insert the updated microSD card and use a regular power supply to start it up (keep your power bank on charge separately while you set things up). Go through the Raspberry Pi setup, making sure you change the default password (since it will be accessible to anyone), and connect to your wireless network. It helps if you can access this network from the garden.
Turn on the interface for the camera, and enable SSH and VNC so you can access Raspberry Pi OS remotely when it’s sitting out in the garden. To do this, open Menu > Preferences > Raspberry Pi Configuration and click on Interface, then set Camera, SSH, and VNC to Enabled (see this documentation). Click Yes when advised that a reboot is needed.
Next, test the camera. Open a terminal window and enter:
raspistill -o Desktop/image.jpgA preview window will appear. After a few moments, it will save an image to the Desktop. Double-click the image.jpg file to open it.
You can use Python to take pictures and shoot video. This is handy if you want to create a time-lapse or video camera. This Raspberry Pi Project guide explains how to control the camera with Python.
Note that recording video will quickly fill up your storage space and drain the battery. A better idea is to leave the preview running and use VNC to view the camera remotely. A neater option is to hook up your Raspberry Pi to YouTube (as explained in this Raspberry Pi infrared bird-box project).
Open a web page and go to studio.youtube.com. Sign in, or set up a YouTube account. You will need to enable permission to live-stream. This involves providing YouTube with your phone number. Click Settings, Channel, and ‘Feature eligibility’, expand ‘Features that require phone verification’, and click ‘Verify phone number’. Type in your phone number, then enter the code that YouTube sends you as a text message. For security reasons, it will take 24 hours for YouTube to activate this feature on your account.
On the left-hand side of the screen you should see a menu with the My Channel option available:
In the middle of the screen you should see the Video Manager option. On the left you should see a Live Streaming option. Look for and select the ‘Stream now BETA’ option.
Scroll down to the bottom of the page and you should see the ENCODER SETUP option.
Here there is a Server URL and a Stream name/key. The key is shown as a line of asterisks, until you click the Reveal button. Keep the key secret and don’t share it online. Copy your Stream Key to a text document (password-protect it, ideally).
Open a terminal window and enter this command (replacing <key goes here> with your own key:
raspivid -o - -t 0 -w 1280 -h 720 -fps 25 -b 4000000 -g 50 | ffmpeg -re -ar 44100 -ac 2 -acodec pcm_s16le -f s16le -ac 2 -i /dev/zero -f h264 -i - -vcodec copy -acodec aac -ab 128k -g 50 -strict experimental -f flv rtmp://a.rtmp.youtube.com/live2/<key goes here>With this running on Raspberry Pi, you can view the stream from your camera on YouTube on any computer. This infrared bird-box project explains more about the command options.
You’ll want this script to execute on startup. Create a file for your startup script and add the aforementioned raspivid stream command to it:
sudo nano /etc/init.d/superscriptMake the script executable:
sudo chmod 755 /etc/init.d/superscriptAnd register the script to run at startup:
sudo update-rc.d superscript defaultsYou can see details of scripts running at startup here.
Shut down Raspberry Pi and fit the computer and Camera Module inside a case (if you are using one). Position Raspberry Pi in your garden and power it with the USB power bank. It will connect to your wireless network, and run the YouTube streaming key.
Navigate to your channel on YouTube at any time to see the action taking place in your garden.
HackSpace magazine is out now, available in print from the Raspberry Pi Press online store, your local newsagents, and the Raspberry Pi Store, Cambridge.
You can also download the directly from PDF from the HackSpace magazine website.
Subscribers to HackSpace for 12 months to get a free Adafruit Circuit Playground, or choose from one of our other subscription offers, including this amazing limited-time offer of three issues and a book for only £10!
The post Watch wildlife with a Raspberry Pi nature camera| Hackspace 33 appeared first on Raspberry Pi.
Keeping an eye on bee life cycles is a brilliant example of how Raspberry Pi sensors help us understand the world around us.
The setup featuring an Arduino, RF receiver, USB cable and Raspberry Pi
Getting to design and build things for a living sounds like a dream job, especially if it also involves Raspberry Pi and wildlife. Glyn Hudson has always enjoyed making things and set up a company manufacturing open-source energy monitoring tools shortly after graduating from university. With access to several hives at his keen apiarist parents’ garden in Snowdonia, Glyn set up BeeMonitor using some of the tools he used at work to track the beehives’ inhabitants.
Glyn checking the original BeeMonitor setup
“The aim of the project was to put together a system to monitor the health of a bee colony by monitoring the temperature and humidity inside and outside the hive over multiple years,” explains Glyn. “Bees need all the help and love they can get at the moment and without them pollinating our plants, weíd struggle to grow crops. They maintain a 34∞C core brood temperature (± 0.5∞C) even when the ambient temperature drops below freezing. Maintaining this temperature when a brood is present is a key indicator of colony health.”
BeeMonitor has been tracking the hives’ population since 2012 and is one of the earliest examples of a Raspberry Pi project. Glyn built most of the parts for BeeMonitor himself. Open-source software developed for the OpenEnergyMonitor project provides a data-logging and graphing platform that can be viewed online.
BeeMonitor complete with solar panel to power it. The Snowdonia bees produce 12 to 15 kg of honey per year
The hives were too far from the house for WiFi to reach, so Glyn used a low-power RF sensor connected to an Arduino which was placed inside the hive to take readings. These were received by a Raspberry Pi connected to the internet.
Diagram showing what information BeeMonitor is trying to establish
At first, there was both a DS18B20 temperature sensor and a DHT22 humidity sensor inside the beehive, along with the Arduino (setup info can be found here). Data from these was saved to an SD card, the obvious drawback being that this didn’t display real-time data readings. In his initial setup, Glyn also had to extract and analyse the CSV data himself. “This was very time-consuming but did result in some interesting data,” he says.
Almost as soon as BeeMonitor was running successfully, Glyn realised he wanted to make the data live on the internet. This would enable him to view live beehive data from anywhere and also allow other people to engage in the data.
“This is when Raspberry Pi came into its own,” he says. He also decided to drop the DHT22 humidity sensor. “It used a lot of power and the bees didn’t like it – they kept covering the sensor in wax! Oddly, the bees don’t seem to mind the DS218B20 temperature sensor, presumably since it’s a round metal object compared to the plastic grille of the DHT22,” notes Glyn.
Unlike the humidity sensor, the bees don’t seem to mind the temperature probe
The system has been running for eight years with minimal intervention and is powered by an old car battery and a small solar PV panel. Running costs are negligible: “Raspberry Pi is perfect for getting projects like this up and running quickly and reliably using very little power,” says Glyn. He chose it because of the community behind the hardware. “That was one of Raspberry Pi’s greatest assets and what attracted me to the platform, as well as the competitive price point!” The whole setup cost him about £50.
Glyn tells us we could set up a basic monitor using Raspberry Pi, a DS28B20 temperature sensor, a battery pack, and a solar panel.
The post Monitoring bees with a Raspberry Pi and BeeMonitor appeared first on Raspberry Pi.
Last week, lots and lots of you shared your Raspberry Pi builds with us on social media using the hashtag #IUseMyRaspberryPiFor. Jay Wainwright from Liverpool noticed the conversation and got in touch to tell us about The Nest Box, which uses Raspberry Pi to bring impressively high-quality images and video from British bird boxes to your Facebook feed.
![]()
Jay runs a small network of livestreaming nest box cameras, with three currently sited and another three in the pipeline; excitingly, the new ones will include a kestrel box and a barn owl box! During the spring, all the cameras stream live to The Nest Box’s Facebook page, which has steadily built a solid following of several thousand wildlife fans.
![]()
The Nest Box’s setup uses a Raspberry Pi and Camera Module, along with a Raspberry Pi PoE HAT to provide both power and internet connectivity, so there’s only one cable connection to weatherproof. There’s also a custom HAT that Jay has designed to control LED lights and to govern the Raspberry Pi Camera Module’s IR filter, ensuring high-quality images both during the day and at night. To top it all off, he has written some Python code to record visitors to the nest boxes and go into live streaming mode whenever the action is happening.
As we can see from this nest box design for swifts, shown on the project’s crowdfunding profile, plenty of thought has evidently been put into the design of the boxes so that they provide tempting quarters for their feathered occupants while also accommodating all the electronic components.
![]()
Follow The Nest Box on Facebook to add British birds into your social media mix — whatever you’ve got now, I’ll bet all tomorrow’s coffees that it’ll be an improvement. And if you’re using Raspberry Pi for a wildlife project, or you’ve got plans along those lines, let us know in the comments.
The post The Nest Box: DIY Springwatch with Raspberry Pi appeared first on Raspberry Pi.
These Raspberry Pis take hourly photographs of snails in plastic container habitats, sharing them to the Snail Habitat website.
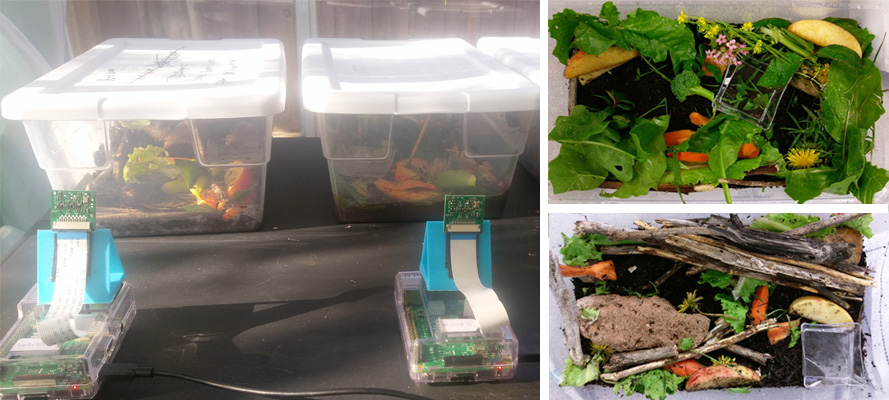
While some might find them kind of icky, I am in love with snails (less so with their homeless cousin, the slug), so this snail habitat project from Mrs Nation’s class is right up my alley.
This project was done in a classroom with 22 students. We broke the kids out into groups and created 5 snail habitats. It would be a great project to do school-wide too, where you create 1 snail habitat per class. This would allow the entire school to get involved and monitor each other’s habitats.
Each snail habitat in Mrs Nation’s class is monitored by a Raspberry Pi and camera module, and Misty Lackie has written specific code to take a photo every hour, uploading the image to the dedicated Snail Habitat website. This allows the class to check in on their mollusc friends without disturbing their environment.
“I would love to see others habitats,” Misty states on the project’s GitHub repo, “so if you create one, please share it and I would be happy to publish it on snailhabitat.com.”

The post Raspberry Pi snail habitats for Mrs Nation’s class appeared first on Raspberry Pi.