A couple of months ago we announced that you can test the online text-based Code Editor we’re building to help young people aged 7 and older learn to write code. Now we’ve made the code for the Editor open source so people can repurpose and contribute to it.
You and your learners can try out the Code Editor in our Python project paths. We’ve included a feedback form for you to let us know what you think about the Editor.
Since the Editor lets learners save their code using their Raspberry Pi Foundation account, it’s easy for them to build on projects they’ve started in the classroom or at home, or bring a project they’ve started at home to their coding club.
Python is the first programming language our Code Editor supports because it’s popular in schools, CoderDojos, and Code Clubs, as well as in industry. We’ll soon be adding support for web development languages (HTML/CSS).
We know that starting out with new programming tools can be tricky and add to the cognitive load of learning new subject matter itself. That’s why our Editor has a simple and accessible user interface and design:
We’ll expand the Editor’s functionalities as we go. For example, at the moment we’re looking at how to improve the Editor’s user interface (UI) for better mobile support.
If there’s a feature you think would help the Editor become more accessible and more suitable for young learners, or make it better for your classroom or club, please let us know via the feedback form.
Our vision is that every young person develops the knowledge, skills, and confidence to use digital technologies effectively, and to be able to critically evaluate these technologies and confidently engage with technological change. We’re part of a global community that shares that vision, so we’ve made the Editor available as an open-source project. That means other projects and organisations focussed on helping people learn about coding and digital technologies can benefit from the work.
To support the widest possible range of learners, we’ve designed the Code Editor application to work well on constrained devices and low-bandwidth connections. Safeguarding, accessibility, and data privacy are also key considerations when we build digital products at the Foundation. That’s why we decided to design the front end of the Editor to work in a standalone capacity, with Python executed through Skulpt, an entirely in-browser implementation of Python, and code changes persisted in local storage by default. Learners have the option of using a Raspberry Pi Foundation account to save their work, with changes then persisted via calls to a back end application programming interface (API).
As safeguarding is always at the core of what we do, we only make features available that comply with our safeguarding policies as well as the ICO’s age-appropriate design code. We considered supporting functionality such as image uploads and code sharing, but at the time of writing have decided to not add these features given that, without proper moderation, they present risks to safeguarding.
There’s an amazing community developing a wealth of open-source libraries. We chose to build our text-editor interface using CodeMirror, which has out-of-the-box mobile and tablet support and includes various useful features such as syntax highlighting and keyboard shortcuts. This has enabled us to focus on building the best experience for learners, rather than reinventing the wheel.
Diving a bit more into the technical details:
You can find out more about our Editor’s code for both the UI front end and API back end in our GitHub readme and contributions documentation. These kick-starter docs will help you get up and running faster:
The Editor’s front end is licensed as permissively as possible under the Apache Licence 2.0, and we’ve chosen to license the back end under the copyleft AGPL V3 licence. Copyleft licences mean derived works must be licensed under the same terms, including making any derived projects also available to the community.
We’d greatly appreciate your support with developing the Editor further, which you can give by:
Our work to develop and publish the Code Editor as an open-source project has been funded by Endless. We thank them for their generous support.
If you are interested in partnering with us to fund this key work, or you are part of an organisation that would like to make use of the Code Editor, please reach out to us via email.
The post Our Code Editor is open source appeared first on Raspberry Pi Foundation.
Nandu Vadakkath was inspired by a line-following robot built (literally) entirely from salvage materials that could wait patiently and purchase beer for its maker in Tamil Nadu, India. So he set about making his own, but with the goal of making it capable of slightly more sophisticated tasks.
Nandu had ambitious plans for his robot: navigation, speech and listening, recognition, and much more were on the list of things he wanted it to do. And in order to make it do everything he wanted, he incorporated a lot of software, including:
So how did Nandu go about trying to make the robot do some of the things on his wishlist?
The engine uses spaCy to analyse sentences, classify all the elements it identifies, and store all this information in a MySQL database. When the robot encounters a sentence with a series of possible corresponding actions, it weighs them to see what the most likely context is, based on sentences it has previously encountered.
The robot has been trained to follow Nandu around but it can get to know other people too. When it meets a new person, it takes a series of photos and processes them in the background, so it learns to remember them.
Nandu didn’t like the thought of a basic robotic voice, so he searched high and low until he came across the MBROLA UK English voice. Have a listen in the videos above!
The robot has an excellent group photo function: it looks for a person, calculates the distance between the top of their head and the top of the frame, then tilts the camera until this distance is about 60 pixels. This is a lot more effort than some human photographers put into getting all of everyone’s heads into the frame.
Nandu has created a YouTube channel for his robot companion, so be sure to keep up with its progress!
The post Nandu’s lockdown Raspberry Pi robot project appeared first on Raspberry Pi.
We found this project at TeCoEd and we loved the combination of an OLED display housed inside a retro Argus slide viewer. It uses a Raspberry Pi 3 with Python and OpenCV to pull out single frames from a video and write them to the display in real time.
TeCoEd names this creation the Raspberry Pi Retro Player, or RPRP, or – rather neatly – RP squared. The Argus viewer, he tells us, was a charity-shop find that cost just 50p. It sat collecting dust for a few years until he came across an OLED setup guide on hackster.io, which inspired the birth of the RPRP.
At the heart of the project is a Raspberry Pi 3 which is running a Python program that uses the OpenCV computer vision library. The code takes a video clip and breaks it down into individual frames. Then it resizes each frame and converts it to black and white, before writing it to the OLED display. The viewer sees the video play in pleasingly retro monochrome on the slide viewer.
TeCoEd ran into some frustrating problems with the OLED display, which, he discovered, uses the SH1106 driver, rather than the standard SH1306 driver that the Adafruit CircuitPython library expects. Many OLED displays use the SH1306 driver, but it turns out that cheaper displays like the one in this project use the SH1106. He has made a video to spare other makers this particular throw-it-all-in-the-bin moment.
If you’d like to try this build for yourself, here’s all the code and setup advice on GitHub.
TeCoEd is, as ever, our favourite kind of maker – the sharing kind! He has collated everything you’ll need to get to grips with OpenCV, connecting the SH1106 OLED screen over I2C, and more. He’s even told us where we can buy the OLED board.
The post Raspberry Pi retro player appeared first on Raspberry Pi.
One of our favourite makers, Pi & Chips (AKA David Pride), wanted to see if they could trigger a DSLR camera to take pictures by using motion detection with OpenCV on Raspberry Pi.
You could certainly do this with a Raspberry Pi High Quality Camera, but David wanted to try with his swanky new Lumix camera. As well as a Raspberry Pi and whichever camera you’re using, you’ll also need a remote control. David sourced a cheap one from Amazon, since he knew full well he was going to be… breaking it a bit.
When it came to the “breaking” part, David explains: “I was hoping to be able to just re-solder some connectors to the button but it was a dual function button depending on depth of press. I therefore got a set of probes out and traced which pins on the chip were responsible for the actual shutter release and then *carefully* managed to add two fine wires.”
Next, David added Dupont cables to the ends of the wires to allow access to the breadboard, holding the cables in place with a blob of hot glue. Then a very simple circuit using an NPN transistor to switch via GPIO gave remote control of the camera from Python.
David then added OpenCV to the mix, using this tutorial on PyImageSearch. He took the basic motion detection script and added a tiny hack to trigger the GPIO when motion was detected.
He needed to add a delay to the start of the script so he could position stuff, or himself, in front of the camera with time to spare. Got to think of those angles.
David concludes: “The camera was set to fully manual and to a really nice fast shutter speed. There is almost no delay at all between motion being detected and the Lumix actually taking pictures, I was really surprised how instantaneous it was.”
Take a look at some more of David’s projects over at Pi & Chips.
The post DSLR motion detection with Raspberry Pi and OpenCV appeared first on Raspberry Pi.
Raspberry Pi is excited to bring the Khronos OpenVX 1.3 API to our line of single-board computers. Here’s Kiriti Nagesh Gowda, AMD‘s MTS Software Development Engineer, to tell you more.
OpenVX™ is an open, royalty-free API standard for cross-platform acceleration of computer vision applications developed by The Khronos Group. The Khronos Group is an open industry consortium of more than 150 leading hardware and software companies creating advanced, royalty-free acceleration standards for 3D graphics, augmented and virtual reality, vision, and machine learning. Khronos standards include Vulkan®, OpenCL™, SYCL™, OpenVX™, NNEF™, and many others.
The Khronos Group and Raspberry Pi have come together to work on an open-source implementation of OpenVX™ 1.3, which passes the conformance on Raspberry Pi. The open-source implementation passes the Vision, Enhanced Vision, & Neural Net conformance profiles specified in OpenVX 1.3 on Raspberry Pi.
Application developers may always freely use Khronos standards when they are available on the target system. To enable companies to test their products for conformance, Khronos has established an Adopters Program for each standard. This helps to ensure that Khronos standards are consistently implemented by multiple vendors to create a reliable platform for developers. Conformant products also enjoy protection from the Khronos IP Framework, ensuring that Khronos members will not assert their IP essential to the specification against the implementation.
OpenVX enables a performance and power-optimized computer vision processing, especially important in embedded and real-time use cases such as face, body, and gesture tracking, smart video surveillance, advanced driver assistance systems (ADAS), object and scene reconstruction, augmented reality, visual inspection, robotics, and more. The developers can take advantage of using this robust API in their application and know that the application is portable across all the conformant hardware.
Below, we will go over how to build and install the open-source OpenVX 1.3 library on Raspberry Pi 4 Model B. We will run the conformance for the Vision, Enhanced Vision, & Neural Net conformance profiles and create a simple computer vision application to get started with OpenVX on Raspberry Pi.
The OpenVX 1.3 implementation is available on GitHub. To build and install the library, follow the instructions below.
Git clone the project with the recursive flag to get submodules:
git clone --recursive https://github.com/KhronosGroup/OpenVX-sample-impl.gitNote: The API Documents and Conformance Test Suite are set as submodules in the sample implementation project.
Use the Build.py script to build and install OpenVX 1.3:
cd OpenVX-sample-impl/
python Build.py --os=Linux --venum --conf=Debug --conf_vision --enh_vision --conf_nn
Build and run the conformance:
export OPENVX_DIR=$(pwd)/install/Linux/x32/Debug
export VX_TEST_DATA_PATH=$(pwd)/cts/test_data/
mkdir build-cts
cd build-cts
cmake -DOPENVX_INCLUDES=$OPENVX_DIR/include -DOPENVX_LIBRARIES=$OPENVX_DIR/bin/libopenvx.so\;$OPENVX_DIR/bin/libvxu.so\;pthread\;dl\;m\;rt -DOPENVX_CONFORMANCE_VISION=ON -DOPENVX_USE_ENHANCED_VISION=ON -DOPENVX_CONFORMANCE_NEURAL_NETWORKS=ON ../cts/
cmake --build .
LD_LIBRARY_PATH=./lib ./bin/vx_test_conformanceUse the open-source samples on GitHub to test the installation.
The post OpenVX API for Raspberry Pi appeared first on Raspberry Pi.
Since we released the first Raspberry Pi camera module back in 2013, users have been clamouring for better access to the internals of the camera system, and even to be able to attach camera sensors of their own to the Raspberry Pi board. Today we’re releasing our first version of a new open source camera stack which makes these wishes a reality.
(Note: in what follows, you may wish to refer to the glossary at the end of this post.)
We’ve had the building blocks for connecting other sensors and providing lower-level access to the image processing for a while, but Linux has been missing a convenient way for applications to take advantage of this. In late 2018 a group of Linux developers started a project called libcamera to address that. We’ve been working with them since then, and we’re pleased now to announce a camera stack that operates within this new framework.
Here’s how our work fits into the libcamera project.
![]()
We’ve supplied a Pipeline Handler that glues together our drivers and control algorithms, and presents them to libcamera with the API it expects.
Here’s a little more on what this has entailed.
V4L2 (Video for Linux 2) is the Linux kernel driver framework for devices that manipulate images and video. It provides a standardised mechanism for passing video buffers to, and/or receiving them from, different hardware devices. Whilst it has proved somewhat awkward as a means of driving entire complex camera systems, it can nonetheless provide the basis of the hardware drivers that libcamera needs to use.
Consequently, we’ve upgraded both the version 1 (Omnivision OV5647) and version 2 (Sony IMX219) camera drivers so that they feature a variety of modes and resolutions, operating in the standard V4L2 manner. Support for the new Raspberry Pi High Quality Camera (using the Sony IMX477) will be following shortly. The Broadcom Unicam driver – also V4L2‑based – has been enhanced too, signalling the start of each camera frame to the camera stack.
Finally, dumping raw camera frames (in Bayer format) into memory is of limited value, so the V4L2 Broadcom ISP driver provides all the controls needed to turn raw images into beautiful pictures!
Of course, being able to configure Broadcom’s ISP doesn’t help you to know what parameters to supply. For this reason, Raspberry Pi has developed from scratch its own suite of ISP control algorithms (sometimes referred to generically as 3A Algorithms), and these are made available to our users as well. Some of the most well known control algorithms include:
But there are many others too, such as ALSC (Auto Lens Shading Correction, which corrects vignetting and colour variation across an image), and control for noise, sharpness, contrast, and all other aspects of image processing. Here’s how they work together.
![]()
The control algorithms all receive statistics information from the ISP, and cooperate in filling in metadata for each image passing through the pipeline. At the end, the metadata is used to update control parameters in both the image sensor and the ISP.
Previously these functions were proprietary and closed source, and ran on the Broadcom GPU. Now, the GPU just shovels pixels through the ISP hardware block and notifies us when it’s done; practically all the configuration is computed and supplied from open source Raspberry Pi code on the ARM processor. A shim layer still exists on the GPU, and turns Raspberry Pi’s own image processing configuration into the proprietary functions of the Broadcom SoC.
To help you configure Raspberry Pi’s control algorithms correctly for a new camera, we include a Camera Tuning Tool. Or if you’d rather do your own thing, it’s easy to modify the supplied algorithms, or indeed to replace them entirely with your own.
Whilst ISP vendors are in some cases contributing open source V4L2 drivers, the reality is that all ISPs are very different. Advertising these differences through kernel APIs is fine – but it creates an almighty headache for anyone trying to write a portable camera application. Fortunately, this is exactly the problem that libcamera solves.
We provide all the pieces for Raspberry Pi-based libcamera systems to work simply “out of the box”. libcamera remains a work in progress, but we look forward to continuing to help this effort, and to contributing an open and accessible development platform that is available to everyone.
So far as we know, there are no similar camera systems where large parts, including at least the control (3A) algorithms and possibly driver code, are not closed and proprietary. Indeed, for anyone wishing to customise a camera system – perhaps with their own choice of sensor – or to develop their own algorithms, there would seem to be very few options – unless perhaps you happen to be an extremely large corporation.
In this respect, the new Raspberry Pi Open Source Camera System is providing something distinctly novel. For some users and applications, we expect its accessible and non-secretive nature may even prove quite game-changing.
The new open source camera system does not replace any existing camera functionality, and for the foreseeable future the two will continue to co-exist. In due course we expect to provide additional libcamera-based versions of raspistill, raspivid and PiCamera – so stay tuned!
If you want to learn more about the libcamera project, please visit https://libcamera.org.
To try libcamera for yourself with a Raspberry Pi, please follow the instructions in our online documentation, where you’ll also find the full Raspberry Pi Camera Algorithm and Tuning Guide.
If you’d like to know more, and can’t find an answer in our documentation, please go to the Camera Board forum. We’ll be sure to keep our eyes open there to pick up any of your questions.
Thanks to Naushir Patuck and Dave Stevenson for doing all the really tricky bits (lots of V4L2-wrangling).
Thanks also to the libcamera team (Laurent Pinchart, Kieran Bingham, Jacopo Mondi and Niklas Söderlund) for all their help in making this project possible.
3A, 3A Algorithms: refers to AEC/AGC (Auto Exposure Control/Auto Gain Control), AWB (Auto White Balance) and AF (Auto Focus) algorithms, but may implicitly cover other ISP control algorithms. Note that Raspberry Pi does not implement AF (Auto Focus), as none of our supported camera modules requires it
AEC: Auto Exposure Control
AF: Auto Focus
AGC: Auto Gain Control
ALSC: Auto Lens Shading Correction, which corrects vignetting and colour variations across an image. These are normally caused by the type of lens being used and can vary in different lighting conditions
AWB: Auto White Balance
Bayer: an image format where each pixel has only one colour component (one of R, G or B), creating a sort of “colour mosaic”. All the missing colour values must subsequently be interpolated. This is a raw image format meaning that no noise, sharpness, gamma, or any other processing has yet been applied to the image
CSI-2: Camera Serial Interface (version) 2. This is the interface format between a camera sensor and Raspberry Pi
GPU: Graphics Processing Unit. But in this case it refers specifically to the multimedia coprocessor on the Broadcom SoC. This multimedia processor is proprietary and closed source, and cannot directly be programmed by Raspberry Pi users
ISP: Image Signal Processor. A hardware block that turns raw (Bayer) camera images into full colour images (either RGB or YUV)
Raw: see Bayer
SoC: System on Chip. The Broadcom processor at the heart of all Raspberry Pis
Unicam: the CSI-2 receiver on the Broadcom SoC on the Raspberry Pi. Unicam receives pixels being streamed out by the image sensor
V4L2: Video for Linux 2. The Linux kernel driver framework for devices that process video images. This includes image sensors, CSI-2 receivers, and ISPs
The post An open source camera stack for Raspberry Pi using libcamera appeared first on Raspberry Pi.
What’s worse than a clock that doesn’t work? One that makes an “unbearably loud screeching noise” every minute of every day is a strong contender.
That was the aural nightmare facing YouTuber Burke McCabe. But rather than just fix the problem, he decided, in true Raspberry Pi community fashion, to go one step further. Because why not?
Burke showing YouTube viewers his invention
On the back of the clock, alongside the built-in mechanism controlling the clock’s arms, Burke added a Raspberry Pi to control a motor, which he hooked up to a webcam. The webcam was programmed using open computer vision library OpenCV to detect whenever a human face comes into view. Why would a clock need to know when someone looks at it? We’ll come to that.
First up, more on how that webcam works. OpenCV detects when a pair of eyes is in view of the webcam for three consecutive frames. You have to be really looking at it, not just passing it – that is, you have to be trying to tell the time. When this happens, the Raspberry Pi rotates the attached motor 180 degrees and back again.
But why? Well:
A clock that falls off the wall when you look at it
hello #invention #robot #raspberrypi
Burke has created a clock which, when you look at it to tell the time, falls off the wall.
We know: you want your own. So do we. Thankfully, Burke responded to calls in the comments on his original video for a more detailed technical walkthrough, and, boy, did he deliver.
How I made A clock that falls off the wall when you look at it
I dunno why I sounded depressed in this video Original Video – https://www.youtube.com/watch?v=R3HUuf6LGQE&t=41s The Code – https://github.com/SmothDragon/Fa…
In his walkthrough video, you get a good look at Burke’s entire setup, including extra batteries to make sure your Raspberry Pi gets enough juice, advice on how to get to grips with the code, and even the slots your different coloured wires need to go in. And so very, very much duct tape. Who’s going to start a GoFundMe to get Burke the glue gun sticks he so desperately needs? And hit subscribe for his YouTube channel while you’re at it!
The post This clock really, really doesn’t want to tell you the time appeared first on Raspberry Pi.
The Edwards Lab at the University of Reading has developed a flexible, low-cost, open source lab robot for capturing images of microbiology samples with a Raspberry Pi camera module. It’s called POLIR, for Raspberry Pi camera Open-source Laboratory Imaging Robot. Here’s a timelapse video of them assembling it.
The robot is useful for all kinds of microbiology imaging, but at the moment the lab is using it to measure antimicrobial resistance in bacteria. They’re doing this by detecting the colour change in a dye called resazurin, which changes from blue to pink in the presence of metabolically active cells: if bacteria incubated with antibiotics grow, their metabolic activity causes the dye to turn pink. However, if the antibiotics stop or impede the growth of the bacteria, their lower levels of metabolic activity will cause less colour change, or none at all. In the photo below, the colourful microtitre plate holds bacterial samples with and without resistance to the antibiotics against which they’re being tested.
POLIR, an open source 3D printer-based Raspberry Pi lab imaging robot
The researchers adapted existing open source 3D printer designs and used v-slot aluminium extrusion (this stuff) with custom 3D-printed joints to make a frame. Instead of a printer extrusion head, a Raspberry Pi and camera module are mounted on the frame. An Arduino running open-source Repetier software controls x-y-z stepper motors to adjust the position of the computer and camera.
Front and top views of POLIR
Open-source OctoPrint software controls the camera position by supplying scripts from the Raspberry Pi to the Arduino. OctoPrint also allows remote access and control, which gives researchers flexibility in when they run experiments and check progress. Images are acquired using a Python script configured with the appropriate settings (eg image exposure), and are stored on the Raspberry Pi’s SD card. From there, they can be accessed via FTP.
Off-the-shelf lab automation systems are extremely expensive and remain out of the reach of most research groups. POLIR cost just £600.
The system has a number of advantages over higher-cost off-the-shelf imaging systems. One is its flexibility: the robot can image a range of sample formats, including agar plates like those in the video above, microtitre plates like the one in the first photograph, and microfluidic “lab-on-a-comb” devices. A comb looks much like a small, narrow rectangle of clear plastic with striations running down its length; each striation is a microcapillary with capacity for a 1μl sample, and each comb has ten microcapillaries. These microfluidic devices let scientists run experiments on a large number of samples at once, while using a minimum of space on a lab bench, in an incubator, or in an imaging robot like POLIR.
POLIR accommodates 2160 individual capillaries and a 96 well plate, with room to spare
For lab-on-a-comb images, POLIR gives the Reading team four times the spatial resolution they get with a static camera. The moveable Raspberry Pi camera with a short focus yields images with 6 pixels per capillary, compared to 1.5 pixels per capillary using a $700 static Canon camera with a macro lens.
Because POLIR is automated, it brings higher temporal resolution within reach, too. A non-automated system, by contrast, can only be used for timelapse imaging if a researcher repeatedly intervenes at fixed time intervals. Capturing kinetic data with timelapse imaging is valuable because it can be significant if different samples reach the same endpoint but at different rates, and because some dyes can give a transient signal that would be missed by an endpoint measurement alone.
Dr Alexander Edwards of the University of Reading comments:
We built the robot with a simple purpose, to make antimicrobial resistance testing more robust without resorting to expensive and highly specialised lab equipment […] The beauty of the POLIR kit is that it’s based on open source designs and we have likewise published our own designs and modifications, allowing everyone and anyone to benefit from the original design and the modifications in other contexts. We believe that open source hardware is a game changer that will revolutionise microbiological and other life science lab work by increasing data production whilst reducing hands-on labour time in the lab.
You can find POLIR on GitLab here. You can also read more, and browse more figures, in the team’s open-access paper, Exploiting open source 3D printer architecture for laboratory robotics to automate high-throughput time-lapse imaging for analytical microbiology.
The post Raspberry Pi vs antibiotic resistance: microbiology imaging with open source hardware appeared first on Raspberry Pi.
Plant scientists and agronomists use growth chambers to provide consistent growing conditions for the plants they study. This reduces confounding variables – inconsistent temperature or light levels, for example – that could render the results of their experiments less meaningful. To make sure that conditions really are consistent both within and between growth chambers, which minimises experimental bias and ensures that experiments are reproducible, it’s helpful to monitor and record environmental variables in the chambers.
Arabidopsis thaliana in a growth chamber on the International Space Station. Many experimental plants are less well monitored than these ones.
(“Arabidopsis thaliana plants […]” by Rawpixel Ltd (original by NASA) / CC BY 2.0)
In a recent paper in Applications in Plant Sciences, Brandin Grindstaff and colleagues at the universities of Missouri and Arizona describe how they developed Growth Monitor pi, or GMpi: an affordable growth chamber monitor that provides wider functionality than other devices. As well as sensing growth conditions, it sends the gathered data to cloud storage, captures images, and generates alerts to inform scientists when conditions drift outside of an acceptable range.
Appl Plant Sci. 2019 Aug; 7(8): e11280. Figure 1, © 2019 Grindstaff et al. / CC BY 4.0
The authors emphasise – and we heartily agree – that you don’t need expertise with software and computing to build, use, and adapt a system like this. They’ve written a detailed protocol and made available all the necessary software for any researcher to build GMpi, and they note that commercial solutions with similar functionality range in price from $10,000 to $1,000,000 – something of an incentive to give the DIY approach a go.
GMpi uses a Raspberry Pi Model 3B+, to which are connected temperature-humidity and light sensors from our friends at Adafruit, as well as a Raspberry Pi Camera Module.
Appl Plant Sci. 2019 Aug; 7(8): e11280. Figure 2, © 2019 Grindstaff et al. / CC BY 4.0
The team used open-source app Rclone to upload sensor data to a cloud service, choosing Google Drive since it’s available for free. To alert users when growing conditions fall outside of a set range, they use the incoming webhooks app to generate notifications in a Slack channel. Sensor operation, data gathering, and remote monitoring are supported by a combination of software that’s available for free from the open-source community and software the authors developed themselves. Their package GMPi_Pack is available on GitHub.
Appl Plant Sci. 2019 Aug; 7(8): e11280. Figure 3, © 2019 Grindstaff et al. / CC BY 4.0
With a bill of materials amounting to something in the region of $200, GMpi is another excellent example of affordable, accessible, customisable open labware that’s available to researchers and students. If you want to find out how to build GMpi for your lab, or just for your greenhouse, Affordable remote monitoring of plant growth in facilities using Raspberry Pi computers by Brandin et al. is available on PubMed Central, and it includes appendices with clear and detailed set-up instructions for the whole system.
The post Growth Monitor pi: an open monitoring system for plant science appeared first on Raspberry Pi.
Low-cost open labware is a good thing in the world, and I was particularly pleased when micropalaeontologist Martin Tetard got in touch about the Raspberry Pi-based microscope he is developing. The project is called microscoPI (what else?), and it can capture, process, and store images and image analysis results. Martin is engaged in climate research: he uses microscopy to study tiny fossil remains, from which he gleans information about the environmental conditions that prevailed in the far-distant past.
microscoPI: a microcomputer-assisted microscope
microscoPI a project that aims to design a multipurpose, open-source and inexpensive micro-computer-assisted microscope (Raspberry PI 3). This microscope can automatically take images, process them, and save them altogether with the results of image analyses on a flash drive. It it multipurpose as it can be used on various kinds of images (e.g.
Martin repurposed an old microscope with a Z-axis adjustable stage for accurate focusing, and sourced an inexpensive X/Y movable stage to allow more accurate horizontal positioning of samples under the camera. He emptied the head of the scope to install a Raspberry Pi Camera Module, and he uses an M12 lens adapter to attach lenses suitable for single-specimen close-ups or for imaging several specimens at once. A Raspberry Pi 3B sits above the head of the microscope, and a 3.5-inch TFT touchscreen mounted on top of the Raspberry Pi allows the user to check images as they are captured and processed.
![]()
The Raspberry Pi runs our free operating system, Raspbian, and free image-processing software ImageJ. Martin and his colleagues use a number of plugins, some developed themselves and some by others, to support the specific requirements of their research. With this software, microscoPI can capture and analyse microfossil images automatically: it can count particles, including tiny specimens that are touching, analyse their shape and size, and save images and results before prompting the user for the name of the next sample.
![]()
microscoPI is compact – less than 30cm in height – and it’s powered by a battery bank secured under the base of the microscope, so it’s easily portable. The entire build comes in at under 160 Euros. You can find out more, and get in touch with Martin, on the microscoPI website.
The post A low-cost, open-source, computer-assisted microscope appeared first on Raspberry Pi.
If you’ve visited the Wizarding World of Harry Potter and found yourself in possession of an interactive magic wand as a souvenir, then you’ll no doubt be wondering by now, “What do I do with it at home though?”
While the wand was great for setting off window displays at the park itself, it now sits dusty and forgotten upon a shelf. But it still has life left in it — let Jasmeet Singh show you how.
Real Working Harry Potter Wand With Computer Vision and ML
A few months back my brother visited Japan and had real wizarding experience in the Wizarding World of Harry Potter at the Universal Studios made possible through the technology of Computer Vision. At the Wizarding World of Harry Potter in Universal Studios the tourists can perform “real magic” at certain locations(where the motion capture system is installed) using specially made wands with retro-reflective beads at the tip.
The interactive displays at Universal Studios’ Wizarding World of Harry Potter have infrared cameras in place, which are ready to read the correct movements of retroflector-tipped wands. Move your wand in the right way, and the cameras will recognise your spell and set window displays in motion. Oooooo…magic!

How do I know this? Thanks to William Osman and Allen Pan, who used this Wizarding World technology to turn cheap hot dogs into their own unique wands! Those boys…
Hacking Wands at Harry Potter World
How to make your very own mostly-functional interactive wand. Please don’t ban me from Universal Studios. Links on my blog: http://www.williamosman.com/2017/12/hacking-harry-potter-wands.html Allen’s Channel: https://www.youtube.com/channel/UCVS89U86PwqzNkK2qYNbk5A Support us on Patreon: https://www.patreon.com/williamosman Website: http://www.williamosman.com/ Facebook: https://www.facebook.com/williamosmanscience/ InstaHam: https://www.instagram.com/crabsandscience/ CameraManJohn: http://www.johnwillner.com/
For his Raspberry Pi-enabled wand project, Jasmeet took that same Wizarding World concept to create a desktop storage box that opens and closes in response to the correct flicks of a wand.
A simple night vision camera can be used as our camera for motion capture as they also blast out infrared light which is not visible to humans but can be clearly seen with a camera that has no infrared filter.
So, the video stream from the camera is fed into a Raspberry Pi which has a Python program running OpenCV which is used for detecting, isolating and tracking the wand tip. Then we use SVM (Simple Vector Machine) algorithm of machine learning to recognize the pattern drawn and accordingly control the GPIOs of the raspberry pi to perform some activities.
For more information on the project, including all the code needed to get started, head over to hackster.io to find Jasmeet’s full tutorial.
The post Take the Wizarding World of Harry Potter home with you appeared first on Raspberry Pi.
Use album artwork to trigger playback of your favourite music with Plynth, the Raspberry Pi–powered, camera-enhanced record stand.
Plynth Demo
This is “Plynth Demo” by Plynth on Vimeo, the home for high quality videos and the people who love them.
Plynth uses a Raspberry Pi and Pi Camera Module to identify cover artwork and play the respective album on your sound system, via your preferred streaming service or digital library.
As the project’s website explains, using Plynth is pretty simple. Just:
As for Plynth’s innards? The stand houses a Raspberry Pi 3B+ and Camera Module, and relies on “a combination of the Google Vision API and OpenCV, which is great because there’s a lot of documentation online for both of them”, states the project creator, Jono Matusky, on Reddit.
Some of you may wonder why you wouldn’t have your records with your record player and, as such, use that record player to play those records. If you are one of these people, then consider, for example, the beautiful Damien Rice LP I own that tragically broke during a recent house move. While I can no longer play the LP, its artwork is still worthy of a place on my record shelf, and with Plynth I can still play the album as well.
In addition, instead of album artwork to play an album, you could use photographs, doodles, or type to play curated playlists, or, as mentioned on the website, DVDs to play the movies soundtrack, or CDs to correctly select the right disc in a disc changer.
Convinced or not, I think what we can all agree on is that Plynth is a good-looking bit of kit, and at Pi Towers look forward to seeing where they project leads.
The post Playback your favourite records with Plynth appeared first on Raspberry Pi.
Tired of opening the refrigerator only to find that your favourite snack is missing? Get video evidence of sneaky fridge thieves sent to your phone, with Adrian Rosebeck’s Raspberry Pi security camera project.
Building a Raspberry Pi security camera with OpenCV
Learn how to build a IoT + Raspberry Pi security camera using OpenCV and computer vision. Send TXT/MMS message notifications, images, and video clips when the security camera is triggered. Full tutorial (including code) here: https://www.pyimagesearch.com/2019/03/25/building-a-raspberry-pi-security-camera-with-opencv
Adrian loves hummus. And, as you can see from my author bio, so do I. So it wasn’t hard for me to relate to Adrian’s story about his college roommates often stealing his cherished chickpea dip.

Garlic dessert
“Of course, back then I wasn’t as familiar with computer vision and OpenCV as I am now,” he explains on his blog. “Had I known what I do at present, I would have built a Raspberry Pi security camera to capture the hummus heist in action!”
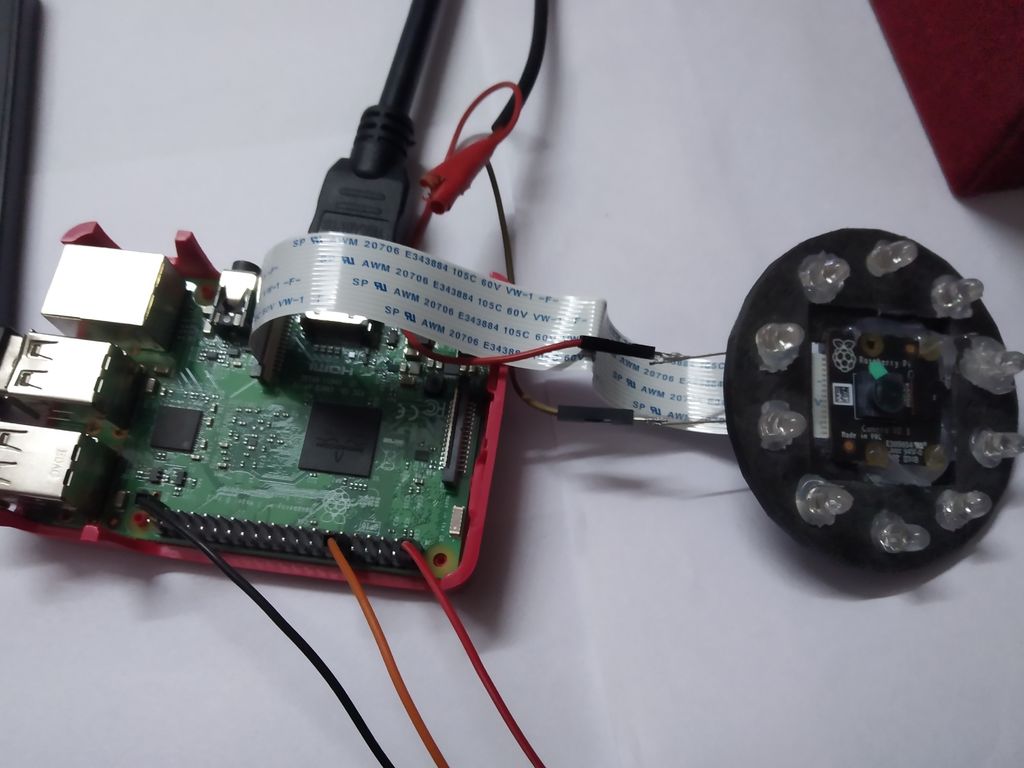
So, in homage to his time as an undergrad, Adrian decided to finally build that security camera for his fridge, despite now only needing to protect his hummus from his wife. And to build it, he opted to use OpenCV, a Raspberry Pi, and a Raspberry Pi Camera Module.
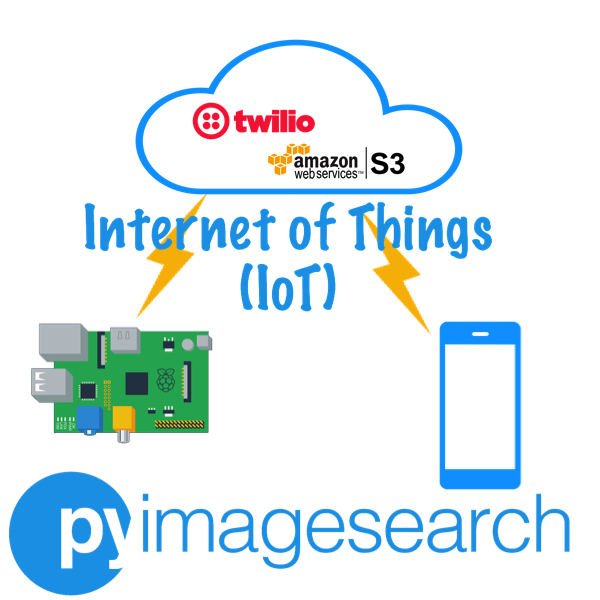
Adrian’s camera is an IoT project: it not only captures footage but also uses Twillo to send that footage, via a cloud service (AWS), to a smartphone.
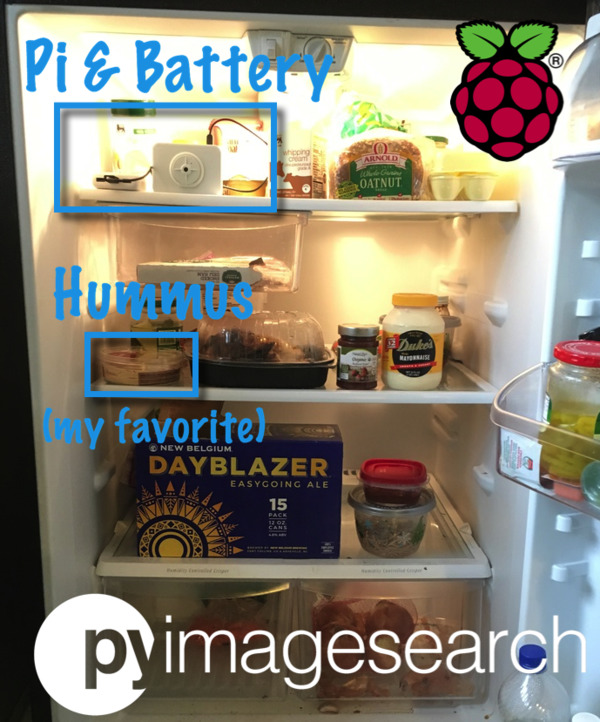
Because the content of your fridge lives in the dark when you’re not inspecting it, the code for capturing video footage detects light and dark, and records everything that occurs between the fridge door opening and closing. “You could also deploy this inside a mailbox that opens/closes,” suggests Adrian.
Adrian provides all the code for the project on his blog, pyimagesearch, with a full explanation of why each piece of code is used — thanks, Adrian!
For more from Adrian, check out his brilliant deep learning projects: a fully functional Pokémon Pokédex and Santa Detector.
The post Build a security camera with Raspberry Pi and OpenCV appeared first on Raspberry Pi.