Moonhack is a free global, online coding challenge by our partner Code Club Australia, powered by Telstra Foundation. It runs once a year for young learners worldwide. In 2022, almost 44,000 young people from 63 countries registered to take part.
This year, Moonhack will happen from 10 to 26 October, to coincide with World Space Week 2023. The challenge is open to all young learners, wherever they are in the world, and features six brand-new projects that focus on space and innovation. We caught up with Kaye North, Community and Engagement Manager at Code Club Australia, to find out more.
Moonhack 2023 offers access to engaging new projects for Scratch, micro:bit, and Python. For the first time ever, young people will also have the option to follow a project brief to code their own solution to a space-based issue, using a programming language of their choice.
In keeping with this year’s theme — which was inspired by the World Space Week 2023 theme of ‘Space and Entrepreneurship’ — the new Moonhack projects showcase inventions that were created for space exploration but are now used in everyday life, such as mobile phone cameras and LEDs.
Kaye shared that in Australia, inventions created for space travel and exploration are part of the science curriculum at primary school level. She hopes that this year’s Moonhack will help more young people understand how space exploration and coding are connected to their daily lives.
Moonhack features six unique coding projects, giving young people of all ages and experience levels the opportunity to engage and learn. The project brief introduced this year encourages participants to be creative, coding a solution on any platform they choose.
Coders who respond to the project brief will also be in with a chance of having their project selected to be developed into an official Code Club Australia project, for other young people and educators around the world to enjoy.
Kaye emphasised that Moonhack is about more than just taking part in a global event; it also helps young people to better understand the real-world opportunities that coding can offer.
“The more kids we expose this to, the better, expanding coding past just coding and having purpose behind it. And I do try to link things in so that we’re connecting with real-world context, careers…”
Kaye North
Registration for Moonhack 2023 is open now. The challenge runs from 10 to 26 October, and projects can be submitted until 30 November. Participation is free and open to any young coder, whether they are part of a Code Club or not. The 2023 projects are already available in English, Arabic, Croatian, Dutch, Filipino, French, Greek, Hindi, Indonesian, Mandarin, Portuguese, and Spanish, and will be available in more languages soon.
To find out more and register to take part, visit the Moonhack website.
Code Club Australia is powered by Telstra Foundation as part of a strategic partnership with us at the Raspberry Pi Foundation.
The post Get ready for Moonhack 2023: Bringing space down to Earth appeared first on Raspberry Pi Foundation.
When we think about a celebration, we also think about how important it is to be intentional about sound. And with this month of February being a celebration of Black history in the USA, we want to help you make some noise to amplify the voices, experiences, and achievements of the Black community.
From the past and present, to those still to come in the future, countless remarkable achievements have been made by Black individuals who have chosen to move to the beat of their own drum. Music and sound can be tools to tell stories, to express ourselves, to promote change, to celebrate, and so much more. So take some time this month to make your own music with your young coders and start dancing.
Of course, choosing to dance is not the same as choosing to devote your life to the equality and freedom of all people. But it reminds us that you can incite change by choosing to do what is right, even when you feel like you’re the only one moving to the music. It won’t be long before you see change and meet people you resonate with, and a new sound will develop in which everyone can find their rhythm.
So join us this month as we explore the power of code and music to celebrate Black History Month.
We’ve selected three of our favourite music-related projects to help you bring a joyful atmosphere to your coding sessions this month. All of the projects are in Scratch, a programming language that uses blocks to help young people develop their confidence in computer programming while they experiment with colours and sounds to make their own projects.
Find your rhythm with this clicker game where you earn points by playing the drums in different venues. The project is one of our Explore projects and it includes step-by-step instructions to help young creators develop their skills, confidence, and interest in programming. This makes it a great option for beginners who want to get started with Scratch and programming.
Code to the beat of your own drum — or any instrument you like. Use this project to create your own virtual musical instrument and celebrate a Black musician you admire. For young people who have some experience with Scratch, they may enjoy expressing themselves with this Design project. Our Design projects give young people support to build on their experience to gain more independence coding their own ideas.
Can you keep up with the beat? Prove it in this game where you play the notes of a song while they scroll down the screen. You could choose to include a song associated with a moment in Black history that is meaningful to you. This project is a great opportunity for young people to expand their programming knowledge to create lists, while they also test their reaction skills with a fun game.
For young creators who want to create projects that don’t involve music or sound, check out these projects which can help you to:
Let us know how you’re celebrating Black History Month in your community on Twitter, LinkedIn, Facebook, or Instagram all month long!
Learn about our partnership with Team4Tech and Kenya Connect, with whom we are empowering educators and students in rural Kenya to use the power of coding and computing to benefit their communities.
Meet Salome, a computer science student from the UK who shares her experiences and advice for young people interested in finding out where computer science can lead them. Salome was one of the first people we interviewed for our ‘I belong’ campaign to celebrate young role models in computer science.
We believe that creating inclusive and equitable learning environments is essential to supporting all young people to see computer science as an opportunity for them. To help engage young people, especially those who are underrepresented in computer science classrooms, we are carrying out research with teachers to make computing culturally relevant. Our work promoting culturally relevant pedagogy in educational settings in England has been impacted by projects of many US researchers who have already contributed heavily to this area. You can learn about two of these projects in this blog post.
Educators who want to find out how they can use culturally relevant pedagogy with their learners can download our free guidelines today.
We would also like to invite you to our monthly research seminar on 7 February 2023, when we will be joined by Dr Jean Salac who will be sharing their research on Moving from equity to justice in computing instruction for youth. Dr Salac’s session is part of our current series of seminars that centres on primary school (K–5) teaching and learning of computing. The seminars are free and open to everyone interested in computing education. We hope to see you there!
The post Code to the beat of your own drum during Black History Month 2023 appeared first on Raspberry Pi Foundation.
In 2016, Code Club Australia launched the Moonhack online coding event and broke the world record for the most children coding in one day. Then in 2017 they broke the record again. By now, more than 150,000 young learners from 70 countries have participated in Moonhack.
Moonhack is an online coding challenge for young learners and celebrates humans’ technological achievements. The 2022 event takes place from 10 to 23 October to coincide with World Space Week, and it features six brand-new projects that show how satellites can help us live more sustainably. We caught up with Kaye North, Community and Engagement Manager at Code Club Australia, to find out more.
Kaye developed this year’s projects across Scratch, micro:bit, and Python to cater for learners with all levels of coding experience. One project was designed in collaboration with astrophysicist Dr Brad Tucker from the Australian National University. Another project highlights that objects in the sky have been meaningful for humans since way before the advent of modern satellites. Kaye developed this project together with a community in the Torres Strait.
“The Torres Strait is a unique part of Australia off the tip of Queensland,” Kaye told us. “It’s this amazing group of islands. As a teacher I taught there for three years and learned a lot about the community’s culture.” When a colleague suggested a project about Tagai — a constellation central to Torres Strait Islander culture — Kaye jumped at the chance to work with the island community again.
Kaye initially intended to work with a Torres Strait elder, “but that really snowballed. I had two days at a Tagai school, where the cultural teacher shared his story about the Tagai constellation. I worked with a Year 6 class, coding and putting ideas together, creating this one amazing project. And as we were pulling it together, one of the girls said ‘We need to put our language into it, we should be able to speak in it.’ And that’s where the idea of having the kids’ voices in the project came from.”
Moonhack 2021 had over 25,000 participants, and Kaye wants to share the Tagai project with as many people in 2022. When we asked her what else she hopes young people take away from Moonhack this year, she said:
“I hope that people really get the connection to satellites in space and how these are going to influence us fulfilling the United Nations’ Sustainable Development Goals. I really hope that comes through. Big picture though? That the kids have fun.”
Moonhack 2022 runs from 10 to 23 October and is free and open to any young coder, whether they are part of a Code Club or not. The projects are already available in English, French, Dutch, and Greek. Arabic and Latin American Spanish versions are in preparation.
To take part with your young people, register on the Moonhack website.
Code Club Australia is powered by Telstra Foundation as part of a strategic partnership with the Raspberry Pi Foundation.
The post Take part in Moonhack 2022: Community, culture, coding appeared first on Raspberry Pi.
Many technology items are disposed of each year, either because they are broken, are no longer needed, or have been upgraded. Researchers from Germany have identified this as an opportunity to develop a scheme of work for Computing, while at the same time highlighting the importance of sustainability in hardware and software use. They hypothesised that by repairing defective devices, students would come to understand better how these devices work, and therefore meet some of the goals of their curriculum.
The research team visited three schools in Germany to deliver Computing lessons based around the concept of a repair café, where defective items are repaired or restored rather than thrown away. This idea was translated into a series of lessons about using and repairing smartphones. Learners first of all explored the materials used in smartphones and reflected on their personal use of these devices. They then spent time moving around three repair workstations, examining broken smartphones and looking at how they could be repaired or repurposed. Finally, learners reflected on their own ecological footprint and what they had learnt about digital hardware and software.
In the classroom, repair workstations were set up for three different categories of activity: fixing cable breaks, fixing display breaks, and tinkering to upcycle devices. Each workstation had a mentor to support learners in investigating faults themselves by using the question prompt, “Why isn’t this feature or device working?” At the display breaks and cable breaks workstations, a mentor was on hand to provide guidance with further questions about the hardware and software used to make the smartphone work. On the other hand, the tinkering workstation offered a more open-ended approach, asking learners to think about how a smartphone could be upcycled to be used for a different purpose, such as a bicycle computer. It was interesting to note that students visited each of the three workstations equally.
The feedback from the participants showed there had been a positive impact in prompting learners to think about the sustainability of their smartphone use. Working with items that were already broken also gave them confidence to explore how to repair the technology. This is a different type of experience from other Computing lessons, in which devices such as laptops or tablets are provided and are expected to be carefully looked after. The researchers also asked learners to complete a questionnaire two weeks after the lessons, and this showed that 10 of the 67 participants had gone on to repair another smartphone after taking part in the lessons.
The project drew on a theory called duality reconstruction that has been developed by a researcher called Carsten Schulte. This theory argues that in computing education, it is equally important to teach learners about the function of a digital device as about the structure. For example, in the repair café lessons, learners discovered more about the role that smartphones play in society, as well as experimenting with broken smartphones to find out how they work. This brought a socio-technical perspective to the lessons that helped make the interaction between the technology and society more visible.
Using this approach in the Computing classroom may seem counter-intuitive when compared to the approach of splitting the curriculum into topics and teaching each topic sequentially. However, the findings from this project suggest that learners understand better how smartphones work when they also think about how they are manufactured and used. Including societal implications of computing can provide learners with useful contexts about how computing is used in real-world problem-solving, and can also help to increase learners’ motivation for studying the subject.
The final aspect of this research project looked at collaborative problem-solving. The lessons were structured to include time for group work and group discussion, to acknowledge and leverage the range of experiences among learners. At the workstations, learners formed small groups to carry out repairs. The paper doesn’t mention whether these groups were self-selecting or assigned, but the researchers did carry out observations of group behaviours in order to evaluate whether the collaboration was effective. In the findings, the ideal group size for the repair workstation activity was either two or three learners working together. The researchers noticed that in groups of four or more learners, at least one learner would become disinterested and disengaged. Some groups were also observed taking part in work that wasn’t related to the task, and although no further details are given about the nature of this, it is possible that the groups became distracted.
The findings from this project suggest that learners understand better how smartphones work when they also think about how they are manufactured and used.
Further investigation into effective pedagogies to set group size expectations and maintain task focus would be helpful to make sure the lessons met their learning objectives. This research was conducted as a case study in a small number of schools, and the results indicate that this approach may be more widely helpful. Details about the study can be found in the researchers’ paper (in German).
If you’re thinking about setting up a repair café in your school to promote sustainable computing, either as a formal or informal learning activity, here are ideas on where to begin:
This article is from our free computing education magazine Hello World. Every issue is written by educators for educators and packed with resources, ideas, and insights to inspire your learners and your own classroom practice.
For more about computing education in the context of sustainability, climate change, and environmental impact, download issue 19 of Hello World, which focuses on these topics.
You can subscribe to Hello World for free to never miss a digital issue, and if you’re an educator in the UK, a print subscription will get you free print copies in the post.
PS If you’re interested in facilitating productive classroom discussions with your learners about ethical, legal, cultural, and environmental concerns surrounding computer science, take a look at our free online course ‘Impacts of Technology: How To Lead Classroom Discussions’.
The post Repair cafés in computing education | Hello World #19 appeared first on Raspberry Pi.
This post has been adapted from an article in issue 19 of Hello World magazine, which explores the interaction between technology and sustainability.
We may have had the Coolest Projects livestream, but we are still in awe of the 2092 projects that young people sent in for this year’s online technology showcase! To continue the Coolest Projects Global 2022 celebrations, we’re shining a light on some of the participants and the topics that inspired their projects.
In this year’s showcase, the themes of sustainability and the environment were extremely popular. We received over 300 projects related to the environment from young people all over the world. Games, apps, websites, hardware — we’ve seen so many creative projects that demonstrate how important the environment is to young people.
Here are some of these projects and a glimpse into how kids and teens across the world are using technology to look after their environment.
Has anyone ever told you that a small change can lead to a big impact? Check out these two Coolest Projects entries that put this idea into practice with clever inventions to make positive changes to the environment.
Arik (15) from the UK wanted to make something to reduce the waste he noticed at home. Whenever lots of people visited Arik’s house, getting the right drink for everyone was a challenge and often resulted in wasted, spilled drinks. This problem was the inspiration behind Arik’s ‘Liquid Dispenser’ project, which can hold two litres of any desired liquid and has an outer body made from reused cardboard. As Arik says, “You don’t need a plastic bottle, you just need a cup!”
Amrit (13), Kingston (12), and Henry (12) from Canada were also inspired to make a project to reduce waste. ‘Eco Light’ is a light that automatically turns off when someone leaves their house to avoid wasted electricity. For the project, the team used a micro:bit to detect the signal strength and decide whether the LED should be on (if someone is in the house) or off (if the house is empty).
“We wanted to create something that hopefully would create a meaningful impact on the world.”
Amrit, Kingston, and Henry
We love to see young people invent things to have positive changes in the community, on a local and global level.
This year, Sashrika (11) from the US shared her ‘Gas Leak Detector’ project, which she designed to help people who heat their homes with diesel. On the east coast of America, many people store their gas tanks in the basement. This means they may not realise if the gas is leaking. To solve this problem, Sashrika has combined programming with physical computing to make a device that can detect if there is a gas leak and send a notification to your phone.
Sashrika’s project has the power to help lots of people and she has even thought about how she would make more changes to her project in the name of sustainability:
“I would probably add a solar panel because there are lots of houses that have outdoor oil tanks. Solar panel[s] will reduce electricity consumption and reduce CO2 emission[s].”
Sashrika
Amr in Syria was also thinking about renewable energy sources when he created his own ‘Smart Wind Turbine’.
The ‘Smart Wind Turbine’ is connected to a micro:bit to measure the electricity generated by a fan. Amr conducted tests that recorded that more electricity was generated when the turbine faced in the direction of the wind. So Amr made a wind vane to determine the wind’s direction and added another micro:bit to communicate the results to the turbine.
We’ve also seen projects created by young people to make the world a better place for future generations.
Naira and Rhythm from India have designed houses that are suited for people and the planet. They carried out a survey and from their results they created the ‘Net Zero Home’. Naira and Rhythm’s project offers an idea for homes that are comfortable for people of all abilities and ages, while also being sustainable.
“Our future cities will require a lot of homes, this means we will require a lot of materials, energy, water and we will also produce a lot of waste. So we have designed this net zero home as a solution.”
Naira and Rhythm
Andrea (9) and Yuliana (10) from the US have also made something to benefit future generations. The ‘Bee Counter’ project uses sensors and a micro:bit to record bees’ activity around a hive. Through monitoring the bees, the team hope they can see (and then fix) any problems with the hive. Andrea and Yuliana want to maintain the bees’ home to help them continue to have a positive influence on our environment.
Some young creators use Coolest Projects as an opportunity to educate and inspire people to make environmental changes in their own lives.
Sabrina (13) from the UK created her own website, ‘A Guide to Climate Change’. It includes images, text, graphics of the Earth’s temperature change, and suggestions for people to minimise their waste. Sabrina also received the Broadcom Coding with Commitment award for using her skills to provide vital information about the effects of climate change.
Kushal (12) from India wanted to use tech to encourage people to help save the environment. Kushal had no experience of app development before making his ‘Green Steps’ app. He says, “I have created a mobile app to connect like-minded people who want to do something about [the] environment.”
These projects are just some of the incredible ideas we’ve seen young people enter for Coolest Projects this year. It’s clear from the projects submitted that the context of the environment and protecting our planet resonates with so many students, summarised by Sabrina, “Some of us don’t understand how important the earth is to us. And I hope we don’t have to wait until it is gone to realise.”
Check out the Coolest Projects showcase for even more projects about the environment, alongside other topics that have inspired young creators.
The post Young people’s projects for a sustainable future appeared first on Raspberry Pi.
Issue 19 of our free magazine Hello World, written by and for the computing education community, focuses on the interaction between sustainability and computing, from how we can interact with technology responsibly, to its potential to mitigate climate change.
To give you a taste of this brand-new issue, here is primary school teacher Peter Gaynord’s article about his experience of using an environmental case study to develop a cross-curricular physical computing unit that gives his learners a real-life context.
The prospect of developing your own unit of work from scratch can feel very daunting. With the number of free resources available, it begs the question, why do it? Firstly, it gives you the opportunity to deliver computing that is interwoven with the rest of your curriculum. It also naturally lends itself to a constructionist approach to learning through meaningful engagement with real-world problem-solving. In this article, I am going to share my experience of developing a ten-lesson unit of physical computing for students aged nine to ten that is linked to the more general topic of the environment.
To engage children in the process of problem-solving, it is important that the problem is presented as a real and meaningful one. To introduce the topic of the environment, we showed pupils a video of the Panama Canal, including information about the staggering amount of CO2 that is saved by ships taking this route instead of the alternative, longer routes that use more fuel. However, we explained that because of the special geographical features, a moving bridge needed to be constructed over the canal. The students’ challenge was first to design a solution to the problem, and then to make a working model.
The model would use physical computing as part of the solution to the problem. The children would program a single-geared motor using a Crumble microcontroller to slowly lift and lower the bridge by the desired amount. We decided to issue a warning to drivers that the road bridge was about to close using a Sparkle, a programmable LED. Ultimately, the raising and lowering of the bridge would happen automatically when a ship approached. For this purpose, we would use an ultrasonic sensor to detect the presence of the ship.
To develop the skills required to use the Crumble microcontroller, we led some discrete computing lessons based largely on the Teach Computing Curriculum’s ‘Programming A — Selection in physical computing’ unit. In these lessons, the children developed the skill of sensing and responding differently to conditions using the selection programming construct. They learnt this key concept alongside controlling and connecting the motor, the Sparkle, and the ultrasonic sensor.
For students to succeed, we also had to teach them skills from other subjects, and consider at what stage it would be most useful to introduce them. For example, before asking children to document their designs, we first needed to teach the design technology (DT) objectives for communicating ideas through sketches. Most other DT objectives that covered the practical skills to make a model were interwoven as the project progressed. At the end of the project, we guided the children through how to evaluate their design ideas and reflect on the process of model making. Before pupils designed their solutions, we also had to introduce some science for them to apply to their designs. We covered increasing forces using levers, pulleys, and gears, as well as the greenhouse effect and how burning fossil fuels contributes to global warming.
It is very important not to specify a solution for students at the beginning, otherwise the whole project becomes craft instead of problem-solving. However, it is important to spend some time thinking about any practical aspects of the model building that may need extra scaffolding. Experience suggested that it was important to limit the scale of the children’s models. We did this by showing them a completed central bridge span and later, guiding the building of this component so that all bridges had the same scale. It also turned out to be very important that the children were limited in their model building to using one single-geared motor. This would ensure that all children engaged with actively thinking about how to utilise the lever and pulley system to increase force, instead of relying on using more motors to lift the bridge.
If you want to finish reading Peter’s article and see his unit outline, download Hello World issue 19 as a free PDF.
As always, you’ll find this new issue of Hello World packed with resources, ideas, and insights to inspire your learners and your own classroom practice:
All issues of Hello World as available as free PDF downloads. Subscribe to never miss a digital issue — and if you’re an educator in the UK, you can subscribe to receive free print copies in the post.
PS: US-based educators, if you’re at CSTA Annual Conference in Chicago this month, come meet us at booth 521 and join us at our sessions about writing for Hello World, the Big Book of Computing Pedagogy, and more. We look forward to seeing you there!
The post Computing and sustainability in your classroom | Hello World #19 appeared first on Raspberry Pi.
Ten years ago, Raspberry Pi started shipping its first computers in order to inspire young people to reimagine the role of technology in their lives. What started with a low-cost, high-performance computer has grown into a movement of millions of people of all ages and backgrounds.
Today, Raspberry Pi is the UK’s best-selling computer, and the Raspberry Pi Foundation is one of the world’s leading educational non-profits. Raspberry Pi computers make technology accessible to people and businesses all over the world. They are used everywhere from homes and schools to factories, offices, and shops.
To help celebrate this 10-year milestone, we’ve partnered with The National Museum of Computing, located at the historic Bletchley Park, to open a new temporary exhibit dedicated to telling the story of the Raspberry Pi computer, the Raspberry Pi Foundation, and the global community of innovators, learners, and educators we’re a part of.
In the exhibit, you’ll be able to get hands-on with Raspberry Pi computers, hear the story of how Raspberry Pi came to be, and see a few of the many ways that Raspberry Pi has made an impact on the world.
We know that not everyone will be able to experience the exhibit in person, and so we’ll live-stream the grand opening this Saturday 5 March 2022 at 11:15am GMT.
If you’re able to make it to the National Museum of Computing on Saturday, tickets are available to purchase.
We’re delighted to celebrate 10 years with all of you, and we’re excited about the next 10 years of Raspberry Pi.
The post Celebrating 10 years of Raspberry Pi with a new museum exhibition appeared first on Raspberry Pi.
Our seminars in this series on AI and data science education, co-hosted with The Alan Turing Institute, have been covering a range of different topics and perspectives. This month was no exception. We were delighted to be able to host Tara Chklovski, CEO of Technovation, whose presentation was called ‘Teaching youth to use AI to tackle the Sustainable Development Goals’.
Tara started Technovation, formerly called Iridescent, in 2007 with a family science programme in one school in Los Angeles. The nonprofit has grown hugely, and Technovation now runs computing education activities across the world. We heard from Tara that over 350,000 girls from more than 100 countries take part in their programmes, and that the nonprofit focuses particularly on empowering girls to become tech entrepreneurs. The girls, with support from industry volunteers, parents, and the Technovation curriculum, work in teams to solve real-world problems through an annual event called the Technovation Challenge. Working at scale with young people has given the Technovation team the opportunity to investigate the impact of their programmes as well as more generally learn what works in computing education.
Tara’s talk was extremely engaging (you’ll find the recording below), with videos of young people who had participated in recent years. Technovation works with volunteers and organisations to reach young people in communities where opportunities may be lacking, focussing on low- and middle-income countries. Tara spoke about the 900 million teenage girls in the world, a substantial number of whom live in countries where there is considerable inequality.
To illustrate the impact of the programme, Tara gave a number of examples of projects that students had developed, including:
Early on, the Technovation Challenge had involved the creation of mobile apps, but in recent years, the projects have focused on using AI technologies to solve problems. An key message that Tara wanted to get across was that the focus on real-world problems and teamwork was as important, if not more, than the technical skills the young people were developing.
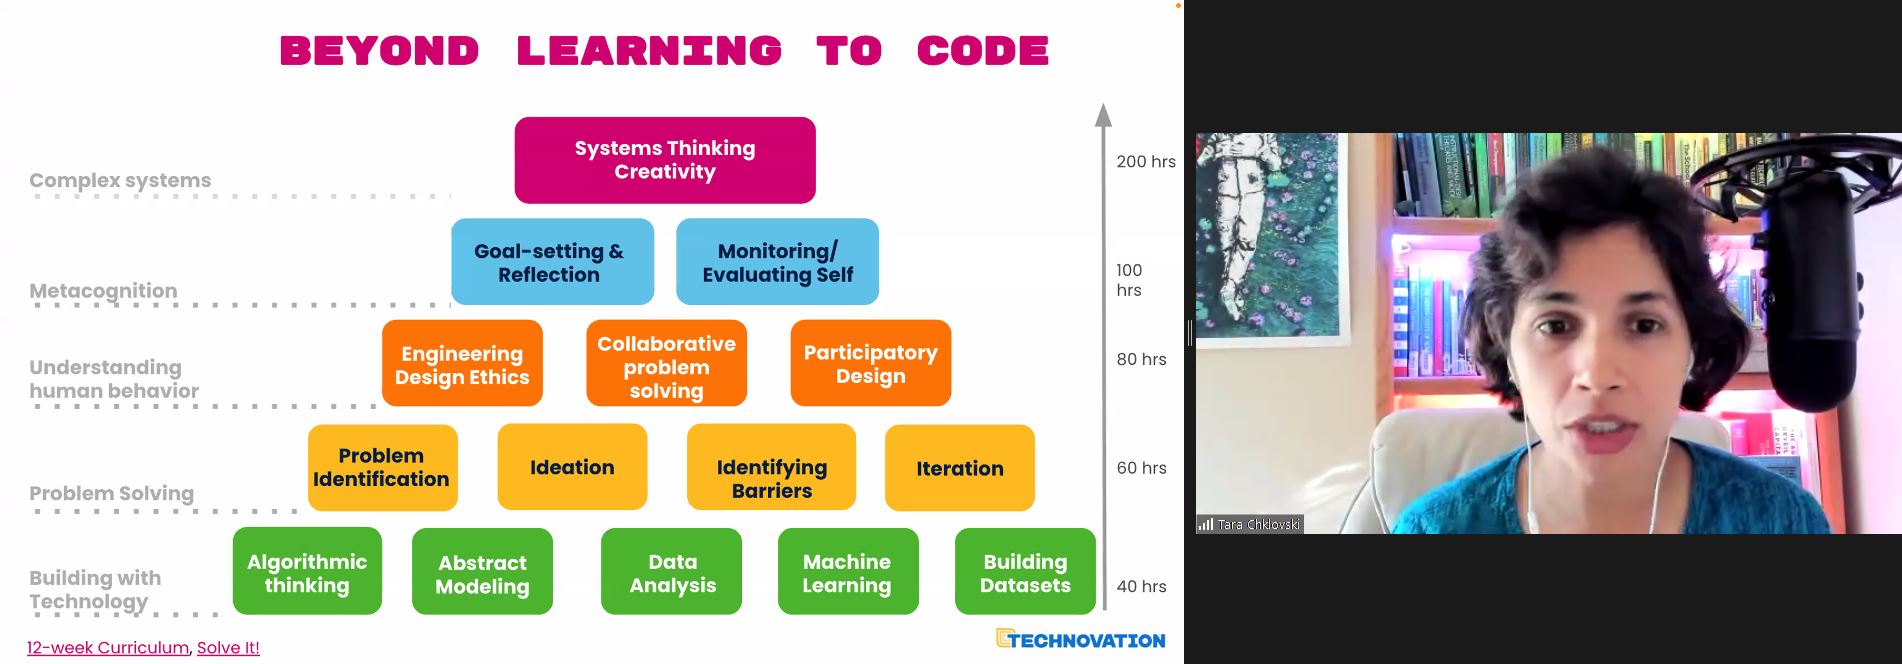
Technovation has designed an online curriculum to support teams, who may have no prior computing experience, to learn how to design an AI project. Students work through units on topics such as data analysis and building datasets. As well as the technical activities, young people also work through activities on problem-solving approaches, design, and system thinking to help them tackle a real-world problem that is relevant to them. The curriculum supports teams to identify problems in their community and find a path to prototype and share an invention to tackle that problem.
While working through the curriculum, teams develop AI models to address the problem that they have chosen. They then submit them to a global competition for beginners, juniors, and seniors. Many of the girls enjoy the Technovation Challenge so much that they come back year on year to further develop their team skills.
Technovation runs another programme, AI Families, that focuses on families working together to learn AI concepts and skills and use them to develop projects together. Families worked together with the help of educators to identify meaningful problems in their communities, and developed AI prototypes to address them.
There were 20,000 participants from under-resourced communities in 17 countries through 2018 and 2019. 70% of them were women (mothers and grandmothers) who wanted their children to participate; in this way the programme encouraged parents to be role models for their daughters, as well as enabling families to understand that AI is a tool that could be used to think about what problems in their community can be solved with the help of AI skills and principles. Tara was keen to emphasise that, given the importance of AI in the world, the more people know about it, the more impact they can make on their local communities.
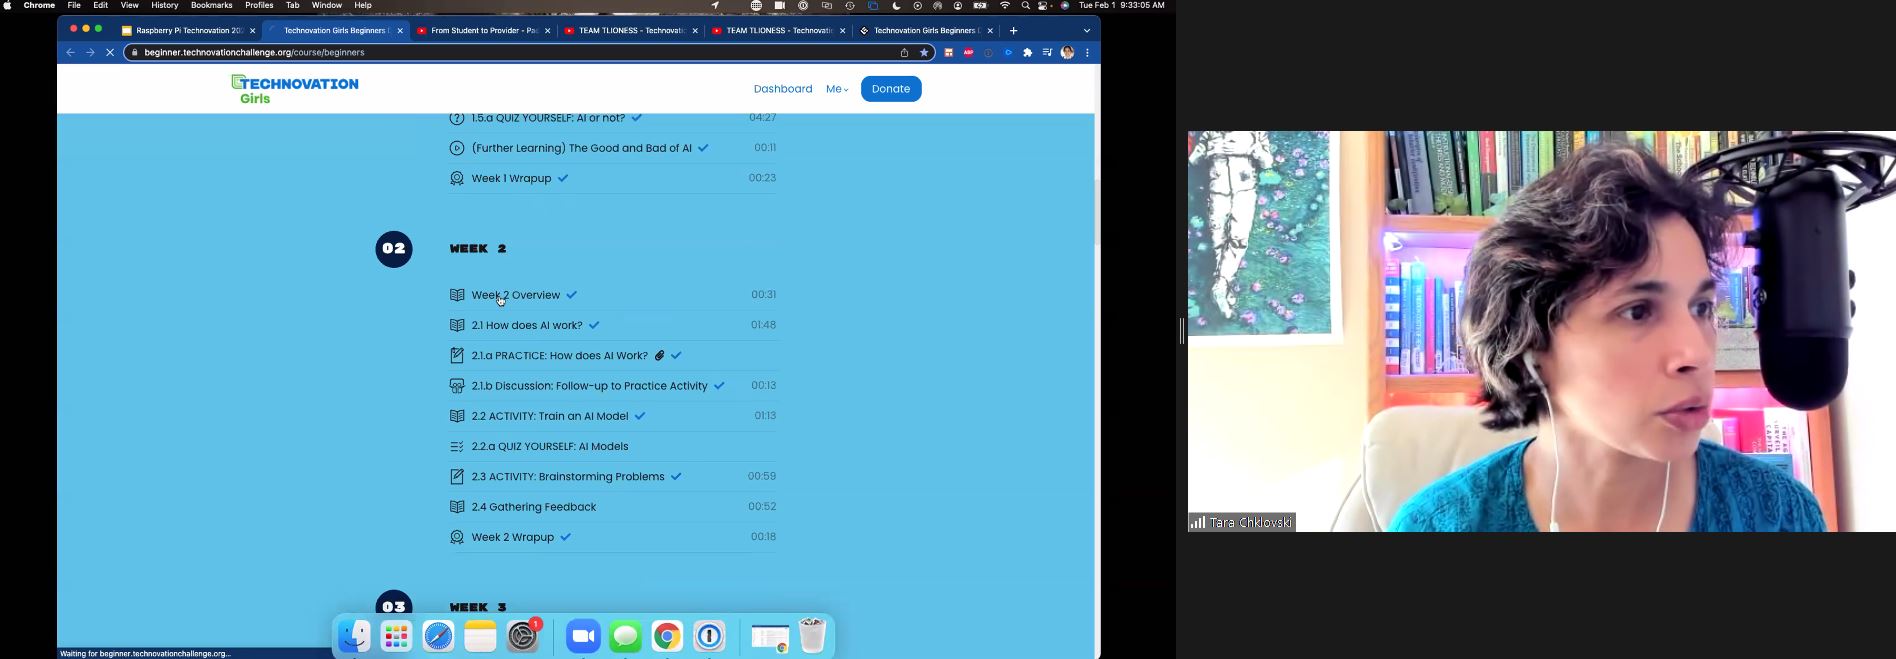
Tara shared links to the curriculum to demonstrate what families in this programme would learn week by week. The AI modules use tools such as Machine Learning for Kids.
The results of the AI Families project as investigated over 2018 and 2019 are reported in this paper. The findings of the programme included:
The research describes how the programme worked pre-pandemic. Tara highlighted that although the pandemic has prevented so much face-to-face team work, it has allowed some young people to access education online that they would not have otherwise had access to.
Our goal is to listen to a variety of perspectives through this seminar series, and I felt that Tara really offered something fresh and engaging to our seminar audience, many of them (many of you!) regular attendees who we’ve got to know since we’ve been running the seminars. The seminar combined real-life stories with videos, as well as links to the curriculum used by Technovation to support learners of AI. The ‘question and answer’ session after the seminar focused on ways in which people could engage with the programme. On Twitter, one of the seminar participants declared this seminar “my favourite thus far in the series”. It was indeed very inspirational.
As we near the end of this series, we can start to reflect on what we’ve been learning from all the various speakers, and I intend to do this more formally in a month or two as we prepare Volume 3 of our seminar proceedings. While Tara’s emphasis is on motivating children to want to learn the latest technologies because they can see what they can achieve with them, some of our other speakers have considered the actual concepts we should be teaching, whether we have to change our approach to teaching computer science if we include AI, and how we should engage young learners in the ethics of AI.
I’m really looking forward to our final seminar in the series, with Stefania Druga, on Tuesday 1 March at 17:00–18:30 GMT. Stefania, PhD candidate at the University of Washington Information School, will also focus on families. In her talk ‘Democratising AI education with and for families’, she will consider the ways that children engage with smart, AI-enabled devices that they are becoming part of their everyday lives. It’s a perfect way to finish this series, and we hope you’ll join us.
Thanks to our seminars series, we are developing a list of AI education resources that seminar speakers and attendees share with us, plus the free resources we are developing at the Foundation. Please do take a look.
You can find all blog posts relating to our previous seminars on this page.
The post Linking AI education to meaningful projects appeared first on Raspberry Pi.
On the occasion of Black History Month UK, we speak to Joe Arday, Computer Science teacher at Woodbridge High School in Essex, UK, about his experiences in computing education, his thoughts about underrepresentation of Black students in the subject, and his ideas about what needs to be done to engage more Black students.
For me personally it’s an opportunity to celebrate our culture, but my view is it shouldn’t be a month — it should be celebrated every day. I am of Ghanaian descent, so Black History Month is an opportunity to share my culture in my school and my community. Black History Month is also an opportunity to educate yourself about what happened to the generations before you. For example, my parents lived through the Brixton riots. I was born in 1984, and I got to secondary school before I heard about the Brixton riots from a teacher. But my mother made sure that, during Black History Month, we went to a lot of extracurricular activities to learn about our culture.
For me it’s about embracing the culture I come from, being proud to be Black, and sharing that culture with the next generation, including my two kids, who are of mixed heritage. They need to know where they come from, and know their two cultures.
So I was a tech professional in the finance sector, and I was made redundant when the 2008 recession hit. I did a couple of consulting jobs, but I thought to myself, “I love tech, but in five years from now, do I really want to be going from job to job? There must be something else I can do.”
At that time there was a huge drive to recruit more teachers to teach what was called ICT back then and is now Computing. As a result, I started my career as a teacher in 2010. As a former software consultant, I had useful skills for teaching ICT. When Computing was introduced instead, I was fortunate to be at a school that could bring in external CPD (continued professional development) providers to teach us about programming and build our understanding and skills to deliver the new curriculum. I also did a lot of self-study and spoke to lots of teachers at other schools about how to teach the subject.
Not really — I had to seek them out. In my environment, there are very few Black teachers, and I was often the only Black Computer Science teacher. A parent once said to me, “I hope you’re not planning to leave, because my son needs a role model in Computer Science.” And I understood exactly what she meant by that, but I’m not even a role model, I’m just someone who’s contributing to society the best way I can. I just want to pave the way for the next generation, including my children.
My current school is supporting me to lead all the STEM engagement for students, and in that role, some of the things I do are running a STEM club that focuses a lot on computing, and running new programmes to encourage girls into tech roles. I’ve also become a CAS Master Teacher and been part of a careers panel at Queen Mary University London about the tech sector, for hundreds of school students from across London. And I was selected by the National Centre for Computing Education as one of their facilitators in the Computer Science Accelerator CPD programme.
But there’s been a lack of leadership opportunities for me in schools. I’ve applied for middle-leadership roles and have been told my face doesn’t fit in an interview in a previous school. And I’m just as skilled and experienced as other candidates: I’ve been acting Head of Department, acting Head of Year — what more do I need to do? But I’ve not had access to middle-leadership roles. I’ve been told I’m an average teacher, but then I’ve been put onto dealing with “difficult” students if they’re Black, because a few of my previous schools have told me that I was “good at dealing with behaviour”. So that tells you about the role I was pigeonholed into.
It is very important for Black students to have role models, and to have a curriculum that reflects them.
Joe Arday
I’ve never worked for a Black Headteacher, and the proportion of Black teachers in senior leadership positions is very low, only 1%. So I am considering moving into a different area of computing education, such as edtech or academia, because in schools I don’t have the opportunities to progress because of my ethnicity.
I think it is, that’s why the number of Black teachers is so low. And as a Black student of Computer Science considering a teaching role, I would look around my school and think, if I go into teaching, where are the opportunities going to come from?
There’s a lack of role models across the board: in schools, but also in tech leadership roles, CEOs and company directors. And the interest of Black students isn’t fostered early on, in Year 8, Year 9 (ages 12–14). If they don’t have a teacher who is able to take them to career fairs or to tech companies, they’re not going to get exposure, they’re not going to think, “Oh, I can see myself doing that.” So unless they have a lot of interest already, they’re not going to pick Computer Science when it comes to choosing their GCSEs, because it doesn’t look like it’s for them.
But we need diverse people in computing and STEM, especially girls. As the father of a boy and a girl of mixed heritage, that’s very important to me. Some schools I’ve worked in, they pushed computer science into the background, and it’s such a shame. They don’t have the money or the time for their teachers to do the CPD to teach it properly. And if attitudes at the top are negative, that’s going to filter down. But even if students don’t go into the tech industry, they still need digital skills to go into any number of sectors. Every young person needs them.
It is very important for Black students to have role models, and to have a curriculum that reflects them. Students need to see themselves in their lessons and not feel ignored by what is being taught. I was very fortunate to be selected for the working group for the Raspberry Pi Foundation’s culturally relevant teaching guidelines, and I’m currently running some CPD for teachers around this. I bet in the future Ofsted will look at how diverse the curriculum of schools is.
I think tech organisations need to work with schools and offer work experience placements. When I was a student, 20 years ago, I went on a placement, and that set me on the right path. Nowadays, many students don’t do work experience, they are school leavers before they do an internship. So why do so many schools and organisations not help 14- or 15-year-olds spend a week or two doing a placement and learning some real-life skills?
And I think it’s very important for teachers to be able to keep up to date with the latest technologies so they can support their students with what they need to know when they start their own careers, and can be convincing doing it. I encourage my GCSE Computer Science students to learn about things like cloud computing and cybersecurity, about the newest types of technologies that are being used in the tech sector now. That way they’re preparing themselves. And if I was a Headteacher, I would help my students gain professional certifications that they can use when they apply for jobs.
Teachers could run a STEM or computing club with a Black History Month theme to get Black students interested — and it doesn’t have to stop at Black History Month. And you can make computing cross-curricular, so there could be a project with all teachers, where each one runs a lesson that involves a bit of coding, so that all students can see that computing really is for everyone.
Because of my role working for the NCCE, I always encourage teachers to join the NCCE’s Computer Science Accelerator programme and to retrain to teach Computer Science. It’s a beautiful subject, all you need to do is give it a chance.
Thank you, Joe, for sharing your thoughts with us!
Joe was part of the group of teachers we worked with to create our practical guide on culturally relevant teaching in the computing classroom. You can download it as a free PDF now to help you think about how to reflect all your students in your lessons.
The post Engaging Black students in computing at UK schools — interview with Joe Arday appeared first on Raspberry Pi.
On the occasion of Black History Month UK, we speak to Lynda Chinaka, Senior Lecturer in Computing in Education at the University of Roehampton, about her experiences in computing education, her thoughts about underrepresentation of Black students in the subject, and her ideas about what needs to be done to engage more Black students.
Black history is a really important topic, obviously, and I think that, when Black History Month was first introduced, it was very powerful — and it continues to be in certain places. But I think that, for where we are as a society, it’s time to move past talking about Black history for only one month of the year, albeit an important, focused celebration. And certainly that would include integrating Black history and Black figures across subjects in school. That would be a very useful way to celebrate the contributions that Black people have made, and continue to make, to society. Children need to be taught a history in which they are included and valued. Good history is always a matter of different perspectives. Too often in schools, children experience a single perspective.
In terms of my journey, I’ve always been passionate about Computing — formerly ICT. I’ve been a Computing subject lead in schools, moving on into senior management. Beyond my career in schools, I have worked as an ICT consultant and as a Teacher Leader for a London authority. During that time, my interest in Computing/ICT led me to undertake an MA in Computing in Education at King’s College London. This led me to become a teacher trainer in my current role. In some sense, I’m carrying on the work I did with the local authorities, but in a university setting. At the University of Roehampton, I teach computing to BA Primary Education and PGCE students. Training teachers is something that I’m very much interested in. It’s about engaging student teachers, supporting them in developing their understanding of Computing in the primary phases. Students learn about the principles of computing, related learning theories, and how children think and learn. Perhaps more importantly, I am keen to instil a love of the subject and broaden their notions about computing.
In terms of the support I’ve received, I’ve worked in certain schools where Computing was really valued by the Headteacher, which enabled me to promote my vision for the subject. Supportive colleagues made a difference in their willingness take on new initiatives that I presented. I have been fortunate to work in local authorities that have been forward-thinking; one school became a test bed for Computing. So in that sense, schools have supported me. But as a Black person, a Black woman in particular, I would say that I faced barriers throughout my career. And those barriers have been there since childhood. In the Black community, people experience all sorts of things, and prejudice and barriers have been at play in my career.
Prejudice sometimes is very overt. An example I think I can share because it prevented me from getting a job: I went for an interview in a school. It was a very good interview, the Headteacher told me, “It was fantastic, you’re amazing, you’re excellent,” the problem was that there weren’t “enough Black pupils”, so she “didn’t see the need…”. And this is a discussion that was shared with me. Now in 2021 a Headteacher wouldn’t say that, but let’s just wind the clock back 15 years. These are the kinds of experiences that you go through as a Black teacher.
So what happens is, you tend to build up a certain resilience. People’s perceptions and low expectations of me have been a hindrance. This can be debilitating. You get tired of having to go through the same thing, of having to overcome negativity. Yes, I would say this has limited my progress. Obviously, I am speaking about my particular experiences as a Black woman, but I would say that these experiences are shared by many people like me.
But it’s my determination and the investment I’ve made that has resulted in me staying in the field. And a source of support for me is always Black colleagues, they understand the issues that are inherent within the profession.
There need to be more Black teachers, because children need to see themselves represented in schools. As a Black teacher, I know that I have made a difference to Black children in my class who had a Black role model in front of them. When we talk about the poor performance of Black pupils, we need to be careful not to blame them for the failures of the education system. Policy makers, Headteachers, teachers, and practitioners need to be a lot more self-aware and examine the impact of racism in education. People need to examine their own policies and practice, especially people in positions of power.
A lot of collective work needs to be done.
Lynda Chinaka
Some local authorities do better than others, and some Headteachers I’ve worked with have been keen to build a diverse staff team. Black people are not well-represented at all in education. Headteachers need to be more proactive about their staff teams and recruitment. And they need to encourage Black teachers to go for jobs in senior management.
In all settings I taught in, no matter how many students of colour there were, these students would experience something in my classroom that their white counterparts had experienced all their lives: they would leave their home and come to school and be taught by someone who looks like them and perhaps speaks the same language as them. It’s enormously affirming for children to have that experience. And it’s important for all children actually, white children as well. Seeing a Black person teaching in the classroom, in a position of power or influence — it changes their mindset, and that ultimately changes perspectives.
So in terms of that route into Computing, Black students need to see themselves represented.
It’s absolutely vital to teach children about Computing. As adults, they are going to participate in a future that we know very little about, so I think it’s important that they’re taught computer science approaches, problem solving and computational thinking. So children need to be taught to be creators and not simply passive users of technology.
One of the things some of my university students say is, “Oh my goodness, I can’t teach Computing, all the children know much more than me.”, but actually, that’s a little bit of a myth, I think. Children are better at using technologies than solving computing problems. They need to learn a range of computational approaches for solving problems. Computing is a life skill; it is the future. We saw during the pandemic the effects of digital inequity on pupils.
In education, we need to look at the curriculum and how to decolonise it to really engage young people. This also includes looking out for bias and prejudice in the things that are taught. Even when you’re thinking about specific computer science topics. So for example, the traditional example for algorithm design is making a cup of tea. But tea is a universal drink, it originates in China, and as a result of colonialism made its way to India and Kenya. So we drink tea universally, but the method (algorithm) for making tea doesn’t necessarily always include a china tea pot or a tea bag. There are lots of ways to introduce it, thinking about how it’s prepared in different cultures, say Kenya or the Punjab, and using that as a basis for developing children’s algorithmic thinking. This is culturally relevant. It’s about bringing the interests and experiences children have into the classroom.
For children to be engaged in Computing, there needs to be a payoff for them. For example, I’ve seen young people developing their own African emojis. They need to see a point to it! They don’t necessarily have to become computer scientists or software engineers, but Computing should be an avenue that opens for them because they can see it as something to further their own aims, their own causes. Young people are very socially and politically aware. For example, Black communities are very aware of the way that climate change affects the Global South and could use data science to highlight this. Many will have extended family living in these regions that are affected now.
So you don’t compromise on the quality of your teaching, and it require teachers to be more reflective. There is no quick fix. For example, you can’t just insert African masks into a lesson without exploring their meaning in real depth within the culture they originate from.
So in your Computing or Computer Science lessons, you need to include topics young people are interested in: climate change, discrimination, algorithms and algorithmic bias in software, surveillance and facial recognition. Social justice topics are close to their hearts. You can get them interested in AI and data science by talking about the off-the-shelf datasets that Big Tech uses, and about what impact these have in terms of surveillance and on minority communities specifically.
‘Culturally relevant’ is easier to sit with. ‘Decolonising the curriculum’ provokes a reaction, but it’s really about teaching children about histories and perspectives on curricula that affect us all. We need to move towards a curriculum that is fit for purpose where children are taught different perspectives and truth that they recognise. Even if you’re in a school without any Black children at all, the curriculum still needs to be decolonised so that children can actually understand and benefit from the many ways that topics, events, subjects may be taught.
When we think about learning in terms of being culturally relevant and responsive, this is about harnessing children’s heritage, experiences, and viewpoints to engage learners such that the curriculum is meaningful and includes them. The goal here is to promote long-term and consistent engagement with Computing.
Diversity initiatives are a good step, but we need to give it time.
The selection process for subjects at GCSE can sometimes affect the uptake of computing. Then there are individual attitudes and experiences of pupils. It has been documented that Black and Asian students have often been in the minority and experience marginalisation, particularly noted in the case of female students in GCSE Computer Science.
ITE (Initial Teacher Education) providers need to consider their partnerships with schools and support schools to be more inclusive. We need more Black teachers, as I said. We also need to democratise pathways for young people getting into computing and STEM careers. Applying to university is one way — there should be others.
Schools could also develop partnerships with organisations that have their roots in the Black community. Research has also highlighted discriminatory practices in careers advice, and in the application and interview processes of Russell Group universities. These need to be addressed.
There are too few Black academics at universities. This can have an impact on student choice and decisions about whether to attend an institution or not. Institutions may seem unwelcoming or unsympathetic. Higher education institutions need to eliminate bias through feedback and measuring course take-up.
Outside the field of education, tech companies could offer summer schemes, short programmes to stimulate interest amongst young Black people. Really, the people in leadership positions, all the people with the power, need to be proactive.
A lot of collective work needs to be done. It’s a whole pipeline, and everybody needs to play a part.
You can present children with Black pioneers in computing and tech. They can show Black children how to achieve their goals in life through computing. For example, create podcasts or make lists with various organisations that use data science to further specific causes.
It’s not a one-off, one teacher thing, it’s a project for the whole school.
Lynda Chinaka
Also, it’s not a one-off, one teacher thing, it’s project for the whole school. You need to build it into a whole curriculum map, do all the things you do to build a new curriculum map: get every teacher to contribute, so they take it on, own it, research it, make those links to the national curriculum so it’s relevant. Looking at it in isolation it’s a problem, but it’s a whole school approach that starts as a working group. And it’s senior management that sets the tone, and they really need to be proactive, but you can start by starting a working group. It won’t be implemented overnight. A bit like introducing a school uniform. Do it slowly, have a pilot year group. Get parents in, have a coffee evening, get school governors on board. It’s a whole staff team effort.
People need to recognise the size of the problem and not be discouraged by the fact that things haven’t happened overnight. But people who are in a position of influence need to start by having those conversations, because that’s the only way that change can happen, quite frankly.
Lynda, thank you for sharing your insights with us!
Lynda was one of the advisors in the group we worked with to create our recently published, practical guide on culturally relevant teaching. You can download it as a free PDF now. We hope it will help you kickstart conversations in your setting.
The post Engaging Black students in computing at UK schools — interview with Lynda Chinaka appeared first on Raspberry Pi.
So far in our series of community stories, we’ve collaborated with young people from the UK, India, and Romania who are getting creative with technology to change the world around them.
Our next community story comes from a highly regarded community member who has been connecting young people with opportunities to learn and create with technology throughout her career. A US-based educator with over twenty years of experience, Yolanda Payne shares our mission to put computing and digital making into the hands of people all over the world.
“The biggest reason I’m so invested in technology is because people invested in me.”
Yolanda Payne
Yolanda Payne is an educator you might recognise from our online courses. Based in Atlanta, Georgia in the USA, she’s passionate about making technology accessible to all and helping young people become technology creators.
Yolanda says, “The biggest reason I’m so invested in technology is because people invested in me. They saw something that I was good at, showed me opportunities, and so in turn, that was my philosophy in teaching.”
Yolanda got her first computer at a young age and was hooked instantly: it opened up many new opportunities and led her to choosing a career in education. She says, “The computer gives me the tools to be an artist, it gives me the tools to create things, and if it does that for me, then just imagine what it will do for kids!”
“If you give a teacher a Raspberry Pi and show them these resources, they’re going to be hooked.”
Yolanda Payne
Yolanda has spent her entire professional life dedicated to education. She gained a bachelor’s degree in Elementary Education from Mississippi University for Women; a master’s degree in Instructional Technology from Mississippi State University; and Educational Specialist degrees from the University of Florida and the University of Georgia in Curriculum and Instruction, and in Language and Literacy.
Throughout her twenty-one years as a classroom teacher and her time running Code Clubs, Yolanda found joy in supporting students who have multiple challenges or complex needs, and in seeing them thrive in the subject of computer science. Yolanda points out, “I worked with both students that were considered to be in special education and students that were gifted. And one of the biggest things that I saw that I don’t think people realise, especially about students in special education: they are used to solving problems. […] You’d be very surprised at how real-life problem-solving skills flow very easily into computer science.”
Yolanda now works as a Research Associate at the Georgia Institute of Technology. We are tremendously thankful for her contributions as an educator and an advocate for technology and young people.
Please join us in celebrating her story by sharing it on Twitter, LinkedIn, and Facebook!
The post Celebrating the community: Yolanda appeared first on Raspberry Pi.
You sit down with your six-string, ready to bash out that new song you recently mastered, but find you’re out of tune. Redditor u/thataintthis (Guyrandy Jean-Gilles) has taken the pain out of tuning your guitar, so those of us lacking this necessary skill can skip the boring bit and get back to playing.
Before you dismiss this project as just a Raspberry Pi Pico-powered guitar tuning box, read on, because when the maker said this is a fully automatic tuner, they meant it.
Guyrandy’s device listens to the sound of a string being plucked and decides which note it needs to be tuned to. Then it automatically turns the tuning keys on the guitar’s headstock just the right amount until it achieves the correct note.
Genius.
If this were a regular tuning box, it would be up to the musician to fiddle with the tuning keys while twanging the string until they hit a note that matches the one being made by the tuning box.
It’s currently hardcoded to do standard tuning, but it could be tweaked to do things like Drop D tuning.
Commenters were quick to share great ideas to make this build even better. Issues of harmonics were raised, and possible new algorithms to get around it were shared. Another commenter noticed the maker wrote their own code in C and suggested making use of the existing ulab FFT in MicroPython. And a final great idea was training the Raspberry Pi Pico to accept the guitar’s audio output as input and analyse the note that way, rather than using a microphone, which has a less clear sound quality.
These upgrades seemed to pique the maker’s interest. So maybe watch this space for a v2.0 of this project…
(Watch out for some spicy language in the comments section of the original reddit post. People got pretty lively when articulating their love for this build.)
This project was inspired by the Roadie automatic tuning device. Roadie is sleek but it costs big cash money. And it strips you of the hours of tinkering fun you get from making your own version.
All the code for the project can be found here.
The post Automatically tune your guitar with Raspberry Pi Pico appeared first on Raspberry Pi.
Today we’re announcing two brand-new, fantastic, free online courses for educators in the USA. And to kickstart their learning journey, we are giving qualified US-based educators the chance to get a free Raspberry Pi Pico microcontroller hardware kit. This is all thanks to our partners at Infosys Foundation USA, who are committed to expanding access to computer science and maker education in public schools across the United States.
You can find both new courses on the Pathfinders Online Institute platform, which supports US classroom educators to bring high-quality computer science and maker education content to their kindergarten through 12th grade students. And best of all, the platform is completely free!
The first course we’ve created for you is called Programming essentials in Scratch. It supports teachers to introduce the essentials of programming to fourth to eighth grade students. The course covers the key concepts of programming, such as variables, selection, and iteration. In addition to learning how to teach programming effectively, teachers will also discover how to inspire their students and help them create music, interactive quizzes, dance animations, and more.
Our second new course for you is called Design, build, and code a rover with Raspberry Pi Pico. It gives teachers of fourth to eighth grade students everything they need to start teaching physical computing in their classroom. Teachers will develop their students’ knowledge of the subject by using basic circuits, coding a Raspberry Pi Pico microcontroller to work with motors and LEDs, and designing algorithms to navigate a rover through a maze. By the end of the course, teachers will have all the resources they need to inspire students and help them explore practical programming, system design, and prototyping.
And thanks to the generous support of Infosys Foundation USA, we’re able to provide qualified educators with a FREE kit of materials to participate in the Design, build, and code a rover with Raspberry Pi Pico course. We’re especially excited about this because the kit includes our first-ever microcontroller, Raspberry Pi Pico. This offer is available to 1,000 US-based K–12 public or charter school teachers on a first-come, first-served basis.
To claim your kit, just create a free account on Pathfinders Online Institute and start the course. On the first page of the course, you’ll receive instructions on how to apply for a free kit.
If you’re not a qualified educator, or if you’ve missed out on the opportunity to get the free hardware, we still welcome you to join the course! You can find the materials yourself, or purchase the kit from our partners at PiShop.us.
All of us at the Raspberry Pi Foundation want to thank the Infosys Foundation USA team for collaborating with us on this new resource and learning opportunity for educators. We appreciate and share their commitment to support computer science and maker education.
The post Free computer science courseware and hardware for American educators appeared first on Raspberry Pi.
With Intel attempting to get into 3D gaming graphics again, Custom PC’s Ben Hardwidge looks at the time it failed to take on 3dfx in the late 1990s.
Back in the late 1990s, I worked at a computer shop in Derby, where we sold components over the counter, while pointing to a sign that said ‘components are sold on the basis that the customer is competent to fit it themselves’. There were often compatibility issues between components, but there were two cards I’d always try to steer customers away from, as they nearly always came back to the shop, accompanied by a tired, angry face and colourful vocabulary.
One was a PCI soft modem that required an MMX CPU and refused to cooperate with Freeserve, Dixons’ free ISP that was taking the UK by storm. The other was Express 3D graphics card, based on Intel’s 740 gaming chip.
This was before Nvidia had coined the term ‘GPU’ for its first GeForce cards, which could take the burden of transform and lighting calculations away from the CPU. The CPU was still expected to do a fair bit of work in the 3D pipeline, but you bought a 3D card to speed up the process and make games look much smoother than software rendering.
However, unlike the 3dfx Voodoo and VideoLogic PowerVR cards at the time, which required a 2D card to output to a monitor, the i740 wasn’t a sole 3D card – it could function as a 2D and a 3D card in one unit, and at £30 it was also cheap. You can see why people were drawn to it.
Another factor in its popularity was being made by Intel; thanks to the company’s relentless marketing campaigns, this meant people assumed it would just work without problems. It also used the brand-new Accelerated Graphics Port (AGP) interface, which people often assumed meant it would be faster than the PCI-based 3D accelerator cards.
The problem for us was that people who wanted cheap graphics cards usually also wanted cheap CPUs and motherboards, which meant going for an AMD K6 or Cyrix 6×86 CPU and a non-Intel motherboard chipset. The i740 didn’t like the AGP implementation on non-Intel chipsets very much, and it particularly didn’t like the ALi Aladdin chipset on which our most popular Super Socket 7 motherboards were based.
If you wanted the i740 to run properly, you really needed a Pentium II CPU and Intel 440LX or 440BX motherboard, and they were expensive. Then, once you’d paired your cheap graphics card with your expensive foundation gear, the i740 wasn’t actually that great, with comparably poor performance and still a load of compatibility issues. However, it had some interesting tech and history behind it that’s worth revisiting.
Intel didn’t have much in the way of graphics tech in the 1990s, but it had spotted a big market for 3D acceleration. The ATX motherboards for its latest Pentium II CPUs also came with an AGP slot, and a 3D AGP graphics card could potentially encourage people to upgrade (more on this later).
With little 3D accelerator expertise in house, Intel teamed up with US aerospace company Lockheed Martin to develop a consumer graphics card. That might seem a bit left field, but Lockheed Martin had acquired a variety of assets through various mergers and takeovers. In 1993, GE Aerospace was sold to Martin Marietta, and in 1995, Martin Marietta merged with Lockheed to form Lockheed Martin.
GE Aerospace was a division of General Electric, and its main business was providing systems and electronic gear to the aerospace and military industries, including simulators. In 1994, it started to branch out, working with Sega to produce the hardware for its Model 2 arcade machines, including 3D graphics tech for texture-mapped polygons and texture filtering. It was used for titles such as Daytona USA and Virtua Fighter 2.
In 1995, Lockheed Martin created a spin-off dedicated to consumer 3D graphics tech called Real3D, mostly using employees from GE Aerospace. Real3D worked with Sega on the 3D graphics hardware in its Model 3 cabinet, which was released in 1996, and then later began working with Intel to produce a consumer 3D graphics card, codenamed ‘Auburn’, which would become the 740.
Intel had clear aims for the i740 when it was released in 1998 – it needed to be cheap and it needed to showcase the new AGP interface featured on the latest Pentium II motherboards. AGP had huge potential.
Although AGP was mainly based on the existing PCI interface, it had a direct connection to the CPU, as opposed to sharing the PCI bus with other cards. This not only freed up bandwidth, but also meant the AGP bus could run at a higher clock speed than the PCI bus.
Another one of its benefits was sideband addressing via a dedicated bus, meaning that all the usual address/data lines could be used solely for data throughput rather than both addressing and data functions, with the sideband bus handling address requests.
This massively increased the speed at which an AGP card could read from system memory compared with a PCI card, and meant an AGP card could practically use system memory as well as its on-board memory. You may remember the ‘AGP aperture’ setting in old motherboard BIOS screens – that was the amount of system memory you could allocate to your graphics card.
Most 3D cards didn’t rely on this feature, instead being piled with fast on-board memory to maximise performance, but Intel decided to go all out on it with the i740. The result was a card that only used its on-board memory as a frame buffer, with textures being stored in system memory.
This meant Intel could save money on memory (the cheapest i740 cards only came with 2MB compared to 8MB on the cheapest Voodoo2 cards), while also ensuring the cards required the new AGP interface.
The first problem, of course, was that using system memory and its interface wasn’t anywhere near as fast as using on-board graphics memory. The other problem was that the need for the graphics card to constantly access system memory ended up starving the CPU of memory bandwidth.
That was a big problem at a time when the CPU was still doing a fair bit of the work in the 3D pipeline. The growing use of larger textures in 3D games to improve detail made the situation even worse. What’s more, as I mentioned earlier, the AGP implementations on most Super Socket 7 motherboards just weren’t designed with a card such as the i740 in mind.
It also didn’t help that some board makers (including Real3D under the Starfighter brand) started making PCI versions of the i740 with a bridge chip and more on-board memory, and these cards were usually faster than the AGP equivalents, as they didn’t rely on system memory for texture storage.
What seems bizarre now is that, at the time, I remember a lot of discussion before the launch about how Intel’s work with Real3D was going to result in Intel having a monopoly on 3D graphics, and putting the likes of ATi, 3dfx and VideoLogic out of business.
Intel had access to huge silicon manufacturing facilities, it had a massive research and development budget, and it had the proven expertise of Real3D at its disposal. In reality, the i740 was soon cancelled and almost completely forgotten by the end of 1999.
Get your hands on the latest issue of Custom PC at your usual outlet, or online from the Raspberry Pi Press store.
You can also download a PDF of Custom PC #218 for the bargain price of £0.00.
The post Remembering Intel 740 | Custom PC #218 appeared first on Raspberry Pi.
In the latest issue of Custom PC magazine Ben Hardwidge travels back to August 1981, when IBM released its Personal Computer 5150 and the PC was born.
A big ape had only just started lobbing barrels at a pixelated Mario in Donkey Kong arcade machines, Duran Duran’s very first album had just rolled off the vinyl presses and Roger Federer was just four days old. In this time, the UK was even capable of winning Eurovision with Bucks Fizz. It’s August 1981, and IBM has just released the foundation for the PCs we know and love today, the PC 5150.
‘By the late 1970s the personal computer market was maturing rapidly from the many build-it-yourself hobbyist kits to more serious players like Apple, Commodore and Tandy,’ retired IBM veteran Peter Short tells us. ‘As people realised the greater potential for personal computers in business as well as at home, pressure grew on IBM to enter the market with their own PC.’
Short is now a volunteer at IBM’s computer museum in Hursley, which holds a huge archive of the company’s computing machines and documentation, from Victorian punch card machines to the company’s personal computers. We ask him if it felt like the beginning of a new era when the PC was first launched 40 years ago. ‘Yes,’ he says, ‘but probably not the beginning of something so huge that its legacy lives on today.’
At this time, the home computer market was really starting to take off, with primitive 8-bit computers, such as the Sinclair ZX80 and Commodore VIC-20, enabling people at home to get a basic computer that plugged into their TV. At the other end of the scale, large businesses had huge mainframe machines that took up entire rooms, connected to dumb terminals.
There was clearly room for a middle ground. IBM was going to continue producing mainframes and terminals for many years yet, but it also wanted to create a powerful, independent machine that didn’t need a mainframe behind it, and that didn’t cost an exorbitant amount of money.
The PC 5150’s launch price of $1,565 US (around £885 ex VAT) for the base spec in 1981 equates to around £3,469 ex VAT in today’s money. That’s still very far from what we’d call cheap, but it was a colossal price drop compared with IBM’s System/23 Datamaster, an all-in-one computer (including screen) that had launched earlier the same year for $9,000 US – six times the price. And even that was massively cheaper than some of IBM’s previous microcomputer designs, such as the 5100, which cost up to $20,000 US in 1975.
IBM needed to act quickly. Commodore had already got a foothold in this market several years earlier with the PET, for example, and IBM realised that it couldn’t spend its usual long development time on the project. The race was on, with the project given a one-year time frame for completion.
‘At the time, IBM was more geared up to its traditional, longer-term development processes,’ explains Short. ‘But it eventually realised that, with a solid reputation in the marketplace, it was time to look for a way to do fast-track development that would not produce a machine three, four or five years behind its competitors.’
We opened up a PC 5150 for this feature, so we could have a good look at the insides and see how it compares with PCs today. It’s hugely different from the gaming rigs we see now, but there are still some similarities. For starters, the floppy drive connects to the PSU with a 4-pin Molex connector, still seen on PC PSU cables today. The PC was also clearly geared towards expansion from the start.
The ticking heart of the box is a 4.77MHz 8088 CPU made by AMD – Intel had given the company a licence to produce clones of its chips so that supply could keep up with demand. It’s for this reason that AMD still has its x86 licence and can produce CPUs for PCs today, but at this point, the two companies weren’t really competitors in the way they are now. To all intents and purposes, an AMD 8088 was exactly the same as an Intel one, and PCs generally came with whichever one was in best supply at the time of the machine’s manufacture.
The CPU itself is an interesting choice. It’s a cut-down version of Intel’s 8086 CPU that it had launched in 1978. The 8088 has the same execution unit design as the 8086, but has an 8-bit external data bus, compared with the 8086’s 16-bit one. As with today’s PCs, the CPU is also removable and replaceable, but in the case of the PC 5150, it’s in a long dual in-line package (DIP) with silver pins, rather than a square socket.
Immediately above the CPU sits another DIP socket for an optional coprocessor. At this point in time, the CPU was only an integer unit with no floating point processor. This was generally fine in an era when most software didn’t overly deal with decimal points, but you had the option to add an 8087 coprocessor underneath it. This worked as an extension of the 8088 CPU. ‘Adding the 8087 allowed numeric calculations to run faster for those users who needed this feature,’ explains Short.
The decision to use a CPU based on Intel’s x86 instruction set laid the machine code foundation for future PCs, and hasn’t changed since. Comparatively, Apple’s Mac line-up has had a variety of instruction sets, including PowerPC, x86 and now Arm. Nvidia might be making big noises about the future of Arm in the PC, but the x86 instruction set has stood its ground on the PC for 40 years now.
IBM itself has also dabbled with different instruction sets, including its own 801 RISC processor. Why did it go with Intel’s CISC 8088 CPU for the first PC? The answer, according to Short, is mainly down to time and a need to maintain compatibility with industry standards at the time.
‘The first prototype IBM computer using RISC architecture only arrived in 1980 and required a compatible processor,’ he explains. ‘In order to complete the 5150 development in the assigned one-year time frame, IBM had already decided to go with industry-standard components, and there was existing experience with the 8088 from development by GSD (General Systems Division) of the System/23. RISC required the IBM 801 processor, but the decision was made to go with industry standard components.’
In addition to the ability to add a coprocessor, the IBM PC 5150’s motherboard also contains five expansion slots, with backplate mounts at the back of the case, just like today’s PCs. Three of the slots in our sample were also filled.
One card is actually two PCBs sandwiched together – it’s a dual-monitor video card with the ability to output to both an MDA screen and a CGA screen simultaneously (more on these standards later) – each standard required a separate PCB on this card – there’s a composite TV output in addition to the pair of 9-pin monitor outputs as well. Bizarrely, this card also doubles as a parallel port controller, with a ribbon cable providing a 25-pin port. It’s typical of the Wacky Races vibe seen on cards at the time, with multiple features shoehorned into one expansion slot.
Similarly, there’s also a 384KB memory expansion card, which also doubles as a serial I/O card, with a 25-pin port on the backplate. The final card is an MFM storage controller for the 5.25in floppy drive at the front of the machine.
Although the PC was clearly built with expansion in mind, Short points out that ‘IBM was not the first to introduce expansion slots. As far back as 1976, Altair produced the 8800b with an 18-slot backplane, the Apple II also featured slots from 1977 and there was also an expansion bus on the BBC Micro from 1981. No doubt market research and competitive analysis showed that this approach would provide additional flexibility and options without having to redesign the motherboard’.
Interestingly, though, Short also says IBM was keeping an ‘eye on the hobby market. A standard bus with expansion slots would allow users to create their own peripherals. IBM even announced a Prototyping Card, with an area for standard bus interface components and a larger area for building your own design’. It’s a far cry from the heavily populated PCI-E cards with complex machine soldering that we see today.
That 384KB memory card shows a very different approach to memory expansion than the tidy modules we have today. Believe it or not, at launch, the PC 5150 base spec came with just 16KB of memory (a millionth of the amount of memory in today’s 16GB machines), which was supplied in the form of DRAM chips on the bottom right corner of the motherboard.
The top spec at launch increased that amount to 64KB, although you could theoretically also install the DRAM chips yourself if you could get hold of exactly the right spec of chips and set it up properly. The chips on the motherboard are split into four banks, each with nine chips (eight bits and one parity bit). In the original spec, the 16KB configuration filled one bank, while the 64KB configuration filled all four banks with 16KB of memory each.
A later revision of the motherboard expanded this to 64KB as the base spec with one bank filled, and 256KB with all four banks filled (this is the spec in our sample). If you then added a 384KB memory card, such as the one in our sample, you ended up with 640KB of memory – the maximum base memory addressable by PCs at this time.
As we previously mentioned, our PC 5150 sample has a dual-monitor card, which supports both the display standards available to the IBM PC at launch. A Mono Display Adaptor (MDA) card could only output text with no graphics, while a Color Graphics Adaptor (CGA) card could output up to four colours (from a palette of 16) at 320 x 200, or output monochrome graphics at 640 x 200.
However, as Short notes, ‘the PC was announced with the mono 5151 display in 1981. The CGA 5153 was not released until 1983’. Even if you had a CGA card in your PC 5150, if you used the original monitor, you wouldn’t be able to see your graphics in colour. Seeing colour graphics either required you to use the composite output or a third-party monitor.
‘Once the colour monitor became available,’ says Short, ‘it could either be attached as the sole display with its own adaptor card, or equipped with both a mono and colour adaptor card, and could be attached together with a mono screen. Now you could run your spreadsheet on the mono monitor and display output graphics in colour.’
There’s an interesting connection with the first PC monitors and the legacy of IBM’s computing history too. When we interviewed the Hursley Museum’s curator Terry Muldoon (who has now sadly passed away) in 2011, he told us the reason why the first PC monitors had 80 columns. ‘It’s because it’s the same as punch cards,’ he said. ‘All green-screen terminals had 80 columns, because they were basically emulating a punch card.’
Storage is another area where the PC is at a crossroads between new tech. As standard, the PC 5150 came with a single 5.25in double-density floppy drive, with 360KB of storage space on each disk. There was the option to add a second floppy drive in the empty drive bay, but there was no hard drive at launch.
‘The first hard drive for microcomputers did not arrive until 1980 – the Seagate ST506 with a capacity of 5MB,’ explains Short. ‘By that time, the PC specifications had already been agreed and the hardware development team in Boca Raton was in full swing. The requirement was for a single machine developed within a one-year time frame.
‘A small company called Microsoft was also developing the first version of DOS under sub-contract. The 5150 BIOS therefore had no hard disk support – DOS 1.0 and 1.1 are the same. The power supply selected for the 5150 wasn’t beefy enough at 63W to power the 5150 and a hard drive.’
Later versions of the 5150, such as our sample, came with a 165W PSU, and future DOS versions enabled you to run a hard drive, but it wasn’t until the IBM PC 5160 XT in 1983 that there was a hard drive option with an IBM PC as standard.
The PSU also connects to a massive red switch power switch on the side, which is very different from the delicate touch-buttons we have today. You had to literally flip a switch to power on the first PCs. This was another legacy of IBM’s past – a time when, if a machine needed to be shut down drastically, you would ‘BRS it’ – BRS stands for big red switch.
The back of the PC 5150 also alludes to another form of storage. There are two DIN sockets on the back, one of which is labelled for the keyboard – the other is labelled ‘cassette’. ‘It was common at the time to provide software on cassette tapes, which could also be used to store user written programmes,’ says Short. ‘My own Radio Shack TRS80 in 1979 used this method. A standard cassette tape machine such as the Philips could be connected through this socket.’
This brings us neatly to the subject of software support. We’re now used to graphical user interfaces such as Windows as standard, but in 1981 Microsoft was a small company, which had developed a popular version of the BASIC programming language.
‘Microsoft Basic was already very much an industry standard by 1980,’ says Short. ‘It was Microsoft’s first product. This fitted with the concept of using industry standard components. IBM chose to sub-contract its operating system development to Microsoft, perhaps for this reason. Again, the compressed development schedule influenced these decisions.’
Terry Muldoon gave us some more insight into the development of the PC’s first operating system, IBM PC DOS 1.0, when we spoke to him in 2011. ‘The story I heard is that basically IBM needed an operating system,’ he said, ‘and IBM didn’t have time to write one – that’s the story. So they went out to various people, including Digital Research for CPM, but Digital Research didn’t return the call. Bill Gates did, but he didn’t have an operating system, so he went down the street and bought QDOS.
‘The original DOS was a tarted-up QDOS, supplied to IBM as IBM Personal Computer DOS, and Gates was allowed to sell Microsoft DOS (MS-DOS). And they carried on for many years with exactly the same numbers, so 1.1 was DOS 1 but with support for us foreigners, then we went to DOS 2 with support for hard disks, DOS 2.1 for the Junior, DOS 3 for the PC80 and so on.’
You can have a play with DOS 1.0 on an emulated PC 5150 at custompc.co.uk/5150, and it’s a very basic affair. Even if you’ve used later versions of DOS, there are some notable absences, such as the inability to add ‘/w’ to ‘dir’ to spread out the directory of your A drive across the screen, rather than list all the files in a single column.
What’s also striking is the number of BASIC files supplied as standard, which can be run on the supplied Microsoft BASIC. One example is DONKEY.BAS, a primitive top-down game programmed by Bill Gates and Neil Konzen, where you move a car from left to right to avoid donkeys in the road (really). What’s more, this game specifically requires your PC to have a CGA card and to run BASIC in advanced mode – you couldn’t run it on the base spec.
With its keen pricing compared with previous business computers, the IBM PC 5150 was well received in the USA, paving the way for a launch in the UK in 1983, along with DOS 1.1 and the option for a colour CGA monitor. Clone machines from companies such as Compaq soon followed, claiming (usually, but not always, rightly) to be ‘IBM PC compatible’, and the PC started to become the widespread open standard that it is today. Was this intentional on IBM’s part?
‘Industry standard components, an expansion bus and a prototyping card would naturally lead to an open standard,’ says Short. ‘Not publishing the hardware circuitry would make it difficult to capture the imagination of “home” developers. Open architecture was part of the original plan.’
Muldoon wasn’t so sure when we asked him back in 2011. ‘Now where did IBM make the mistake with DOS?’ He asked. ‘This is personal opinion, but IBM allowed Bill Gates to retain the intellectual property. So we’ve now got an Intel processor – the bus was tied to Intel – and another guy owns the operating system, so you’ve already lost control of all of your machine in about 1981. The rest is history.
‘The only bit that IBM owned in the IBM PC was the BIOS, which was copyright. So, to make a computer 100 per cent IBM compatible, you had to have a BIOS. There were loads of software interrupts in that BIOS that people used, such as the timer tick, which were really useful. You get that timer tick and you can get things to happen, so you have to be able to produce something that hits the timer tick, because the software needs it.’
Rival computer makers could circumvent the copyright of the BIOS by examining what it did and attempting to reverse-engineer it. Muldoon explained the process to us.
‘The way people did it is: with one group of people, say: “this is what it does”, and another group of people take that specification, don’t talk to them, and then write some code to make it do that – that’s called “clean room”. So one person documents what it does, and another person now writes code to do it – in other words, nobody has copied IBM code, and there’s a Chinese wall between these two people.
‘What some of the clone manufacturers did is, because we published the BIOS, they just copied it. Now, the BIOS had bugs in it, and we knew they’d copied our BIOS because they’d copied the bugs as well. This was only the small companies that came and went. Phoenix produced a clean room BIOS, so if you used a Phoenix chip in your clones, you were clean.’
Of course, any self-contained personal computer can technically be called a PC. Peter Short describes a PC as a machine that ‘can be operated directly by an end user, from beginning to end, and is general enough in its capabilities’. It doesn’t require an x86 CPU or a Microsoft OS. In fact, there was and still is a variety of operating systems available to x86 PCs, from Gem and OS/2 in the early days, through to the many Linux distributions available now.
However, the PC as we generally know it, with its x86 instruction set and Microsoft OS, started with the PC 5150 in 1981. Storage and memory capacities have hugely increased, as have CPU clock frequencies, but the basic idea of a self-contained box with a proper CPU, enough memory for software to run, its own storage and a display output, as well as room to expand with extra cards, started here. Thank you, IBM.
The Computers That Made Britain tells the story of those computers – and what happened behind the scenes during their creation. With dozens of new interviews discover the tales of missed deadlines, technical faults, business interference, and the unheralded geniuses behind all of it. Geniuses who brought to the UK everything from the Dragon 32 and ZX81, through to the Amstrad CPC 464 and the Commodore Amiga.
You can order your copy of The Computers that Made Britain today online from the Raspberry Pi Press Store. Alternatively, you can buy it in the Raspberry Pi Store in Cambridge, and from other leading online highstreet booksellers, including Waterstones. As always, you can also download the book in PDF format, for free, directly from the Wireframe website.
The post 40 years of the PC appeared first on Raspberry Pi.
In the latest issue of Custom PC magazine, Gareth Halfacree reviews Oratek’s TOFU, a carrier printed circuit board for Raspberry Pi Compute Module 4.
The launch of the Raspberry Pi Compute Module 4 family (reviewed in Issue 209) last year sparked an entirely unsurprising explosion of interest in designing carrier boards. This was aided in no small part by the Raspberry Pi Foundation’s decision to release its own in-house carrier board design under a permissive licence from which others could springboard with their own creations.
Oratek doesn’t hide its inspiration. ‘Inspired by the official CM4IO board,’ chief executive Aurélien Essig openly admits, ‘it is intended for industrial applications. With user-friendly additions, it may also be used by enthusiasts looking for a compact yet complete solution to interface the many inputs and outputs of the single-board computer.’
The board is undeniably compact, although it bulks out when paired with the optional 3D-printed Switchblade Enclosure designed by Studio Raphaël Lutz. The reason for the name is that there are hinged lids on the top and bottom, which swing out for easy access, locking into place with small magnets when closed.
At least, that’s the theory. In practice, the magnets are a little weak; there’s also no way to fasten the lid shut beyond overtightening the screw in the corner. Otherwise, it’s a well-designed enclosure with top and bottom ventilation. Sadly, that’s not enough to prevent a Compute Module 4 from hitting its thermal throttle point under sustained heavy load, so you’ll need to budget for a third-party heatsink or fan accessory.
The Tofu board itself is well thought out, and finished in an attractive black. Two high-density connectors accept a Raspberry Pi Compute Module 4 board – or one of the increasing number of pin-compatible alternatives on the market, although you’ll need to provide your own mounting bolts.
The 90 x 90mm board then breaks out as many features of the computer-on-module as possible. The right side houses a Gigabit Ethernet port with Power-over-Ethernet (PoE) support if you add a Raspberry Pi PoE HAT or PoE+ HAT, two USB 2 Type-A ports, along with barrel-jack and 3.5mm terminal-block power inputs. These accept any input from 7.5V to 28V, which is brought out to an internal header for accessories that need more power than is available on the 40-pin general-purpose input/output (GPIO) port.
Meanwhile, the bottom has 22-pin connectors for Camera Serial Interface (CSI) and Display Serial Interface (DSI) peripherals, a full-sized HDMI port and an additional USB 2 port. These ports aren’t available outside the Switchblade Case by default, although a quick snap of the already-measured capped-off holes fixes that.
The left side includes a micro-SD slot for Compute Module 4 variants without on-board eMMC storage, plus a micro-SIM slot – hinting at another feature that becomes visible once the board is flipped. There’s also a USB Type-C port, which can be used for programming or as an On-The-Go (OTG) port. Oddly, there’s no cut-out at all for this in the Switchblade Case; if you want one, you’ll need to take a drill and file to it.
Turning over the board reveals the micro-SIM slot’s purpose. The Compute Module 4’s PCI-E lane is brought out to an M.2 B-Key slot, providing a connection for additional hardware including 3G/4G modems. For storage, you can use an optional adaptor board to convert it to M-Key for Non-Volatile Memory Express (NVMe) devices, with a spacer fitted for 2230, 2242, 2260, or 2280 form factor drives.
That’s not as flexible as it sounds, unfortunately. The spacer is soldered in place and needs to be chosen at the time of ordering. If you want to switch to a different-sized drive, you’ll need another adaptor.
There’s one other design point that makes the Tofu stand out: the inclusion of a user-replaceable fuse, a Littelfuse Nano 2 3.5A unit that was originally designed for automotive projects.
While it’s primarily there for protection, it also enables you to cut off the on-board power supply when the board is driven through PoE. With the fuse in place, there’s clearly audible coil whine, which can be silenced by carefully popping the fuse out of its holder. Just remember to put it back in if you stop using PoE.
The biggest problem is price. At 99 CHF (around £78 ex VAT) you’ll be into triple figures by the time you’ve picked up a suitable power supply and Compute Module 4 board. The M.2 M-Key adaptor adds a further 19 CHF (around £15 ex VAT), and the Switchblade Case is another 35 CHF (around £28 ex VAT). If you have access to a 3D printer, you can opt to print the latter yourself, but you’ll still pay 8 CHF (around £6 ex VAT) for access to the files.
The Tofu is available to order now from oratek.com. Compatible Raspberry Pi Compute Module 4 boards can be found at the usual stockists.
You can read more features like this one in Custom PC issue 217, available directly from Raspberry Pi Press — we deliver worldwide.
And if you’d like a handy digital version of the magazine, you can also download issue 217 for free in PDF format.
The post TOFU for Raspberry Pi Compute Module 4 appeared first on Raspberry Pi.
Safely catching mice is a better way of fixing a problem, and using Raspberry Pi means it needs less supervision. In the new issue of The MagPi magazine, Rob Zwetsloot takes a look with the maker, Andrew Taylor.
With some IoT projects, it’s the little things that help. For example, take Andrew Taylor, who did the good thing of setting up a humane mousetrap. However, checking it to see if any mice had been caught in it, while necessary, was getting a little boring.
“If a mouse had gone in and I did not check it, the mouse would quickly run out of food and water!” Andrew tells us. “Having been interested in Raspberry Pi for a couple of years and having recently begun learning Python using the Enviro+ environment sensors, I figured a Raspberry Pi with a motion sensor would be an ideal way to check.”
It’s a fairly simple setup, one commonly used in CCTV builds and some fun ‘parent detectors’ on the Raspberry Pi Foundation’s projects site.
Mouse motion
“I came across a couple of automated mousetraps that people had made from scratch, but wanting to keep it simple and cheap,” Andrew explains. “I wanted to use off-the-shelf parts where possible and keep costs down. The Pi Hut had a tutorial for a DIY burglar alarm utilising a PIR sensor, IFTTT, and Pushbullet, which seemed like an ideal starting point.”
IFTTT – If This Then That – is an online service popular with IoT folks. It’s great for small things like cross-posting images on social media services, or sending a push notification when motion is detected in a mousetrap.
“I have only had one mouse since, but it worked!” Andrew says. “I was averaging about 800 detections a day and suddenly got well over a 1000. Sure enough, there was a mouse in the trap which I released shortly afterwards. I do tend to notice that the values fluctuate a bit, so it is always worth checking over the previous day’s results to see if it is notably higher.”
You might think that 800 push notifications a day is far worse than just occasionally checking your garage, and you’d be right, so Andrew tweaked the code a bit: “The code examples I found sent a notification for each movement detection – which I knew would be rather annoying, considering how randomly PIR sensors sometimes seem to trigger. My script instead logs any hits at a max of 1 per 30 seconds and then triggers a notification once every 24 hours, meaning I just get one notification a day.”
Beat a path
There’s always room for improvement, as Andrew explains: “I intend to improve the code so that it can record running averages and give an indication as to whether it believes there has been a significant spike that might necessitate me checking it out.”
Whilst the aim of the project was to keep costs down, Andrew is tempted to experiment by adding a camera, and possibly a light, so he can have a peek remotely when there has been a spike in the readings and to see if it is a false alarm. Which, as he admits, is “a new height in laziness!”
You can grab the brand-new issue right now from the Raspberry Pi Press store, or via our app on Android or iOS. You can also pick it up from supermarkets and newsagents. There’s also a free PDF you can download.
The post Humane mouse trap | The MagPi #108 appeared first on Raspberry Pi.
In the last issue of Custom PC magazine, Gareth Halfacree checked out an Amiga fan’s open hardware build: ‘PiStorm’. Let’s see why he thought it stood out from the crowd…
Officially, the Commodore Amiga died in 1996, 11 years after Commodore brought the innovative machines to market with the Amiga 1000. In reality, there are people out there from whom you will never take their Amigas – even if the legal rights surrounding the trademarks, technology, hardware, software and so on are increasingly muddied in the face of competing legal claims.
It’s this band of enthusiasts that’s keeping the Amiga alive with new hardware, typically designed to bridge the gap between classic and modern computing. The most popular of these are accelerators, designed to increase a stock Amiga 1000 or 500 from its aging 7MHz Motorola 68000 to a system that’s a little faster.
The PiStorm, designed by Amiga fan Claude Schwarz, is just one of them, but one that stands out from the crowd for a variety of reasons. The first is its open hardware; Schwarz doesn’t sell the PiStorm, but instead publishes the source code and design files for anyone to submit to a PCB fabricator. If you don’t fancy fighting with minimum order quantities, the community around the PiStorm organises semi-regular group buys, in which an assembled board, requiring only the headers to be soldered in place, can cost as little as $13 US (around £9 ex VAT).
In a market where your average Amiga accelerator costs 5-15 times as much money, an accelerator for that little would be remarkable, but the PiStorm is far from a simple accelerator. The board itself is simple, driven by an Intel Altera MAX II complex programmable logic device (CPLD) – akin to a field-programmable gate array (FPGA), but simpler and cheaper.
The CPLD acts as ‘glue logic’ between the host Amiga and a Raspberry Pi single-board computer in an unusual fashion. Connected via the Raspberry Pi’s 40-pin general-purpose input/output (GPIO) header, the PiStorm allows the Amiga to treat the Raspberry Pi as a replacement processor and more.
Installation is simple – remove the processor from your Amiga 1000, 500 or 500 Plus, and push the PiStorm into its place. Add the Raspberry Pi on top, with a micro-SD card loaded with the lightweight Linux distribution of your choice, and you’re done.
The software side is a little trickier. PiStorm is a constantly evolving project, and there’s no ready-to-run software image. The documentation walks you through downloading and compiling the software, updating the CPLD and finally loading the Muhashi emulator. It’s here that the PiStorm cuts its costs – rather than having a real processor or an FPGA loaded with a soft core, the PiStorm connects the Amiga to a software emulator.
This unusual blend of real and emulated hardware unlocks additional features too. By default, the PiStorm is configured to act as a Motorola 68020 and a 128MB chip memory expansion. Tweak the configuration and you can increase that to a Motorola 68040 – albeit with a few compatibility issues that are still being worked on – with 8MB of additional Zorro II memory – just about the most you could ever fit in a classic Amiga.
Handling the CPU and RAM is just the beginning though. The PiStorm’s keyboard and mouse pass-through also allow you to connect USB peripherals to the Raspberry Pi and have them control the Amiga. Meanwhile, a network pass-through, which will allow the Amiga to use the Raspberry Pi’s Wi-Fi connection, is on the road map.
The PiStorm can also turn hard drive images, or physical block devices, into SCSI Amiga drives, making it easy to expand your Amiga’s storage. The board acts as a real-time clock as well, setting the Amiga’s clock to the Raspberry Pi’s clock – which is, in turn, set automatically over the network via NTP.
The board isn’t finished there either. The PiStorm can also emulate a retargetable graphics (RTG) card, a common form of add-in card that gives an Amiga high-resolution and high-colour-depth capabilities. Better still, when configured as an RTG – a task that requires adjusting the configuration on both the Raspberry Pi and the Amiga itself – the video is output from the Raspberry Pi’s HDMI port, making it easy to connect your Amiga to modern monitors and TVs.
In short, the PiStorm is remarkable. It’s not perfect – the ability to boot from physical Kickstart ROMs didn’t work during testing, for example, with the PiStorm failing unless a ROM dump file was provided, and when the Amiga is powered off, the Raspberry Pi loses power without shutting down safely. Also, among other compatibility issues, it’s currently limited to the Raspberry Pi 3 Model A+, with Raspberry Pi 4 and Compute Module 4 support in progress, but for the money there’s still nothing else like it.
More information on the PiStorm is available from custompc.co.uk/PiStorm, where you’ll also find a readme file containing a link to the Discord channel where group buys are organised.
You can read more features like this one in Custom PC magazine, available directly from Raspberry Pi Press.
And if you’d like a handy digital version of the magazine, you can also download the latest issue for free in PDF format.
The post PiStorm – Keeping the Amiga alive appeared first on Raspberry Pi.
Our friends over at RealVNC are having a whale of a time with Raspberry Pi, so they decided to write this guest blog for us. Here’s what they had to say about what their VNC Connect software can do, and how Raspberry Pi can be integrated into industry. Plus, hear about a real-life commercial example.
RealVNC’s VNC Connect is a secure way for you to control your Raspberry Pi from anywhere, as if you were sat in front of it. This is particularly useful for Raspberry Pis which are running ‘headless’ without monitor connected. The desktop can instead be presented in the VNC Connect Viewer app on, say, a wirelessly-connected iPad, from which you have full graphical control of the Raspberry Pi. The two devices do not even have to be on the same local network, so you can take remote control over the Internet. Which is great for roaming robots.
You can read more about RealVNC for Raspberry Pi here. It’s free to get started for non-commercial use.
RealVNC have seen an increase in the use of Raspberry Pi in business, not just at home and in education. Raspberry Pi, combined with VNC Connect, is helping businesses both to charge for a service that they couldn’t previously provide, and to improve/automate a service they already offer.
For example, Raspberry Pi is a useful, as well as a cost effective, “edge device” in complex hardware environments that require monitoring – a real IoT use case! Add VNC Connect, and the businesses which perform these hardware installations can provide monitoring and support services on a subscription basis to customers, building repeat revenue and adding value.
With VNC Connect being offered at an affordable price (less than the price of a cup of coffee per month for a single device), it doesn’t take these businesses long to make a healthy return.
Centurion Solar provides monitoring software for home solar panels. Each installation is hooked up via USB to a Raspberry Pi-powered monitoring system, and access is provided both to the customer and to Centurion Solar, who run a paid monitoring and support service.
Having every new system leave the factory pre-installed with VNC Connect allows Centurion Solar to provide assistance quickly and easily for customers, no matter where they are, or how tech-savvy they are (or aren’t).
The software is currently being used in over 15,000 systems across 27 countries, with more new users every week.
“We’ve gone from being in limp mode to overdrive in one easy step, using RealVNC as the driving force to get us there.”
Johan Booysen, Founder at Centurion Solar
You can read more here.
There are many more industry sectors which could be considering Raspberry Pi as a lightweight and convenient monitoring/edge compute solution, just like Centurion Solar do. For example:
The possibilities are only limited by imagination, and the folks down the road at RealVNC are happy to discuss how using Raspberry Pi in your environment could be transformative. You can reach us here.
From the engineers to the CEO, we’re all Raspberry Pi enthusiasts who love nothing more than sharing our experience and solving problems (our CEO, Adam, even publishes a popular bare-metal Raspberry Pi operating system tutorial on Github).
The post Building a business with VNC Connect on Raspberry Pi appeared first on Raspberry Pi.
When maker Stéphane (aka HalStar) set about building this self-playing xylophone, their goal was to learn more about robotics, and to get hands-on with some mechanical parts they had never used before, in this case solenoids.
They also wanted to experiment with Raspberry Pi to build something that reflected their love of music. This automated instrument, capable of playing hundreds of MIDI files, fits the brief.
Two factors constrained the design: Stéphane wanted to be able to do it all using parts from the local DIY store, and to use as many regular modules as possible. So, no breadboard or wires everywhere, and no custom PCB. Just something simple to assemble and neat.
Raspberry Pi Zero WH is the teeny tiny brain of the self-playing xylophone. And its maker’s build details video very helpfully labels all the parts, where they sit, and what’s connected to what.
These three buttons select the tracks, set the tempo, and set the mode. Choose between playing all loaded tracks or just one. You can also decide whether you want all tracks to play on repeat in a loop, or stop after your selections have played through. A two-inch LCD screen shows you what’s going on.
While there are thousands of MIDI files freely available online, very few of them could actually be played by the xylophone. With only 32 notes, the instrument is limited in what it can play without losing any notes. Also, even when a MIDI file uses just 32 consecutive notes, they might not be the same range of 32 notes as the xylophone has, so you need to transpose. Stéphane developed a tool in Python to filter out 32-note tunes from thousands of MIDI files and automatically transpose them so the xylophone can play them. And, yes, everything you need to copy this filtering and transposing function is on GitHub.
Now, Stéphane says that whenever friends or family visit their home, they’re curious and impressed to see this strange instrument play by itself. Sadly, we are not among Stéphane’s family or friends; fortunately, though, this project has an entire YouTube playlist, so we can still have a look and a listen to see it in action up close.
We know it’s technically a glockenspiel. Stéphane acknowledges it is technically a glockenspiel. But we are firm fans of their going down the xylophone route, because way more people know what one of those is. If you’re interested, the difference between a xylophone and the glockenspiel is the material used for the bars. A xylophone has wooden bars, whereas glockenspiel bars are metal.
The post Raspberry Pi Zero makes a xylophone play itself appeared first on Raspberry Pi.
Fancy some extra PC hardware, overclocking, gaming and modding content in your life this summer? You can get your hands on a FREE PDF download of each new Custom PC magazine issue released during May through to September.
You’ll find stuff like in-depth hardware reviews and step-by-step photo guides, as well as hard-hitting tech opinion, game reviews, and all manner of computer hobbyism goodness.
Our favourite regular feature is Retro Tech, so we’re sharing this latest one by Stuart Andrews to get you started on your summer of love with Custom PC.
Pity the poor PC of 1983-1984. It wasn’t the graphics powerhouse we know today. IBM’s machines and their clones might have been the talk of the business world, but they were stuck with text-only displays or low-definition bitmap graphics. The maximum colour graphics resolution was 320 x 200, with colours limited to four from a hard-wired palette of 16. Worse, three of those colours were cyan, brown and magenta, and half of them were just lighter variations of the other half.
By this point, IBM’s Color Graphics Adaptor (CGA) standard was looking embarrassing. Even home computers such as the Commodore 64 could display 16-colour graphics, and Apple was about to launch the Apple IIc, which could hit 560 x 192 with 16 colours. IBM had introduced the Monochrome Display Adaptor (MDA) standard, but this couldn’t dish out more pixels, only higher-resolution mono text.
Meanwhile, add-in-cards, such as the Hercules or Plantronics Colorplus, introduced higher resolutions, but did nothing for colour depth. The PC needed more, which IBM delivered with its updated 286 PC/AT system and the Enhanced Graphics Adaptor (EGA).
The original Enhanced Graphics Adaptor was a hefty optional add-in-card for the IBM PC/AT, using the standard 8-bit ISA bus and with support built into the new model’s motherboard. Previous IBM PCs required a ROM upgrade in order to support it.
It was massive, measuring over 13in long and containing dozens of specialist large scale integration (LSI chips), memory controllers, memory chips and crystal timers to keep it all running in sync. It came with 64KB of RAM on-board but could be upgraded through a Graphics Memory Expansion Card and an additional Memory Module Kit to up to 192KB. Crucially, these first EGA cards were designed to work with IBM’s 5154 Enhanced Color Display Monitor, while still being compatible with existing CGA and MDA displays. IBM managed this by using the same 9-pin D-Sub connector, and by fitting four DIP switches to the back of the card to select your monitor type.
EGA was a significant upgrade from low-res, four-colour CGA. With EGA, you could go up to 640 x 200 or even (gasp) 640 x 350. You could have 16 colours on the screen at once from a palette of 64. Where once even owners of 8-bit home computers would have laughed at the PC’s graphics capabilities, EGA and the 286 processor put the PC/AT back in the game.
However, EGA had one big problem; it was prohibitively expensive, even in an era when PCs were already astronomically expensive. The basic card cost over $500 US, and the Memory Expansion Card a further $199. Go for the full 192KB of RAM and you were looking at a total of nearly $1,000 (approximately £2,600 inc VAT in today’s money), making the EGA card the RTX 3090 of its day, and only slightly more readily available. What’s more, the monitor you needed to make the most of it cost a further $850 US. EGA was a rich enthusiast’s toy.
However, while the initial card was big and hideously complex, the basic design and all the tricky I/O stuff were relatively easy to work out. Within a year, a smaller company, Chips and Technologies of Milpitas, California, had designed an EGA-compatible graphics chipset. It consolidated and shrunk IBM’s extensive line-up of chips into a smaller number, which could fit on a smaller, cheaper board. The first C&T chipset launched in September 1985, and within a further two months, half a dozen companies had introduced EGA-compatible cards.
Other chip manufacturers developed their own clone chipsets and add-in-cards too, and by 1986, over two dozen manufacturers were selling EGA clone cards, claiming over 40 per cent of the early graphics add-in-card market. One, Array Technology Inc, would become better known as ATI, and later swallowed up by AMD. If you’re on the red team in the ongoing GPU war, that story starts here.
EGA also had a profound impact on PC gaming. Of course, there were PC games before EGA, but many were text-based or built to work around the severe limitations of CGA. With EGA, there was scope to create striking and even beautiful PC games.
This didn’t happen overnight. The cost of 286 PCs, EGA cards and monitors meant that it was 1987 before EGA support became common, and 1990 before it hit its stride. Yet EGA helped to spur on the rise and development of the PC RPG, including the legendary SSI ‘Gold Box’ series of Advanced Dungeons and Dragons titles, Wizardry VI: Bane of the Cosmic Forge, Might and Magic II and Ultima II to Ultima V.
It also powered a new wave of better-looking graphical adventures, such as Roberta Williams’ Kings Quest II and III, plus The Colonel’s Bequest. EGA helped LucasArts to bring us pioneering point-and-click classics such as Maniac Mansion and Loom in 16 colours. And while most games stuck to a 320 x 200 resolution, some, such as SimCity, would make the most of the higher 640 x 350 option.
What’s more, EGA made real action games on the PC a realistic proposition. The likes of the Commander Keen games proved the PC could run scrolling 2D platformers properly. You could port over Apple II games such as Prince of Persia, and they wouldn’t be a hideous, four-colour mess.
And when the coder behind Commander Keen – a certain John Carmack – started work on a new 3D sequel to the Catacomb series of dungeon crawlers, he created something genuinely transformative. Catacomb 3-D and Catacomb: Abyss gave Carmack his first crack at a texture-mapped 3D engine, and arguably started the FPS genre.
Sure, EGA had its limitations – looking back, there’s an awful lot of green and purple – but with care and creativity, an artist could do a lot with 16 colours and begin creating more immersive game worlds.
EGA’s time at the top of the graphics tech tree was short. Home computers kept evolving, and in 1985, Commodore launched the Amiga, supporting 64 colours in games and up to 4,096 in its special HAM mode. Even as it launched EGA, IBM was talking about a new, high-end board, the Professional Graphics Controller (PGC), which could run screens at 640 x 480 with 256 colours from a total of 4,096.
PGC was priced high and aimed at the professional CAD market, but it helped to pave the way for the later VGA standard, introduced with the IBM PS/2 in 1987. VGA supported the same maximum resolution and up to 256 colours at 320 x 200. This turned out to be exactly what was needed for a new generation of operating systems, applications and PC games.
What extended EGA’s lifespan was the fact that VGA remained expensive until the early 1990s, while EGA had developed a reasonable install base. Even once VGA hit the mainstream, many games remained playable in slightly gruesome 16-colour EGA. Much like the 286 processor and the Ad-Lib sound card, EGA came before the golden age of PC gaming, but this standard paved the way for the good stuff that came next.
Did you know that Raspberry Pi 400 was inspired by retro tech?
Eben Upton explains:
“Raspberry Pi has always been a PC company. Inspired by the home computers of the 1980s, our mission is to put affordable, high-performance, programmable computers into the hands of people all over the world. And inspired by these classic PCs, here is Raspberry Pi 400: a complete personal computer, built into a compact keyboard… Classic home computers – BBC Micros, ZX Spectrums, Commodore Amigas, and the rest – integrated the motherboard directly into the keyboard. No separate system unit and case; no keyboard cable. Just a computer, a power supply, a monitor cable, and (sometimes) a mouse.”
Yes, you did read that right. Not only have we unleashed an awesome new issue of Custom PC into the wild, but you can even download a PDF of it for the bargain price of absolutely nothing. In fact, you’ll be able to download every issue of Custom PC over the summer for free.
The post Custom PC for free! Reviews, guides, retro tech… appeared first on Raspberry Pi.
After a brief hiatus over the Easter period, we are excited to be back with our series of online research seminars focused on diversity and inclusion, where in partnership with the Royal Academy of Engineering, we host researchers from the UK and USA. By diversity, we mean any dimension that can be used to differentiate groups and people from one another. This might be, for example, age, gender, socio-economic status, disability, ethnicity, religion, nationality, or sexuality. The aim of inclusion is to embrace all people irrespective of difference.
This month we welcomed Dr Maya Israel, who heads the Creative Technology Research Lab at the University of Florida. She spoke to us about designing inclusive learning experiences in computer science (CS) that cater for learners with a wide range of educational needs.
Maya introduced her work by explaining that the primary goal of her research is to “increase access to CS education for students with disabilities and others at risk for academic failure”. To illustrate this, she shared some preliminary findings (paper in preparation) from the analysis of data from one US school district.
Her results showed that only around 22–25% of elementary school students with additional needs (including students with learning disabilities, speech or language impairments, emotional disturbances, or learners on the autistic spectrum) accessed CS classes. Even more worryingly, by high school only 5–7% of students with additional needs accessed CS classes (for students on the autistic spectrum the decline in access was less steep, to around 12%).
Maya made the important point that many educators and school leaders may ascribe this lack of representation to students’ disabilities being a barrier to success, rather than to the design of curricula and instruction methods being a barrier to these students accessing and succeeding in CS education.
Maya detailed the systems approach she uses in her work to think about external barriers to inclusion in CS education:
As an example, Maya pointed out that many of the programming platforms used in CS education are not fully accessible to all learners; each platform has unique accessibility issues.
This is not to say that students with additional needs have no internal barriers to succeeding in CS (these may include difficulties with understanding code, debugging, planning, and dealing with frustration). Maya told us about a study in which the researchers used the Collaborative Computing Observation Instrument (C-COI), which allows analysis of video footage recorded during collaborative programming exercises to identify student challenges and strategies. The study found various strategies for debugging and highlighted a particular need for supporting students in transitioning from a trial-and-error approach to more systematic testing. The C-COI has a lot of potential for understanding student-level barriers to learning, and it will also be able to give insight into the external barriers to inclusion.
Maya’s work has focused not only on identifying the problems with access, it also aims to develop solutions, which she terms pathways to inclusion. A standard approach to inclusion might involve designing curricula for the ‘average’ learner and then differentiating work for learners with additional needs. What is new and exciting about Maya’s approach is that it is based on the premise that there is no such person as an average learner, and rather that all learners have jagged profiles of strengths and weaknesses that contribute to their level of academic success.
In the seminar, Maya described ways in which CS curricula can be designed to be flexible and take into account the variability of all learners. To do this, she has been using the Universal Design for Learning (UDL) approach, adapting it specifically for CS and testing it in the classroom.
The UDL approach helps educators anticipate barriers to learning and plan activities to overcome them by focusing on providing different means of engagement, representation, and expression for learners in each lesson. Different types of activities are suggested to address each of these three areas. Maya and her team have adapted the general principles of UDL to a CS-specific context, providing teachers with clear checkpoints to consider when designing computing lessons; you can read more on this in this recent Hello World article.
A practical UDL example Maya shared with us was using a series of scaffolded Scratch projects based on the ‘Use-Modify-Create’ approach. Students begin by playing and remixing code; then they try to debug the same program when it is not working; then they reconstruct code that has been deconstructed for the same program; and then finally, they try to expand the program to make the Scratch sprite do something of their choosing. All four Scratch project versions are available at the same time, so students can toggle between them as they learn. This helps them work more independently by reducing cognitive load and providing a range of scaffolded support.
This example illustrates that, by designing activities that support students with additional educational needs, we can improve the understanding and proficiency of all of our students.
Maya identified three groups of teachers who can benefit from training in either UDL or in supporting students with additional needs in CS:
Maya and her team conducted research with all three of these teacher groups, where they provided professional development for the teachers with the aim to understand what elements of the training were most useful and important for teachers’ confidence and practice in supporting students with additional needs in CS. In this research project, they found that for the teachers, a key aspect of the training was having time to identify and discuss the barriers/challenges their students face, as well as potential strategies to overcome these. This process is a core element of the UDL approach, and may be very different to the standard method of planning lessons that teachers are used to.
Another study by Maya’s team showed that an understanding of UDL in the context of CS was a key predictor of teacher confidence in teaching CS to students with additional needs (along with the number years spent teaching CS, and general confidence in teaching CS). Maya therefore believes that focusing on teachers’ understanding of the UDL approach and how they can apply it in CS will be the most important part of their future professional development training.
Maya talked to us about the importance of intersectionality in supporting students who are learning CS, which aligns with a previous seminar given by Jakita O. Thomas. Specifically, Maya identified that UDL should fit into a wider approach of Intersectional Inclusive Computer Science Education, which encompasses UDL, culturally relevant and sustaining pedagogy, and translanguaging pedagogy/multilingual education. We hope to learn more about this topic area in upcoming seminars in our current series.
You can download Maya’s presentation slides now, and watch the seminar recording here:
The next seminar in the diversity and inclusion series will take place on Tuesday 4 May at 17:00–18:30 BST / 12:00–13:30 EDT / 9:00–10:30 PDT / 18:00–19:30 CEST. You’ll hear from Dr Cecily Morrison (Microsoft Research) about her research into computing for learners with visual impairments.
To join this free event, click below and sign up with your name and email address:
We’ll send you the link and instructions. See you there!
This was our 15th research seminar — you can find all the related blog posts here.
The post How can we design inclusive and accessible curricula for computer science? appeared first on Raspberry Pi.
If you liked the look of yesterday’s Raspberry Pi Roon Endpoint Music Streamer but thought: “Hey, you know what would be great? If it had a touchscreen,” then look no further. Home Theater Fanatics has built something using the same RoPieee software, but with the added feature of a screen, for those who need one.
The build cost for this is a little higher than the $150 estimate to recreate yesterday’s project, given the inclusion of a fancier Digital Audio Decoder and the touchscreen itself.
The brilliant Home Theater Fanatics show you how to put all of this together from this point in the build video, before moving on to the software install. They take care to go through all of the basics of the hardware in case you’re not familiar with things like ribbon cables or fans. It’s a really nice bird’s-eye view walkthrough, so beginners aren’t likely to have any problems following along.
Same as yesterday’s build:
At this point in the build video, Home Theater Fanatics go through the three steps you need to take to get the RoPieee and Roon software sorted out, then connect the DAC. Again, it’s a really clear, comprehensive on-screen walkthrough that beginners can be comfortable with.
Aside from being able to see the attributed artwork for the music you’re currently listening to, this touchscreen solution provides easy song switching during home workouts. It’s also a much snazzier-looking tabletop alternative to a plugged-in phone spouting a Spotify playlist.
The post Raspberry Pi touchscreen music streamer appeared first on Raspberry Pi.
Our friend Mike Perez at Audio Arkitekts is back to show you how to build PiFi, a Raspberry Pi-powered Roon Endpoint Music Streamer. The whole build costs around $150, which is pretty good going for such a sleek-looking Roon-ready end product.
Roon is a platform for all the music in your home, and Roon Core (which works with this build) manages all your music files and streaming content. The idea behind Roon is to bring all your music together, so you don’t have to worry about where it’s stored, what format it’s in, or where you stream it from. You can start a free trial if you’re not already a user.
Fix the HiFiBerry DAC2 Pro into the top of the case with the line output and headphone outputs poking out. A Raspberry Pi 4 Model B is the brains of the operation, and slots nicely onto the HiFiBerry. The HiFiBerry HAT is compatible with all Raspberry Pi models with a 40-pin GPIO connector and just clicks right onto the GPIO pins. It is also directly powered by the Raspberry Pi so, no additional power supply needed.
Next, secure the bottom half of the case, making sure all the Raspberry Pi ports line up with the case’s ready-made holes. Mike did the whole thing by hand with just a little help from a screwdriver right at the end.
Download the latest RoPieee image onto your SD card to make it a Roon Ready End Point, then slot it back into your Raspberry Pi. Now you have a good-looking, affordable audio output ready to connect to your Roon Core.
And that’s it. See – told you it was easy. Don’t forget, Audio Arkitekts’ YouTube channel is a must-follow for all audiophiles.
The post How to build a Raspberry Pi Roon Endpoint Music Streamer appeared first on Raspberry Pi.
Recreating Apple’s iconic iPod Classic as a Spotify player may seem like sacrilege but it works surprisingly well, finds Rosie Hattersley. Check out the latest issue of The MagPi magazine (pg 8 – 12) for a tutorial to follow if you’d like to create your own.
When the original iPod was launched, the idea of using it to run anything other than iTunes seemed almost blasphemous. The hardware remains a classic, but our loyalties are elsewhere with music services these days. If you still love the iPod but aren’t wedded to Apple Music, Guy Dupont’s Spotify hack makes a lot of sense. “It’s empowering as a consumer to be able to make things work for me – no compromises,” he says. His iPod Classic Spotify player project cost around $130, but you could cut costs with a different streaming option.
“I wanted to explore what Apple’s (amazing) original iPod user experience would feel like in a world where we have instant access to tens of millions of songs. And, frankly, it was really fun to take products from two competitors and make them interact in an unnatural way.”
Guy Dupont
Guy’s career spans mobile phone app development, software engineering, and time in recording studios in Boston as an audio engineer, so a music tech hack makes sense. He first used Raspberry Pi for its static IP so he could log in remotely to his home network, and later as a means of monitoring his home during a renovation project. Guy likes using Raspberry Pi when planning a specific task because he can “program [it] to do one thing really well… and then I can leave it somewhere forever”, in complete contrast to his day job.
Guy seems amazed at having created a Spotify streaming client that lives inside, and can be controlled by, an old iPod case from 2004. He even recreated the iPod’s user interface in software, right down to the font. A ten-year-old article about the click wheel provided some invaluable functionality insights and allowed him to write code to control it in C. Guy was also delighted to discover an Adafruit display that’s the right size for the case, doesn’t expose the bezels, and uses composite video input so he could drive it directly from Raspberry Pi’s composite out pins, using just two wires. “If you’re not looking too closely, it’s not immediately obvious that the device was physically modified,” he grins.
Guy’s retro iPod features a Raspberry Pi Zero W. “I’m not sure there’s another single-board computer this powerful that would have fit in this case, let alone one that’s so affordable and readily available,” he comments. “Raspberry Pi did a miraculous amount of work in this project.” The user interface is a Python app, while Raspberry Pi streams music from Spotify via Raspotify, reads user input from the iPod’s click wheel, and drives a haptic motor – all at once.
Most of the hardware for the project came from Guy’s local electronics store, which has a good line in Raspberry Pi and Adafruit components. He had a couple of attempts to get the right size of haptic motor, but most things came together fairly easily after a bit of online research. Help, when he needed it, was freely given by the Raspberry Pi community, which Guy describes as “incredible”.
Part of the fun of this project was getting the iPod to run a non-Apple streaming service, so he’d also love to see versions of the iPod project using different media players. You can follow his instructions on GitHub.
Next, Guy intends to add a DAC (digital to analogue converter) for the headphone jack, but Bluetooth works for now, even connecting from inside his jacket pocket, and he plans to get an external USB DAC in time.
The post Raspberry Pi Zero W turns iPod Classic into Spotify music player appeared first on Raspberry Pi.
Although it’s a very flexible term, supercomputing generally refers to the idea of running multiple computers as one, dividing up the work between them so that they process in parallel.
In theory, every time you double the amount of processing power available, you half the time needed to complete your task. This concept of ‘clusters’ of computers has been implemented heavily in large data processing operations, including intensive graphics work such as Pixar’s famous ‘render farm’. Normally the domain of large organisations, supercomputing is now in the hands of the masses in the form of education projects and makes from the cluster-curious, but there have also been some impressive real-world applications. Here, we’ll look at some amazing projects and get you started on your own supercomputing adventure.
One of the first high-profile cluster projects surprisingly came from the boffins at GCHQ (Government Communications Headquarters) in the UK. Created as part of their educational outreach programme, the OctaPi used eight Raspberry Pi 3B computers to create a cluster. Kits were loaned out to schools with multiple coding projects to engage young minds. The first demonstrated how supercomputing could speed up difficult equations by calculating pi. A more advanced, and very appropriate, task showed how these eight machines could work together to crack a wartime Enigma code in a fraction of the time it would have taken Bletchley Park.
As we’ve already said, most Raspberry Pi cluster projects are for education or fun, but there are those who take it seriously. The Raspberry Pi Compute Module form factor is perfect for building industrial-grade supercomputers, and that’s exactly what Turing Pi has done. Their custom Turing Pi 1 PCB can accept up to seven Raspberry Pi 3+ Compute Modules and takes care of networking, power, and USB connectivity. Although claiming a wide range of uses, it appears to have found a niche in the Kubernetes world, being a surprisingly powerful device for its price. Future plans have been announced for the Turing Pi 2, based on the more powerful Raspberry Pi 4.
Multiple machines are one thing, but there’s also the individual speed of those machines. The faster they go, the faster the cluster operates exponentially. Overclocking is common in supercomputing, and that means heat. This water-cooled cluster, which maker Michael Klements freely admits is one of those ‘just because’ undertakings, uses the kind of water cooling usually found on high-end gaming PCs and applies it to a Raspberry Pi cluster. This beautiful build, complete with laser-cut mounts and elegant wiring, has been extensively documented by Klements in his blog posts. We can’t wait to see what he does with it!
So how far can we take this? Who has built the largest Raspberry Pi cluster? A strong contender seems to be Oracle, who showed off their efforts at Oracle OpenWorld in 2019. No fewer than 1060 Raspberry Pi 3B+ computers were used in its construction (that’s 4240 cores). Why 1060? That’s as much as they could physically fit in the frame! The creation has no particular purpose bar a demonstration of what is possible in a small space, cramming in several network switches, arrays of USB power supplies, and a NAS (network-attached storage) for boot images.
We’re thinking you probably don’t fancy trying to beat Oracle’s record on your first attempt, and would like to start with something a bit simpler. Our sister magazine, The MagPi, has published a cluster project you can make at home with any number of Raspberry Pi devices (although just one might be a little pointless). In this case, four Raspberry Pi 4B computers were assigned the job of searching for prime numbers. Each is assigned a different starting number, and then each adds four before testing again. This is handled by an open-source cluster manager, MPI (Message Passing Interface). A solid introduction to what is possible.
Each month, HackSpace magazine brings you the best projects, tips, tricks and tutorials from the makersphere. You can get it from the Raspberry Pi Press online store or your local newsagents. As always, every issue is free to download from the HackSpace magazine website.
The post Supercomputing with Raspberry Pi | HackSpace 41 appeared first on Raspberry Pi.
Today is International Women’s Day, giving us the perfect opportunity to highlight a research project focusing on Black girls learning computing.
Between January and July 2021, we’re partnering with the Royal Academy of Engineering to host speakers from the UK and USA to give a series of research seminars focused on diversity and inclusion. By diversity, we mean any dimension that can be used to differentiate groups and people from one another. This might be, for example, age, gender, socio-economic status, disability, ethnicity, religion, nationality, or sexuality. The aim of inclusion is to embrace all people irrespective of difference. In this blog post, I discuss the third research seminar in this series.
This month we were delighted to hear from Dr Jakita O. Thomas from Auburn University and BlackComputHer, who talked to us about a seven-year qualitative study she conducted with a group of Black girls learning game design. Jakita is an Associate Professor of Computer Science and Software Engineering at Auburn University in Alabama, and Director of the CUlturally and SOcially Relevant (CURSOR) Computing Lab.
The Supporting Computational Algorithmic Thinking (SCAT) programme started in 2013 and was originally funded for three years. It was a free enrichment programme exploring how Black middle-school girls develop computational algorithmic thinking skills over time in the context of game design. After three years the funding was extended, giving Jakita and her colleagues the opportunity to continue the intervention with the same group of girls from middle school through to high school graduation (7 years in total). 23 students were recruited onto the programme and retention was extremely high.
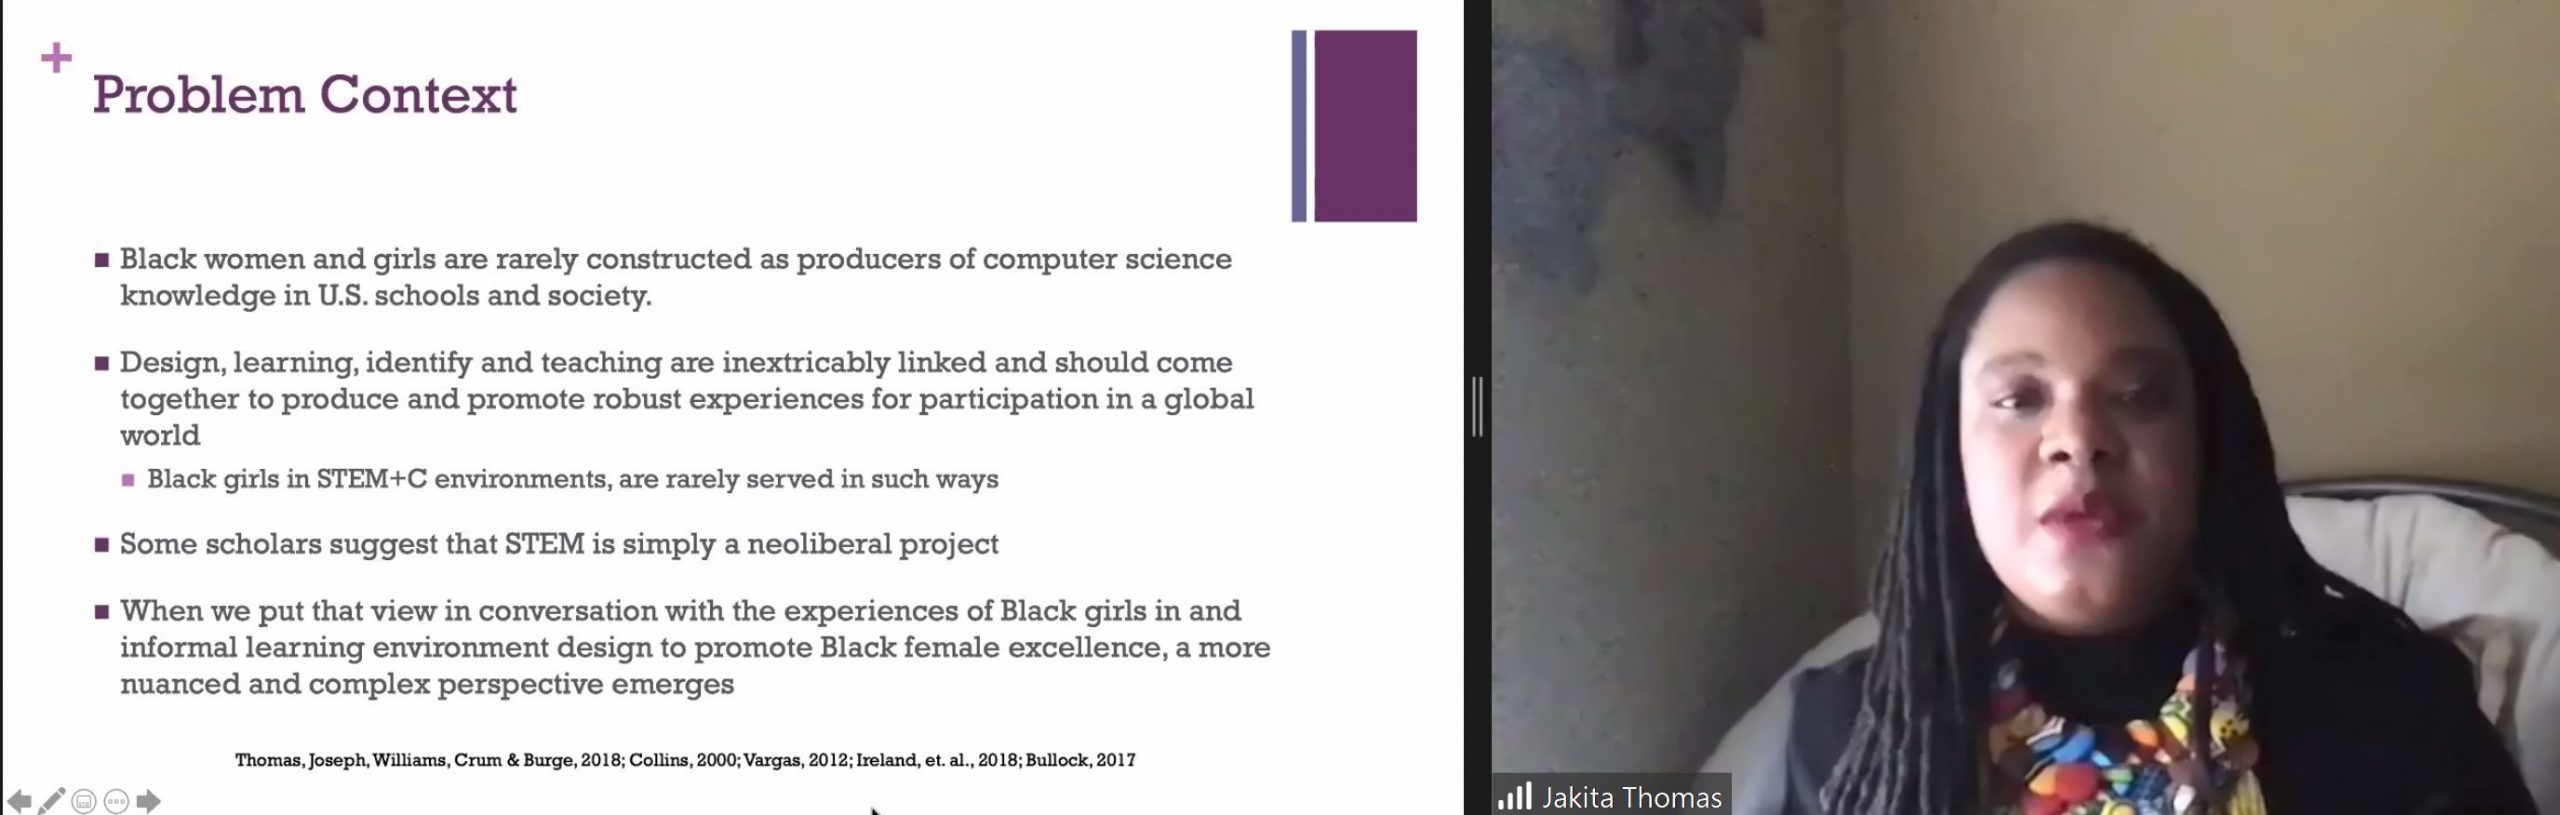
The SCAT programme ran throughout each academic year and also involved a summer camp element. The programme included three types of activities: the two-week summer camp, twelve monthly workshops, and field trips, all focused on game design. The instructors on the programme were all Black women, either with or working towards doctorates in computer science, serving as role models to the girls.
The theoretical basis of the programme drew on a combination of:
This context highlights that interventions to increase diversity in STEM or computing tend to support mainly white girls or Black and other ethnic minority boys, marginalising Black girls.
Game design was selected as a topic because it is popular with all young people as consumers. According to research Jakita drew on, over 94% of girls in the US aged 12 to 17 play video games, with little differences relating to race or socioeconomic status. However, game design is an industry in which African American women are under-represented. Women represent only 10 to 12% of the game design workforce, and less than 5% of the workforce are African American or Latino people of any gender. Therefore Jakita and her colleagues saw it as an ideal domain to work in with the girls.

Another reason for selecting game design as a topic was that it gave the students (the programme calls them scholars) the opportunity to design and create their own artefacts. This allowed the participants to select topics for games that really mattered to them, which Jakita suggested might be related to their own identity, and issues of equity and social justice. This aligns completely with the thoughts expressed by the speakers at our February seminar.
Jakita explained that her findings suggest that the ways in which the SCAT programme was intentionally designed to offer Black girls opportunities to radically shape their identities as producers, innovators and disruptors of deficit perspectives. Deficit perspectives are ones that include implicit assumptions that privilege the values, beliefs, and practices of one group over another. Deficit thinking was a theme in our February seminar with Prof Tia Madkins, Dr Nicol R Howard, and Shomari Jones, and it was interesting to hear more about this.
Data sources of the project included analysis of online journal data and end of season questionnaires across the first three years of SCAT, which provided insights into the participants’ perceptions and feelings about their SCAT experience, their understanding of computational algorithmic thinking, their perceptions of themselves as game designers, and the application of concepts learned within SCAT to other areas of their lives outside of SCAT.
In the first three years of the programme, the number of participants who saw game design as a viable hobby went from 0% to 23% to 45%. Other analysis Jakita and her colleagues performed was qualitative and identified as one theme that the participants wanted to ‘find meaning and relevance in altruism’. The researchers found that the participants started to reflect on their own narrative and identity through the programme. One girl on the programme said:
“At the beginning of SCAT, I didn’t understand why I was there. Then I thought about what I was doing. I was an African American girl learning how to properly learn game design. As I grew over the years in game designing, I gained a strong liking. The SCAT program has gifted me with a new hobby that most women don’t have, and for that I am grateful.”
– SCAT scholar (participant)
Jakita explained that the girls on the programme had formed a sisterhood, in that they came to know each other well and formed a strong and supportive community. In addition, what I found remarkable was the long-term impact of this programme: 22 out of the 23 young women that took part in the programme are now enrolled on STEM degree courses.
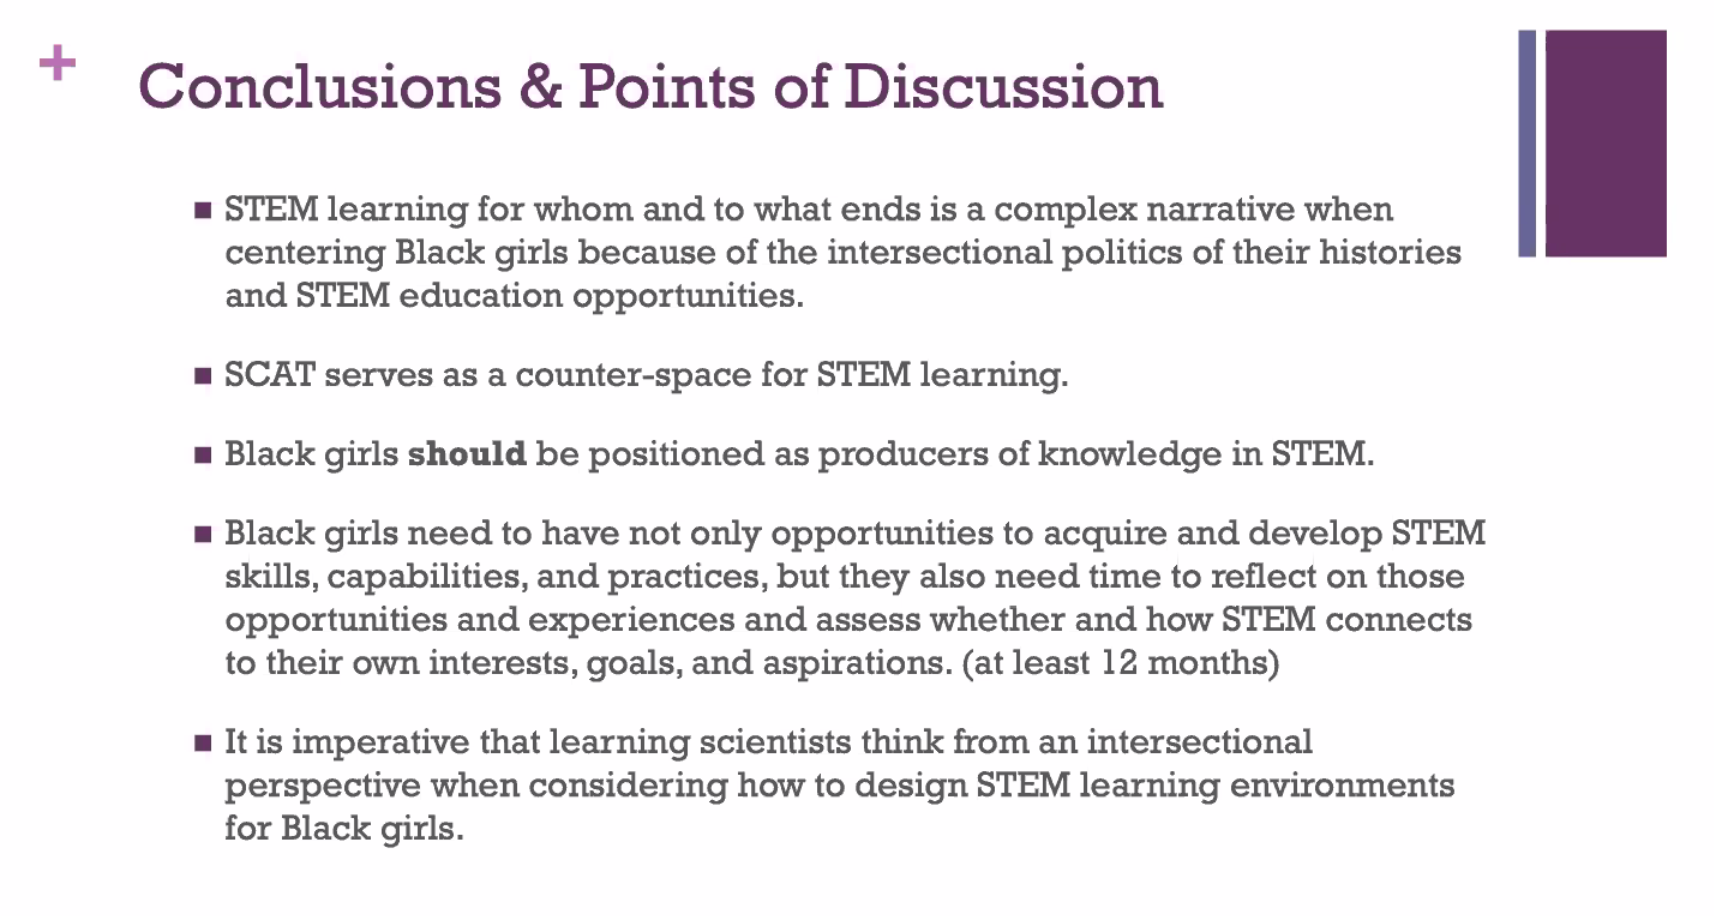
Read the paper on which Jakita’s seminar was based, download the presentation slides, and watch the video recording:
This research intervention obviously represents a very small sample, as is often the case with rich, qualitative studies, but there is much we can learn from it, and still much more to be done. In the UK, we do not have any ongoing or previously published research studies that look at intersectionality and computing education, and conducting similar research would be valuable. Jakita and her colleagues worked in the non-formal space, providing opportunities outside the formal curriculum, but throughout the academic year. We need to understand better the affordances of non-formal and formal learning for supporting engagement of learners from underrepresented groups in computing, perhaps particularly in England, where a mandatory computing curriculum from age 5 has been in place since 2014.
This was our 14th research seminar! You can find all the related blog posts on this page.
Next we’ve got three online events coming up in quick succession! In our seminar on Tuesday 20 April at 17:00–18:30 BST / 12:00–13:30 EDT / 9:00–10:30 PDT / 18:00–19:30 CEST, we’ll welcome Maya Israel from the University of Florida, who will be talking about Universal Design for Learning and computing. On Monday 26 April, we will be hosting a panel session on gender balance in computing. And at the seminar on Tuesday 2 May, we will be hearing from Dr Cecily Morrison (Microsoft Research) about computing and learners with visual disabilities.
To join any of these free events, click below and sign up with your name and email address:
We’ll send you the link and instructions. See you there!
The post Engaging Black girls in STEM learning through game design appeared first on Raspberry Pi.
In our brand-new issue of Hello World magazine, Hayley Leonard from our team gives a primer on how computing educators can apply the Universal Design for Learning framework in their lessons.
Universal Design for Learning (UDL) is a framework for considering how tools and resources can be used to reduce barriers and support all learners. Based on findings from neuroscience, it has been developed over the last 30 years by the Center for Applied Special Technology (CAST), a nonprofit education research and development organisation based in the US. UDL is currently used across the globe, with research showing it can be an efficient approach for designing flexible learning environments and accessible content.
Engaging a wider range of learners is an important issue in computer science, which is often not chosen as an optional subject by girls and those from some minority ethnic groups. Researchers at the Creative Technology Research Lab in the US have been investigating how UDL principles can be applied to computer science, to improve learning and engagement for all students. They have adapted the UDL guidelines to a computer science education context and begun to explore how teachers use the framework in their own practice. The hope is that understanding and adapting how the subject is taught could help to increase the representation of all groups in computing.
The UDL guidelines help educators anticipate barriers to learning and plan activities to overcome them.
The UDL framework is based on neuroscientific evidence which highlights how different areas or networks in the brain work together to process information during learning. Importantly, there is variation across individuals in how each of these networks functions and how they interact with each other. This means that a traditional approach to teaching, in which a main task is differentiated for certain students with special educational needs, may miss out on the variation in learning between all students across different tasks.
The UDL guidelines highlight different opportunities to take learner differences into account when planning lessons. The framework is structured according to three main principles, which are directly related to three networks in the brain that play a central role in learning. It encourages educators to plan multiple, flexible methods of engagement in learning (affective networks), representation of the teaching materials (recognition networks), and opportunities for action and expression of what has been learnt (strategic networks).
The three principles of UDL are each expanded into guidelines and checkpoints that allow educators to identify the different methods of engagement, representation, and expression to be used in a particular lesson. Each principle is also broken down into activities that allow learners to access the learning goals, remain engaged and build on their learning, and begin to internalise the approaches to learning so that they are empowered for the future.
| Multiple means of engagement | Multiple means of representation | Multiple means of action and expression |
|
Provide options for recruiting interests * Give students choice (software, project, topic) * Allow students to make projects relevant to culture and age |
Provide options for perception * Model computing through physical representations as well as through interactive whiteboard/videos etc. * Select coding apps and websites that allow adjustment of visual settings (e.g. font size/contrast) and that are compatible with screen readers |
Provide options for physical action * Include CS unplugged activities that show physical relationships of abstract computing concepts * Use assistive technology, including a larger or smaller mouse or touchscreen devices |
|
Provide options for sustaining effort and persistence * Utilise pair programming and group work with clearly defined roles * Discuss the integral role of perseverance and problem-solving in computer science |
Provide options for language, mathematical expressions, and symbols * Teach and review computing vocabulary (e.g. code, animations, algorithms) * Provide reference sheets with images of blocks, or with common syntax when using text |
Provide options for expression and communication * Provide sentence starters or checklists for communicating in order to collaborate, give feedback, and explain work * Provide options that include starter code |
|
Provide options for self-regulation * Break up coding activities with opportunities for reflection, such as ‘turn and talk’ or written questions * Model different strategies for dealing with frustration appropriately |
Provide options for comprehension * Encourage students to ask questions as comprehension checkpoints * Use relevant analogies and make cross-curricular connections explicit |
Provide options for executive function * Embed prompts to stop and plan, test, or debug throughout a lesson or project * Demonstrate debugging with think-alouds |
Each principle of the UDL framework is associated with three areas of activity which may be considered when planning lessons or units of work. It will not be the case that each area of activity should be covered in every lesson, and some may prove more important in particular contexts than others. The full table and explanation can be found on the Creative Technology Research Lab website at ctrl.education.ufl.edu/projects/tactic.
While an advantage of UDL is that the principles can be applied across different subjects, it is important to think carefully about what activities to address these principles could look like in the case of computer science.
Researchers at the Creative Technology Research Lab, led by Maya Israel, have identified key activities, some of which are presented in the table on the previous page. These guidelines will help educators anticipate potential barriers to learning and plan activities that can overcome them, or adapt activities from those in existing schemes of work, to help engage the widest possible range of students in the lesson.
As well as suggesting approaches to applying UDL to computer science education, the research team at the Creative Technology Research Lab has also investigated how teachers are using UDL in practice. Israel and colleagues worked with four novice computer science teachers in US elementary schools to train them in the use of UDL and understand how they applied the framework in their teaching.
The research found that the teachers were most likely to include in their teaching multiple means of engagement, followed by multiple methods of representation. For example, they all offered choice in their students’ activities and provided materials in different formats (such as oral and visual presentations and demonstrations). They were less likely to provide multiple means of action and expression, and mainly addressed this principle through supporting students in planning work and checking their progress against their goals.
Although the study included only four teachers, it highlighted the flexibility of the UDL approach in catering for different needs within variable teaching contexts. More research will be needed in future, with larger samples, to understand how successful the approach is in helping a wide range of students to achieve good learning outcomes.
There are numerous resources designed to help teachers learn more about the UDL framework and how to apply it to teaching computing. The CAST website (helloworld.cc/cast) includes an explainer video and the detailed UDL guidelines. The Creative Technology Research Lab website has computing-specific ideas and lesson plans using UDL (helloworld.cc/udl).
Maya Israel will be presenting her research at our computing education research seminar series, on 20 April 2021. Our seminars are free to attend and open to anyone from anywhere around the world. Find out more about the current seminar series, which focuses on diversity and inclusion in computing education.
In issue 15 of Hello World, we hear from five teachers who have made the switch to computing from another subject. They tell us about the challenges they have faced, as well as the joys of teaching young people how to create new things with technology. All this and much, much more in the new issue!
Educators based in the UK can subscribe to receive print copies for free!
The post Universal design for learning in computing | Hello World #15 appeared first on Raspberry Pi.
We shared Dennis Mellican’s overly effective anti-burglary project last month. Now he’s back with something a whole lot more musical and mini.
Dennis was inspired by other jukebox projects that use Raspberry Pi, NFC readers, and tags to make music play. Particularly this one by Mark Hank, which we shared on the blog last year. The video below shows Dennis’s first attempt at creating an NFC Raspberry Pi music player, similar to Mark’s.
After some poking around, Dennis realised that the LEGO Dimensions toy pad is a three-in-one NFC reader with its own light show. He hooked it up to a Raspberry Pi and developed a Python application to play music when LEGO Dimension Minifigures are placed on the toy pad. So, if an Elvis minifigure is placed on the reader, you’ll hear Elvis’s music.
The Raspberry Pi is hooked up to the LEGO Dimensions toy pad, with Musicfig (Dennis’s name for his creation) playing tracks via Spotify over Bluetooth. The small screen behind the minifigures is displaying the Musicfig web application which, like the Spotify app, displays the album art for the track that’s currently playing.
Spotify playback is optional, as you can use your own MP3 music file collection instead. You also don’t have to use LEGO Minifigures: most NFC-enabled devices or tags can be used, including Disney Infinity, Nintendo Amiibo, and Skylander toy characters.
Dennis thought Musicfig could be a great marketable LEGO product for kids and grown-ups alike, and and he submitted it to the LEGO Ideas website. Unfortunately, he had tinkered a little too much (we approve) and it wasn’t accepted, due to rules that don’t allow non-LEGO parts or customisations.
The LEGO Dimensions toy pad was discontinued in 2017, but Dennis has seen some sets on sale at a few department stores, and even more cheaply on second-hand market sites like Bricklink. We’ve spotted them on eBay and Amazon too. Dennis also advises that the toy pad often sells for less than a dedicated NFC reader.
Watch Dennis’s seven-year-old son Benny show you how it all works, from Elvis through to Prodigy via Daft Punk and Queen.
There are some really simple step-by-step instructions for a quick install here, as well as a larger gallery of Musicfig rigs. And Dennis hosts a more detailed walkthrough of the project, plus code examples, here.
You can find all things Dennis-related, including previous Raspberry Pi projects, here.
The post Raspberry Pi makes LEGO minifigures play their own music appeared first on Raspberry Pi.
What if you could give the joy of opening a Raspberry Pi–themed gift every single month for a whole year? But what if the thought of wrapping 12 individual things fills you with Scrooge-level dread?
Snap up a magazine subscription for one of your nearest and/or dearest and we’ll take care of the packaging and delivery while you sit back and reap all the credit!
You could end up with a few extra gifts depending on what you sign up for so, read on and take your pick.
The official Raspberry Pi magazine comes with a free Raspberry Pi Zero W kit worth £20 when you sign up for a 12-month subscription. You can use our tiniest computer in tonnes of projects, meaning Raspberry Pi fans can never have enough. That’s a top gift-giving bonus for you right there.
Every issue of The MagPi is packed with computing and electronics tutorials, how-to guides, and the latest news and reviews. They also hit their 100th issue this month so, if someone on your list has been thinking about getting a subscription, now is a great time.
Check out subscription deals on the official Raspberry Pi Press store.
HackSpace magazine is the one to choose for fixers and tinkerers of all abilities. If you’re looking for a gift for someone who is always taking things apart and hacking everyday objects, HackSpace magazine will provide a year of inspiration for them.
12-month subscriptions come with a free Adafruit Circuit Playground Express, which has been specially developed to teach programming novices from scratch and is worth £25.
Check out subscription deals on the official Raspberry Pi Press store.
Custom PC is the magazine for people who are passionate about PC technology and hardware. And they’ve just launched a pretty cool new giveaway with every 12-month subscription: a free Chillblast Aero RGB Gaming mouse worth £40. Look, it lights up, it’s cool.
Check out subscription offers on the official Raspberry Pi Press store.
Wireframe magazine lifts the lid on video games. In every issue, you’ll find out how games are made, who makes them, and how you can code them to play for yourself using detailed guides.
The latest deal gets you three issues for just £10, plus your choice of one of our official books as a gift. By the way, that ‘three for £10 plus a free book’ is available across ALL our magazines. Did I not tell you that before? My bad. It’s good though, right?
Check out more subscriptions deals on the official Raspberry Pi Press store.
And as an extra Christmas gift to you all, we’ve decided to keep our Black Friday deal rolling until Christmas Eve, so if you buy just one teeny tiny book from the Raspberry Pi Press store, you get two more completely FREE!
Better still, all of the books in the deal only cost £7 or £10 to start with, so makes for a good chunky batch of presents at a brilliantly affordable price.
The post Gifts that last all year round appeared first on Raspberry Pi.
Mike Perez from Audio Arkitekts took to YouTube to show you how to build your own music streamer using a Raspberry Pi. Haters of Bluetooth and RCA plugs, he’s done this for you.
Mike reports a “substantial difference in sound quality” compared to his previous setup (the aforementioned and reviled Bluetooth and RCA plug options).
This project lets you use a Raspberry Pi as a music player and control it from your mobile phone.
Mike started out with an $80 Argon Neo Raspberry Pi Bundle, which includes a Raspberry Pi 4 Model B. He made a separate video to show you how to put everything together.
This bundle comes with a nice, sleek case, so your music player can be on display discreetly.
Not sure about spending $80 on this kit? In the project video, Mike says it’s “totally, totally worth it” — partly due to the quality of the case.
Mike grabbed a compatible Volumio image from Volumio’s ‘Get Started’ page and flashed it onto Raspberry Pi with Etcher.
You can use an Ethernet cable, but Mike wanted to utilise Raspberry Pi 4’s wireless connectivity to boot the Volumio app. This way, the Raspberry Pi music player can be used anywhere in the house, as it’ll create its own wireless hotspot within your home network called ‘Volumio’.
You’ll need a different version of the Volumio app depending on whether you have an Android phone or iPhone. Mike touts the app as “super easy, really robust”. You just select the music app you usually use from the ‘Plugins’ section of the Volumio app, and all your music, playlists, and cover art will be there ready for you once downloaded.
And that’s basically it. Just connect to the Volumio OS via the app and tell your Raspberry Pi what to play.
To get his new music player booming all around the house, Mike used a Starke Sound AD4, which you can watch him unbox and review.
What kind of amplification system have you got paired up with your Raspberry Pi–powered music player?
The post Personal Raspberry Pi music streamer appeared first on Raspberry Pi.
Explore our new free pathway of environmental digital making projects for young people! These new step-by-step projects teach learners Scratch coding and include real-world data — from data about the impact of deforestation on wildlife to sea turtle tracking information.
By following along with the digital making projects online, young people will discover how they can use technology to protect our planet, all while improving their computing skills.
In the projects, learners are introduced to 5 of the United Nations’ 17 Sustainable Development Goals (SDGs) with an environment focus:
Technology, science, maths, geography, and design all play a part in the projects. Following along with the digital making projects, young people learn coding and computing skills while drawing on a range of data from across the world. In this way they will discover how computing can be harnessed to collect environmental data, to explore causes of environmental degradation, to see how humans influence the environment, and ultimately to mitigate negative effects.
To help us develop these environmental digital making projects, we reached out to a number of organisations with green credentials:
The digital making projects, created with 9- to 11-year-old learners in mind, support young people on a step-by-step pathway to develop their skills gradually. Using the block-based visual programming language Scratch, learners build on programming foundations such as sequencing, loops, variables, and selection. The project pathway is designed so that learners can apply what they learned in earlier projects when following along with later projects!
We’re really excited to help learners explore the relationship between technology and the environment with these new digital making projects. Connecting their learning to real-world scenarios not only allows young people to build their knowledge of computing, but also gives them the opportunity to affect change and make a difference to their world!
With Green goals, learners create an animation to present the United Nations’ environment-focused Sustainable Development Goals.
Through Save the shark, young people explore sharks’ favourite food source (fish, not humans!), as well as the impact of plastic in the sea, which harms sharks in their natural ocean habitat.
With the Tree life simulator project guide, learners create a project that shows the impact of land management and deforestation on trees, wildlife, and the environment.
Computers can be used to study wildlife in areas where it’s not practical to do so in person. In Count the creatures, learners create a wildlife camera using their computer’s camera and Scratch’s new video sensing extension!
Electricity is important. After all, it powers the computer that learners are using! In Electricity generation, learners input real data about the type and amount of natural resources countries across the world use to generate electricity, and they then compare the results using an animated data visualisation.
Understanding the movements of endangered turtles helps to protect these wonderful animals. In this new Turtle tracker project, learners use tracking data from real-life turtles to map their movements off the coast of West Africa.
All of our projects are free to access online at any time and include step-by-step instructions. They can be undertaken in a club, classroom, or at home. Young people can share the project they create with their peers, friends, family, and the wider Scratch community.
Visit the Protect our planet pathway to experience the projects yourself.
The post Digital making projects about protecting our planet appeared first on Raspberry Pi.
Laura Sach and Martin O’Hanlon, who are both Learning Managers at the Raspberry Pi Foundation, have written a brand-new book to help you to get more out of your Python projects.
In Create Graphical User Interfaces with Python, Laura and Martin show you how to add buttons, boxes, pictures, colours, and more to your Python programs using the guizero library, which is easy to use and accessible for all, no matter your Python skills.
This new 156-page book is suitable for everyone — from beginners to experienced Python programmers — who wants to explore graphical user interfaces (GUIs).
You might have met Martin recently on one of our weekly Digital Making at Home live streams for young people, were he was a guest for an ‘ooey-GUI’ code-along session. He talked about his background and what it’s like creating projects and learning resources on a day-to-day basis.
Laura is also pretty cool! Here she is showing you how to solder your Raspberry Pi header pins:
Martin and Laura are also tonnes of fun on Twitter. You can find Martin as @martinohanlon, and Laura goes by @codeboom.
In Create Graphical User Interfaces with Python, you’ll find ten fun Python projects to create with guizero, including a painting program, an emoji match game, and a stop-motion animation creator.
You will also learn:
You can buy Create Graphical User Interfaces with Python now from the Raspberry Pi Press online store, or the Raspberry Pi store in Cambridge, UK.
And if you don’t need the lovely new book, with its new-book smell, in your hands in real life, you can download a PDF version for free, courtesy of The MagPi magazine.
The post New book: Create Graphical User Interfaces with Python appeared first on Raspberry Pi.
I am delighted to share the news that we have appointed a new Chair and Trustees of the Raspberry Pi Foundation. Between them, they bring an enormous range of experience and expertise to what is already a fantastic Board of Trustees, and I am really looking forward to working with them.
John Lazar has been appointed as the new Chair of the Board of Trustees. John is a software engineer and business leader who is focused on combining technology and entrepreneurship to generate lasting positive impact.
Formerly the Chairman and CEO of Metaswitch Networks, John is now an angel investor, startup mentor, non-executive chairman and board director, including serving as the Chair of What3Words. He is a Fellow of the Royal Academy of Engineering and played an active role in developing the programme of study for England’s school Computer Science curriculum. John has also spent many years working on tech-related non-profit initiatives in Africa and co-founded Enza Capital, which invests in early-stage African technology companies that solve pressing problems.
John takes over the Chair from David Cleevely, who has reached the end of his two three-year terms as Trustee and Chair of the Foundation. David has made a huge contribution to the Foundation over that time, and we are delighted that he will continue to be involved in our work as one of the founding members of the Supporters Club.
Alongside John, we are welcoming three new Trustees to the Board of Trustees:
I am also delighted to announce that we have appointed Suranga Chandratillake as a Member of the Raspberry Pi Foundation. Suranga is a technologist, entrepreneur, and investor.
He founded the intelligent search company blinkx and is now a General Partner at Balderton Capital. Suranga is a Fellow of the Royal Academy of Engineering and a World Economic Forum Young Global Leader, and he serves on the UK Government’s Council for Science and Technology.
As a charity, the Raspberry Pi Foundation is governed by a Board of Trustees that is ultimately responsible for what we do and how we are run. It is the Trustees’ job to make sure that we are focused on our mission, which for us means helping more people learn about computing, computer science, and related subjects. The Trustees also have all the usual responsibilities of company directors, including making sure that we use our resources effectively. As Chief Executive, I am accountable to the Board of Trustees.
We’ve always been fortunate to attract the most amazing people to serve as Trustees and, as volunteers, they are incredibly generous with their time, sharing their expertise and experience on a wide range of issues. They are an important part of the team. Trustees serve for up to two terms of three years so that we always have fresh views and experience to draw on.
Appointments to the Board of Trustees follow open recruitment and selection processes that are overseen by the Foundation’s Nominations Committee, supported by independent external advisers. Our aim is to appoint Trustees who bring different backgrounds, perspectives, and lived experience, as well as a range of skills. As with all appointments, we consider diversity at every aspect of the recruitment and selection processes.
Formally, Trustees are elected by the Foundation’s Members at our Annual General Meeting. This year’s AGM took place last week on Zoom. Members are also volunteers, and they play an important role in holding the Board of Trustees to account, helping to shape our strategy, and acting as advocates for our mission.
You can see the full list of Trustees and Members on our website.
The post New Chair and Trustees of the Raspberry Pi Foundation appeared first on Raspberry Pi.
Spookify your home in time for Halloween with Rob Zwetsloot and these terror-ific projects!
We picked four of our favourites from a much longer feature in the latest issue of The MagPi magazine, so make sure you check it out if you need more Haunted House hacks in your life.
This project is a bit of a mixture of indoors and outdoors, with a doorbell on the house activating a series of spooky effects like a creaking door, ‘malfunctioning’ porch lights, and finally a big old monster mash in the garage.
MagPi magazine talked to its creator Stewart Watkiss about it a few years ago and he revealed how he used a PiFace HAT to interface with home automation techniques to create the scary show, although it can be made much easier these days thanks to Energenie. Our favourite part, though, is still the Home Alone-esque monster party that caps it off.
Check it our for yourself here.
The dreaded dark lord Sauron from Lord of the Rings watched over Middle-earth in the form of a giant flaming eye atop his black tower, Barad-dûr. Mike Christian’s version sits on top of a shed in Saratoga, CA.
It makes use of the Snake Eyes Bonnet from Adafruit, with some code modifications and projecting onto a bigger eye. Throw in some cool lights and copper wires and you get a nice little effect, much like that from the films.
There are loads more cool photos on Mike’s original project page.
A classic indoor Halloween decoration (and outdoor, according to American movies) is the humble Jack-o’-lantern. While you could carve your own for this kind of project (and we’ve seen many people do so), this version uses a pre-cut, 3D-printed pumpkin.
If you want to put one outside as well, we highly recommend you add some waterproofing or put it under a porch of some kind, especially if you live in the UK.
Here’s a video about the project by the maker.
You’re unlikely to trick someone already in your house with a random door that has appeared out of nowhere, but while they’re investigating they’ll get the scare of their life. This door was created as a ‘sequel’ to a Scary Porch, and has a big monitor where a window might be in the door. There’s also an array of air-pistons just behind the door to make it sound like someone is trying to get out.
There are various videos that can play on the door screen, and they’re randomised so any viewers won’t know what to expect. This one also uses relays, so be careful.
This project is the brainchild of the element14 community and you can read more about how it was made here.
The MagPi magazine is out now, available in print from the Raspberry Pi Press onlinestore, your local newsagents, and the Raspberry Pi Store, Cambridge.
You can also download the PDF directly from the MagPi magazine website.
The post Haunted House hacks appeared first on Raspberry Pi.
Element14’s Clem previously built a giant Raspberry Pi-powered resin-based 3D printer and here, he’s flipped the concept upside down.
The new Raspberry Pi 4 8GB reduces slicing times and makes for a more responsive GUI on this experimental 3D printer. Let’s take a look at what Clem changed and how…
The previous iteration of his build was “huge”, mainly because the only suitable screen Clem had to hand was a big 4K monitor. This new build flips the previous concept upside down by reducing the base size and the amount of resin needed.
To resize the project effectively, Clem came out of an X,Y axis and into Z, reducing the surface area but still allowing for scaling up, well, upwards! The resized, flipped version of this project also reduces the cost (resin is expensive stuff) and makes the whole thing more portable than a traditional, clunky 3D printer.
Now for the brains of the thing: nanodlp is free (but not open source) software which Clem ran on a Raspberry Pi 4. Using an 8GB Raspberry Pi will get you faster slicing times, so go big if you can.
A 5V and 12V switch volt power supply sorts out the Nanotec stepper motor. To get the signal from the Raspberry Pi GPIO pins to the stepper driver and to the motor, the pins are configured in nanodlp; Clem has shared his settings if you’d like to copy them (scroll down on this page to find a ‘Resources’ zip file just under the ‘Bill of Materials’ list).
For the display, there’s a Midas screen and an official Raspberry Pi 7″ Touchscreen Display, both of which work perfectly with nanodlip.
At 9:15 minutes in to the project video, Clem shows you around Fusion 360 and how he designed, printed, assembled, and tested the build’s engineering.
Now for the fancy, groundbreaking bit: Clem chose very specialised photocentric, high-tensile daylight resin so he can use LEDs with a daylight spectrum. This type of resin also has a lower density, so the liquid does not need to be suspended by surface tension (as in traditional 3D printers), rather it floats because of its own buoyancy. This way, you’ll need less resin to start with, and you’ll waste less too whenever you make a mistake. At 13:30 minutes into the project video, Clem shares the secret of how you achieve an ‘Oversaturated Solution’ in order to get your resin to float.
Join the conversation on YouTube if you’ve got an idea that could improve this unique approach to building 3D printers.
The post New twist on Raspberry Pi experimental resin 3D printer appeared first on Raspberry Pi.
One of our Approved Resellers in the Netherlands, Daniël from Raspberry Store, shared this Raspberry Pi–powered prayer reminder with us. It’s a useful application one of his customers made using a Raspberry Pi purchased from Daniël’s store.
As a Raspberry Pi Official Reseller, I love to see how customers use Raspberry Pi to create innovative products. Spying on bird nests, streaming audio to several locations, using them as a menu in a restaurant, or in a digital signage-solution… just awesome. But a few weeks ago, a customer showed me a new usage of Raspberry Pi: a prayer clock for mosques.
Made by Mawaqit, this is a narrowcasting solution with a Raspberry Pi at its heart and can be used on any browser or smartphone.
This project is simple in hardware terms. You just need Raspberry Pi 3 or Raspberry Pi 4, a TV screen, and a HDMI cable.
If you do not have an internet connection, you’ll also need an RTC clock
With the HDMI cable, Raspberry Pi can broadcast the clock — plus other useful info like the weather, or a reminder to silence your phone — on a wall in the mosque. Awesome! So simple, and yet I have not seen a solution like this before, despite Mawaqit’s application now being used in 51 countries and over 4609 mosques. And, last I checked, it has more than 185,000 active users!
You’ll need to install the pre-configured system image and flash the mawaqit.xz system image onto your Raspberry Pi’s SD card.
There are then two options: connected and offline. If you set yourself up using the connected option, you’ll be able to remotely control the app from your smartphone or any computer and tablet, which will be synchronised across all the screens connected to Raspberry Pi. You can also send messages and announcements. The latest updates from Mawaqit will install automatically.
If you need to choose the offline option and you’re not able to use the internet at your mosque, it’s important to equip your Raspberry Pi with RTC, because Raspberry Pi can’t keep time by itself.
All the software, bits of command line code, and step-by-step guidance you’ll need are available on this web page.
The Mawaqit project is free of charge, and the makers actually prohibit harnessing it for any monetary gain. The makers even created an API for you to create your own extentions — how great is that? So, if you want your own prayer clock for in a mosque, school, or just at home, take a look at Mawaqit.net.
The post Raspberry Pi prayer reminder clock appeared first on Raspberry Pi.
Redditor Mark Hank missed the tactile experience of vinyl records so he removed the insides of an old Sonos Boost to turn it into a Raspberry Pi- and NFC-powered music player. Yes, this really works:
The Sonos Boost was purchased for just £3 on eBay. Mark pulled all the original insides out of it and repurposed it as what they call a ‘vinyl emulator’ to better replicate the experience of playing records than what a simple touchscreen offers.
The Boost now contains a Raspberry Pi 3A+ and an ACR122U NFC reader, and it plays a specific album, playlist, or radio station when you tap a specific NFC tag on it. It’s teamed with Sonos speakers, and NTAG213 NFC tags. The maker recommends you go with the largest tags you can find, as it will improve read performance; they went with these massive ones.
One of the album covers printed onto thick card
The tags are inside printouts mounted on 1mm thick card (those album cover artwork squares getting chucked at the Sonos in the video), and they’re “super cheap” according to the maker.
You’ll need to install the node-sonos-http-api package on your Raspberry Pi; it’s the basis of the whole back-end of the project. The maker provides full instructions on their original post, including on how to get Spotify up and running on your Raspberry Pi.
The whole setup neatened up
Rather than manually typing HTTP requests into a web browser, the maker wanted to automate the process so that the Raspberry Pi does it when presented with certain stimulus (aka when the NFC reader is triggered). They also walk you through this process in their step-by-step instructions.
How the maker hid the mess under the display table
The entire build cost around £50, and the great thing is that it doesn’t need to sit inside an old Sonos Boost if you don’t want it to. The reader works through modest-width wood, so you can mount it under a counter, install it in a ‘now listening’ stand, whatever — it’s really up to you.
Full instructions are available on hackster.io! And here’s all the code you’ll need, handily stored on GitHub.
The post Who needs vinyl records when you’ve got Raspberry Pi and NFC? appeared first on Raspberry Pi.
This rotary phone features a built-in Raspberry Pi that communicates with radiooooo.com (a musical time machine) and an Arduino working behind the map to control the selection of the country. Just pick up the phone, choose a country and a decade, and listen to some great music!
The Raspberry Pi:
The Arduino:
We saw this project on hackster.io and loved how maker Caroline Buttet dug into the finer detail of an old-fashioned rotary phone’s pick-up/put-down mechanism, as well as how the phone knows which numbers you’re dialling. She goes into more detail about that aspect in the second build video, above.
Some countries have a jack pin – this is how you select the music
As well as a Raspberry Pi 4 and Arduino UNO, you’ll need a world map (obviously) and something to mount it on which can be drilled into. This is because the jack pins you can see in the image above need to poke out of different countries.
Caroline’s grandma donated the old rotary phone she used for this project. You should be able to pick one up from a second-hand shop or, if you can get a new handset made in the retro style online.
The shopping list for this build also includes: jumper wires; audio/video cable assembly; LED, breadboard; jack socket 3-pin; resistors
A simplified visual representation of how everything works
In her original post, Caroline explains in detail how to connect the rotary phone’s switches to the pins on your Raspberry Pi, how to build in audio sockets on the board you glue your map to, how to run the necessary Python script from the command line, and what a Chrome extension to use to make radiooooo.com work with your Raspberry Pi.
The Raspberry Pi inside the rotary phone
And yes, Caroline is one of those most magical of makers who deposits all the code needed for this build on GitHub!
And here’s the Arduino mounted onto the back of the map, with the audio jacks taped up to the holes drilled into different countries
The post Travel the world with a retro musical phone appeared first on Raspberry Pi.
The closure of schools has called attention to the digital divide, which sees poorer families struggling or unable to access education*. The coronavirus pandemic didn’t cause this divide, but it has highlighted it and its impact on many people in our society.
As our Foundation CEO Philip outlined back in April, part of our response to the pandemic and social distancing measures is to send free Raspberry Pi computers to students who currently lack the technology to complete their school work at home. Generously funded by the Bloomfield Trust, we have started to distribute Raspberry Pis in the UK.
Our approach for this initiative is to work with partner charities that help us identify the right recipients for the computers; we want them to go to young people who don’t have a suitable device for completing their schoolwork in their home.
The first partner charity we’ve been working with, whose team has been so patient as we’ve learned together how to do this, are the incredible School Home Support, a youth organisation working to improve school attendance, behaviour, and engagement in learning. With their help, we’ve so far distributed more than 120 Raspberry Pi 4 computers (with 2GB RAM), together with all the peripherals including a screen. School Home Support were also able to secure funding to provide high-speed internet access to the recipients’ home so students can reliably connect to their schools.
The young people set up their Raspberry Pis themselves, and we provide detailed instructions to guide them through this process. Most of the families have never used a computer like Raspberry Pi, so they need encouragement and support to get up and running. This is being provided both by the excellent School Home Support practitioners, and by Raspberry Pi team members, who answer questions when recipients get stuck.
“My mum was confused by the setup at first, but having a call to explain it really helped, and now we see how easy it is to set up and use.”
Raspberry Pi recipient
Before receiving these computers, many of the young people only had occasional access to their parents’ phone to find out what school work had been set for them, and to complete it.
“It’s much easier to do my schoolwork now on the bigger screen. I feel like I’m learning more.”
Raspberry Pi recipient
We’re getting feedback that the Raspberry Pis help recipients focus on their work; they now have their own space to work in and more time to complete schoolwork, as they’re no longer rushing to share a device with other family members.
“I don’t always enjoy doing homework, but it’s better now that I have my own computer to do my work.”
Raspberry Pi recipient
Having a Raspberry Pi has increased the students’ motivation, and it has reduced stress — for parents as well as children:
“The Raspberry Pi kit came at a time when I really needed it. Up until that point, T had to do his homework and access the school’s home learning using my phone, which was not very practical at all. This was made worse by the fact that he had to share my phone with his sister, which ended up causing a lot of arguments. He was so pleased to receive a computer he could use. At first he had a lot of fun playing different games on it, and I was surprised about how well he was able to understand and help me set it up. The only negative was that he enjoyed playing games on it a bit too much! I feel relieved that he has his own computer which he can use. It was very stressful and frustrating having to use my mobile phone. There were times when T would be using my phone to do his work and he would be interrupted if I got a phone call, which meant that he would have to log in again, and sometimes would lose his work.”
Parent of a Raspberry Pi recipient
It’s wonderful to hear stories like this of how our computers make a difference in people’s lives. We’re still learning lots: while many families have been able to get up and running easily and quickly, others are still overwhelmed because they are unfamiliar with the device. We know we need to do more to build their confidence.
As we’re learning, we’re also talking to our next charity partners in the UK to help us identify more recipients, and to help the recipients get set up on their new Raspberry Pi devices.
If you are part of an organisation that could partner with us to support families in need of access to technology, please email us at stayconnected@raspberrypi.org. Be aware that your organisation would need to fund the families’ internet access.
* The impact of the digital divide on students has for example been reported on by BCS, the Chartered Institute for IT and by the Institute for Fiscal Studies.
The post Distributing Raspberry Pi computers to help families access education appeared first on Raspberry Pi.
How has computing education changed over the last few months? And how will the coronavirus pandemic affect education in the long term? In the introduction to our newest issue of Hello World, our CEO Philip Colligan reflects on the incredible work of front-line educators, and on the challenges educators and students will face.
![]()
In just a few short weeks, the coronavirus pandemic has had a profound impact on every aspect of life, not least education. With 1.2 billion young people affected by the closure of schools, teachers have joined health and care workers, and the many others, who are on the front line of the fight against the virus.
As chair of governors at a state school here in Cambridge, I’ve seen first-hand the immense pressure that schools and teachers are under. The abrupt transition to emergency remote teaching, caring for the most vulnerable students, supporting families who are experiencing the health and economic devastation wrought by the virus, and doing all of this while looking after themselves and their loved ones. The word ‘heroic’ doesn’t feel nearly sufficient to describe the efforts of teachers all over the world.
At the Raspberry Pi Foundation, we wanted to learn about how different schools have responded, what’s working, what the challenges are, and crucially, what is happening to computing education. We spoke to teachers at primary schools, secondary schools, and further education colleges. Most were based in the UK, with a few in India and the US.
Even from this small collection of interviews, we saw incredible innovation and resilience, coupled with a determination to ensure that all young people could continue learning during the lockdown.
Most of the teachers that we spoke to were specialists in computing. Their expertise with technology has put them centre-stage, with many stepping into leadership roles, supporting the rapid roll-out of online learning, and providing invaluable support to colleagues and students alike. We hope that this leads to schools giving greater priority to computing education. Digital technologies are keeping the world connected and working. Equipping all young people with the ability to harness the power of computing has never been more vital.
We’ve also seen profound challenges. The digital divide has never been more apparent. Far too many young people lack access to a computer for learning at home. This is a problem that can be fixed at a cost that is trivial compared to the long-term economic impact of the educational disadvantage that it causes.
But we’re also hearing first-hand how educational disadvantage isn’t just about access to technology. Many families are struggling to support home learning, whether because of the condition of their housing, their work or caring responsibilities, or the struggle to put food on the table. Teachers have responded compassionately, offering practical support where it’s needed most, and planning now for how they will help students catch up when schools reopen.
We know that school closures disproportionately impact the most disadvantaged students. If we are going to reduce the long-term economic and social impact of the virus, there needs to be a huge global effort to invest in addressing the educational impact that it has caused.
As we start to figure out what a post-lockdown world might look like, the only thing that feels certain is we are facing a long period of disruption to formal education. We need to find new ways to combine online learning, classroom and remote teaching, mentoring, and non-formal learning experiences, to ensure that all young people, whatever their backgrounds, are able to thrive and fulfil their potential. The stories we’ve heard from these educators give me hope that we can, but they will need the support of government, industry, and nonprofits. The Raspberry Pi Foundation is committed to playing our part.
Besides the Learning in lockdown feature, issue 13 of Hello World contains articles and opinion pieces on managing screen time, safeguarding in online lessons, and how the education landscape is shifting at an unprecedented rate.
We’ve also collected together some of the best free resources for online learning, and we share fantastic activities in our resources section.
Download your free copy to read about all this and more!
And if you’re an educator in the UK, you can take out a free subscription to receive print copies of Hello World.
The post What are the effects of the pandemic on education? | Hello World #13 appeared first on Raspberry Pi.
Eagle-eyed Raspberry Pi Press fans might have noticed some changes over the past few months to the look and feel of our website. Today we’re pleased to unveil a new look for the Raspberry Pi Press website and its online store.

Raspberry Pi Press is the publishing imprint of Raspberry Pi (Trading) Ltd, which is part of the Raspberry Pi Foundation, a UK-based charity that does loads of cool stuff with computers and computer education.
Raspberry Pi Press publishes five monthly magazines: The MagPi, HackSpace Magazine, Wireframe, Custom PC, and Digital SLR Photography. It also produces a plethora of project books and gorgeous hardback beauties, such as retro gamers’ delight Code the Classics, as well as Hello World, the computing and digital making magazine for educators! Phew!

The Raspberry Pi Press online store ships around the globe, with copies of our publications making their way to nearly every single continent on planet earth. Antarctica, we’re looking at you, kid.
With all this exciting work going on, it seemed only fair that Raspberry Pi Press should get itself a brand new look. We hope you’ll enjoy skimming the sparkling shelves of our online newsagents and bookshop.
Ain’t nothin’ wrong with a little tsundoku
You can pick up all the latest issues of your favourite magazines or treat yourself to a book or three, and you can also subscribe to all our publications with ease. We’ve even added a few new payment options to boot.

We’ve made a few changes to our shipping options, with additional choices for some regions to make sure that you can easily track your purchases and receive timely and reliable deliveries, even if you’re a long way from the Raspberry Pi Press printshop.

Customers in the UK, the EU, North America, Australia, and New Zealand won’t see any changes to delivery options. We continue to work to make sure we’re offering the best price and service we can for everyone, no matter where you are.
So hop on over to the new and improved Raspberry Pi Press website to see the changes for yourself. And if you have any feedback, feel free to drop Oli and the team an email at rpipresshelp@raspberrypi.com.
The post The Raspberry Pi Press store is looking mighty fine appeared first on Raspberry Pi.
Did you know: the first machine to break the exaflop barrier (one quintillion floating‑point operations per second) wasn’t a huge dedicated IBM supercomputer, but a bunch of interconnected PCs with ordinary CPUs and gaming GPUs.
With that in mind, welcome to the Folding@home project, which is targeting its enormous power at COVID-19 research. It’s effectively the world’s fastest supercomputer, and your PC can be a part of it.
The Folding@home project is now targeting COVID-19 research
Put simply, Folding@home runs hugely complicated simulations of protein molecules for medical research. They would usually take hundreds of years for a typical computer to process. However, by breaking them up into smaller work units, and farming them out to thousands of independent machines on the Internet, it’s possible to run simulations that would be impossible to run experimentally.
Back in 2004, Custom PC magazine started its own Folding@home team. The team is currently sitting at number 12 on the world leaderboard and we’re still going strong. If you have a PC, you can join us (or indeed any Folding@home team) and put your spare clock cycles towards COVID-19 research.
Getting your machine folding is simple. First, download the client. Your username can be whatever you like, and you’ll need to put in team number 35947 to fold for the Custom PC & bit-tech team. If you want your PC to work on COVID-19 research, select ‘COVID-19’ in the ‘I support research finding’ pulldown menu.
Enter team number 35947 to fold for the Custom PC & bit-tech team
You’ll get the most points per Watt from GPU folding, but your CPU can also perform valuable research that can’t be done on your GPU. ‘There are actually some things we can do on CPUs that we can’t do on GPUs,’ said Professor Greg Bowman, Director of Folding@home, speaking to Custom PC in the latest issue.
‘With the current pandemic in mind, one of the things we’re doing is what are called “free energy calculations”. We’re simulating proteins with small molecules that we think might be useful starting points for developing therapeutics, for example.’
If you want your PC to work on COVID-19 research, select ‘COVID-19’ in the ‘I support research finding’ pulldown menu
Bear in mind that enabling folding on your machine will increase power consumption. For reference, we set up folding on a Ryzen 7 2700X rig with a GeForce GTX 1070 Ti. The machine consumes around 70W when idle. That figure increases to 214W when folding on the CPU and around 320W when folding on the GPU as well. If you fold a lot, you’ll see an increase in your electricity bill, so keep an eye on it.
Could we also see Folding@home running on Arm machines, such as Raspberry Pi? ‘Oh I would love to have Folding@home running on Arm,’ says Bowman. ‘I mean they’re used in Raspberry Pis and lots of phones, so I think this would be a great future direction. We’re actually in contact with some folks to explore getting Folding@home running on Arm in the near future.’
In the meantime, you can still recruit your Raspberry Pi for the cause by participating in Rosetta@home, a similar project also working to help the fight against COVID-19. For more information, visit the Rosetta@home website.
You’ll also find a full feature about Folding@home and its COVID-19 research in Issue 202 of Custom PC, available from the Raspberry Pi Press online store.
The post Help medical research with folding@home appeared first on Raspberry Pi.
As many educators across the world are currently faced with implementing some form of remote teaching during school closures, we thought this topic was ideal for the very first of our seminar series about computing education research.
![]()
At the Raspberry Pi Foundation, we are hosting a free online seminar every second Tuesday to explore a wide variety of topics in the area of digital and computing education. Last Tuesday we were delighted to welcome Dr Lauren Margulieux, Assistant Professor of Learning Sciences at Georgia State University, USA. She shared her findings about different remote teaching approaches and practical tips for educators in the current crisis.
![]()
Lauren’s research interests are in educational technology and online learning, particularly for computing education. She focuses on designing instructions in a way that supports online students who do not necessarily have immediate access to a teacher or instructor to ask questions or overcome problem-solving impasses.
In non-pandemic situations, online instruction comes in many forms to serve many purposes, both in higher education and in K-12 (primary and secondary school). Much research has been carried out in how online learning can be used for successful learning outcomes, and in particular, how it can be blended with face-to-face (hybrid learning) to maximise the impact of both contexts.
![]()
In her seminar talk, Lauren helped us to understand the different ways in which online learning can take place, by sharing with us vocabulary to better describe different ways of learning with and through technology.
Lauren presented a taxonomy for classifying types of online and blended teaching and learning in two dimensions (shown in the image below). These are delivery type (technology or instructor), and whether content is received by learners, or actually being applied in the learning experience.
![]()
In Lauren’s words: “The taxonomy represents the four things that we control as instructors. We can’t control whether our students talk to each other or email each other, or ask each other questions […], therefore this taxonomy gives us a tool for defining how we design our classes.”
This taxonomy illustrates that there are a number of different ways in which the four types of instruction — instructor-transmitted, instructor-mediated, technology-transmitted, and technology-mediated — can be combined in a learning experience that uses both online and face-to-face elements.
![]()
Using her taxonomy in an examination (meta-analysis) of 49 studies relating to computer science teaching in higher education, Lauren found a range of different ways of mixing instruction, which are shown in the graph below.
![]()
Lauren’s examination found that the flipped blend approach was most likely to demonstrate improved learning outcomes. This is a useful finding for the many schools (and universities) that are experimenting with a range of different approaches to remote teaching.
Another finding of Lauren’s study was that approaches that involve the giving of feedback promoted improved learning. This has also been found in studies of assessment for learning, most notably by Black and Wiliam. As Lauren pointed out, the implication is that the reason blended and flipped learning approaches are the most impactful is that they include face-to-face or synchronous time for the educator to discuss learning with the students, including giving feedback.
Of course we currently find ourselves in the midst of school closures across the world, so our only option in these circumstances is to teach online. In her seminar talk, Lauren also included some tips from her own experience to help educators trying to support their students during the current crisis:
Although Lauren’s experience is primarily from higher education (post-18), this advice is also useful for K-12 educators.
All our seminars include an opportunity to break out into small discussion groups, followed by an opportunity to ask questions of the speaker. We had an animated follow-up discussion with Lauren, with many questions focused on issues of representation and inclusion. Some questions related to the digital divide and how we could support learners who didn’t have access to the technology they need. There were also questions from breakout groups about the participation of groups that are typically under-represented in computing education in online learning experiences, and accessibility for those with special educational needs and disabilities (SEND). While there is more work needed in this area, there’s also no one-size-fits-all approach to working with students with special needs, whether that’s due to SEND or to material resources (e.g. access to technology). What works for one student based on their needs might be entirely ineffective for others. Overall, the group concluded that there was a need for much more research in these areas, particularly at K-12 level.
![]()
Much anxiety has been expressed in the media, and more formally through bodies such as the World Economic Forum and UNESCO, about the potential long-lasting educational impact of the current period of school closures on disadvantaged students and communities. Research into the most inclusive way of supporting students through remote teaching will help here, as will the efforts of governments, charities, and philanthropists to provide access to technology to learners in need.
At the Raspberry Pi Foundation, we offer lots of free resources for students, educators, and parents to help them engage with computing education during the current school closures and beyond.
Lauren’s seminar made it clear to me that she was able to draw on decades of research studies into online and hybrid learning, and that we should take lessons from these before jumping to conclusions about the future. In both higher education (tertiary, university) and K-12 (primary, secondary) education contexts, we do not yet know the educational impact of the teaching experiments we have found ourselves engaging in at short notice. As Charles Hodges and colleagues wrote recently in Educause, what we are currently engaging in can only really be described as emergency remote teaching, which stands in stark contrast to planned online learning that is designed much more carefully with pedagogy, assessment, and equity in mind. We should ensure we learn lessons from the online learning research community rather than making it up as we go along.
![]()
Today many writers are reflecting on the educational climate we find ourselves in and on how it will impact educational policy and decision-making in the future. For example, an article from the Brookings Institution suggests that the experiences of home teaching and learning that we’ve had in the last couple of months may lead to both an increased use of online tools at home, an increase in home schooling, and a move towards competency-based learning. An article by Jo Johnson (President’s Professorial Fellow at King’s College London) on the impact of the pandemic on higher education, suggests that traditional universities will suffer financially due to a loss of income from international students less likely to travel to universities in the UK, USA, and Australia, but that the crisis will accelerate take-up of online, distance-learning, and blended courses for far-sighted and well-organised institutions that are ready to embrace this opportunity, in sum broadening participation and reducing elitism. We all need to be ready and open to the ways in which online and hybrid learning may change the academic world as we know it.
If you missed this seminar, you can find Lauren’s presentation slides and a recording of her talk on our seminars page.
Next Tuesday, 19 May at 17:00–18:00 BST, we will welcome Juan David Rodríguez from the Instituto Nacional de Tecnologías Educativas y de Formación del Profesorado (INTEF) in Spain. His seminar talk will be about learning AI at school, and about a new tool called LearningML. To join the seminar, simply sign up with your name and email address and we’ll email the link and instructions. If you attended Lauren’s seminar, the link remains the same.
The post Making the best of it: online learning and remote teaching appeared first on Raspberry Pi.
Take a musical trip down memory lane all the way back to the 1920s.
Sick of listening to the same dozen albums on repeat, or feeling stifled by the funnel of near-identical YouTube playlist rabbit holes? If you’re looking to broaden your musical horizons and combine that quest with a vintage-themed Raspberry Pi–powered project, here’s a great idea…
![]()
Alex created a ‘Radio Time Machine’ that covers 10 decades of music, from the 1920s up to the 2020s. Each decade has its own Spotify playlist, with hundreds of songs from that decade played randomly. This project with the look of a vintage radio offers a great, immersive learning experience and should throw up tonnes of musical talent you’ve never heard of.
In the comments section of their reddit post, Alex explained that replacing the screen of the vintage shell they housed the tech in was the hardest part of the build. On the screen, each decade is represented with a unique icon, from a gramophone, through to a cassette tape and the cloud. Here’s a closer look at it:
![]()
Now let’s take a look at the hardware and software it took to pull the whole project together…
Hardware:
The Raspberry Pi 4 audio output is connected to the auxiliary input on the radio (3.5mm jack).
Software:
Take a look at the video on reddit to hear the Radio Time Machine in action. The added detail of the white noise that sounds as the dial is turned to switch between decades is especially cool.
Alex even went to the trouble of sharing each decade’s playlist in the comments of their original reddit post.
Here you go:
1920s
1930s
1940s
1950s
1960s
1970s
1980s
1990s
2000s
2010s
Comment below to tell us which decade sounds the coolest to you. We’re nineties kids ourselves!
The post Go back in time with a Raspberry Pi-powered radio appeared first on Raspberry Pi.
Have all of y’all been hoarding toilet roll over recent weeks in an inexplicable response to the global pandemic, or is that just a quirk here in the UK? Well, the most inventive use of the essential household item we’ve ever seen is this musical project by Max Björverud.
Ahh, the dulcet tones of wall-mounted toilet roll holders, hey? This looks like one of those magical ‘how do they do that?’ projects but, rest assured, it’s all explicable.
Max explains that Singing Toilet is made possible with a Raspberry Pi running Pure Data. The invention also comprises a HiFiBerry Amp, an Arduino Mega, eight hall effect sensors, and eight magnets. The toilet roll holders are controlled with the hall effect sensors, and the magnets connect to the Arduino Mega.
In this video, you can see the hall effect sensor and the 3D-printed attachment that holds the magnet:
Max measures the speed of each toilet roll with a hall effect sensor and magnet. The audio is played and sampled with a Pure Data patch. In the comments on his original Reddit post, he says this was all pretty straight-forward but that it took a while to print a holder for the magnets, because you need to be able to change the toilet rolls when the precious bathroom tissue runs out!
Max began prototyping his invention last summer and installed it at creative agency Snask in his hometown of Stockholm in December.
The post These loo rolls formed a choir appeared first on Raspberry Pi.
You don’t need me to tell you about the unprecedented situation that the world is facing at the moment. We’re all in the same boat, so I won’t say anything about it other than I hope you stay safe and take care of yourself and your loved ones.
The other thing I will say is that every year, Raspberry Pi Press produces thousands of pages of exciting, entertaining, and often educational content for lovers of computing, technology, games, and photography.
In times of difficulty, it’s not uncommon for people to find solace in their hobbies. The problem you’ll find yourself with is that it’s almost impossible to buy a magazine at the moment, at least in the UK: most of the shops that sell them are closed (and even most of their online stores are too).
We’re a proactive bunch, so we’ve done something about that:
From today, you can subscribe to The MagPi, HackSpace magazine, Custom PC, or Digital SLR Photography at a cost of three issues for £10 in the UK – and we’re giving you a little extra too.
We like to think we produce some of the best-quality magazines on the market today (and you only have to ask our mums if you want a second opinion). In fact, we’d go as far as to say our magazines are exactly the right mix of words and pictures for making the most of all the extra home-time you and your loved ones are having.
If you take us up on this offer, we’ll send the magazines direct to your door in the UK, with free postage. And we’re also adding a gift to thank you for signing up: on top of your magazines, you’ll get to choose a book that’s worth £10 in itself.
In taking up this offer, you’ll get some terrific reading material, and we’ll deliver it all straight to you — no waiting around. And of course you’ll also be actively supporting great independent journalism.
I hope that among our magazines, you’ll find something that’s of interest to you or, even better yet, something that sparks a new interest. Enjoy your reading!
The post Special offer for magazine readers appeared first on Raspberry Pi.
![]() In this guest blog post, OpenFaaS founder and Raspberry Pi super-builder Alex Ellis walks us down a five-year-long memory lane explaining how things have changed for cluster users.
In this guest blog post, OpenFaaS founder and Raspberry Pi super-builder Alex Ellis walks us down a five-year-long memory lane explaining how things have changed for cluster users.
I’ve been writing about running Docker on Raspberry Pi for five years now and things have got a lot easier than when I started back in the day. There’s now no need to patch the kernel, use a bespoke OS, or even build Go and Docker from scratch.
My stack of seven Raspberry Pi 2s running Docker Swarm (2016)
Since my first blog post and printed article, I noticed that Raspberry Pi clusters were a hot topic. They’ve only got even hotter as the technology got easier to use and the devices became more powerful.
![]()
Back then we used ‘old Swarm‘, which was arguably more like Kubernetes with swappable orchestration and a remote API that could run containers. Load-balancing wasn’t built-in, and so we used Nginx to do that job.
I built out a special demo using kit from Pimoroni.com. Each LED lit up when a HTTP request came in.
Docker load-balanced LED cluster Raspberry Pi
Ask questions and get all the details including the code over on the blog at: http://blog.alexellis.io/iot-docker-cluster/
After that, I adapted the code and added in some IoT sensor boards to create a smart datacenter and was invited to present the demo at Dockercon 2016:
IoT Dockercon Demo
Get all the write-up here: http://blog.alexellis.io/meet-me-at-dockercon/
Docker then released a newer version of Swarm also called ‘Swarm’ and I wrote up these posts:
Docker Swarm mode Deep Dive on Raspberry Pi (scaled)
Please Subscribe to the channel! Get all the details @ http://blog.alexellis.io/live-deep-dive-pi-swarm/
This is still my most popular video on my YouTube channel.
Now that more and more people were trying out Docker on Raspberry Pi (arm), we had to educate them about not running potentially poisoned images from third-parties and how to port software to arm. I created a Git repository (alexellis/docker-arm) to provide a stack of common software.
I wanted to share with users how to use GPIO for accessing hardware and how to create an IoT doorbell. This was one of my first videos on the topic, a live run-through in one take.
Did you know? I used to run blog.alexellis.io on my Raspberry Pi 3
Then we all started trying to run upstream Kubernetes on our 1GB RAM Raspberry Pis with kubeadm. Lucas Käldström did much of the groundwork to port various Kubernetes components and even went as far as to fix some issues in the Go language.
I wrote a recap on everything you needed to know including exec format error and various other things. I also put together a solid set of instructions and workarounds for kubeadm on Raspberry Pi 2/3.
Users often ask what a practical use-case is for a cluster. They excel at running distributed web applications, and OpenFaaS is loved by developers for making it easy to build, deploy, monitor, and scale APIs.
In this post you’ll learn how to deploy a fun Pod to generate ASCII text, from there you can build your own with Python or any other language:
This blog post was one of the ones that got pinned onto the front page of Hacker News for some time, a great feeling when it happens, but something that only comes every now and then.
The instructions for kubeadm and Raspbian were breaking with every other minor release of Kubernetes, so I moved my original gist into a Git repo to accept PRs and to make the content more accessible.
I have to say that this is the one piece of Intellectual Property (IP) I own which has been plagiarised and passed-off the most.
You’ll find dozens of blog posts which are almost identical, even copying my typos. To begin with I found this passing-off of my work frustrating, but now I take it as a vote of confidence.
Shortly after this, Scott Hanselman found my post and we started to collaborate on getting .NET Core to work with OpenFaaS.
![]()
This lead to us co-presenting at NDC, London in early 2018. We were practising the demo the night before, and the idea was to use Pimoroni Blinkt! LEDs to show which Raspberry Pi a Pod (workload) was running on. We wanted the Pod to stop showing an animation and to get rescheduled when we pulled a network cable.
It wasn’t working how we expected, and Scott just said “I’ll phone Kelsey”, and Mr Hightower explained to us how to tune the kubelet tolerance flags.
As you can see from the demo, Kelsey’s advice worked out great!
Building a Raspberry Pi Kubernetes Cluster and running .NET Core – Alex Ellis & Scott Hanselman
Join Scott Hanselman and Alex Ellis as they discuss how you can create your own Raspberry Pi cluster that runs Kubernetes on the metal. Then, take it to the …
Fast forward and we’re no longer running Docker, or forcing upstream Kubernetes into 1GB of RAM, but running Rancher’s light-weight k3s in as much as 4GB of RAM.
k3s is a game-changer for small devices, but also runs well on regular PCs and cloud. A server takes just 500MB of RAM and each agent only requires 50MB of RAM due to the optimizations that Darren Shepherd was able to make.
I wrote a new Go CLI called k3sup (‘ketchup’) which made building clusters even easier than it was already and brought back some of the UX of the Docker Swarm CLI.
Kubernetes Homelab with Raspberry Pi 4
Join me for this hands-on tutorial where I build out a Kubernetes Homelab with a Raspberry Pi 4 and get internet access with a LoadBalancer, something normal…
To help combat the issues around the Kubernetes ecosystem and tooling like Helm, which wasn’t available for ARM, I started a new project named arkade . arkade makes it easy to install apps whether they use helm charts or kubectl for installation.
k3s, k3sup, and arkade are all combined in my latest post which includes installing OpenFaaS and the Kubernetes dashboard.
![]()
In late March I put together a webinar with Traefik to show off all the OpenFaaS tooling including k3sup and arkade to create a practical demo. The demo showed how to get a public IP for the Raspberry Pi cluster, how to integrate with GitHub webhooks and Postgresql.
The latest and most up-to-date tutorial, with everything set up step by step:
Cloud Native Tools for Developers with Alex Ellis and Alistair Hey
In this Traefik Online Meetup, Alex Ellis, Founder of OpenFaaS, and Alistair Hey, from the OpenFaaS community, will show you how to bootstrap a Kubernetes cl…
In the webinar you’ll find out how to get a public IP for your IngressController using the inlets-operator.
Some people try to reason about whether you should or should not build a cluster of Raspberry Pis. If you’re asking this question, then don’t do it and don’t ask me to convince you otherwise.
You don’t need special equipment, you don’t even need more than one Raspberry Pi, but I would recommend two or three for the best experience.
Kubernetes clusters are built to run web servers and APIs, not games like you do with your PC. They don’t magically combine the memory of each node into a single supercomputer, but allow for horizontal scaling, i.e. more replicas of the same thing.
Some popular software like Istio, Minio, Linkerd, Flux and SealedSecrets do not run on ARM devices because the maintainers are not incentivised to make them do so. It’s not trivial to port software to ARM and then to support that on an ongoing basis. Companies tend to have little interest since paying customers do not tend to use Raspberry Pis. You have to get ready to hear “no”, and sometimes you’ll be lucky enough to hear “not yet” instead.
If you compare my opening statement where we had to rebuild kernels from scratch, and even build binaries for Go, in order to build Docker, we live in a completely different world now. We’ve seen classic swarm, new swarm (swarmkit), Kubernetes, and now k3s become the platform of choice for clustering on the Raspberry Pi. Where will we be in another five years from now? I don’t know, but I suspect things will be better.
In my opinion, the primary reason to build a cluster is to learn and to explore what can be done. As a secondary gain, the skills that you build can be used for work in DevOps/Cloud Native, but if that’s all you want out of it, then fire up a few EC2 VMs on AWS.
Featured: my 24-node uber cluster, chassis by Bitscope.
Well, all of that should take you some time to watch, read, and to try out — probably less than five years. I would recommend working in reverse order from the Traefik webinar back or the homelab tutorial which includes a bill of materials.
Become an Insider via GitHub Sponsors to support my work and to receive regular email updates from me each week on Cloud Native, Kubernetes, OSS, and more: github.com/sponsors/alexellis
And you’ll find hundreds of blog posts on Docker, Kubernetes, Go, and more on my blog over at blog.alexellis.io.
The post Five years of Raspberry Pi clusters appeared first on Raspberry Pi.
Yoshi aside, we can’t think of anyone who isn’t a fan of the double jump. In their latest video, the Wireframe magazine team take a deep(ish) dive into one of video gaming’s most iconic moves.
What is the Double Jump | Wireframe Deep Dive
The humble jump got a kick in 1984 with the introduction of the double jump, a physicist’s worst nightmare and one of video gaming’s most iconic moves. Subsc…
Are you looking to upgrade your computer monitor? Last week, Custom PC magazine, a publication of Raspberry Pi Press, released their latest video discussing HDR monitors. Are you ready to upgrade, and more importantly, should you?
What is an HDR monitor? High dynamic range explained | Custom PC magazine
High dynamic range (HDR) monitors are all the rage, but what exactly is HDR and which monitors produce the best image quality? Check out our full HDR guide: …
We produce videos for all our Raspberry Pi Press publications, including magazines such as The MagPi and HackSpace magazine, as well as our book releases, such as Code the Classics and Build Your Own First-Person Shooter in Unity.
Subscribe to the Raspberry Pi Press YouTube channel today and click on the bell button to ensure you’re notified of all new releases. And, for our complete publication library, visit the Raspberry Pi Press online store.
The post Wireframe’s deep(ish) dive into the glorious double jump appeared first on Raspberry Pi.
Here’s our latest How to use video, showing you how to connect a button to your Raspberry Pi.
HOW TO USE a BUTTON with Raspberry Pi
Learn how to use a tactile button with your Raspberry Pi. They’re a great addition to any digital making project! Subscribe to our YouTube channel: http://rp…
Attaching a button to your Raspberry Pi is a great way of introducing digital making into your coding experience. Use it to play music, turn lights on and off, or even shut down your device.
Follow our other How to use videos to learn how to use a servo motor, LED, and Raspberry Pi camera module with your Raspberry Pi. Try linking them together to build something grander, such as a digital camera, a robot, or a music box.
You’ll find a full list of our current How to use videos here – be sure to subscribe to our channel for more content as we release it.
The post How to use a button with a Raspberry Pi appeared first on Raspberry Pi.