We shared Dennis Mellican’s overly effective anti-burglary project last month. Now he’s back with something a whole lot more musical and mini.
Dennis was inspired by other jukebox projects that use Raspberry Pi, NFC readers, and tags to make music play. Particularly this one by Mark Hank, which we shared on the blog last year. The video below shows Dennis’s first attempt at creating an NFC Raspberry Pi music player, similar to Mark’s.
After some poking around, Dennis realised that the LEGO Dimensions toy pad is a three-in-one NFC reader with its own light show. He hooked it up to a Raspberry Pi and developed a Python application to play music when LEGO Dimension Minifigures are placed on the toy pad. So, if an Elvis minifigure is placed on the reader, you’ll hear Elvis’s music.
The Raspberry Pi is hooked up to the LEGO Dimensions toy pad, with Musicfig (Dennis’s name for his creation) playing tracks via Spotify over Bluetooth. The small screen behind the minifigures is displaying the Musicfig web application which, like the Spotify app, displays the album art for the track that’s currently playing.
Spotify playback is optional, as you can use your own MP3 music file collection instead. You also don’t have to use LEGO Minifigures: most NFC-enabled devices or tags can be used, including Disney Infinity, Nintendo Amiibo, and Skylander toy characters.
Dennis thought Musicfig could be a great marketable LEGO product for kids and grown-ups alike, and and he submitted it to the LEGO Ideas website. Unfortunately, he had tinkered a little too much (we approve) and it wasn’t accepted, due to rules that don’t allow non-LEGO parts or customisations.
The LEGO Dimensions toy pad was discontinued in 2017, but Dennis has seen some sets on sale at a few department stores, and even more cheaply on second-hand market sites like Bricklink. We’ve spotted them on eBay and Amazon too. Dennis also advises that the toy pad often sells for less than a dedicated NFC reader.
Watch Dennis’s seven-year-old son Benny show you how it all works, from Elvis through to Prodigy via Daft Punk and Queen.
There are some really simple step-by-step instructions for a quick install here, as well as a larger gallery of Musicfig rigs. And Dennis hosts a more detailed walkthrough of the project, plus code examples, here.
You can find all things Dennis-related, including previous Raspberry Pi projects, here.
The post Raspberry Pi makes LEGO minifigures play their own music appeared first on Raspberry Pi.
Add a bit of security to your project or make things selectable
by using different cards. In the latest issue of HackSpace magazine, PJ Evans goes contactless.
NFC (near-field communication) is based on the RFID (radio-frequency identification) standard. Both allow a device to receive data from a passive token or tag (meaning it doesn’t require external power to work). RFID supports a simple ID message that shouts ‘I exist’, whereas NFC allows for both reading and writing of data.
Most people come into contact with these systems every day, whether it’s using contactless payment, or a card to unlock a hotel or office door. In this tutorial we’ll look at the Waveshare NFC HAT, an add-on for Raspberry Pi computers that allows you to interact with NFC and RFID tokens.
We start with the usual step of preparing a Raspberry Pi model for the job. Reading RFID tags is not strenuous work for our diminutive friend, so you can use pretty much any variant of the Raspberry Pi range you like, so long as it has the 40-pin GPIO. We only need Raspberry Pi OS Lite (Buster) for this tutorial; however, you can install any version you wish. Make sure you’ve configured it how you want, have a network connection, and have updated everything by running sudo apt -y update && sudo apt -y upgrade on the command line.
This NFC HAT is capable of communicating over three different interfaces: I2C, SPI, and UART. We’re going with UART as it’s the simplest to demonstrate, but you may wish to use the others. Start by running sudo raspi-config, going to ‘Interfacing options’, and selecting ‘Serial Interface’. When asked if you want to log into the console, say ‘No’. Then, when asked if you want to enable the serial interface, say ‘Yes’. You’ll need to reboot now. This will allow the HAT to talk to our Raspberry Pi over the serial interface.
As mentioned in the previous step, we have a choice of interfaces and swapping between them means changing some physical settings on the NFC HAT itself. Do not do this while the HAT is powered up in any way. Our HAT can be configured for UART/Serial by default but do check on the wiki at hsmag.cc/iHj1XA. The jumpers at I1 and I0 should both be shorting ‘L’, D16 and D20 should be shorted and on the DIP switch, everything should be off except RX and TX. Check, double-check, attach the HAT to the GPIO, and boot up.
You can download some examples directly from Waveshare. First, we need to install some dependencies. Run the following at the command line:sudo apt install rpi.gpio p7zip-full python3-pip
pip3 install spidev pyserial
Now, download the files and unpack them:cd
wget https://www.waveshare.com/w/upload/6/67/Pn532-nfc-hat-code.7z
7z x Pn532-nfc-hat-code.7z
Before you try anything out, you need to edit the example file so that we use UART (see the accompanying code listing).cd ~/raspberrypi/python
nano example_get_uid.py
Find the three lines that start pn532 = and add a # to the top one (to comment it out). Now remove the # from the line starting pn532 = PN532_UART. Save, and exit.
Finally, we get to the fun part. Start the example code as follows:python3 example_get_uid.py
If all is well, the connection to the HAT will be announced. You can now place your RFID token over the area of the HAT marked ‘NFC’. Hexadecimal numbers will start scrolling up the screen; your token has been detected! Each RFID token has a unique number, so it can be used to uniquely identify someone. However, this HAT is capable of much more than that as it also supports NFC and can communicate with common standards like MIFARE Classic, which allows for 1kB of storage on the card. Check out example_dump_mifare.py in the same directory (but make sure you make the same edits as above to use the serial connection).
You can now read unique identifiers on RFID and NFC tokens. As we just mentioned, if you’re using the MIFARE or NTAG2 standards, you can also write data back to the card. The examples folder contains some C programs that let you do just that. The ability to read and write small amounts of data onto cards can lead to some fun projects. At the Electromagnetic Field festival in 2018, an entire game was based around finding physical locations and registering your presence with a MIFARE card. Even more is possible with smartphones, where NFC can be used to exchange data in any form.
Each month, HackSpace magazine brings you the best projects, tips, tricks and tutorials from the makersphere. You can get it from the Raspberry Pi Press online store, The Raspberry Pi store in Cambridge, or your local newsagents.
Each issue is free to download from the HackSpace magazine website.
The post Read RFID and NFC tokens with Raspberry Pi | HackSpace 37 appeared first on Raspberry Pi.
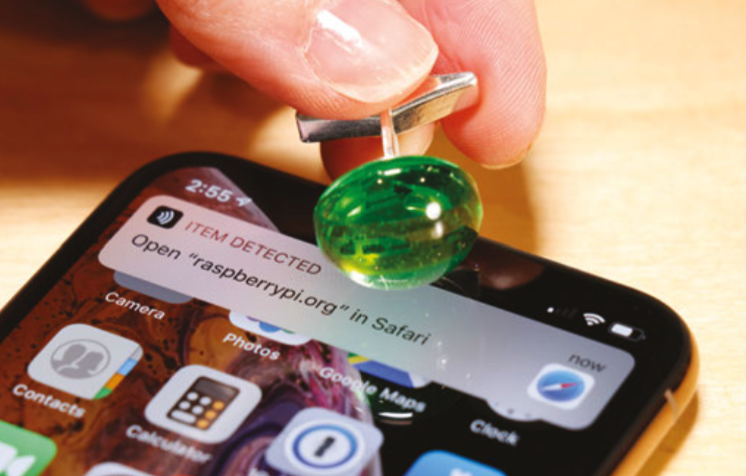
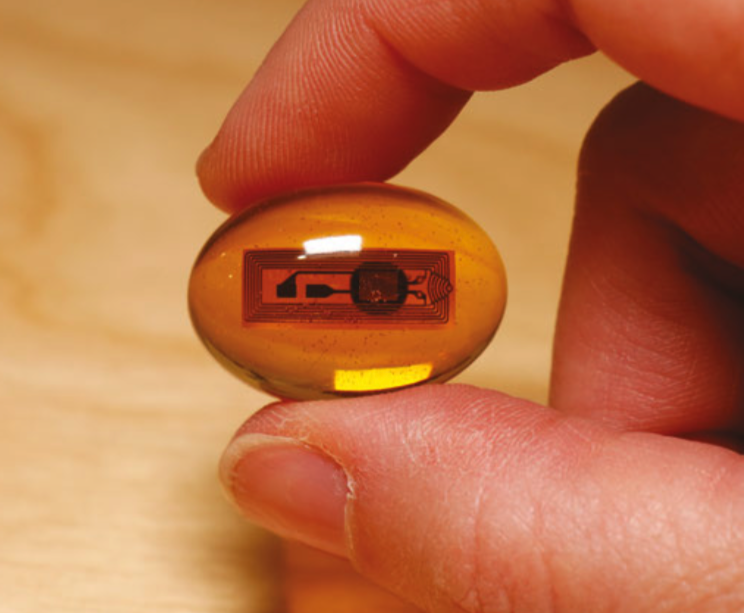
In this project, we’ll make a pair of NFC data cufflinks, ideal for storing a website URL, a password, or a secret message. This project is perfect for a sartorial spy who loves dry Martinis, and anyone who can’t remember their WiFi password.
NFC stands for near-field communication, and is a protocol that allows two devices to communicate wirelessly when they are physically near each other. An evolution of RFID, NFC is becoming increasingly popular in consumer technology, and is already commonly used in contactless payment systems and identification badges. NFC wristbands are also being used to create enhanced experiences for visitors at theme parks and other venues.
The rise of NFC hasn’t bypassed hobbyists and tinkerers, and companies like Pimoroni and Adafruit sell components that make it relatively easy to add NFC functionality to your projects. Here, we’ll make use of tiny NFC tags that can be read and written to by a smartphone or external NFC reader. The tags can be read through a non-metal barrier, like plastic, so we’ll embed the tag in resin to make an elegant cabochon for our cufflink. When complete, holding the cufflink to your smartphone or NFC reader will let you read or write data to the chip inside.
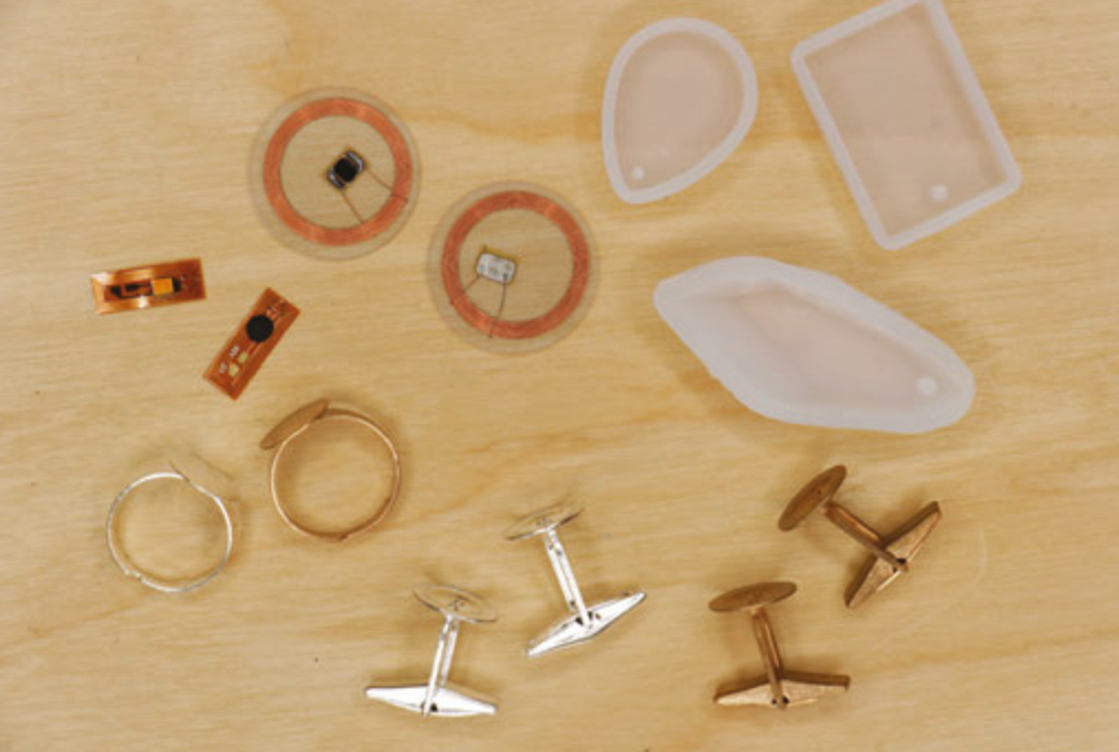
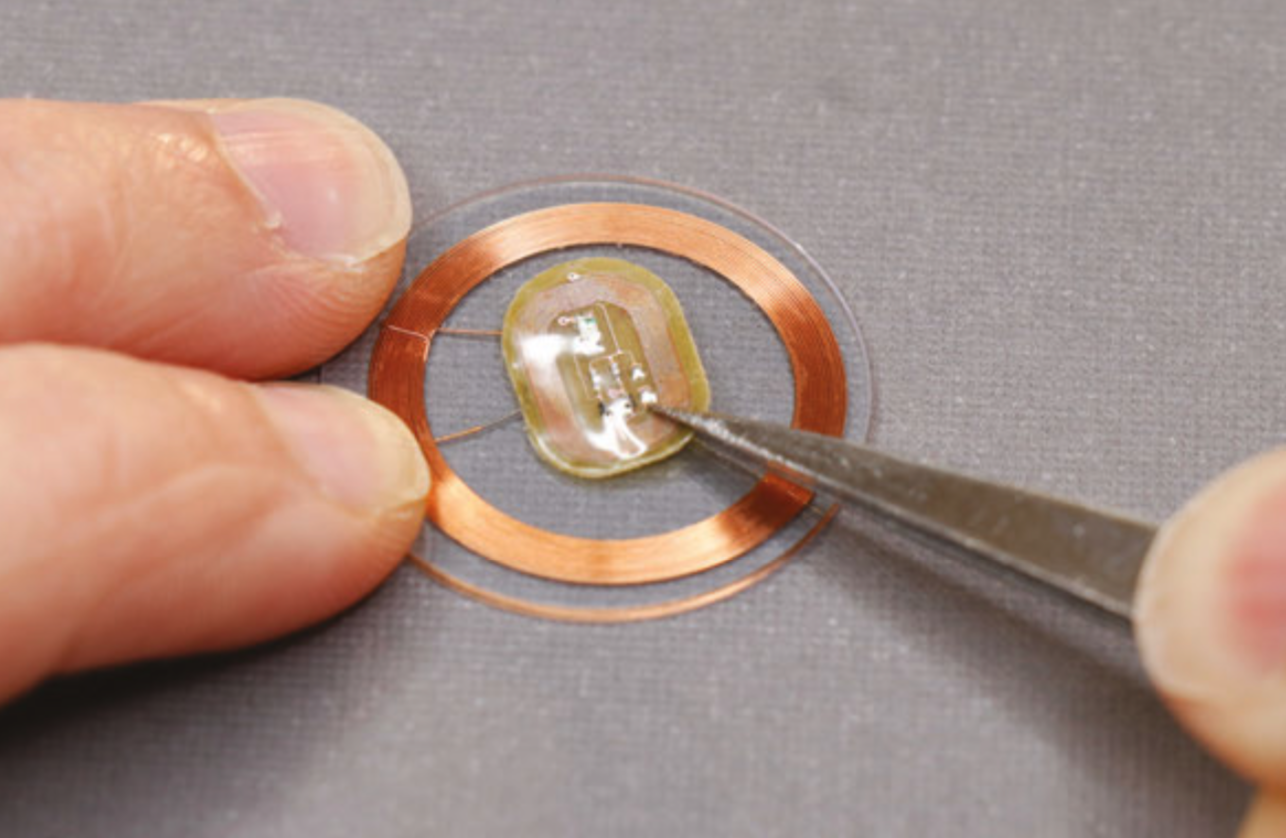
For this project we used the smallest NFC tags we could find, micro NFC/RFID transponders from Adafruit (product number 2800). These 15.6mm x 6mm flexible tags are formatted with the now standard NDEF format, and will work as-is with newer phones and most NFC readers. If you happen to pick up older Mifare Classic formatted tags, they may need to be reformatted as NDEF to work with your reader/writer. Reformatting isn’t a function of most NFC read/write apps, but it can be done with Adafruit’s PN532 NFC/RFID controller breakout board or shield.
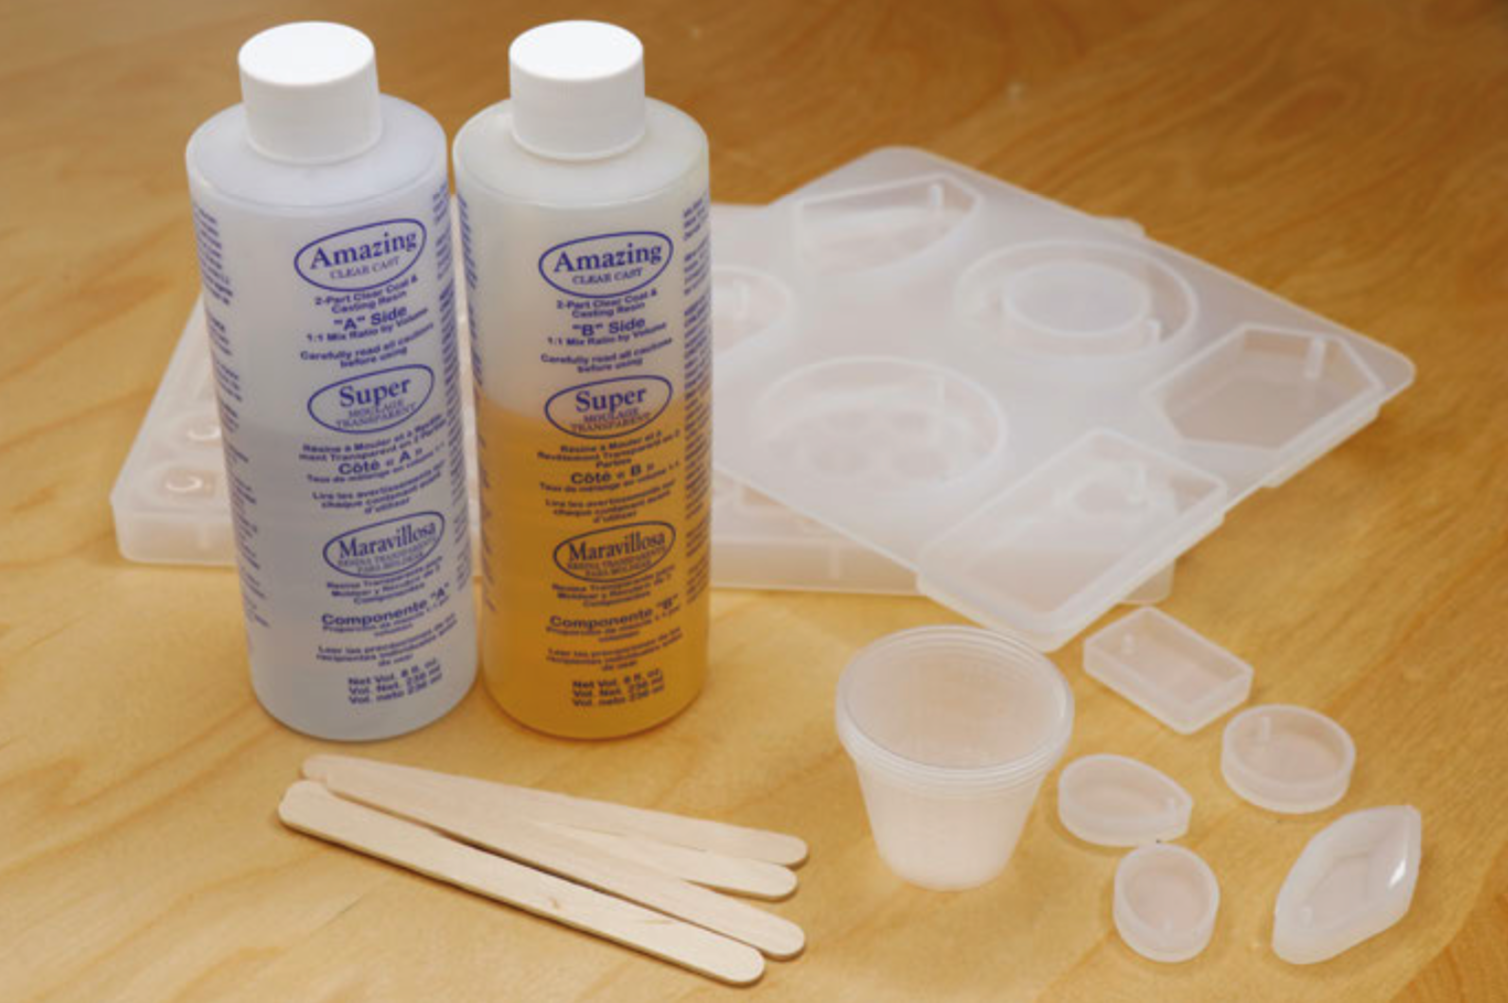
If this is your first time working with resin epoxy, get ready for a new, fun kind of mess! Resin epoxy comes in two parts that must be mixed together in equal proportions before use. Once mixed, the resin will be workable for a short period of time before entering the curing phase and hardening completely. Figuring out exactly how much resin to mix up is definitely an art. There are even some online tools available to help calculate this. For a small project like this, just make sure you mix up a bit more than you think you’ll need.
You don’t want to run out during the pour and have to quickly mix up more at the last minute. If you’re tinting your resin, you definitely want to pour all of your pieces from the same mix, as it’s almost impossible to match the colour of one batch of resin to another.
All of this means you’ll undoubtedly end up with more than just two cabochons for one pair of cufflinks, and if you’re going to make a mess anyway, why not go big? Pick up a few extra NFC tags and plan to pour some other pieces, like pendants or key chain fobs. These make great holiday or birthday gifts that are both technologically advanced and crafty at the same time!
Resin-cast jewellery has been made for decades and there are loads of options for resin moulds available at craft stores and online. The best moulds for resin are made of silicone. Flexible silicone moulds make it easy to remove the hardened pieces, and produce ultra-shiny surfaces. Cufflink blanks, ring blanks, and pendant bails can also be purchased at jewellery supply stores. Refer to your moulds when choosing cufflink and ring blanks, to make sure that the blanks will work with the size of cabochon you’ve chosen to cast, and vice versa.
Start by gathering your materials and setting up your workspace for working with resin. There will be a lot of stirring, pouring, and drips, and things are likely to get messy! Cover your work surface with paper and keep some paper towels nearby. Read and heed the safety warnings on your resin and hardener. Although some resins are considered non-toxic when used as directed, it’s always a good idea to work in a well-ventilated area and wear nitrile gloves to keep the resin off of your skin while working.
Once the two-part resin is mixed together, you will have a limited amount of time to pour the resin before it hardens, so planning and timing is key. Check the ‘pot life’ indicated on your resin; this is the amount of working time you’ll have after mixing before the resin begins to harden. Our resin had a pot life of 30 minutes. It can be helpful to set up a timer so you can keep track of time while you work.
If you have multiple moulds, decide which ones you will use before mixing, and make sure your NFC tags will fit into the shapes you plan to use. If you are making matching cufflinks, remember that you’ll need two identical shapes. Our tiny 15.6mm tags fit perfectly into 16mm cabochons. Remember that you will mix more resin than you need for just two cufflink cabochons, so it’s good to have extra moulds in front of you to pour into.
Unwrap the NFC tags and make sure they are clean and ready to be embedded in the resin. For a light-up effect, you may want to combine a data tag with an LED tag, like we did in one of our extra pieces. The back of the NFC LED nail sticker is adhesive, so it was easy to stick it directly to the larger data tag.
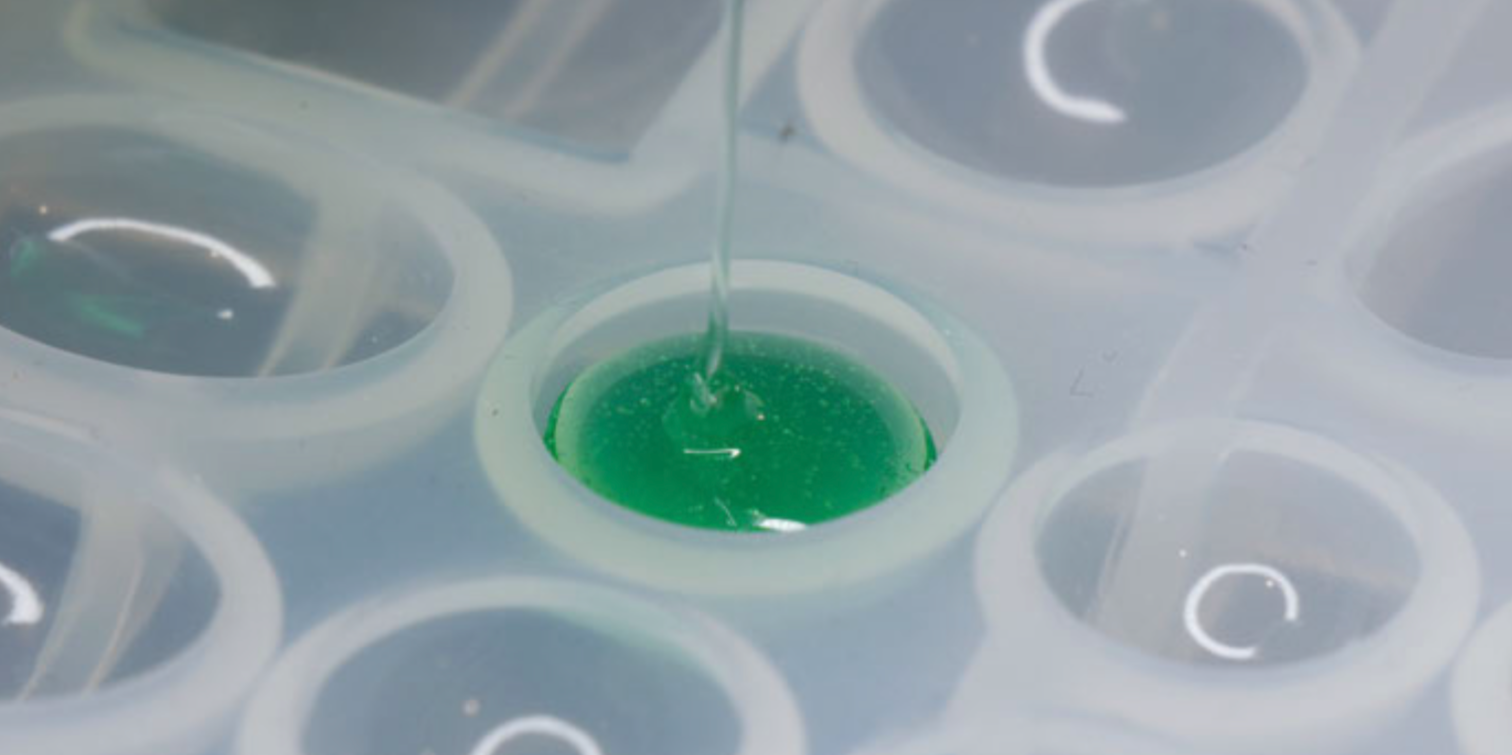
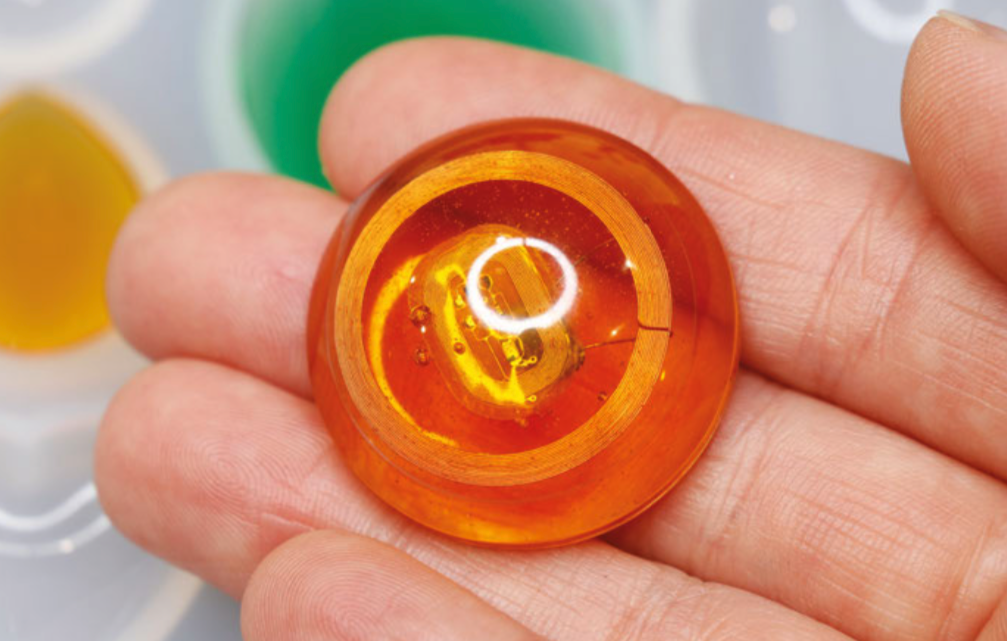
We mixed up about 6oz (170g) of resin, then tinted it green for a tech-emerald look. This was plenty for two cabochons and three to four extra shapes. Follow the manufacturer’s instructions to mix up your resin. Generally, it’s a 1:1 ratio by volume. A good method for this is to pour each part into matching containers, up to the same measuring mark. Then, pour both into a third cup and stir. Stir slowly, but thoroughly, for at least two or three minutes, making sure to scrape the sides of your mixing cup often. If the resin is not completely and evenly mixed, it will not cure properly. If tinting your resin, add the tint to your mixed resin one drop at a time, slowly deepening the colour to your preference.
Once your resin is mixed and tinted, you’ll notice lots of tiny bubbles that have been incorporated while you were stirring. Let the mixture rest for a few minutes so the bubbles can float to the top, then use a stick to move the bubbles to the side of your container and pop them.
When you’ve removed as many bubbles as possible, it’s time to pour! Place your moulds on a level surface where they’ll be able to sit undisturbed for the amount of time required to cure (check the manufacturer’s instructions; ours specified 24 hours curing time). Pour the resin in a thin stream into the deepest point of your mould, and let it slowly rise to just below the top lip of your mould. Don’t overfill the mould, or the resin will bow and have a convex bottom when you remove it from the mould. Pouring the resin in a thin stream can help pop larger bubbles that are still in the mix.
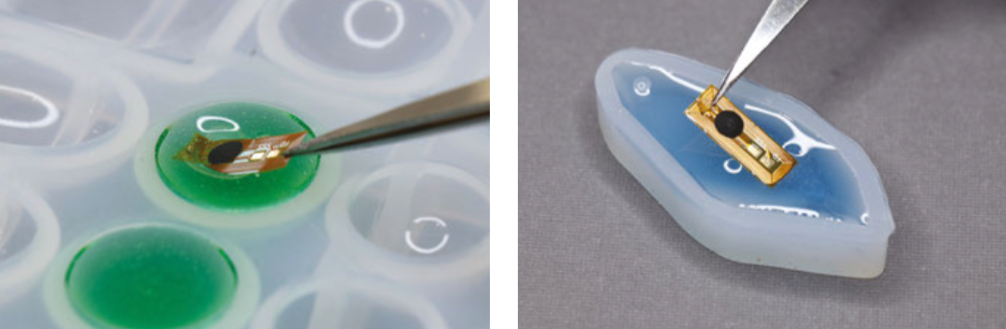
With the resin in your mould, you can slide the NFC tag into place. Using tweezers, dip the tag into your unpoured resin to coat it first – this will help the resin in your mould accept the tag without adding too many bubbles. Then, gently slide the tag into the mould and centre it in the resin. It will want to slowly sink to the bottom of the mould, and ideally it stays centred on the way down. You may need to wiggle it back into place with your tweezers or a thin stick, but try not to introduce any new bubbles.
After your resin is poured and the NFC tags are in place, let the resin sit in the moulds for about ten minutes. This is enough time for most of the bubbles to rise to the top surface. Then, spray a fine mist of isopropyl alcohol over the resin to pop the bubbles. This step is optional, but we noticed that it really helped achieve clearer results.
Repeat this process for all the moulds you want to pour and add NFC tags to. Check them after a few minutes to make sure your tag hasn’t slid out of place, and remember to keep an eye on your pot life timer. Finish all your fiddling and bubble popping before the resin starts to harden. Then, leave your resin to cure for the amount of time specified in your resin’s instructions.
When the resin has completely hardened, it’s time for the exciting part: removing the cured resin from the moulds. If using silicone moulds, your piece should release from the mould without much fuss. Gently flex the silicone to let air seep between the hardened resin and the wall of the mould. Then you should be able to carefully pull the resin piece out of the mould.
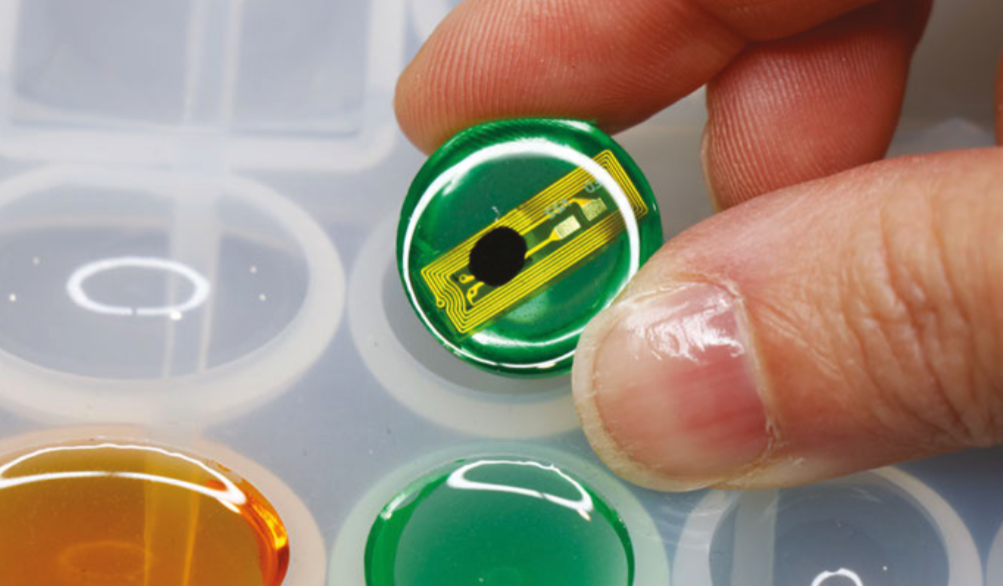
Take a moment to admire your shiny cabochons! If you discover that you’ve over-poured your moulds, or the resin has crept up the sides of the mould, making a curved back, don’t worry. Resin can be wet-sanded; just be sure to keep both the sandpaper and the piece underwater while sanding, and wear a mask to keep from inhaling resin particles.
Use glue to affix the flat-backed cabochons to the cufflink blanks. We used E6000, which is an industrial-strength adhesive that works great on plastics. Again, be sure to work in a well-ventilated area, and wear a respirator while working with E6000.
Apply the glue to the cufflink blank and hold the cabochon in place while the glue sets. Make two, and you’re done! You could also glue the cabochons to ring blanks to make NFC data rings. For pendants, you can use jewellery findings like bails and jump rings to make necklaces or key-chain fobs.
Now that you’ve made your NFC cufflinks, you can load them with data like a website, a password, or a secret message. There are a few methods for doing this. If you have an NFC-capable smartphone, such as an Android phone, you won’t need any additional hardware. You can download a free app like NFC Tools to write and read data on your cufflink. NFC Tasks, another free app, lets you create automatic actions for your phone to perform when the NFC tag is read.
If you have an iPhone, (at the time of publishing of this article) you cannot write directly to NFC tags from your phone. But don’t worry! You can still join the NFC fun by purchasing a USB NFC reader/writer. You’ll be able to read and write to NFC tags with your computer using the NFC Tools desktop app. Your author purchased the NFC reader/writer shown here for about $35 on Amazon.com. You can still use NFC Tools on your iPhone to read tags, and the latest version of iOS, 12.1, supports background NFC tag reading. Some basic actions, like opening a URL in a browser, can now be performed right from the home screen or lock screen – pretty cool!
For a more custom hardware/software approach, try Adafruit’s PN532 NFC/RFID controller breakout board, which lets you add NFC functionality to Raspberry Pi or Arduino projects. It takes some soldering and programming to set up, but this breakout gives you lower-level control of the NFC tag, and is supported by an Adafruit NFC Arduino library. The library includes handy example code for reading and writing to tags, and reformatting Mifare Classic tags with the NDEF format.
Sport your new cufflinks at your next dressy event, and you’ll be both covert and classy! Or, gift these to your favourite snappy dresser, loaded with a secret message for their eyes only. Heading to a conference? Instead of handing out a business card to connect with someone, hold your wrist over their smartphone to bring up your webpage. It’s not magic, it’s technology!
You can find more tutorials like this in Wearable Tech Projects by Sophy Wong, a HackSpace magazine publication. Wearable Tech Projects is on sale now from the Raspberry Pi Press online store, and it’s available as part of the Raspberry Pi Store Black Friday sale this weekend.

The post Make your own NFC data cufflinks appeared first on Raspberry Pi.