Today we are introducing you to Code Club World — a free online platform where young people aged 9 to 13 can learn to make stuff with code.
In Code Club World, young people can:
When we spoke to parents and children about learning at home during the pandemic, it became clear to us that they were looking for educational tools that the children can enjoy and master independently, and that are as fun and social as the computer games and other apps the children love.
What’s more, a free tool for learning to code at home is particularly important for young people who are unable to attend coding clubs in person. We believe every child should have access to a high-quality coding and digital making education. And with this in mind, we set out to create Code Club World, an online environment as rich and engaging as a face-to-face extracurricular learning experience, where all young people can learn to code.
The Code Club World activities are mapped to our research-informed Digital Making Framework — a coding and digital making curriculum for non-formal settings. That means when children are in the Code Club World environment, they are learning to code and use digital making to independently create their ideas and address challenges that matter to them.
By providing a structured pathway through the coding activities, a reward system of badges to engage and motivate learners, and a broad range of projects covering different topics, Code Club World supports learners at every stage, while making the activities meaningful, fun, and flexible.
We’ve also designed Code Club World to be mobile-friendly, so if a young person uses a phone or tablet to visit the platform, they can still code cool things they will be proud of.
Since we started developing Code Club World, we have been working with a community of more than 1000 parents, educators, and children who are giving us valuable input to shape the direction of the platform. We’ve had some fantastic feedback from them:
“I’ve not coded before, but found this really fun! … I LOVED making the dance. It was so much fun and made me laugh!”
Learner, aged 11
“I love the concept of having islands to explore in making the journey through learning coding, it is fabulous and eye-catching.”
Parent
The platform is still in beta status — this means we’d love you to share it with young people in your family, school, or community so they can give their feedback and help make Code Club World even better.
Together, we will ensure every child has an equal opportunity to learn to code and make things that change their world.
The post Introducing Code Club World: a new way for young people to learn to code at home appeared first on Raspberry Pi.
Before we meet Stan Dmitriev of Surrogate.tv on this week’s Digital Making at Home live stream, we decided to learn more about the platform so we can get excited ahead of time.
Surrogate.tv is a platform for remote play experiences. That’s where creators hook up things like robots, consoles, RC cars, cat lasers, or anything else they can imagine to the internet, and let anyone in the world connect to them and control them remotely. And it’s all done using a Raspberry Pi.
Last year The MagPi Magazine covered Surrogate.tv‘s Oktoberfest Pinball Machine. This allowed anyone from anywhere in the world to queue up and play a real physical pinball machine over the internet. A single Raspberry Pi 4B powered the whole set up, which combined and encoded two camera feeds into a single low-latency stream for the players, and let them fully control the pinball machine with the help of a custom Raspberry Pi HAT.
The goal of the project was to showcase what’s possible with Surrogate.tv’s streaming and robotics control SDK, called SurroRTG. At the time, the SDK was still in development, but since then it has become available for anyone to use to create remote operation and cloud gaming experiences with Raspberry Pi.
For people who aren’t confident with coding, the team is constantly adding new game templates to their open-source Python SDK, which allows creators to easily connect things to the platform. Templates include robots like Sphero RVR, consoles such as Nintendo Switch, relay boards (to control anything that has buttons, like a pinball machine or a handheld remote control), and an RC Car game template.
Creators with more programming experience can follow the documentation and hook up just about anything to the internet by integrating their own device with the SurroRTG Python SDK. The process steps are well-described in the SDK’s documentation, and it can be accessed freely from GitHub.
“So far creators have been really going all-in with their projects on the platform. One user, Carlitto, created a drone racing game and enabled his friend from New Zealand to fly a drone in the UK from literally another side of the world. Another creator, Mordecai, hooked their Nintendo Switch console to Surrogate.tv and using the Raspberry Pi 4 compute capabilities added 60+ custom image recognition events to track different custom achievements in Zelda Breath of the Wild, making it a challenging and fun experience for the players.
Stan Dmitriev CMO at Surrogate.tv
Overall, it’s amazing what people have been up to already, and we can’t wait to see what other awesome projects creators will come up with in the coming months.”
To help creators with their projects, the company has also launched a new monthly initiative called “Creators Fund”. Every month, the team covers the costs of ten projects for creators who have the skills and a great idea, but don’t have the hardware to make it happen.
Fancy having a play? To get started with Surrogate’s SDK, all you need is a Raspberry Pi 3 or 4, a 16GB SD card, a Raspberry Pi camera or a USB webcam, and around 20 minutes of your time. Start off at surrogate.tv/creators.
Join young people from all over the world on the Raspberry Pi Foundation’s weekly live stream. Chat, code together, hear from cool people, and see amazing digital making projects.
Subscribe on YouTube to get notifications when we go live, or watch on Facebook, Twitter, and Twitch.
The post A Raspberry Pi-powered platform for remote play experiences appeared first on Raspberry Pi.
YouTuber Chris Courses takes hydration seriously, but all those minutes spent filling up water bottles take a toll. 15 hours per year, to be exact. Chris regularly uses three differently sized water bottles and wanted to build something to fill them all to their exact measurements.
(Polite readers may like to be warned of a couple of bleeped swears and a rude whiteboard drawing a few minutes into this video.)
The solenoid valve determines when water can and cannot pass through. Mains water comes in through one tube and passes through the water filter, then the solenoid valve releases water via another tube into the bottle.
The Raspberry Pi sends a signal to the solenoid valve telling it to open for a specific amount of time — the length of time it takes to fill a particular water bottle — and to close when that time expires. Chris set this up to start running when he clicks a physical button.
Chris also programmed lights to indicate when the dispenser is turned on. This manual coding proved to be the most time-consuming part of the project.
Chris agreed, so he 3D-printed a beautiful enclosure to house what he dubs the ‘Hydrobot 5000’. It’s a sleek black casing that sits pretty in his kitchen on a wall next to the fridge. It took a fair bit of fridge shuffling and electrical mounting to “sit pretty”, however. This Raspberry Pi-powered creation needed to be connected to a water source, so the tubing had to be snaked from Hydrobot 5000, behind appliances, to the kitchen sink.
Check out those disco lights! Nice work, Chris. Follow Chris on YouTube for loads more coding and dev videos.
The post Raspberry Pi automatically refills your water bottle appeared first on Raspberry Pi.
Since launching our first-ever Pi Day fundraising campaign, we’ve been absolutely amazed by the generous support so many of you have shown for the young learners and creators in our community. Together, our Pi Day donors have stepped up to make an impact on over 20,000 learners (and counting!) who rely on the Raspberry Pi Foundation’s free digital making projects and online learning resources.
We need your help to keep the momentum going until 14 March, so that as many young people as possible gain the opportunity to develop new skills and get creative with computing. If you are able to contribute, there’s still time for you to join in with a gift of £3.14, £31.42, or perhaps even more.
We can’t thank you enough for your support, and as a way to show our gratitude, we offer you the option to see your name listed as a Pi Day donor in an upcoming issue of The MagPi magazine!
We’d also like to invite you to our virtual Pi Day celebration! This Sunday at 7pm GMT, we’ll host a special episode of Digital Making at Home, our weekly live stream for families and young digital makers. Eben will be on to share the story of Raspberry Pi, and of course we’ll be making something cool with Raspberry Pi and celebrating with all of you. Subscribe to the Foundation’s YouTube channel and turn on notifications to get a reminder about when we go live.
Last but not least, we’d like to extend a big thank you to OKdo. They’re celebrating Pi Day with special deals throughout the weekend, and a generous 50% of those proceeds will be donated to the Raspberry Pi Foundation.
“We’re delighted to be supporting Raspberry Pi’s first ever Pi Day Campaign. Events like this are vital to aid our mutual mission to make technology accessible to young people all over the world. At OKdo we exist to spark a love of computing for children and help them to develop new skills so that they have every possible chance to fulfil their potential.”
Richard Curtin, OKdo’s SVP
We’re grateful to OKdo for championing our Pi Day campaign along with our friends at EPAM Systems and CanaKit.
Happy Pi Day, and we can’t wait to celebrate with you this weekend!
The post Celebrate Pi Day with us appeared first on Raspberry Pi.
One of the harsh lessons we learned last year was that far too many young people still don’t have a computer for learning at home. There has always been a digital divide; the pandemic has just put it centre-stage. The good news is that the cost of solving this problem is now trivial compared to the cost of allowing it to persist.
Removing price as a barrier to anyone owning a computer was part of the founding mission of Raspberry Pi, which is why we so work hard to make sure that Raspberry Pi computers are as low-cost as possible for everyone, all of the time. We saw an incredible rise in the numbers of people — particularly young people — using Raspberry Pi computers as their main desktop PC during the lockdown, helped by the timely arrival of the fabulous Raspberry Pi 400.
As part of our response to the pandemic, the Raspberry Pi Foundation teamed up with UK Youth and a network of grassroots youth and community organisations to get Raspberry Pi desktop kits (with monitors, webcams, and headphones) into the hands of disadvantaged young people across the UK. These were young people who didn’t qualify for the government laptop scheme and who otherwise didn’t have a computer to learn at home.
This wasn’t just about shipping hardware (that’s the easy bit). We trained youth workers and teachers, and we worked closely with families to make sure that they could set up and use the computers. We did a huge amount of work to make sure that the educational platforms and apps they needed worked out of the box, and we provided a customised operating system image with free educational resources and enhanced parental controls.
The impact has been immediate: young people engaging with learning; parents who reported positive changes in their children’s attitude and behaviour; youth and social workers who have deepened their relationship with families, enabling them to provide better support.
You can read more about the impact we’re having in the evaluation report for the first phases of the programme, which we published last week.
After a successful pilot programme generously funded by the Bloomfield Trust, we launched the Learn at Home fundraising campaign in December, inviting businesses and individuals to donate money to enable us to expand the programme. I am absolutely thrilled that more than 70 organisations and individuals have so far donated an incredible £900,000 and we are on track to deliver our 5000th Raspberry Pi kit in March.
While the pandemic shone a bright spotlight onto the digital divide, this isn’t just a problem while we are in lockdown. We’ve known for a long time that having a computer to learn at home can be transformational for any young person.
If you would like to get involved in helping us make sure that every young person has access to a computer to learn at home, we’d love to hear from you. Find out more details on our website, or email us at partners@raspberrypi.org.
The post Closing the digital divide with Raspberry Pi computers appeared first on Raspberry Pi.
Do you remember the Danger Shed? New Orleans-based Raspberry Pi-powered home brewing monitoring set up in a… shed? Well, Patrick Murphy and his brewing crew are back with a new toy.
It’s called Keg Punk – inventory software written in Python, specifically for running on Raspberry Pi and the 7″ Raspberry Pi Touch Display. You mount the touchscreen station in a convenient place and run the program on an embedded Raspberry Pi 4.
Keg Punk is written in Python and is about 2500 lines of code. Since the program is small with a simple interface, it runs on anything from Raspberry Pi Zero to Raspberry Pi 4.
As a manager at a local craft brewery, Patrick hated not knowing (or not being able to remember) how many kegs of each beer were left in the cellar.
So he started developing a cellar inventory program with the intention of being able to run it within arm’s reach of the beer taps.
The station needed to have a touchscreen and be tough enough to cope with harsh environments (beer gets EVERYWHERE). Raspberry Pi is the perfect platform for the job as it’s small and easy to connect a touchscreen to.
It can be mounted discreetly close to workstations, so bartenders can quickly see how much stock is left without needing to go down to the cellar.
While requirements in a professional setting inspired the idea of Keg Punk, it was developed with the home brewer in mind. The touchscreen station can easily be mounted to a kegerator (a portmanteau of keg and refrigerator) and the tap display can be configured to your setup.
One of the things the Danger Shed team admire most about Raspberry Pi users is their willingness to do a little hands-on tinkering. With that in mind, they launched Keg Punk in three packages, so you can choose an option based on how much of that you’d like to do:
The Taproom Package: This is a full plug-in-and-go setup for those who don’t have a Raspberry Pi or who simply do not have time to tinker while also running a bar.
Keg Punk pre-loaded SD card: Perfect for beer slingers who already have a Raspberry Pi but don’t want to install on their current SD card or deal with the hassle of installation.
Keg Punk software only: If you already have a Raspberry Pi and don’t mind a fair bit of tinkering, you can download the Keg Punk software and manually install.
The post Check beer stock with Keg Punk on Raspberry Pi appeared first on Raspberry Pi.
With so many people all over the world still living in various levels of lockdown, we’ve been working hard to provide free, creative project resources for you to keep young digital makers occupied, learning, and most importantly having fun.
As a dad of two, I know how useful it is to have resources and project ideas for things that we can do together, or that the kids can crack on with independently. As we head into the weekend, I thought I’d share a few ideas for where to get started.
We offer hundreds of self-guided projects for learning to create with code using tools like Scratch, Python, and more. The projects can be completed online on any computer, they are tailored for different levels of experience, and they include step-by-step guidance that quickly leads to confident, independent young digital makers.
We recently launched a new set of beginner Scratch projects on the theme of ‘Look after yourself’, which include activities designed to help young people take care of their own wellbeing while getting creative with code. They are brilliant.
“I am so excited by the [‘Look after yourself’] projects on offer. It couldn’t be more perfect for everything we are navigating right now.”
– teacher in Scotland
We offer lots of project ideas for the more advanced learners too, including a new set of Python machine learning projects.
With spring in the air here in Cambridge, UK, my kids and I are planning on building a new Raspberry Pi–powered nature camera this weekend. What will you make?
If Earth is getting you down, then how about creating code that will be sent to the International Space Station?
As part of Astro Pi Mission Zero, young people up to age 14 can write a Python program to send their own personal message to the astronauts aboard the ISS. Mission Zero takes about an hour to complete online following a step-by-step guide. It’s a fantastic activity for anyone looking to write Python code for the first time!
We know that motivation matters. Young digital makers often need a goal to work towards, and that’s where Coolest Projects comes in. It’s the world-leading technology showcase where young digital makers show the world what they’ve created and inspire each other.
Coolest Projects is open to young people up to the age of 18, all over the world, with any level of experience or skills. Young people can register their project ideas now and then create their project so that they can share it with the world on our online gallery.
It’s a brilliant way to motivate your young digital makers to come up with an idea and make it real. If you’re looking for inspiration, then check out the brilliant projects from last year.
I hope that these resources and project ideas inspire you and your kids to get creative with technology, whether you’re in lockdown or not. Stay safe and be kind to yourself and each other. We’ll get through this.
The post Creative projects for young digital makers appeared first on Raspberry Pi.
How to improve upon the standard burglar deterring method of leaving lights switched on? Dennis Mellican turned to Raspberry Pi for a much more effective solution. It actually proved too effective when a neighbour stopped by, but more on that in a bit.
Here you can see Dennis’s system in action scaring off a trespasser:
The burglar deterrent started out as Dennis’s regular home automation system. Not content with the current software offerings, and having worked in DevOps, Dennis decided to create his own solution. Enter Raspberry Pi (well, several of them).
Dennis has multiple Raspberry Pi–powered devices dotted around his home, doing things such as turning on lights, powering up a garden sprinkler, and playing fake dog barks on wireless speakers. All these burglar deterrents work together and are run by a chat bot.
Each Raspberry Pi controls a single automated item in Dennis’s home. All the Raspberry Pis communicate with each other via Slack. Dennis issues commands if he, for example, wants lights to turn on while he is away, but the Raspberry Pis can also talk to each other when a trigger event occurs, such as when a motion sensor is tripped.
Google Chromecast enables ‘dumb’ speakers to be smart. Dennis has such speakers set up inside, close to windows at the front and back of the house, and they play an .mp3 file of a fake dog bark when commanded.
The security cameras Dennis uses in his home setup are a wireless CCTV variety, and the lights are a mix of TP-Link and Lifx smart bulbs.
Here’s all the Python code running Dennis’ entire security system.
Dennis’s smart system has backfired on him a few times. Once a neighbour visited while he was out and thought Dennis was rudely not answering the door, because she saw the lights go on inside, making it appear like he was home. Awkward.
The fake dog barking has also startled the postman and a few joggers — Dennis says it adds to the realism.
The troupe of Raspberry Pis has also scared away an Australian possum (video above). These critters are notorious for making nests in roof cavities, so Dennis dodged another problematic home invasion there.
Dennis is a maker after our own hearts when explaining where he’d like to go next with his anti-burglary build:
“I feel like Kevin McCallister from Home Alone, with these home security ‘traps’. I’m still waiting to catch the Wet Bandits for the sequel to this story. So far only stray cats have been caught by the sprinkler. Perhaps the next adventure of the chat bot is to order pizza and have Gangster ‘Johnny’ complete the transaction when the pizza delivery triggers the sensors.”
Go for it, Dennis!
The post Deter burglars with a Raspberry Pi chatbot appeared first on Raspberry Pi.
Working with Oak National Academy, we’ve turned the materials from our Teach Computing Curriculum into more than 300 free, curriculum-mapped video lessons for remote learning.
One of our biggest projects for teachers that we’ve worked on over the past two years is the Teach Computing Curriculum: a comprehensive set of free computing classroom materials for key stages 1 to 4 (learners aged 5 to 16). The materials comprise lesson plans, homework, progression mapping, and assessment materials. We’ve created these as part of the National Centre for Computing Education, but they are freely available for educators all over the world to download and use.
In the second half of 2020, in response to school closures, our team of experienced teachers produced over 100 hours of video to transform Teach Computing Curriculum materials into video lessons for learning at home. They are freely available for parents, educators, and learners to continue learning computing at home, wherever you are in the world.
You’ll find our videos for more than 300 hour-long lessons on the Oak National Academy website. The progression of the lessons is mapped out clearly, and the videos cover England’s computing national curriculum. There are video lessons for:
To access the full set of classroom materials for teaching, visit the National Centre for Computing Education website.
The post Supporting teachers and students with remote learning through free video lessons appeared first on Raspberry Pi.
Did you get Raspberry Pi 400 as a home learning or working device? We hope you’ve been getting on well with our affordable all-in-one computing solution.
If you’re a new user, here are some tips for you to get the most out of your brand-new Raspberry Pi 400.
Make sure your Raspberry Pi runs the newest version of the Raspberry Pi OS. Here is how (and here is a video preview of what the process looks like):
Open a terminal window by clicking on the Terminal icon in the top menu bar. Then type this command in the terminal window:
sudo apt update
Press Enter on the keyboard. Once the update is downloaded, type into the window:
sudo apt full-upgrade
Press Enter again. It is safe to just accept the default answer to any questions you are asked during the procedure by typing y and pressing Enter.
Now reboot your Raspberry Pi.
With the newest version of Raspberry Pi OS installed, you can use the following applications in the Chromium browser:
Just log in with your username and password and start working or learning!
Raspberry Pi OS also has LibreOffice installed for working with text files, spreadsheets, and the like.
Go into the Preferences section in the main menu, and open Print Settings. This shows the system-config-printer dialog window, where you can do the usual things you’re familiar with from other operating systems: add new printers, remove old ones, set a printer as the default, and access the print queue for each printer.
Like most things in Linux-based operating systems such as Raspberry Pi OS, whether you can make your printer model work depends on user contributions; not every printer is supported yet. We’ve found that most networked printers work fine, while USB printers are a bit hit-and-miss. The best thing to do is to try it and see, and ask for help on our forums if your particular printer doesn’t seem to work.
Our very own Alasdair Allen wrote a comprehensive guide that covers more topics of setting up a Raspberry Pi for home working, from getting your audio and video ready to setting up a Citrix workspace. Thanks Alasdair!
We’ve got a host of completely free resources for young people, parents, and teachers to continue computing school lessons at home and learn about digital making. Discover them all here!
Let us know in the comments if there are any niggles you’re experiencing, or if you have a top tip to help others who are just getting to grips with using Raspberry Pi as a home learning or working device.
The post Raspberry Pi 400 for working and learning at home appeared first on Raspberry Pi.
As the UK — like many countries around the world — kicks off the new year with another national lockdown, meaning that millions of young people are unable to attend school, I want to share an update on how the Raspberry Pi Foundation is helping young people to learn at home.
Please help us spread the word to teachers, school leaders, governors, parents, and carers. Everything we are offering here is 100% free and the more people know about it, the more young people will benefit.
Schools and teachers all over the world have been doing a heroic job over the past ten months, managing the transition to emergency remote teaching during the first round of lockdowns, supporting the most vulnerable pupils, dealing with uncertainty, changing the way that schools worked to welcome pupils back safely, helping pupils catch up with lost learning, and much, much more.
Both in my role as Chief Executive of the Raspberry Pi Foundation and as chair of governors at a state school here in Cambridge, I’ve seen first-hand the immense pressure that schools and teachers are under. I’ve also seen them display the most amazing resilience, commitment, and innovation. I want to say a huge thank you to all teachers and school staff for everything you’ve done and continue to do to help young people through this crisis.
Here’s some of the resources and tools that we’ve created to help you continue to deliver a world-class computing education:
All of these resources are mapped to the English computing curriculum and produced as part of the National Centre for Computing Education. They are available for everyone, anywhere in the world, for free.
Parents and carers are the other heroes of remote learning during lockdown. I know from personal experience that juggling work and supporting home learning can be really tough, and we’re all trying to find meaningful, fun alternatives to letting our kids binge YouTube or Netflix (other video platforms and streaming services are available).
That’s why we’ve been working really hard to provide parents and carers with easy, accessible ways for you to help your young digital makers to get creative with technology:
One of the harsh lessons we learned last year was that far too many young people don’t have a computer for learning at home. There has always been a digital divide; the pandemic has just put it centre-stage. The good news is that the cost of solving this problem is now trivial compared to the cost of allowing it to persist.
That’s why the Raspberry Pi Foundation has teamed up with UK Youth and a network of grassroots youth and community organisations to get computers into the hands of disadvantaged young people across the UK.
For under £200 we can provide a vulnerable child with everything they need to learn at home, including a Raspberry Pi desktop computer, a monitor, a webcam, free educational software, and ongoing support from a local youth worker and the Foundation team. So far, we have managed to get 2000 Raspberry Pi computers into the hands of the most vulnerable young people in the UK. A drop in the ocean compared to the size of the problem, but a huge impact for every single young person and family.
This has only been possible thanks to the generous support of individuals, foundations, and businesses that have donated to support our work. If you’d like to get involved too, you can find out more here.
The post Learning at home with the Raspberry Pi Foundation appeared first on Raspberry Pi.
The official Raspberry Pi magazine turned 100 this month! To celebrate, the greatest Raspberry Pi moments, achievements, and events that The MagPi magazine has ever featured came back for a special 100th issue.
100 Raspberry Pi Moments is a cracking bumper feature (starting on page 32 of issue 100, if you’d like to read the whole thing) highlighting some influential projects and educational achievements, as well as how our tiny computers have influenced pop culture. And since ’tis the season, we thought we’d share the How Raspberry Pi made a difference section to bring some extra cheer to your festive season.
The Raspberry Pi Foundation was originally launched to get more UK students into computing. Not only did it succeed at that, but the hardware and the Foundation have also managed to help people in other ways and all over the world. Here are just a few examples!
The Raspberry Pi Foundation provides free learning resources for everyone; however, not everyone has access to a computer to learn at home. Thanks to funding from the Bloomfield Trust and in collaboration with UK Youth and local charities, the Foundation has been able to supply hundreds of Raspberry Pi Desktop Kits to young people most in need. The computers have allowed these children, who wouldn’t have been able to otherwise, to learn from home and stay connected to their schools during lockdown. The Foundation’s work to distribute Raspberry Pi computers to young people in need is ongoing.
Elsewhere, a need for more medical equipment around the world resulted in many proposals and projects being considered for cheap, easy-to produce machines. Some included Raspberry Pi Zero, with 40,000 of these sold for ventilator designs.
While there’s no global project or standard to say what an offline internet should contain, some educational projects have tried to condense down enough online content for specific people and load it all onto a Raspberry Pi. RACHEL-Pi is one such solution. The RACHEL-PI kit acts as a server, hosting a variety of different educational materials for all kinds of subjects, as well as an offline version of Wikipedia with 6000 articles. There’s even medical info for helping others, math lessons from Khan Acadamy, and much more.
17,000 ft is another great project, which brings computing to schools high up in the Himalayas through a similar method in an attempt to help children stay in their local communities.
The free coding resources available on our projects site are great, and the Raspberry Pi Foundation works to make them accessible to people whose first language isn’t English: we have a dedicated translation team and, thanks to volunteers around the world, provide our free resources translated into up to 32 other languages. From French and Welsh to Korean and Arabic, there’s a ton of projects that learners from all over the world can access in their first language.
And through the Code Club and CoderDojo programmes, the Foundation supports volunteers around the world to run free coding clubs for young people.
That’s not all: several charitable groups have set up Raspberry Pi classrooms to bring computing education to poorer parts of the world. People in African countries and parts of rural India have benefited from these programmes, and work is being done to widen access to ever more people and places.
The HAM radio community loves Raspberry Pi for amateur radio projects; however, sometimes people need radio for more urgent purposes. In 2016, German group Media in Cooperation and Transition created the Pocket FM 96 , micro radio transmitters with 4–6km range. These radios allowed Syrians in the middle of a civil war to connect to free media on Syrnet for more reliable news.
Raspberry Pi powered these transmitters, chosen because of how easy it is to upgrade and add components to. Each transmitter is powered by solar power, and Syrnet is still transmitting through them as the war continues into its tenth year.
The post 100 Raspberry Pi moments appeared first on Raspberry Pi.
Design Engineering student Ben Cobley has created a Raspberry Pi–powered sous-chef that automates the easier pan-cooking tasks so the head chef can focus on culinary creativity.
Ben named his invention OnionBot, as the idea came to him when looking for an automated way to perfectly soften onions in a pan while he got on with the rest of his dish. I have yet to manage to retrieve onions from the pan before they blacken so… *need*.
A Raspberry Pi 4 Model B is the brains of the operation, with a Raspberry Pi Touch Display showing the instructions, and a Raspberry Pi Camera Module keeping an eye on the pan.
Ben’s affordable solution is much better suited to home cooking than the big, expensive robotic arms used in industry. Using our tiny computer also allowed Ben to create something that fits on a kitchen counter.
A thermal sensor array suspended above the stove detects the pan temperature, and the Raspberry Pi Camera Module helps track the cooking progress. A servo motor controls the dial on the induction stove.
No machine learning expertise was required to train an image classifier, running on Raspberry Pi, for Ben’s robotic creation; you’ll see in the video that the classifier is a really simple drag-and-drop affair.
Ben has only taught his sous-chef one pasta dish so far, and we admire his dedication to carbs.
Ben built a control panel for labelling training images in real time and added labels at key recipe milestones while he cooked under the camera’s eye. This process required 500–1000 images per milestone, so Ben made a LOT of pasta while training his robotic sous-chef’s image classifier.
Ben open-sourced this project so you can collaborate to suggest improvements or teach your own robot sous-chef some more dishes. Here’s OnionBot on GitHub.
He also rates this Auto ML system used in the project as a “great tool for makers.”
The post Hire Raspberry Pi as a robot sous-chef in your kitchen appeared first on Raspberry Pi.
In the latest issue of HackSpace Magazine, out now, @MrPJEvans shows you how to add voice commands to your projects with a Raspberry Pi 4 and a microphone.
It’s amazing how we’ve come from everything being keyboard-based to so much voice control in our lives. Siri, Alexa, and Cortana are everywhere and happy to answer questions, play you music, or help automate your household.
For the keen maker, these offerings may not be ideal for augmenting their latest project as they are closed systems. The good news is, with a bit of help from Google, you can add voice recognition to your project and have complete control over what happens. You just need a Raspberry Pi 4, a speaker array, and a Google account to get started.
For a home assistant device, being able to hear you clearly is an essential. Many microphones are either too low-quality for the task, or are unidirectional: they only hear well in one direction. To the rescue comes Seeed’s ReSpeaker, an array of four microphones with some clever digital processing to provide the kind of listening capability normally found on an Amazon Echo device or Google Assistant. It’s also in a convenient HAT form factor, and comes with a ring of twelve RGB LEDs, so you can add visual effects too. Start with a Raspberry Pi OS Lite installation, and follow these instructions to get your ReSpeaker ready for use.
You’ll see later on that we can add the power of Google’s speech-to-text API by streaming audio over the internet. However, we don’t want to be doing that all the time. Snowboy is an offline ‘hotword’ detector. We can have Snowboy running all the time, and when your choice of word is ‘heard’, we switch to Google’s system for accurate processing. Snowboy can only handle a few words, so we only use it for the ‘trigger’ words. It’s not the friendliest of installations so, to get you up and running, we’ve provided step-by-step instructions.
As we’ve just mentioned, we can have a hotword (or trigger word) to activate full speech recognition so we can stay offline. To do this, Snowboy must be trained to understand the word chosen. The code that describes the word (and specifically your pronunciation of it) is called the model. Luckily, this whole process is handled for you at snowboy.kitt.ai, where you can create a model file in a matter of minutes and download it. Just say your choice of words three times, and you’re done. Transfer the model to your Raspberry Pi 4 and place it in your home directory.
After the trigger word is heard, we want Google’s fleet of super-servers to help us transcribe what is being said. To use Google’s speech-to-text API, you will need to create a Google application and give it permissions to use the API. When you create the application, you will be given the opportunity to download ‘credentials’ (a small text file) which will allow your setup to use the Google API. Please note that you will need a billable account for this, although you get one hour of free speech-to-text per month. Full instructions on how to get set up can be found here.
To use Google’s API, we need to install the firm’s speech-to-text SDK for Python so we can stream audio and get the results. On the command line, run the following:pip3 install google-cloud-speech(If you get an error, run sudo apt install python3-pip then try again).
Remember that credentials file? We need to tell the SDK where it is:export GOOGLE_APPLICATION_CREDENTIALS="/home/pi/[FILE_NAME].json"(Don’t forget to replace [FILE_NAME] with the actual name of the JSON file.)
Now download and run this test file. Try saying something and see what happens!
Now we can talk to our Raspberry Pi, it’s time to link the hotword system to the Google transcription service to create our very own virtual assistant. We’ve provided sample code so that you can see these two systems running together. Run it, then say your chosen hotword. Now ask ‘what time is it?’ to get a response. (Don’t forget to connect a speaker to the audio output if you’re not using HDMI.) Now it’s over to you. Try adding code to respond to certain commands such as ‘turn the light on’, or ‘what time is it?’
Each month, HackSpace magazine brings you the best projects, tips, tricks and tutorials from the makersphere. You can get it from the Raspberry Pi Press online store, The Raspberry Pi store in Cambridge, or your local newsagents.
Each issue is free to download from the HackSpace magazine website.
The post Talk to your Raspberry Pi | HackSpace 36 appeared first on Raspberry Pi.
This week, we’re introducing young people around the world to coding GUIs, or graphical user interfaces. Let them tune in this Wednesday at 5.30pm BST / 12.30pm EDT / 10.00pm IST for a fun live stream code-along session with Christina and special guest Martin! They’ll learn about GUIs, can ask us questions, and get to code a painting app.
For beginner coders, we have our Thursday live stream at 3.30pm PDT / 5.30pm CDT / 6.30pm EDT, thanks to support from Infosys Foundation USA! Christina will share more fun Scratch coding for beginners.
Now that school is back in session for many young people, we’ve wrapped up our weekly code-along videos. You and your children can continue coding with us during the live stream, whether you join us live or watch the recorded session on-demand. Thanks to everyone who watched our more than 90 videos and 45 hours of digital making content these past month!
The post Code a GUI live with Digital Making at Home appeared first on Raspberry Pi.
September is wellness month at Digital Making at Home. Your young makers can code along with our educators every week to create projects that focus on their well-being. This week’s brand-new projects are all about helping young people concentrate better.
Through Digital Making at Home, we invite parents and kids all over the world to code and make along with us and our new projects, videos, and live streams every week.
This week’s live stream will take place on Wednesday at 5.30pm BST / 12.30pm EDT / 10.00pm IST at rpf.io/home. Let your kids join in so they can progress to the next stage of learning to code with Scratch!
If you’re in the USA, your young people can join Christina on Thursday at 3.30pm PDT / 5.30pm CDT / 6.30pm EDT for an additional US-time live stream! Christina will show newcomers how to begin coding Scratch projects. Thanks to our partners Infosys Foundation USA for making this new live stream possible.
The post Coding for concentration with Digital Making at Home appeared first on Raspberry Pi.
September is wellness month at Digital Making at Home. Your young makers can code along with our educators every week to create projects which focus on their well-being. This week’s brand-new projects are all about embracing the things that make you feel calm.
Start coding with our all-new projects now!
Through Digital Making at Home, we invite parents and kids all over the world to code and make along with us and our new projects, videos, and live streams every week.
This week’s live stream will take place on Wednesday at 5.30pm BST / 12.30pm EDT / 10.00pm IST at rpf.io/home. Let your kids join in so they can progress to the next stage of learning to code with Scratch!
The post Explore well-being in September with Digital Making at Home appeared first on Raspberry Pi.
Through Digital Making at Home, we invite your and your kids all over the world to code and make along with us and our new videos every week.
Since March, we’ve created over 20 weeks’ worth of themed code-along videos for families to have fun with and learn at home. Here are some of our favourite themes — get coding with us today!
Follow along with our code-along video released this week and make a digital stress ball with us. In the video, we’ve got 6-year-old Noah trying out coding for the first time!
Creating your own video games is a super fun, creative way to start coding and learn what it’s all about.
Check out our code-along videos and projects where we show you:
If you have a Raspberry Pi computer at home, then get it ready! We’ve got make-along videos showing you:
Digital making isn’t all about video games and robots! You can use it to create truly artistic projects as well. So come and explore with us as we show you:
You’ll find many more code-along videos and projects on the rpf.io/home page. Where do you want your digital making journey to take you?
The post Coding for kids and parents with Digital Making at Home appeared first on Raspberry Pi.
Have your kids never coded before? Then out Digital Making at Home video this week is perfect for you to get them started.
In our free code-along video this week, six-year-old Noah codes his first Scratch project guided by Marc from our team. The project is a digital stress ball, because our theme for September is wellness and looking after ourselves.
Follow our beginners’ code-along video now!
Through Digital Making at Home, we invite parents and kids all over the world to code and make along with us and our new videos and live stream every week.
Our live stream will take place on Wednesday 5.30pm BST / 12.30pm EDT / 10.00pm IST at rpf.io/home. Let your kids join in so they can progress to the next stage of learning to code with Scratch!
The post Beginners’ coding for kids with Digital Making at Home appeared first on Raspberry Pi.
Join us for Digital Making at Home: this week, young people can find out how to create web pages with us! Through Digital Making at Home, we invite kids all over the world to code and make along with us and our new videos every week.
So get ready to contribute to the World Wide Web:
Let’s create web pages this week! Watch our video to get coding now.
And tune in on Wednesday 2pm BST / 9am EDT / 7.30pm IST at rpf.io/home to code along with our live stream session and ask us all your question about the World Wide Web, the internet, and web development.
The post Try web development with Digital Making at Home appeared first on Raspberry Pi.
Join us for Digital Making at Home: this week, young people can build a Raspberry Pi robot buggy with us! Through Digital Making at Home, we invite kids all over the world to code and make along with us and our new videos every week.
So get your Raspberry Pi, wheels, wires, and breadboards ready! We’re building a robot:
Let’s build a robot together this week!
And tune in on Wednesday 2pm BST / 9am EDT / 7.30pm IST at rpf.io/home to code along with our live stream session with Estefannie from Estefannie Explains it All to ask us your questions about robots and build something cool with Adafruit’s Circuit Playground.
The post Build a Raspberry Pi robot buggy with your kids appeared first on Raspberry Pi.
Join us for Digital Making at Home: this week, young people can do stop motion and time-lapse animation with us! Through Digital Making at Home, we invite kids all over the world to code along with us and our new videos every week.
So get your Raspberry Pi and Camera Module ready! We’re using them to capture life with code this week:
Check out this week’s code-along projects!
And tune in on Wednesday 2pm BST / 9am EDT / 7.30pm IST at rpf.io/home to code along with our live stream session to make a motion-detecting dance game in Scratch!
The post Create a stop motion film with Digital Making at Home appeared first on Raspberry Pi.
Join us for Digital Making at Home: this week, young people can explore the graphics side of video game design! Through Digital Making at Home, we invite kids all over the world to code along with us and our new videos every week.
So get ready to design video game graphics with us:
Check out this week’s code-along projects!
And tune in on Wednesday 2pm BST / 9am EDT / 7.30pm IST at rpf.io/home to code along with our live stream session to make a Space Invaders–style shooter game in Scratch!
The post Design game graphics with Digital Making at Home appeared first on Raspberry Pi.
Join us for Digital Making at Home: this week, young people can recreate classic* video games with us! Through Digital Making at Home, we invite kids all over the world to code along with us and our new videos every week.
So get ready to code some classic retro games with us:
Check out this week’s code-along projects!
And tune in on Wednesday 2pm BST / 9am EDT / 7.30pm IST at rpf.io/home to code along with our live stream session!
* Be warned that we’re using the terms ‘classic/retro’ in line with the age of our young digital makers — a LOT of games are retro for them ?
The post Code retro games with Digital Making at Home appeared first on Raspberry Pi.
Join us for Digital Making at Home: this week, young people can do out-of-this-world coding with our space-themed projects! Through Digital Making at Home, we invite kids all over the world to code along with us and our new videos every week.
So get ready to do some galactic coding with us:
Check out this week’s code-along projects!
And tune in on Wednesday 2pm BST / 9am EDT / 7.30pm IST at rpf.io/home to code along with our live stream session!
The post Galactic coding with Digital Making at Home! appeared first on Raspberry Pi.
Join us for Digital Making at Home: this week, young people can learn about using the Sense HAT — or its emulator — with us! With Digital Making at Home, we invite kids all over the world to code along with us and our new videos every week.
So get ready to do some colourful coding with us:
Check out this week’s code-along projects!
And tune in on Wednesday 2pm BST / 9am EDT / 7.30pm IST at rpf.io/home to code along with our live stream session.
The post Let’s make it colourful with Digital Making at Home appeared first on Raspberry Pi.
There’s no question that families have faced disruptions and tough challenges over the last few months. For the parents and carers who’ve been supporting their children with learning at home, it can feel overwhelming, stressful, rewarding — or all three! As many children are still carrying on with learning at home, we are supporting them with extra resources, and parents with support tutorials.
In our last blog post for parents, we talked to you about debugging — finding and fixing errors in code. This week we’re covering the amazing things young people can do and learn with Scratch — it’s not just for beginners!
Scratch is a block-based programming tool that lets you create lots of different projects. It’s often one of the first programming tools children use in primary school. We’ve made a video introduction to Scratch in case you’re less familiar with it.
If your child at home is ready to try more challenging coding tasks, Scratch is still a great tool for them, as they can use it to build some truly epic projects.
In this video, Mark shows you examples from the Scratch community and signposts useful resources that will support you and your children as they develop their confidence in Scratch.
Scratch is a great tool for building complex, unique, and challenging projects. For example, the Scratch game Fortnite Z involves 13,500 Scratch blocks and took more than four months to develop. People have also built astounding 3D graphic projects in Scratch!
You can find other amazing examples if you explore the Coolest Projects online showcase. Our free annual tech showcase for young people has lots of great Scratch projects: plenty of inspiration for you and your young people at home.
The Scratch community is a great place for young people to safely share their projects with each other all year round, and to like and comment on them. It’s a real treasure trove they can explore to find inspiration and learning opportunities, and for young people who are spending more time at home, it offers a way to connect to peers around the world.
In this video, Katharine shows you how the team behind Scratch keeps the community safe, where you as a parent can find the information you need, and how your child will engage with the community.
To keep young people entertained and learning, we’re running a Digital Making at Home series. You’ll find new, free code-along videos every Monday, with different themes and projects for all levels of experience. We have lots of Scratch code-alongs on offer! We also live-stream a code-along session every Wednesday at 14:00 BST at rpf.io/home.
We’ve been asking parents what they’d like to see as part of our initiative to support them and the young people they care for. They’ve sent us some great suggestions so far! If you’d like to share your thoughts too, email us at parents@raspberrypi.org.
Sign up now to start receiving free activities suitable to your child’s age and experience level straight to your inbox. And let us know what you as a parent or guardian need help with, and what you’d like more or less of from us.
PS All of our resources are completely free. This is made possible thanks to the generous donations of individuals and organisations. Learn how you can help too!
The post Learn at home #4: All about Scratch appeared first on Raspberry Pi.
Join us for Digital Making at Home: this week, young people can learn about encryption and e-safety with us! With Digital Making at Home, we invite kids all over the world to code along with us and our new videos every week.
So get ready to decode a secret message with us:
Check out this week’s code-along projects!
And tune in on Wednesday 2pm BST / 9am EDT / 7.30pm IST at rpf.io/home to code along with our live stream session.
PS: If you want to learn how to teach students in your classroom about encryption and cybersecurity, we’ve got the perfect free online courses for you!
The post Let’s learn about encryption with Digital Making at Home! appeared first on Raspberry Pi.
Join us for Digital Making at Home: this week, young people get to make sports games in Scratch! With Digital Making at Home, we invite kids all over the world to code along with us and our new videos every week.
So get ready to exercise your digital making skills with us:
Check out this week’s sporty code-along projects!
And tune in on Wednesday 2pm BST / 9am EDT / 7.30pm IST at rpf.io/home to code along with our live stream session.
The post Let’s do virtual sports with Digital Making at Home! appeared first on Raspberry Pi.
The new Ubuntu Appliance portfolio provides free images to help you turn your Raspberry Pi into an IoT device: just install them to your SD card and you have all the software you need to make a media server, get started with home automation, and more. Canonical’s Rhys Davies is here to tell us all about it.
We are delighted to announce the new Ubuntu Appliance portfolio. Together with NextCloud, AdGuard, Plex, Mosquitto and openHAB, we have created the first in a new class of Ubuntu derivatives. Ubuntu Appliances are software-defined projects that enable users to download everything they need to turn a Raspberry Pi into a device that does one thing – beautifully.
The Ubuntu Appliance mission is to enable you to build your own secure, self-updating, single-purpose devices. Tell us what you want to see next, or let’s talk about turning your project into the next Ubuntu Appliance in Discourse. For now, we are excited to bring these initial appliances to your attention.
![]()
Head over to the Ubuntu Appliances website, click the appliance you would like, select download, follow the instructions, and away you go. Once you get to this stage, there are links to tutorials and documentation written by the upstream project themselves, so you can get next steps from the horse’s mouth. If you run into any bother let us know with a new topic and we’ll get on it.
![]()
The problem we are trying to solve is to do with the fragmentation in IoT. We want to give publishers and developers a platform to get their software in the hands of their users and into their devices. We work with them to securely bundle the OS, their applications and configurations into a single download that is available for anyone to turn a Raspberry Pi into a dedicated device. You can go to the portfolio and download as many of the appliances as you like and start using them today.
All of this gives a stage and a secure, production-grade base to projects. There are no restrictions on who can make an Ubuntu Appliance; all you need is an application that runs on a Raspberry Pi or another certified board, and to let us know what you’ve got so we can help you over the line. If you need more information, head to our community page where you’ll find the rules and the exact steps to become featured as an Ubuntu Appliance.
All that’s left to say is to try them out. All five of the initial appliances work on Raspberry Pi, so if you have one, you can get started. And if you don’t have one – maybe your Raspberry Pi is still in the post – then you can also ‘try before you Pi’: install the appliance in a virtual machine and see what you think.
The list of appliances is already growing. This launch marks the first five appliances, but we are already working with developers on the next wave and are looking for more. Start with these ones and go to our discourse to tell us what you think.
Thanks for having me, Raspberry Pi <3
![]()
The post Build an IoT device with Ubuntu Appliance and Raspberry Pi appeared first on Raspberry Pi.
Join us for Digital Making at Home, where this week, young people get to create all things 3D. With Digital Making at Home, we invite kids all over the world to code along with us and our new videos every week!
So get ready to visit a new digital dimension with us:
Check out this week’s code-along videos!
And tune in on Wednesday at 2pm BST / 9am EDT / 7.30pm IST at rpf.io/home to code along with our live stream session.
The post Let’s make it 3D with Digital Making at Home! appeared first on Raspberry Pi.
Digital Making at Home: Out at sea
Subscribe to our YouTube channel: http://rpf.io/ytsub Help us reach a wider audience by translating our video content: http://rpf.io/yttranslate Buy a Raspbe…
Join us for Digital Making at Home, where this week for World Oceans Day, the big blue sea is calling our names. With Digital Making at Home, we invite young people all over the world to code along with us and our new videos every week to keep the coding fun going at home!
There’s a whole world to discover under the sea, so let’s use the power of digital making to dive in together, code-first:
Check out this week’s code-along videos!
And tune in on Wednesday at 2pm BST / 9am EDT / 7.30pm IST at rpf.io/home to code along with our live stream session.
The post Let’s go out to sea with Digital Making at Home appeared first on Raspberry Pi.
With changes to school and work around the world, many parents and carers still aren’t sure what to expect over the next few weeks. While some children have returned to school, we know that many young people and families are still learning and working at home. We’re providing lots of free extra resources for young people, and we’re offering free support tutorials for parents who want to help their children understand more about the tools they’ll be using on their coding journey.
![]()
In our last blog post for parents, we talked to you about Python, which is a widely used text-based programming language, and about Trinket, a free online platform that lets you write and run your code in any web browser.
This week we talk about the importance of resilience and problem solving as we cover debugging — finding and fixing errors in your code.
When your child embarks on a coding project, expect to hear the phrase “It’s not working!” often. It’s really important to recognise that their code might not work on the first (or fourth) go, and that that’s completely OK. Debugging is a key process for young people who are learning how to code, and it helps them to develop resilience and problem solving skills.
Learning Manager Mac shows you tips and tricks for fixing Python code errors to help you build more confidence while you support your children at home.
Fixing errors in Python code
In this video, Learning Manager Mac will show you some tips and tricks for fixing Python code errors (also known as ‘debugging’) to help you build more confi…
If your child is following one of our online coding projects, the instructions are usually very detailed and precise. Encourage your child to read through the instructions thoroughly and see if they can spot a difference between their code and what’s in the instructions. You should find that many errors can be fixed by doing this!
Coding is iterative: programs are written in stages, with debugging during every stage. Errors in code are normal and very common, so mistakes in your child’s programs are to be expected. As a young person begins to develop coding skills, they start learning to problem-solve and persevere despite the errors, which will help them both on and off the computer. And the more they code, the quicker they’ll become at spotting and fixing errors.
![]()
Most of the coding problems your child will come across will be due to tiny mistakes, e.g. one letter or a piece of punctuation that needs changing. So during debugging, it’s helpful for both you and your child to frame the problem in this way: “It’s just one small thing, you are so close.” This helps them build resilience and perseverance, because finding one small error is much more achievable than thinking that the whole program is broken and they need to start over.
When your child encounters a problem with their code, encourage them to talk you through their whole problem, without interrupting them or making suggestions. Programmers call this technique ‘rubber duck debugging’: when they encounter a problem with their code, they explain everything their code does to an inanimate object — such as a rubber duck! — to find the detail that’s causing the problem. For your child, you can play the part of the rubber duck and provide a supportive, listening ear!
To keep young people entertained and learning, we’re running a Digital Making at Home series, which is free and accessible to everyone. New code-along videos are released every Monday, with different themes and projects for all levels of experience. We also stream live code-along sessions on Wednesdays at 14:00 BST at rpf.io/home!
![]()
Ben Garside is a Learning Manager at the Raspberry Pi Foundation and also a dad to three children aged between 6 and 8. Ben is currently homeschooling and working (and still smiling lots!). In this video, Ben shares his personal experience of trying to find the best way of making this work for his family, with a bit of trial and error and lots of flexibility.
Parent diary: Adapting to life online
Ben Garside is a Learning Manager at the Raspberry Pi Foundation and also a dad to three children aged between 6 and 8. Ben is currently homeschooling and wo…
You’ve got a Raspberry Pi computer at home and aren’t sure how to use it? Then why not sign up to our new free online course to find out all about how to set up your Raspberry Pi, and how to use it for everyday tasks or for learning to code!
![]()
We’ve been asking parents what they’d like to see as part of our initiative to support young people and parents. We’ve had some great suggestions so far! If you’d like to share your thoughts, email us at parents@raspberrypi.org.
Sign up now to start receiving free activities suitable to your child’s age and experience level straight to your inbox. And let us know what you as a parent or guardian need help with, and what you’d like more or less of from us.
PS All of our resources are completely free. This is made possible thanks to the generous donations of individuals and organisations. Learn how you can help too!
The post Learn at home #3: building resilience and problem solving skills appeared first on Raspberry Pi.
Digital Making at Home: Make art
Subscribe to our YouTube channel: http://rpf.io/ytsub Help us reach a wider audience by translating our video content: http://rpf.io/yttranslate Buy a Raspbe…
Digital Making at Home is our initiative to encourage young people to code along with us in their homes across the world. We support them with weekly themed content, code-along videos, live streams, and more!
For our newest theme, we explore making digital art. Many young makers are no stranger to making art, especially the digital kind! That’s why this week, we’re inviting them to bring their most colourful and imaginative ideas to life using code.
So this week for Digital Making at Home, let’s make some art!
The post Let’s make digital art at home this week appeared first on Raspberry Pi.
Did you know: the first machine to break the exaflop barrier (one quintillion floating‑point operations per second) wasn’t a huge dedicated IBM supercomputer, but a bunch of interconnected PCs with ordinary CPUs and gaming GPUs.
With that in mind, welcome to the Folding@home project, which is targeting its enormous power at COVID-19 research. It’s effectively the world’s fastest supercomputer, and your PC can be a part of it.
The Folding@home project is now targeting COVID-19 research
Put simply, Folding@home runs hugely complicated simulations of protein molecules for medical research. They would usually take hundreds of years for a typical computer to process. However, by breaking them up into smaller work units, and farming them out to thousands of independent machines on the Internet, it’s possible to run simulations that would be impossible to run experimentally.
Back in 2004, Custom PC magazine started its own Folding@home team. The team is currently sitting at number 12 on the world leaderboard and we’re still going strong. If you have a PC, you can join us (or indeed any Folding@home team) and put your spare clock cycles towards COVID-19 research.
Getting your machine folding is simple. First, download the client. Your username can be whatever you like, and you’ll need to put in team number 35947 to fold for the Custom PC & bit-tech team. If you want your PC to work on COVID-19 research, select ‘COVID-19’ in the ‘I support research finding’ pulldown menu.
Enter team number 35947 to fold for the Custom PC & bit-tech team
You’ll get the most points per Watt from GPU folding, but your CPU can also perform valuable research that can’t be done on your GPU. ‘There are actually some things we can do on CPUs that we can’t do on GPUs,’ said Professor Greg Bowman, Director of Folding@home, speaking to Custom PC in the latest issue.
‘With the current pandemic in mind, one of the things we’re doing is what are called “free energy calculations”. We’re simulating proteins with small molecules that we think might be useful starting points for developing therapeutics, for example.’
If you want your PC to work on COVID-19 research, select ‘COVID-19’ in the ‘I support research finding’ pulldown menu
Bear in mind that enabling folding on your machine will increase power consumption. For reference, we set up folding on a Ryzen 7 2700X rig with a GeForce GTX 1070 Ti. The machine consumes around 70W when idle. That figure increases to 214W when folding on the CPU and around 320W when folding on the GPU as well. If you fold a lot, you’ll see an increase in your electricity bill, so keep an eye on it.
Could we also see Folding@home running on Arm machines, such as Raspberry Pi? ‘Oh I would love to have Folding@home running on Arm,’ says Bowman. ‘I mean they’re used in Raspberry Pis and lots of phones, so I think this would be a great future direction. We’re actually in contact with some folks to explore getting Folding@home running on Arm in the near future.’
In the meantime, you can still recruit your Raspberry Pi for the cause by participating in Rosetta@home, a similar project also working to help the fight against COVID-19. For more information, visit the Rosetta@home website.
You’ll also find a full feature about Folding@home and its COVID-19 research in Issue 202 of Custom PC, available from the Raspberry Pi Press online store.
The post Help medical research with folding@home appeared first on Raspberry Pi.
With millions of schools still in lockdown, parents have been telling us that they need help to support their children with learning computing at home. As well as providing loads of great content for young people, we’ve been working on support tutorials specifically for parents who want to understand and learn about the programmes used in schools and our resources.
If you don’t know your Scratch from your Trinket and your Python, we’ve got you!
Glen, Web Developer at the Raspberry Pi Foundation, and Maddie, aged 8
In our last blog post for parents, we talked to you about Scratch, the programming language used in most primary schools. This time Mark, Youth Programmes Manager at the Raspberry Pi Foundation, takes you through how to use Trinket. Trinket is a free online platform that lets you write and run your code in any web browser. This is super useful because it means you don’t have to install any new software.
A parents’ introduction to Trinket
Sign up to our regular parents’ newsletter to receive regular, FREE tutorials, tips & fun projects for young people of all levels of experience: http://rpf.i…
Trinket also lets you create public web pages and projects that can be viewed by anyone with the link to them. That means your child can easily share their coding creation with others, and for you that’s a good opportunity to talk to them about staying safe online and not sharing any personal information.
Lincoln, aged 10
We’ve also got an introduction to Python for you, from Mac, a Learning Manager on our team. He’ll guide you through what to expect from Python, which is a widely used text-based programming language. For many learners, Python is their first text-based language, because it’s very readable, and you can get things done with fewer lines of code than in many other programming languages. In addition, Python has support for ‘Turtle’ graphics and other features that make coding more fun and colourful for learners. Turtle is simply a Python feature that works like a drawing board, letting you control a turtle to draw anything you like using code.
A parents’ introduction to Python
Sign up to our regular parents’ newsletter to receive regular, FREE tutorials, tips & fun projects for young people of all levels of experience: http://rpf.i…
Why not try out Mac’s suggestions of Hello world, Countdown timer, and Outfit recommender for yourself?
Python is used in lots of real-world software applications in industries such as aerospace, retail banking, insurance and healthcare, so it’s very useful for your children to learn it!
Olympia is Head of Youth Programmes at the Raspberry Pi Foundation and also a mum to two girls aged 9 and 11. She is currently homeschooling them as well as working (and hopefully having the odd evening to herself!). Olympia shares her own experience of learning during lockdown and how her family are adapting to their new routine.
Parent diary: Juggling homeschooling and work
Olympia Brown, Head of Youth Partnerships at the Raspberry Pi Foundation shares her experience of homeschooling during the lockdown, and how her family are a…
To keep young people entertained and learning, we launched our Digital Making at Home series, which is free and accessible to everyone. New code-along videos are released every Monday, with different themes and projects for all levels of experience.
Code along live with the team on Wednesday 6 May at 14:00 BST / 9:00 EDT for a special session of Digital Making at Home.
Sarah and Ozzy, aged 13
We’ve been asking parents what they’d like to see as part of our initiative to support young people and parents. We’ve had some great suggestions so far! If you’d like to share your thoughts, you can email us at parents@raspberrypi.org.
Sign up now to start receiving free activities suitable to your child’s age and experience level, straight to your inbox. And let us know what you as a parent or guardian need help with, and what you’d like more or less of from us.
PS: All of our resources are completely free. This is made possible thanks to the generous donations of individuals and organisations. Learn how you can help too!
The post Learn at home: a guide for parents #2 appeared first on Raspberry Pi.
If you find yourself working or learning, or simply socialising from home, Raspberry Pi can help with everything from collaborative productivity to video conferencing. Read more in issue #92 of The MagPi, out now.
If you’re using a USB webcam, you can simply insert it into a USB port on Raspberry Pi. If you’re using a Raspberry Pi Camera Module, you’ll need to unpack it, then find the ‘CAMERA’ port on the top of Raspberry Pi – it’s just between the second micro-HDMI port and the 3.5mm AV port. Pinch the shorter sides of the port’s tab with your nails and pull it gently upwards. With Raspberry Pi positioned so the HDMI ports are at the bottom, insert one end of the camera’s ribbon cable into the port so the shiny metal contacts are facing the HDMI port. Hold the cable in place, and gently push the tab back home again.
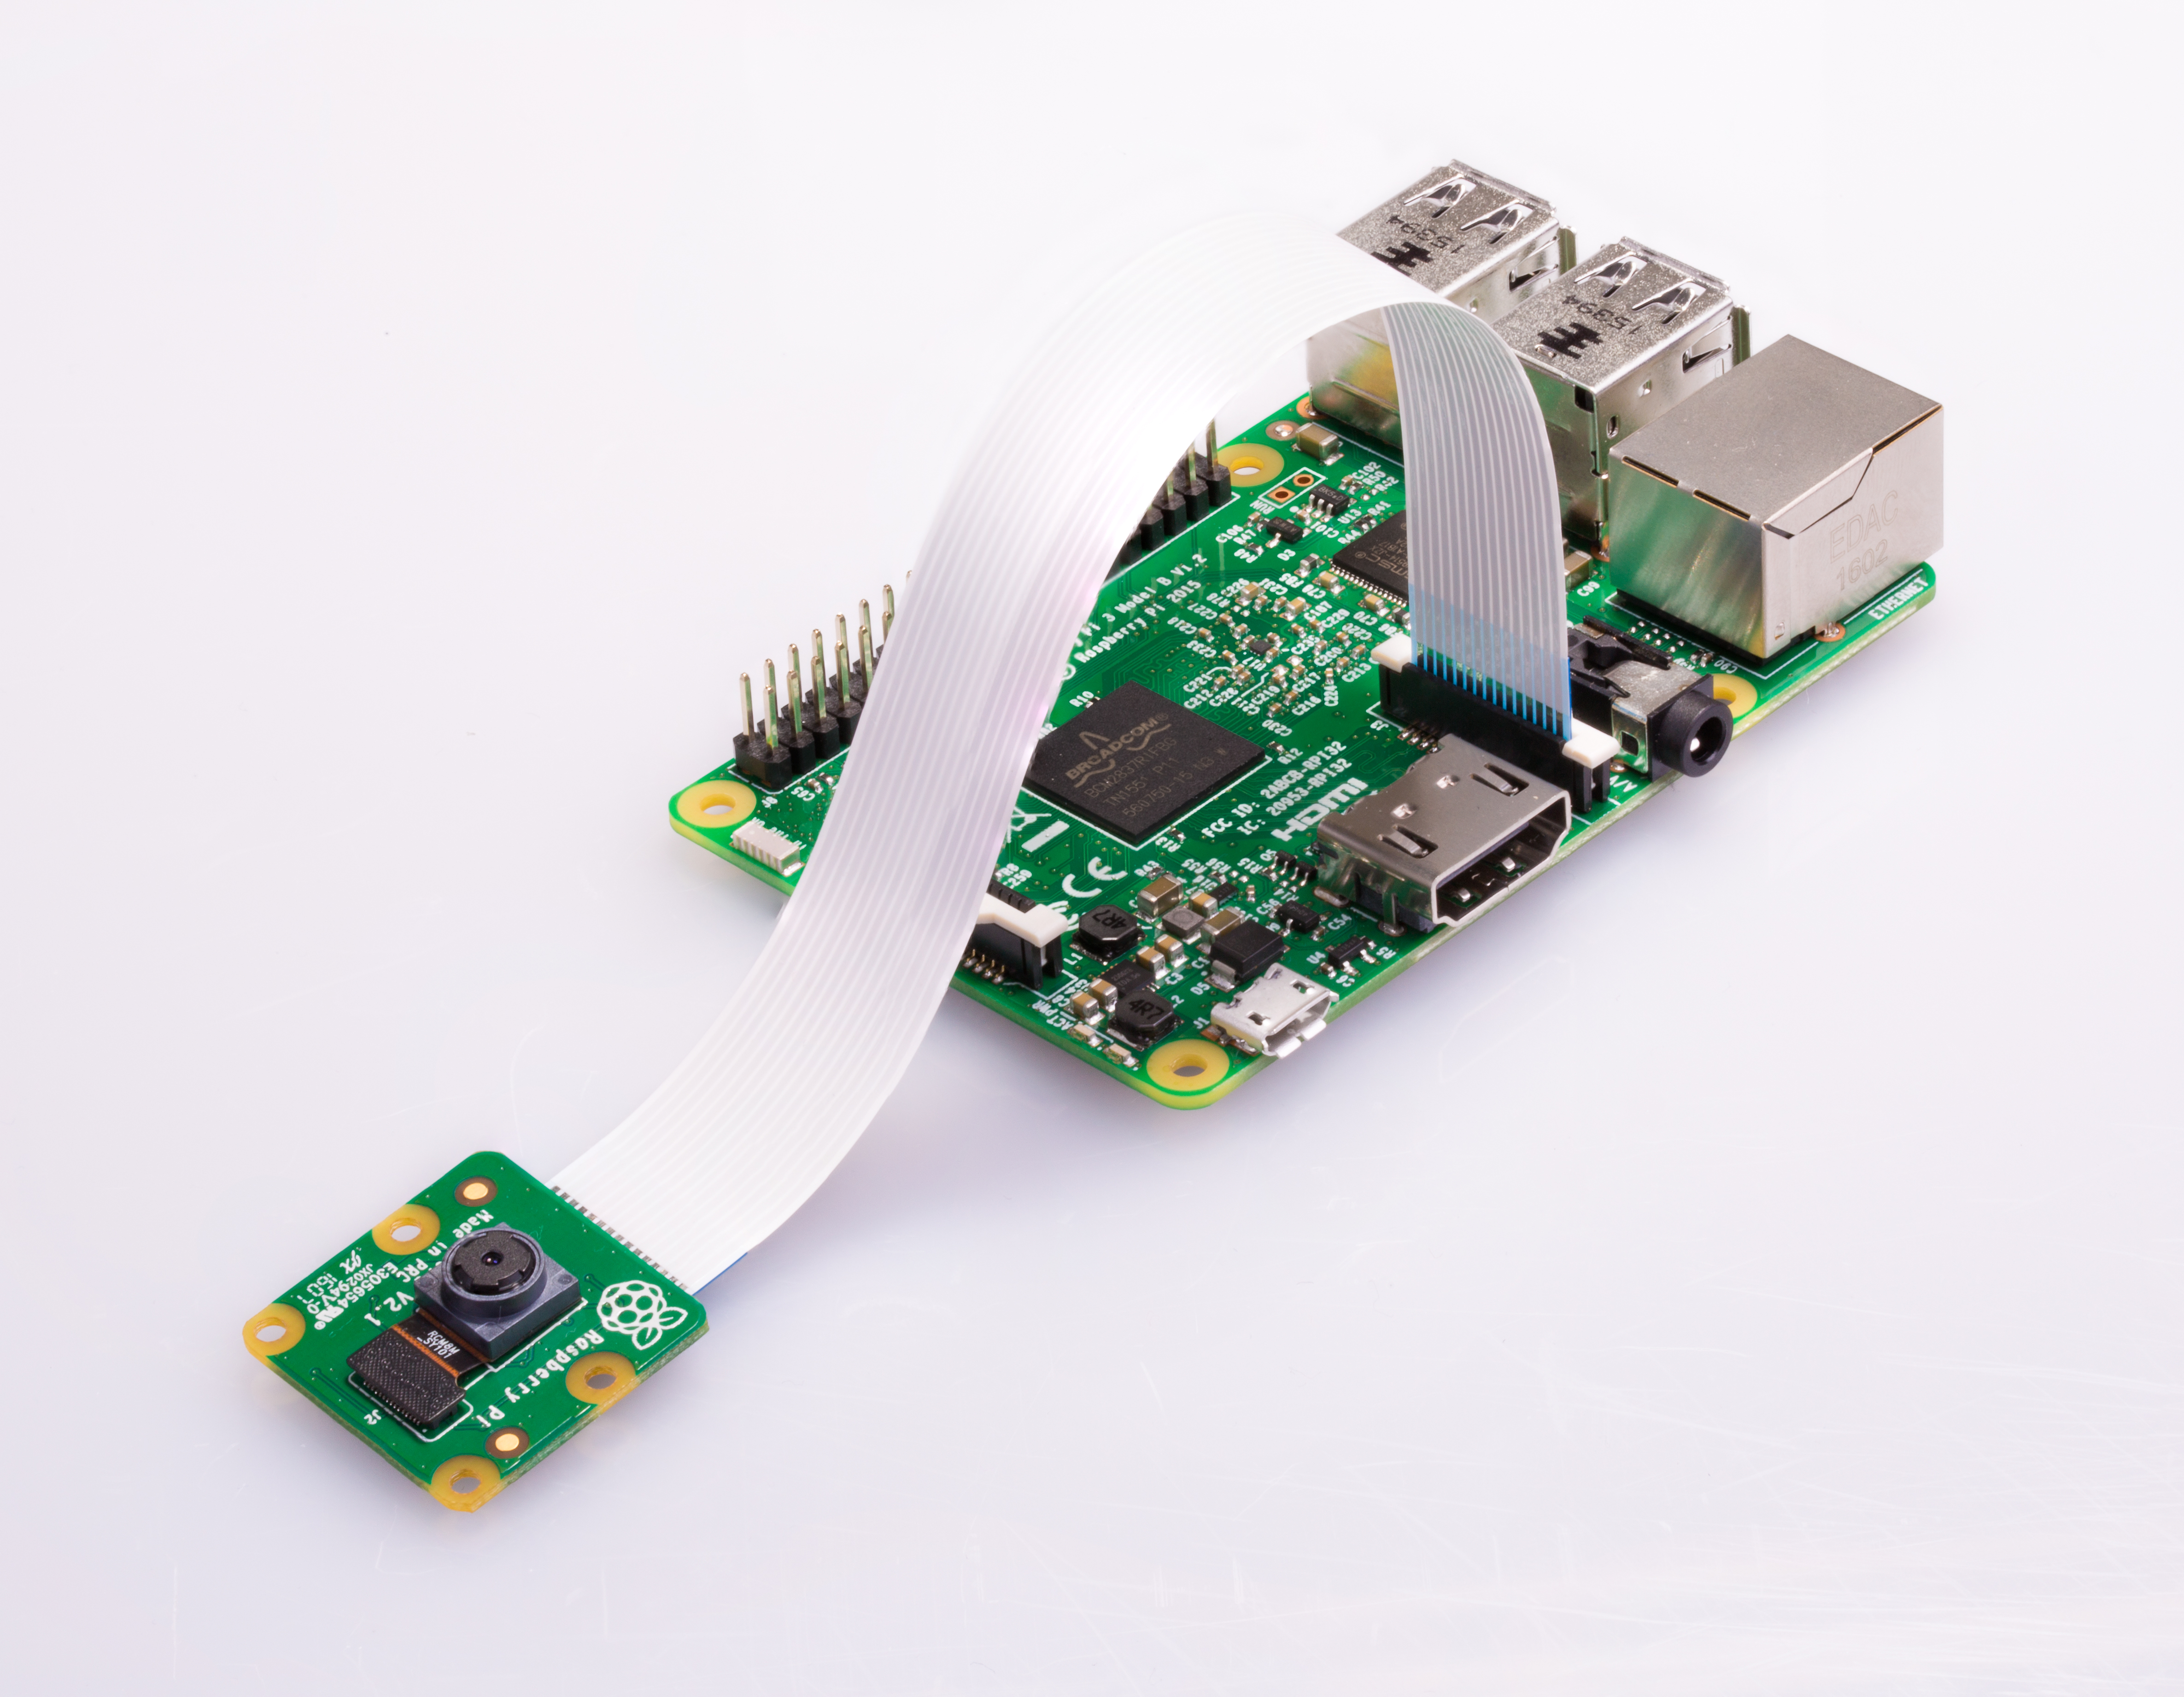
If the Camera Module doesn’t have the ribbon cable connected, repeat the process for the connector on its underside, making sure the contacts are facing downwards towards the module. Finally, remove the blue plastic film from the camera lens.
Before you can use your Raspberry Pi Camera Module, you need to enable it in Raspbian. If you’re using a USB webcam, you can skip this step. Otherwise, click on the raspberry menu icon in Raspbian, choose Preferences, then click on Raspberry Pi Configuration.
![]()
When the tool loads, click on the Interfaces tab, then click on the ‘Enabled’ radio button next to Camera. Click OK, and let Raspberry Pi reboot to load your new settings. If you forget this step, Raspberry Pi won’t be able to communicate with the Camera Module.
If you’re using a USB webcam, it may come with a microphone built-in; otherwise, you’ll need to connect a USB headset, a USB microphone and separate speakers, or a USB sound card with analogue microphone and speakers to Raspberry Pi. Plug the webcam into one of Raspberry Pi’s USB 2.0 ports, furthest away from the Ethernet connector and marked with black plastic inners.
Right-click on the speaker icon at the top-right of the Raspbian desktop and choose Audio Inputs. Find your microphone or headset in the list, then click it to set it as the default input. If you’re using your TV or monitor’s speakers, you’re done; if you’re using a headset or separate speakers, right-click on the speaker icon and choose your device from the Audio Outputs menu as well.
Click on the Internet icon next to the raspberry menu to load the Chromium web browser. Click in the address box and type hangouts.google.com. When the page loads, click ‘Sign In’ and enter your Google account details; if you don’t already have a Google account, you can sign up for one free of charge.
When you’ve signed in, click Video Call. You’ll be prompted to allow Google Hangouts to access both your microphone and your camera. Click Allow on the prompt that appears. If you Deny access, nobody in the video chat will be able to see or hear you!
You can invite friends to your video chat by writing their email address in the Invite People box, or copying the link and sending it via another messaging service. They don’t need their own Raspberry Pi to participate – you can use Google Hangouts from a laptop, desktop, smartphone, or tablet. If someone has sent you a link to their video chat, open the message on Raspberry Pi and simply click the link to join automatically.
You can click the microphone or video icons at the bottom of the window to temporarily disable the microphone or camera; click the red handset icon to leave the call. You can click the three dots at the top-right to access more features, including switching the chat to full-screen view and sharing your screen – which will allow guests to see what you’re doing on Raspberry Pi, including any applications or documents you have open.
If your microphone is too quiet, you’ll need to adjust the volume. Click the Terminal icon at the upper-left of the screen, then type alsamixer followed by the ENTER key. This loads an audio mixing tool; when it opens, press F4 to switch to the Capture tab and use the up-arrow and down-arrow keys on the keyboard to increase or decrease the volume. Try small adjustments at first; setting the capture volume too high can cause the audio to ‘clip’, making you harder to hear. When finished, press CTRL+C to exit AlsaMixer, then click the X at the top-right of the Terminal to close it.
Adjust your audio volume settings with the AlsaMixer tool
Just because you’re not shoulder-to-shoulder with colleagues doesn’t mean you can’t collaborate, thanks to these online tools.
Google Docs
![]()
Google Docs is a suite of online productivity tools linked to the Google Drive cloud storage platform, all accessible directly from your browser. Open the browser and go to drive.google.com, then sign in with your Google account – or sign up for a new account if you don’t already have one – for 15GB of free storage plus access to the word processor Google Docs, spreadsheet Google Sheets, presentation tool Google Slides, and more. Connect with colleagues and friends to share files or entire folders, and collaborate within documents with simultaneous multi-user editing, comments, and change suggestions.
![]()
Designed for business, Slack is a text-based instant messaging tool with support for file transfer, rich text, images, video, and more. Slack allows for easy collaboration in Teams, which are then split into multiple channels or rooms – some for casual conversation, others for more focused discussion. If your colleagues or friends already have a Slack team set up, ask them to send you an invite; if not, you can head to app.slack.com and set one up yourself for free.
![]()
Built more for casual use, Discord offers live chat functionality. While the dedicated Discord app includes voice chat support, this is not yet supported on Raspberry Pi – but you can still use text chat by opening the browser, going to discord.com, and choosing the ‘Open Discord in your browser’ option. Choose a username, read and agree to the terms of service, then enter an email address and password to set up your own free Discord server. Alternatively, if you know someone on Discord already, ask them to send you an invitation to access their server.
![]()
If you need to send a document, image, or any other type of file to someone who isn’t on Google Drive, you can use Firefox Send – even if you’re not using the Firefox browser. All files transferred via Firefox Send are encrypted, and can be protected with an optional password, and are automatically deleted after a set number of downloads or length of time. Simply open the browser and go to send.firefox.com; you can send files up to 1GB without an account, or sign up for a free Firefox account to increase the limit to 2.5GB.
![]()
For programmers, GitHub is a lifesaver. Based around the Git version control system, GitHub lets teams work on a project regardless of distance using repositories of source code and supporting files. Each programmer can have a local copy of the program files, work on them independently, then submit the changes for inclusion in the master copy – complete with the ability to handle conflicting changes. Better still, GitHub offers additional collaboration tools including issue tracking. Open the browser and go to github.com to sign up, or sign in if you have an existing account, and follow the getting started guide on the site.
Find more fantastic projects, tutorials, and reviews in The MagPi #93, out now! You can get The MagPi #93 online at our store, or in print from all good newsagents and supermarkets. You can also access The MagPi magazine via our Android and iOS apps.
![]()
Don’t forget our super subscription offers, which include a free gift of a Raspberry Pi Zero W when you subscribe for twelve months.
And, as with all our Raspberry Pi Press publications, you can download the free PDF from our website.
The post How to work from home with Raspberry Pi | The Magpi 93 appeared first on Raspberry Pi.
If you’re working from home and you have children, you’re probably finding it all pretty demanding at the moment. Spreadsheets and multiple tabs and concentrating aren’t nearly so manageable without the dedicated workspace you have at the office and with, instead, small people vying relentlessly for your attention.
And that’s not to mention the horror that is arranging video conference calls and home life around one another. There’s always the danger that a housemate (young offspring or otherwise) might embarrassingly crash your formal party like what happened to Professor Robert Kelly live on BBC News. (See above. Still funny!)
Well, Belgian maker Elio Struyf has created a homemade solution to mitigate against such unsolicited workspace interferences: he built a status light that integrates with Microsoft Teams so that his kids know when he’s on a call and they should stay away from his home office.
DIY busy light created with Raspberry Pi and Pimoroni Unicorn pHAT
The light listens to to Elio’s Microsoft Teams status and accordingly displays the colour red if he’s busy chatting online, yellow if his status is set to ‘Away’, or green if he’s free for his kids to wander in and say “Hi”.
Here’s what you need to build your own:
Pimoroni Unicorn pHAT on Raspberry Pi Zero
The Pimoroni Unicorn pHAT has an 8×4 grid of RGB LEDs that Elio set to show a single colour (though you can tell them to display different colours). His Raspberry Pi runs DietPi, which is a lightweight Debian distro. On top of this, running Homebridge makes it compatible with Apple’s HomeKit libraries, which is how Elio was able to connect the build with Microsoft Teams on his MacBook.
Elio’s original blog comprehensively walks you through the setup process, so you too can try to manage your home working plus domestic duties. All you need is to get your five-year-old to buy into your new traffic-light system, and with that we wish you all the luck in the world.
And give Elio a follow on Twitter. Fella has mad taste in T-shirts.
The post Create your own home office work status light with Raspberry Pi appeared first on Raspberry Pi.
Welcome back for another exciting week of Digital Making at Home from the Raspberry Pi Foundation! Get ready to keep the coding going, and if you’re joining us for the first time, we’re so thrilled to have you!
All of the stories you sent us from across the world last week were not only super creative, they were really uplifting as well. Great job, digital makers! The best part of this for us is seeing what you create, so please keep sharing your projects with us.
Our new theme this week is a complete joke… because we want you to make us laugh!
Welcome to Digital Making at Home: Make us laugh
Find out more about Digital Making at Home at http://rpf.io/home Find more digital making projects at http://rpf.io/projects Find out more about the #Raspber…
Laughter makes a world of difference, and what better way for us all to connect as a global community than by sharing a good laugh together! Just like coding, laughter is a universal language. So this week, we challenge you to make us laugh (or even LOL!). Ask yourself what jokes and tricks you think are funny and then let that guide you while you create your digital making project.
We like to think that we’re a funny bunch at the Raspberry Pi Foundation, so in case you need help with where to begin your project, we share a few tricks of our own in this week’s code-along videos:
Join Mark and his sidekick Zac to find out how to use Scratch and your webcam to make fun photo filters and digital props that will have us rolling on the floor laughing.
Digital Making at Home – ScratchChat filters (beginner)
Go to the free project guide: http://rpf.io/dm-filters Find out more about Digital Making at Home at http://rpf.io/home Provide feedback on this video: https…
If you love this video, also check out Mr C’s extra video about how to turn yourself into a ‘Deal with it’ meme in Scratch.
Go to the brand new and free project guide (available in 14 languages).
Christina shows you how to use Scratch, Raspberry Pi, and LEDs together to make a unicorn dance.
Digital Making at Home – Dancing unicorn (intermediate)
Go to the free project guide: http://rpf.io/dm-unicorn Find out more about Digital Making at Home at http://rpf.io/home Provide feedback: https://docs.google…
Go to the free project guide (available in 12 languages).
Try not to giggle while Marc explains how to create your own meme generator using HTML, CSS, and JavaScript!
Digital Making at Home – Meme generator (advanced)
Go to the free project guide: http://rpf.io/dm-meme-gen Find out more about Digital Making at Home at http://rpf.io/home Provide Feedback on this video: http…
Go to the free project guide (available in 17 languages).
We really, really loved the stories you all sent us last week, so please share your hilarious projects with us this week. We truly do hope that you love getting creative with Digital Making at Home, and if you have the time, please tell us your feedback!
We’re looking forward to all the laughs this week!
PS: Don’t forget that you have access to all of our resources for free, forever! Go to www.raspberrypi.org/donate if you want to join the amazing people and organisations whose donations make this possible.
The post Digital Making at Home: Make us laugh! appeared first on Raspberry Pi.
Welcome back to Digital Making at Home from the Raspberry Pi Foundation! If you’re joining us for the first time this week, welcome: you’re now part of a global movement with other young digital makers from all over the world. You’re in great company, friend!
You all CRUSHED making your own games last week, so we’re eager to see how you take on this week’s theme: storytelling!
Welcome to Digital Making at Home: Storytelling with code
Find out more about Digital Making at Home at http://rpf.io/home Find more digital making projects at http://rpf.io/projects Find out more about the #Raspber…
We all have a story to tell, and with the power of coding and digital making, you can share your own story in your very own way with other digital makers around the world! This week, your challenge is to tell us a story using code. Maybe you want to create your own story or retell one of your favourite tales in your own way — the possibilities are endless.
![]()
And when you’ve created your story, share it with others! We’re excited to see it too, so show us what you’ve made by sending it to us to check out..
If you need some inspiration, our Raspberry Pi team is here for you! They’re all back with more code-along videos to help you explore storytelling with code.
Join Mr. C and his sidekick Zac as they create their own story generator in Scratch.
Digital Making at Home – Story generator (beginner)
Go to the project guide: http://rpf.io/dm-storygen What do you think about this content? Tell us your feedback: https://docs.google.com/forms/d/e/1FAIpQLScM4…
Go to the free project guide (available in 19 languages).
Mr C has also recorded some extra videos showing you how to do cool extra things with your Scratch story! Find them in this week’s playlist.
Christina shows you how to tell a story on a web page you build with HTML/CSS and any pictures you like.
Digital Making at Home – Tell a story (intermediate)
Go to the project guide: http://rpf.io/dm-tellastory What do you think about this content? Tell us your feedback: https://docs.google.com/forms/d/e/1FAIpQLSc…
Go to the free project guide (available in 25 languages).
Code along with Marc, who creates his own online version of a classic story using more advanced HTML/CSS code and content that’s in the public domain.
Digital Making at Home – Magazine (advanced)
Go to the project guide: http://rpf.io/dm-magazine What do you think abotut his content? Tell us your feedback: https://docs.google.com/forms/d/e/1FAIpQLScM4…
Go to the free project guide (available in 21 languages).
If you want to try something else, here’s a video from a friend of ours! In it, Nick, one of our Raspberry Pi Certified Educators in the USA, explains how to create interactive fiction stories in Python.
We would love to see the story you’re choosing to tell this week! When you’re ready, enlist an adult to send us your story. Who knows, maybe we will feature it in an upcoming blog for our global community to see?
As you’re coding something new this week, we’ll be playing through your game projects from last week! We were super thrilled to see so many digital makers submit their games from all over the world: Iraq, Canada, United Kingdom, and beyond. We wonder what story you’ll tell us this week…?
Are you ready? Get set…LET’S CODE!
We’d love to know what you think of Digital Making at Home, so that we can make it better for you! Please let us know your thoughts.
PS: All of our resources are available for free forever. This is made possible thanks to the generous donations of individuals and organisations. Learn how you can help too!
The post Digital Making at Home: Storytelling with code appeared first on Raspberry Pi.
When you’re part of the Raspberry Pi Foundation community, you’re a part of a global family of young creators who bring things to life with the power of digital making. We imagine that, given the current changes we’re all navigating, there are probably more of you who are interested in creating new and exciting things at home. And we want to help you! One of the best things we can do right now is to tap into what connects us as a community, and that’s digital making. So, welcome to Digital Making at Home from the Raspberry Pi Foundation!
Welcome to Digital Making at Home from the Raspberry Pi Foundation
Find out more about Digital Making at Home at http://rpf.io/home Find more digital making projects at http://rpf.io/projects Find out more about the #Raspber…
Whether you wrote your first line of code years ago or minutes ago, or you’ve yet to get started, with Digital Making at Home we’re inviting you on a digital making adventure each week.
![]()
At the start of each week, we will share a theme that’s designed to jumpstart your journey of creative expression and problem solving where you create a digital making project you’re proud of. Every week, we’ll have code-along videos led by people from our team. They will walk you through projects from our free projects collection, to give you a place to start and a friendly face to accompany you!
![]()
For those of you whose mother language isn’t English, our free project guides are available in up to 30 languages so far.
Each week, when you’ve made something you love using digital making, you can share it with us! Just make sure you have your parent’s or guardian’s permissions first. Then share your project by filling out this form. You might find one of your projects featured in a future blog post for the whole community to see, but no matter what, we want to see what you created!
Just because we’re all at home, that doesn’t mean we can’t create together, so let’s kick off Digital Making at Home with this week’s theme:
Playing a game is a fun way to pass the time, but why not take it to the next level and make your own game? This week, we invite you to create a game that you can play with your friends and family!
Let your imagination run free, and if you’re not sure where to start, here are three code-along videos to help you.
If you’re new to coding, we want to introduce you to Scratch, a block-based coding language that is perfect to start with.
Try out Archery, led by Mr C and his sidekick Xavier:
Digital Making at Home – Archery (beginner)
Access the project guide at http://rpf.io/archery Find out more about Digital Making at Home at http://rpf.io/home Share your thoughts about this content: ht…
Go to the free Archery project guide (also available in Polish).
If you’re looking to go beyond the Scratch surface, dive a little deeper into the coding language with.
Try out CATS!, led by Christina:
Digital Making at Home – CATS! (intermediate)
Access the project guide at http://rpf.io/cats Find out more about Digital Making at Home at http://rpf.io/home Share your thoughts about this content: https…
Go to the free CATS! project guide.
If you’re all Scratched out, move on to Python, a text-based coding language, to take things up a notch.
Try out Turtle Race, led by Marc:
Digital Making at Home – Turtle Race (advanced)
Access the project guide at http://rpf.io/turtle-race Find out more about Digital Making at Home at http://rpf.io/home Share your thoughts about this content…
Go to the free Turtle Race project guide (available in 16 languages).
If you’re creating a game in Scratch, check out the extra videos from Mr C in the ‘Digital Making at Home: Making games’ playlist. These will show you how to add a timer, or a score, or a game over message, or a cool starter screen to any Scratch game!
![]()
And if you’re into Python coding and hungry for more creative inspiration, we’ve got you covered. Our own Wireframe magazine, which you can download for free, has a ton of resources about making games. The magazine’s Source Code series shows you how to recreate an aspect of a classic game with a snippet of Python code, and you can read articles from that series on the Raspberry Pi blog. And if that’s still not enough, take a look at our Code the Classics book, which you can also download for free!
Alright friends, you’ve got all you need, so let’s get digital making!
We’d love to know what you think of Digital Making at Home, so that we can make it better for you! Let us know your thoughts by filling in this form.
The post Digital Making at Home: Making games appeared first on Raspberry Pi.
At the Raspberry Pi Foundation, our mission is to put the power of computing and digital making into the hands of people all over the world. We know that a lot of families around the globe are navigating school closures and practicing social distancing right now to keep their communities healthy and safe.
So in today’s post, we put together a list for you with some of our free online projects and resources that digital makers of all ages and experience levels can explore at home.
![]()
For most of these projects, you don’t need any new software or hardware. And many of our online resources are available in multiple languages, so young learners can use them even if their mother language isn’t English!
![]()
![]()
![]()
![]()
Our team is working hard to bring you more online learning experiences to support you, your children, and everyone in the community at this time. You can read our CEO Philip Colligan’s message about how we are responding to the novel coronavirus. And for people who are involved in running Code Clubs, CoderDojos, or Raspberry Jams, we’ve specifically put together guidance on how to keep your learners engaged.
We want to make sure digital makers of all ages have the resources they need to explore and create with code. What do you think of these activities, and what else would you like to see? Tell us in the comments below!
The post Activities you can do at home this week! appeared first on Raspberry Pi.
Project Alias, the newest creation of Amsterdam-based maker Bjørn Karmann, allows you to rename your home assistant and, more importantly, paralyse the device’s always-on listening function — for better security.
Project Alias
Alias is a teachable “parasite” that is designed to give users more control over their smart assistants, both when it comes to customisation and privacy. Through a simple app the user can train Alias to react on a custom wake-word/sound, and once trained, Alias can take control over your home assistant by activating it for you.
Love them or hate them, devices such as Google Home and Amazon Echo have become a staple in many homes, thanks to people’s desire to automate mundane chores. I mean, why think about vacuuming my home when my Echo Dot can tell my robot hoover to do it for me?
![]()
However, despite their convenience, one concern remains for users of most off-the-shelf products: the always-on, always listening function.
As stories of TV ads prompting unwanted purchases via Amazon surface and South Park commandeers people’s devices via a rather ingenious episode script, more and more people are looking for ways to plug their home assistants’ ears, so to speak.
But how do you get something to do your bidding without it always listening for your commands?
Bjørn Karmann’s Project Alias serves two purposes: it lets you rename your assistant however you see fit (hello Trogdor!), and it paralyses the device’s always-listening function, taking over command. Then, instead of Amazon/Google/etc. listening to the comings and goings in your home, it’s a headless Raspberry Pi 3A+. And as the Raspberry Pi doesn’t need an internet connection in order to do its thing, the only one listening to you in your home is your significant other, your kids or, in my case, two obnoxious house bunnies.
![]() Bjørn has provided a STL file to let prospective Project Alias makers 3D print their own modern-looking case for the 3A+. And the setup tutorial and complete code are on his GitHub.
Bjørn has provided a STL file to let prospective Project Alias makers 3D print their own modern-looking case for the 3A+. And the setup tutorial and complete code are on his GitHub.
Once the add-on is built, you simply access the Project Alias trainer via your phone’s browser and tell your home assistant its new name.
![]()
And there you have it: an augemented home assistant that does your bidding without you needing to be concerned about who is listening at the other end.
Now you have Project Alias set up on your Amazon Echo or Google Home, here are some names we think you should use:
![]()
The post Disable ‘always-listening’ on your smart home assistant appeared first on Raspberry Pi.